
All-Access Pass
Unlimited access to 50+ courses, unlimited critique, live events, and 24/7 community. Join School of Motion All-Access today.

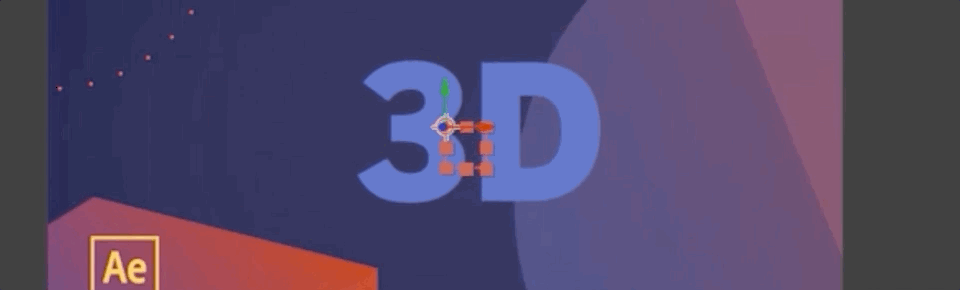
3D Text in After Effects looks amazing and really elevates your work, but some artists find it complicated to create.
One easy way to help your After Effects work stand out is to add some flashy 3D text. The challenge comes from unfamiliar 3D renderers, complicated tools, and expensive programs. That's why SOM TA Sara Wade is here to show you a better way.
After Effects is a robust program, capable of more than you're probably aware. That's why we want to show you three easy ways you can create 3D text, without any fancy gadgets or gizmos (okay, one fancy expression). Today we'll cover:
- Stacking 3D Layers in Space
- Using the Built-In Extrude Function
- Building with Cinema 4D Lite
{{lead-magnet}}
Stacking 3D Layers
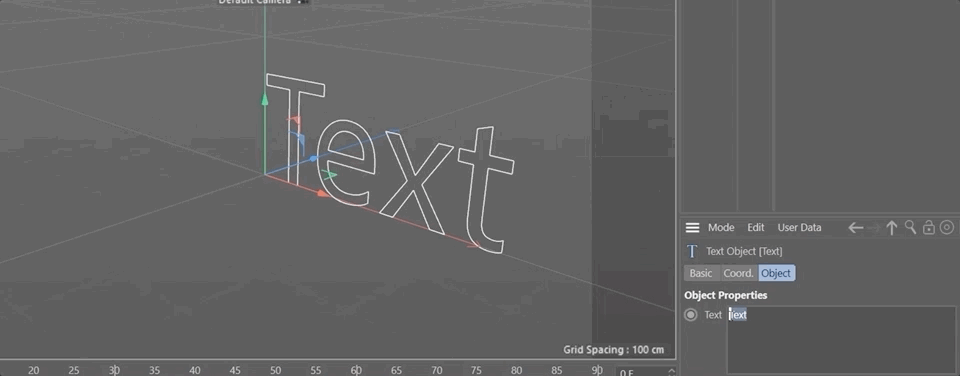
The first thing to do is create a simple text layer. I'm writing out 3D.
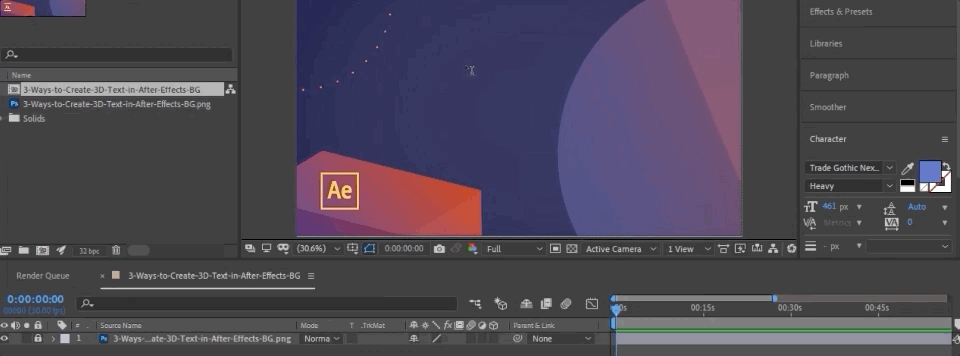
Select the text layer and set it as 3D by toggling this switch.

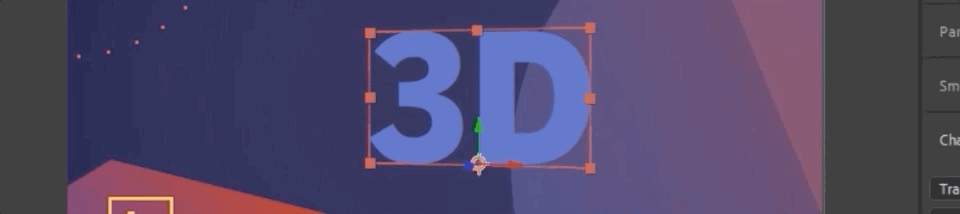
It doesn't look like much yet, but if I hit R, it opens up rotations. If I rotate on the Y-axis, you can see it is a 3D layer. Still not much to look at; it's too thin.
By adding in duplicate layers along the Z-axis, we can beef up this text so that it appears 3D. To do this, we're going to use a tiny little expression (don't panic!)
Alt-Click or Command + Left Click the stopwatch to open up the Expressions Menu, then type this command: [value[0],value[1],index*10];
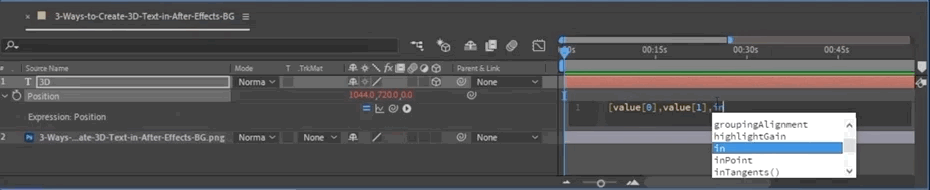
The first value refers to the first position (the X-axis), the second is for the Y, the third will index off the Z as many times as I command...in this case, I chose ten. Now, when I duplicate this layer, this same formula will be translated across Z space.
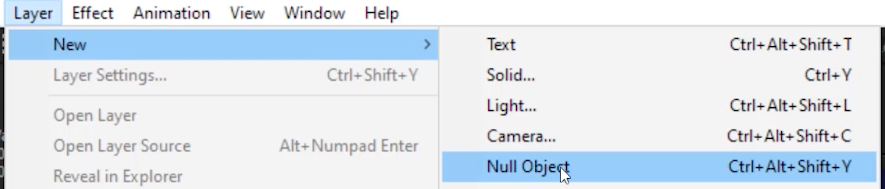
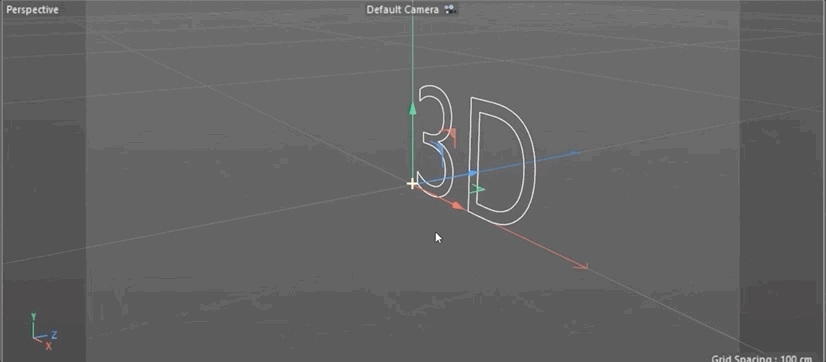
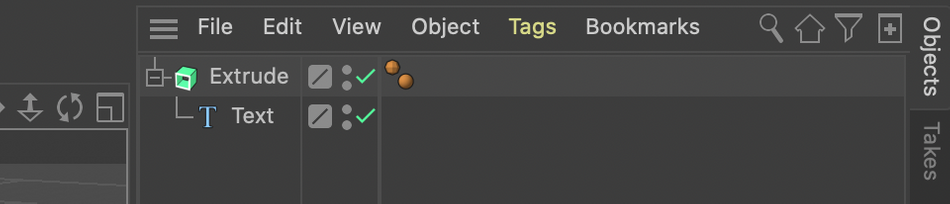
Next, we create a new Null layer and place it at the bottom.
We select all the text layers and pickwhip them to the Null. Now that everything is parented to the Null, we make sure the Null layer is also set as 3D and...
It looks 3D, right? And if we adjust the colors of the lower layers...

If you want a thicker 3D object, all you have to do is add more layers. The downside of this method is that, from the side, you will see the space between each layer and break the illusion.
Using the Extrude Function
The next method is to Extrude the layer. In After Effects, an Extruded object is one that appears to be 3D. Now, there isn't just an option that let's us extrude the layer. So how are we going to do it?
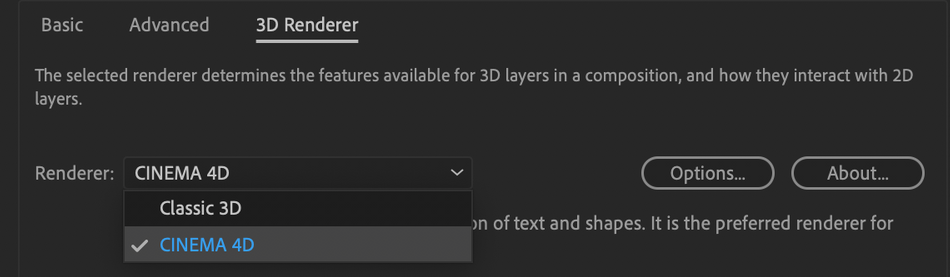
Once we make this layer 3D, you'll see the Renderer button pop up in the top right.

This lets us select between Classic 3D and Cinema 4D. I'm going to select Cinema 4D, as that allows me to extrude. Some options are disabled, such as blending and motion blur.
Now, when I go into the text layer, you can see all these new options since we're in Cinema 4D rendering.
If I add value under Extrude and rotate on the Y-Axis you can see my type is now showing up as a real 3D object.

I can even add Beveling if I want. So you can see just how quickly I was able to make 3D text. I can even play with a variety of materials to find the best look for my text.
You should never be afraid of a little extruding.

With this method, you can also rotate completely and it still looks 3D, unlike our stacked layer option. One drawback is the sides of the text are hard to see. To fix that, simply go to the arrow next to Animate and select Side > Color > Hue. What's great is that all of this is built right in to After Effects.

Building in Cinema 4D Lite
Our final method for creating 3D text is to use Cinema 4D Lite, which is included in After Effects. If you're not familiar with C4D, that's okay. This is quick and easy, and it will expose you the power of that software while staying in your AE comfort zone.
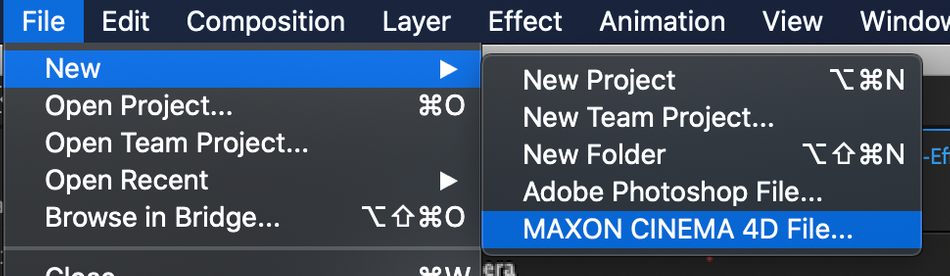
Go to Layer > New > MAXON CINEMA 4D File...
Once you open the new C4D file, it will open an new window for you. Don't worry if this looks a little foreign. I'm here to walk you through.

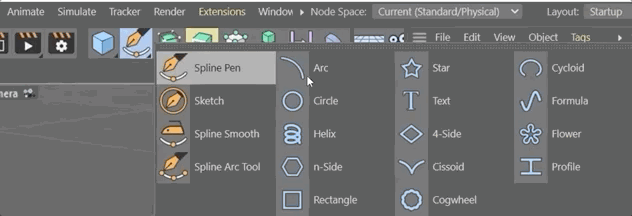
I'm going to go to the Pen tool and select Text, which will create a 3D text layer for me to use.
Then I can quickly type in the layer to change the text to "3D" (it's been working for us so far, so why break the mold?)
If I click and drag around, I can see that my object exists in 3D space, but it needs a little meat on them bones.
How I do that is by clicking on the extrude icon and add an extrude object, then drag the text object under Extrude. I can also select the text and hold the Alt or Option key as I select extrude. This is how the object should be parented.
Now I can change the extrude offset values in my object tab to make it look how I'd like.

Finally, I'll save my project and head back to After Effects, and my 3D text will be waiting for me!
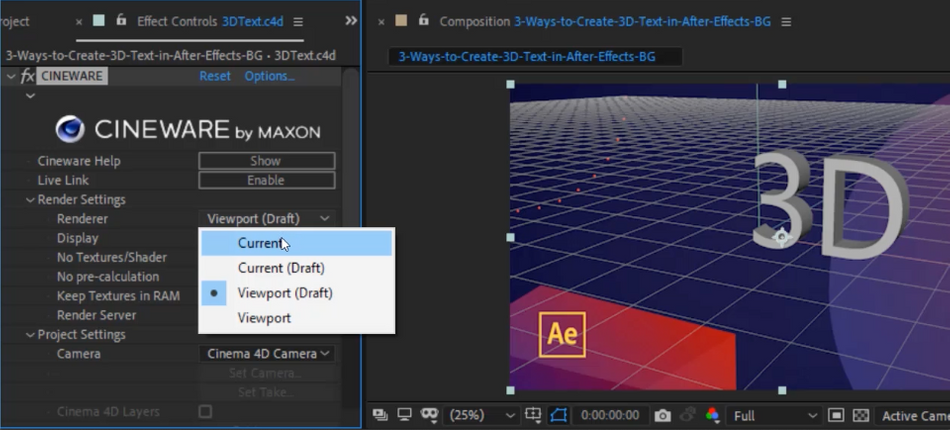
Those grid lines you see won't be rendered and are just there to help you out. If you want to get rid of them, just go to the Render Setting in the Effects Controls panel and select Current.
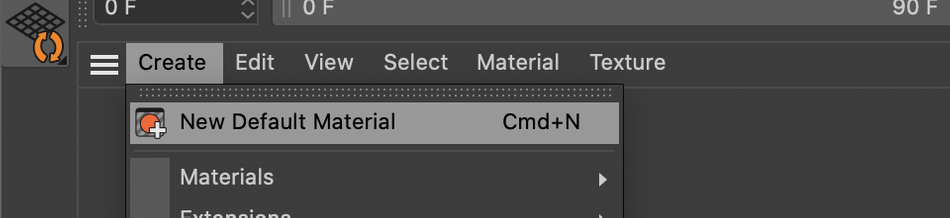
Now I want to add color to my object. We go back to Cinema 4D and under the create tab select new default material (CTRL-N).
I'm going to use the same purple-blue that I've been working with all day. You can change the color of a material in the attributes panel.

I just drag it onto the extrude object and...voilà!

And because this is an actual 3D object, the sides are properly shaded. I save my project (the long way, or just CTRL-S) and back in After Effects I'll see my colored text waiting.
Now you can make 3D text in After Effects
See? Not too complicated. After Effects is a robust program, and once you master the basics, the possibilities really open up. Just remember that you can stack layers, extrude using the C4D renderer, and jump right into Cinema 4D Lite, and you'll be cranking out some 3D magic in no time.
If you're looking to step up your AE game, or get a better handle on the foundation, be sure to check out Animation Bootcamp and After Effects Kickstart! We packed each course to the brim with the lessons you need to get to the next level.
Learn the basics of the world's most popular motion design software, and get the skills you need to stand out from the crowd!
-----------------------------------------------------------------------------------------------------------------------------------
Tutorial Full Transcript Below 👇:
Sara Wade (00:00): Today, I'm going to teach you three ways to make 3d texts using only the tools available with after effects.
Sara Wade (00:14): Hi, I'm Sara Wade, freelance motion designer and teaching assistant for school of motion. 3d text looks really cool and MoGraph, but it can be time-consuming to learn and render 3d with the big complex 3d applications. I can show you three ways to make 3d texts using only the tools available inside of after effects. No fancy additional software required. First, we're going to look at stacking 3d layers in space. Next, we're going to take a look at how we can use the built in extrude portions of the text tool. And finally, we're going to take a look at how to do this in cinema 4d light, which is included with after effects. Also, you can download the project files I'm using in this video to follow along or to practice this technique. After you're done, watching details are in the description.
Sara Wade (01:06): The first way we're going to make 3d texts is we're just going to take a plain old text layer. Let's go ahead and write 3d. I'm going to position that let's put it just in the middle for now, and I'm going to just make this a 3d layer. Now it doesn't look any different right away, but if I hit the R it opens up all these rotations and then I can see if I rotate it in the Y. It is in fact 3d. Now I don't want to actually rotate this layer just yet. What I want to do is make copies of this layer that are at a slightly different position in Z space. So I could duplicate this layer and change the Z position. If I hit the Peaky, you'll see that my position has 1, 2, 3 values. And this last one being the Z position.
Sara Wade (01:55): I don't want to do this manually because it's simply going to take more time than I want to spend. If you're not an expressions person, don't worry. This is a very easy one. It's going to be super simple. What I'm going to do is I'm going to I'll click the stopwatch that's option, click on a Mac, and that's going to open this expression for the position. Now, what I'm going to put in here is left bracket value zero. And what that's telling it is that I want the position to be whatever the first position value is here. In this case, it's the exposition. And then going to type comma value one. Now I'm telling it to use the first value. And the second value that this layer already has, here's the really useful, tricky part. I'm going to type index times. Let's say 10, and that's telling it to use the index of this layer, which is zero, because the first layer is zero.
Sara Wade (02:49): The second layer is one, the third layers, two. That's just how the index of the layer works in after effects. So we are going to make the Z position, the index of this layer, times 10. So in this case, it's going to be zero times 10, which is zero. I'm just going to close it up with a right bracket at the end. It doesn't do much right now, but when I duplicate the layer, each copy will have a different index and a different position. For this example, I'm just going to duplicate it six times so that we can leave some space here at the top of the layer stack. Okay. It doesn't look very different right now. What I'm going to do is I'm going to create a new normal layer. I'm going to put this down at the bottom. This doesn't really matter. I'm just being really nitpicky here.
Sara Wade (03:33): Next, I'm going to select all of the layers here and I'm going to pick, whip them to the novel. This will allow me to rotate all of the layers together instead of one at a time, which can get messy. Now, if I go into this, no layer, everything is parented to the knob. It's going to do what I tell the NOL to do, make sure all these layers are 3d and they are because the first one was let's make sure that this no is also a 3d object so that I have control over X, Y, and Z rotations. Now, if I start to rotate this, you can see it looks 3d. We can get it looking even more 3d. If we go in and adjust the colors of these layers. So I'm going to select not the front one, but the back ones. And I'm going to go just over here, click the color.
Sara Wade (04:18): And let's just take this down a little bit. So it's a little bit darker. Um, maybe not that dark. Now, you can see that those other layers have different color value to them. So they're behind it and they look 3d. So this is not going to work with everything. You'll see if I go to the side, I can see through those layers, right? That's not quite working. I can see that it's a bunch of things stacked in 3d space, but as long as you're not looking at it from the side, it looks pretty good, right? And this is going to render really fast. No plugins. You use that little script that we put on the position again, that was values zero value, one index times five or 10 or 15 or whatever you want it to be. And I cannot even make this deeper by just copying a whole bunch more. And it's adding and adding. And actually let's undo that I copied the front one, so we didn't get the cool, cool color that we had changed. Let's start here and then copy a whole much more. And it's just getting longer and longer and longer. And as long as everything's parented to that, no, I can rotate that now. And it's going to look very cool, right? Super fast. That is our first way of making 3d texts. Again, we are just stacking layers in 3d space, super, super easy.
Sara Wade (05:39): The next way we're going to create 3d texts is we're going to actually extrude it. So this time I'm going to make a new text layer, call it 3d. So let's make sure we select it and then change that level there. Oh, that looks pretty good. Okay. I've got my text here and now I don't really have any options to extrude this text, right? I've got texts in here. Source texts. I've got path options. I've got some more options, but none of those options are really letting me make it 3d. So what if I go ahead and make this layer 3d. I click this here and now you see up in the top right corner of this render appeared renders basically, you know, the same way that after effects, renders your 2d files, this has some different choices for the 3d renderer. So we have our choice between classic 3d and cinema 4d, 3d.
Sara Wade (06:32): I'm going to choose cinema 4d because once I click on that, it lets me do extruded and beveled text shapes. And that is the key. You will notice. You cannot do a lot of this other stuff when you're doing this method. So that is one of the drawbacks, but this is going to give us some very cool texts very quickly. So I'm going to select that cinema 4d. I'm going to hit, okay. Now you see up there, it says cinema 40. And now when I look into this text layer, I've got some more options in here. Now I've got these geometry options. One of which is the extrude depth. So this isn't looking like much now, but if I go back up here and I hit the arche to pull up my rotation values, I can adjust the Z axis so that you can really get a sense of the 3d look.
Sara Wade (07:19): So now let's go back to those geometry options and I can see that my extrusion depth, it's going back into space there. I can also bevel this, which is very fun. Again, I can key frame all these things, which is super, super cool. And I've even got some material options down here. So you can play around with these. There's actually a lot of different stuff. You can get pretty deep into this, but the basic thing here is just adjusting that extrusion depth until you get a look that you were happy with. So a drawback here is we cannot see the sides of the text in a different color, but fear not. We can fix that and to change the color of the extrusion, go into the menu by clicking on this little arrow, you can't see it cause it's coming off, off, off screen, but basically you select side color.
Sara Wade (08:10): You will see different options such as opacity and brightness. We're just going to use hue, but feel free to play around with those other options. And I can make it any, anything I want. I just want it a little bit different, maybe something a little bit pink, like, and again, this is the whole side of the 3d. It's an actual extruded side. So when I rotate it, it's not going to go away. We've got that whole side there. So fun, little trick, lots of options to play within here. Again, those steps are, make the text layer, make it 3d, select the cinema 4d renderer drill down into, if we close everything out here, you can see this geometry options. Third thing down and extrusion depth is going to be the key bevel. Again, you can bevel those edges. This is pretty small, probably on your video to see, but you can play around with that. And to get that side color, uh, go into that little arrow to side and color and you can choose some different options, opacity, brightness, different things. We chose Hugh, but play around with that as well. So that is how you make 3d texts using the extrude options.
Sara Wade (09:25): Third and final way we are going to create 3d texts is to use the cinema 4d light plugin that is included with after effects. If you aren't familiar with cinema 4d, that's all right. I promise this is quick and easy. So I'm going to go to my layer menu. I'm going to choose new Maxon cinema 4d file. I'm going to call this bile 3d, and you can save it to the same location as your after effects project. After I hit save, you will see the cinema 4d license window. Pop-up. I'm not going to worry about all of this and go ahead and click. Okay. And now we just need to wait a few moments for cinema 4d light to open. So that opens up an interface that looks like this. Don't worry. If this is completely foreign to you, we are just going to use a couple of quick and easy things, and it's going to make us some awesome 3d texts that we can do all kinds of fun stuff with in after effects, including letter by letter.
Sara Wade (10:19): Awesome. This, so the first thing I need to do is I need to make the text. I'm going to grab this little pen looking tool. This is basically like the pen tool would be in, um, illustrator or animator or after effects, same kind of thing. I'm just going to go over and grab this text. And now it's showing me texts. So in here, I'm going to change this to say 3d. And once I click out of that, you'll see that it's 3d. Okay. So it just looks like lines, right? Like I can see that it's in 3d space here. I can even, um, sort of zoom around it. But what I want to see is the cool edges of that there. Right? So how I do that is I'm going to add an extrude. So if I go up here into this menu, that looks a little bit like what we want to do, right?
Sara Wade (11:06): It looks like a cube being extruded. I'm going to go here and select extrude, nothing happened. That's because I didn't actually put the text in the extrude. So I'm going to drag this text under the extrude. And now it's extruded a quick shortcut. If you want to do that more quickly, let's just undo. That is I can select the text and I can hold the alt or option key and then grab that extrude. And it's going to automatically put it there. So now that I've got that text there it's extruded. I can again, rotate around it in 3d space. I can do all of the things. So if I want to change some things about this text, I select this extruded and then I can do all kinds of fun things to change the way it looks. So right here, this offset value. Again, I'm down here in extrude object, object tab.
Sara Wade (11:54): This should be the default. When you select it, it pops up. I can make this extrude bigger, or I can make it smaller. I can type in the values I can play around with that. Let's go with about 50. I think that's going to, well, maybe let's even go 40. I think that's gonna match up well with what we did with the other techniques. The amount of subdivisions in the object are going to change how detailed the object appears. So I'm going to make sure to save my file. I'm just going to go file save project. It's already got a place to go. Now, when I jumped back in the after effects, I can see our text in the composition with the same background as I was working with before. Don't worry about these grid lines. They're only there for you to reference and won't render.
Sara Wade (12:42): If you want to turn them off, you can go up here to the renderer and select current. So I want to add a color here, right? But how can I do that? What you want to do with this is actually out of material and cinema 4d. So we're going to go back to the cinema four D window and just say, create a new default material. And in that material, I can select a color. Let's go ahead and let's do a hex color and I'm going to make it the same purple that we were using in after effects while purple-ish blue. Let's say, and then if I want to apply this color, I just drag it onto that text. And now you'll see it's that color. And because it's actual 3d in cinema 4d, those sides are automatically having that darker background color. And I like that.
Sara Wade (13:32): So I'm going to keep it again. I'm going to just see save project here. Control S will work as well. And now when I go back to after effects, you can see it pops in and it's got that color to it. So now that I have this 3d layer, I can do stuff to it. And after effects that I would normally do so I can add, um, some glow to it or some of those other fun effects that you might like to use. I can change the opacity of it. I can do all those fun things. And it's an actual 3d layer. It's an actual 3d file. And again, if you want to change the color of it, you go up to the pen tool and select text. And once you have the text and there's a new text, you can either drag it under an extrude or select the text, hold the alter or option key, go up to this extruded cube looking thing at an extrude. And that is how you create 3d text and after effects using cinema 4d light. That's it easy right now you can make fancy 3d text three different ways. Next time your client says, Hey, I want some 3d texts. You can say, great, no problem. Make sure you subscribe and click the bell icon. So you'll be notified for our next tutorial video. And if you want to really get started in after effects with the help of industry pros, checkout after effects, kickstart, or animation bootcamp from School of Motion.
ENROLL NOW!
Acidbite ➔
50% off everything

ActionVFX ➔
30% off all plans and credit packs - starts 11/26

Adobe ➔
50% off all apps and plans through 11/29

aescripts ➔
25% off everything through 12/6
Affinity ➔
50% off all products

Battleaxe ➔
30% off from 11/29-12/7
Boom Library ➔
30% off Boom One, their 48,000+ file audio library
BorisFX ➔
25% off everything, 11/25-12/1

Cavalry ➔
33% off pro subscriptions (11/29 - 12/4)

FXFactory ➔
25% off with code BLACKFRIDAY until 12/3

Goodboyninja ➔
20% off everything

Happy Editing ➔
50% off with code BLACKFRIDAY

Huion ➔
Up to 50% off affordable, high-quality pen display tablets

Insydium ➔
50% off through 12/4
JangaFX ➔
30% off an indie annual license
Kitbash 3D ➔
$200 off Cargo Pro, their entire library
Knights of the Editing Table ➔
Up to 20% off Premiere Pro Extensions
Maxon ➔
25% off Maxon One, ZBrush, & Redshift - Annual Subscriptions (11/29 - 12/8)
Mode Designs ➔
Deals on premium keyboards and accessories
Motion Array ➔
10% off the Everything plan
Motion Hatch ➔
Perfect Your Pricing Toolkit - 50% off (11/29 - 12/2)

MotionVFX ➔
30% off Design/CineStudio, and PPro Resolve packs with code: BW30

Rocket Lasso ➔
50% off all plug-ins (11/29 - 12/2)

Rokoko ➔
45% off the indie creator bundle with code: RKK_SchoolOfMotion (revenue must be under $100K a year)

Shapefest ➔
80% off a Shapefest Pro annual subscription for life (11/29 - 12/2)

The Pixel Lab ➔
30% off everything
Toolfarm ➔
Various plugins and tools on sale

True Grit Texture ➔
50-70% off (starts Wednesday, runs for about a week)

Vincent Schwenk ➔
50% discount with code RENDERSALE

Wacom ➔
Up to $120 off new tablets + deals on refurbished items


All-Access Pass
Unlimited access to 50+ courses, unlimited critique, live events, and 24/7 community. Join School of Motion All-Access today.