
Learn After Effects the Right Way
Master the After Effects interface and build a real animation skillset. Enroll in All-Access to unlock AE Kickstart and 50+ other courses.

From Content-Aware Fill to the updated Expressions Editor, let's take a look at the new After Effects 16.1 features you should know about.
Adobe just released a massive update with really cool game-changing features that you should know about. Not only are there really big updates that will affect how you'll use After Effects, there are also nice quality of life improvements that are going to have motion designers and visual effects artists singing hallelujah!
So, What are the new After Effects updates in 16.1? Let's find out...
{{lead-magnet}}
An Overview of After Effects 16.1
There are a ton of new features to get excited about in After Effects 16.1. So if you don't want to follow along with the video above, here's a quick rundown of the updates.
1. CONTENT AWARE FILL IN AFTER EFFECTS
Adobe has taken one of Photoshops beloved features, used some coding magic, and has brought Content Aware Fill to After Effects! This is going to take hours out of editing simple videos and be a great way to get started tinkering with VFX work. In the tutorial above we walk through how to use Content Aware Fill inside of After Effects.

How to Use Content Aware in After Effects 16.1
- You can use the Content Aware Fill Panel by going to Window > Content Aware Fill
- Roughly Mask out the object you want to remove. (You can use any method you like, e.g. track a mask, erase or key out an object, apply an alpha matte, or use Roto Brush.)
- Click Generate Fill Layer to render a new layer that fills in the hole. After Effects will do the rest!
Is the content aware fill not getting it just right? Try playing with the Alpha Expansion. Alpha Expansion expands the amount of pixels the algorithm is utilizing to fill in. This can produce better fill results in some cases.
How does After Effects cover up your video? It generates a PNG sequence that sits on a layer just above your original video footage. Making this a non-destructive way to edit.
Using Content Aware Fill Reference Frames
There may be some rough patches that After Effects may not be able to work through. So, what do you do if Content Aware Fill didn't get everything? In the tutorial above Joey shows you how to create a reference frame using content aware fill. Here's an outline of what you want to do.
How to use Create Reference Frame
- Find a clean frame in the new PNG Sequence
- Click Create Reference Frame in the Content Aware Fill Panel.
- Use the clone stamp tool, or other tools, to clean up the blemished area in Photoshop
- Save the Photoshop project that was opened by After Effects
- Pre-comp the original and generated PNG Sequence
- Repeat masking and tracking
- Select Generate Fill layer
Fun Fact
During Adobe MAX 2017 Adobe demoed "Project Cloak" and the crowd went bananas! Now, with After Effects update 16.1, Content Aware Fill has made its way into After Effects!
2. THE EXPRESSION EDITOR GETS A MAJOR OVERHAUL
In the tutorial above Joey went over a few changes in the expression editor, and for the enthusiast coder out there we thought we'd throw out just a few more options that have been added. So, what are the new features for the expression editor in After Effects?
- Syntax Highlighting- There is now Syntax highlighting of JavaScript syntax and After Effects methods and properties. Along with this option, Adobe has allowed you to set custom colors for syntax highlighting, selection, and background. You can also save and load custom themes.
- Line Numbers - Tired of trying to count which line your expression had an error at? Line numbers has found its way to the After Effects expression editor. This is a great quality of life improvement!
- Formatting and Structure - Tabs or Spaces have been added to the expression editor as well. Being able to read your code is going to be easier than ever. Also, if you're not liking how much or little space is given, you can set a custom tab width! Adobe has really put some thought and love into this release.
- Braces - Highlighting of matching braces and the automatic closing of braces have been added to help you travel across those lengthy strips of code. This is sure to help reduce those easily forgotten braces.
- Adjustable Font Size - Forgot your glasses? Well, it seems like the After Effects Team has got your back here also! Scripting preferences in After Effects lets you set fonts sizing now!
- Optional Code Folding - There are now 4 different types of ways to fold up your code in the expression editor. This will help reduce how long it takes to scroll and travel through those super long and complicated expressions.
- Auto-Complete - One of our favorite updates is the auto complete function added to the expression editor. Once you start typing After Effects will give you a list of the available options for your line of code. Custom variables are even available as options in the auto-complete. These auto-complete features are going to be setting those fast typing fingers on fire!
3. GUIDES!
The guides in After Effects have received some love that's going to help boost your workflow. Teams are for sure going to rejoice over the new import and export function now built into After Effects Guides!
- Zack Lovatt Kbar Script - As mentioned in the tutorial above, Zack wrote a free script that helps you create rule-of-thirds guides with just a click of a button! It's available in the download file just below the tutorial at the top of this article. If you don't have K-bar and are looking to work faster, check out K-Bar at aescripts!
- GridGuide Update - Now, after creating grids using GridGuide you can turn them into native guides in After Effects!
- Import/Export Guides - You can now import and export guides in After Effects and Premiere Pro!
4. QUALITY OF LIFE UPDATES
- Edit Original Option From Timeline - To access the edit original option just right click a layer in the timeline, select open, and click "edit original..." Now you can jump into editing faster. And, if you're a hotkey ninja, you can now set a hotkey to launch this for the selected layer. Your Photoshop and After Effects workflow is now that much easier.
- Motion Blur and Frame Blending - Motion blur and frame blending is now automatically activated for the entire composition when you toggle it on a layer. No more forgetting to click those buttons!
- Automatic Adobe Font Syncing - The missing fonts pop up box is now a little more tame. When you open a project that contains Adobe fonts After Effects will automatically sync those fonts in the background.
LEVEL-UP YOUR AFTER EFFECTS SKILLS
It's time for you to become an After Effects master. Whether you're a beginner looking to get serious about your After Effects skills, or a seasoned pro ready to take a deep dive in the world of animation, our courses will help you achieve your Motion Design goals.
Now stop reading this article and go write some colorful expressions!

-----------------------------------------------------------------------------------------------------------------------------------
Tutorial Full Transcript Below 👇:
Joey Korenman (00:00): It's that time of year or time for another after effects update. And this one has a lot of crazy, really cool new features in it.
Joey Korenman (00:16): In this video, I'm going to be going over some of the really big headline generating features and also some of the smaller quality of life improvements that Adobe added to aftereffects 16.1. If you want to stay up to date on everything that's going on with after effects and with the motion design industry in general, please subscribe to our channel and go to school of motion.com for a free student account. You can get on our motion Mondays mailing list. Once a week, we'll send you a very short email that will keep you up to date on everything going on in the industry. After fixed 16.1 is a big improvement and there's some really neat new features. So let's jump in and take a look. All right. So let's start with what is probably the craziest new feature that was added to after effects. And this is content aware, fill for video.
Joey Korenman (00:59): Now this feature is still very new. It's not totally perfect, but I'm going to show you a demonstration of it, which, uh, if you're anything like me is going to blow your mind. All right. So let's say you have this shot here and you know, I'm really focused on this building here. I kind of like this nice little driving down the street shot. The problem is you've got these two annoying poles. You've got the light pole, you've got this little sign and you want to remove those. Now of course, if you're a visual effects Wiz, you could track them in mocha and do all kinds of clean plate, you know, painting and stuff like that. That is going to be really tricky and not everyone has that skill set. So now there's a new way to do this. So this is how the tool works.
Joey Korenman (01:38): You start by just drawing a mask around the things that you want to remove. All right? So I'm just going to draw a mask around this pole and the more precise you are, the easier it's going to be to get a decent result. But in fact, the way this tool works, it doesn't really matter. If there are extra pixels, you don't need a super tight mask. I'm going to set this mask to none mode so I can still see it while I'm working on it. And then I'm going to hit option M so I can put a mask key frame, and I'm just going to go sort of to the end of the clip here and move this mask over. And then I'm going to have to just sort of go through and manually create a little bit of a Rodo mat here so that I make sure I'm getting the entire light pole contained in the mask on every single frame.
Joey Korenman (02:26): And that's going to take a little bit of manual tweaking. I'm not going to make you sit here and watch me do that. So, all right. And here we are, look at that. So I went ahead and made two masks, one for the light pole, one for the sign, and you can see that as I play it. I mean, they're comically sloppy masks, but they actually work. They do cover up the features. So now, if I was going to paint this out the traditional way, I would have to basically make sure I have a clean frame of this wall. And then I would have to track it back over itself to cover up these sections here no more. So here's how the tool works. I'm going to click on the layer and make sure that the masks are set to subtract. This tool works by filling in holes in the layer.
Joey Korenman (03:07): So it's important that you have holes. Uh, that's why, um, I have it set to subtract mode. You do not need to feather these masks. Sometimes that gets you a better result, but you don't actually need to do it. So now let's come over to the content aware fill tool. Now you can see, as I scrub through the shot, uh, this little thumbnail is kind of updating and showing me where the holes are in the footage. Now there's a lot of features in this and a lot of settings, and we're going to actually have a separate video where we go over this tool in detail, cause it's pretty deep, but the alpha expansion is a very important property. It's by default set to zero. And I found that setting it to one or two, it just sort of expands the amount of pixels that the algorithm tries to fill in.
Joey Korenman (03:50): Uh, and you don't get any aliasing around the edges. Uh, there's different film methods, uh, object surface, and edge blending. In this case, I'm just going to use object. And then of course the range, uh, that you want it to try and fill in. So I'm going to leave that at work area. And now I'm just going to click generate, fill layer. Now you can see that it's analyzing and depending on your computer and how long the clip is, this can actually take a little while, but in most cases it's pretty quick and it looks like this is going to finish in probably less than 30 seconds and now we're done. So what's actually happened is after effects has generated a PNG sequence. And if I solo this, you'll see it's generated a sequence just within those pixels that I needed to replace. All right?
Joey Korenman (04:35): And even just playing this, it's pretty crazy how well you can see this tool working. And of course, if I unsold it and I play this clip, you can see that the light pole and the sign are gone. Now, that's pretty crazy. Now, if you're working on a feature film or something, you have a visual effects supervisor that really likes to get in there to make sure things are pixel perfect. This tool may not work that well. If you go frame by frame, there are certain areas where you can kind of see some artifacting happening. Uh, you know, like I'm kinda noticing right around here, right in there as I play it, there's like a little bit of a, there's almost like a little bit of a line moving through it that you can kind of catch. But honestly, there's a, there's a phrase that I used to use a lot called good enough for government.
Joey Korenman (05:18): And this is good enough for government. Now, one thing that has not been fixed is this little blob on the ground here, you'll see that that was the base of the sign and the algorithm wasn't, you know, sort of smart enough, I guess, to fix that and make it look like sidewalks. So there's another really cool feature that I want to show you really quick. Uh, and that is to create a reference frame. So if I go to this frame here, right, and I'm going to leave this fill on, and what I'm going to do is click create reference frame. Now, when I click this, what that does is it renders that one frame and it opens it in Photoshop. What I can then do is use any tools I want in Photoshop to paint this out and make it look exactly the way I want.
Joey Korenman (06:02): So I could just use, say the clone stamp tool to kind of clean this up a little bit, make it look a little better. And I'm just going to do a quick and dirty job here. All right. So that only took a couple of minutes and now I have a much cleaner frame. And if I save this, I can now go back to after effects. And you'll see that there's a reference frame layer in there now, because this is in my comp the content aware fill tool is going to use that reference frame as kind of a guide, as it fills in the pixels. It's going to try and match that throughout the content of our film. If I click generate fill layer again, I can actually do another pass of content aware, fill over the result that I've already got here. So this is going to be really cool
Joey Korenman (06:40): What I'm going to do is pre-camp what I have already. And then I need to put a mask around this part of the shot, this part that I want to get rid of. And I need to be a little bit more precise here. Okay. And then I can set this to subtract and you can see with my reference frame there, that that frame looks clean now, and I'm going to have to do the same process and doing a little bit of manual key framing to make sure that that mask, uh, tracks with that object, that the entire time. So I'm gonna do that real quick and come back. All right. So now I have a mask that tracks with that thing. And again, it's pretty rough and lumpy, but should do the trick. Uh, then I can just hit, generate, fill air again. But before I do that, I'm going to change the fill method to surface.
Joey Korenman (07:26): Now surface works by treating the area to be filled as sort of a plane. And so in this case, that's exactly what it is now. And the other example, when I was removing the pole and the sign, those were changing perspective, the camera was moving and the, and they had all kinds of motion blur on them. This is literally just a smudge on a flat surface. I'm going to try this surface film method and hit, generate, fill layer. The surface method does analyze and process a little bit faster. So that's one of the advantages of it. And just like that, our shot is basically clean. Now you'll see a little bit of something happened and kind of towards the end of the shot here. And that could just be because my mask was a little bit loose, so I could easily go back in and fix that.
Joey Korenman (08:08): Uh, but you can see in really about five or six minutes of work here, I've removed two objects from the shot without having to actually know how to do that. The old fashioned way, which is very labor intensive, especially on a shot like this. Now, like I mentioned, this tool is brand new and it doesn't always give you the perfect result. You kind of have to try it. I think it's one of those tools where when it works, it's like a fricking miracle. Uh, but when it doesn't work, sometimes there's not really a, a good solution to that. So I wanted to try it on this shot, because this seems like the perfect kind of thing, where if you're an editor or someone who just doesn't really have the skillset yet to remove a logo like this Amelie motor oil logo here, uh, from a shot, you could use a tool like that.
Joey Korenman (08:55): So let's just try that really quickly. So all I'm going to do is just draw a quick mask around the logo. Like, so I'm going to set the mode to none so I can still see it. I'm actually going to open up the tracker and with the mask selected, I can use the mask tracker so I can kind of track forwards and then I can track backwards to get the entire shot. And this way I don't actually have to do any manual key framing. I can let after effects do the hard work for me. So now that the mask is tracked on there, we can set that to subtract. We can come to the content aware fill panel and we can create a fill layer. And the fill method is still surfaced. Let's try that first. And here's our results. Now you can see there's a lot of strange things going on there.
Joey Korenman (09:44): It ain't perfect, right? And this is the thing that you have to remember with tools that are just being launched. They may save you a lot of time or they may not work. And if they don't work, I know this tool is going to get a lot better over subsequent versions of after effects. But as you saw in the previous example, sometimes you can get really incredible results. Here's an example. I wanted to just show you really quick to let you see what happens when the tool doesn't work at all. I tried to remove the runner from the shot, uh, and I suspect that there's a lot of reasons that this shot isn't a good candidate for content aware fill, but this was the result you can see. I mean, it is interesting, you know, uh, it's almost like there's a, a rip in the space-time continuum happening over here.
Joey Korenman (10:29): Um, so, you know, I mean, this could potentially be the start of a cleanup and maybe, you know, you could also then just track this mountain back in there. Sometimes this tool isn't going to be enough all by itself. And frankly, in some cases, it's just not going to work for you. Uh, but when it does, it really is a miraculous time-saver all right. The next feature I want to show you is going to make everyone who uses expressions and aftereffects really, really excited. So temporarily I jumped back into the previous version of after effects, 16.01. And the reason I did that is to show you how expressions look in the version that you've been using up until now. Uh, so I've got this little setup here where I've got a mouse pointer, and as I get close to these layers, they scale up and they kind of turn pink.
Joey Korenman (11:14): All right. All done with expression. So if I open up the expressions on these layers, you'll see, I've got one expression on the tint effect one on the scale property. If I click on the scale property expression, you can see, this is what it looks like. And looking at expressions in the old editor, you're not given a lot of visual cues as to what you're seeing most modern code editors like Adam or sublime, text, they color code your code for you. They pick a different color for variables, for functions, for numbers, for things like that. For comments, it makes it a lot easier to look at. There's also features in modern code editors that can help you write the code. When you type an expression in after effects, you just start typing and you hope that you get it right. There's not a lot of help given to you.
Joey Korenman (12:01): Now, let me show you how it works in the new expression editor. So back in 16.1, let's put an expression on the scale property of the ball, and you can see right off the bat that the editor looks totally different. There's line numbers, there's color coding going on with the expressions. And we're going to go in and write a little bit of an expression so you can see how it works. Now, the first thing I want to do is set up a variable to grab the layer for my mouse pointer. Now you saw, as I was typing, this little box popped up and that is the auto code completion box. And I'm gonna show you how that works in a second. Let me pick whip to my mouse layer and add a semi-colon and hit return. Now, already, you can see that this color coding makes this easier to read.
Joey Korenman (12:46): All right, as you're writing your expression, things will automatically be turned to the right color. And you'll be able to see when you're referencing a layer. When you're using a variable, when you're using a function, all of these things will have different colors. It's really, really handy. The next thing I need to do is grab the true comp position of this mouse. So to do that, I need to use the two comp expression. So what I can do is set up a new variable mouse location equals. And what I want to do is use to comp on this layer. So I'm going to type in the name of that layer. And you can see as I'm typing it after effects realizes, ah, you're probably trying to reference that mouse variable that you set up previously. And so I can use my arrow keys and just kind of up and down and pick the one I want hit enter, and then keep typing.
Joey Korenman (13:32): So then I'm going to say.to comp. And again, after effects has already guessed, I want to use the two comp expression, but if I wasn't sure I could arrow up and down and look at the other options. And this is also a great way to learn what expressions, what functions and properties and methods are available to you. So I want to comp you'll see that after effects has already given me the parentheses and inserted my cursor right in the middle, the next thing I want is that mouse layers, anchor points I can type in mouse dot anchor, and it will guess anchor point, I hit enter and I'm done. I add a semi-colon boom onto the next line. This is how most modern code editors work. By the way, if you're in software development, you know this, if you're a motion designer, you probably don't.
Joey Korenman (14:15): This is a much, much, faster, much nicer, much easier way to work. Now I won't make you watch me type out the rest of this. I'm just going to copy and paste it. So take a look at this. This is the entire expression in there, and you can see that we've got different color coding for things like comments, uh, numbers, the semi-colons, the variables. When we're referencing layers, when we're using a function like length, there's all kinds of visual cues here to tell me what's going on. It's much, much easier for you to read. And especially if you share expressions, it's easier for anyone else to read. Now, I have another expression on the tint effect, which is what actually turns these dots purple in the mouse gets close. So if I go to the tint effect and I open up that expression, it's very similar to the scale expression with one big difference.
Joey Korenman (15:02): At the end of the expression, the way it works is it checks to see if the distance between my mouse pointer and my.is less than a certain threshold. And if it is, then it tents it 100%. Otherwise it tends it 0%. It does this using an if statement. And what's cool about if statements and other statements like this is that they're sort of encapsulated. They're like these code blocks and they're wrapped in these little curly cues. And when you have curly cues that sort of contain these giant code blocks or, or tiny code blocks in this case, you can actually collapse them and expand them. This gets really, really handy. If your expressions get long, if you have lots of, if statements, if you're doing loops, if you're, uh, defining functions and then reusing them, the ability to collapse and expand code blocks is really, really handy.
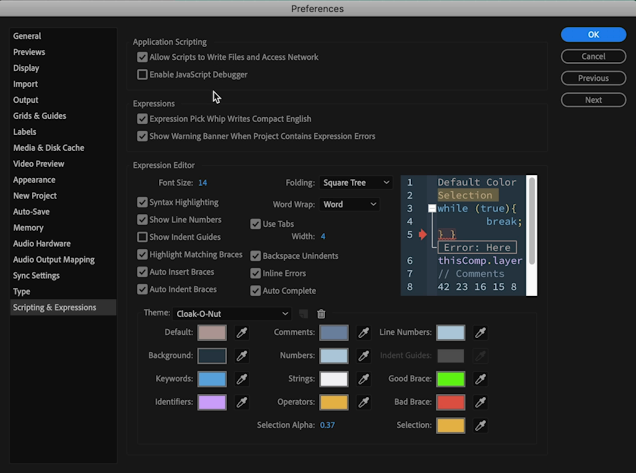
Joey Korenman (15:52): Another really cool thing about this expression editor is that you can actually change the way it looks. If you go up to the aftereffects menu preferences, there's a new section called scripting and expressions, and there's some brand new preferences in here, and they've moved some of the scripting preferences to this menu. So enable JavaScript, debugger allow scripts to write files and access network. That's where that property is located now, which makes a lot more sense than where it used to be. And what I love is you can totally customize the expression editor. So right now the font size is 14 by default, it's 12. So we can set it back to 12. You get a little preview of what that's gonna look like. And this is really cool. There's lots of different themes that ship with after effects that Adobe included. And you can try them out here and you can kind of see which ones you like.
Joey Korenman (16:37): And let's say, we want this playground one, you hit, okay. And now everything's updated in this code editor. This is a massive, massive improvement from the previous expressions editor inside of after effects. I know it's only going to get better with time, but this is already approximately 10000% better. Now, if you think that this expression setup is cool, you can actually download it for free@schoolofmotion.com. Check the link in the description of this video. And all you need is a free student account. Go check it out. You can download this file and many, many more on our site next feature. And this is one of my favorites, even though it is not the sexiest, I think it's super important. There's been some really great updates for guides in after effects. So, you know, guides, if you have your ruler opened command R you can grab a guide like this, right?
Joey Korenman (17:23): And let's say that we wanted guides set up right where the, these type layers sort of begin and end, right? Just like this. So let's say that I wanted to share this guide setup with another after effects artist. Well, you could do that in previous versions. What you could do is basically save this after effects, project out. And as long as they took this comp and they duplicated it, the duplicate would have those guides in it, right? But there's no way to copy and paste those guides from one comp to another. And so that can create hassles if you already have things set up. So what Adobe has done is they've added a new feature where you can export guides. So what you do is go to the view menu, go to export guides and you export a guides file. Once we've done that, if we make a new comp, we can then go up to the view menu and say, import guides.
Joey Korenman (18:13): And you can import the exact same guide set up, which is very handy. What's really cool about this is you can also import these guides into Adobe premier, and you can export guides out of Adobe premier and import them into after effects. So that's one pretty nice update that I think is very handy, but there's an even cooler one. I want to show you next. Now in previous versions of after effects, there was no way for scripts or extensions to access guides and after effects and to set them in Photoshop. One of my favorite tools is in the view menu, new guide layout, this panel will let you set up guides with all kinds of functionality. You could do a rule of thirds guide. You could have a 12 by three with a gutter and a gutter by the way, is actually spacing in between columns or rows.
Joey Korenman (19:02): You can set all these up and then you have this perfect set of guides that you can snap to and design with. Now, after effects doesn't have anything like that built in and in previous versions, there wasn't even the ability to do that. But now there is. So you may have noticed I have a K bar installed. And if you're unfamiliar, K bar is an extension that lets you add little one-click buttons to commonly used tools, effects, presets, scripts, extensions, things like that. And you can customize it to your heart's content. So what I've done here is I have set up a button using this new feature in after effects to give me a one-click rule of thirds. And this is really cool because it actually works no matter what the resolution is of my comp. Now I have to thank Mr. Zach, love it.
Joey Korenman (19:47): Creator of explode, shape layers. One of the creators of flow on all around classy guy, he built the code for this. This is a Scriplet that you can load right into K bar. And it gives you a rule of thirds, no matter what size your comp is. Now, I know you're probably thinking to yourself. I wish I had my own K bar button for a rule of thirds guide layout. And Zach Lovett has been kind enough to give us permission to just give that to you. So again, check the link in the description, go to school, emotion.com and with a free student account, you can download the little Scriplet that will let you add that button to K bar. Now that's all well and good, but what if you don't want rule of thirds? What if you want all that sweet control like you hadn't Photoshop.
Joey Korenman (20:30): Well, that's where this really great tool comes in called grid guide. Now grid guide is not new, but in previous versions of after effects, it was kind of hamstrung because it couldn't actually make guides for you. And it sort of had this really clever, but hacky work-around and it would open Photoshop and save a Photoshop file and import it. And that it was crazy. So now, because of this new scriptable guide functionality, it works as it should. And it's basically indispensable at this point and here's how it works. So if I click this button here, this creates a bounded grid, which is typically the one that I want. What happens is you get a shape layer in your comp and that shape layer has some controls on it. So you can set the row, the number of rows and the number of columns. So let's say we want like a 12 by five or something like that.
Joey Korenman (21:18): I'm having 12 columns is actually pretty common if you're doing web design. So maybe that's what we're doing. We're doing something that's going to end up on a webpage. You also have a setting for a square grid. If you want to do that. And then you can add a gutter, let's say a 20 pixel gutter. And if you really want a margin, you can set that as well. And then when you're done, what you can do is click convert grids to guides. And what will happen is this shape layer will get turned into actual guide. So I'm gonna click that button and it literally takes less than one second. And it's done if I close this now and turn off my shape layer, and now I have guides. Now what's cool about guides. Guides are Snapple. If I grab my shape tool, I can very easily snap to any intersection of these guides.
Joey Korenman (22:06): If I like that shape, I can then duplicate it and move the copy wherever I want it. And it will snap. If I want to make the type snap to the guides, I can do that as well. Right? And so this just makes layout all heck of a lot easier. If you're interested in grid guide, we're going to link to it in the description for this video. And we're also going to link to it in the article that goes with this video on school of motion.com, check it out@aascripts.com. It's an amazing tool. So here's a couple of really small updates that are really nice to have. They're just kind of quality of life improvements. Thank you, Adobe. So we just have this simple animation here with an arrow, moving from one key frame to another. And let's say we want motion blur on that. Well, it's obvious we go to the layer switches and we turn on motion blur.
Joey Korenman (22:53): Now, before I do that, I want to remind you that in previous versions of aftereffects, you had to turn it on here on the layer, then turn it on globally for the comp. Well now in 16.1, if you turn it on the first time you turn that layer on, it's going to automatically enable it for the comp. Now, maybe that's not the behavior you want. Maybe you want it to work the way it did in the previous version. So if you go to preferences previews, you can turn that off and it will revert the behavior to the way it worked in 16.01, by the way, this also works with frame blending. So if you have a piece of footage and you enable frame blending, it will automatically enable frame blending by default in the comp there's also a new contextual menu option that you can access.
Joey Korenman (23:36): So for example, if I wanted to change this artwork in some way, this a linear key frame here, I wanted to change the way it looks or something like that. Um, I can control, or right-click on this layer. I can go to open and edit original has been added to this menu. You can also set a hot key for this. If you use this feature a lot, but now you can also right click and very quickly get to it. This will open the original artwork either in Photoshop or illustrator. And so let's say I wanted to change this key frame in some way. Maybe I want to, you know, just duplicate it and have a scaled down version inside. So you get this kind of weird, interesting, fake 3d look. Uh, and then I can combine those two layers and make sure that the layer is named exactly the same hit, save, jump back into after effects and that layer updates.
Joey Korenman (24:24): And we're good to go now. Pretty cool. All right. So just a couple of little things that I thought were nice. The last thing I want to show you is also a really handy feature that was added. And this is really nice if you're working in a studio or with a group of artists and you have to figure out what font someone used and sync it and do that a lot. So to show you how this works, I have a font here. This is an Adobe font, and this feature only works with Adobe fonts. And this is Nimbus Sans, extended, bold. So what I'm going to do is deactivate this font, and I'm going to open this project in the old version of after effects and then in this one, and you'll see what happens. So these are the Adobe fonts that I have active on my system and here's Nimbus Sans.
Joey Korenman (25:06): So I'm just going to deactivate it just like that. Now let's go back into after effects 16.01. So here it is the old version of after effects. And if I open that project, you'll see that the resolve fonts dialogue pops up telling me Nimbus Sans, extended, bold is not installed. Now I can click this and I can hit. OK. Uh, and it's really not that big of a deal, but watch what happens in the new version, in the new version. If I open the file, you'll see that for a second, the font is not correct. And then wait for it, wait for it. Boom. And there it is. The font has sinked pretty nifty, huh? Now this isn't a huge deal. But if you're working with after effects, artists or editors, people like that who are not super savvy with after effects, this is just one of those things that can save you and save them from getting tripped up.
Joey Korenman (25:58): So again, another good improvement on after effects. Now, of course, we just scratched the surface here with the improvements and additions that Adobe made to after 16.1. If you want to know every single thing that was updated or change, we are going to link in the description of this video and on our site to a page that Adobe set up listing every single tweak and improvement they made. I hope this video got you excited about the updates to 16.1. We're going to have other videos focusing on the specific features like content aware, fill for video in the new expressions editor. Those will be coming out soon. And if you'd like to stay up to date on after and the entire industry, please subscribe. Please go to school of motion.com, register for a free student account, and we will see you on the next one. Did you dig this video? If so, please give it a like and subscribe to our channel. Then head to school of motion.com to grab a free account, to download tons of project files, take a free class, get our weekly industry newsletter and much more. Let us know what you thought in the comments. Tell us anything you'd like to learn, and we will see you soon.
ENROLL NOW!
Acidbite ➔
50% off everything

ActionVFX ➔
30% off all plans and credit packs - starts 11/26

Adobe ➔
50% off all apps and plans through 11/29

aescripts ➔
25% off everything through 12/6
Affinity ➔
50% off all products

Battleaxe ➔
30% off from 11/29-12/7
Boom Library ➔
30% off Boom One, their 48,000+ file audio library
BorisFX ➔
25% off everything, 11/25-12/1

Cavalry ➔
33% off pro subscriptions (11/29 - 12/4)

FXFactory ➔
25% off with code BLACKFRIDAY until 12/3

Goodboyninja ➔
20% off everything

Happy Editing ➔
50% off with code BLACKFRIDAY

Huion ➔
Up to 50% off affordable, high-quality pen display tablets

Insydium ➔
50% off through 12/4
JangaFX ➔
30% off an indie annual license
Kitbash 3D ➔
$200 off Cargo Pro, their entire library
Knights of the Editing Table ➔
Up to 20% off Premiere Pro Extensions
Maxon ➔
25% off Maxon One, ZBrush, & Redshift - Annual Subscriptions (11/29 - 12/8)
Mode Designs ➔
Deals on premium keyboards and accessories
Motion Array ➔
10% off the Everything plan
Motion Hatch ➔
Perfect Your Pricing Toolkit - 50% off (11/29 - 12/2)

MotionVFX ➔
30% off Design/CineStudio, and PPro Resolve packs with code: BW30

Rocket Lasso ➔
50% off all plug-ins (11/29 - 12/2)

Rokoko ➔
45% off the indie creator bundle with code: RKK_SchoolOfMotion (revenue must be under $100K a year)

Shapefest ➔
80% off a Shapefest Pro annual subscription for life (11/29 - 12/2)

The Pixel Lab ➔
30% off everything
Toolfarm ➔
Various plugins and tools on sale

True Grit Texture ➔
50-70% off (starts Wednesday, runs for about a week)

Vincent Schwenk ➔
50% discount with code RENDERSALE

Wacom ➔
Up to $120 off new tablets + deals on refurbished items


Learn After Effects the Right Way
Master the After Effects interface and build a real animation skillset. Enroll in All-Access to unlock AE Kickstart and 50+ other courses.