Create Stunning Visual Effects in AE
Learn compositing, tracking, keying, and rotoscoping in After Effects. Enroll in All-Access to unlock VFX for Motion and 50+ other courses.
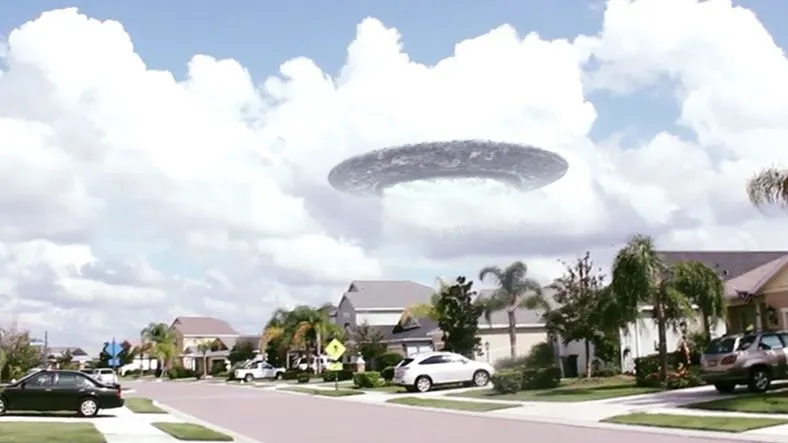
Florida is full of many strange things, including massive floating Alien Motherships.
Ok, so maybe those Alien Motherships aren't an everyday occurrence, but in this two part series you'll learn how to make them a regular every day thing. In these next two lessons Joey is going to show you everything you need to know to make a VFX shot that makes it look like aliens are invading your home town.You'll learn how to model, texture, and light an alien ship using Cinema 4D and Photoshop. You'll then take that 3D render and bring it into After Effects where you'll composite it into Joey's once peaceful Florida subdivision. By the end of this two part series you'll have a pretty good idea on how to make VFX shots like this on your own.
In this tutorial you'll be in Cinema 4D working on the alien ship, getting it ready for it's debut.We want to give a quick shout out to the amazing folks at Premium Beat. If you ever need affordable stock music or sound effects, we can’t recommend them enough. Check out the Resources tab for more info on Premium Beat.
{{lead-magnet}}
-----------------------------------------------------------------------------------------------------------------------------------
Tutorial Full Transcript Below 👇:
Joey Korenman (00:00:00):
Yeah, there's the new minivan. It's pretty sweet.
Joey Korenman (00:00:23):
What's up guys, Joey here and welcome to a two-part series from premium beat.com. This is going to be an awesome tutorial series, where we're going to show you how to create a giant city sized UFO, and have it hover and terrorize your town. All of the music and sound effects that I used in the trailer for this two, four year old came from premium beat.com. They are an amazing music and sound effects resource. So if you haven't checked them out yet, definitely check out their website. Now, part one, we're going to go into cinema 4d, and we're going to model texture, light render, and talk about a whole bunch of other things to create a realistic UFO let's hop in and get started. So to get to this result, there's a bunch of steps that it takes. And I'm going to walk you through each one, one by one, because I don't want to just show you like a recipe, how to make a UFO, because what use is that I want to teach you guys how to think about how to approach something like this.
Joey Korenman (00:01:15):
So, first of all, if you're going to be making a UFO, you have to have some kind of design for that UFO. You need to know what it's gonna look like. Right. Um, and so whenever I have to design absolutely anything I just pull reference. Okay. So first thing I'm going to do is just pop into my good old friend, Google. And, uh, I'm just going to type in UFO or UFO spaceship that popped up and I'm going to go to Google image search. Okay. And what I'm looking for, because you can see that there's, you know, 1,000,001 different ways that UFO can look. And most of them are kind of like this flying saucer shape. Um, but there's like a lot of different, you know, some aren't very good. Some are really good. Some are, um, you know, this is from district nine and obviously it looks amazing.
Joey Korenman (00:02:01):
And this is kind of the vibe I wanted to go for. I wanted this mammoth looking thing hovering over, you know, my neighborhood and I wanted it to look absolutely gigantic. And so this actually is one of the reference images I used to try and figure this out. Now, the detail in this model and the model of this spaceship is incredible. And I knew I wasn't gonna have time to do something like that. Um, so I wanted to find like a simpler kind of design and this image is actually one I really liked because it's a simple shape, but I liked that there's some kind of glowing lights going on. Um, and it just really kind of struck me. All right. So what I did was I actually saved this image to my hard drive. All right. And I could just say, save image as, and, uh, we're going to pop into my little, uh, little project folder here and I'm going to make a new folder and I'm just going to call this reference.
Joey Korenman (00:02:54):
Okay. And so let's just save that image in there and let's see what else, you know, one of the other things that I kind of wanted to, to get was just a subtle kind of a speaker, you know, shape, um, because this is for premium beat.com. I thought that might be a nice little, a nice little touch. Uh, so if we type in speaker, then you can see that there's lots and lots of reference images of speakers. And I really just wanted to get a sense of, you know, how big the, uh, the middle part needs to be and then how big the next part, and just have something to reference. And maybe what, you know, I was also looking for some other details I could add, you know, like there's a coil in here. Um, there's a nice mesh on this. So, you know, here's another good image.
Joey Korenman (00:03:39):
Uh, so let me just save this as I'll just save that as speaker in my reference folder. Okay. And there's one other thing that I want to point out before we get going too far. And that is, um, let's go back to our UFO spaceship images here. One of the things that's very, very important when you want something to look big is to know how to make things look big. Right. Um, you know, for example, I dunno if we look at this, okay, this image does not jump back here. This image doesn't strike me as a big thing, right? This looks very small and not just because the image is small. Um, but because there's no, there's no, there's no scale to it. Look at this image. There's another good example, right? There's nothing in this image that tells me how big this is, except for the water, the surface of the water.
Joey Korenman (00:04:29):
And, you know, looking at the surface of the water, this makes me think that this flying saucer, I dunno, maybe it's 10 feet across or something and because your brain is going to take whatever details it can. And it's going to use that to try and figure out the scale of that object. Okay. And so if you look at the one I've done here, what, uh, you know, the main trick I used was using a very detailed texture. Um, and then there's some compositing tricks to, to make it look big, but what you want to make sure you don't do is just have a smooth surface that doesn't give you anything to really latch on to for scale. And one of the ways we're going to do that is by using something called a grievable. Uh, and if you're not familiar with what agreeable is, agreeable is just a sort of a meaningless detail added to a surface.
Joey Korenman (00:05:13):
And these are some of the most famous scribbles in history. Uh, all that detail all over the death star that just, they're just there to make it look humongous, right? Cause your brain assumes all, there's this tiny little thing here and the, and these little details are covering this. So this must be a massive thing. Right. Um, and star wars actually is famous for gribbles. I think that might even be where the word came from. All right. So enough of that, we've got our reference now let's make a new cinema 4d project and let's get started. So when I have a reference, uh, when I have a reference picture that I want to look at inside of cinema 4d, what I do is I open up a picture viewer and then you can go file open and you can actually open your reference. Okay. So let me open up this.
Joey Korenman (00:06:00):
And now I've got this image and I can actually grab right here where these little, these little dots are, and I can dock this and maybe I'll just dock it over here. Okay. Let's see here. It didn't do it. Right. Let's try that again. There we go. All right. So I docked my picture viewer over on the right side. And so now I can just sort of glance over and make sure that, um, you know, the model I'm creating kind of has the same proportions as this. So we are going to start with just a primitive, but we are going to get into the modeling tools, which I'm hoping that's something that not a lot of you have a ton of experience with. Um, cause cinema 4d makes it so easy to model things without actually knowing how to model. But we are going to use some of those tools for this.
Joey Korenman (00:06:42):
So we are going to start with a let's start with a cylinder. All right. And first thing I want to do is just get the general proportions. Correct. And I'm going to move my camera. So I'm underneath this thing because I know that that's pretty much the angle. I'm going to be seeing it from all right. We are this thing's flying up in the air, so we're going to be down here underneath it. All right. And I just want to roughly get the proportions, correct. It's not super important, but you know, having this image over here makes it easy. I'm not gonna, you know, I'm not going to make something like this. Right. Cause it's easy to see. Well, that doesn't work. That's not what I want. So you can either use the interactive controls or use the, use the properties over here. Um, I want that nice roundness right on the sides.
Joey Korenman (00:07:23):
So I'm gonna turn on the caps and fill it, those caps and then adjust the, uh, the radius right. Until I get a nice smooth curve like that. Now here's something that's really important. I know that in order to get these, you know, concentric, sorry, concentric circles and get all that detail in there, I'm going to need to model this thing. And because I'm going to be modeling it, it's very, very important that I can see the polygons of this object so I can sort of see what I'm going to be working with. So it's always a good idea to switch your display from the default goo rod go rod. I don't know how you say that. Switch it from that to the one right below it. So now you can actually see the polygon lines. Okay. And if you hit render really quickly, um, a good thing to look at is look at the contour of the image, right?
Joey Korenman (00:08:09):
It looks very smooth on the inside and that's because we've got, um, we've got this Fong tag on our object, which sort of smooths out the shading, but there's not very many subdivisions around the edge of this. Right. So if I look at it, you can actually see, especially if I get in close here, you can see these hard edges. And when we render this for real, we are going to see those. So I want to make sure I have enough detail in there. So I'm going to up, I'm going to go to the object tab and up the rotation segments, and I'll just make it 64. All right. And now that should work better. Okay. Now it's going to be far away. You know, it's probably never going to be bigger than this in the frame. Um, so I don't need it to be, you know, a crazy amount of detail.
Joey Korenman (00:08:52):
Um, but I do want to make sure there's enough. Alright. So now go back to our picture viewer and let's see what else. Okay. So w w you know, one thing I'm noticing is that this looks very, very smooth and flat, and it looks, you know, a lot like a coin or something. This, uh, it's got a lot more kind of a pointiness to it in the middle. So I actually want to change the shape of this thing. All right. And this is where we really are going to get into some modeling. So what first thing I need to do is if I'm going to model this thing, I need to convert it into a polygon object. Um, you can do that by hitting the C key, um, or you can come up here and hit this button too, and it will, uh, feel kind of hover your mouse over it.
Joey Korenman (00:09:35):
Um, it should tell you, if you look down here, it'll tell you what it does, converts a parametric object into polygon object. So now you can model it. So, first thing I want to do is I want to try and stretch it out a little bit, so that it's got that point in your middle, like our reference does. All right. So I'm going to kind of move quickly through these modeling tools. So, um, I'm going to turn on the screen capture feature, where you can see what buttons I'm pushing, and I'll talk through it, but I'm going to move fast because we've got a lot to get through. So I'm gonna switch to edge mode so I can select the edges here. And I'm going to hit you, which brings up a menu that shows me all of the commands that have to do with selecting.
Joey Korenman (00:10:14):
And there's also some modeling commands in there. And if you hit you and then another letter, and you gotta make sure you don't move the mouse, cause then the menu goes away. So you hit you. And now I'm going to hit L and if you look really quickly, L is for loop selection, and this is going to let me quickly select loops like this. So I'm going to select this middle loop here. Okay. Now with that selected, I can hit T to switch to scale mode, and I can just scale that edge out now. That's cool, but I don't want it to just scale that edge yet. I want it to scale all of the edges, but this edge, the most. So there's a cool thing you can do in cinema 4d, where you select something, right. And with it's selected. Um, so let me, let me go back to my loop selection tool, U L K, and I'm going to select it.
Joey Korenman (00:10:58):
And now I can switch to my normal selection tool. You can just hit space bar and it'll switch back to that. And now where it says mode normal, let's switch that to soft selection. Okay. And what soft selection does is it lets you select something, but then it will automatically select things around your selection based on these settings. Okay. So right now the mode is group. I'm going to switch that to all. And what that's going to do is it's going to allow absolutely any edge to be selected. And you can see sort of that the, the part around the edge that's selected is a little bit more yellow than the rest of it. So let me mess with some of the settings. Here's the radius of the soft selection, and this is sort of the distance from your initial selection that will actually be selected.
Joey Korenman (00:11:46):
So now that I've lowered this to 28 centimeters, you can see that none of this is selected. This is selected all the way. And then it's of creating this gradient of selectiveness along the edge of this thing. So soft selections, incredibly powerful modeling tool. And now whatever I do to this edge will be done to the other edges proportionally with how much they're selected. So just by getting a nice soft selection and scaling it, I've managed to get something that's more like that. Okay. So let's take a look at it from underneath and it looks much better scale it a little bit more. I could even move it. I could move it up and watch what happens. It's going to move the other edges up, but just a little bit, not as much. So you can get this sort of, I don't know, like a Reese's peanut butter cup shape.
Joey Korenman (00:12:31):
All right. Pretty cool. So now we've got the bottom of this thing. And so now looking at this, right. If we're underneath this thing, I can't really see the top at all. And I might want to see the top a little bit more. So now I'm gonna use another selection tool. All right. I'm that? Well, actually, maybe I'll just still do another soft selection. I'm going to switch to polygon mode and I'm gonna switch to my selection too. And I'm just going to quickly select like this, all of these polygons, then I'm gonna up the soft selection. Okay. And I want to select everything up until about this edge here. So now when I pull this up, right, you can see what it does. It pulls everything up. I need to move this down a little bit more. Um, but it's gonna move these polygons the most.
Joey Korenman (00:13:12):
Okay. So I can really dial in that shape. I want, there's a lot more settings here. Um, I'm not gonna get into them too much, but that's the basics of soft selection. Cool. Okay. So now this is our base shape. Okay. Now let's talk about getting some of these cool details in here. Now, like for example, there's this cool blue light that goes around the top of our reference. And so let's say that I decided within this row of polygons here, I want to put like a cut inside there and have the inside of that cut be lit up. Okay. Well, how would we do that? So what we're going to do is switch to polygon mode. And what we're going to do is we want to select all of these polygons, right? This row right here. I don't want soft selection on anymore. So I'm going to set that.
Joey Korenman (00:13:56):
Um, I'm going to set that mode on the live selection tool to normal. And I want to select that ring of polygons. You can do the same thing. We did loop selection on an edge, could do it with polygons. So we're going to hit U and L bring up our loop tool, grab that loop. Okay. And you can see that it's, it's kind of, it's alternating between grabbing a loop that goes this way and a loop that goes sideways. Um, and it just depends what edge you're closest to. Okay. So if you're closest to one of these edges, it will select that loop. And if you're closest to one of these, um, sort of horizontal edges, then it's going to select a loop that goes into Z. So now we've got that loop of polygon selected. Now we're going to use a couple of modeling tools.
Joey Korenman (00:14:38):
I'm going to hit M which brings up another contextual menu of modeling tools. And we're going to use extrude inner, which is w extrude is one of the most common modeling operations you can do in 3d software. Um, and an extrude inner works kind of the same way, except a, and actually this might be easier to show you guys just very quickly in a new scene here. If I make a cube and hit C to make it into a polygon object, and then I select all of the faces of it. And I hit em to bring up my modeling tools. And then I hit T to extrude, right? This is what extrude does. It takes a polygon and it extrudes it out and creates new geometry where it moves through extrude, inner MW, extrudes inside the polygons. Okay. And then you could extrude those and you can create these really cool complex shapes this way.
Joey Korenman (00:15:31):
Okay. So back to our UFO, I'm going to do an extrude inner M w we're going to sh and we're going to extrude inwards, and you can see what it does. It creates a new set of polygons, and I can make them as thin as I want. I'm literally just clicking and dragging interactively. All right. This is fantastic. Now I've got a nice, thin edge to zoom in a little bit. Now I'm going to hit M T and now I'm going to extrude these. Okay. So what extrude is going to do if I click and drag, you'll see it will extrude out like that. Or it will extrude in, in, in is what I want. I want to create a little inset in there, just like that. Okay. Now you can see that the angle that this is coming out at, uh, is basically perpendicular to the normal or which direction this polygon is facing.
Joey Korenman (00:16:20):
Okay. Um, and if that's not what you want, you can change that, um, by changing the edge angle here, but this is actually exactly what I want. So, um, and you do need to be careful that you don't extrude and then say, oh, I want to adjust it and do this again, because now you're doing two extrusions. All right. So undo. If you don't get what you want, I want it to just go in a little bit like that, and that's good to go. And now another thing we need to worry about is these edges here right now, the edge that kind of goes up into the spaceship. It's a, super-duper hard edge. If we just do a quick render, you can see a very hard edge. So maybe we want to soften that a little bit. So if we go back into edge mode and hit U L right loop selection, I can grab that edge.
Joey Korenman (00:17:04):
And then I can hold shift and grab that edge. And I can use another modeling tool. So hit M and we're going to select the bevel tool, which is S so M then S is bevel. And then you can click and drag interactively. And it's going to soften out that edge a little bit. Now it's not giving me a lot of detail there, but what you can do is you can kind of get it started and then come over here to the tools and you can interactively adjust those. So if I up the subdivision, you can see it adds more edges in there, and it makes it softer. Okay. So with a subdivision of Ford adds four levels, and now I've got this nice, this knife soft kind of roundness to it. Cool. All right. So now what I want to do is, um, let's talk about getting something like this in the middle here.
Joey Korenman (00:17:52):
Okay. So what I want to do is kind of get something that resembles a speaker. So I sort of want like a big hole here, and then inside the hole, I want to have some more stuff happening. So what I'm going to do is go to polygon mode. I'm going to grab all these polygons. I'm also going to hit option D and that temporarily disables, that access that pops up, it just gets it out of the way. Visually makes it a little bit easier to see I'm going to hit MW, right. To bring in my inner extrude tool. And I'm just gonna, I'm just gonna move it in a little bit and then hit M T and extrude this thing up like this. And you can see if I go too far, it goes through the top of the UFO. So that's too far. So let's just do that.
Joey Korenman (00:18:37):
Okay. And then you L switched to edge mode, grabbed that edge and then hit M S remember is all stuff we've done already the bevel tool. And we'll Bel that edge a little bit. Okay. There you go. So now we've got this cool UFO with the hole in the middle, and it's fantastic. Um, and now we can fill in that middle with some more detail and try to make like a little speaker type of thing. Okay. So why don't we just start with, uh, another cylinder and before we get too far, let me make sure I, I name this correctly. So this is UFO main. Cool. And then we're going to add another cylinder and we're just going to do pretty much the same steps we just did. We're going to, um, we're going to scale it up, right? So it's roughly the right size, and this can be inset inside of this UFO a little bit.
Joey Korenman (00:19:30):
Um, I'm going to up the segments to 64. So we get a lot of detail and then I'm just going to hit, see, turn it into a polygon object. And now what I want to do is pull up the reference of my speaker. So now in my picture, viewer, I'm going to open up my speaker image and I'm going to hit H which is just going to fill my frame with it. Um, and now I can just kind of look at this and figure out what little details I want to pull out. Okay. So I like this outer edge here. So let me pull that out. So, uh, I'm going to go to polygon mode, select all these, and I'm going to do a quick extruded inner, so MW, right? Just like that. And I'm going to do empty extrude. I'm gonna push it in a little bit.
Joey Korenman (00:20:11):
Okay. And it doesn't have to be too far. Um, and then let's see, then let's do another extreme dinner just a little bit, and then another extrude empty and pull it back out. Now this is going to look a little bit different than the one I have in my demo, but that's okay. So now I've modeled this edge and then this little divot, and now we've got this part where it's kind of poofy. So let's do an extrude inner like this. Okay. And what I need to do is add a bunch of subdivisions in here, cause I want it to end up looking poofy like this. And I can't do that if I've only got an edge here and an edge here. Um, so what I'm going to do is now that I've done my inner extrude, I can come over to the options and interactively add more edges.
Joey Korenman (00:20:55):
And I'm going to add fi I'm going to set that number to five so that there is one in the middle, right. That I can select. Um, and let me, let me actually do a few more subdivisions there. As long as you're, as long as you get an odd number of subdivisions, you will have one edge that's in the middle and then we'll select it, do a soft selection and pull it up and we'll get that. Nice. All right. So let's not worry about that yet though. So now we've got our, we've got one more little kind of section here, so I'm going to do another extruded inner. Okay. Um, and this time I want to set the subdivision down to one. Okay. And I want this one to kind of angle in a little bit. So actually with all of these selected, now I'm going to hit E which brings up my move tool, and I'm gonna hit option D to bring back that access.
Joey Korenman (00:21:41):
And I'm just going to push it up a little bit like that. All right. So I'm actually just shaping this thing. Uh, and then I'm going to do another extrude inner and go to about there. And I'm going to push this one up a little bit too. And now this section here, that's going to be this poofy section. Okay. That's going to be this big, um, kind of central cone thing. So I'm going to do an extrude inner, and I'm an extrude this way into the middle. And then I'm going to up the subdivision to some odd number. Let's say nine. Okay. So now I can start shaping the pieces I need to, so I've already got this selected. So with that selected, why don't I go to my selection tool, turn on soft selection and I can up the radius a little bit, and then I can drag this down like this and create that extruded kind of counting.
Joey Korenman (00:22:31):
Now, if you look, it's dragging it down in this very linear way, and this is this nice pillowy looking, you know, kind of shape. So what I'm going to do, I'm just hitting on. Do a couple of times is I'm going to go to my soft selection settings and I'm gonna change fall off from linear, which makes a linear shape like that to dome. And now it's going to give me this nice round shape, um, and you can play with, uh, you can play with the settings to get it exactly the way you want, but that's, that's pretty good. Okay. Um, now one other thing I want to talk about really quickly, if I render this right now, you see how it looks very smooth in there. Like you're not seeing those nice hard edges like you kind of do here. Um, what is, what could be causing that is, um, this Fong tag, the Fong tag looks at the angle between all your polygons and if it's below a certain threshold, it just smooths it.
Joey Korenman (00:23:25):
And by default, the Fong angle is set to 80, which is very smooth. So I usually set that to something like 30, and it'll let you see a little bit more detail. You can even set it lower than that. Um, and now you can start to see, you'll start to see every single polygon. So that might be too much. Um, but you can adjust that to get more or less a hardness, right. That's kinda, that looks more like what I want, actually. All right. So the next thing is this piece here, right? This nice poofy piece right there. I want to, I want to get that. So, uh, let me select that object and I'm going to call this inner UFO. Cool. And we're going to go into edge mode, select that center loop, right? The very center loop, which is that one. And then I'm going to go and do, I'm going to just hit space bar to go back to my selection tool and I'm going to adjust my soft selection.
Joey Korenman (00:24:17):
So only hitting those polygons, and then I'm going to pull this down like that. Right. So now you can see I've got that nice poofy shape. Perfect. Okay. Um, and there we go. So now I've got this cool base UFO shape and, um, you know, we're going to texture it. We're going to do a lot of things to it also, but I also want to talk a little bit about those gribbles. Okay. So right now this could be an enormous city size spaceship, or it could be something the size of a car, or it could be something the size of a headphone, right. It's impossible to tell. And so, you know, doing the little Gribble trick, right? Putting tons of detail in there is one way to, to give things a lot of scale. So I use a very cheap trick to do this, um, on, on the demo.
Joey Korenman (00:25:12):
And this is how I did it. So I took a cube and you make it very small, make it like one by one by one, really, really tiny, and then add a cloner, put the cube in the cloner. And what we're gonna do is we're going to clone that cube all over the main part of this UFO, but we don't want to clone it over the, we don't want to clone it over every single part. Um, we really only want it on, you know, the main pieces that we can see. So what I'm going to do is I'm going to go to loop selection, uh, in polygon mode. So you L and then I am just going to kind of zoom in here and I'm going to select that loop and holding shift. I'm just going to select a whole bunch of loops, like this only ones that we really can see just like that.
Joey Korenman (00:25:58):
Okay. And then with all the, with those polygons selected, I'm going to go up to select and say set selection. This is going to create a little triangle tag on that object called a polygon selection. And now I'm going to rename that, um, for gribbles gribbles. All right. And what this is going to let me do is clone the cube all over that UFO, but only where I selected. So it's not going to clone up in that little part there. It's not going to clone on the inside that we can't really see. It's not going to call them on the top that we can't see only where we want it. Okay. So, uh, let's go to the cloner. Let's set that to object mode, and we're going to clone onto the main UFO object. And down here, what's a selection I'm going to drag that selection.
Joey Korenman (00:26:44):
And there you go. Now you can see that cube has been cloned, but only on the parts that we want now, right now it's being cloned onto each Vertex. So it looks very organized and that's not what I want. I actually want it to be on the surface. And I'm going to crank that number up to like some really high number. Let's try like 2,500. Okay. And now you're getting a lot of little cubes all over the surface of it. And even just doing that, it adds a ton of detail that tells your brain, this thing is much bigger, uh, you know, than things around it, right? Because if these things are on there and you see them, well, they must be tiny. This thing must be massive, right? You're tricking your brain. Um, I also want to make sure that I have render instances turned on because we're going to have so many clones here that we don't want.
Joey Korenman (00:27:31):
We want to sort of maximize our memory usage and turning on render instances is going to speed up renders and make things work better. Um, and since these gribbles aren't going to be moving or anything, and actually let me, let me rename the scribbles. Uh, that's gonna work out. Great. Cool. All right. So, uh, let's actually up that number. Let's make that 4,500. And then with my cloner selected, I'm going to grab a random effector and I'm going to have it, not randomized positioned, but randomized scale. And I want the X to be randomized a lot. The Y could be randomized a little bit, and then the Z can be randomized even more. And just by doing that, you've got all of this surface detail all over your UFO. All right. So this is a super easy way to add quote gribbles. Um, and if you wanted to, you could actually build two or three variations in one is a cube and one is a sphere and you could, you could model things and use MoGraph to just clone them all over your spaceship.
Joey Korenman (00:28:32):
Cool. So that's a way of adding gribbles and, uh, one thing that you can see that, um, you know, it's still moving pretty quickly, cause these are just cubes. But a little trick I like to do is to just disable the gribbles in the viewport so that I can really move around quickly, but, but leave that bottom traffic light left alone so that when you render, they do show up. Cool. Uh, and then the last thing I want to do is I'm going to take that inner UFO shape that I made. Um, and I'm going to, uh, I'm going to copy it and we're going to call this small speaker and I'm going to go into object mode. And I'm just going to scale this thing way down like this. And what I want to do is take that shape and clone it all over the UFO and maybe, uh, maybe put them on the inside here, or maybe put them on the outside of this ring.
Joey Korenman (00:29:24):
Cause I just want to add more detail, but I don't want to model anything else I've already modeled enough. So what I'm going to do is let me zero out the coordinates for this real quick. And we're going to take this and put this in its own corner. All right. So we'll grab a cloner and we'll call this speakers, put the small speaker in there and we're going to set the cloner mode from linear to radial. And we're going to expand that radius out. Um, and you can see that it's creating a radio. Clojure here, not on the, not in the right, you know, orientation. We actually want that on the X, Z plane. And now we can't see them cause they're inside our UFO. So let's move the whole thing down and let's figure out where we want these. We could put them around, maybe on this poofy ring with that might be weird.
Joey Korenman (00:30:07):
You might see them better if they were, um, if they were like sticking out of the side of this thing. So maybe we'll do that. So I'm going to grab my speaker that's inside of my cloner and actually the easier way go into your clone or go to the transform tab. And this will let you transform all of your clones equally. Um, and let's just pitch them 90 degrees. All right. And let's go into our top view here. And so this let's see here, I'm trying to orient myself and it might be easier to just do in this view. Um, what I want to do is I want to make more of these, so I'm going to up the count. Okay. I also want them smaller. They're too big right now. So you could adjust that in the transform tab or you can just grab the speaker, hit T to go into scale Mo uh, scale mode and just manually scale it down and make them maybe that big.
Joey Korenman (00:31:00):
And then let's move, let's move our cloner up like this. Okay. Add that up where we want it. And then we'll add more clones until we've got a lot of these things around the edge. And now if we come back here, we take a look. Now you've got, you know, more detail and you've got gribbles all over these things and there's a lot going on. And what's also cool about having knees. Is that now let me just go ahead and group this entire thing. I'm going to select every piece of it, including the random effector and hit option G to group it. And this will be my UFO. And now I've got enough detail on there where, when I rotate this, you'll be able to see that it's rotating and those speakers all around. They're really going to help you do it. Cool. All right.
Joey Korenman (00:31:49):
So now we've got our base model and we've added the Griebeler and we've added some more detail now, how do we texture this thing? So texturing and cinema 4d, unfortunately is one of those things that I feel like a lot of people don't really understand. Um, you know, I'm sure all of, you know how to make a material and apply it to an object. But when you're doing something like this, you really want total total control. And so what you want to do is set up a UV map. Okay? So that's the first thing we're going to do. I'm going to turn off my green bulls, turn those totally off. And I'm going to turn off that inner UFO and I'm going to turn off my speakers and we're just going to focus on this. Okay? Because once I show you how to UV and texture, this you'll know how to do it on the rest of this.
Joey Korenman (00:32:31):
Okay? So here's what we're going to do. First thing we need to do is create a UV map for this and a UV map. If you don't know, is a two D representation of your object, sort of flattened out that you can paint on and, and make your texture on. And then that UV map will get wrapped around your object in a way that you could specify. Now, one thing about UV maps is that they are to D. And so if you have a 3d object, like your UFO here, which has a totally seamless and continuous surface, there are no holes in it, right? So you're not actually going to be able to unfold that, uh, unless you tell cinema 4d where, where to create an artificial hole. Now we're a little bit lucky. We know we're going to be underneath this UFO and we are not ever going to see the top of it.
Joey Korenman (00:33:18):
So to make our life a little easier, I'm just going to grab those polygons up here and make sure soft selection is off. And then with those selected, I'm just going to hit, delete and delete those polygons. Cool. So now I've got a shape that has an opening. So now this can be flattened. Next thing I'm going to do is I'm going to run the optimized command whenever you delete polygons, it deletes those polygons, but it doesn't delete those points. You can see there's a point there hovering in space, and that point is not attached to anything and that can screw some things up. So whenever you delete polygons, it's a good idea to go up to the mesh menu commands and run the optimized command. It will get rid of any points that are not attached to anything among other things, but that's, that's one of the things it does.
Joey Korenman (00:34:03):
So now let's switch our layout from start-up to BP UV edits. Okay? Now over here, this area is your UV area, and this area has a relationship with your 3d model, which is defined by this checkerboard tag here called a UVW tag. So if I click on my object and I come over here to UV mesh and say, show me the UV mesh. Well, this is the UV mesh currently for this object. And you're probably looking at this, like I am in saying, I don't understand what I'm looking at. This makes no sense. I don't know which part, you know, if I, if I was saying, where is this polygon on this mesh? I have no idea. There's no correlation. So this isn't going to do us much good. Um, and you know, you, if you don't understand why you need UV maps, there's another tutorial on school of motion site, uh, called UV mapping and cinema 4d effects.
Joey Korenman (00:34:57):
It will explain it. So watch that. So we're going to make a UV and the way we're going to do that is we're going to go up here and we're going to switch into UV polygon mode. And we're going to come over here to the UV mapping tab and go to projection. Okay. And these are all sort of the starting point when you're doing UV mapping. Uh, one of my favorite ways of getting good UV map is to go into one of these isometric views and find a good view, a good vase, basic view of your object in this case, the top is showing me the most, right? So I wanna make sure I'm selecting my top view because you can see, I can actually select my front view or my right view. I want the top view selected, and then I'm going to hit frontal projection.
Joey Korenman (00:35:37):
And it's going to copy this view over here into my UV, my UV map, um, and then using my four or five, six keys, the same way you can move rotate and scale objects. Um, in this view, you can do it in this view. So four moves, five scales, six rotates. Okay. So I'm going to just kind of center this now, right now, this might look like a good UV map, but what you're actually not seeing is that all of these polygons at the edge here, these are overlapping. And so if you have overlapping polygons on your UV map, you won't be able to get a good texture. All right. And just to prove it, I'm going to make a new material really quickly. I'm going to go to my materials, browser, double click, make a new material. I'm going to hit this red X.
Joey Korenman (00:36:19):
That's going to load it into memory. And now I'm going to give it a color channel. So I'm going to double click this little X. All right. And I want a new two K texture. So 20 by 48, 20 by 48. Um, my background color can just be gray. And I'm going to name this UFO main text, text, sorry for texture and not UFP UFO. There we go. Hit. Okay. So now I have a texture and I'm going to apply the texture to that object. So now I can grab my paint brush. I can actually paint right on the UFO, which is great. See, now if I, um, if I paint right on this, that looks great. Okay. The problem is, see how, if I paint up here, it also shows up down here. I don't have independent control. Now. Why is that? Well, if I paint a circle up here and we come over on our UV map and look, there is the circle on our UV map.
Joey Korenman (00:37:12):
And apparently that UV map is intersecting multiple polygons on our model. Okay? So we can't have overlapping polygons. It will not work. So there's some tools in cinema 4d to fix that you need to be in one of these UV modes, which are these checkerboard buttons up here. I usually use UV polygon mode. I'm going to hit command a, to select all my polygons. And then I'm going to go to relax UV. All right. And what relax UV does, if you hit apply, is it attempts to unfold your object? And it may take a few seconds because there are a lot of polygons here, but what it's going to do is it's actually going to unfold this. Okay. So now look at what it's given you. Okay. You can see that it's, it's unfolded. Nothing is inter intersecting. And here's how you check a UV map, go into your layers.
Joey Korenman (00:38:01):
You have to have a material, have the material applied to the object, and then you can turn off the background and it will create this cool checkerboard pattern. Okay. And one of the things you're going to see is, um, you know, you're going to see the checkerboard pattern applied across this whole object. And ideally what you want is you want that checkerboard to be uniformly scaled across the whole thing. And it is for the most part, except if you look here, you can see how the checkerboards get smaller and smaller and smaller, the more inward they go. That can be a problem because when you're, when you're painting on your UV map, things are going to get smaller and smaller on this part of the model. And they're gonna be bigger on this part of the model. Uh, so we're going to just use another tool to sort of help get a more equalized kind of result.
Joey Korenman (00:38:51):
Um, so I'm going to hit command a select all the polygons again, uh, go to UV mapping and in your optical mapping tab, select realign, uh, have all of these things, check, preserve orientation, stress to fits equalize island site, equalize island size and hit apply. And it's just going to adjust it ever so slightly. Um, and you know, if, if you had like a UV like this and you hit apply, it's going to scale it up to maximize the amount of real estate that you get on your UV map. And so now, if we look at this, you never going to get a perfect result. Um, but this is better when you, when you have something that is not flat, right? And this is a 3d object that by definition is not flat. You're always going to have some distortion on your UV map, but this is going to work pretty well.
Joey Korenman (00:39:36):
And now of course, the beauty is we go back to our layers and turn on our background. I can paint right on this and I'm not going to get, let me actually grab a paintbrush so I can paint. I can paint right on this and I can paint right on this. And you're never going to get any sort of overlapping polygons. Right. Cool. And I'm not sure where that pain stroke ended up it's somewhere. All right. So, uh, now what I want to do is actually create this texture and make it really cool, but be able to see it in 3d at the same time. And, and, and this is how you can, you can use body paint, which is what this is all called inside us. And before D this is how you can use it to create super-duper custom Austin textures. So what I need to do is first save out this texture that I have, um, so I can open it in Photoshop.
Joey Korenman (00:40:20):
Photoshop is a much better image editing tool. Um, and so first thing I want to do is, uh, I want to delete these little circles. I'm going to turn off my UV mesh for a second. Um, and I'm just gonna make a gigantic brush here and paint over these. So I'd have nothing, I just have a blank background. And then what I'm gonna do is go to my color tab, select, uh, select white is a color, and I'm going to go into one of my UV modes here and select all my polygons. And I'm going to say layer, create UV mesh layer. And what that does is it actually makes a bitmap layer of your UVS. And the reason you want to do that is so that you can go file, save texture as an I'm going to save this as a Photoshop file. And let's save that. Let's make a new folder and we'll just call it a new textures. And I'm going to say, this is the UFO main texture Photoshop file. Okay. We can now hop into Photoshop and open up that file. So let's hop in there.
Joey Korenman (00:41:23):
Oh, there it is. New textures. You have foamy and texture. And now in Photoshop, I have my background and my UV mesh layer. Okay. So any layers you see in body paint, you can see in Photoshop, and there are some exceptions where you can't go back and forth. Uh, but a lot of Photoshop features will translate perfectly right back into cinema 4d. Cool. So, uh, one thing that might be helpful too, because, you know, I, I can sort of tell where some of the boundaries are here. Um, but I can't see my 3d model. Like I can't hear. Right. And so if I want to know exactly, let's say that, I know I want to put a ring around this edge, right. Of the, of the model. What I might do is make a new layer, uh, make a new layer. Let's see it's this button, this leftmost button makes a new layer, and I'm a call this ring reference, and I'll just grab my paintbrush, um, make it a little smaller.
Joey Korenman (00:42:17):
And I will just very quickly draw a ring, um, you know, right on the model. And that way I can say, okay, I know I'm going to want a ring right there. I can turn off my UV mesh layer and you can see that it's creating sort of a ring like that. And you know, this can be very, very, very, very rough, but this is going to now, and now I'm gonna do is I'm going to save, I'm going to save my texture. I'm going to go up to file and say, save texture. So now I'll go back into Photoshop and I'll close the texture, don't save it. And I'll just reopen it. And now I've got that reference layer. Okay. And I can line it up with my UV mesh layer. And so now if I wanted to, by the way, I just faded that back by hitting two on my keyboard.
Joey Korenman (00:43:05):
And it's a neat little way to quickly change the opacity of your layer and let me lock my UV mesh layer. So now I can see exactly where on the UV mesh that rain needs to be. Okay. Um, another thing I like to do, because this is a symmetrical texture is I'm gonna hit, uh, I'm going to make sure my rulers open command are, if it's not, and I'm just going to click and drag a guide and stick one right in the middle there, and one right in the middle there that's going to let me do is, uh, let me grab like this ellipse tool. And now I can line this up just like this, right in the middle and hold option and shift. And I could make a ring, right, exactly where I want it. And let's turn that stroke. Um, the fill off and give it a stroke.
Joey Korenman (00:43:49):
We could just make the stroke. It doesn't matter. Just make it like dark blue or something. Um, 10 pixels. Okay. And there you go. And so now I've got on the lips, right. Perfectly centered on my UV map, right. Where I want it. Um, and now I'm fairly sure we could actually try this, but I don't believe body paint can read an ellipse layer. Here's how we check it. We save our Photoshop file command S hot back into body paint. And you just go up to file and say, revert texture to saved and say, yes. Okay. And it will bring in the newest version of your Photoshop file. Now you can see here's the ellipse layer, but it doesn't know what to do with it. All right. So in this case, what I'm going to do is just take my lips layer control, click it and say, rasterize now save this, go back into body paint, file, revert, texture to save.
Joey Korenman (00:44:38):
And now look at that. There is my blue ring, right on that edge exactly where I wanted it. Very cool. Okay. So this just gives you a taste of like the control you can get. Next thing is I wanted a nice, rough, gritty cool texture. Now, where do you get something like that? Well, one of my favorite favorite websites is CG textures.com, which has a free account you can sign up for. And there are tons of amazing, amazing textures. Um, and so I went into metal and I looked around at some of the textures and let me actually use a different texture this time. So we can get a little bit of a different result. Maybe something like this or something like this. I just wanted something a little bit grungy and rough. Right. Um, and what you can do, what's really cool is a lot of times you can, you can look at these and you can see if they are tile, bubble tile bubble means you can loop them and make them seamless, um, and make the, make the textures bigger, smaller.
Joey Korenman (00:45:35):
And that's actually what I want to do. So let me find something that says set tiled. Um, why don't we try this? Here we go. Okay. And so now I can download this image for free. Uh, if you get a premium membership, you can get higher res versions of it, but I'll just use the small one for now. So I'm gonna download this. Okay. Um, and then I'm just gonna grab my download, bring it right into Photoshop. Okay. And what I'm going to do is I'm going to take this texture and I'm just going to hold comment, cold option and copy it. And I'm just going to keep lining it up, just like this. I'm making a giant patch of that texture. Then I'm gonna select all four of these layers, hit command E that'll, combine them all. And then I can do the same thing here.
Joey Korenman (00:46:21):
And you could see how quickly with that seamless texture. You can just build these things up, CG, textures.com, people. It's amazing. Um, cool. All right. And so now I want to, I'm going to save a copy. I'm going to call this metal original. I, I don't want to manipulate this copy. I want to keep a copy of that. So I'm going to turn that copy off, and then this is going to be the basis for my color channel. So I'm going to say color base and I want it to be really dark. All right. Um, I want it to, I want it to be pretty dark, but I kind of want to see a little bit of detail in there. Um, maybe something like that. And then I'm going to, I'm going to open my color balance, by the way I did that really fast.
Joey Korenman (00:47:03):
That was the levels effect command L brings that up. Uh, and then I'm gonna do command beef color balance, and I'm going to push a little teal into the mid-tones not too, too much. And then in the shadows, I'm going to pull some of the blue out cause it's so blue and I'm trying to neutralize it a little bit. Um, I could de-saturated but I do like having some color in there. That's kind of interesting. All right. So let's say, okay, now let's bring that color base down here. We've got our blue lips, which I don't really want to be blue. So I'm going to hit command you to bring up human saturation and I'm going to de saturate it, and I'm going to bring the lightness up. So it's more of a grayish color. And then I'm going to hit save. Now let's go back into cinema 4d and let's go up to file revert texture to saved.
Joey Korenman (00:47:52):
And now you can see sometimes you get redraw issues, just zoom in and out really quickly. You can now see our textures come in, and this is what it looks like. It's being put onto our UFO. Okay. Now here's a good time to talk about scale. Look at the scale of the texture. Okay. It's too big. I can see too much. I can see like, too much detail in it from this and it should, it should feel further away. And it doesn't so easy. Fix back into Photoshop, take our color base, shrink it down really small like that. Okay. And then let's do the same thing. Let's copy it. The new Photoshop has these amazing built in like smart guides, which makes it a lot easier to do this a lot quicker. Um, and then I can just select all those hit command E to combine them and then just copy one more time. Cool. All right. So here's my new color base. All right. Save that. Go back into cinema 4d revert, texture to saved.
Joey Korenman (00:48:56):
And there you go. Cool. And now when we render it, there's a lot more detail in there. Okay. So that that's working better for me. All right. So now let's talk about some of the other things that we need to do. So first off, um, I want to have some detail in this. Okay. And so I'm going to bring my UV mesh layer up to the top here and turn it on so I can actually see where the polygons are. All right. So this ellipse here, um, I want to create sort of a series of those ellipses. So I'm going to grab my lips tool and I'm going to click in the middle and hold option and shift, and I'm just going to sort of line them up with various edges. Okay. So, um, I'm going to turn the Phil off. I'm going to turn the stroke on, um, I'll just use white and let's not make them too thick.
Joey Korenman (00:49:47):
Actually. I'm going to delete the original lips cause it's too thick. So I have an ellipse, um, with a three pixel stroke on it. And now what I can do is I can turn these guides off temporarily command semi-colon is the hot key. Uh, and I'm going to duplicate the ellipse and then I'm going to shrink the copy down and let's put one copy. You see these dense areas here right here. That's where, that's where we, um, added, um, the bevel. And so this inner part, this is actually the, the inset part of the spaceship. Right. So maybe we'll make that another color. That would actually be cool. Um, so I'm gonna keep copying these ellipses and I just kind of want to sprinkle them around, but I want them to line up on edges. So it does look deliberate. Okay. Um, and let's do one more and we'll do it on this edge there.
Joey Korenman (00:50:40):
Okay. Now this is that inner part of that spaceship, right? Between this thick edge and this thick edge. So what I'm going to do is I'm gonna make another lips. I'm going to transform it and I'm gonna stick it right in the middle of that, just like that. That's not enough, let's scale it up a little bit more. There we go. Right in the middle like that. And then I'm going to, um, I'm going to increase the stroke until it fills that area. Um, and it's actually putting the stroke inside. So I'm going to line it up on the outside and then let's make that like 35 and see, yeah, there we go. Okay. And so this is my inner color, so whatever color I make this that's, what's going to be inside this little groove right there. So why don't I make that like a, you know, some neat blue color, right?
Joey Korenman (00:51:38):
And then we're going to color correct this heavily in after effects. Anyway. Um, so now remember cinema 4d does not read these ellipses. So what I, what you can do is take them all, put them inside a folder like this call this ellipse group. And that way you always have a copy of them, then you can just copy that whole group, turn the group off, select the folder and hit command E and that will rasterize it let's turn off the UV mesh layer and hit save. And then, um, you know, we could even adjust the opacity of this. We can maybe make the opacity 80%. Right. I just did that by switching to my arrow tool and hitting eight on the number pad. So we can see through this a little bit. All right. And if we go into cinema 4d now, and we say revert texture to saved, okay.
Joey Korenman (00:52:23):
Now all of those rings, all of that detail is coming through. We have total control over everything. Cool. Um, you know, another thing that, uh, you know, I wanted on this UFO was I wanted a ton of little kind of architectural looking details and I knew that was going to be tricky to do. Um, so what I did was I actually just got on, um, Google images and I just sorta looked for some geometric patterns. Right. Um, you know, not, and I didn't want stuff that was obviously a pattern. Um, you know, so I, what I ended up doing was getting on Pinterest and I found a bunch of stuff, kind of like this. Um, let me actually see here. Pinterest is another Michael Fredrick, good friend of mine that my Pinterest is a great place to find stuff like this, you know, you can search for geometric, right.
Joey Korenman (00:53:19):
And it's going to show you a whole bunch of reference and you can be like, oh, that's cool. Let me grab something like that. Or, or, you know, actually maybe I want to try and do something different with you guys than I did on the demo, just to show you kind of the techniques involved, right. Something like this. Right. What if I could grab like that interesting pattern? Um, you know, and, and so let's see if we can, let's actually open Photoshop and just pull that right in. And I'm going to, de-saturated, uh, that's shift command you by the way. Um, and I'm going to try and just crush the levels here so I can get just that pattern out of there. Okay. That's kind of interesting. I'm going to solo this layer. I'm going to hold option and click on the eyeball. Um, and I need to put a black shape underneath it.
Joey Korenman (00:54:12):
There we go. And that needs to be at a hundred percent of pasty. Um, and so what I'm going to do is I'm going to take this black and white image here, and I'm going to attempt to copy it and flip it, flip it horizontal and line it up like this and see if we can get some kind of symmetrical shape out of it. Let's see, here we go. Right. And then I'm going to combine those and I'm going to duplicate it. I'm just holding option and dragging it. And then I'm going to flip it vertically like that. Right. And again, I want to come in, I want to make sure this is symmetrical. That's great. Okay, cool. And then I'm gonna combine those. And now, because we're getting this feathering on the edge, this part is going to be a little trickier, but why don't I move this to the top and do another copy like this?
Joey Korenman (00:55:02):
And I think it's actually going to be okay. I mean, it's kind of fading out a little bit, but that might be fine. Let's combine these. And so this is, this is just kind of the quick and dirty way to just, um, take, take a texture. That's not really big enough to tile the way you want and just keep copying it and flipping it and mirroring it and create what you want. Cool. Um, and then maybe let's, let's kind of center this thing here, right. And I know I'm doing this fast, but this would be a four hour tutorial if I wasn't and I'm going to copy it and I'm going to rotate it 90 degrees, and then I'm going to set it to screen. So now we get this crazy kind of doubling effect and maybe that copy, right. The copy that I just switched 90 degrees, I could shrink it down a little bit.
Joey Korenman (00:55:51):
Right. So we can sort of have multiple layers. Sorry about that. Um, we can have multiple layers of this texture. Here we go. And combine those, set that back to screen. Actually first, let me just go ahead and copy like that, set that the screen and maybe set the opacity back a little bit. And so now you're just getting all this detail. That's just so fine. There's tons of stuff. Okay. And let's, uh, let's turn that off for a second and let's turn our color base, turn that back on. Um, and we've got our ellipse group copy here, uh, which I believe I've actually somehow messed up. So let me delete that and make a copy of my lips group again, turn it on and hit command E and then we've now got these two new layers, which I'm going to just combine those and set it to screen.
Joey Korenman (00:56:46):
Right. And I'm gonna turn the opacity down a little bit and you can see now I've got all this crazy geometric funky detail on there. Let me rotate it a little bit too. So it's not like perfectly lined up. Okay. There you go. Cool. And I can scale it down cause it's only going to show up within that circle. Right. So I can make it even finer. There we go. Cool. And let's save that. Let's go into cinema 4d and revert our texture. Okay. And now you can see you getting all this crazy stuff on there and it's too big. See, it's crazy. It looks like the scale is good. And then you look at it on the object and you're like, yeah, it's too big, but that's an easy fix. Let me hit undo so I can get rid of that rotation. And let's just scale this thing way down again.
Joey Korenman (00:57:33):
Okay. And we're just gonna do the same thing. We're just gonna make a copy and we're going to tile it. Right. We'll put this like this, make another copy, flip this one vertically. Cool. And then merge this and make sure that we've scaled it big enough so that we can actually cover the entire UFO set at the screen. Save that hot back into cinema 4d and revert our textures saved. And now you're getting a ton of detail in there. Cool. All right. Um, so what I did was I sort of had multiple levels of this. I'll actually open up, um, the texture. So you guys can see, this was actually the texture I created. You see, I had some geometric patterns. Um, oh, here's another thing I did. There's so many little tricks. Uh, I took a circuit board image and I ran the, uh, filter polar coordinates on it to make it kind of circle sphere, fire circle of fi um, to get that, oh, here's another cool thing.
Joey Korenman (00:58:34):
I'll show you guys. Um, I made a new layer and I'll just call this a Russ and I'm going to set it to color. I'm going to say, it's a color burn, and I'm going to pick like some kind of orangy color and what this is gonna let you do is paint on this layer. And you can see I've already got kind of a goofy brush here. Um, you can grab like a, kind of a rusty grungy brush and turn on your UV mesh layer. And this is going to let you see where the edges are and you can just sort of paint like a grunge kind of right onto it. Right. And this is a lot easier if you have a Wacom stylist or a Santiq or something like that, because you can literally just, just sketch, like, you know, and kind of build up a layer of rust right around edges.
Joey Korenman (00:59:28):
Right. Cause that's generally where rust is going to form. It's going to form on the edges of things. Right. Um, and so let me, while I'm at it, let me take this lit ellipse group. Um, and let me tone it way down and then I'm gonna make a copy of it and I'm gonna blur the copy just cause it's feeling a little too harsh for me right now. I'm going to set the copy to screen. All right. I'm going to come back up to my rust layer and I'm just going to paint a little bit of rust. I'm doing this really quickly cause it's tutorials already so long and there's still a couple of other things we have to get to. All right. So, you know, this is the idea. You, you take a brush and you paint these Russ strokes right on it. Okay.
Joey Korenman (01:00:11):
By the way, you can do this inside of cinema 4d too, but I just liked the brushes in Photoshop better. All right. And then if you want, you can lower the opacity of the, of the rust. So it's not so dark, let's try 70% save our texture, go back to cinema 4d and save file revert texture to saved. Right. And now you've got your rust layer. And if you look on here, you can see you get these nice little patches of rust. Okay. So this would take some tweaking. I think the geometric stuff's a little heavy, you know, I, I, I really would want to probably dial that back. Um, so it's not nearly as intense. Um, but now let's revert that real quick. So now I want to talk about the next steps. All right, because now you sort of know the workflow, how you build up a texture and how you can get it to look the way you want, but it still looks so smooth and crappy.
Joey Korenman (01:01:05):
And so we need to move on to lighting. Okay. Lighting is very important. Now, an easy way to sort of preview this. I'm going to go to startup mode for a minute, an easy way to sort of test your lighting is, um, to use two lights. All right. This is specifically for UFO. If this thing is a UFO and it's floating outside, you've really got a couple of things, lighting it. You've got the sky, right. Which would be an, we can make it just an area light and let me rotate it. I'm going to hit command D to bring up my, uh, there we go. Bring up our access. All right. So you've got an area light, negative, 90 degrees above it. Right. Um, and this, this is going to light the top of it, right. These top edges, but then light's going to bounce off of the ground and go back up onto the UFO.
Joey Korenman (01:02:00):
All right. So there's going to be another one below the UFO. So let's take that light, move it down like this, right. And flip it around. Um, and so now you get something like this. Okay. And you can start to visualize a little bit, uh, what this is going to look like. Um, the light that's on the top, it's going to be much brighter than the lights on the bottom. And it may even have like a little bluish tint if you wanted to. Um, if you wanted to preview that you could set your light to have the tint, um, and you know, there are going to be shadows and ambient occlusion. So we could, um, we could turn on our nav inclusion effect, which is going to help us see what it's going to look like inside, you know, our nice little grooves and things like that.
Joey Korenman (01:02:43):
Um, and so, you know, but I knew going in that I wanted this to look very real and I needed it to sort of match, um, my footage. Right. Um, so first off, let me grab a background here. Uh, and I'm going to make a new texture and in the color channel I'm going to load in, let's see here, this is just a JPEG that I grabbed off of the video. Right. Um, and it looks crunched because I don't have my, uh, my project set up correctly. So let's set that to 1920 by 10 80. All right. So this is just a shot from the actual footage. And so what this, let me do is sort of get my camera oriented correctly so that this would look right. And, you know, I, because if I couldn't look at the scene, maybe the camera, maybe I would've done it like this.
Joey Korenman (01:03:32):
Right. And now it kind of looks like the UFO is tilted, you know? And so maybe, maybe, you know, but that's too flat. So I sort of used my, uh, my image as a reference to really make it easier to, to position this thing. Once I had it, where I liked, I zoomed in like this and rendered that. So I ha I knew I could shrink it down. Um, but I used that and I also wanted to have an image light this thing, right. Instead of actually using lights like this, you can use an image to do it. Um, one of the cool things that comes with cinema 4d is the content browser. So if you hit shift that it'll bring up your content browser, and I have the studio version of cinema 4d, I'm sure most of you do too, but there's all these other folders in there.
Joey Korenman (01:04:16):
And one of them is, uh, visualize. All right. Um, and you've got materials in there and HDR materials. Um, there's also, um, a prime folder, which has a materials, uh, folder in it and HTRI folder. And there's all these HTRI image maps in there. And these are literally spherical maps. So what I did was I just looked around for an image that I thought was close enough to my neighborhood, right. Blue skies, some clouds, trees, green grass, and trees, you know, that kind of stuff. Um, right. So something like this, maybe this might work. So how do you actually take this image in and light your scene with it? Uh, well, you first you can just drag this material right in, and then I'm going to add a sky and I'm going to turn off my background. I don't need it anymore. And I'm going to take this HTRI material and put it on the sky.
Joey Korenman (01:05:10):
Okay. And now if I hit render, you will see that, uh, I've got, I can see my HDR. I image it's very pixelated. It's not lighting anything. If you want it to light this, you have to turn on global illumination. Okay. Global illumination. We'll let your textures light things in your scene. Okay. And so now you can see that this thing is being lit way more from the top. Um, and actually, let me turn these two lights off that I have in my scene. So you can see just the lighting from the scene. Okay, cool. Now it's not very bright lighting in the scene. Um, and so if I want to increase that, what I can do is go to my, uh, global illumination settings and up the gamma. Right. And then that's going to give, that's going to give more influence to the lights from my, um, from my image that we're using on the sky.
Joey Korenman (01:06:10):
And I also don't want to render the sky. I just want to use it to light this. So the other thing you can do is right. Click on sky or control, click, or whatever, cinema, 4d tags, compositing tag, and set this to not be seen by camera, just uncheck that. And now you can still use it to light your scene. Right. And it will still light it perfectly. You just will not actually see it in the render. There you go. Um, so now with all of that done, let's turn on our gribbles. Let's turn those back on. All right. Uh, just in the render, not in the viewer and I'm just going to copy my texture right. Onto the cloner. And I know that the, the texture is not going to line up perfectly with it, but that's okay. Right. Because really we're not supposed to really be able to see those gribbles.
Joey Korenman (01:06:57):
I just want them to be there to break up the image and, and give it some more detail. And now you can see if I turned my background on, especially and do another render. Um, you can see that those gribbles, they do a really good job of adding just a bunch of visual kind of variation to that. UFO's because our texture has so much detail to it. This thing is really starting to look big. Okay. Um, so, uh, a few other things I did, um, this tutorial is already super long, but hopefully you guys are just learning a ton. Um, obviously you would, you would need to do a UV map for the inside texture map it, um, and you know, do all the same things. Right. Um, and just to make this go a little bit faster, what I'm actually going to do is open up my final UFO here.
Joey Korenman (01:07:48):
And I'm going to show you guys some things, um, on this scene. Okay. So this is set up the same way. We've got a sky with an ECRI on it. Um, and we've got, you know, the same kind of deal we've got gribbles and textures. Now here's the big difference. Okay. Um, the big difference is these materials that are on the UFO are not just color materials. Right. We also have diffusion reflection and bump. Okay. And so let me just turn, let me turn off reflection and bump into fusion for a minute. Okay. And let me turn off the, let me turn off all the pieces that I don't need to see right now. Let's turn that off and turn this off and we'll turn the gribbles off and let me just do a quick render of this and you can see it. Okay. Let me zoom in on this.
Joey Korenman (01:08:36):
So if we go like this, right, you'll see, okay. Here's our texture. It's nice and smooth. Right. But I have also created textures for the bump map. Right. And it's literally just a copy of the color channel with a few differences. Um, and I'll show you what those differences are. And also a displacement map, which is identical to the bump map. Um, and so we've got bumped, uh, sorry, not, not displacement diffusion. There we go. Identical to the bump map. Right. And so now when we render this and actually let me turn reflection back on, cause I did have a reflection channel with vanilla in it. Okay. And what this is going to do is it's going to give our surface some variation in lighting too. It's going to give it a little bit of a grungier look. And so let's go back here, right?
Joey Korenman (01:09:31):
And I'll show you, I'll show you how this is going to work on this, on this model. So what I would do is I would go back into Photoshop and I would say, okay, I need a bump map and I want it to match up with our color map. Right. So what I'm going to do is I'm going to take this color base layer and just move it up to the top here. I'm going to copy it. And I'm going to use levels to get as much contrast out of it as I can, and I'm going to de saturate it. Cool. All right. So that's a good high contrast bump map. I'm now going to save this. I'm going to hit shift command S to save as, and I'm going to save this as a UFO bump texture. Okay. And I don't need to save the layers here.
Joey Korenman (01:10:14):
I'm just going to save it as a copy. So now I'll go back into cinema 4d. All right. And before I do that, I want to make sure that I turn that layer off so that it's not covering up our color channel. Okay. So now I'm going to go into my UFO material, which is this material, and I should probably name this. This is UFO. Oh one. And I'm going to add a bump channel, a diffusion channel, and a reflection channel. Let's go into the diffusion channel first. And the texture, uh, is going to be that file I just made. Okay. So that's going to be our UFO bump Photoshop file. And then I'm going to copy that channel and go into bump and paste it. And then I'm going to go into reflection. And I'm going to add for Nell to the texture. I'm going to mix it as a multiplier and set it to 50%, setting it to multiply.
Joey Korenman (01:11:06):
Basically, lets you use this brightness value here to be the overall brightness of your reflection. And then this for Nell only subtract from it. It can't increase it. If you have it set to normal, it's going to totally override this. And I don't want, I don't want it to be totally reflective. Okay. I just want it to be somewhat reflective. And so now you can see there's a lot more, it's almost like a little bit shiny up there, which is pretty cool. It, that, that bump map and the diffusion map, it really gives it a lot of nice kind of contrast and, and detailed surface detail, which can make it look bigger. All right. So, um, the diffusion, you can see how dark it's getting that's because my diffusion is a little strong. So I'm going to turn down the mixed strength here and you can see that our preview, it shows you, it gets a little bit brighter, right?
Joey Korenman (01:11:53):
And then the bump, the strength is 20. I'm going to leave it at that. I also noticed it was very shiny up here. Um, that might be reflection. So let me just turn the reflection down to 20, because that might've actually been the reflection of the clouds in the, in the UFO. Here we go. This is working better. Okay. And you can see, because I used an HDR image on a sky to light this. It really does kind of feel like it sits in the scene. Now it's way too dark. It hasn't been composited. And obviously this part here has no texture on it yet, but you can see how we're, we've built up this object. It looks very detailed with the green bulls and the, the fine texture. And now it's got this nice bump map and you can see the contours kind of show you that this is a huge, massive thing.
Joey Korenman (01:12:40):
Um, and so this is the process I use to get to this okay. Exact same process. Um, and so now let's turn all this stuff back on, turn this on, turn this on, turn our UFO gribbles on. Um, and I'll do a render of this. And while we're waiting, I want to tell you that before I end the tutorial, um, there is going to be a couple other things I'm going to tell you, okay, now I knew I was going to be compositing this in after effects. Um, and I knew that one of the cues that helps you tell that things are big is by having closer parts of that thing look different than further parts of that thing. I hope that made sense. I basically wanted a way to be able to composite the depth of this thing inside of after effects. So what I did was I added a camera and I went to my top, you here.
Joey Korenman (01:13:35):
Right. And what I did was I set the focus distance of my camera to right before the object. Right. See how it's right before that. And then I turned on the rear blur and I set the end, uh, value there. Right? And then you can see it. If I move it, it changes where this plane is here. Right. I set the end to the very back of that UFO. And so then what that, let me do is it, let me create a depth map and I'll show you what that looks like. I'm going to turn off say for a minute. Um, I enabled in my settings, I enabled a depth which is already in there, which is why you don't see it and what this depth pass does. Let me set it to current frame. And let me just set this down to nine 60 by five 40 also, I'll do a quick render.
Joey Korenman (01:14:26):
So the depth pass gives you a black and white image where things that are close and as, as it starts to render, you'll see things that are close are black and things that are far are white. Okay. And you have to set up the depth pass correctly with your camera settings. But now that I've done that you can see, I am. I also have a multipass here, like a render pass where I have, I could not color correct the UFO so that the back of it is different than the front of it. And that's a good way to help sell the size of it. Okay. So this is the render. This is the depth pass. Here's the alpha channel. Right. And all I did animation wise was I just slowly, slowly, and it's going to the animation, doesn't play very quickly because I've got all of these layers turned on, right.
Joey Korenman (01:15:21):
But if I turn all of these things off, there we go. It's still going to be very, very slow. Um, all I'm doing is rotating this very, very slowly. Um, there's, there's not a lot of animation. Um, it's just barely, barely turning. And the idea was to have it just turned very slowly here. I can show you on this one. Right. I didn't want it to turn like this. Right. Cause then it's like, oh my God, that he normous thing is spinning so fast. That doesn't make sense. If it's really a gigantic city sized spaceship, it should be turning like very slowly, very, very slowly. So just a little bit of rotation on there. Um, a depth pass in one last trick because now I just, I noticed it if you notice, right. Let me go to the picture viewer here. If you notice in our render, this stuff is glowing.
Joey Korenman (01:16:11):
We've got lights on there. Right? How cool. Um, so one of the things I did was on those little speakers, uh, that I modeled on these there's a light. All right. So we could do the same thing on ours. Remember we, we modeled the speakers, right. And we put them, uh, let me turn those on. There we go. We've got these speakers here. So what I could do is just take a light, parent it to the speaker, zero it out. And then let's push that. Let's push that light. Let's figure it out. Here we go. Push that light out. And here we go. And we'll turn on a fall off on all of those lights and we don't need a lot. We don't need enormous fall off like that. We need a little bit of fall off. There we go. And then let's make those lights.
Joey Korenman (01:16:58):
I don't know, some kind of alien, teal color. Right. And then let's render that and you can see now you're going to get, um, lighting on each of those little speakers. All right. So that was one thing I did and I probably cranked it up. So it looked a lot brighter. Right. So let's set that to like 300. Um, but then on top of that, I wanted kind of a glow underneath this thing too. So here's a really cool lighting trick you can do with stuff like this. I'm going to make a spline, like a circle spline, put it on the Z plane and let's move down so we can actually see it. Here we go. And I'm going to scale it. So it's about the size of the inside, right? The inside of the, uh, of the little speaker cone here, then I'm going to add an area light and I'm going to call this circle light.
Joey Korenman (01:17:48):
And what I'm going to do is go to details and where it says area shape, switch that from rectangle to object spline and drag your spline in there. That will let that spline actually be a light emitting object. So now I can change these settings and I could, you know, maybe pick similar kind of alien color and turn the brightness up and I can turn fall off on. Right. And set that to like a much smaller value. Right. And now if we render that, you're going to see that the under the underside of this is going to have light hitting it too. Okay. So now we've got light here on the speakers and we've also got light underneath it. And the light underneath isn't bright enough and you're seeing some noise, which means there's not enough samples. So I'm gonna have to up these, uh, these samples to, um, and probably turn this way up so we can actually see it.
Joey Korenman (01:18:47):
Um, and so that's what I did. I used, uh, a circle spline underneath, and I also had lights on each of these little speakers. Um, and there you go. And now you can start to get that diffused school. And what would be really slick is if you duplicated this whole lighting setup and you took that circle spline, and you made it even bigger, right. And you lined it up, remember, we've got this cool. Let me switch my display for a minute to quick shading. Remember we've got this cool little groove that we modeled in there. Well, if you are really, really precise, you could put, you could put that circle spline in there, and it's going to be tricky to get it just right. But if you can just thread the needle and get that to actually go inside there. All right. And now let's, uh, let's take, make sure the setup circle light one, let's call this inner light and it's looking at circle one.
Joey Korenman (01:19:47):
Um, and let's take, let's turn the fall off, off for a minute. Alright. And now let's do a quick render this and you can see that now inside there, you've got this glowing light because you've got that circle spline up in there. So using the Sur, using the spline to light pieces of your model is another cool way to, to kind of get that UFO glowing look. All right. And this is starting to look pretty sweet. All right. Woo. That was a long one. I'm going to have to edit this thing. So what did we go over? Let's recap real quick. We went over getting referenced materials and how to utilize it. In cinema 4d. We went over a lot of modeling tools. We talked about using the body paint tools to get a good UV map, going back and forth with Photoshop to texture.
Joey Korenman (01:20:37):
We talked about setting up the depth pass, setting up image based lighting and talking about a little bit of rendering using the multi passes to get a depth pass. Um, just so you guys know, I rendered, uh, let me show you my render settings. I rendered this 1920 by 10 80. I know I changed it in the middle of the demo, but it was 1920 by 10 80, um, 24 frames. A second. I did a, an open EXR 32 bit file with an alpha channel. And then the multipass file was also open the XR 32 bits. I set it to be a multi-layer file. So I didn't have a million files. I just had one multi-layered set of files, um, turned on multipass for the depth past my anti-aliasing was set to best. So I had good reflections and all of that stuff. Um, and that was basically it.
Joey Korenman (01:21:29):
So, uh, my God, that was, that was an absolute brain dump right there. Um, I hope you guys learned a lot and this is just part one. Part two is where we're going to go into after effects. Talk about compositing, this whole thing. So I want to thank you guys for sticking with this. I want to thank premium beats, uh, for asking me to make this video. And just so you guys know all of the music and sound effects used in the demo were, were all straight from premium beat. I did not use any other outside sources. And if you guys like this, check out my site, school, motion.com. Thank you guys. I'll see you on part two. I want to thank you guys for watching. I hope you learned a lot and please check out premium beat.com. If he needs, thought music or sound effects, super affordable, but super high quality. I can't recommend them enough. And if you like tutorials like this, please check out my site. School motion.com, where there's a lot more content, just like this. Thank you guys so much. I'll see you next time.
ENROLL NOW!
Acidbite ➔
50% off everything

ActionVFX ➔
30% off all plans and credit packs - starts 11/26

Adobe ➔
50% off all apps and plans through 11/29

aescripts ➔
25% off everything through 12/6
Affinity ➔
50% off all products

Battleaxe ➔
30% off from 11/29-12/7
Boom Library ➔
30% off Boom One, their 48,000+ file audio library
BorisFX ➔
25% off everything, 11/25-12/1

Cavalry ➔
33% off pro subscriptions (11/29 - 12/4)

FXFactory ➔
25% off with code BLACKFRIDAY until 12/3

Goodboyninja ➔
20% off everything

Happy Editing ➔
50% off with code BLACKFRIDAY

Huion ➔
Up to 50% off affordable, high-quality pen display tablets

Insydium ➔
50% off through 12/4
JangaFX ➔
30% off an indie annual license
Kitbash 3D ➔
$200 off Cargo Pro, their entire library
Knights of the Editing Table ➔
Up to 20% off Premiere Pro Extensions
Maxon ➔
25% off Maxon One, ZBrush, & Redshift - Annual Subscriptions (11/29 - 12/8)
Mode Designs ➔
Deals on premium keyboards and accessories
Motion Array ➔
10% off the Everything plan
Motion Hatch ➔
Perfect Your Pricing Toolkit - 50% off (11/29 - 12/2)

MotionVFX ➔
30% off Design/CineStudio, and PPro Resolve packs with code: BW30

Rocket Lasso ➔
50% off all plug-ins (11/29 - 12/2)

Rokoko ➔
45% off the indie creator bundle with code: RKK_SchoolOfMotion (revenue must be under $100K a year)

Shapefest ➔
80% off a Shapefest Pro annual subscription for life (11/29 - 12/2)

The Pixel Lab ➔
30% off everything
Toolfarm ➔
Various plugins and tools on sale

True Grit Texture ➔
50-70% off (starts Wednesday, runs for about a week)

Vincent Schwenk ➔
50% discount with code RENDERSALE

Wacom ➔
Up to $120 off new tablets + deals on refurbished items


Create Stunning Visual Effects in AE
Learn compositing, tracking, keying, and rotoscoping in After Effects. Enroll in All-Access to unlock VFX for Motion and 50+ other courses.