
All-Access Pass
Unlimited access to 50+ courses, unlimited critique, live events, and 24/7 community. Join School of Motion All-Access today.

Learn some advanced tricks and approaches to difficult shape animations with After Effects wizard Sander van Dijk.
Sander van Dijk has worked with some of the top studios and brands in the world. His unique and supremely clever approaches to using After Effects has earned him a reputation as an incredible animator and problem solver. He has also helped create some incredible tools for motion designers, like Ray Dynamic Color. In short, he's pretty good at this stuff.

In this tutorial Sander, who also teaches Advanced Motion Methods, will take you through the process and workflow he used to animate a very tricky piece of geometry, the Penrose Triangle. Animating "impossible" shapes like this one can leave you wondering... where do I start?
After this tutorial, you'll know.
Advanced Animation Approaches in After Effects
Want to learn even more? Check out Part 2 of this tutorial where Sander shows you how he completed the animation of this element from the Blend Manifesto video.
{{lead-magnet}}
What are you going to learn in this tutorial?
This lesson is a peek into the way Sander's brain works. You'll pick up a dozen or more workflow tips, and hopefully gain a deeper understanding of the way he approaches complex animation tasks in After Effects. Put on your best learning pants.
HOW TO APPROACH BUILDING ANIMATABLE SHAPES
One aspect of an animator's job that doesn't get talked about much is the asset preparation phase. Sander talks about how to create (or modify) assets so that you can use them to animate.
ILLUSTRATOR TO AFTER EFFECTS WORKFLOWS
Now that you've got your artwork, how do you transfer it into After Effects with the correct position, anchor point, and other properties?
A DOZEN OR MORE TIPS FOR WORKING FASTER
One of Sander's superpowers is working extremely efficiently in After Effects. By sitting over his shoulder and watching him work, you'll pick up many time-saving tricks.
ANIMATION RETIMING TECHNIQUES
There are many ways to animate a shape, but in the end you still want lots of control over things like timing and spacing. Sander shows you how to maintain control over complex animation setups.
Learn Advanced After Effects Techniques from Sander
If you're ready to go to the next level with your After Effects and animation skills, check out Sander's class Advanced Motion Methods. It will transform the way you work and give you a set of motion design superpowers that you'll use for the rest of your career.
Our team is standing by to answer any questions you have about this course or any other class in our curriculum. Please let us know if we can help you in any way!
-----------------------------------------------------------------------------------------------------------
Tutorial Full Transcript Below 👇:
Sander van Dijk (00:00): Hello, my name is Sander van Dijk. And in this video, I'm going to teach you how you can make this. It's actually one of the elements that was used in a blend manifesto animation. I'll be sharing how I approach this animation and show you some handy techniques that you can use in other projects as well After effects is a very deep tool and it can take years to master. But if you're looking for a way to get to the next level as an animator and check out advanced motion methods, where I teach you exactly how I've used after effects on projects, for some of the biggest brands in the world, also, you can download the project files I'm using in this video to follow along or practice. After you're done, watching details are in the description. Now let's get started.
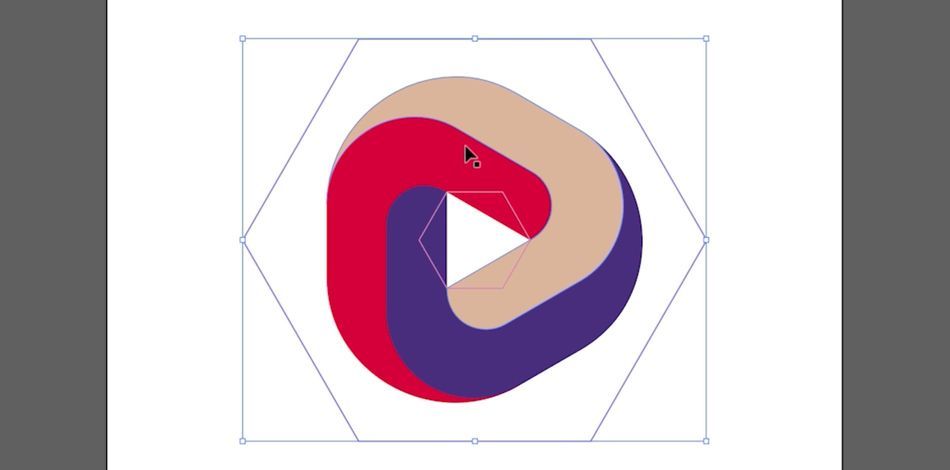
Sander van Dijk (00:48): So first of all, how do we get a shape like that? It's actually really difficult to draw. So luckily I've actually included the file where it's already done. So you could just grab that if you don't want to draw this thing on your own, I would like to challenge you to try, because it's actually really hard if you want to, uh, hint, uh, what we, what I can do is I could just show you how to do this with a square, because it's a lot easier to do that with a shape like that. So just draw a square, hit command C command after paste it in the same place. And then let's just create lines for now.
Sander van Dijk (01:22): So you have lions here and then the outside shape, uh, let's make some around corners for those. And then what you can do is you can just, you know, move these shapes like this, and you can start to see the effect already occurring, right? Duplicate that once more like this. And now you could see this shape starts to form, you know, you have two options. You could either go completely to the edge or you could do like halfway. So there's lots of different ways to go about it or to recreate the shape. So if you end up doing this tutorial, try to do it with a different shape, uh, just to see, uh, what new challenges that brings. And maybe you can eventually share that with the community as well, so that everyone can learn from each other's creation.
Sander van Dijk (02:10): Alright, now let's get this into after effects. So there's a couple ways you can bring things into after effects. One of the easiest ways is to just grab a shape like this, copy it, go to after effects, go to your pen tool, click anywhere in the field and just hit paste. And then that will, that way it will come in. Now, there are some challenges with like, as far as where the anchor point is. So if I just copied this shape and I paste it into after effects like this, we showed a title, same thing right now, it's in the center over here. But then when I paste, uh, another object like this one, that's obviously not going to line up. So, uh, you know, it kind of does whatever with the anchor points. So that's why I actually have this shape that you see here around it, because if you use that shape as well, so you click here and you click on that.
Sander van Dijk (02:59): So now you have two objects selected. You copy that, go to after effects, go to pencil, hit paste. Now you could see that luckily actually the path that we don't want actually came in as a mask this time and the path that we do want ended up being the path. So in this case, I could just delete the mask, but this shape will actually be at the right position in my aftereffects calm. So I could do the same with another shape, just make sure I constantly select this larger shape. That's on the outside of that shape students again, paste. And now you can see it actually lines up, uh, really well. And the reason for that is because if you always select a shape, that's like outside of your drawings, um, after facts will always make the center based on the largest object in your scene.
Sander van Dijk (03:51): So this is kind of like a hack to figure out how you can get around it. So yeah, now that's kind of the poor man's way because it's a lot of work and it's like crappy, doesn't work half at a time. So you have to copy and paste a lot of stuff. So if you're, if you're smart, you actually picked up overlord a game, Adam Pluff. So this way, what I can do is I could select any shape and just push it to after effects like this. And I believe it actually pushes it in the right place as well. So you, so you don't have to do that whole like selecting of another shape, uh, on the outside, that way you could just send stuff to after effects.
Sander van Dijk (04:34): So let's select all of this and then push those staff effects at are a couple of different options here, because right now all those shapes came in to the same shape layer. Now you can obviously use Zach Lovett script, explode, shape layers, which has incredible explode and boom, you have all your elements separately now. Uh, I believe, uh, overlord, might've this as well. If you click this little explosion button that does the same trick. So yeah, either way, I'm just, again, I'm just showing you all the different options that you can go about bringing this into after effects. Not our option you have is actually taken the illustrator file throwing in after effects, footage, throwing it in here, right? Click create an uncreate, create shapes from factor layer. When you do that, your illustrator layer disappears. And then you have this shape layer here that has all these different groups.
Sander van Dijk (05:34): So you can go from there as well. It really depends on the, on the situation you're in what technique is is best for you. So, okay. Let's actually copy everything over with overlord. Let's push this over. Let's call original one. So first of all, it's a bit small. So let's create a knowledge layer here, call that zoom, link, everything to it, and then just scale this up 400 pixels. Yeah, that seems about right. So in order to create this effect, what I'm going to do is I need a duplicate of this shape. So let's just duplicate this and then colored brown. And then now shape is brown. So think about this shape over here, which is slightly different colored brown. Let's actually correct that. Let's think about this shape here, passing on its color studies shape. So that would mean that the path of this one, um, shoot, like reduce like this.
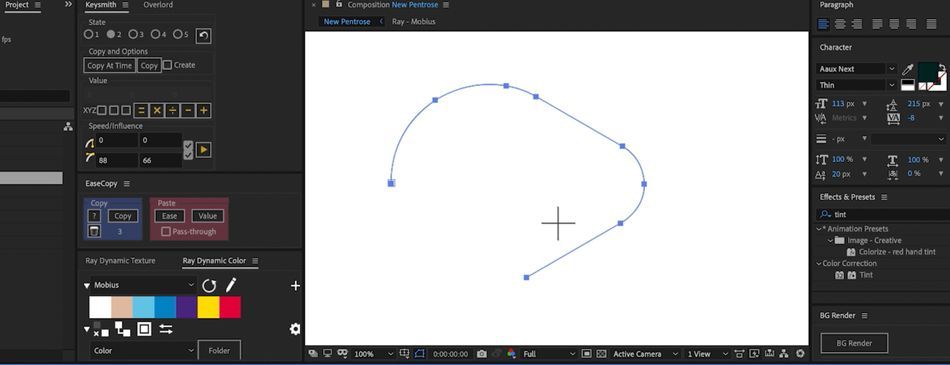
Sander van Dijk (06:35): It should like disappear. And then this path over here, the new one shoot appear. So it should come from here and start filling up like this. So you could see how those paths are moving. So essentially I want to reveal this shape. Let's focus on the line zone. I want to reveal the shape from this edge over here. So the way I do that is let's undo all that stuff. And let's focus on this by Oregon. Uh, what I do is first of all, this is a shape I want to end up with. So I'm just going to search for path here, set a key frame and then use option shift, right? Arrow key to push that key frame 10 frames into the future. So let's then, uh, focus on what the shape should look like at this time. So at this time, what I want to do is take all these points and actually move them.
Sander van Dijk (07:30): Sometimes it's multiple points and just actually move them all the way to this. And, and what really helps here is that you could see that these points match, like if there were more points along this line than there are on this line, it could potentially be a problem because then you get some weird shapes, but in general, I'm trying to like keep everything pretty parallel or symmetric so that it's not doing any, uh, weird things. So here around this corner, I might have to travel to this dot because you could see that the arc starts here before it was straight. And then here, it's straight and then the arc starts here. So I don't want to go here because that's going to give me some weird artifacts. What I want to do is I want to respect that curve and just go here. And then for this point, I might have to end up somewhere over here.
Sander van Dijk (08:25): So you're trying to find like the equivalent point on the opposite side of the line so that when it all starts to move, it moves in one straight shot for versus like, if, if this was over here, which you could see as that, you know, it starts to form this curve here, but it doesn't really, it doesn't really work properly. So that's how you do that. And then for situations like this here, when points come really close together and they had some curvature to it, make sure those tangents are gone. So I'm just going to click on them once or does that work? No, it doesn't. That's an illustrator. And after effects, you just have to like drag them to the point. And then that way you could see that it makes a way better connection, error. It looks actually like the shape is scaling down into that other point.
Sander van Dijk (09:13): So that's what you, that's how you approach corners like that. And then for things like this, you can either grab the line and like push it halfway there and then sort of use these tangents, try and match this shape. And you'll never get a hundred percent. Right. But I mean, unless you could read the values of the other tangents and really like, make everything perfect, but I don't think we can access that data. So yeah, roughly eyeballing, it works really well. So another thing I like to do sometimes when I'm doing this, that's actually pretty good. Don't seem much line left. But another thing I like to do sometimes is that you see the zoom layer here, right? So this is scaled up like 400%. Sometimes I just do times two on the composition settings. So this will be an eight K clip. And then I also do times w times two on the zoom layer.
Sander van Dijk (10:11): So then everything becomes like twice the size and you'll have a lot more detail to work with. So make sure you're on full settings here because now you can see a lot more details and really, you know, fine tune this. And then once you're, you know, once you're happy with that, then you can scale this thing back. And then you'll probably end up with a much better picture because it's kind of like how you sometimes film in 4k and then you scale it down to 10 80 and it looks a lot better because you had a lot more resolution to begin with. So that's a trick that I always use there. Just get as much resolution as you can. And then you can always scale it down because if you build this whole thing and then you realize I got to scale it up and when you scale it up easy, all these like little details that you didn't see when it was so, so, so small, then, you know, you have to redo it potentially. So, and I don't know, looking at it, I think actually animated the wrong way. So it should have actually gone from, you know, this ad should have actually gone to the inside versus the inside edge of go into the outside. So, you know, I guess that's two ways to go about it. You can also make it rotate the other way, if you want to. And that's, I guess what you, what you can do, uh, as well,
Sander van Dijk (11:26): Actually, this allows me to show you another way to actually do this, because sometimes it can be very tedious to go in and like change the paths here in after facts. I mean, you don't really have a lot of control. So sometimes illustrator can be more comfortable to, to work with on some of these details. These points actually snapped together. So that makes like a perfect connection, right? So now you could see that this line is a lot cleaner here in the middle, then we could ever get in and after effects because after effects, those points just don't snap together. It's still a little hard around the curves, but you know, in illustrator you have a lot more zooming capacity than in after-effects in order to get those tangents to show up in the right place. So another thing you could do is even though these are two separate key frames, you could design these two key frames in illustrator.
Sander van Dijk (12:18): So that's what extra would've done right here. You could see it on and off layer on layer has the original shape and the off layer has a shape that I've actually reduced down the same technique as I just showed you. Uh, it still has a little bit of artifacts here and there to use, but I think it's a much cleaner, thinner line than I could ever get an after fact. So for the, in that case, what I can do get rid of these key frames and then just go to illustrator, let's grab the Onshape here. This one, I'm just going to push that to after facts, but make sure that you have this path selected because now you saw that overlord actually pushed it on this path versus creating a new layer. So, so none of that came in, let's create a key frame here and push that key frame, 10 frames into the future with options shift, right, arrow key.
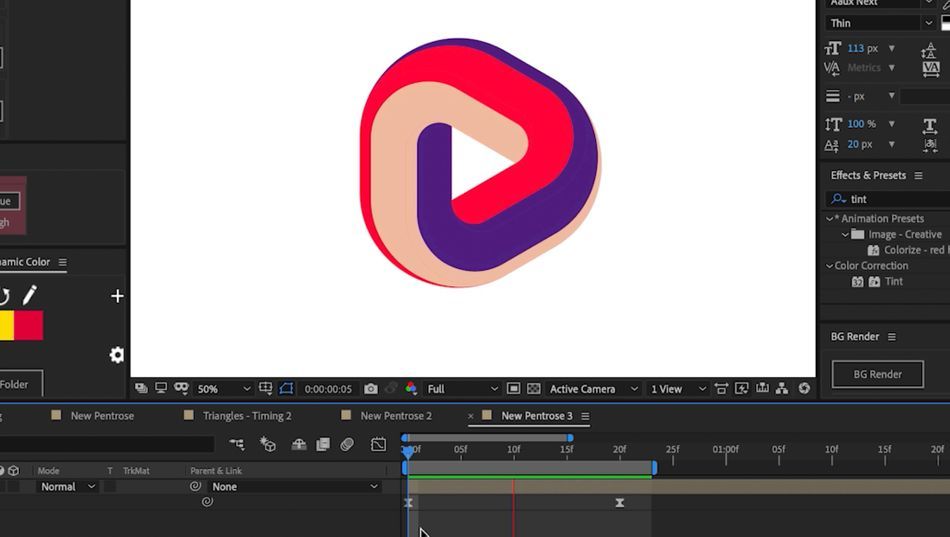
Sander van Dijk (13:11): And now here's the cool thing. I can actually still select this path and then select a whole different shape here in illustrator and push that over to that same layer. It creates a new key frame here. And if your paths are roughly the same point, it actually knows how to interpret between those two, which is really cool. That way you could actually design your key frames and illustrator, which is much more capable program than after effects. Sometimes as far as drawing goes and you can just copy and paste them to after effects. Cool. So that's great. So now we have our animation here and then what we can do now is, uh, let's just get rid of the older shapes because dish is the main shape that has the, uh, animation on it. I'm just going to call it side one and it's going to duplicate it rotate 120 degrees like it just did and colored red, then duplicate it, rotate it to 40 degrees this time and color it purple.
Sander van Dijk (14:10): And then here you get the animation. Now you could see that there's something wrong here. So what we need is we need a backdrop with different colors. So I'm just going to duplicate all these. So I have side four, five, and six, and then, uh, reveal the key frames for this and just push these key frames all the way to the start like this. Now nothing's happening because they are the same color. So it's just revealing the same color. So let's so yeah, you can either shift the colors or rotate the shapes 120 degrees. So right now I could just add 120 to this at a 20 to that and add 120 days. And then that way we get our effect. Great. So there's a couple ways you can animate this. Of course you can apply easing here, or you can take this composition, uh, moving into a new comp and then apply key frames there. So say we wanted to do this, you know, it's fine to apply easing here, like this F nine, uh, so that it looks smoother. But if you were to stack some of these, uh, facts, so if I create more objects like this, let's move them over. Uh, let's rotate them again, plus 120 plus 120 plus 120. So now you actually have a double, um, animation.
Sander van Dijk (15:44): Now, if you leave all these keys, linear, what you could do is you noted this goes to frame 20. So you could take this composition, throw it in a different one, uh, apply Tyra map, go to frame 20 over here, set a key frame. And then instead of, uh, applying easing to these key frames inside, what you could do is, you know, do it here. So let's apply some easing and now it creates a double emotion. You see it goes through a two cycles. So that's cool. All right. So that's how you create this Petros triangle, infinite shape and animated. There are many shapes that you can use this trick with. So I'm curious what version you'll come up with. If you happen to post this on Instagram and please hashtag it with advanced motion methods. So I can check it out. The download link with the project files are in the description of this video. So check that out to get started. And if you didn't get enough, and you're curious how to continue to sanitation into the Mobius strip, then check out this video part two and hit the subscribe button on this channel. If you want more tips from other instructors as well. And if you're ready to deep dive into aftereffects workflows, that some of the best artists in the industry are using, then check out advanced motion methods from school of motion. Thanks for watching.
ENROLL NOW!
Acidbite ➔
50% off everything

ActionVFX ➔
30% off all plans and credit packs - starts 11/26

Adobe ➔
50% off all apps and plans through 11/29

aescripts ➔
25% off everything through 12/6
Affinity ➔
50% off all products

Battleaxe ➔
30% off from 11/29-12/7
Boom Library ➔
30% off Boom One, their 48,000+ file audio library
BorisFX ➔
25% off everything, 11/25-12/1

Cavalry ➔
33% off pro subscriptions (11/29 - 12/4)

FXFactory ➔
25% off with code BLACKFRIDAY until 12/3

Goodboyninja ➔
20% off everything

Happy Editing ➔
50% off with code BLACKFRIDAY

Huion ➔
Up to 50% off affordable, high-quality pen display tablets

Insydium ➔
50% off through 12/4
JangaFX ➔
30% off an indie annual license
Kitbash 3D ➔
$200 off Cargo Pro, their entire library
Knights of the Editing Table ➔
Up to 20% off Premiere Pro Extensions
Maxon ➔
25% off Maxon One, ZBrush, & Redshift - Annual Subscriptions (11/29 - 12/8)
Mode Designs ➔
Deals on premium keyboards and accessories
Motion Array ➔
10% off the Everything plan
Motion Hatch ➔
Perfect Your Pricing Toolkit - 50% off (11/29 - 12/2)

MotionVFX ➔
30% off Design/CineStudio, and PPro Resolve packs with code: BW30

Rocket Lasso ➔
50% off all plug-ins (11/29 - 12/2)

Rokoko ➔
45% off the indie creator bundle with code: RKK_SchoolOfMotion (revenue must be under $100K a year)

Shapefest ➔
80% off a Shapefest Pro annual subscription for life (11/29 - 12/2)

The Pixel Lab ➔
30% off everything
Toolfarm ➔
Various plugins and tools on sale

True Grit Texture ➔
50-70% off (starts Wednesday, runs for about a week)

Vincent Schwenk ➔
50% discount with code RENDERSALE

Wacom ➔
Up to $120 off new tablets + deals on refurbished items


All-Access Pass
Unlimited access to 50+ courses, unlimited critique, live events, and 24/7 community. Join School of Motion All-Access today.