
All-Access Pass
Unlimited access to 50+ courses, unlimited critique, live events, and 24/7 community. Join School of Motion All-Access today.

Learn to create life-like movements with the animation principle of follow-through in After Effects.
Animators are often trying to mimic the way things move in real life, using the principles of animation to recreate what they see with their eyes. Learning this skill is the key to creating beautiful movement regardless of the software or medium you're working with. Follow-through, or overlapping action, is a principle that can add loads of visual interest and realism to your work once you grasp it.
In this tutorial, Joey, who teaches Animation Bootcamp and our free course The Path to MoGraph, shows you one way you can apply follow-through to your After Effects work. This trick is incredibly handy because it doesn't rely on having artwork that was divided up into layers for animation.
Follow us. Follow us to follow-through.
Animation 101: Follow-Through in After Effects
{{lead-magnet}}
What are you going to learn in this tutorial?
In this lesson, you'll learn what animators mean by the term "follow-through," and then you'll see exactly how to apply it in After Effects. This is just one of the many ways to use this principle, but it will unlock many new creative ideas once you grasp the basic concept.
WHAT IS FOLLOW-THROUGH?
Boring name, amazing animation principle. Find out what all of the hype is about.
WHY SHOULD YOU USE IT IN YOUR WORK?
If you're not using follow-through in your work yet, you'll find out just how big a difference it can make.
USING PUPPET PINS TO SET UP A RIG
For this particular technique, the first step is to set up a "spine" of puppet pins in your artwork. While a bit tedious, it gives you a ton of control and doesn't require you to prep your artwork.
USING DUIK BONES TO CREATE A JOINT CHAIN
Just Duik. Creating a puppet-pin joint chain without Duik is possible, but kind of a pain. You'll learn how to use this free plugin to save you time. And time is money.
OVERLAPPING THE ACTION
Once your animation rig is set up, it's time to create overlapping movement! This is the easy (and fun) part of the job. Play around with this!

Don't just be "Good at After Effects." Learn to Animate.
There are plenty of courses out there that can teach you how After Effects works so that you can be "good at the software." But the hard truth is that the software is just the tool... it doesn't actually make great work for you. If you're not happy with your work, it's time to learn the fundamentals of animation. Anticipation, Overshoots, Follow-Through, Squash & Stretch... learn all of these principals and more in Animation Bootcamp, the #1 course in the world for learning to animate well in After Effects.
Our team is standing by to answer any questions you have about this course or any other class in our curriculum. Please let us know if we can help you in any way!
-----------------------------------------------------------------------------------------------------------------------------------
Tutorial Full Transcript Below 👇:
Joey Korenman (00:00): Howdy. I'm Joey Korenman. And in this short video, I'm going to teach you a really easy way to add life to your animation by using follow through in, after fast, This technique is an example of what we go over in our animation bootcamp class at school of motion. So make sure to check that out. If you like what you learned today, also you can download the project files I'm using in this video to follow along or to practice this technique. After you're done, watching details are in the description. What is follow through well follow through also called overlapping action is the idea that when an object moves different parts of that object move at different times, here are some examples. This project from Bee Grandinetti has followed through in a few places like in this moment when the girl jumps back and her limbs and hair move at separate times. And during the type reveal at the end in this piece that Andrew Vucko did for Google, the overlapping action is a bit more subtle, but definitely add some visual interest.
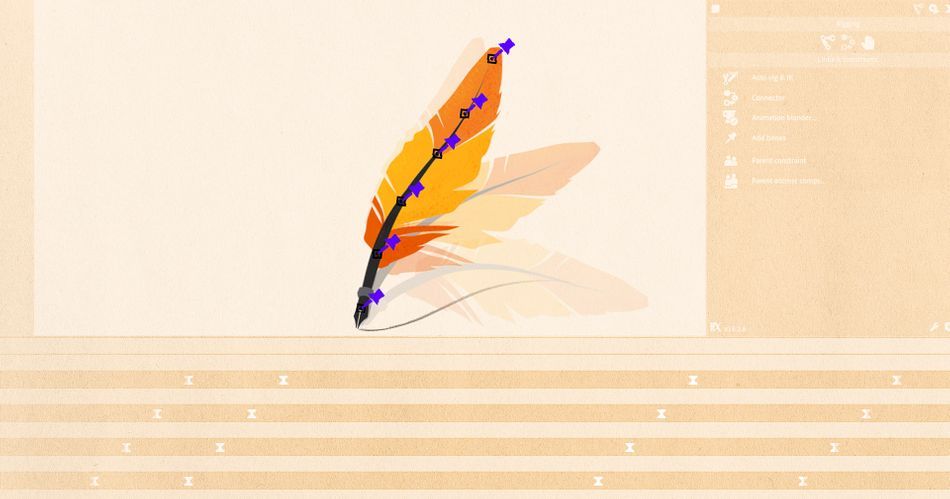
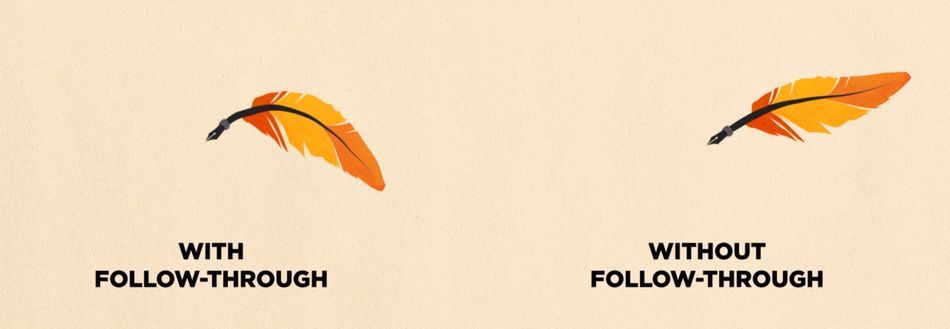
Joey Korenman (01:07): So here we have a really simple logo reveal and we've already animated most of it. And what I want you to notice is how stiff that feather feels feathers are soft objects. And so if it really was rotating up like this at the end, it wouldn't feel like a stiff board. Now, if you notice this feather is just one layer that came in from Photoshop, if it was on multiple layers, maybe we could sort of parent them together and rotate them a little bit manually to make it feel like it's bending. But what do we do when we have artwork? That's all on one layer. So here's our goal. When the feather finishes writing on this line and starts to rotate up, I want it to bend naturally like a feather using follow-through AKA overlapping action. There are two steps to this process. And the first step is to use puppet pins, which can be found up here.
Joey Korenman (01:55): The puppet pin tool works by letting us place pins inside of artwork like this. And then we can manipulate those pins to deform the artwork any way we want. Now I'm going to undo that because I need to set this up a very specific way. What I want to do is place pins along the spine of the feather like this. So I'm going to put one down towards the bottom, and then I'm going to put, I don't know, maybe three or four more up along the length of it. And then one at the very tip like this. Now, if we look at the timeline, you'll see that there have been positioned key frames set for each puppet pin. As I set them down into the feather. And what this means is I can now select my puppet effect and I can move these pins around and actually hand animate the deformation of this feather, the problem with doing it this way. And it may already be obvious to you is that if I'm not careful, I could stretch the artwork out and doing this by hand is going to be really, really tedious and not very efficient or easy to do. So what we need is a way of keeping the distance between these pins constant so that we don't accidentally stretch out our artwork.
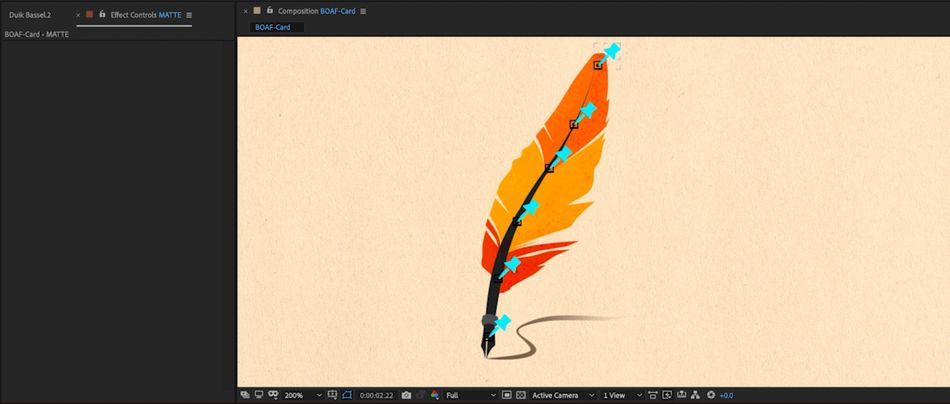
Joey Korenman (03:01): So to do that, we're going to create bones, something that we can rig up to make this really easy. And you can do this manually in after effects. So I don't recommend it because there's a lot of gotchas. We are going to use a free tool called duet Basel. And the link to that can be found in the description. Now, duke is primarily a rigging tool and that is actually what we're doing here. So watch closely, and then I'll explain exactly what's going on once we're ready. So what I'm going to do is select my layer and I'm going to go ahead and select all of these puppet pins in my timeline. You can see they're all selected here. Next thing you want to do is make sure that in my duke Basel window, I have the rigging tools open, and then I'm going to move over and select the links and constraints.
Joey Korenman (03:42): Then I'm going to click, add bones, wonderful bones have been added and they look like puppet pins. And they're a little bit hard to see. So I'm just going to quickly change the color of each one to something a little more high contrast. So duke has created a bunch of guide layers here. And if you don't know what a guide layer is, any layer in your timeline, you can right click or control, click and activate this to make it a guide layer guide layers do not render, but they can be useful visual guides while you're building your animation. So if I move any of these guide, layers around, you'll see that. Now my artwork deforms, it follows that pin. The bone is now tied to it. And it did this automatically in a few seconds, which is why I recommend you use the free tool rather than set this up manually.
Joey Korenman (04:24): The next thing we want to do is set up a joint chain for this feather. And if you've never seen a joint chain set up before, well, it's really, really easy. And in a minute, you're going to understand why it's so powerful. I'm going to start from the top. This is puppet pin six, and I'm going to parent six to five, five to four, four to three, three to two and two to one just like that. Now, why did I do that? Well, if I take puppet pin one now, and I move it around, the entire feather moves. If I rotate puppet pin one, the entire feather rotates, but watch this. If I rotate the second puppet pin, the feather bends. If I rotate the third puppet pin, the feather bends from further up. And so you can see how now we have this rotation control that actually bends the feather, but it maintains the length of it automatically pretty slick.
Joey Korenman (05:11): Now, one thing that I do want to do is take puppet pin one and parent it to the artwork itself. The reason for this is that the artwork already has rotation key frames on it. You can see that as it finishes drawing, it rotates up. So how do we achieve follow through? Well, think about where this feather should be bending from. It should probably be bending from about this pin, or maybe from this pin. We can sort of see what's going on here. But if we look at these rotation, key frames in the graph editor shift F three, you can see that in addition to rotating, there's also some extra animation principles going on here. There's a little bit of an anticipation right there where it sort of dips down before it rotates up. And then there's an overshoot at the end, by the way, these are things we talk about in animation bootcamp.
Joey Korenman (05:59): If you want to dive deeper into animation, check that class out. So I want this same rotation movement to sort of percolate its way up the feather. I'm not sure that's the right word percolate, but I'm gonna stick with it. So here's what we're going to do. We are going to go into our timeline and we're going to copy these key frames and I want to pace them starting with puppet pin two, all the way to puppet pin five. Now, why am I not doing puppet pin six? Well, because rotating this pin will not do anything and I'm not quite sure I want the feather to actually be bending this far down the chain. So I'm just going to hit paste. Watch what happens. Okay. Now it's obviously a little bit wonky at the beginning here, but don't worry. We can fix that, but I do want you to notice what's happening already.
Joey Korenman (06:43): The feather no longer looks stiff like a board. Now there's not actually any overlap happening yet. We're going to set that up in a minute, but first let's go ahead and fix the beginning of this. So if we look at the key frames here, we can see that what's going on is at the beginning. These rotation values are not zero and they should be. So I'm just going to go ahead and zero these out. All right. So I have zero that out, but now there's way too much rotation happening here. I'm going to select all of these key frames at the same time and go back into my graph editor. And now I can see exactly what's going on. So for most of the feather, I want this first move to be a lot smaller. So I have a few options here. I can just grab all of these key frames at the same time and move them down and you can see what's going on there.
Joey Korenman (07:24): But another thing I could do is turn on the transform controls down here, and then I could select all of the key frames I could hold command and set my anchor point to be the very last key frame. And then I can hold command and adjust the scale of this box proportionally, which will keep the timing and the overall vibe of this animation. But it will scale it down proportionally while leaving the start and end values the same. This is a very useful tool. We use a lot in animation bootcamp. Cool. So now that first move, it's still a little bit harsh, but we're going to work on it a little bit more, but you can notice that we are starting to get a softer feeling on the feather. Now, the next thing we want to do is we want to actually have parts of this feather move at different times.
Joey Korenman (08:10): We want overlapping action, and this is actually pretty easy to set up. So if we look at the rotation, key frames, starting with the feather and then going up the bone chain, you'll see, they're all lined up. Exactly what we want to do is stagger them. And we're going to start by just staggering them one frame each. So I'm going to move these over one frame and these over one frame, and I'm just going to stagger all of the key frames with that done. There's already an obvious change when this feather kind of dips down before it pops back up, while it's doing its anticipation, you almost feel a whipping movement to it, right? The tip of it moves a little bit later than the rest of it. Now that this is set up, I can actually turn off the visibility of these bones by the way.
Joey Korenman (08:49): So that's feeling pretty good, but what if we wanted that feather to feel even a little bit softer? Well, an easy way to do that is to just increase the amount of overlap. So each key frame was staggered by one frame from the next set of key frames. Why don't we stagger them two frames, and now it's even softer and more obvious what the feather is doing, and I'm actually digging that. But just to show you that we can use that transform box to really dial this in even better. I'm going to select all the key frames. Again, only on the bones, go into my graph editor. I can grab this set of key frames here and I can just scoot those down a little bit. So there's a little bit more of an overshoot at the end there. If you look at the tip of the feather whips up like that. Well, that is quite lovely. Isn't it? That's it pretty simple, huh? Hit subscribe. If you want more tips like this one and make sure to check out the description so you can download the project files from this video. If you want to learn more about using the principles of animation inside of after effects with the help of industry pros, check out animation bootcamp from school of motion. Thanks for watching.
ENROLL NOW!
Acidbite ➔
50% off everything

ActionVFX ➔
30% off all plans and credit packs - starts 11/26

Adobe ➔
50% off all apps and plans through 11/29

aescripts ➔
25% off everything through 12/6
Affinity ➔
50% off all products

Battleaxe ➔
30% off from 11/29-12/7
Boom Library ➔
30% off Boom One, their 48,000+ file audio library
BorisFX ➔
25% off everything, 11/25-12/1

Cavalry ➔
33% off pro subscriptions (11/29 - 12/4)

FXFactory ➔
25% off with code BLACKFRIDAY until 12/3

Goodboyninja ➔
20% off everything

Happy Editing ➔
50% off with code BLACKFRIDAY

Huion ➔
Up to 50% off affordable, high-quality pen display tablets

Insydium ➔
50% off through 12/4
JangaFX ➔
30% off an indie annual license
Kitbash 3D ➔
$200 off Cargo Pro, their entire library
Knights of the Editing Table ➔
Up to 20% off Premiere Pro Extensions
Maxon ➔
25% off Maxon One, ZBrush, & Redshift - Annual Subscriptions (11/29 - 12/8)
Mode Designs ➔
Deals on premium keyboards and accessories
Motion Array ➔
10% off the Everything plan
Motion Hatch ➔
Perfect Your Pricing Toolkit - 50% off (11/29 - 12/2)

MotionVFX ➔
30% off Design/CineStudio, and PPro Resolve packs with code: BW30

Rocket Lasso ➔
50% off all plug-ins (11/29 - 12/2)

Rokoko ➔
45% off the indie creator bundle with code: RKK_SchoolOfMotion (revenue must be under $100K a year)

Shapefest ➔
80% off a Shapefest Pro annual subscription for life (11/29 - 12/2)

The Pixel Lab ➔
30% off everything
Toolfarm ➔
Various plugins and tools on sale

True Grit Texture ➔
50-70% off (starts Wednesday, runs for about a week)

Vincent Schwenk ➔
50% discount with code RENDERSALE

Wacom ➔
Up to $120 off new tablets + deals on refurbished items


All-Access Pass
Unlimited access to 50+ courses, unlimited critique, live events, and 24/7 community. Join School of Motion All-Access today.