Learn After Effects the Right Way
Master the After Effects interface and build a real animation skillset. Enroll in All-Access to unlock AE Kickstart and 50+ other courses.

In this tutorial we’ll get you up to speed with everything you need to know to get started with cameras in After Effects.
You may have heard of 2D or 3D, but have you ever heard of the term 2.5D? While this term may seem made-up it’s actually a very important concept and the backbone for all animation work in After Effects. At its core 2.5D is moving 2D objects in 3D space, kinda like paper mario.
Cameras are the secret to unlocking this extra half-dimension in After Effects, so in this tutorial and article we’re going to take a look at using cameras in After Effects. Cameras allow After Effects users to move through their projects in pseudo-3D worlds and an understanding of what a camera is capable of doing is essential for becoming a skilled AE artist. Let’s-a-go!
Camera Tutorial for After Effects
If you enjoy watching tutorials more than reading just check out the following video. The tutorial covers most of the concepts outlined in this article. If you have any questions feel free to send them along. Remember there is no such thing as a stupid question, except these…
{{lead-magnet}}
Understanding Cameras in After Effects
Cameras in After Effects work in a surprisingly similar way to cameras in real-life. Concepts like sensor size, focal length, and iris shape are all represented in the various camera menus in After Effects. However, Even if you have a background in physical camera work you can definitely benefit from an overview of the various camera settings in After Effects. So let’s start with the basics.

Creating a Camera in After Effects
Creating a new camera in After Effects is super easy. All you have to do is create a new composition and navigate to Layer> Create New Camera. Click Ok and Boom. Your new camera is in the timeline. You can also create a new camera by hitting the keyboard shortcut command+option+shift+C on a Mac or control+alt+shift+c on a PC. (Why do the key names have to be different?…)
Note: If the layers in your timeline are not set to 3D you must check the 3D box before they will interact with your camera.

The Camera Menu
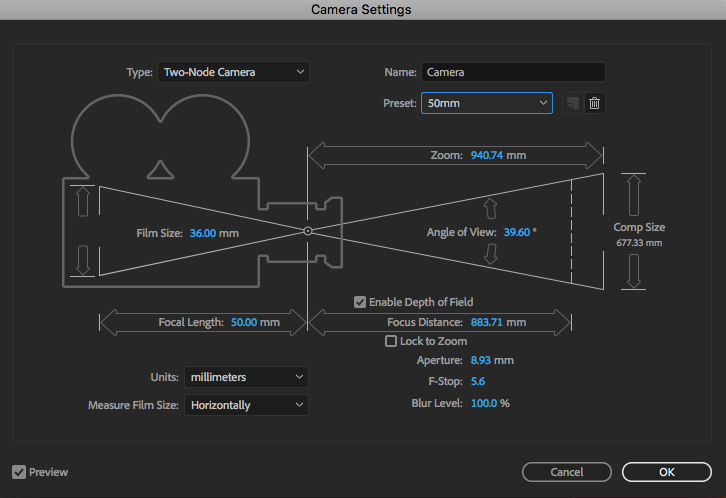
Now you probably noticed when you created a new camera that a Camera Settings box popped up with bunch of settings that sound like they are from a NASA cockpit. Luckily for us understanding these terms isn’t exactly rocket-science. Here’s a breakdown of what they mean:
One Node Cameras
- Pros: Easy to Understand, Easy to Use, Works Well with the Camera Tools, More ‘Life-Like’
- Cons: No Point of Interest, No ability to orbit
The first setting that you’ll see in the top left is a little box that says One Node or Two Node. A node is simply a point of movement for your camera. By default After Effects will select a Two Node camera, but a One Node camera is a little easier to understand so we’ll start with that one.
A one node camera operates in a very similar way to a camera in real life. You are able to adjust the pan, tilt, and zoom, along with the focus distance. One node cameras don’t have points of interest, but they can be parented to a null object for further control.
Two Node Camera
- Pros: Great for Orbits, Great for Shots with a Single Focus,
- Cons: Difficult to Control with Complex 3D Movement, Needs to Be
Paired with Null Object for Maximum Efficiency. A Two Node camera is a camera with a point of interest. Unlike cameras in real-life a Two Node camera revolves around a single point in 3D space. This makes complex movements like orbits and arcs possible. Whereas One Node cameras are typically used to simulate realistic camera movements Two Node cameras can be helpful to create camera movements that wouldn’t be possible in any other way.
Two Node cameras are the most popular type of cameras used in After Effects, but when you’re new to After Effects they can be kinda tricky to work with so be prepared to troubleshoot a bit when you start working with them.
ONE NODE OR TWO NODE?
As we stated earlier the biggest difference between One Node and Two Node cameras is the point of interest. On some projects like logo reveals you may have a specific singular point that you are trying to work around. If that is the case a Two Node camera is the way to go.
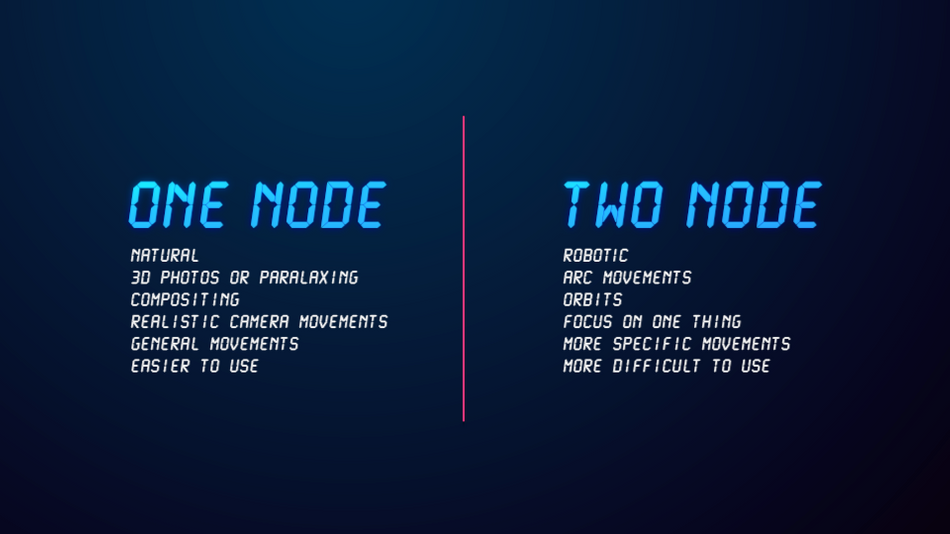
If you’re working on a project that needs to look more realistic or just needs simple 3D movement without a lot of complex arcs or orbits the One Node is the way to go. It completely depends on your project, but if you need the maximum amount of control possible you need to use the following method…
THE NULL OBJECT APPROACH
If you’re new to parenting I hope you’re getting enough sleep. If you’re new to parenting in After Effects you’re in luck. After Effects parenting allows you to connect two different layers’ transformation data together. This means as you move or scale an object in the parented layer (child) will do the exact same thing. There is a million and five different ways in which you can use parenting to your advantage in After Effects, but one of the most unique and helpful ways is to parent a camera to a 3D Null Object. To parent a camera to a null object follow these quick steps:
- Set your Null Object to 3D
- Grab the Parent Squiggle on the Camera
- Drop the Connection Point on the Null Object’s Name
After you do this you will find that your camera, whether One Node or Two, now has the ability to be moved in 3D space by moving the null object at the same time. This will allow you to more easily add camera shake to Two Node cameras and create complex camera movements like angled tracking shots more easily. However, because the cameras in After Effects were built without the need for a null object you need to be mindful that any adjustments made to the null object will global change the angles and positions of your camera in the composition. Just be prepared to make a lot of adjustments in the beginning.
The Camera Settings in After Effects
In the scary Camera Settings box you’ll see a bunch of numbers let’s break down each one:
FOCAL LENGTH
As you probably know, the focal length on a real camera lens tells a photographer how zoomed in they will be to their subject. The same is true in After Effects. By default the active camera view in After Effects is 50mm so if you select the 50mm camera equivalent in the dropdown menu you will see that nothing changes when you create the camera. A smaller focal length will create a wider angle lens and a larger focal length will create a more ‘zoomed’ or ‘telephoto’ lens. Neato-speedo.
FILM SIZE
Film Size is not the most essential concept to lock-in when we’re talking about cameras in After Effects. This is mainly because a computer generated camera and a physical camera are totally different things. In the real-world film size is important for understanding crop-factors, bokeh, and even low-light sensitivity. In After Effects none of these physical limitations exist so you should just keep the film size at the default 36mm which is After Effects’ full-frame equivalent.
ANGLE OF VIEW
Angle of view is exactly what the name implies. The wider the angle of view the wider your camera. You’ll notice how your zoom and focal length will also be adjusted as you change the angle of view.
ZOOM
Zoom is another way of saying focal length. If you adjust the zoom your angle of view and focal length will follow. Like baby ducks.
Depth of Field in After Effects
Depth of Field is an optical effect that blurs out your foreground and background. It’s pretty darn essential if you want your projects to look life-like in After Effects or any other Motion Design application.
To enable depth of field you can either click the ‘Enable Depth of Field’ button. Below you will see settings for Aperture, F-Stop, and Blur Level. All of these settings can be adjusted after you create your camera by clicking the little dropdown menu in the timeline next to the camera, and selecting ‘Camera Options’. By default the blurring effect for depth of field will not be very intense in After Effects. However, by adjusting Aperture and Blur Level you can dial in the right amount of blur for you. Here’s what each one does:Aperture: Similar to a camera in real-life Aperture adjusts how shallow your depth of field is. The larger the Aperture the more shallow the in-focus area will be. Blur Level: Blur Level is a nifty slider that allows you to adjust how much blur is applied to your out of focus areas. If only real cameras had this feature…
Tips for Working with Focus Distance in After Effects
As the name implies Focus Distance has to do with the physical distance in which your camera is focused at any one point in time. Just like in real-life it can be tricky to focus manually in After Effects. So there are a few tools that you have at your disposal.
1. SET FOCUS DISTANCE TO LAYER
One of the fastest ways to make sure your Focus Distance is focused to the right layer is to snap the focus using the ‘Set Focus to Layer’ feature. To do this select the camera and layer you want to be in focus and navigate to Layer>Camera>Set Focus Distance to Layer. This tool will allow you to quickly get the perfect focus for any layer.
2. LINK FOCUS DISTANCE TO LAYER
Similar to Set Focus Distance to Layer, if you link your focus distance to your layer your camera will focus on the selected layer. However, Link Focus Distance to Layer takes it one step further by writing an expression that will tie your focus distance to the selected layer for the entire composition. This means as the layer moves your focus distance will move as well. Neat!
The Camera Tools in After Effects
To move a camera in After Effects you need to use one of the four camera movement tools. Each one does something specific. To activate a camera tool hit the ‘C’ key on your keyboard and cycle until you have the right layer selected.
THE ORBIT TOOL
With a One Node camera the orbit tool simply pans and tilts. Think of videotaping (is that term obsolete?) a racecar as it speeds by. With a Two Node camera the orbit tool will orbit around a point of interest. This makes the orbit tool incredibly powerful if you are working with logos or 3D text. The anchor point is not affected when you adjust the unified camera tool.
TRACK XY TOOL
The Track XY Tool will track your camera and anchor point along the X and Y axis. This tool does the same thing for One Node and Two Node Cameras.
TRACK Z TOOL
The Track Z tool pushes the camera forwards and backwards in Z-Space. Hooray!
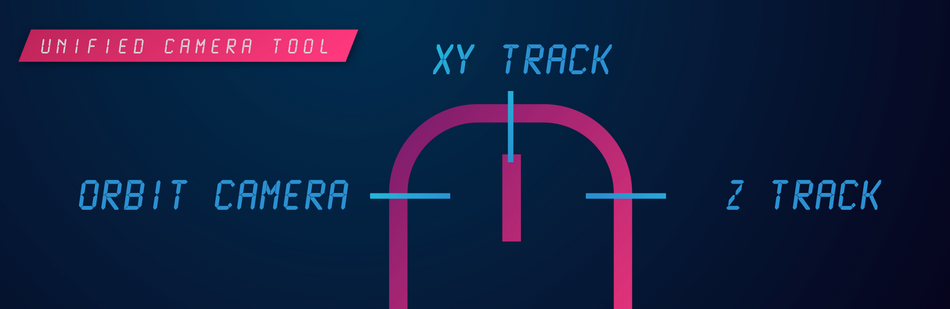
UNIFIED CAMERA TOOL
The Unified Camera Tool basically combines all three of the tools above into a single tool. Using your mouse you can quickly move between the orbit tool, Track XY, and Track Z tools.
- Left Click: Orbit
- Right Click: Track Z
- Middle (Wheel) Click: Track XY
This is the fastest way to adjust your camera.
If you’ve made it this far it’s safe to say that you are ready to start working with cameras in After Effects. Just remember to point the camera in the right direction.
ENROLL NOW!
Acidbite ➔
50% off everything

ActionVFX ➔
30% off all plans and credit packs - starts 11/26

Adobe ➔
50% off all apps and plans through 11/29

aescripts ➔
25% off everything through 12/6
Affinity ➔
50% off all products

Battleaxe ➔
30% off from 11/29-12/7
Boom Library ➔
30% off Boom One, their 48,000+ file audio library
BorisFX ➔
25% off everything, 11/25-12/1

Cavalry ➔
33% off pro subscriptions (11/29 - 12/4)

FXFactory ➔
25% off with code BLACKFRIDAY until 12/3

Goodboyninja ➔
20% off everything

Happy Editing ➔
50% off with code BLACKFRIDAY

Huion ➔
Up to 50% off affordable, high-quality pen display tablets

Insydium ➔
50% off through 12/4
JangaFX ➔
30% off an indie annual license
Kitbash 3D ➔
$200 off Cargo Pro, their entire library
Knights of the Editing Table ➔
Up to 20% off Premiere Pro Extensions
Maxon ➔
25% off Maxon One, ZBrush, & Redshift - Annual Subscriptions (11/29 - 12/8)
Mode Designs ➔
Deals on premium keyboards and accessories
Motion Array ➔
10% off the Everything plan
Motion Hatch ➔
Perfect Your Pricing Toolkit - 50% off (11/29 - 12/2)

MotionVFX ➔
30% off Design/CineStudio, and PPro Resolve packs with code: BW30

Rocket Lasso ➔
50% off all plug-ins (11/29 - 12/2)

Rokoko ➔
45% off the indie creator bundle with code: RKK_SchoolOfMotion (revenue must be under $100K a year)

Shapefest ➔
80% off a Shapefest Pro annual subscription for life (11/29 - 12/2)

The Pixel Lab ➔
30% off everything
Toolfarm ➔
Various plugins and tools on sale

True Grit Texture ➔
50-70% off (starts Wednesday, runs for about a week)

Vincent Schwenk ➔
50% discount with code RENDERSALE

Wacom ➔
Up to $120 off new tablets + deals on refurbished items


Download the project file and dive in!
Learn After Effects the Right Way
Master the After Effects interface and build a real animation skillset. Enroll in All-Access to unlock AE Kickstart and 50+ other courses.