
Find out the difference between the Cinema 4D Lite and Cinema 4D Studio in this helpful video tutorial from EJ Hassenfratz.
What are the differences between the full-fledged version of Cinema 4D and the free Lite version available in After Effects? Ej Hassenfratz, our Cinema 4D Basecamp instructor, is here do give you the 411 on these two different versions.
By the end of this video you'll have a clear understanding of the limitations and advantages of having Cinema 4D Lite available to you, and what the full version is capable of. Be warned; It's going to be hard not to salivate when you see all the crazy cool things you can create in the full version.
If you haven't dipped your toes into the world of 3D animation and have been scared away by the cost, then what you'll learn today should bring a little more joy into you life. So, let's watch what EJ has to say about these two different versions...
{{lead-magnet}}
What is Cinema 4D Lite?
Cinema 4D Lite is a limited 3D tool that allows you view, build, and render 3D scenes in After Effects using with a Cinema 4D integration known as Cineware.
As you build and save your creation in Cinema 4D Lite you can see updates inside of After Effects, making this program an extremely attractive bonus to your workflow.
In addition to viewing and rendering, you are able to use a few After Effects features with Cinema 4D Lite. Cineware allows you to extract scene data, like cameras, that can be manipulated inside of After Effects.
The biggest win for those subscribed to the Creative Cloud is that this takes away the excuse of learning the basics in Cinema 4D. The tight integration with Adobe allows you to create artwork even though the lite version is limited.
Here are a few ways you can use Cinema 4D lite:
- Basic Modeling
- Basic Lighting
- Texturing
- Animate
How do you access Cinema 4D Lite?
You may have not even known that After Effects can create a Cinema 4D file or that this Cinema 4D and After Effects integration was even possible. So how exactly do you get started?
To access a Cinema 4D Lite in After Effects just navigate to:
File > New > MAXON CINEMA 4D FILE...
This will launch Cinema4D lite, as long as you have a subscription to the Creative Cloud.
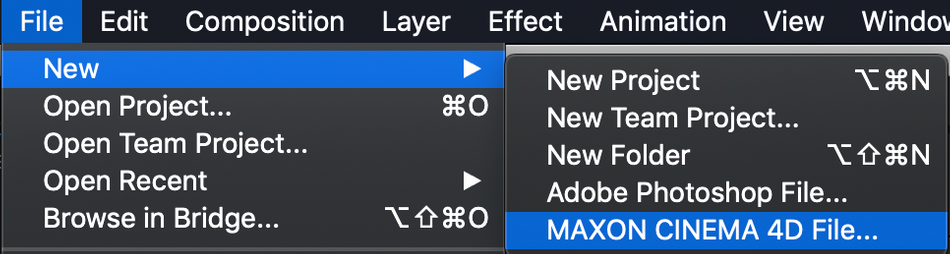
(above: how to access Cinema 4D Lite from After Effects)
Limitations of Cinema 4D Lite
There are a lot of possibilities in Cinema 4D lite, but it only scratches the surface of what's possible in Cinema 4D. But, what are the bigger things that your workflow is missing with Cinema 4D Lite? Let's go a little deeper and just clear up a few things about what Cinema 4D Lite does not have access to.
1. MODELING TOOLS ARE NOT AVAILABLE
Industry standard polygon modeling, and sculpting tools are not available in Lite. There are work arounds that you can use by implementing deformers, but don't expect to create complicated pieces of geometry without some clever jimmy-rigging.
2. MOGRAPH EFFECTORS ARE VERY LIMITED
MoGraph effectors are what put Cinema4D on the map. Creativity and workflow was unlocked in an unprecedented way with new ways to manipulate objects in your scene.
In Cinema 4D Lite you are given just a small taste of the MoGraph effector. While still powerful you can only effect and manipulate basic transform properties.
Notable MoGraph effectors in the full version are Voronoi Fracturing and the Cloner options. Using tools like this can really speed up and enhance your workflow, keeping the flow of ideas flowing.

(above: look at all those options in the full version!)
3. RENDERING LIMITATIONS
There are some significant limitations when it comes to rendering in the lite version. One example is that the ability to use Physical Render Engine (PBR) is not available with Cinema 4D Lite, which is very important if you're looking to use GPU rendering. In fact, ProRender is natively available in the studio version, but not in the lite version. Lite versions will be sticking with their CPU's for rendering out scenes.
4. NO PLUG-IN SUPPORT
Plug-ins like X-Particles and kits created by Greyscalegorilla are not compatible with Cinema 4D lite. What you're given with the free version is what you get.
If you've seen some of the plug-ins that are available and what they can do, this can be a bummer. So, while you do have the ability to create 3D animated scenes, you won't be adding any swooping particles.

WANT THE NITTY GRITTY?
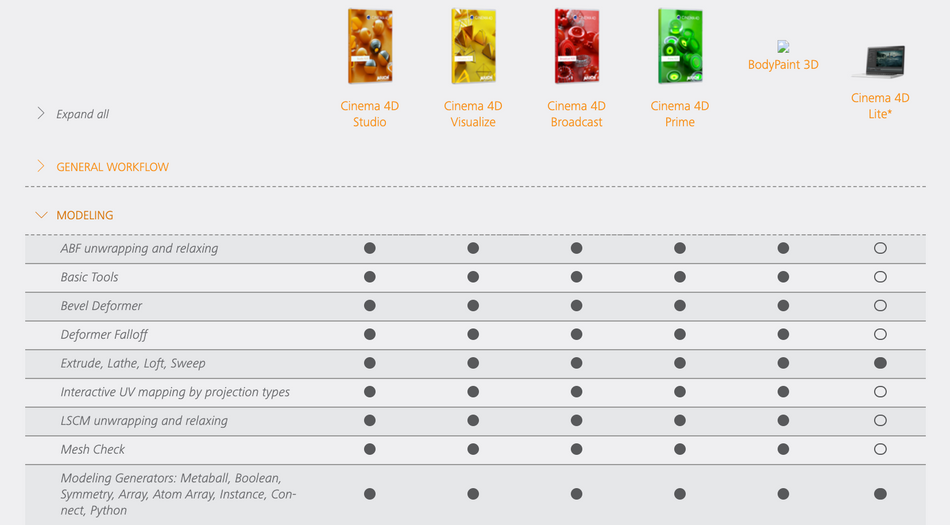
For a full breakdown, Maxon has created a very comprehensible chart detailing the differences between the Cinema 4D options.
Why would I get Cinema 4D Studio if I have Cinema 4D Lite?
The lite version has just enough tools to help you build up the fundamentals for 3D. There are basic lighting tools, basic cameras, and a few deformer options. For a few people this may be just enough for your projects.
The full program of Cinema 4D is very robust, and offers a lot of useful tools for creating in a 3D environment.
Here are some of the main features in Cinema 4D Studio:
Physics and Simulation:
- Rigid Body
- Soft Body
- Aerodynamics
- Cloth
- Gravity
- Particles
- Joints, Springs, Motors
MoGraph Tools:
- Cloner
- Fracture
- Advanced Fields
- MoText
- Python
- Delay
- Tracer
Modeling:
- Polygon Modeling
- Parametric Modeling
- Sculpting
Plug-ins:
- Redshift Renderer
- Octane Renderer
- X-Particles
- Light Kit Pro 3.0
As you can see, there are a lot of available options that can really enhance your workflow in Cinema 4D. The list's above are just a small taste of the massive world that is Cinema 4D. In short, if you are serious about learning 3D for motion design, Cinema 4D Studio is the way to go.
Want to Learn 3D animation?
If you're ready to take a deep dive into the amazing world of 3D check out Cinema 4D Basecamp. The course, led by EJ, was built for those who've never touched a 3D program. Students come in with no knowledge and finish the course by making amazing animations. Check out some this work example from Deanna Reilly.
Here's a quick intro that will show you what you'll learn in Cinema 4D Basecamp.
-----------------------------------------------------------------------------------------------------------------------------------
Tutorial Full Transcript Below 👇:
EJ Hassenfratz (00:00): Hey, I'm EJ Hassenfratz for school of motion in today's video, I'm going to be covering the main differences between the light and studio versions of cinema 4d. There's lot of confusion out there as to what version does, what, what version you need. And that's what we're going to be covering in this video today.
Music (00:20): [intro music]
EJ Hassenfratz (00:29): One of the things a lot of people don't know is that if you own a subscription to creative cloud, you actually own a copy of cinema 4d and it's that cinema 4d light version. The thing is, is it's a little hard to get to. And the reason for that is, is you actually have to open cinema 4d light through after effects. I know it's a little weird, but here's how you open up cinema 4d light. You just go in after effects, go to file new max on cinema 40 file. And once you jump on that, it will then prompt you to save an entitled default file. I'm just going to save this to desktop and I'll, I've done this before, so I'm just going to replace that. And what's going to happen is that's going to launch cinema 4d light. So, boom, you now have a copy of cinema 4d that you have full access to as long as you have your creative cloud subscription access, which is pretty cool.
EJ Hassenfratz (01:23): So you might be thinking, all right, I'm all set here. I have a version of cinema 4d. Why would I need to shell out my cold hard cash for the full studio version when I have cinema 4d already? So that's what we're going to be talking about in this video and talking about the differences between light and studio. So let's go ahead and begin by talking about what is included in the light version of cinema 4d. All right. So the first thing you're going to notice is we have the full blown cinema 4d interface, and mostly this is the same as what you would see in cinema 4d studio version. So in this regard, light is really great for getting used to how cinema 4d works in where everything is as well as just kind of navigating around in 3d space. So we have most of the menus that we have in studio.
EJ Hassenfratz (02:11): We have our primitives menu where you can create basic 3d shapes. We have the pen tool where you can actually draw spline shapes, and we have all these different spline shape objects here as well. And basically spines are the cinema 4d equivalent of like aftereffects path. So we can get the Bentall here. Just kind of draw a little blobby here in Walla. There you go. Actually, I like the pen tools in cinema four D a little bit better than I like in after effects. Actually it's pretty, uh, intuitive, but, uh, so once you create splines, uh, outside of, you know, great, uh, creating these basic 3d shapes using splines in what's called generator objects, and light has a small selection of some of the generator objects that studio has. Um, basically what gener generator objects do is allows you to create geometry based on splines.
EJ Hassenfratz (03:05): So I have like an extrude here. We all know what extrude is. You have it in aftereffects, but basically you can place a spline as a child of the extrude object and boom. We have some 3d geometry that if I hit this button that renders the current active view, you can see, Hey, we got some geometry. You look, mom 3d in a, but basically like creating these basic shapes, creating splines, and then creating geometry based off those splines using generators is two of the only ways you can create a geometry in cinema 4d lay, unless you actually import in a model, uh, the modeling tools are not available inside of cinema 4d light. So that's, that's a thing. We have a lot of other generator objects like an array or a ball or an instance with basically makes a copy or an instance of a single object.
EJ Hassenfratz (03:56): A ball can have you subtract your combined different, uh, pieces of geometry. So generating geometry while we can't actually model anything, we have a lot of control and ability to create a lot of different types of geometry to build up your scene. So once you build geometry, you can then deformed it using a selection of deformers. And it's just a select group of performers that you'll find in studio. It's a lot of the most used ones. So like Ben bald shear taper wins a really cool one. If you want to create like a wavy flag or something like that, or animate a little fishy, uh, doing its thing, twist, if you want to blow stuff up, get the TNT. There have a lot of stuff. And as far as, you know, seeing objects, we have the floor, we have like a fog environment, sky foreground, uh, stage object, which allows you to kind of animate between different camera views.
EJ Hassenfratz (04:51): And speaking of cameras, there's a selection of the type of cameras you can use. Again, most people use the basic camera, so that's really cool. You can look through it, you can change the focal length, all that good stuff, just like, you know, an after effects camera. And then we have all of our lights. So this is pretty incredible that the free version that comes with after effects of cinema 4d, uh, has all of this stuff. I mean, it, it, you have no excuses to not learn 3d. And if you want to learn cinema 4d, get used to the workflow again, get used to the menus, all that good stuff. This is a really great, a great way to remove that, that barrier of like, well, I can't afford the full studio version, right? You have no excuse. This is, this is what you get with a creative cloud subscription.
EJ Hassenfratz (05:38): And it is pretty substantial. It's pretty robust. So let me go ahead. And I have another project here that I made completely inside of the light version, and you can see what kind of scenes you can build up. I have all the lights here. Uh, we have area lights, which is one of the most accurate lights, cinema 4d, uh, outside of the PBR light. You can see here physically, uh, based light. And we have, there's an instance there. I got all these different objects and basically what, what I've done in this scene is I've used either your basic primitive, 3d shapes, okay? Like your cubes, your tourists, all that stuff. And then basically created different shapes using splines, and then use all these different generator objects to then build out the scene. So let's see this little cactus guy, this, uh, this little pot is a lave and a lave basically takes a spline and sweeps it around.
EJ Hassenfratz (06:36): So you can create this little pot shape there. Same thing with this cup. If I just open that up, that is basically just a, a tube. And then to create the steam, I just made a sweep object with the circle as the profile spline. One of the cool things you can do with the sweep spline is you can adjust the scale of the sphere as it sweeps along that main spline here. Okay. Now I have a wind object here that if I scrubbed through, you can see creates this nice little wavy motion. So tons of ability of, you know, building up scenes and lighting scenes inside of cinema 4d light. Okay. So, uh, lighting is such a huge aspect of 3d. And guess what? This has all of the lighting tools that you have, or need to build up that fundamental skill of lighting, which I feel like for newcomers to 3d lighting is one of the weakest points for, uh, 3d artists, newcomers to 3d artists.
EJ Hassenfratz (07:43): Just because you really don't have to think about that aspect of, uh, of, of a scene when you're working in 2d, right? You're, you're basically dealing with 2d shapes and you don't need to learn, uh, about real-world kind of lighting techniques and photography lighting and all that stuff, or F you know, photo studio lighting. So this has the ability to create all these objects. It also has the ability to animate stuff. So we've got a full timeline here. You can set key frames, any key frameable animation is possible inside of cinema four D light, which is really, really amazing. Uh, you can see, we have all different types of textures here. I have a gold texture. So the material system is pretty robust. It has a lot of the same material creation, uh, functionality as the full studio version. We can get reflect and see if you like your shiny, shiny materials.
EJ Hassenfratz (08:40): Guess what? This has that in there, we can utilize bump channels. We can use noise shaders. We have, uh, a wide selection of different effects you can use here. So you can use tiles, which is cut off at the bottom there, but tiles is something I use a lot. You can see that for the cactus stripes here. That's basically I loaded a tile shader in the alpha. And if I go in, just grab this render region here and just click and drag, just to render my little cactus guy can see those little lines right there. So a lot of material options here, a lot of the most basic, most often used materials and material functions are inside of light. So again, if you want to get used to how a material system works in 3d light is great for that. So back to animation, uh, one of the most common features, or one of the most widely used features by motion designers in cinema 4d is a little thing called MoGraph.
EJ Hassenfratz (09:45): Now MoGraph basically, you can see the little, uh, menu here. MoGraph allows you, uh, in the studio version at least to clone and create an animate loads and loads of objects very easily using what's called effectors. So factors basically can allow you to do a multitude of things inside of cinema 4d light. You have access to the plane and random effectors, uh, and you only have access to this if you register your cinema 4d light version. So be sure you do that, and you can have access to the plane and random effector and this fracture object. And basically what the fracture object allows you to do is make objects, be able to be used by the, or be manipulated by these plan and random effectors. So, for example, I have these little cube objects here. Let me just go into my scene. There's my plane effector.
EJ Hassenfratz (10:42): Basically you can see this falloff is a bunch of a couple planes here. If I just move this through, you can see that this plane effect, or I have this set up to scale everything down. So as I pass this through, I can adjust and manipulate the position scale and rotation values of those objects. So I can turn on the position. I can turn on the rotation. Let's grab, let's just move this a little bit over here. I can make this rotate a little bit. So basically just by key framing this little fall off, I got all of this animation happening, and this is the, again, the main use feature, this feature put cinema 4d on the map. Basically, uh, the only downside about the light version is you only get a select few, uh, just a tiny fraction of the ability and functionality of MoGraph.
EJ Hassenfratz (11:34): You don't have a cloner object, which clones objects very easily, and you don't have a lot of the most powerful aspects of the MoGraph module. So there's that. So again, with, uh, with light, you have the ability to do basic modeling, uh, not like polygon modeling or anything like that. I'm talking just, you know, using generators and building your, your main objects and, you know, using a bull, all that good stuff. You can deformed those, those pieces of geometry as well. So you can do that. You can use lighting, you can texture, you can animate. And these are the most fundamental, uh, aspects of 3d, which is super awesome that all of this is able to be done inside of light. So the one major thing you can't do, and it's kind of a biggie. If I go to my render settings here, you can not save out an image from cinema 4d light.
EJ Hassenfratz (12:32): So you might be wondering, well, that completely stops me from working at this. Like, I don't want to build this scene and then I have no way to render out my scene here. You might be, you might be thinking now, like, what's the point then? Well, there's actually a workaround. Okay. So let's just go ahead and jump into after effects. All right. So here we are an after effects. And one of the cool things about cinema 4d in general is the powerful integration with after effects. So one of the cool things you can actually import a cinema 4d file here. So I'm going to go and grab my cinema 4d light scene demo. Again, you have access to this file. So go ahead and download it so you can follow along and I'm just going to open this. Okay. And you're going to see that the cinema 4d file imported into after effects, just like any other asset or footage.
EJ Hassenfratz (13:21): And basically what I can do now is just drag and drop this, make a new composition in here, and basically, boom, we have our CINAware layer right here, and we can see our cinema 4d light scene inside of after effects, which is really awesome. So CINAware is basically an effect that allows you to view your cinema 4d scene in an after effects comp. And this is the way you could then render out your cinema 4d scene. So here we have the different renders right now we have the software renderer, which basically just shows you the same kind of view that I just showed you inside of cinema 4d. But the one thing you can do is choose the different types of renders. So standard render is, uh, it's aptly named it's the standard render inside of cinema 4d. And here you can see everything all nice and lit, you know, this good stuff, and this is the draft version.
EJ Hassenfratz (14:15): But if you crank this up and change this to standard final, basically what you're going to get is the final resolution of this scene. And basically what's going to be happening in the background is cinema 4d is going to be rendering that scene or that image, that frame, and then importing it into after effects. And then at that point you can just render out either that animation or in my case, I just have a still image still seen. So you can go ahead and render through after effects. I know it's a little bit of a work around, but that's how you can go ahead and render, uh, all of your beautiful art, 3d art from, from cinema 4d, bringing an after effects, render it out, print it, put it on your refrigerator. Your mom will be really proud of you. So, uh, one of the really cool things about CINAware in addition to just being able to, you know, import a cinema 4d file view it in your after effects, composition, composite 2d elements on top of this is, uh, we can actually it's a live link.
EJ Hassenfratz (15:23): Okay. So what that means is I can go over into, uh, back in a cinema 4d light. Okay. And let's just make a change here. Let's just say that we just gave a lot of plants feed to our cactus and you got huge. You got really big. So I'm just going to scale this guy up. He's super big now. So I made that change. What I'm going to use. Go ahead and save this. Okay. Save that file. And then let's jump back into after effects. And if I go to a non Ram, uh, previewed, or actually let me just go into my standard draft. Now, if I go into a frame that's not already pre-rendered, you can see that already updated there. Okay. And let's actually just go back to, uh, software or even open GL. That's a good one too, and kind of see what this looks like here.
EJ Hassenfratz (16:12): So you can see that automatically updated. And now we have our huge cactus in here. So it's this live link. As long as you, uh, save all of your changes in your cinema 4d light file, you can jump back into after effects and just make sure you're not already in a, you know, Ram cashed, uh, frame and it'll then update, which is really, really cool. So another awesome thing with CINAware is you can see, we can actually extract seen data from cinema 4d. So if we jump back into cinema 4d here, you can see that we have our cameras, we have our lights and I have this no that's smack dab in the middle of the scene. And it has an external compositing tag. And basically what an external compositing tag does is allows you to export the position information, position, scale rotation, information of a certain object in cinema 4d.
EJ Hassenfratz (17:09): And we can even export this as a solid, that will then come into after effects as a solid or as a Knoll. So I'm going to check on solids. It's going to come in as this red, uh, solid with a size of 200 by 100. And let's just go ahead. Let's go and save this again. Since I made that change to check on that solid and let's hop back into after effects. All right. So now with this updated, what I can do is go in extract, not only the camera in lights from my cinema 4d light project, but also that no, and this is a 3d layer inside of after effects. So what I can do is go back into my CINAware layer, change this camera to say a calm camera and what this will now use is the camera inside of after effects. And now check this out.
EJ Hassenfratz (18:01): I'm going to hit the C key and just orbit around the scene. And what I'm doing as this updates is I'm rotating the camera and what rotated it a little bit too much, but rotated the camera and I'm orbiting. And it's actually orbiting the actual three scene from cinema 4d light, which is pretty incredible. So I can do all my camera animation entirely inside of after effects. Say, I want to zoom in here. I'll just hit the C key to toggle to the zoom. And let's just zoom up into this solid layer. And there you go. Really cool stuff. Just the flexibility. I mean, this is what puts cinema 4d on the map is this tight integration with after effects. Okay. So a lot of stuff here, this is just kind of a skimming the surface on the power there, but this is available. This functionality is available in cinema 4d light.
EJ Hassenfratz (19:00): So it's just this integration, all the things you can do, it's such a huge selling point for cinema 4d in general, right? So that was a super quick overview of all of the features included in the light version of cinema 4d. Let's go ahead and check out all the features included in only the studio version of cinema 4d, right? So here's a little clip from an older tutorial of mine. That's utilizing. What are the most robust features for MoGraph artists and cinema 4d. Again, I'm referencing that MoGraph module that again, allows you to clone an and objects in a variety of complex ways super easily. So again, MoGraph is why cinema 4d is known today. It's so powerful. It is such a huge workflow enhancer, as far as motion graphics go put cinema 4d on the map, way back when this came out about, I don't want 10 years ago.
EJ Hassenfratz (19:56): So while cinema 4d light does have some of those basic elements of MoGraph like, like I showed you with the fracture object in the plane and random effectors, you are missing out on a majority of the powerful animation features that come with the full studio version and on the subject of animation, if you're into, you know, animating characters and after-effects fortunately character rigging and animation is not supported in lights either. So here's another example of a feature that's not included in cinema 4d light. And it's actually one of my favorite features to play around with in that is the powerful dynamics engine. So dynamics is a real world physics engine inside of cinema 4d studio that allows you to add physics to your objects, allowing the objects to fall Clyde squish in inflates among other things it's extremely easy to do in super, super powerful.
EJ Hassenfratz (20:52): And if you spend any time on Instagram, I'm sure you see types of these animations all over the place every single day. Uh, another really cool thing that is part of dynamics. It's a separate engine it's called cloth and allows you to make really cool cloth types of animation, again, not included in light. All right, so let's move on to another feature. That again is only in studio and that's a fairly new feature to cinema 4d just got added in version R 20, and it's called volume modeling, which is a really amazing feature that allows you to model organic meshes super easily by simply combining shapes together to form a more complex piece of geometry in model things that otherwise would have been super difficult to model the traditional polygon modeling way. And one of the coolest parts is you can utilize volumes with some of those MoGraph features.
EJ Hassenfratz (21:47): I talked about off the top to create some really interesting animations like this cool liquid reveal. So speaking of modeling again, I want to reiterate that polygon modeling is not available in light, but is in studio. And this is the traditional way to create geometry using the modeling tools as well as sculpting tools that are in cinema 4d studio. So outside of that, you're pretty limited to what kind of geometry you can create in cinema 4d light. As again, you can only generate those basic 3d shapes, those primitive shapes, and then create splines and extrude them and lay them. But you cannot manipulate that polygon geometry at all, outside of those basic geometry to formers like bend and twist. So it would be kind of like being able to create an aftereffect shape layer like a rectangle, but not being able to add more points or those points to create your own custom shape layer.
EJ Hassenfratz (22:44): So that is pretty limiting, but as I showed you, there is a ton of geometry you can make just by combining different types of those primitive, 3d shapes together with things you can generate based off of splines. So some of the other major things that aren't included in light are the ability to utilize advanced render engines like physical render pro renderer, and third-party render engines like Redshift and octane that are becoming industry standards that allow you to render scenes, especially photo realistic scenes, way faster than standard render engine that is included in cinema 4d light. So many of the advanced materials shaders aren't included in light either. So you're pretty limited to the types of materials you can create, but you still have a lot of ability there. And if you'd like to create cell shaded, cartoony renders, unfortunately that sketch and Toon render, which I really love to use that turns your 3d renders into cartoony outlined renders is not in light either.
EJ Hassenfratz (23:47): So speaking of third party things like renderers, cinema 4d light does not allow you to install or use any plugin. So anything from grayscale gorilla, or if you've heard of X particles, which is a popular particle and dynamic system, that's becoming industry standard for a lot of cinema, 4d artists, all of those things will not be usable. No plug-ins whatsoever. So that's kind of a biggie. All right. So that covers some of the major differences between light and studio versions of cinema 4d. And like I said before, one of the most important things about the light version is that if you're wanting to learn cinema 4d, it removes any excuses of you not actually learning cinema 4d. If you have a creative cloud subscription, boom, you have a version of cinema 4d that for beginners is perfect because again, you have the full interface or most of the interface, uh, you can get used to how cinema 4d works, the workflow.
EJ Hassenfratz (24:45): You can learn the lingo, the terms, uh, you can get into getting used to navigating in 3d space, creating in 3d space, animating get your lighting, fundamentals, your materials, all that stuff is perfect for beginners. And before you even get onto an advanced version, those are all those fundamental skills that you'll need to succeed anyways. Uh, no matter what version of cinema 4d or whatever 3d software you're using, things like lighting is a huge thing for you to be able to practice in cinema four D light. So get your feet wet, learn the lingo. Light's perfect for that. But if you are in any way serious about getting in to 3d, adding it to your production workflow, there's no question that you absolutely need the studio version because the studio version has a lot of the advanced features that you will need to stay competitive in this current 3d market.
EJ Hassenfratz (25:43): So hopefully this video gives you a little bit more insight into which version of cinema 4d is best for you. And if you're completely new to cinema 4d, or if you've been using cinema 4d for a while, and you just aren't quite getting it, you've been watching YouTube videos or tutorials, and you're just, you're not quite understanding what all the different functions are that those tutorial artists are using and, or you just don't feel that comfortable in 3d. I have a course on school of motion called cinema 4d base camp. That takes you from zero to cinema 4d artists in just a few weeks. And it's going to teach you all of the really important foundational skills that you need to be successful as a cinema 4d artists, and stay ahead in the motion graphics industry. Now, this is a course that I developed, uh, that I wish I had when I started learning cinema 4d years and years and years ago, as it really will set you apart from everyone else.
EJ Hassenfratz (26:45): As far as just getting those fundamentals, get things like lighting super important. Not a lot of people understand this. We'll teach you some of those fundamental skills to have your work look so much better than it could have. Otherwise, if you've been holding out on learning cinema 4d, definitely check out cinema 4d base camp, you can find it on the school of motion courses page, or you can find the link in the video description here. By the way, when you sign up to cinema 4d base camp, you have a limited time access to the educational version of the full blown studio version with all of the advanced features that you can use during the class. So that is a huge thing. You'll be learning in that full studio version with all of those features at your fingertips that I just showed you in this video. So how's that for a perk, right? Well, hopefully I'll see you in an upcoming cinema 4d base camp session. Thank you so much for watching.
ENROLL NOW!
Acidbite ➔
50% off everything

ActionVFX ➔
30% off all plans and credit packs - starts 11/26

Adobe ➔
50% off all apps and plans through 11/29

aescripts ➔
25% off everything through 12/6
Affinity ➔
50% off all products

Battleaxe ➔
30% off from 11/29-12/7
Boom Library ➔
30% off Boom One, their 48,000+ file audio library
BorisFX ➔
25% off everything, 11/25-12/1

Cavalry ➔
33% off pro subscriptions (11/29 - 12/4)

FXFactory ➔
25% off with code BLACKFRIDAY until 12/3

Goodboyninja ➔
20% off everything

Happy Editing ➔
50% off with code BLACKFRIDAY

Huion ➔
Up to 50% off affordable, high-quality pen display tablets

Insydium ➔
50% off through 12/4
JangaFX ➔
30% off an indie annual license
Kitbash 3D ➔
$200 off Cargo Pro, their entire library
Knights of the Editing Table ➔
Up to 20% off Premiere Pro Extensions
Maxon ➔
25% off Maxon One, ZBrush, & Redshift - Annual Subscriptions (11/29 - 12/8)
Mode Designs ➔
Deals on premium keyboards and accessories
Motion Array ➔
10% off the Everything plan
Motion Hatch ➔
Perfect Your Pricing Toolkit - 50% off (11/29 - 12/2)

MotionVFX ➔
30% off Design/CineStudio, and PPro Resolve packs with code: BW30

Rocket Lasso ➔
50% off all plug-ins (11/29 - 12/2)

Rokoko ➔
45% off the indie creator bundle with code: RKK_SchoolOfMotion (revenue must be under $100K a year)

Shapefest ➔
80% off a Shapefest Pro annual subscription for life (11/29 - 12/2)

The Pixel Lab ➔
30% off everything
Toolfarm ➔
Various plugins and tools on sale

True Grit Texture ➔
50-70% off (starts Wednesday, runs for about a week)

Vincent Schwenk ➔
50% discount with code RENDERSALE

Wacom ➔
Up to $120 off new tablets + deals on refurbished items


