Learn After Effects the Right Way
Master the After Effects interface and build a real animation skillset. Enroll in All-Access to unlock AE Kickstart and 50+ other courses.

Let’s talk about the Continuous Rasterize and Collapse Transformations switch in this After Effects tutorial.
In After Effects there are a lot of confusing terms, but two terms that seem to stump Motion Designers again and again are Continuous Rasterize and Collapse Transformations. If you’re reading this article there’s a good chance that you are trying to figure out what these terms mean. Well the good news is from a practical standpoint the Continuous Rasterize and Collapse Transformations button is not difficult to use. However, if we want to understand exactly how this tool works we’re going to have to explain some intermediate-level topics. So put on your thinking caps, we’re about to learn some important Motion Graphic information.
CONTINUOUS RASTERIZE AND COLLAPSE TRANSFORMATIONS TUTORIAL FOR AFTER EFFECTS
If you would prefer to watch a video check out the tutorial below. The tutorial covers everything outlined in this article. There are even some helpful animated graphics in the tutorial that help to explain what’s going on. If you want to download the free project file just click the download link below the video.
DOWNLOAD THE CONTINUOUSLY RASTERIZE AND COLLAPSE TRANSFORMATIONS PROJECT FILE
To download the project file used in this video just click the download link below. The project file is available to every free subscriber at School of Motion.
{{lead-magnet}}
What is the Continuously Rasterize and Collapse Transformation Button?
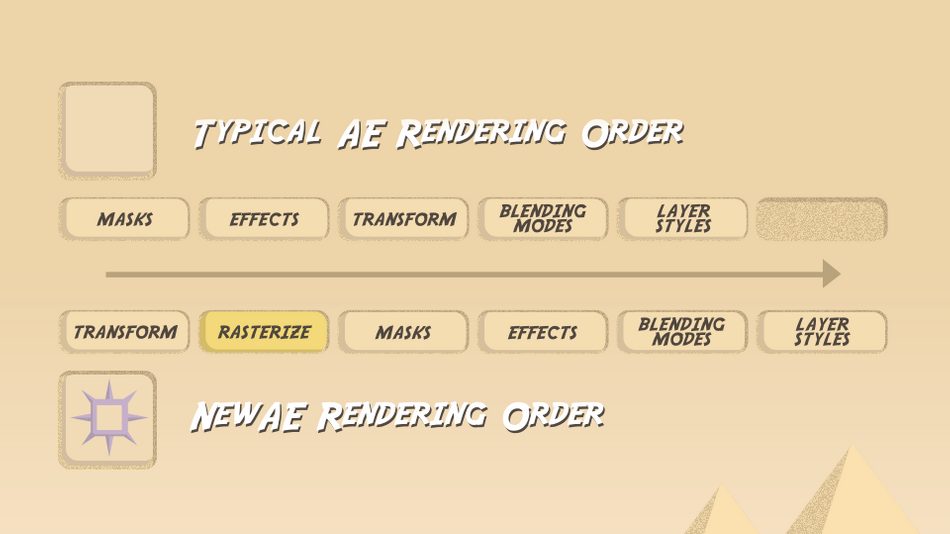
In its most basic form, the Continuously Rasterize and Collapse Transformation Button, also called the ‘Star Button’, is a switch in After Effects that changes the rendering order for a layer in the timeline. In After Effects the rendering order is typically:
- Masks
- Effects
- Transformations
- Blending Modes
- Layer Styles
Note: After Effects also renders the bottom layers before the top, but like the fact that the dog from Blue’s Clues is a girl, that’s not important for this article.
If you’ve used After Effects for any amount of time then you’ve probably been working with this render order subconsciously. This very specific rendering order is why effects like fractal noise scale up as you change the scale of your layers. It’s also why masks pixelate when you scale them up.
.gif)
Most of the time this render order is perfectly fine, but under a few different scenarios this render order can be less-than-ideal. This is where the Continuously Rasterize and Collapse Transformation switch come into play.
When selected the Continuously Rasterize and Collapse Transformation switch changes the order in which After Effects renders out layers in the timeline. If the switch is selected the render order changes from:
- Masks
- Effects
- Transformations
- Blending Modes
- Layer Styles
To:
- Transformations
- Rasterize
- Masks
- Effects
- Blending Modes
- Layer Styles
You’ll notice how transformations are moved to the beginning of the rendering order. This might seem like a non-consequential difference, but when it comes to your workflow in After Effects this is actually a HUGE change.
The biggest change comes from the way in which Effects and Vector Files are rendered, and to explain that concept we’re going to focus on the first major function of this switch.
What does Continuously Rasterize do in After Effects?
As you may or may not already know After Effects is a raster-based software. This means layers must be converted into pixels to be used in After Effects.
“Rasterisation (or rasterization) is the task of taking an image described in a vector graphics format (shapes) and converting it into a raster image (pixels or dots) for output on a video display or printer, or for storage in a bitmap file format.” - Wikipedia
Most assets that you bring into After Effects will already have pixel information that After Effects can use, with one big exception… vector layers. Vectorized assets pose a problem to After Effects because AE requires that every object be ‘rasterized’ in order to drop it into your timeline. So to make vector files usable After Effects automatically rasterizes any vector objects that you bring into your composition. This happens only once, before you even drop your vector file into a timeline.
These vector file rasters are almost always too small for practical use in your composition. Which means you will need to scale up that layer at some point. However, when you do scale up the vector image you’ll see that it is pixelated, which completely defeats the purpose a vector file. So that brings us to the one-hundred million dollar question...
HOW DO YOU REMOVE PIXELATION FROM VECTOR FILES IN AFTER EFFECTS?
If you’ve found yourself with a pixelated vector file in After Effects there’s no need to cry. There’s a quick and easy solution. All you have to do is hit the Continuously Rasterize switch to the right of the ‘Source Name’ in the timeline (It’s the switch that looks like a compass).

The switch will tell After Effects to rasterize the layer every single time there is transformation movement (scale, rotation, opacity, position, & anchor point). This will remove all pixelation from your vector image, but it will introduce a few workflow issues that you will have to deal with. Namely, your render order will change for that layer in the timeline. This will remove the normal link from your effects and your transformations. So... if you scale up your vector file your effects will not scale up with it. This (of course) can be quite annoying…

REMOVE MASK PIXELATION IN AFTER EFFECTS
One benefit from this new render order is that masks can be scaled up without pixelation. So if you are ever dealing with pixelated masks in After Effects just hit the Continuously Rasterize switch for that layer in the timeline.
What does the Collapse Transformations switch do in After Effects?
Now that we’ve talked about the Continuously Rasterize feature in After Effects let’s talk about the other function of this handy switch, Collapse Transformations.
As we’ve already talked about above, anytime you hit the Collapse Transformations and Continuously Rasterize switch in After Effects you will change the render order of your layer. This applies to any potential layer in After Effects, not just vector layers. But when you apply the switch to a nested composition your transformation data between the nested composition layer and the layers contained in that composition will be connected or ‘collapsed’ as After Effects puts it.
From a practical perspective this means that any transformations you make to the nested composition in the timeline will affect all of the layers in the contained composition as well. This removes the typical 2D restrictions that apply to most pre-composed compositions.
Note: The render order will start with all of the layers in the nested composition and ultimately end with the composition being rendered as a layer in the timeline.

Benefits of the Collapse Transformations Feature
Now this concept can be really confusing without an example, so let’s talk about a few of the benefits of the Collapse Transformations feature.
1. PRE-COMPS ACT LIKE FOLDERS RATHER THAN 2D FOOTAGE
Typically when you precompose a layer or series of layers in the timeline the nested composition interacts like footage in the timeline. What I mean by this is that all of the layers contained in the composition will be rendered as a 2D footage layer. If you hit the 3D button you’ll see that your 2D footage layer is flatter than steamrolled silly-putty. Essentially, the 3D properties of your layers inside will not be retained.
However, When you have the Collapse Transformations switch selected, your contained layers will RETAIN their 3D properties. This means your pre-comp will work much more like a folder that houses all of the 3D layers, rather than a 2D footage layer with edges. This completely removes the borders from your composition.

This is super handy if you need to organize all of the 3D objects in your scene or if you want to retain the 3D position of your layer in your timeline when you pre-compose.
2. YOU CAN EASILY APPLY EFFECTS TO MULTIPLE LAYERS
Another great use for the collapse transformations feature is the ability to apply effects to multiple layers very quickly. For example, If you need to quickly apply color or stylization effects to a sequence of layers you can do it in three quick steps:
- PreCompose Your Desired Layers
- Hit the Collapse Transformations Effect
- Apply the Effects
Now it’s important to note the rendering order for compositions with Collapsed Transformations. Any effects applied to a nested composition will take priority over the effects applied to the individual 3D layers contained inside. If you apply an effect to your nested composition your 3D layers will lose their ability to interact with other 3D objects in your timeline. This means features like casting shadows, accepting lights, and passing behind other 3D layers in the composition will be nullified.
3. YOU CAN ADJUST 3D PROPERTIES FOR MULTIPLE LAYERS
By using the Collapse Transformations switch you can give yourself the ability to adjust the transformation data for multiple 3D layers from a single composition layer. In a way, this makes your pre-comp transformation data act as if it was a parented null object to all of the 3D layers housed inside.

4. YOU CAN ORGANIZE YOUR COMPOSITIONS
One of the easiest uses of the Collapse Transformations switch is simply to organize your 3D layers. Because of this switch you don’t have to sift through hundreds of 3D layers. Once you get your transformations right just precompose the composition and hit that Collapse Transformations effect.
NOW WHAT HAVE WE LEARNED?
I hope you’ve learned a lot from this article and tutorial. This term can definitely be confusing so feel free reference this article in the future as you have questions. The biggest takeaway is that the Continuous Rasterize and Collapse Transformations switch changes the render order of your layers in the timeline. By using the Continuous Rasterize feature you can depixelate any vector object in After Effects. And by using Collapse Transformations you can connect transformation data between nested and contained compositions.
You’ll be surprised at just how much you’ll use this feature in your After Effects workflow. Plus, think of how cool you’ll be when you can tell your friends you know how to connect transformation data across nested compositions…

Take Your Skills Further with After Effects Kickstart
Check out After Effects Kickstart, available with School of Motion All-Access.
ENROLL NOW!
Acidbite ➔
50% off everything

ActionVFX ➔
30% off all plans and credit packs - starts 11/26

Adobe ➔
50% off all apps and plans through 11/29

aescripts ➔
25% off everything through 12/6
Affinity ➔
50% off all products

Battleaxe ➔
30% off from 11/29-12/7
Boom Library ➔
30% off Boom One, their 48,000+ file audio library
BorisFX ➔
25% off everything, 11/25-12/1

Cavalry ➔
33% off pro subscriptions (11/29 - 12/4)

FXFactory ➔
25% off with code BLACKFRIDAY until 12/3

Goodboyninja ➔
20% off everything

Happy Editing ➔
50% off with code BLACKFRIDAY

Huion ➔
Up to 50% off affordable, high-quality pen display tablets

Insydium ➔
50% off through 12/4
JangaFX ➔
30% off an indie annual license
Kitbash 3D ➔
$200 off Cargo Pro, their entire library
Knights of the Editing Table ➔
Up to 20% off Premiere Pro Extensions
Maxon ➔
25% off Maxon One, ZBrush, & Redshift - Annual Subscriptions (11/29 - 12/8)
Mode Designs ➔
Deals on premium keyboards and accessories
Motion Array ➔
10% off the Everything plan
Motion Hatch ➔
Perfect Your Pricing Toolkit - 50% off (11/29 - 12/2)

MotionVFX ➔
30% off Design/CineStudio, and PPro Resolve packs with code: BW30

Rocket Lasso ➔
50% off all plug-ins (11/29 - 12/2)

Rokoko ➔
45% off the indie creator bundle with code: RKK_SchoolOfMotion (revenue must be under $100K a year)

Shapefest ➔
80% off a Shapefest Pro annual subscription for life (11/29 - 12/2)

The Pixel Lab ➔
30% off everything
Toolfarm ➔
Various plugins and tools on sale

True Grit Texture ➔
50-70% off (starts Wednesday, runs for about a week)

Vincent Schwenk ➔
50% discount with code RENDERSALE

Wacom ➔
Up to $120 off new tablets + deals on refurbished items


Learn After Effects the Right Way
Master the After Effects interface and build a real animation skillset. Enroll in All-Access to unlock AE Kickstart and 50+ other courses.