

All-Access Pass
Unlimited access to 50+ courses, unlimited critique, live events, and 24/7 community. Join School of Motion All-Access today.

How do Styleframes and Boris FX Optics enhance your Photoshop projects?
Have you ever completed a project in Photoshop only to feel it’s still half-finished? Did you know that using styleframes and Boris FX Optics can take your images from “eh” to “exceptional?” With just a little effort, and a bit of experimentation, Boris Optics can help you hone your ideas into something spectacular. It’s time to ditch that folder of lens flares, glints, and glares.
So many artists pour hours into their work only to quit at the ten yard line. With just a little more effort, and a little knowledge about the program, you can add incredible dimension to your images. Boris Optics helps you take your compositions and bring them together, adding cohesion that makes it look like everything was shot on the same day in the same location.
In this tutorial, we’ll show you:
- What is Boris Optics
- How to open Boris Optics
- How Optics rescues your work
- Why you should lose prebuilt packs
Grab a Special Discount from Boris FX Optics!
We're excited to share a special offer from our friends at Boris FX. For the month of March, the School of Motion audience can save 25% off Boris FX Optics.
The discount can be applied to a new purchase OR the annual subscription for an excellent and affordable option.
To take advantage, to this link here and use discount code: SOM-optics25
What is Boris FX Optics?
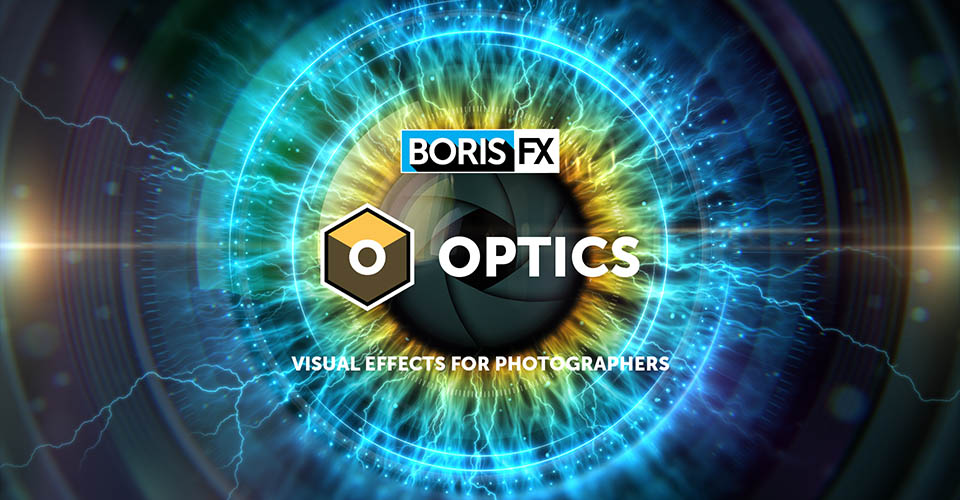
Boris FX Optics is a Cinematic Effects plugin that brings a huge number of tools to Adobe Photoshop and Lightroom. Created by Oscar-winning effects artists, this plugin brings film-quality lighting and lens effects, curated film looks, and realistic particle creation tools designers.
Though it is great to have thousands of filters, particle presets, and effects kits, one of our favorite features of Boris FX Optics is its ability to accurately mimic real-world photography. It is possibly the only Photoshop plugin to emulate the physical characteristics of optical lenses. This allows you to create images that look as though they were captured in the real world, no matter how fantastical they appear.
So what can you do with Boris FX Optics? Let’s take a look at a real project.
How to Apply Boris FX Optics in Photoshop
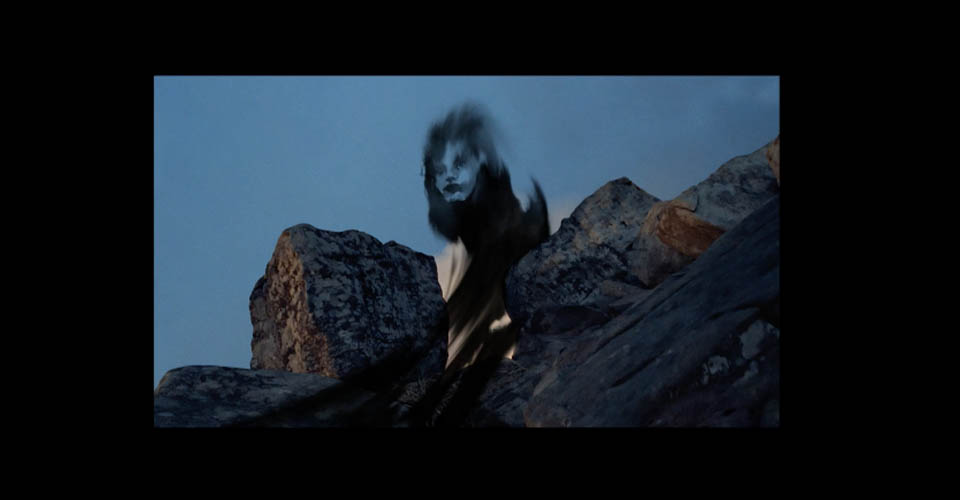
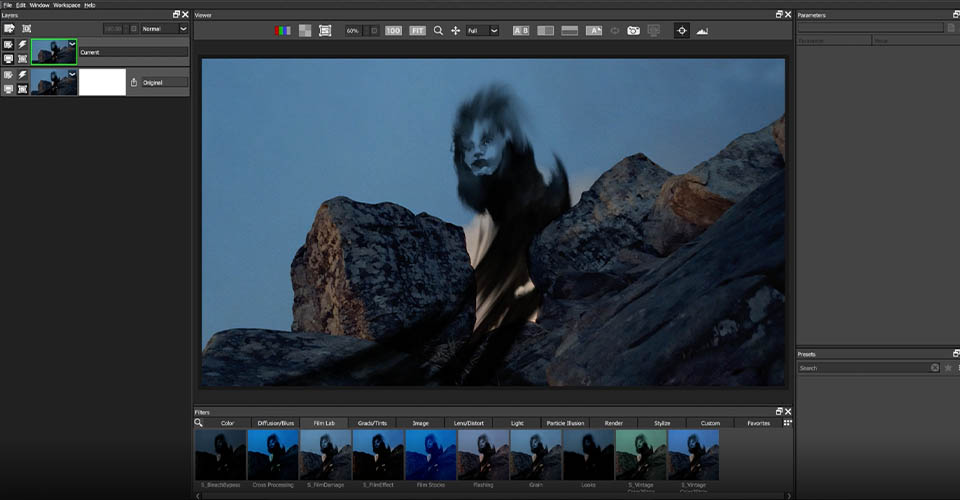
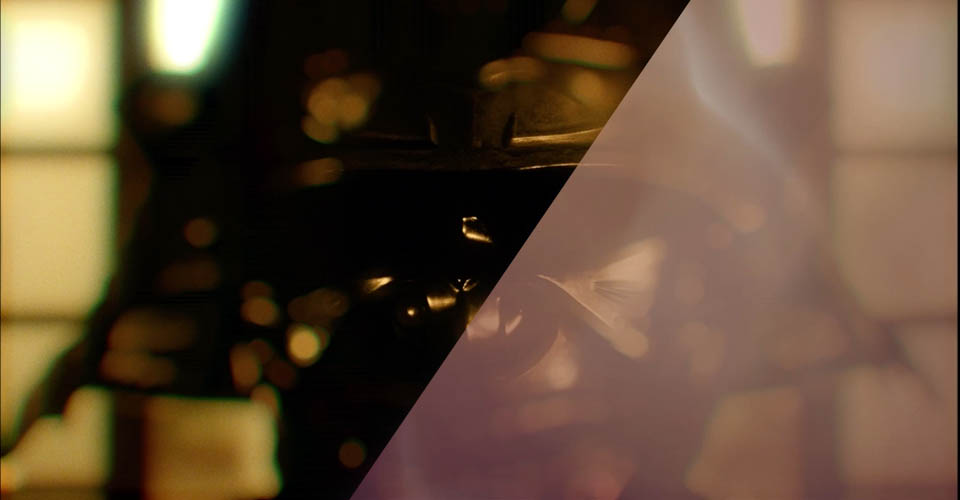
For this project, we were tasked with creating an image that combined real-world elements with a brush stroke that formed a ghostly visage. We found the assets we wanted to use and photobashed them together until we had a decent arrangement of pieces. The problem is that, if you look at the image above, it looks bashed together. We need to tie these elements together.
One of the first things we do, once we’re happy with the arrangement of layers, is to bring everything together. You can do this with CTRL/CMD+E to flatten everything into one layer. Then, convert to a smart object by going to Layer > Smart Objects > Convert to Smart Object.
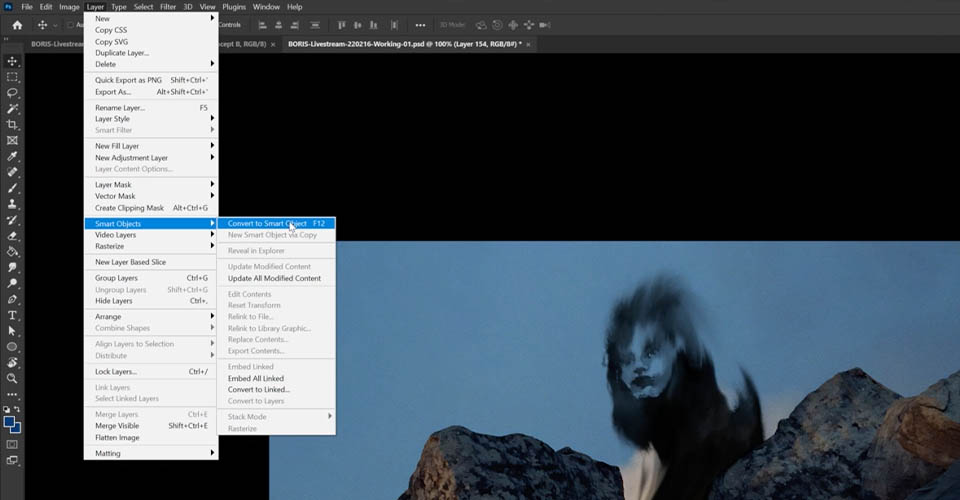
Smart objects in Photoshop allow you to make changes without destroying the original image, which is great when you want to experiment. Now go to Filter > Boris Effects > Optics 2020.
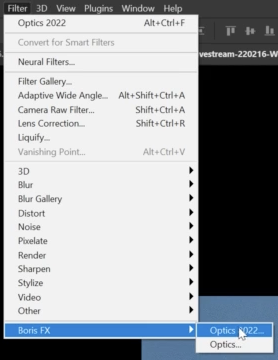
And once you’ve selected your image, you’ll be greeted with Boris FX Optics’ window.
Right off the bat, you can see all the different presets available to you. If you’ve ever used Optics before, you’ll be able to bring up old presets, or any other combinations you’ve used. We find it incredibly helpful to be able to compare different looks altogether, so you can find which will work best for your project.
How to use Boris Optics with Photoshop
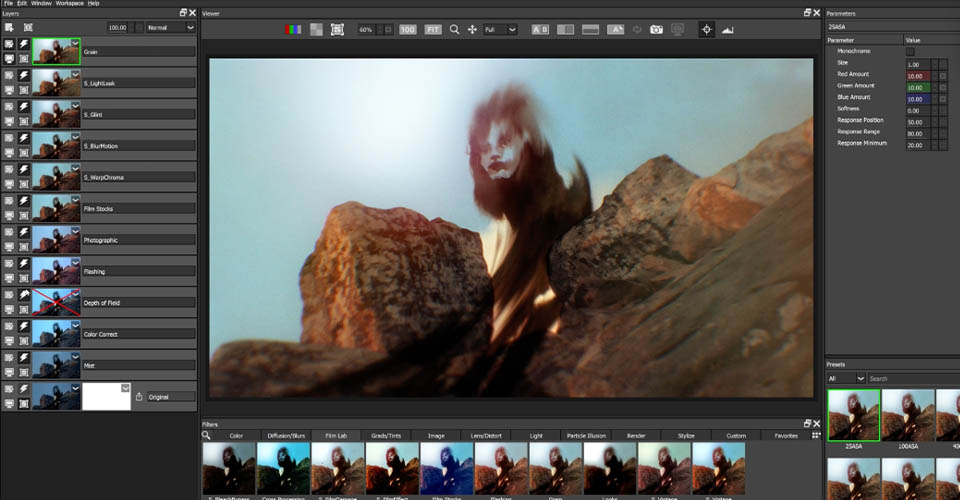
In Boris FX Optics, you have a powerful effects tool set at your fingertips. In the above image, we’ve applied a subtle grain, used a creative depth of field in key areas, and obviously dropped some color correction to bring all our elements together in a cohesive composition. So how do you get started?

On the left side of the screen you’ll see our layers. Just as with Photoshop, you can layer effects, apply filters, set opacity, and compose your image with a fine brush. What’s great is how this tool set feels so complimentary to Photoshop. If you’re comfortable working with the main program, you’ll feel right at home in this plugin.
The only thing you can’t do is move layers around, but you’ll quickly learn how to plan out your effects and lay them down in order to achieve great results.
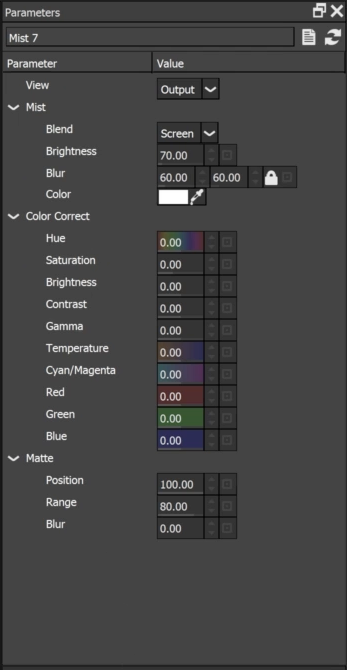
When you apply an effect in Optics, you’ll see the Parameters window on the right side of the screen. This allows you to adjust and tweak the effect to your liking, and you can really get granular. Subtle shifts in one area or another can have a huge impact on your image. You’ll also see a list of presets based on the chosen effect.

Even better is the ability to preview, compare, and contrast how different effects and presets will affect your final image. When you’re experimenting with Optics, it’s helpful to explore a variety of options until you hone in on your desired look.
However, our favorite bit of “secret sauce” in Optics is the ability to bring your photobashed images together in a cohesive way. It’s an effect called Warp Chroma.
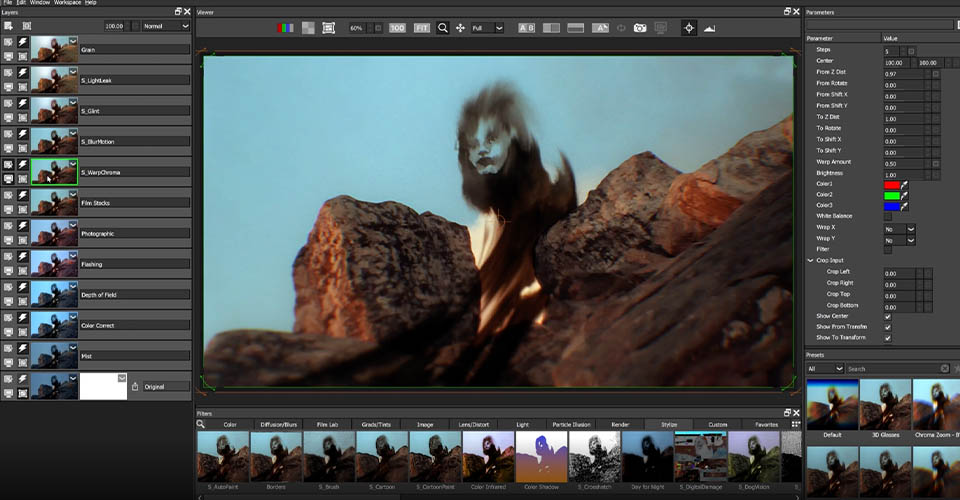
What this does is subtle shift the RGB channels, adding a soft blur that blends different layers together and makes your image look more cohesive, as if all the elements were shot in the same location on the same day. You’ll need to play around with the percentages (we ended up at .97 for our desired effect), but the results are great.
Why you should lose prebuilt packs in Photoshop
Look, presets are great. If you’re just starting out in Photoshop (or any design program for that matter), presets will save your life. They are designed by professionals to finish your looks, adding subtle effects that improve the overall composition. However, as you gain experience—and find your personal voice—you’ll start to notice that presets sometimes only get you 90% of the way to your desired vision.
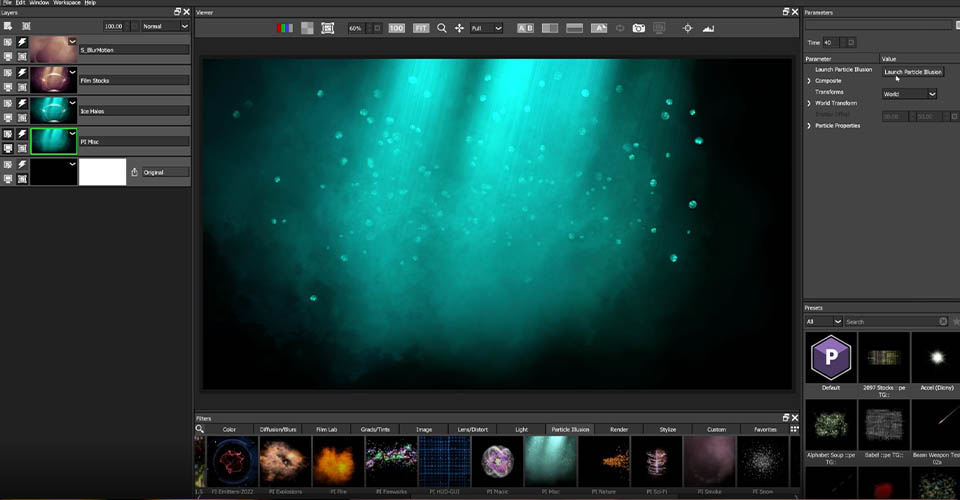
In Boris FX Optics, you can launch Particle Illusion, a built-in effects generator that allows you to create custom particle effects for your project. It is a complex—but not complicated—design tool. You can combine various looks, tweak the effect to your liking, and bring that over to your image to create a look that is entirely your own.
As you layer more and more effects in Optics, you can adjust opacity, add warps, and find the grain that complements your work in the best way. Curating your effects to create the final look is not difficult once you’ve played around with the tool set, and it's an incredibly satisfying feeling to create something wholly unique.
Want to master design elements? Then get ready for bootcamp
We’ve touched on one of the most important skills you can have as an artist: an eye for design. If you want to create compositions that are absolutely stunning, you need to understand and apply the principles of design to everything you do. If you’re not sure where to start, we recommend Design Bootcamp!
Design Bootcamp shows you how to put design knowledge into practice through several real-world client jobs. You’ll create style frames and storyboards while watching typography, composition, and color theory lessons in a challenging, social environment.
ENROLL NOW!
Acidbite ➔
50% off everything

ActionVFX ➔
30% off all plans and credit packs - starts 11/26

Adobe ➔
50% off all apps and plans through 11/29

aescripts ➔
25% off everything through 12/6
Affinity ➔
50% off all products

Battleaxe ➔
30% off from 11/29-12/7
Boom Library ➔
30% off Boom One, their 48,000+ file audio library
BorisFX ➔
25% off everything, 11/25-12/1

Cavalry ➔
33% off pro subscriptions (11/29 - 12/4)

FXFactory ➔
25% off with code BLACKFRIDAY until 12/3

Goodboyninja ➔
20% off everything

Happy Editing ➔
50% off with code BLACKFRIDAY

Huion ➔
Up to 50% off affordable, high-quality pen display tablets

Insydium ➔
50% off through 12/4
JangaFX ➔
30% off an indie annual license
Kitbash 3D ➔
$200 off Cargo Pro, their entire library
Knights of the Editing Table ➔
Up to 20% off Premiere Pro Extensions
Maxon ➔
25% off Maxon One, ZBrush, & Redshift - Annual Subscriptions (11/29 - 12/8)
Mode Designs ➔
Deals on premium keyboards and accessories
Motion Array ➔
10% off the Everything plan
Motion Hatch ➔
Perfect Your Pricing Toolkit - 50% off (11/29 - 12/2)

MotionVFX ➔
30% off Design/CineStudio, and PPro Resolve packs with code: BW30

Rocket Lasso ➔
50% off all plug-ins (11/29 - 12/2)

Rokoko ➔
45% off the indie creator bundle with code: RKK_SchoolOfMotion (revenue must be under $100K a year)

Shapefest ➔
80% off a Shapefest Pro annual subscription for life (11/29 - 12/2)

The Pixel Lab ➔
30% off everything
Toolfarm ➔
Various plugins and tools on sale

True Grit Texture ➔
50-70% off (starts Wednesday, runs for about a week)

Vincent Schwenk ➔
50% discount with code RENDERSALE

Wacom ➔
Up to $120 off new tablets + deals on refurbished items


All-Access Pass
Unlimited access to 50+ courses, unlimited critique, live events, and 24/7 community. Join School of Motion All-Access today.


