
All-Access Pass
Unlimited access to 50+ courses, unlimited critique, live events, and 24/7 community. Join School of Motion All-Access today.

Make Work that Stands the Test of Time.
There’s no doubt about it, there’s an overwhelming amount of insanely solid motion design work out there these days, with more and more coming out every day. It’s really important to stay fresh on what’s latest and greatest.
Honestly, sometimes I see motion work that’s just so good it makes me wonder if I should give up and find a new industry! On better days, great work from around the industry inspires me to try something new or push my limits a bit, or even try to recreate a piece of a project on my own.
As I see it, you can react one of two different ways to seeing work that makes you ask “how on earth did they do that?” You can:
a) listen to the voice of impostor syndrome that tells you you’ll never be able to create stuff on that level, or...
b) you can try and learn something from what you’ve just seen.
I’d like to share about a recent experience I had, where I witnessed something awesome that something I just had to try and figure out how to recreate. In this article I’m going to show you what I saw, what I ended up creating, walk you step-by-step through my thought process, and share some little tricks in After Effects that I hope you’ll find useful.
But before I dive in, I want to say a couple things. Yes, I’m writing this piece as a tutorial of sorts, and there will be “instructions” for how to make what I made. But my main hope in putting this together is that you’d learn something from my process and the questions I asked in approaching this scenario.
The reality is, one-off tips and tricks won’t help you make amazing things on your own, and neither will making carbon copies of things people make tutorials about. If you want to make work that stands the test of time, I believe you need to be a solid problem-solver as well as a solid animator. It’s with an eye to the former skill I’m writing this — and to that end, this is going to be a long article.
{{lead-magnet}}
Getting Inspired: What Kicked it Off
If you’re not following Andrew Vucko, you should be. He’s one of the artists I most consistently look to for inspiration. A few months ago I saw a cutdown of a piece he did for Tweed that, among other awesome stuff, had a quick shot (about 0:48 in) that had some 3d-looking spirals in it. Though on screen for maybe two seconds, I was completely riveted. Was that 3d? 2d? I knew right away I needed to figure out how to pull that shot off.
Personally, I love figuring out how to fake 3d things in After Effects (admittedly, part of that is I’m just scared of Cinema 4D), and I liked the challenge of trying to see if I could do that here.
When approaching an animation that’s going to be potentially complex, I like to start by writing out observations, thoughts, and questions on paper. For me, this helps me process the different things I’m going to have to accomplish in order to solve a particular problem.
Starting away from the computer helps me think a bit more clearly and break what might seem like a big problem into smaller, more manageable chunks. So, after staring scrubbing through the Tweed shot for a while, I sat down with a paper and pencil and processed my thoughts.
Here’s some of what I wrote down:
- It kind of looks like a bunch of 2d circles in a ring, but there’s no seam or overlap
- Part of what makes this look psychedelic is that the rings are rotating in opposing directions
- I should start by trying to make one ring, not the whole scene
- If this is made up of 2d circles, the fill colors need to alternate – maybe there’s a way I can automate this with expressions?
- Things I’d like to rig up front to be easily editable for animating later:
- Size of all circles
- Distance from center of comp
- Getting shapes to overlap seamlessly might be tough – set matte? Alpha matte? Something else?
Taking the thoughts and musings above and narrowing everything down, I decided to approach this task in 3 steps, ordered from what I was most sure of how to execute to least sure:
- Start by creating one ring of circles around the center, with size and distance from center rigged.
- Find a way to automate alternating colors
- Make it appear that no layers are on top of or below others
I find that the most complex shots, transitions, etc don’t end up feeling quite as intimidating to me once I’ve taken the time to list out all the different things I can think of that will go into making it happen. Most of the time, starting from what I feel most sure of (or least unsure of, in some cases) helps me find a starting point when tackling something complex and build momentum to solve the tougher parts later on. Baby Steps.
Getting into After Effects
Alright! Enough preamble — now that I’ve given you a bit of the backstory, let’s hop into After Effects and start making trippy stuff!
One Ring to Rule them All
Starting with a 1500x1500 comp, I created a circle by double-clicking the ellipse tool icon in the menu bar. Knowing ahead of time I wanted to be able to control ellipse size (ring thickness) and distance from center (ring radius) I added a null object and named it “Ctrls”, and added slider controls for both these properties, named appropriately. For the ellipse size, I pick whipped the “Size” property to the “Size” slider on the Ctrls null.
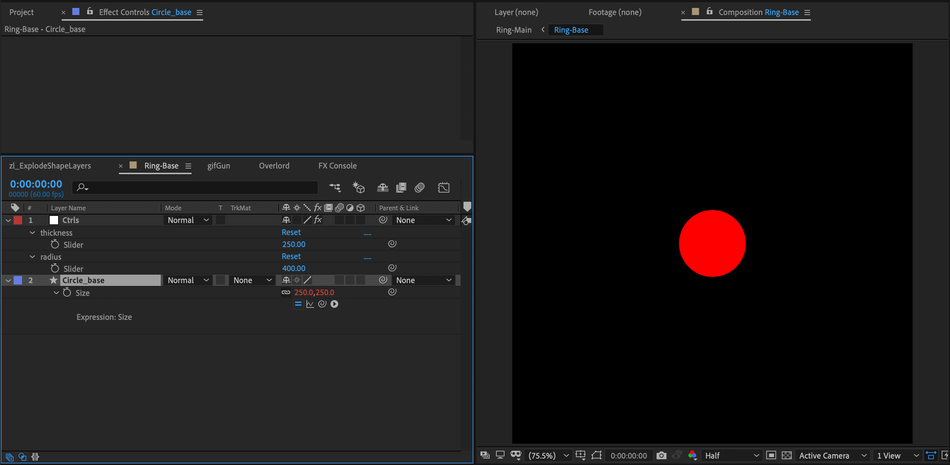
The distance was a bit less straightforward. Knowing that I needed these circles to rotate around the center of the comp to create a ring, I needed a way to keep their layer anchor points in the center of the comp while maintaining their shape anchor points in the center of the shape itself.
If I move the layer using position, the center point moves with the layer and I can’t easily rotate it around the center.
However, if I adjust the position of the shape, we can see that the circle moves away from the center too. And if I rotate the layer, it still rotates around the center. Perfect, let’s link this to our slider.
Position is a type of property called an array — meaning it has more than one value — so our expression needs to output two values. To make this work, we need to assign the slider to a variable, and by pick-whipping After Effects will automatically do this for us. The variable is placed for both the x and y values, but for our example we just need the slider to affect the y position. This constrains the movement away from the center to only one axis, keeping the movement a little cleaner.
temp = thisComp.layer("Ctrls").effect("dist")("Slider");
[0, temp]
Great! We’ve got one piece down.
Now, let’s make a ring out of them! To do this, we need all of our circles to rotate themselves around the center of our comp, and for their rotation to add up to 360º (the number of degrees in a full circle). So, if we have 4 circles, they each need to be rotated 90º, or 360/4; if we have 12, they’d need to be rotated 360/12 or 30º, and so on and so forth. Essentially, each circle needs to be rotated 360º (the number of degrees in a full circle) divided by the number of circles we’ve got in our comp.
Of course, it’d be great if we didn’t have to manually adjust this property on every single layer! Expressions to the rescue again. Turns out there’s a handy expression that will let us know how many layers we’ve got in our comp:
thisComp.numLayers.
So, let’s add an expression to the “Rotation” property of our base circle. Let’s first create a variable numCircles and set it equal to thisComp.numLayers. However, we don’t want to factor our null control layer into this calculation, so let’s adjust this to “thisComp.numLayers-1”. Next, let’s divide 360 by this number (to get our rotation increment) in a variable called “rot”, so rot = 360/numCircles.
numCircles = thisComp.numLayers-1;
rot = 360/numCircles;
Now, if we duplicate our circles, they’re all rotating the exact same amount — which isn’t really what we want.
We need these to rotate in the same increments — so if we have 4 circles that would rotate by 90º each (360/4) to form a full circle, the first is rotated 90º (90*1), the second is 180º (90*2), the third is 270º (90*3), and the fourth is 360º (90*4). Essentially, each circle has to rotate by its “circle number” multiplied by our 360/numCircles variable.
In After Effects, we can grab a layer’s layer number using “index”. Once again, we don’t want to factor in our controller null into the equation here, so if we add another variable to our rotation expression (let’s call it “ind” for a shortened version of “index”), and set it equal to thisLayer.index-1, we can multiply this by our “rot” variable so that when we duplicate layers, each will rotate incrementally.
Let’s see if this works.
numCircles = thisComp.numLayers-1;
rot = 360/numCircles;
ind = thisLayer.index-1;
rot*ind
Great! We’ve solved step 1. If I haven’t managed to bore you yet, keep reading — we’re about to do some more expression magic.
ALTERNATING COLORS
Now, let’s tackle getting these things to automatically alternate colors. Let’s add two color controls to our control Null, and name them “Color 1” and “Color 2”, so if we want to change the colors later on, that will be real easy. I’ll set Color 1 and 2 to be black and white, respectively.
This was something I wasn’t exactly sure how to approach. While it’s not difficult to link a fill color to a color control, I didn’t want to have to adjust each layer individually if I added or subtracted circles. Feeling a bit stuck, I decided it was time for another “brain dump” on paper.
- Idea A: I need the colors to alternate between Color 1 (white) and Color 2 (black) every time I add a new layer. So if I duplicate Circle 1, the second copy needs to be black. If I duplicate it again, it needs to be white. If I duplicate that, it needs to be black. And so on, and so forth. This is my ideal solution.
- Idea B: Alternatively I could start with two circles, with fills expression linked to the two colors on the Ctrl layer. If could duplicate this pair of circles so the colors alternate. Only annoying thing here is that I have to be careful I’m always duplicating in pairs.
- All the circles are rotating in increments of 1 (Circle 1 rotates 1 * the rotation amount, Circle 2 rotates 2 * the rotation amount, and Circle 3 rotates 3* the rotation amount, etc). Can I make the same idea happen for the colors but in increments of 2? I.e. Circle 3 is the same as circle 1, circle 4 is the same as 2, etc etc etc. So odd layers are color 1 and even layers are color 2? Could potentially use index +/- 2 to reference even/odd layers, or a % operator. Index - 2 won’t work if there’s a layer index = 2 though.
With a couple viable ideas in my head, I decided to get back into AE. I really wanted to find a way to get my “ideal solution” to work — mostly because I’m stubborn, but also on a practical level it seemed best to me to be able to duplicate just one layer, and have everything change automatically from there.
The idea that stuck with me the most was that “odd layers are color 1 and even layers are color 2”. Mathematically, even numbers are those that are divisible by 2, and odd numbers are those that aren’t. So if there was a way to calculate if a layer’s index was odd or even, I could begin to make something work. Because math.
Expressions to the rescue (yet again!). If you’re not familiar with the modulus (%) operator, it’s sort of like dividing, but it outputs only the remainder — what’s left over — when you divide one number by another. A couple examples:
- 18%5 — the closest 5 can get to 18 by multiplying is 15 (5x3), and the remainder (difference between 18 and 15) is 3, so 18%5 is 3.
- 11%10 — 10 can only be multiplied by 1 (simply outputting 10) before it becomes greater than 11, so here the result would be 1 (11-10 = 1).
- 10%2 — You can actually divide 10 by 2 evenly, with no remainder (10/2 = 5). So here, 10%2 would be 0.
Remembering that even numbers are divisible by 2 and odd numbers aren’t, if we take a layer’s index value and “modulus” it by 2, we’ll either get a result of 1 (if the number is odd) or 0 if the number is even.
- 1%2 = 1, because 0 is the nearest number 2 can multiply to without passing 1 and 1-0 = 1
- 2%2 = 0, because 2 multiplies evenly into 2 with no remainder.
- 3%2 = 1, because 2 is the nearest number 2 can multiply to without passing 3 and 3-2 = 1
- 4%2 = 0, because 2 multiplies evenly into 4 with no remainder.
- 5%2 = 1, because 4 is the nearest number 2 can multiply to without passing 5 and 3-4 = 1
And so on and so forth. So, running a %2 on a layers index will only ever yield a result of 1 or 0. This can be nicely paired with what’s called an “if/else” statement in expressions to assign Color 1 to our odd layers and Color 2 to our even layers. If you’re not familiar with if/else’s, here’s a quick breakdown of how they work:
if (this thing is true) {
Make the value this thing
} else {
Make the value this other thing instead
}
In our case, we’d want it to read something like this:
if (this layer index is odd) {
Fill it with color 1
} else {
Fill it with color 2
}
So, let’s make this work! Let’s create a variable n for whether or not the layer is even.
n = thisLayer.index%2;
if (n == 0) {
thisComp.layer("Ctrls").effect("Color 1")("Color")
} else {
thisComp.layer("Ctrls").effect("Color 2")("Color")
}
(Keep in mind, when using expressions, one equals sign “=” is used for assigning variables (such as n = thisLayer.index%2), and two “==” are used to calculate if two values are equal to each other). Boom! Now we can hit Cmd/Ctrl-D to our heart’s content, and we’ll get a full ring of circles that automatically alternate between the two colors we’ve set on our null.
However, we’ll quickly see there’s a problem: the circle at the top of the layer stack is clearly on top of other layers, sort of ruining the illusion of seamlessness. We’ll tackle this final problem next.
THERE SEAMS TO BE A PROBLEM
This was probably the part this setup I felt least clear on how to approach going in — but with being so close to being done, I couldn’t give up. Once again, I turned to a piece of paper to process what was going on in my head.
- What am I trying to solve for here? I need the circles at the very top of the layer stack to somehow look as if they’re underneath the circles they overlap with so we don’t see a full circle.
- Set Matte would potentially work, but would be a pain in the butt. I would need to manually select which circles to use as mattes, and this would change if I added or subtracted circles from the ring. Advantage is that this doesn’t add layers to the comp.
- Alpha mattes could also work, but this would mean adding layers which would mess up all the expressions. Same problem as with Set Matte in that I’d need to re-do which layers are matted, AND which layers they use as mattes, if the number of circles change.
- Is there something that doesn’t involve having to add a bunch more layers? Maybe precomp everything, duplicate, mask out the circle and then rotate so the two copies overlap and hide the seam?
As often is the case after a brain dump, the last thing I wrote down made the most sense to me as a starting point. I resolved to try the precomp and mask/rotate idea. So, I did a good old-fashioned Cmd/Ctrl-A and then a Cmd/Ctrl-Shift-C, naming it “Ring-Base-01” so I’m just looking at one precomp.
I started by roughly masking out the offending circle — then duplicated the precomp, deleted the mask, and placed it below the masked precomp. Initially, this looks exactly the same as where we started. BUT, if we start rotating the bottom precomp, we’ll see that offending circle disappear pretty quickly. Boom!
But I quickly discovered a couple issues with this method. First, if I add or subtract circles in the precomp, I have to adjust the masking and rotation in this main comp. Second, I have to zoom in pretty tight and tweak the rotation a lot to make sure there aren’t any weird edges.
My general rule of thumb is that I want my “rigs” to allow me to make as many changes as quickly + easily as possible without having to spend more time correcting things to accommodate the changes I’ve made. At this point, this method wasn’t not working, but I felt there was some room for improvement. Thinking through the above issues, I decided to see if there was a way I could hide the seam from within the precomp, so as to minimize having to jump between comps to make edits.
Here, I got really lucky and the first idea that popped into my head ended up working. It was really the same idea as the duplicated precomps + mask + rotation, but executed slightly differently.
Inside my base precomp, I added an adjustment layer and drew a rough mask over the circle that was poking out. Remembering that all the expressions for rotation on the circles were using “thisComp.numLayers-1” to eliminate the null from the rotation equation, I realized I’d have to edit these to subtract 2 instead of 1 so the new adjustment layer wasn’t factored in either. The advantage of how things were built, though, is that I could simply delete all the circles except one, adjust the expression, and then duplicate until I had the same number of circles again. No big deal.
I then added a transform effect, and started adjusting/tweaking the rotation until I couldn’t see the circle any more.
In my mind, this was already a better solution than the previous, because now if I add or subtract circles I’ll see if that messes things up right away, without having to jump into another comp — eliminating one step from making changes to the ring.
But this still didn’t solve the problem of the rotation being messy.

I figured through trial and error that the amount of rotation on the adjustment layer needed to perfectly mask out the top circle would have to somehow correlate to the incremental rotation of all the individual circles. So, if I had 36 circles, each rotated by 10º to fill a full 360º circle, the adjustment layer would need to rotate by some factor of 10º to keep everything seamless.
The solution? You guessed it — expressions.
I copied and pasted the rotation expression from one of the circle layers into the rotation on the Transform effect as a starting point.
numCircles = thisComp.numLayers-2;
rot = 360/numCircles;
ind = thisLayer.index-2;
rot*ind
In this case, we don’t need a variable for the index of the Adjustment Layer. Instead, we want to make sure that the Rotation property of the Transform Effect is always constrained to the same increments that the circles are being rotated by. So I added a Slider Control to the Adjustment Layer, named it “rot offset”, and adjusted the expression like so:
numCircles = thisComp.numLayers-2;
rot = 360/numCircles;
rot_offset = effect("rot offset")("Slider");
rot*rot_offset
Now when I adjust the “rot offset” slider, the Adjustment Layer rotates everything within the mask in increments proportional to the rest of the circles. And if we zoom in, we can see everything is perfectly seamless! BOOOOOM.
The Final Details
From here, the rest of the process really just involved making a couple more new copies of the Base precomp, changing the appearance of each ring slightly, and then collecting all three rings into one Main comp. I then added some simple animation to the Size and Dist sliders on the control nulls in each precomp to make things more interesting, as well as some rotation on the precomps within the Main comp to add some more movement. As an extra touch to get some subtle depth and shading, I added Inner Glow Layer Styles to each ring, with a black shadow set to Multiply so the edges of the rings would have a bit of shading on them. After some more tweaking and adjusting parameters, I decided to call it a day and export a GIF.

Conclusion: Ask the Right Questions
I spent a few years working at a Genius Bar in an Apple Store. When I was hired, I was surprised that they spent more time training us how to ask questions than making us memorize technical information about iPhones. But, I quickly learned there was a point to this. If all I knew was technical information, if I ever encountered an issue that I didn’t know anything about (which was inevitable), I’d be unable to do anything. But, on the other hand, if I knew what kinds of questions to ask and who or where to look for answers from, I could reasonably approach any problem and have a good shot at at least isolating the root cause to a couple different possibilities.
In the same way, I think (preaching to myself here) it’s extremely important as artists to push ourselves to grow as problem-solvers and not just as animators. I encounter situations on almost every project where I’m faced with a shot don’t know how to animate off the top of my head, and have to do a good deal of figuring out to wrap my head around how to approach it. Solutions range from nerdy expressions to messy masking and everywhere in between, or some weird combination of clean and messy approaches (like we saw here).
When you see work that makes you ask the question “how on earth did they do that”, chances are the artist didn’t know the answer to that very question themselves when they started out on the shot or project
Did you know it took a year of experimentation to get 10 seconds the directors of SpiderVerse were happy with!
It’s okay — and not just okay, perfectly normal — to not know where to start animating something.
There’s sort of a running joke in the industry about people commenting “What software did you make this in?” on different artists’ work. This is a totally reasonable question! However, I’d encourage all of us — myself the foremost — to instead ask questions like “Is there a way I could try to pull something like this off with the tools I’m familiar with” or “what would I need to learn to be able to do something like this?”, and then — here’s the real important part — just go try.
ENROLL NOW!
Acidbite ➔
50% off everything

ActionVFX ➔
30% off all plans and credit packs - starts 11/26

Adobe ➔
50% off all apps and plans through 11/29

aescripts ➔
25% off everything through 12/6
Affinity ➔
50% off all products

Battleaxe ➔
30% off from 11/29-12/7
Boom Library ➔
30% off Boom One, their 48,000+ file audio library
BorisFX ➔
25% off everything, 11/25-12/1

Cavalry ➔
33% off pro subscriptions (11/29 - 12/4)

FXFactory ➔
25% off with code BLACKFRIDAY until 12/3

Goodboyninja ➔
20% off everything

Happy Editing ➔
50% off with code BLACKFRIDAY

Huion ➔
Up to 50% off affordable, high-quality pen display tablets

Insydium ➔
50% off through 12/4
JangaFX ➔
30% off an indie annual license
Kitbash 3D ➔
$200 off Cargo Pro, their entire library
Knights of the Editing Table ➔
Up to 20% off Premiere Pro Extensions
Maxon ➔
25% off Maxon One, ZBrush, & Redshift - Annual Subscriptions (11/29 - 12/8)
Mode Designs ➔
Deals on premium keyboards and accessories
Motion Array ➔
10% off the Everything plan
Motion Hatch ➔
Perfect Your Pricing Toolkit - 50% off (11/29 - 12/2)

MotionVFX ➔
30% off Design/CineStudio, and PPro Resolve packs with code: BW30

Rocket Lasso ➔
50% off all plug-ins (11/29 - 12/2)

Rokoko ➔
45% off the indie creator bundle with code: RKK_SchoolOfMotion (revenue must be under $100K a year)

Shapefest ➔
80% off a Shapefest Pro annual subscription for life (11/29 - 12/2)

The Pixel Lab ➔
30% off everything
Toolfarm ➔
Various plugins and tools on sale

True Grit Texture ➔
50-70% off (starts Wednesday, runs for about a week)

Vincent Schwenk ➔
50% discount with code RENDERSALE

Wacom ➔
Up to $120 off new tablets + deals on refurbished items


All-Access Pass
Unlimited access to 50+ courses, unlimited critique, live events, and 24/7 community. Join School of Motion All-Access today.