
All-Access Pass
Unlimited access to 50+ courses, unlimited critique, live events, and 24/7 community. Join School of Motion All-Access today.

Learn how to record your own Motion Capture data for Cinema 4D for cheap!
Welcome to the second part of our series covering Character Animation using Mixamo in Cinema 4D. In our previous article we took a look at how to Rig and Animate 3D Characters with Mixamo in Cinema 4D using Mixamo's character animation library. At this point you may have begun to play with Mixamo and have come to the realization that the mocap library may not be as extensive as you wished.
For example, What if you needed a very specific movement for a project? What if you wanted to motion capture your own movements? Do you need to rent one of those ping-pong ball suits?! I was just as curious as you so I took some time to research and test a DIY motion capture system that can be imported into Cinema 4D. The result is my recreation of the "crane kick" scene from the original Karate Kid movie. I've even setup a free project file for you to download and mess around with. Enjoy!
{{lead-magnet}}
Now before the Karate Kid movie buffs give me flack for Johnny Lawrence not infamously crawling on his face after a right head kicking, let me add that I had to improvise with FallingBackDeath.fbx from the Mixamo library due to recording in a small room. I mentioned this was DIY, right?

DIY Motion Capture for Cinema 4D
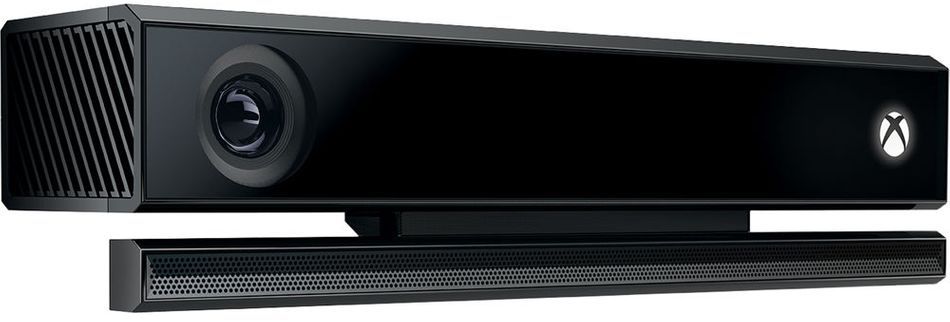
After doing some research I found a great DIY motion capture rig to be iPi Soft mixed with an Xbox Kinect Camera. The result was even better than I originally imagined.
You may already own some of the gear required to build this kit. If so, lucky you!
HARDWARE FOR DIY MOTION CAPTURE
Here's a quick list of hardware you will need to setup the DIY motion capture rig.
1. A PC (or MAC with Windows installed using Boot Camp) 2. Kinect 2 Camera (~$40) 3. Kinect 2 USB Adapters for Xbox One & Windows ($18.24). 4. Camera Tripod ($58.66)
Grand Total w/o Computer: $116.90
SOFTWARE FOR DIY MOTION CAPTURE
Below is a quick list of software that you will need to perform the DIY Motion Capture project.
- iPi Recorder (free download)
- iPi Mocap Studio ( 1 month trail or purchase)
- Kinect one windows driver
- Cinema 4D Studio
We are going to try to keep this cheap as possible.
You can get an express $195 perpetual license for iPi. That means it’s totally yours and includes two years of technical support and software updates. The express edition includes the both iPi Recorder & iPi Mocap Studio. You are however limited to using a single RGB/depth sensor camera, but it's 99% as reliable as the more expensive options. For this article demo purposes I just downloaded the trial version, you can do the same to follow along.
iPi says you can only record frontways on a single camera. However, I spun around and... oh my goodness, it worked!Bear in mind this is the only software I've tested using this technique. If you use any other applications to test out DIY motion capture please tell us about your experience. I've listed them at the end of this article for reference.
DIY Motion Capture: Step-by-Step
Now that we have our software and hardware gathered, let's take a look at how to do some quick DIY Motion Capture.
STEP 1: INSTALLATION
- First install iPi Recorder & IPi Mocap Studio before connecting your Kinect to your PC.
- Plugin your Kinect to your PC
- It will prompt you for Kinect One Driver. If not, download here.
STEP 2: IPI RECORDER
1. Setup the camera between 2 feet (0.6m) and 6 Feet (1.8m) off the floor. Note: The floor has to be completely visible! We need to see your feet!
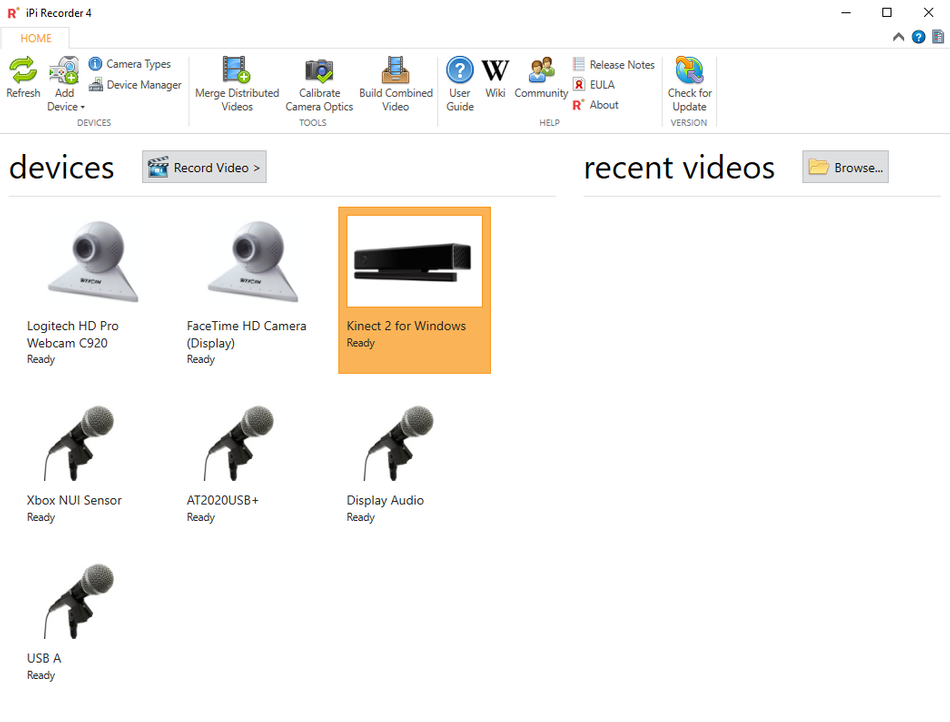
2. Launch iPi Recorder
3. Under your devices tab an icon of Kinect 2 for Windows will appear highlighted in orange and marked ready. If not, either make sure USB is correctly plugged in, the driver was installed, & restart your computer.
4. Click Record Video
5. New Tabs will appear. Setup, Background & Record.
6. Click Background
7. Click Evaluate Background This will take a single snapshot of the background. Setup the timer for the snapshot with the Start Delay dropdown menu (be careful not to move the camera once your snapshot has been taken).
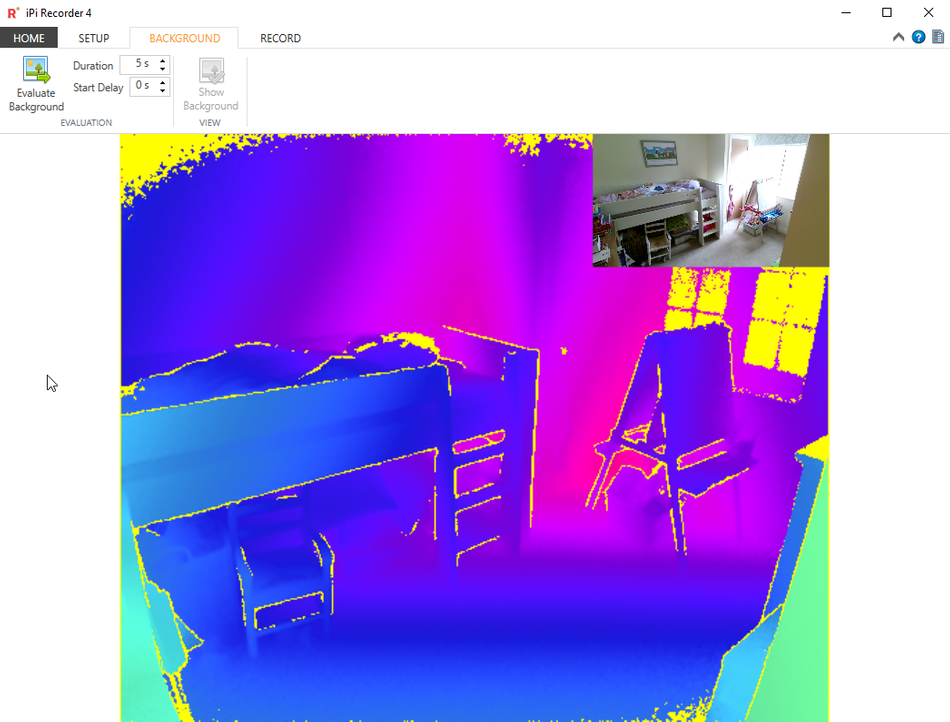
8. Be sure to Change your Folder path to where you want recording to live.
9. Click the RECORD tab, set your Start Delay dropdown to give you a chance to get your behind the camera into position & press “Start Recording”
10. Create the 'T' Plate - Get yourself into a T-pose. Stand straight with your arms out like you about to turn into an aeroplane. Just for a 1-2secs, then start moving/acting.
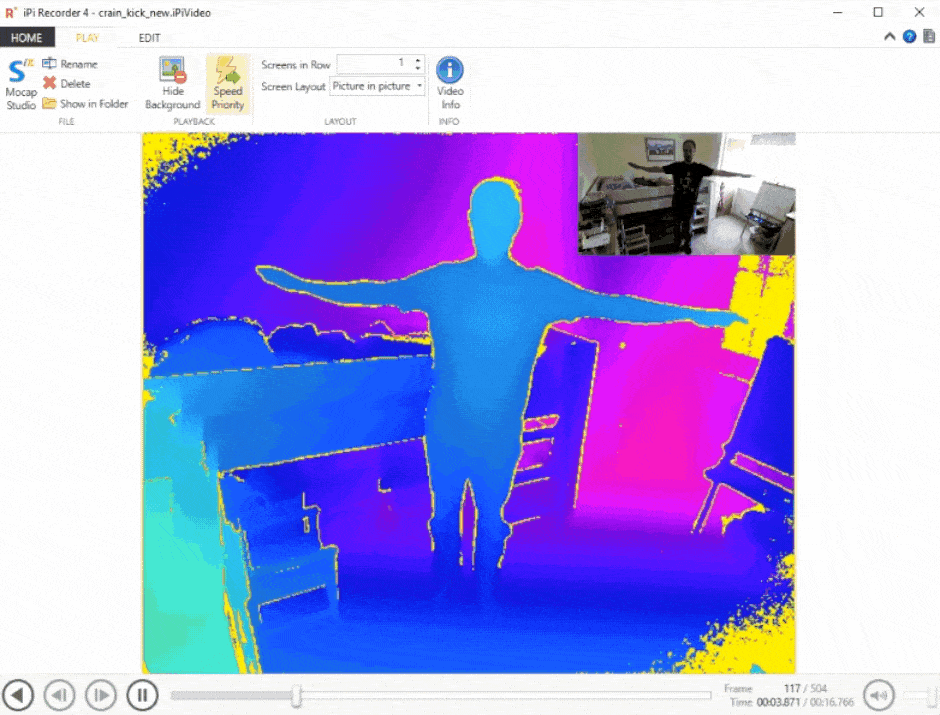
11. A new window will popup labeled Recording Finished. Click the Rename Video Icon and give your recording an appropriate name.
STEP 3: IPI MOCAP STUDIO
Let's take that data into Mocap Studio!
1. Launch Ipi Mocap Studio
2. Drag your .iPiVideo onto the window/canvas
3. You will be prompted to choose if character’s gender & height. If you don’t know the height your will get another chance to manually edit it. Click Finish.
4. You will now see yourself appear, along with blue dotted mesh & lots of grain.
5. At the bottom of the window is a timeline that you can scrub to view your recording
6. Drag the Region of Interest (grey bar) and the Take (grey bar) to crop to the begin of your T-pose and your final resting position before you walked off your computer to stop your recording.
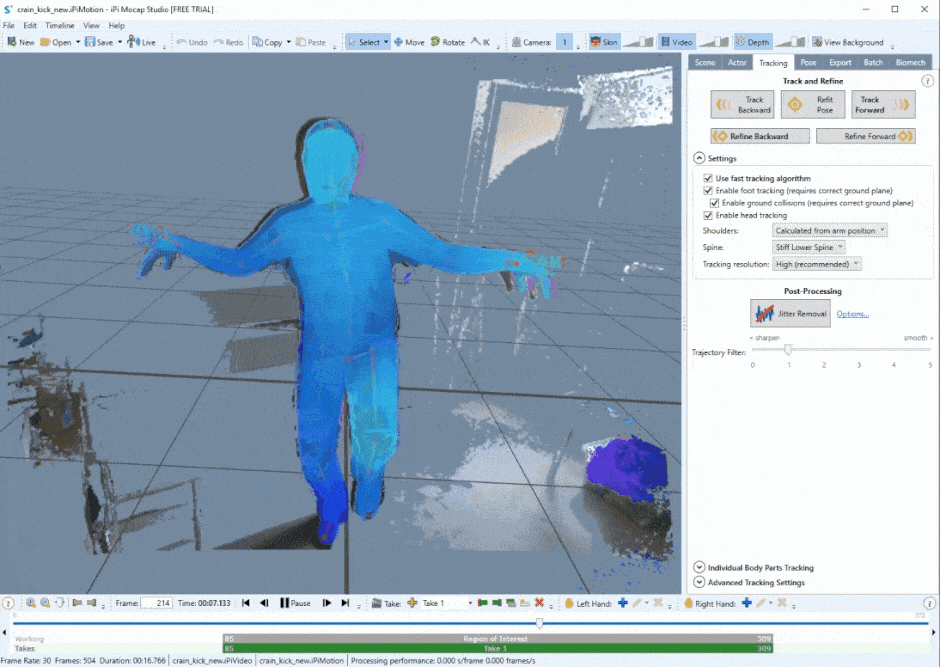
7. Under Tracking/settings be sure to check enable all check boxes for fast tracking algorithm, foot tracking, ground collisions & head tracking.
8. Scrub timeline to begin of cropped region and click track forward. You will now see a bone rig tracked to your recording.
9. On your first track you may find an arm or leg stuck to the body on your first track. To resolve this go to Individual Body Parts Tracking dropdown and uncheck all the parts only leaving the offending body part checked. Then just press Refind Forward which will only refine that track on just that single leg or arm.
10. Then click Jitter Removal. It works pretty well off the bat. If it’s extra jittery on a specific limb, click Option” and drag the sliders of the offending part to a higher smoothing range. Think of it as a blur tool. If you smooth you may remove detail (i.e. a wobbly hand will stabilize), but if you sharpen you're adding detail in (i.e. you may get a better head movement).
11. Now go to File/Set Target Character import your Mixamo T-pose .fbx file
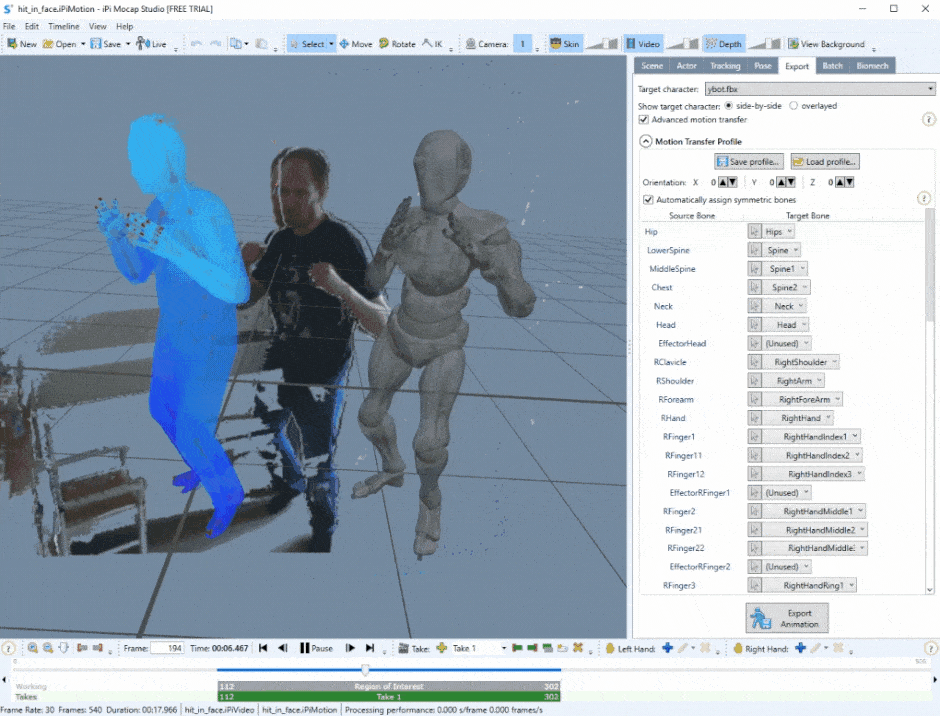
12. Go to Actor tab and set your characters height (this is the size your character will be once imported in C4D) .
13. Go to Export tab and click Export Animation and export out your .FBX file.
14. Now these are the basics. If you want to go more in depth check out their User Guide. Also iPi doesn't track fingers. If you want to know more about manually keyframing check out Hand Keyframing in iPi or alternatively Keyframe it in C4D. My advice is also to keep your recordings short to minimize tracking errors. You can then stitch all of the shorts together in Cinema 4D.
STEP 4: OPEN IN CINEMA 4D (OR 3D PACKAGE OF YOUR CHOICE)
- Import the .FBX by going to File/Merge and locate your Running.fbx
- If you need a refresher on what to do next? Read Rig and Animate 3D Characters with Mixamo in Cinema 4D.
That's all there is to it! You're motion captured data is now inside of Cinema 4D.
Learn More: Motion Capture Using Cinema 4D
Hat tip to Brandon Parvini who was my Mr Miyagi for this project! This video tutorial featuring Brandon is a great resource for more insight into the process I used for this project.
Here are some other tutorials that I found to be helpful for Motion Capture as well.
- Cinema 4D & Mixamo - Combine Mixamo Animations Using Motion Clips
- Cinema 4D Motion Clip - T-Pose to Animation (and a little Marvelous Designer)
- IPISOFT - Animation Smoothing Tutorial
- Kinect Motion Capture Tutorial - Ipisoft Motion Capture Studio
- Motion Capture for the Masses: Review of iPi Soft with Cinema 4D
Motion capture is a rabbit hole that can get REALLY deep. If you're looking for some alternative methods to those listed here in this article, here are some different motion capture solutions from around the industry.
ALTERNATE APPLICATIONS FOR DIY MOTION CAPTURE
- Brekel - ($139.00 - $239.00)
- Old version of Brekel - (Free, but Slightly Buggy)
- NI mate - ($201.62)
- IClone Kinetic Mocap - ($99.00 - $199.00)
ALTERNATE CAMERAS FOR DIY MOTION CAPTURE
- Azure Kinect DK - ($399.00)
- Playstation 3 Eye Camera - ($5.98)
- New PlayStation 4 Camera - ($65.22)
- Intel RealSense - ($199.00)
- Asus Xtion PRO - ($139.99)
ALTERNATE MOTION CAPTURE SYSTEMS
- Perception Neuron - ($1,799.00+)
- Xsens (Price available on request)
- Rokoko ($2,495+)
Ready to Defeat Cinema 4D?
If you're new to Cinema 4D, or want to learn the program from a master, sensei EJ Hassenfratz has developed an entire course to help you get up to speed with with everything you need to know to conquer the program. If you want to learn more check out Cinema 4D Basecamp here on School of Motion. This is super fun Cinema 4D training; No fence painting or car washing required!
ENROLL NOW!
Acidbite ➔
50% off everything

ActionVFX ➔
30% off all plans and credit packs - starts 11/26

Adobe ➔
50% off all apps and plans through 11/29

aescripts ➔
25% off everything through 12/6
Affinity ➔
50% off all products

Battleaxe ➔
30% off from 11/29-12/7
Boom Library ➔
30% off Boom One, their 48,000+ file audio library
BorisFX ➔
25% off everything, 11/25-12/1

Cavalry ➔
33% off pro subscriptions (11/29 - 12/4)

FXFactory ➔
25% off with code BLACKFRIDAY until 12/3

Goodboyninja ➔
20% off everything

Happy Editing ➔
50% off with code BLACKFRIDAY

Huion ➔
Up to 50% off affordable, high-quality pen display tablets

Insydium ➔
50% off through 12/4
JangaFX ➔
30% off an indie annual license
Kitbash 3D ➔
$200 off Cargo Pro, their entire library
Knights of the Editing Table ➔
Up to 20% off Premiere Pro Extensions
Maxon ➔
25% off Maxon One, ZBrush, & Redshift - Annual Subscriptions (11/29 - 12/8)
Mode Designs ➔
Deals on premium keyboards and accessories
Motion Array ➔
10% off the Everything plan
Motion Hatch ➔
Perfect Your Pricing Toolkit - 50% off (11/29 - 12/2)

MotionVFX ➔
30% off Design/CineStudio, and PPro Resolve packs with code: BW30

Rocket Lasso ➔
50% off all plug-ins (11/29 - 12/2)

Rokoko ➔
45% off the indie creator bundle with code: RKK_SchoolOfMotion (revenue must be under $100K a year)

Shapefest ➔
80% off a Shapefest Pro annual subscription for life (11/29 - 12/2)

The Pixel Lab ➔
30% off everything
Toolfarm ➔
Various plugins and tools on sale

True Grit Texture ➔
50-70% off (starts Wednesday, runs for about a week)

Vincent Schwenk ➔
50% discount with code RENDERSALE

Wacom ➔
Up to $120 off new tablets + deals on refurbished items


All-Access Pass
Unlimited access to 50+ courses, unlimited critique, live events, and 24/7 community. Join School of Motion All-Access today.