
All-Access Pass
Unlimited access to 50+ courses, unlimited critique, live events, and 24/7 community. Join School of Motion All-Access today.

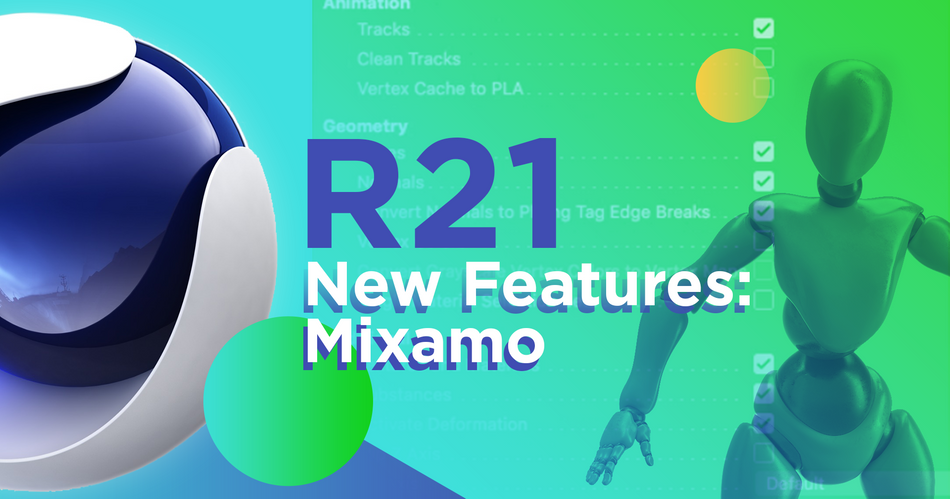
New Mixamo Character Rig in C4D R21 Enables Easy Applying, Adjusting and Mixing of Mocap Data
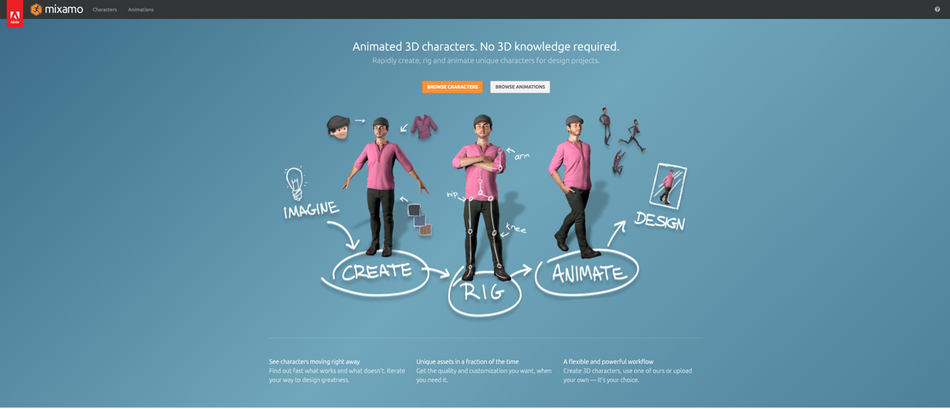
Mixamo allows you to rapidly create, rig and animate unique characters for your design projects — and with the addition of the Mixamo Control Rig to Release 21 of Cinema 4D there's now a powerful, streamlined process for leveraging Mixamo's animated characters in your C4D motion designs.
Previously, we demonstrated how to rig and apply motion capture data and extra hand-keyframed animation to your 3D character with Mixamo in Cinema 4D; in this tutorial from our 3D Creative Director and Cinema 4D Basecamp instructor EJ Hassenfratz, we break down the new and improved way to use Mixamo characters and animations in the latest version of C4D.
THE MIXAMO CONTROL RIG TUTORIAL VIDEO
{{lead-magnet}}
Nine Steps to Mastering the Mixamo Control Rig in Cinema 4D R21
With Adobe Mixamo, you can:
- Select from a vast collection of pre-rigged 3D characters or use Adobe Fuse or Cinema 4D to custom build your own character (read more on creating characters here)
- Automatically rig your 3D character, allowing Mixamo to calculate skinning weights and adjust bones on your behalf
- Select from thousands of customizable motion-tracked animations, using Mixamo's editing interface to fine tune the animation to your specs
Then, you can import your Mixamo character into Cinema 4D for use in your motion design project.
Below, we walk you through the nine steps you'll take when using Mixamo's characters and animations.
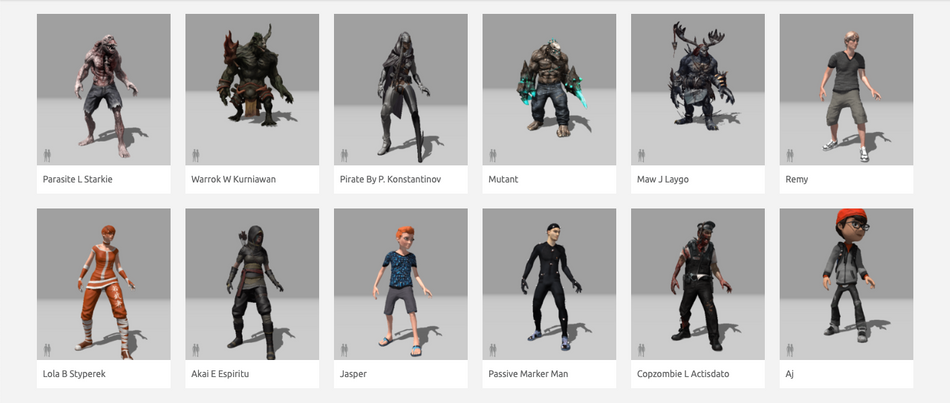
1. CHOOSE YOUR CHARACTER
At the top of the Mixamo website are two tabs: Characters; and Animations. To select your character, click the Characters tab and then pick from the collection of zombies, robots, goblins, medieval knights and others.
2. CHOOSE YOUR CHARACTER ANIMATION
To choose a starting animation for your selected character, click the Animations tab. Then, scroll through the more than 50 pages of pre-set character animations, and pick the one that best fits the role of your character in your motion design. Do you want them to fall over? Swing a sword? Drunk stumble? Mixamo's got it.
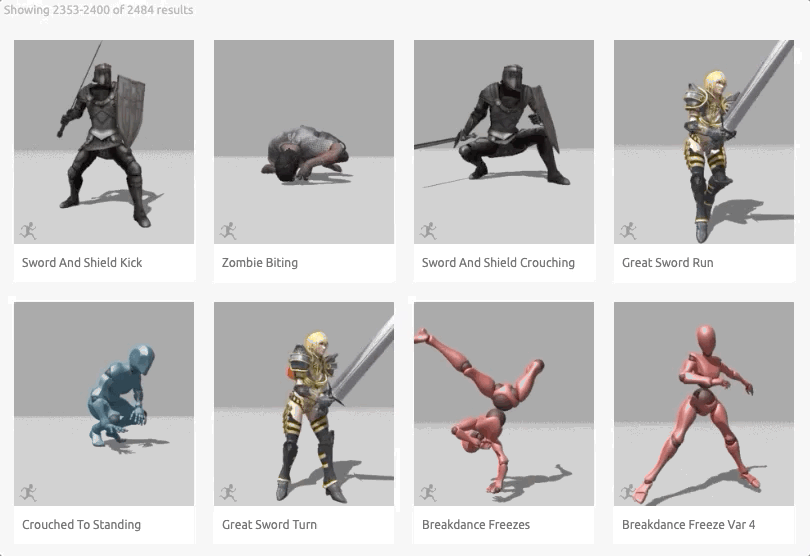
This is a helpful resource for developing quick mockups to preview for your clients what they can expect to see in your scene.
3. DOWNLOAD YOUR CHARACTER
Once you've decided on your character and animation, you'll want to import them into Cinema 4D. To do this, you'll need the file.
Click the Download button at the top right of the Mixamo screen, and you should see the following dialog box popup:
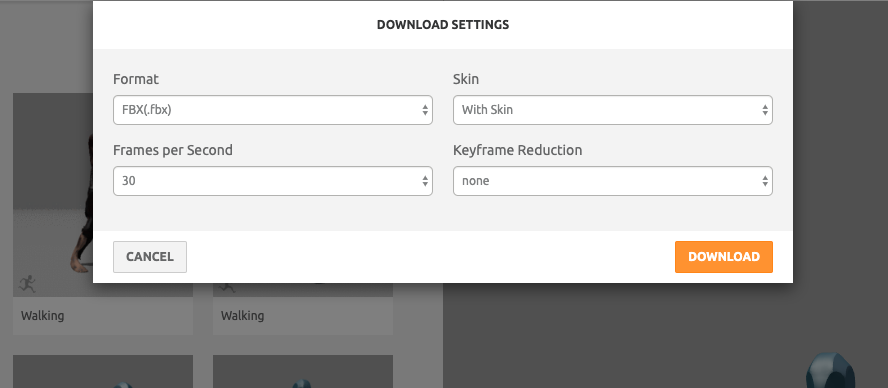
For the purposes of this tutorial, at least, there's no need to adjust the default settings. Click the orange button to download your .fbx file.
4. IMPORT YOUR .FBX FILE IN CINEMA 4D
To start working with your Mixamo character in Cinema 4D, launch the C4D app. Then, click to view the File menu, click Open, and navigate through your file browser to find and select your recently downloaded .fbx character file.
The following Import Settings prompt will pop up:

Leave the settings as they are, and click OK.
The Mixamo model should now appear in your Cinema 4D scene and, if you press Play, your character should act out your chosen animation.
5. SET UP THE MIXAMO CONTROL RIG IN C4D
In earlier versions of Cinema 4D, the process of animating imported characters was laborious, to say the least. To bend a single joint, you had to navigate through your entire layer hierarchy.
Not anymore. In Release 21, there are three steps to prepping your C4D workflow:
A. Fix the Take LayerB. Reset the Character Rig PoseC. Disable the Animation Track
5A. FIX THE TAKE LAYER
When importing a Mixamo rig, it's uploaded as a Take Layer; to start editing, using keyframes, this needs to be changed.
To do so, click the Take tab on the right side of your user interface. Find and select only the Mixamo.com layer, then open the File tab and click Current Take to New Document. This will open a new project file.

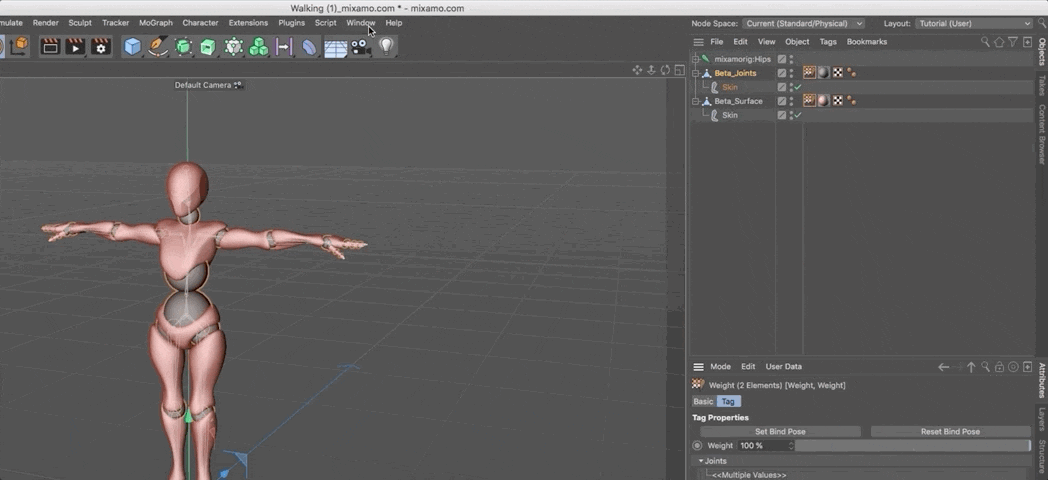
5B. RESET THE CHARACTER RIG POSE
The next step in preparing your rig for use is changing the pose.
Select both of your weight tags in the Objects panel and then click the Reset Bind Pose button. This will produce the T pose.

5C. DISABLE THE ANIMATION TRACK
The third and final step is disabling (not deleting) the keyframes used to animate your downloaded Mixamo character.
To disable an animation in Cinema 4D, open the Window tab and click Timeline (Dope Sheet).

In the Timeline window, find your model's layer and click the yellow film strip. This will disable the animation.
6. APPLY MIXAMO CONTROLS IN CINEMA 4D
To start animating your Mixamo character in Cinema 4D, you'll first need to apply the Mixamo Control Rig.
Navigate to the Character tab at the top of the program window, and select Character. Then, to access the controls, select the Character object in the Objects panel at the top right, and select the Object tag in the Attributes tab at the bottom.
7. ADD MIXAMO LEG AND ARM CONTROLLERS
Next, use the Mixamo Control Rig template to add the necessary components for animating.
In the Attributes tab, select the Object tab. Then, in the Object Properties tab, select the Build tab.
Hold CMD/CTRL + SHIFT to add legs and then, still in the Build tab, click CMD/CNTRL to create arms and hands.
8. ALIGN YOUR CHARACTER CONTROLS
When a Mixamo Control Rig is imported into Cinema 4D, the bone structure is straight, so C4D doesn't know which way the rig should bend.
To set your joints, start — with your character still selected — by clicking the Adjust tab within the Object tab. Your controllers should snap to your joints, automatically retargeting the Mixamo Control Rig component controls to the Mixamo joint rig.
Next, click the Binding tab next to the Adjust tab, and delete the object in this tab.
Then, to set your joints, independently of the rest of the rig, hold down the 7 key and move your joints in the direction you want them to bend.

9. RETARGET THE MIXAMO CONTROLS TO THE MIXAMO RIG
The last step to setting the Mixamo Control Rig to control your rig in Cinema 4D is to connect the Character object to the Mixamo joint rig.
To do so, click the Character object and then select the Root object. With that object selected, navigate to the Attributes window, then the Control tab, and click Retarget All. This establishes the relationship between the Control Rig and the joints — but not the character geometry, since the weight tags on the joints are not yet properly referenced.
To transfer the weights of the joints to the Mixamo Control Rig, select the Root object and then click the Controls tab. Then, drag and drop Character Mesh into the Weight Tags field and click Transfer Weights to apply the changes.
Now we have the Mixamo Control Rig controlling and deforming the rig!
Become a Cinema 4D Expert
Adding 3D to your toolkit is one of the best ways to up your value and expand your capabilities as a motion designer.
With the new pricing options and enhanced features of Cinema 4D, there's never been a better time to master the world's leading 3D animation software — and there's no better way to learn than with School of Motion (our approval rating is higher than 99%!).
CINEMA 4D BASECAMP
Taught by our very own EJ Hassenfratz, who created today's tutorial, Cinema 4D Basecamp is designed for artists with little to no experience in the software; in mere weeks, you'll know your way around.
Plus, when you sign up for a session of Cinema 4D Basecamp, Maxon will provide you with a short-term license of Cinema 4D for use in this course!
Learn More About Cinema 4D Basecamp >>>
-----------------------------------------------------------------------------------------------------------------------------------
Tutorial Full Transcript Below 👇:
EJ Hassenfratz (00:00): With the addition of the new mixing middle control rig, the cinema 4d are 21. You now have this really powerful way to be able to control and add on to existing Mixamo mocap animation. Let's check it out.
Music (00:15): [intro music]
EJ Hassenfratz (00:23): And this video, I'm going to break down the mix and those control rig and how it gives you a crazy amount of control over your mix and mil animation. Now, if you want to follow along, be sure to check the description and you'll find a link to download some of the project files. If you want to learn more about the whole workflow of how to use Mixamo animations and rig up your characters using Maximo, be sure to also check out the article on school emotion, that link will also be in the description. All right. So here we are on maximo.com and basically what this is is a it's it's magic. Basically. That's what it is. It allows you to, uh, RigUp and apply motion capture animation to either a preset model that you can download from Maximo, or you can upload your own characters and models and rig it using Maximo and apply all different kinds of fun mocap animations to it.
EJ Hassenfratz (01:15): So, one thing to know is that if you have an Adobe creative cloud subscription, you have Mixamo, which is really, really awesome. So let's go ahead and we're just going to use a character that is on mix mode. So I'm just going to go to this character tab here. We've got all these just really beautiful look at all this great stuff. We've got a little parasite man with the needs to see the dentist, uh, all the, all these, uh, pre-bill characters. Uh, but basically what I'm going to do is I'm going to use this X spot. And again, you can actually upload your own character and rig it. And if you want to know more about that, be sure to check out the article on school motion, all about Mixamo rigging. So be sure to check that out. It's pretty intense in depth, uh, covers all you need to know about it, but we're just going to use this little X-bar character for now.
EJ Hassenfratz (02:03): So now that you have your character, you upload one, you can then go to the animations tab. And this is where the real fun happens is you can now apply animation to it. And the dancing ones are always the most fun. You can really spend a lot of time getting lost in all of the different, uh, mocap animations here, but there's just a huge library of stuff. Uh, so what we can do is we can actually use this search bar and maybe we just want a plain old walk cycle. Uh, and maybe we want this sassy little sassy walking cycle where you can have this just animate in place. Or if we uncheck that we can have this kind of walk across the screen. There's also some other settings here, which, uh, overdrive is just, you know, how fast or how slow that walk is.
EJ Hassenfratz (02:48): The stride is how wide the stride is, are big, the strategies, and then the, uh, character I'm space is very important. If this is too low, your arms, are you just going to go and intersect with your body? Never a good thing, but we can go ahead and click in this viewport little area here. We've got the rotates option activated, and we can adjust this character arm space. So we don't have any intersecting going on, which is always a good, we can use the pan tool and the zoom tool. And there's just so much cool stuff you can do inside mixed mode. But once you have your animation applied to your character, you can go ahead. Let me just pause this and download it. Okay. So what you're going to be prompted is these with these downloads settings, and basically all you need to do is just leave this as it is.
EJ Hassenfratz (03:34): Okay. You don't need to change it or anything like that. And basically where you're going to do is you're going to download this animation as an FBX file. So the animation and the actual, uh, animated characters. So that just saved. So let's go ahead and jump into cinema 4d, right? So to bring in our rig into cinema 4d, we're just going to go ahead and simply import that FBX file. So let's go to file open project and let's just grab that FBX file there. We named walking and you'll get this import dialogue. All these settings, all the default settings are fine. I'm just going to hit, okay. And boom, we have our Mixamo character inside of cinema 4d. And if I hit play, you'll see that it's walking. And basically what this is made up of are some joints. And you can see, as I clicked on the joint, you can see all of these key frames.
EJ Hassenfratz (04:24): There's a key on every frame here. And we also have our two pieces of geometry that make up this character. So you'll see that this better surface is this red portion of our object in the better joints are basically the circular spherical joints in the neck and the shoulders and knees and all that good stuff. Okay. So two pieces of geometry that make up our character in it's being animated by all of these joints, uh, basically the bone structure of our character. Okay. So the problem with actually, you know, editing this and adding on top of this was that you really had no easy way to do this. Say if you want it to turn the way the head is, is looking, you would need to really dig into your structure here, your joint structure, and try to find where the neck is. Okay, there's the neck.
EJ Hassenfratz (05:18): And if I rotate this, I can actually rotate the neck, but that's a very laborious way to be digging through a joint structure, to edit an add, uh, you and adjust your rig and add extra animation on top of this. And that's where the mixed mode control rig comes in handy is gets solves that issue, okay, by adding all these extra levels of control on top of your existing Mixamo rigs. So let's go ahead and let's go ahead. And before we even begin, there's a lot of, uh, very specific steps you need to take to get this mixed mode control, rig working properly. Number one is a little quirky thing that happens when you import any Mixamo rig at all. And that is that it comes in as a take layer. So if I go to my take tab here, you'll see there's my Mixamo take.
EJ Hassenfratz (06:08): If I get out of this by clicking on this main, you'll see that it's no longer animated anymore. So our Mixamo animation lives inside of a tape. Now the problem with that is, is you'll see that if I click on anything, everything's great out. My coordinates is grayed out. I can't key frame any of this stuff. And that's because the take is basically locked. So to prevent that what I'm going to do is just one simple step in that is to select my mixamo.com rig here. Make sure that this little viewport icon is highlighted. You don't want this highlighted or this, but you want this highlighted here. And then I'm going to go to file current, take two new document. What that's going to do is you probably missed it. It was so quick, this opened up a whole new file, and now there are no other different takes.
EJ Hassenfratz (06:56): We just have one layer. All the animation exists on our main take. And now we're not going to be able to run into issues. Say, if we want to animate anything, you'll see that everything is unlocked. I can key frame all these coordinates because it's not locked in a tape. Okay? So one little wonky thing that you need to take care of. Another one is to be able to rig up your character, using the Mixamo control rig, you need to bring your character back to its original T pose. And that's basically the pose that you would rig a character from. If you don't know what a T pose is, we're going to see one really quickly. And that is by selecting both of your weight tags here by holding command or control key to select both of these. And you're just going to click this button reset by and pose and bam, this makes our character go back to its original T pose.
EJ Hassenfratz (07:45): And this is the pose that you would traditionally rig from. It's just a wee easier way and predictable way to rig up a character in a piece of 3d software. So you'll notice if you click off anywhere in this timeline, it's going to snap back to the animation. So what we're going to do is we're going to reset this bind pose, and then we're going to turn off the animation track and how we can do that is by going to window timeline and clicking this little yellow animation, a filmstrip here and just deactivating it, turning it gray. And if I hit play, you're going to see that the animation is no longer going to play at all. Okay. So that's exactly what we want in now with our character reset to it's a T post. We can go ahead and add our Mixamo control rig, and you'll find that in the character menu, if we go to character object, you'll see that if I go to my object tab, there is my Mixamo control rig template.
EJ Hassenfratz (08:39): If you click and hold, you'll see all these other different templates. If this didn't show up automatically, you can go ahead and just select it there. And here's where you're going to build out all of your components or AKA all of your little body parts. Okay? So we have our roots. If we click that, you're going to see this as just basically the base of your character, where your feet are, and then we can start adding like the pelvis. And then would you add the pelvis? You can then add all of these other different components on top of it. So to add both of the legs at once and also stay in this level of hierarchy, I'm just going to hold the command or control key down with shift, also held down and click, and this will add both the left and right leg, and then keep me in the same component menu.
EJ Hassenfratz (09:22): And then I can go ahead and hold commander control and click on this arm. And this will add both the left and right arm at the same time. And then I can just click the hand ones and you'll see, this will add the left and right hands. You're going to see all of these other controls. Basically all these controls are going to help us control the underlying, uh, animation of our character. So we have like the hip, the torso, the waist, uh, all these, all these little controls that are made up of NOLs that are gonna help us out here. But right now they're not aligned to our rig at all. So what we're going to do is go to the adjust tab and you'll see that we just snapped everything to our joints in the proportions of our character. And you can see all of these different dots.
EJ Hassenfratz (10:05): These are basically your component dots. These are your components. Okay. And if we go ahead and go to the binding tab and that's going to add all of this stuff in the objects tab, what I'm going to do is just delete that. Okay. I just need to go to this binding tab and then go to the anime tab. Okay. And now if I click in, move this hip up and down, you can see that we have a problem and that is our knees are bending in the wrong direction. Now they're bending kind of like a horse or something like that, or one of those really creepy, uh, robot, horse things. They're going to take over the world, those little robot, dog things. You, you see YouTube videos of all the time. So we need to fix this. And the reason why this happens is that the mixing bowl control rate comes in a little weird and it brings in the joints in a straight line.
EJ Hassenfratz (10:56): So it's hard for cinema 4d to guess which way all these joints should bend. Traditionally, if you built up a rig, you would move, say the knee cap, uh, or the knee joint a little bit forward to say, Hey, cinema 4d, the knee is going to be bending forward. Okay. So let's go ahead and do that. So we're in the enemy tablets go to the adjust tab and let's just click on our little knee component here. And you're going to see that we have another little line with a dot, and this is basically where the rig is currently. And this is why it's bending backwards is because it's slightly bent this way. Okay? So what I'm going to do is move this knee slightly forward and just move this knee component forward by holding the seven key down. So I can move this independently of all the other objects in the hierarchy and just move this slightly forward.
EJ Hassenfratz (11:47): And you'll see that now the knee is bending a little bit forward. You can see the dots right here. It's very hard to see what these little dots that are bent slightly forward. Okay. So now if I go back to my animate tab and click up and down, we're bending in the right direction, but you're going to see that we fix that problem, but we have no connection to the underlying rig. Okay. So what I'm gonna do is undo that don't, don't kind of move things around and leave it that way. Always undo to go back to your original posts and to build the relationship and retarget, these joins to this existing rig. We're going to go to our roots and go to controls. And we're going to twirl down this whole menu here, if it's hidden and you're going to see this retarget all, and basically in each of our little components here, we have these little spline retarget options, and they're currently empties.
EJ Hassenfratz (12:43): We need to populate these and get the hips joint from this mixed mow rig in here. And instead of dragging and dropping it manually, there's actually a really handy a button here. That's going to do that automatically. So if I click retarget all, you're going to see if I go to the pelvis. It just totally populated all of these little spline controls with all their corresponding joints on everything. And this is perfect. So you're going to see that still nothing's really changed. And that is because our weights are currently referencing this original joint structure. And what we need to do is make it, so these weight tags are referencing our new Maximo control rig. So we can use this rig with all these controllers to distort and to form and adjust these pieces of geometry through these skin. Deformers. So to do that, you're going to see this little weight transfer area.
EJ Hassenfratz (13:36): All I need to do is drag and drop the geometry of your object. And again, we have two pieces of geometry that make up our character here, and I'm just going to click transfer weights and nothing's going to happen. But if you go ahead and click and move your whole object around, you can see now we have our whole thing set up here. Okay. We can now adjust and select these different controllers to edit our rig. Now, this is what I was talking about. This is that added layer of control on top of our existing control rig that we don't have to go digging through this hierarchy to select that piece of our object to then adjust. Okay. So with this all set up, you no longer need to see this whole old joint structure in here. So I'm just going to go ahead and hide it by double clicking these dots and turning them red.
EJ Hassenfratz (14:24): And now I can just activate and turn on our animation track again. So remember we deactivated. I'm just going to go into my timeline, click back onto my filmstrip to change them yellow. So we're going to activate them and you can see boom, that's, that's one of the little poses there. If I hit play, boom, we have our animation playing and all of our Mixamo control NOLs are following with it. And now can control on top of this rig. So if I select this head controller, I can maybe turn the head to face a different direction and you can see that head is now turned that way. So we're just adding another layer of control onto our existing rig underneath. So I can animate this head here and to enemy any of these controllers. You're not going to select these objects here. These are the components.
EJ Hassenfratz (15:13): If you want to see all of these NOLs to then animate, what you're going to do is go to your character. You're going to go to the display. And right now, the only thing we're seeing in our managers here, if this is tolled up, just click that to untwirl it, you're only seeing the components in your object manager. Okay. And what you're actually going to need to select and key frame are the controllers. Okay? So we're not seeing controllers here, so it's going to be hard to select them and add key frames. So what I'm going to do is go to my object manager instead of showing the components, I'm going to say, show the controllers and you're going to see all of these Knowles. Basically, these are the NOLs that are all of our controllers in our viewport here. If I go ahead and select that controller, and if I want to see this show up in our viewport, instead of scrolling around here, one little handy shortcut key is the hit the S key while you, your cursor is hovered over your object manager, and that's going to scroll to first active.
EJ Hassenfratz (16:15): You can see that it's also here as well in the view menu scroll to first active. And that's going to scroll to the object that you have selected here. So that's your head control. And if I go to and click on my little head control spline, basically, that's, that's the controller we have here and go to the coordinates. You can see now I can rotate this and you can see there is all of my rotations. So if I wanted to key frame this, I would go back, set some key frames in the rotation, and maybe it's rotating this way. You can see that updated here, set some new key frames. And maybe we have this rotated back this way and set some new key frames. And now you'll see that we have this animated head turn on top of our Mixamo animation. This is just really, really cool adds all this other layer of control on top of your existing rig, hence them control rig.
EJ Hassenfratz (17:09): But this is, is a thing that with new people to, to character animation, a lot of people make the mistake of your key framing, the actual components, the spline, and all that stuff that we saw before. If we go to our components, that's not going to key frame anything. Okay. So make sure if you want to key frame anything you're in your controllers view and you twirl down. And if you select anything, like say your hips here, I'm just going to hit S and there's the hip controller. You can then go ahead and add some key frames to this, if you want it to rotate this as well. And you see, as I rotate this, that's rotating the rotation values in the coordinate manager for this hip controller. Uh, no here, Kip controller objects. So I can, you know, maybe hit some key frames here and then maybe we have them kind of just pivot like this.
EJ Hassenfratz (18:01): I don't know. We're just adding and we're just do it. We're just testing things out. Now we have this little hip rotation in there a little bit as well. So all types of stuff. So we have that rotation. If I just want to move this down and have this kind of crouching, I can just move that controller down and, you know, do, do something like that, where we have this crouching going on. So you don't have to animate anything. You can just adjust the controller's position and have totally something different. Maybe it's on the tippy toes. And we got a little stretching going on, but you can see that, you know, there's just so much added Le level of control that we have here with this Mixamo control rig. Now, with all of these extra controls, we can add things to our, uh, our rig here.
EJ Hassenfratz (18:45): So let's say we wanted to put a fancy hat on our robot. So it's a little less, uh, intimidating to look at. Maybe what we can do is go ahead. Let me just throw up all these controllers, but let's go and add a cone. This is going to be a very fancy party hat. And I'm just going to position this on top of the head of our robot here very, very is a party robot. We just, we're just going to do that. And let's rotate this into place and close enough, we got a party hat on our robot looking really stylish, ready to party. But if I hit play, you're going to see that that hat is staying in place. So what we need to do is this is the head controller. I need to parent this cone to this controller and in rigging, there's a very easy way to do this, to build a relationship between an object and a controller is to select the object.
EJ Hassenfratz (19:44): You want to have parented to this other object and hold the shift key down to select that controller. Now, if I go to my character menu, go to constraints and add a parent constraint. You're going to see that's going to add a tag to my cone. And if I hit play, you're going to see that we have a little bit of lagging, and this is due to priorities. Now, just like in real life, it's important to get your priorities straight. And the one thing that's happening here is just like an after effects, just like with deformers and cinema 4d, uh, but basically effects and after effects, execute from top to bottom, that's the same thing in cinema 4d with objects. So your top objects going to execute first in the animation and then everything underneath. So what's causing that glitching is that actually the cone is following the parent, but the parent isn't actually animated until we get down to this character object.
EJ Hassenfratz (20:37): And that's where we're getting this glitchy playback. So to fix this, all we need to do is simply move this cone all the way to the bottom of our hierarchy in our object manager. Okay? And now what's going to happen is the animation's going to happen and play out. And then this cone can more accurately be parented to those animated controllers. So now if we hit play no more lag and we have a party hat on top of our little robot here. So a lot of really cool things, a lot of added control, you can create an add on to your object and the list of possibilities is endless. Now, one other thing I want to mention is we go to our display, go to our components. You can see in each of our different little controllers here or different components, sorry, you see all these different sliders in their control tab.
EJ Hassenfratz (21:34): So if we go to the right leg and say, Ben, this, you can see that we're actually bending or, uh, our ankle there. And then we have the right knee and the right toe. We have the toe roll baked in there and all this great stuff here. And you can also go from Ika to FK as well. If you need to do that, you also have knee twist, just like that key frame in that, uh, and same thing with everything else, your left arm, your hands, we have all these different sliders for, uh, you know, your spread on that. So dig into all of these different controllers in the control tab of your components, and you can even have, uh, you know, animated stuff this way. Okay? So just endless amount of controls here, have fun playing around with this, but this is just huge.
EJ Hassenfratz (22:22): This was not, uh, possible inside of cinema 4d before to add this a whole other layer of control. And there's just, just so much fun that you can have with your, uh, animations now and, and have every animated character be walking to a birthday party. The Mixamo control rig offers this whole new level of control that allows you to make your own unique character animation, no matter what your skill level is now, be sure to stay tuned because we're going to have more in-depth tutorials about more cool new features from cinema 4d, our 21 like fueled forces. Now, if you want to stay up to date on all things, cinema four D and the industry in general, please like, and subscribe to our channel and I'll see you in the next one.
ENROLL NOW!
Acidbite ➔
50% off everything

ActionVFX ➔
30% off all plans and credit packs - starts 11/26

Adobe ➔
50% off all apps and plans through 11/29

aescripts ➔
25% off everything through 12/6
Affinity ➔
50% off all products

Battleaxe ➔
30% off from 11/29-12/7
Boom Library ➔
30% off Boom One, their 48,000+ file audio library
BorisFX ➔
25% off everything, 11/25-12/1

Cavalry ➔
33% off pro subscriptions (11/29 - 12/4)

FXFactory ➔
25% off with code BLACKFRIDAY until 12/3

Goodboyninja ➔
20% off everything

Happy Editing ➔
50% off with code BLACKFRIDAY

Huion ➔
Up to 50% off affordable, high-quality pen display tablets

Insydium ➔
50% off through 12/4
JangaFX ➔
30% off an indie annual license
Kitbash 3D ➔
$200 off Cargo Pro, their entire library
Knights of the Editing Table ➔
Up to 20% off Premiere Pro Extensions
Maxon ➔
25% off Maxon One, ZBrush, & Redshift - Annual Subscriptions (11/29 - 12/8)
Mode Designs ➔
Deals on premium keyboards and accessories
Motion Array ➔
10% off the Everything plan
Motion Hatch ➔
Perfect Your Pricing Toolkit - 50% off (11/29 - 12/2)

MotionVFX ➔
30% off Design/CineStudio, and PPro Resolve packs with code: BW30

Rocket Lasso ➔
50% off all plug-ins (11/29 - 12/2)

Rokoko ➔
45% off the indie creator bundle with code: RKK_SchoolOfMotion (revenue must be under $100K a year)

Shapefest ➔
80% off a Shapefest Pro annual subscription for life (11/29 - 12/2)

The Pixel Lab ➔
30% off everything
Toolfarm ➔
Various plugins and tools on sale

True Grit Texture ➔
50-70% off (starts Wednesday, runs for about a week)

Vincent Schwenk ➔
50% discount with code RENDERSALE

Wacom ➔
Up to $120 off new tablets + deals on refurbished items


All-Access Pass
Unlimited access to 50+ courses, unlimited critique, live events, and 24/7 community. Join School of Motion All-Access today.