
All-Access Pass
Unlimited access to 50+ courses, unlimited critique, live events, and 24/7 community. Join School of Motion All-Access today.

Keeping Your After Effects Projects Organized by Mastering the File Menu
Sure, making cool-looking animations is what we all strive for, but if you're planning to make a career out of using After Effects, you also need to be organized, efficient, and know how to share project files correctly. There are plenty of unexpected gems in After Effects, but today we'll focus on:
- Increment Save
- Removing unused files
- Collecting a project & all associated media

Increment Save to Always Backup Your After Effects Project
Projects don’t always crash, but when they do, it’s usually right before a big deadline. If you're not already using Increment Save, it's about to become your new best friend. This is different (and better) than Auto-Save, which you should also be using on anything of importance.
Sometimes you go waaaaay past your undo limit, accidentally delete a precomp, or a project gets corrupted - it happens! To avoid losing too much of your work, it’s important to frequently save new versions of your project files—but there’s a better way than hitting “Save as” and renaming it manually. Instead, try using Increment Save.
This is the most efficient way to make sure projects are properly backed up without wasting time on your own naming convention.
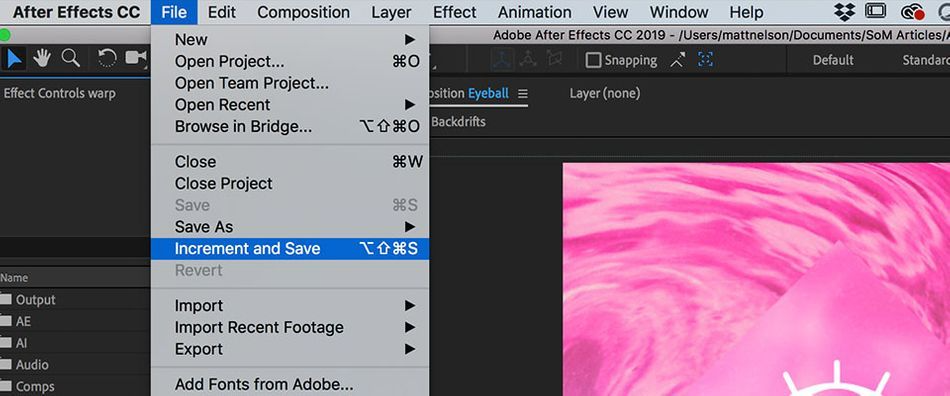
This will automatically save the project file as a second version, and even update to a unique project name.
To save time, I use the mash-all-the-modifier-keys-at-once shortcut:
- Command+Option+Shift+S (Mac OS)
- Ctrl+Alt+Shift+S (Windows).
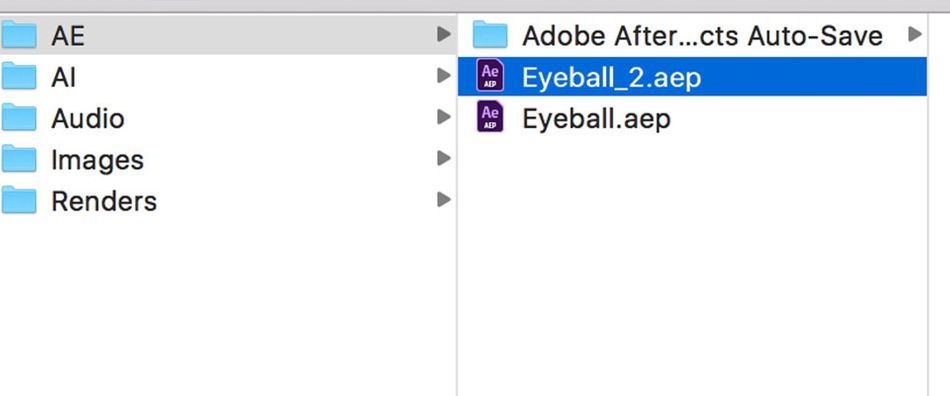
Your project file will still be saved in the same folder, with ascending numbers added each time you use this command. The highest number will be the most recent version.
It's smart to increment save whenever you want to make an alternate version of a project, you’re working on new revisions for a client - I tend to make a new increment save each day I work on a project, or any time I make a major decision that might be hard to undo. If you’re concerned about your system crashing, try increment saving more frequently, so you don’t lose progress on a corrupt project file. After Effects will make different sets of auto-saves for each increment save, so this is like double safety! Using this method can save you a lot of time and headaches in the long run.
Remove Unused Files & Collect Media Used in Your After Effects Project
Have you ever opened someone else’s project file only to discover they didn't properly package up their project, and you're missing half the media files? Don’t be that person.
In this section, I’ll show you three ways Dependencies will help get your project files in tip top shape. You'll be able to keep your project files tidy for yourself, clients or team members, or when archiving old work.
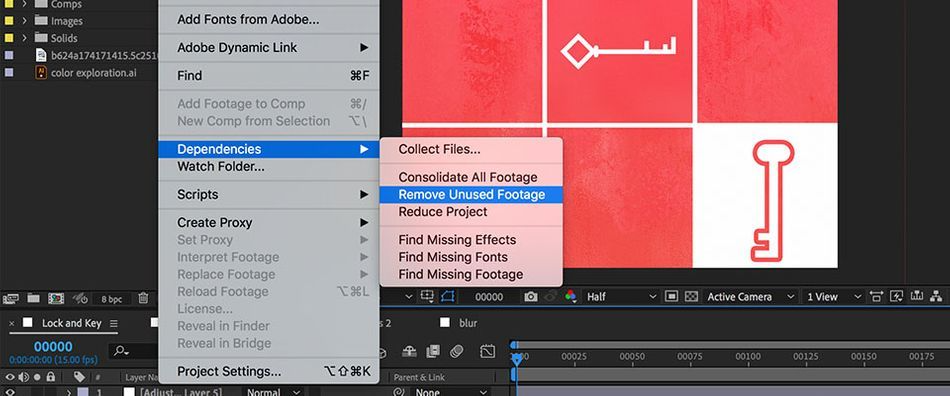
1. Remove Unused Footage
Your Project panel can get overstuffed with unused media, especially early in a project. It’s normal to experiment, gather reference materials, or try out a few different options. But if your save times are getting out of hand, or you’re packaging project files to send to someone else, you can reduce the file size big time by removing the unused footage. So how do you do that?
To do this, go to File > Dependencies > Remove Unused Footage. This will clear away any unnecessary footage (images, videos or other files that aren't being used in any composition) bogging down your project. The related Consolidate All Footage is good if you ended up importing the same file a few different times, and just want to clean up the multiple instances of it floating around in your Project panel.
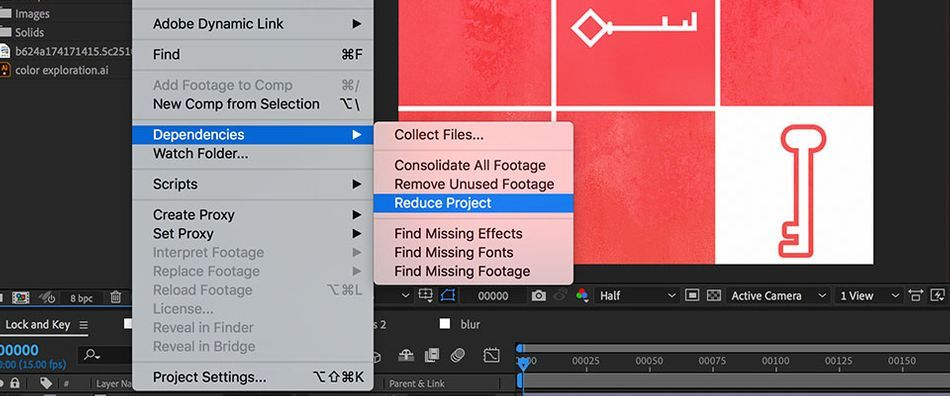
2. Reduce Project
If you want to take things a step further, you can reduce a project down to include only media and compositions used in the specific composition(s) you choose. While this is great for reducing clutter, this is also handy if you want to share or save only a portion of a larger project.
Select your main timeline, or multiple unrelated compositions you want to keep, and go to File > Reduce Project. This will delete anything in the project that isn't inside one of the compositions you selected in the Project panel.
Make sure to double check that you’ve selected all of the precomps you want to keep! It's also important to note that if you've created expressions that reference other compositions, Reduce Project isn't aware of this, so make sure to avoid accidentally trashing your cool control setup.
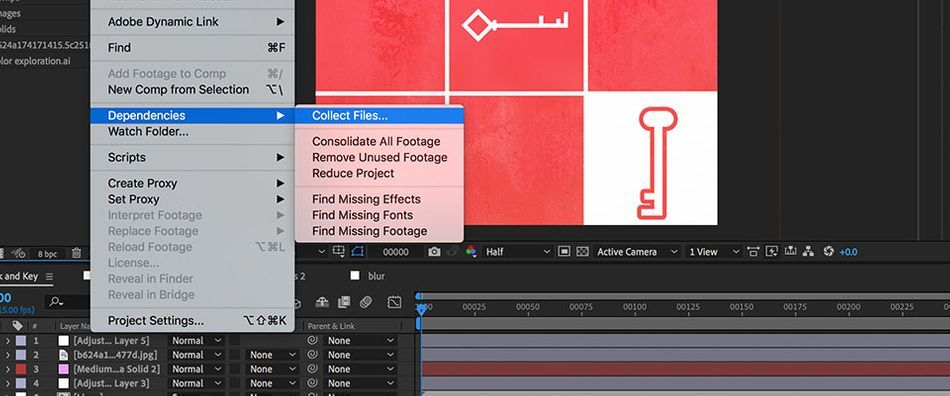
3. Collect Files
Now that your project is all cleaned up, you’re ready to put everything into a nice package for your archives or to send to your teammate. Since you don't want them to experience the dreaded "missing project files" window, you want to make sure everything gets nicely wrapped up together. After Effects can gather all of the media elements like audio, video footage, pictures and illustrator files used in your project and place them all into a single folder, even retaining the folder structure you created within the Project panel. To do this, go to File > Dependencies > Collect Files.
This will compile all of the necessary source footage and assets into one tidy folder that you can toss in your backups, or zip and send to someone else. If you used any non-Adobe fonts in your project, make sure to keep track of those, as they aren't included in this process.
Find Missing Effects, Fonts or Footage in Your Project
You may have noticed one more group of commands under Dependencies, and they're all about finding the missing third-party effects, fonts or footage that some other artist and definitely not you managed to misplace.

Using any of these three commands will point you to the exact composition(s) and layer(s) that are missing specific effects or fonts, or where a missing piece of footage is supposed to be used. These commands obviously can't magically give you things you don't have, but at least it helps you pinpoint the issues, and be able to better assess whether you can come up with a workaround.
Congratulations! Now you know a little more about After Effects
As you can see, the File tab has more to offer than just “New project” and “Save.” You can manage, streamline and package up your projects in a way that’s clean and intuitive, and easily find any missing elements without searching for them manually. There's plenty more goodness in the File menu we didn't cover here, like specialized import/export functions, cross-app integrations, Project Settings and more. Don't be afraid to explore and see what time-saving features are waiting there for you to discover!
After Effects Kickstart
If you're looking to get the most out of After Effects, maybe it's time to take a more proactive step in your professional development. That's why we put together After Effects Kickstart, a course designed to give you a strong foundation in this core program.
After Effects Kickstart is the ultimate After Effects intro course for motion designers. In this course, you'll learn the most commonly used tools and best practices for using them while mastering the After Effects interface.
ENROLL NOW!
Acidbite ➔
50% off everything

ActionVFX ➔
30% off all plans and credit packs - starts 11/26

Adobe ➔
50% off all apps and plans through 11/29

aescripts ➔
25% off everything through 12/6
Affinity ➔
50% off all products

Battleaxe ➔
30% off from 11/29-12/7
Boom Library ➔
30% off Boom One, their 48,000+ file audio library
BorisFX ➔
25% off everything, 11/25-12/1

Cavalry ➔
33% off pro subscriptions (11/29 - 12/4)

FXFactory ➔
25% off with code BLACKFRIDAY until 12/3

Goodboyninja ➔
20% off everything

Happy Editing ➔
50% off with code BLACKFRIDAY

Huion ➔
Up to 50% off affordable, high-quality pen display tablets

Insydium ➔
50% off through 12/4
JangaFX ➔
30% off an indie annual license
Kitbash 3D ➔
$200 off Cargo Pro, their entire library
Knights of the Editing Table ➔
Up to 20% off Premiere Pro Extensions
Maxon ➔
25% off Maxon One, ZBrush, & Redshift - Annual Subscriptions (11/29 - 12/8)
Mode Designs ➔
Deals on premium keyboards and accessories
Motion Array ➔
10% off the Everything plan
Motion Hatch ➔
Perfect Your Pricing Toolkit - 50% off (11/29 - 12/2)

MotionVFX ➔
30% off Design/CineStudio, and PPro Resolve packs with code: BW30

Rocket Lasso ➔
50% off all plug-ins (11/29 - 12/2)

Rokoko ➔
45% off the indie creator bundle with code: RKK_SchoolOfMotion (revenue must be under $100K a year)

Shapefest ➔
80% off a Shapefest Pro annual subscription for life (11/29 - 12/2)

The Pixel Lab ➔
30% off everything
Toolfarm ➔
Various plugins and tools on sale

True Grit Texture ➔
50-70% off (starts Wednesday, runs for about a week)

Vincent Schwenk ➔
50% discount with code RENDERSALE

Wacom ➔
Up to $120 off new tablets + deals on refurbished items


All-Access Pass
Unlimited access to 50+ courses, unlimited critique, live events, and 24/7 community. Join School of Motion All-Access today.