
All-Access Pass
Unlimited access to 50+ courses, unlimited critique, live events, and 24/7 community. Join School of Motion All-Access today.

Glitchin’ aint easy - actually, it can be. Today we’re going to create a Glitch Effect Template that will work with any image or video.
Have you ever been hacked? Or maybe you’re the one doing the hacking? Either way, glitch effects like this are very popular in today’s cyber world. So in today’s tutorial, we are going to make this glitch effect that you can set up once and then drop over any footage.
How to Create a Glitch Effect in After Effects
The great thing about this template is that we are going to have some control over the variables once we set it up. Once you create it, you can make your glitch as subtle or as chaotic as you’d like.
Today, we'll cover:
- How to add distortion using a displacement map
- How to shift color channels
- Set up sliders to change these effects easily
- Building a reusable Glitch Template
Download this glitch setup for free!
ENROLL NOW!
Acidbite ➔
50% off everything

ActionVFX ➔
30% off all plans and credit packs - starts 11/26

Adobe ➔
50% off all apps and plans through 11/29

aescripts ➔
25% off everything through 12/6
Affinity ➔
50% off all products

Battleaxe ➔
30% off from 11/29-12/7
Boom Library ➔
30% off Boom One, their 48,000+ file audio library
BorisFX ➔
25% off everything, 11/25-12/1

Cavalry ➔
33% off pro subscriptions (11/29 - 12/4)

FXFactory ➔
25% off with code BLACKFRIDAY until 12/3

Goodboyninja ➔
20% off everything

Happy Editing ➔
50% off with code BLACKFRIDAY

Huion ➔
Up to 50% off affordable, high-quality pen display tablets

Insydium ➔
50% off through 12/4
JangaFX ➔
30% off an indie annual license
Kitbash 3D ➔
$200 off Cargo Pro, their entire library
Knights of the Editing Table ➔
Up to 20% off Premiere Pro Extensions
Maxon ➔
25% off Maxon One, ZBrush, & Redshift - Annual Subscriptions (11/29 - 12/8)
Mode Designs ➔
Deals on premium keyboards and accessories
Motion Array ➔
10% off the Everything plan
Motion Hatch ➔
Perfect Your Pricing Toolkit - 50% off (11/29 - 12/2)

MotionVFX ➔
30% off Design/CineStudio, and PPro Resolve packs with code: BW30

Rocket Lasso ➔
50% off all plug-ins (11/29 - 12/2)

Rokoko ➔
45% off the indie creator bundle with code: RKK_SchoolOfMotion (revenue must be under $100K a year)

Shapefest ➔
80% off a Shapefest Pro annual subscription for life (11/29 - 12/2)

The Pixel Lab ➔
30% off everything
Toolfarm ➔
Various plugins and tools on sale

True Grit Texture ➔
50-70% off (starts Wednesday, runs for about a week)

Vincent Schwenk ➔
50% discount with code RENDERSALE

Wacom ➔
Up to $120 off new tablets + deals on refurbished items


Download this free Glitch setup for After Effects!
What is a Glitch Effect
So, what makes a cool glitch effect? Well, a glitch is an unexpected digital error. On a video screen, they happen when something isn’t working properly, or a signal is getting corrupted. This usually means that the effect is random and chaotic.
Creating distortion
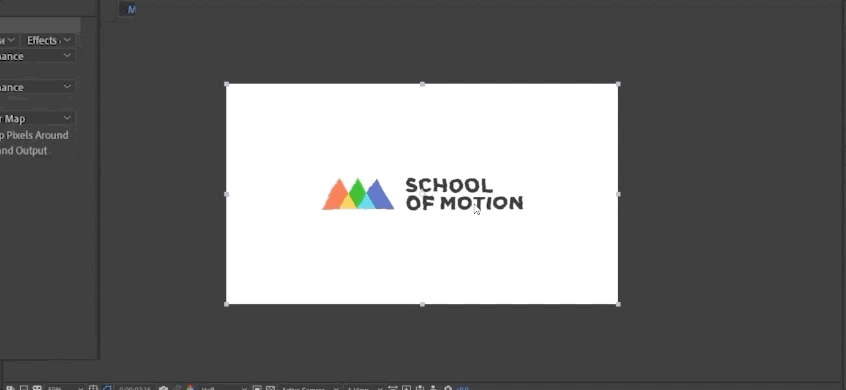
To get started, I’m going to drop in my source image. This can be whatever you want—an image, video, text. I’m going to use the School of Motion logo. We can go ahead and precompose this and call it “Source.” Now that this image is precomposed, we can change whatever is inside this source composition in the future without messing up our effect.
We want to create some distortion (or noise), which is going to drive this glitch effect. Make a new layer so we can reference this easily with an adjustment layer. Let’s make a new solid and call this "Noise."

Add Fractal Noise. Bump up the contrast. Stretch out the scale. We want this noise to dance around randomly as though it’s glitching.
Open Evolution options, alt-click on Random Seed, then type “time*15”. This will give us a new random seed that changes depending on the number we type in here. The higher the number, the faster the change.
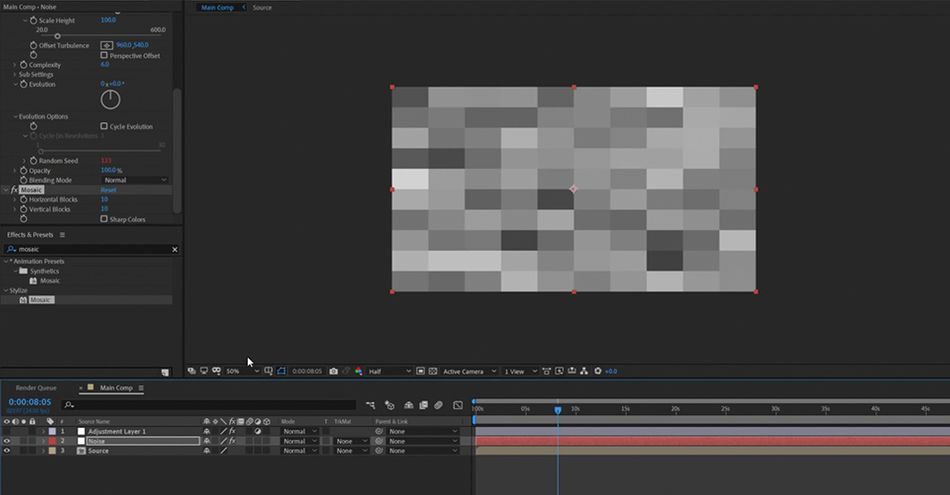
Make a new adjustment layer and add a displacement map. Target the Noise layer and select Luminance: This will make the effect look for the dark and light values. Select Effects and Masks. Now you can see a glitch starting to come together.
Shift Color Channels

Another aspect of glitches is the separation of red, green and blue values—also known as chromatic aberration. Since all colors on a screen are made up of RGB, when you are getting hacked—or doing some hacking—your R,G, and B go crazy. Come on, this is Hollywood hacking 101.
Let’s make a new adjustment layer and add a Shift Channels effect. Keep the red, and turn other channels to “full off.”
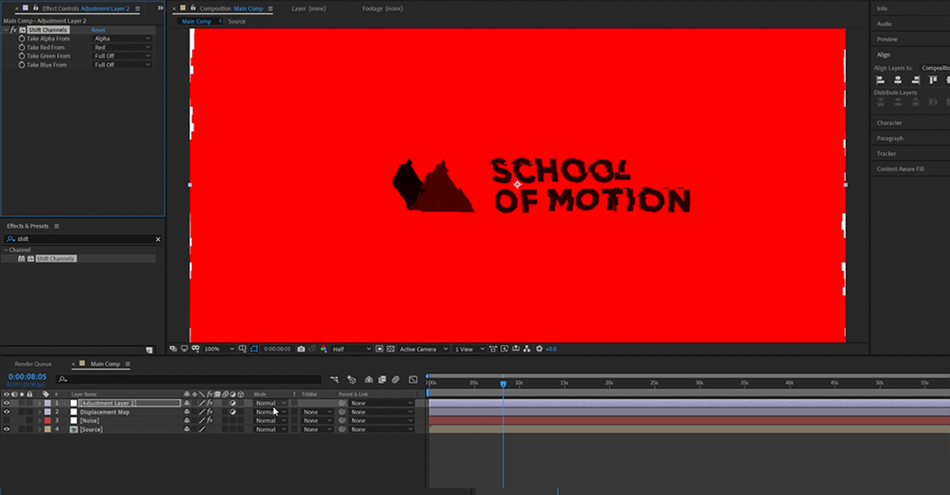
Set the blending mode to “Lighten.” Add a transform to this layer. Now if we move the position on the transform, you can start to see what's happening here—a single shift for only one color.
Let’s call this layer “Shift Red” and duplicate the steps for green and blue…
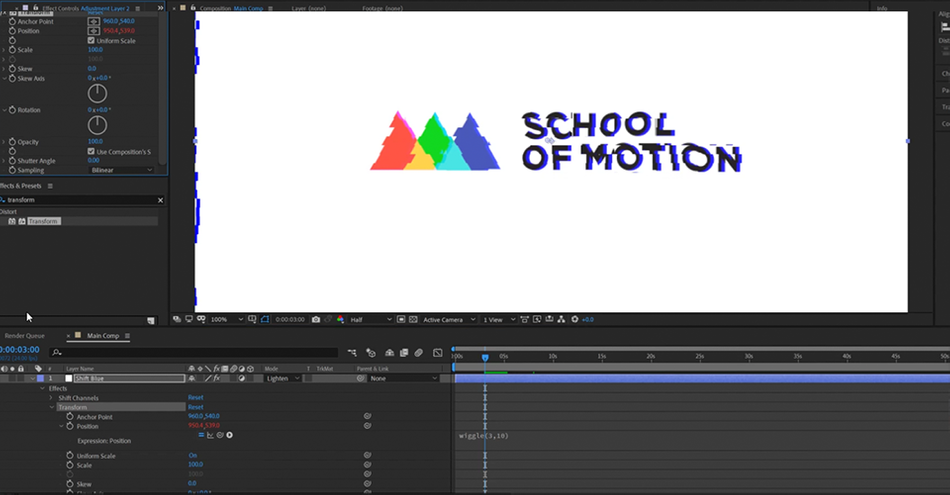
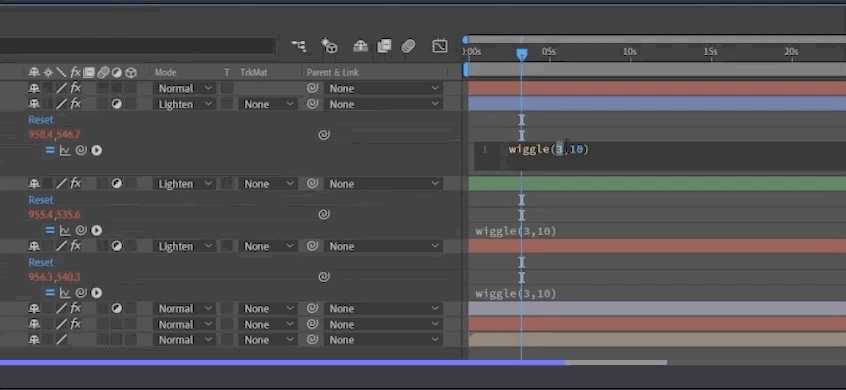
Like we said in the beginning, we want this effect to also feel random. So let’s add a little Wiggle expression to the transform property on one of these channels. Copy expression on to blue and green.
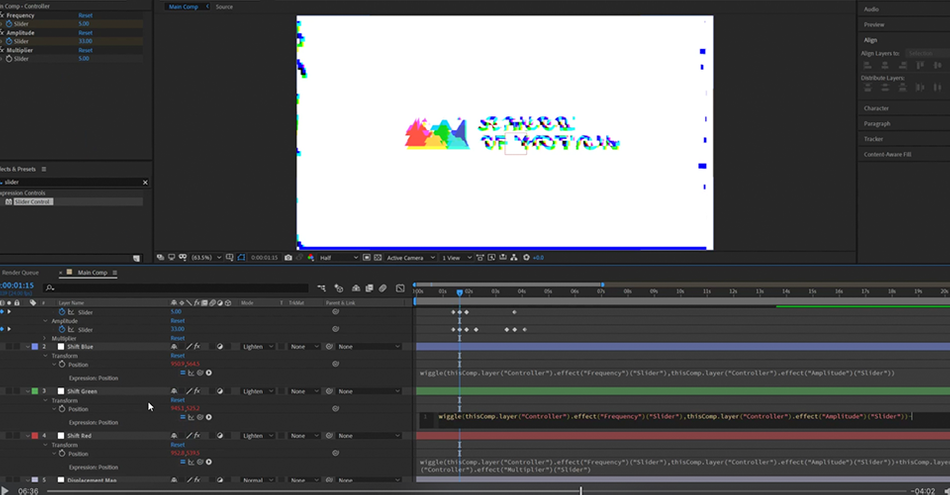
Set up sliders for easy control
Now it's time to set up some sliders so we can easily manipulate this effect and get the desired results.
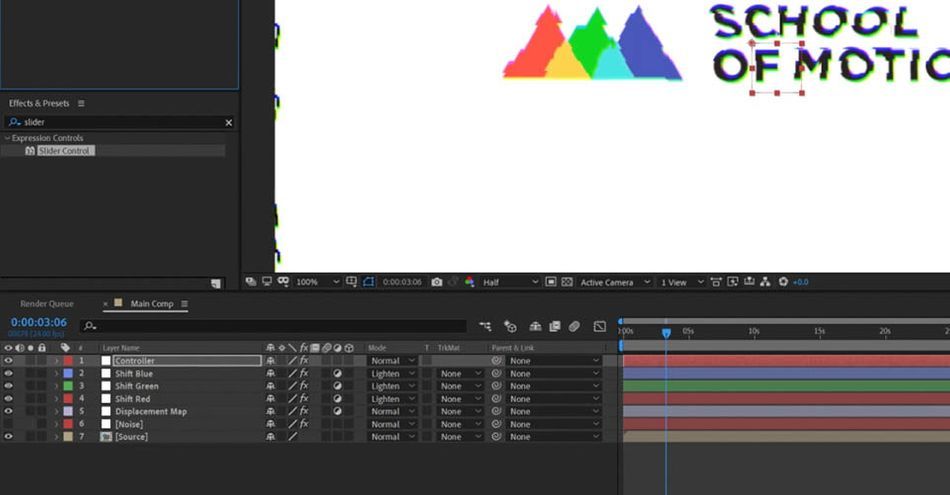
Add a null object and name it "Controller." Now add 2 slider controls. Pick whip Wiggle Expression to sliders, and copy the expression to other adjustment layers. Now we can animate the sliders on this controller layer—from zero to whatever—to create a glitch.
Use hold keyframes to create snappier start and ends. And if you aren’t happy with how linked together things are, you can start messing around with these expressions and making even more sliders!
Now let’s see how we can reuse this effect in the future.
Build a reusable glitch
Now that we have a glitch effect we are happy with, let’s clean this up a bit and templatize this so it’s easier to reuse.
Highlight them all and precompose them. I will call this "Glitch Effect." But OH NO, the effect is GONE! What have we done?! No worries, just click the Continuously Rasterize button and our effect will affect all the layers below it.
Now the issue here is that if we want to make any changes to our glitch, we have to click into the glitch comp and change the sliders, and then click back out to see the effects.
That’s not going to work for me. Let’s copy all the sliders from our controller Null, and then past them onto our Source Precomp.
Then lock the Source Effects Control Panel up top and switch back into the glitch comp. Now we can go ahead and delete any keyframes we made on the controller layer, and just re-link these sliders to the same corresponding sliders, using the pick whip.
Now you can keep any animation you want to do on the outer comp on the Source layer. The original sliders are linked to the sliders on this layer. All of the expressions have been updated.
G-G-G-Get It!
.gif)
And there we go. Look at this awesome glitch effect we made. We created some nice distortion, shifted color channels, and even attached all of these properties to sliders so we could easily control them in the future. Way to go. Very proud of you for making it this far.
Express Yourself
And if you want to take your motion skills even further, why not advance your knowledge of automation with Expression Session, where Zack and Nol will teach you how to approach, write, and implement expressions in After Effects.
-----------------------------------------------------------------------------------------------------------
Tutorial Full Transcript Below 👇:
Nick Greenawalt (00:00): Glitching. Ain't easy. Actually it can be today. We're going to create a glitch effect template that will work with any image or video.
Nick Greenawalt (00:17): Hi, I'm Nick Greenawalt motion designer, online teacher and all around chill guy. Have you ever been hacked or maybe you're the one doing the hacking either way glitch effects, like this are very popular in today's cyber world. So in this tutorial, we're going to make this glitch effect that you can set up once and then drop over any footage. The great thing about this template is that we're going to have some control over the variables. Once we set it up, once you create it, you can make your glitch as subtle or chaotic as you'd like. Here's what we're going to learn, how to add distortion, using a displacement map, how to shift color channels, set up sliders to change these effects easily building a reusable glitch template. Make sure to check out the link in the description and you can snag the project files that will help you get the most out of this lesson. Let's check it out
Nick Greenawalt (01:22): To get started. I'm going to drop in my source image. This can be whatever you want an image, video, text, whatever I'm going to use. This school of motion logo. And we can go ahead and pre compose this stuff, call this composition source. So now that this image is pre composed, we can change whatever is inside this composition in the future without messing up our effect. Okay? So now we want to create some distortion, which is going to drive this Glitch effect, and we want this distortion or noise to be on a new layer so that we can reference it in the future easily with an adjustment layer. So let's make a new solid call. This noise, make it the size of our comp color. Doesn't matter. Okay. We're going to add an effect called fractal noise. Cool. So let's set the type to block and bump up the contrast a little bit to give it some defined shapes.
Nick Greenawalt (02:34): And I'm going to open up the transform properties here and uncheck uniform scaling this way. I can stretch out the width like this, so it gets real nice and wide. That's good. And let's scroll down to the evolution options, and this is what we want right here. Random seed. You can see if I scroll through this, it starts to dance like this. Now we want to of automate this right here. So I'm going to alt click on this random seed stopwatch and type in a little expression time times, and then we can type in whatever number we want. Let's say 15. So now if I press play, you can see, this is just running through this random seeds, the higher number you type in the faster it's going to cycle lower number slower, that change rate. Now let's go ahead and hide this noise layer. You can see nothing's happening. That's okay. Let's make something happen. We're going to right. Click make a new adjustment layer and add a displacement map.
Nick Greenawalt (03:48): Now we want this displacement map to target our noise layer. And we also want to click here where it says source, and we want to use the effects and masks on our noise layer too. And we also want to set this to luminance so that it targets the black and white values. If we press play here, you can see what's starting to happen. Now we can mess with the horizontal and vertical displacement to really kind of make this fact look a lot crazier, but I don't really like how kind of sharp this effect is starting to look. So I think that I want to go back on my noise layer and make it look a little blockier. So I'm going to add an effect on this layer called mosaic so we can tweak the amount of blocks in here, and it's a little bit hard to see the results of what's actually happening. So let's go ahead and turn off our noise layer, turn back on our adjustment layer. And then with this adjustment layer on, we can tweak the amount of blocks in here until we get something that we like, and we can just play around with this and we can always come back to it later. And I'm also going to go ahead and just rename this layer displacement map, just to keep things nice and tidy.
Nick Greenawalt (05:16): Now, another aspect of glitches is the separation of red, green, and blue values. Also known as chromatic aberration. Since all the colors on a screen are made up of RG and B, when you are getting hacked or doing some hacking your RG and B go crazy. Come on. This is Hollywood hacking 1 0 1. So let's make a new adjustment layer by right clicking new adjustment layer. And we're going to add an effect called shift channels. So what we want to do here is we want to turn off all of the colors except for red. So let's where it says green click full off blue, full off. There we go. And we'll come down here to the blending mode and set this to LinkedIn. Great. Now it looks like nothing's happening, but we're going to get there again. And why don't we rename this layer to be shift red and we can even set this little, a layer color tag to red.
Nick Greenawalt (06:22): Also it will help us visually identify it in the future. Let's help out future us. Now we want to do also is duplicate this layer two more times and do it for the other colors. So I'm going to click control or command D to duplicate it once more. We'll call this to be shift green changes, a little color tag to be green and turn off red and turn on green. Do it once more for blue change the color tag to blue, name it, blue, turn off green turn on blue. So really it looks like nothing's happening here. So let's make something happen. What I want to do is I also want to add a transform effect.
Nick Greenawalt (07:19): So now with this transformer effects on here, if I move the position on this layer, you can see that I am shifting the blue here, but I want this to feel a little more random, like we said in the beginning. So if I all to click on the position of this transform effect and type in a little wiggle expression, start typing in wiggle with open parentheses and it will also auto fill here. And then we can type in two numbers. So let's say three comma 10. This will mean wiggle three times per second, 10 pixels like this, we press play. This is what's happening. And if we copy this transform effect, we can paste it on our other two layers and they will also now have the wiggle.
Nick Greenawalt (08:14): Cool. But you know, looking at this, I don't think I'm happy with the way that these things are all wiggling around. And I think I want a little more control over all of these properties. So let's make a controller. I'm going to right. Click create a new Knoll object. And I'm going to name this controller. Did you guess it? And let's add some slider controls to this layer search for slider control and let's add one. And we're going to duplicate this clicking here and click control D or command D on Mac. Now we have two slider controls. We're going to name the first one to be frequency by clicking enter rename and the second one to be amplitude. Great. Now what I'm going to do is I'm going to open up the expressions that we put down on these layers. I'm going to highlight these layers DoubleClick II on the keyboard to reveal the expressions.
Nick Greenawalt (09:20): Let me give myself a little more room here. And if I click onto my controller layer, I can lock this panel up here by clicking the lock button. Okay. And so if I grab one of the numbers, the first number on my wiggle expression here, this three, I'm going to pick whip and attach it to the frequency slider like this. And I will do the same with the 10, the second number pick with it to my second slide or the amplitude slider like this. And if you do this and you get this little error here, all that you need to do is add a closing parentheses to your line like this, just close the expression out and you should fix your error. So now what we can do is we can actually control this transform expression using these sliders. Isn't that neat? So I'm going to copy this expression.
Nick Greenawalt (10:23): Now, if I right click on the position here, copy expression only, and I will paste it onto my other two shift layers like this just control or command V to paste it. And I'll also why don't I open up my displacement map here and do the same onto my horizontal displacement. First, I'm going to zero it out so that the zero matches the zero, all my sliders, and then paste it onto here. Cool. So now we can just animate these sliders, any kind of animation we want on here and it'll affect all of these layers. So why don't I just go ahead and do this now create a glitch animation on the sliders and make some kind of cool glitch animation to happen. And I don't want to bore you as I put down some key frames. So I'm actually going to hack the space time continuum and travel forward very quickly. And this is a skill that you can learn once you get really good at hacking like me.
Nick Greenawalt (11:33): Okay? So I made a little glitch animation, but one thing I'm not happy with is how linked certain things are. For example, the horizontal displacement. It's not being as exaggerated as I want compared to how much these layers are shifting. So what I'm going to do is I'm going to add slider onto this controller layer. That's going to work as a multiplier. So I'll show you what I'm talking about. If I add another slider control onto here, and let me just call this multiplier. Now, what I'll do is on this expression on our displacement map, I'm going to add at the end of this line, eight times, sine multiply and then pick whip to this multiplier. So now what this will do is any number I put into this multiplier will multiply this entire previous expression times the multiplier. So let me go where there's a little bit of key frame action happening.
Nick Greenawalt (12:36): And now if I start to crank this number up a little bit, you can see now it is multiplying by this number. Cool. And I can do the same thing with the other expressions here, but I can just do different multipliers. For example, if I want this to be a little bit different, but unless I could do plus this multiplier, or I could do minus this multiplier like this, and this can just really help you now add a little bit of variety to your different layer properties. So now let me just go in and just tweak my animation a little bit, add some of this multiplier. There are some key frames down on it and let's see what kind of animation we can come up with. And once again, I'm going to hack space time and do this very quickly and do not try this at home. I am a professional.
Nick Greenawalt (13:31): All right. So I think this is looking pretty good. I think the multiplier helped a lot and I'm pretty happy with this. So now that we have a glitch effect that we are happy with, let's clean all of this up a little bit and make it an easy template that we can reuse in the future. So personally, I don't like all of these layers stacked here. I'm clicking you to hide and show all of my key frames by the way. So what I'm going to do is I'm going to take all of these layers and I'm going to pre compose them, grabbing everything, except from my source comp. And I'm just gonna right. Click pre compose. Let's call this glitch effect. It's important to get really clever with your names. So now if I play through this, oh no, the effect is gone. What have we done?
Nick Greenawalt (14:25): Well, no worries. If we click the continuously rasterize button, all of our adjustment layers and everything are going to still affect anything that's below them. So no worries here, but now the issue is that if we want to keep working on this glitch, we have to click into this comp and, and edit these sliders in here. And that's going to be kind of a pain because we can't see what we're working on and we have to keep clicking back and forth. So what can we do? Let's figure it out. So if they click back into our comp, what we can do is we can actually copy these sliders country control C, copy them, go back into our main comp and let's just paste them onto our source composition. You can click you to reveal everything and make sure, just confirm that it actually paste it onto here.
Nick Greenawalt (15:23): And great. And so now with this composition selected, I'm going to lock these effect controls up here, click back into my glitch effect. And I'm just going to delete all of these key frames here. And with this controller layer selected, let me just pick whip these sliders onto the sliders on this source comp like this. So now what should happen is everything in this glitch effect comp should be really linked to the sliders on this main composition like this. So now anything we want to work on in here, we can just do it all on this outer source composition and any changes we want to make. We can just do them out here and it will update inside the main composition. So now to update the contents of this glitch, all you gotta do is go into their source here. And you can just drag right in a new source image, contents, whatever, and your glitch will just apply right on top.
Nick Greenawalt (16:29): So from here, you can either just work directly into this template that we made and make new glitches, or you could save this project file and import it into another and use it as a glitch template. And that's really all there is folks. And there we go, look at this awesome glitch effect we made. We created some nice distortion, shifted color channels, and even attached all these properties to sliders. So you can easily control them in the future. And if you want to take your motion skills even further, why not advance your knowledge of automation with expression session or Zack and Knoll, we'll teach you how to approach bright and implement expressions in after effects. If you want to learn more ways to improve, make sure to subscribe to this channel and hit the bell icon. So you'll be notified when we drop the next tip. Thanks for watching goodbye.
All-Access Pass
Unlimited access to 50+ courses, unlimited critique, live events, and 24/7 community. Join School of Motion All-Access today.