All-Access Pass
Unlimited access to 50+ courses, unlimited critique, live events, and 24/7 community. Join School of Motion All-Access today.

If you want to get started in Unreal Engine 5, UE Master Jonathan Winbush is here to show you how.
Unreal Engine 5 is officially here, and it’s pretty fantastic. With incredible power, a bevy of features, and the intuitive controls you’ve come to expect, this free 3D tool is the killer app you need to see to believe.
Want to follow along? Download the project files below.
{{lead-magnet}}
I’ve had a chance to work with Unreal Engine 5 for some time, and now that it’s in Beta for anyone to download and enjoy, I figured you could use a guided tour to get you started. Now this isn’t going to be everything you can do, but I’ll walk you through the basics so you have a strong foundation. After that, it’s between you and your imagination.
In this video, I’ll show you:
- How to download Unreal Engine 5
- How to navigate the menu to open a new project
- How to quickly create using MegaScans, Lumin, and other assets
- How to build and light your scene using the new interface
If you're completely new to 3D animation and need help building a strong foundation, you should check out Cinema 4D Basecamp.
.gif)
Getting started is fairly simple. First, you want to head to your browser of choice and navigate to UnrealEngine.com. The new home page shows off the demo from their latest showcase, which helps keep you hyped while you get started. Click on the DOWNLOAD button in the top right corner to get started.
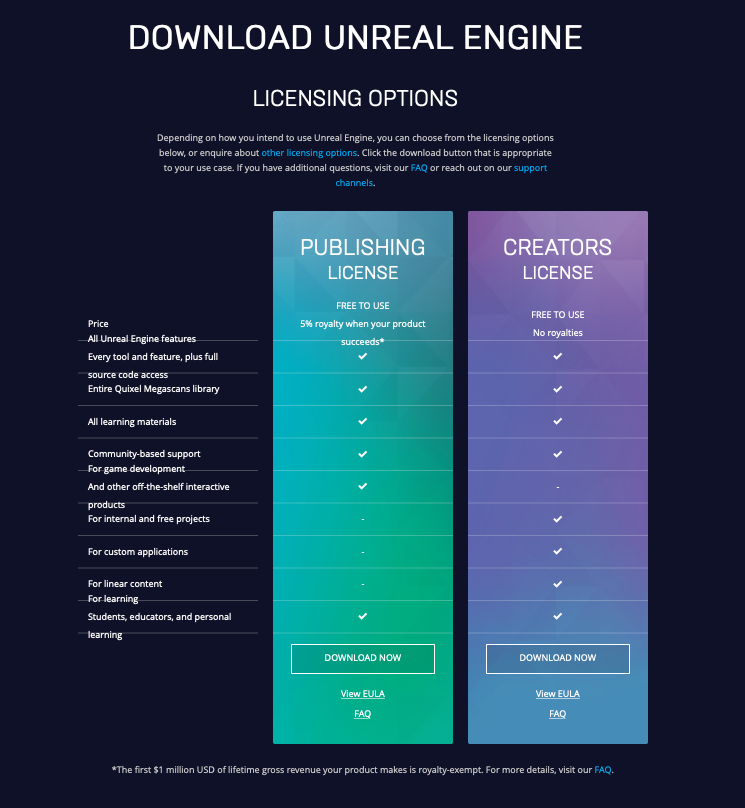
Remember, Unreal Engine is completely free. If you are creating a product to sell, you only have to pay a 5% commission when you surpass $1 Million in revenue. Since we're primarily focused on motion graphics, we get to use the program for free.
On the license page, scroll down and click the Download button. You might see this page.

If you don't have an account with Epic Games, you can create one here. If you already have an account, go to Log In and enter your information. You can create a solo Epic Games account, or log in using your Google, Apple, Facebook, or game console IDs. That takes you to the launcher.
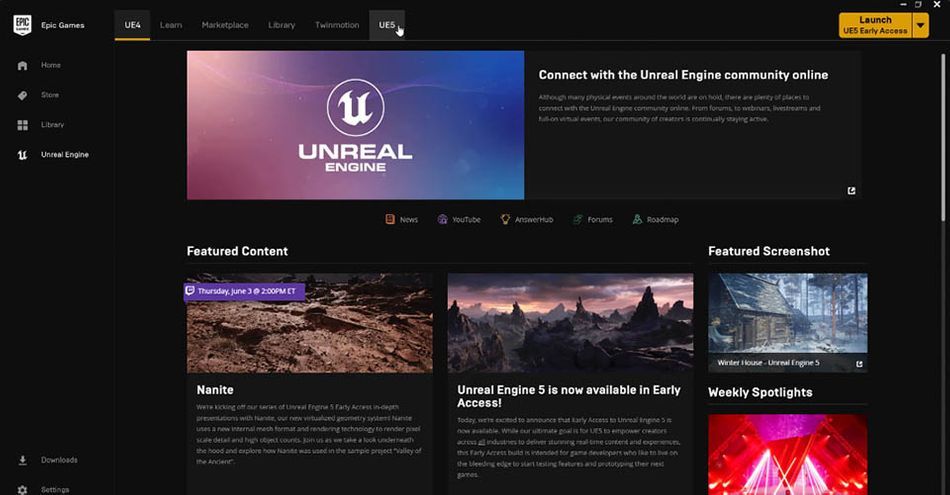
At the top of the page, you'll see a tab marked UE5. Click on that to head to the download page. Here you'll see that Unreal Engine 5 is marked as Early Access. UE5 is still in Beta, which means some functionality might be limited, and the optimization could be a little less polished than you're used to. We saw a similar phase with the UE4 launch, and Epic Games is well known for putting in the hours to deliver a final, finished product.

If you scroll down this page, you'll see a sample project that shows off all the new features in UE5. I'd set aside some time for this one, as it is a 100 GB download. However, if you want a crash course in everything new, this is a fantastic free sample.
Once you had UE 5 downloaded, head to the top right for the launcher.
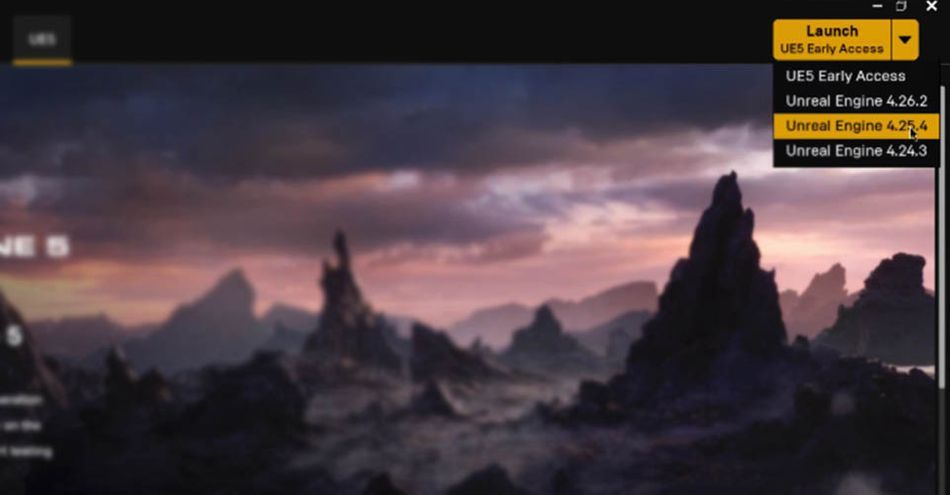
You'll notice that you have options of which version to launch. This is a great feature if you're working on a long-term project in a specific version and are worried about messing things up by updating the file. For now, UE5 only has the Early Access option.
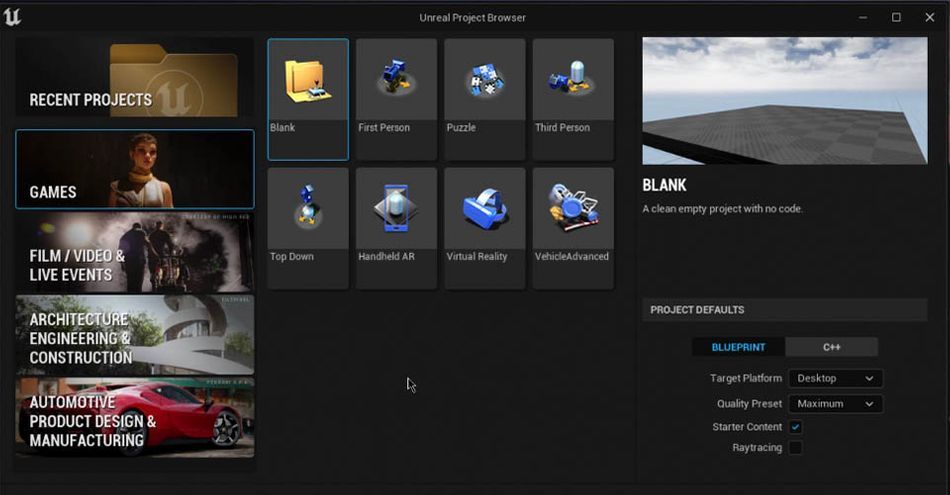
Welcome to the new Unreal Engine Project Browser. If you're familiar with UE4, this should all look familiar. It's a new skin, but the same functionality.
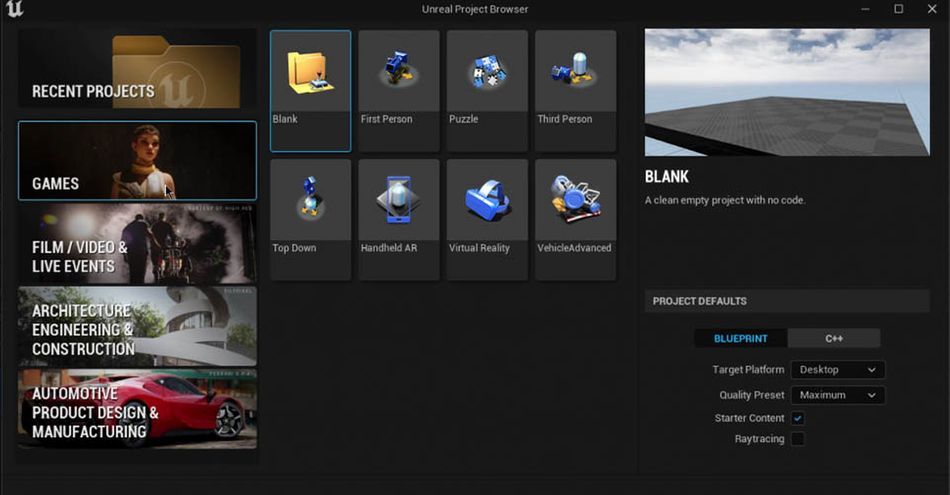
If you're looking to make a new video game, you'll see the templates for building a first-person shooter, top down, puzzle game, or even virtual reality.
With Unreal Engine 5, you can use the program for automotive or product design, and even construction and engineering projects. If that's what brought you to this page...hello, welcome to School of Motion. We don't really build buildings that often, but we're happy you stopped by.
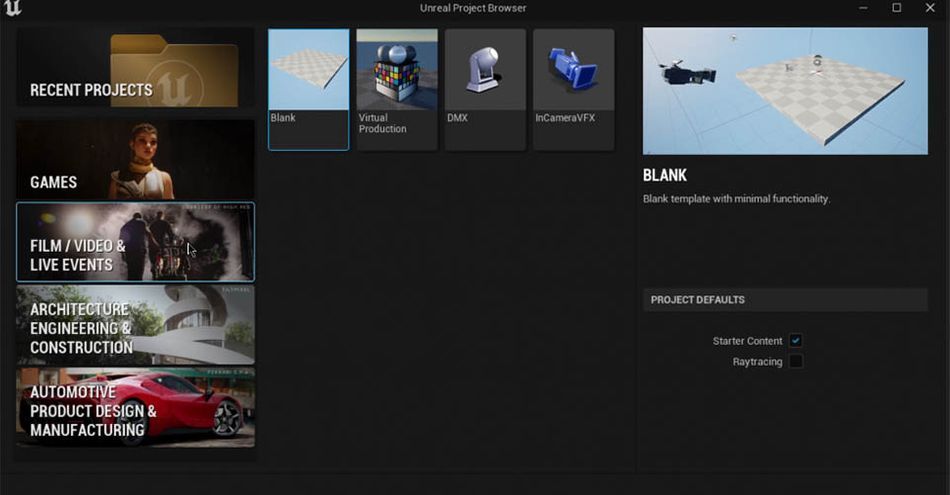
Today, I'm going to head over to Film / Video & Live Events. You can see a number of helpful templates, but I like to start with a blank canvas. At the bottom of the browser, select a location to save your project, give it a classy name (FunReel in Unreal, for example), and click CREATE.
Welcome to Unreal Engine 5.
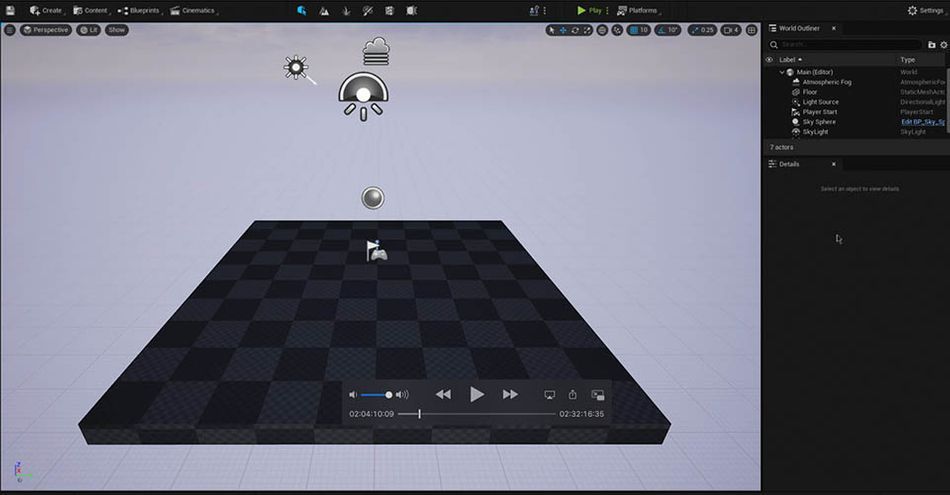
Navigating around the workspace will be easy for anyone familiar with first-person-shooter games. Just make sure you are holding down the Right Mouse Button to move around.
Watch me build the rest of this scene in the video above, then let's get started with some cinematic lighting!
.gif)
Now it's time to really get started and build a new scene. With Unreal Engine 5, creating a new landscape is incredibly simple. Not easy, at least not for everyone, but the toolset is designed to be intuitive. Best of all, you have access to MegaScans to create rapidly.
If you have 3D assets you want to bring in, Unreal Engine 5's Nanite tech makes the process even easier. Even if you have a model from ZBrush rocking a million pixels, Nanite optimizes the render for the pixels that can be seen...and nothing more. This helps even massively detailed scenes run smooth. We won't need any normal maps or displacement maps.
Since we want to create fast, let's navigate to Content > Quixel Bridge.
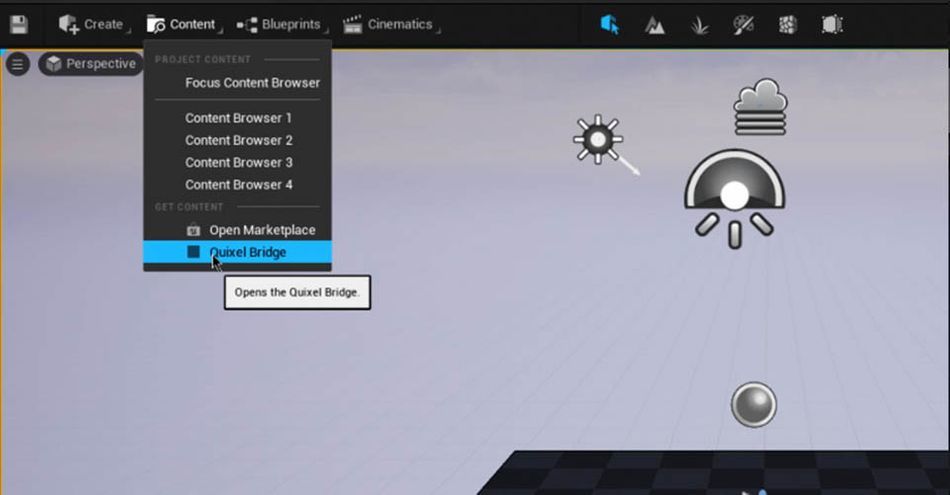
This is access to all of the assets you'll have for free using MegaScans. This is objects, landscapes, textures, foliage, and a metric ton more. In the past, you had to download Quixel Bridge separate from Unreal Engine. The integration of these platforms is a HUGE improvement to your workflow.
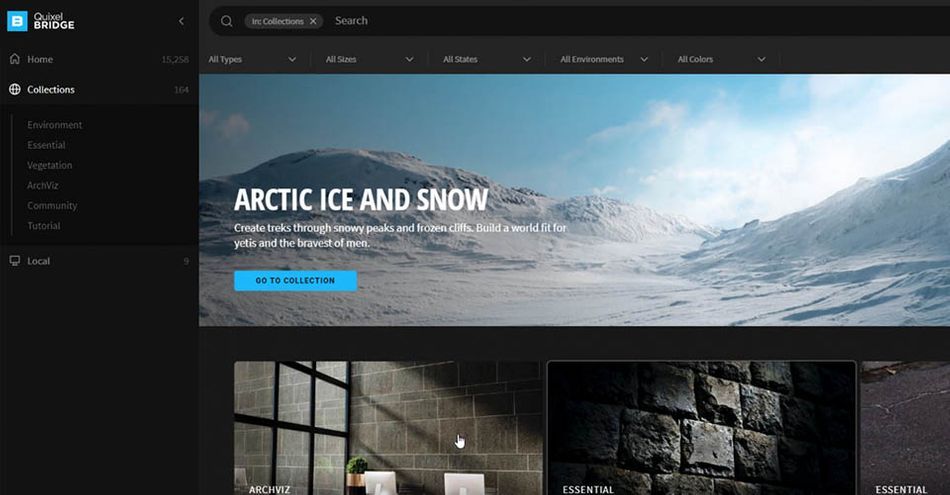
If it's your first time navigating Quixel Bridge, I would recommend starting with Collections. It is a curated list of the favored assets by a community of designers. For this example, I'll use the Arctic Ice and Snow. Before you go to download, make sure you are signed in (with the same ID as you used earlier) in the top right corner.
Some of these models can be exceptionally large, as much as 500 MB for a single asset. Make sure you set a save location with plenty of space under Preferences.
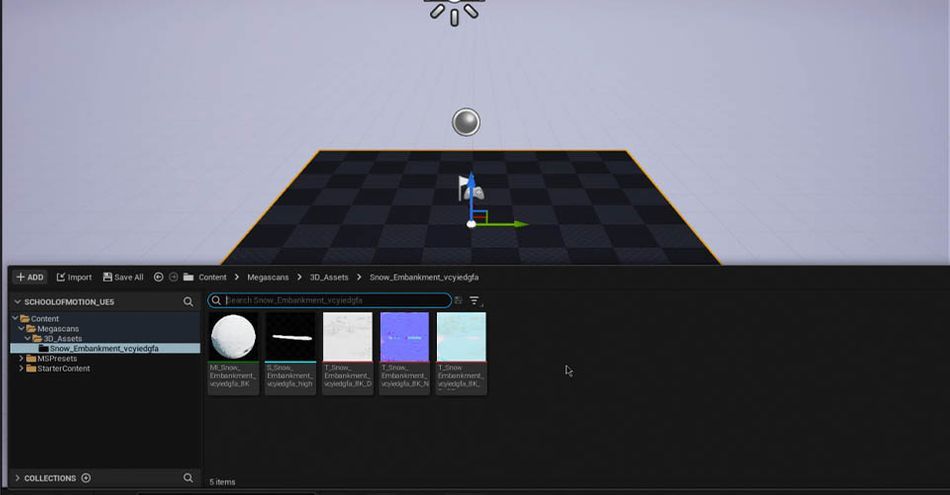
Back in Unreal Engine, go to the bottom where it says Content Drawer. You'll find all the assets you've downloaded, together and ready for use. Best of all, using these assets is a simple drag and drop.
.gif)
Check out the video above to watch me quickly build out this scene!
%2520(1).gif)
Lighting in Unreal Engine 5 offers a unique advantage over some other 3D design software. With the powerful real-time rendering, you are able to see each change the moment you make it. This allows you to experiment with different looks, implement volumetrics, and position directional lighting to take advantage of the scenery.
Since this is a DEEP topic, I'd recommend you watch the video above to really see how I craft my scene. If you want to learn more of the specifics of lighting in 3D, I can also recommend the excellent video David Ariew put together on lighting beyond HDRIs.
As you can see, Unreal Engine 5 is already showcasing some incredible power, even in Beta. As Epic Games continues to refine the engine over the next few months, you’ll see the speed increase and new tools come online. Still, if you’re ready to jump into the next generation of 3D design, the barrier to entry is literally a few clicks of a mouse.
Unreal Engine for 3D Artists
In this course with UE master Jonathan Winbush, you will learn how to import assets, world build, animate, and create cinematic sequences all in real-time. You'll also learn how to work with materials, lights, and cameras so you'll be able to create amazing 3D renders in no time.
-----------------------------------------------------------------------------------------------------------------------------------
Tutorial Full Transcript Below 👇:
Jonathan Winbush (00:00): Unreal engine five is officially here and it's pretty fantastic with incredible power, a bevy of features and intuitive controls. You've come to expect this free 3d tool is the killer app. You need to see to believe
Jonathan Winbush (00:20): What else, what else? When boys here, it said I'm excited to bring you guys unreal. Engine five that had been used in the early access for a little bit now. So I've reached out to my friends at school of motion. So I could give you guys a guided tour to get you guys started. Now, this isn't going to be everything that you could do, but it's going to give you a solid foundation on where you can get started and let your imagination run wild. And this video I'll show you how to download unreal engine five, how to navigate the menu to open a new project, how to quickly create, use a mega skins, lumen, and other assets, and how to build a light. You're seeing using a new interface before we begin, make sure to download the project files in the link below so that you can follow along.
Jonathan Winbush (01:02): Okay. To get started. First, you want to go to unreal engine.com. You can see we have a brand new loading page chair showing why the demos from the UAE five demo that they revealed a couple of days ago. And it gets started in the upper right-hand corner. We want to click on this download button here. So I'm going to click on this and that's going to bring us to the licensing page. And now, since we're creators, we're able to use unreal engine 100% free. The only time you have to pay for it is if you make an interactive experience like a video game, and which, if you have a million dollars worth of revenue, then you have to pay them their 5% as you can see there and the royalties. But since we're going to be using it for motion, graphics and broadcast and whatever else we want to use it for like daily renders or something of that nature, we're going to be free to use unreal engine for free.
Jonathan Winbush (01:46): So if you scroll down here to the bottom, I'm just going to click on download right here, and that's going to bring us to this screen here. And so if you don't have an epic scam account already, you want to make sure you sign up for one. But if you do have one, you're just going to hit login now. And then from here, it gives you a whole plethora of ways to sign into epic games. Like I just made a separate epic games account. It just keeps it clean. But if you want, you can sign up with Facebook, Google, even some of your gaming consoles and even with apple. And so I always suggest just, you know, making a brand new account with the epic games right here. And then once you do, it's going to download the exe file in which it's going to start at epic games launcher.
Jonathan Winbush (02:22): So once you have everything up and running and installed, this is the epic games launcher, and this is what you're going to see. Now, if you're already experienced with unreal engine, you'll notice we have a brand new tab up here. This is UE5 and that's exactly what we want to go to, to get unreal engine five. So I'm going to click on this and that brings us to the unreal engine five page and which it gives you download the early access and which I want to reiterate. This is a beta. And so some of the functionality might be a little bit weird and might be a little bit slower than what you're used to, but it is in beta. And it's going to be worked over for the next couple of months. So take that with a grain of salt. Now, if you want to check some of the stuff out that came and engine five, they have the sample project down here, which showcases all the new features like night-night and lumen, which is really cool. Make sure you set some time aside. It is a hundred gig download, but if you watch the YouTube trailer that they revealed, it's exactly that demo, but you could play and you can explore around in a road and you could kind of just dissect it and see exactly how they built it out.
Jonathan Winbush (03:23): Once you have the early access installed, you should have a tab up here in the upper right-hand corner. If I click on this down arrow, this actually shows me all the different versions of unreal engine that I have installed. You can have multiple versions installed, which is really cool. So if you start on a project saying like 4.2, five and 4.26 came out, but you didn't want to upgrade because it might mess up your project. You can totally keep that version in there. And so you want to go to the one that says [inaudible] early access, and you want to click on this and there we go. It's loading up unreal engine. It has this pretty cool splash screen here. And once it's done loading, we have the unreal engine project browser here, which is completely revamped with the UI and everything. It looks really clean here on the left-hand side, we have our recent projects.
Jonathan Winbush (04:07): And if you're familiar with unreal engine for the show, all look familiar to you. It's just re-skinned. And still we have games here. We have film, video and live production, which is, this is what we're going to be using. We have Archbishop engineering and construction, and then we have automotive and product design is. So if you notice, as I click on these, these have a whole bunch of different templates that will get you started to say that you wanted to make like a first person game. You click on this and automatically gives you everything. You need to get started with a first person shooter there. If you want to do like a top down experience, something like Diablo, you have that option. But I like to go to the film, video and live events, and I like starting with a blank slate. So I'm going to click on blank here and then down here under project location, make sure you save it to where you want your unreal engine project to save to.
Jonathan Winbush (04:56): And then over here on the right hand side, under project name, I'm just going, named this school of motion underscore [inaudible]. And then we're going to click on create. And here we are, this is what you guys have been waiting for. This is the brand new unreal engine five. As you can see, the interface is completely redone. It should look familiar if you've been using a real engine for, but the interface is a lot cleaner. It's a lot sleeker. Like if you weren't working at unreal engine four, this should look really familiar to you. On the right-hand side, we have the road outliners still. We have the details panel still, but if you notice on the left-hand side, we don't have to act as panel. And so for those that aren't familiar with unreal engine four, let me show you exactly what the old interface looked like, which is really cool.
Jonathan Winbush (05:40): Cause we could kind of go back and forth between the two. So if I come up to window and I come down here to load layout, it actually gives us the option to bring up the old unreal engine for classic layout. In which if I click here, this is exactly what unreal engine four looks like, but it still has a nice interface. And so this is what I was alluding to before we had this panel called the place actors, which kind of gives us an easy access point. So audit different things that we need here. So if we wanted to add stuff like player start, or if you want it to come over the lights, it has all of your lights sitting here. If you want it to come over to virtual production cameras, it was all easy to access here. Having a place actors here on the left-hand side just gave you easy access to all these different things that I use a lot.
Jonathan Winbush (06:22): But as you can see, it does take up a lot of real estate here on the left-hand side. And so for me, I like this old interface, but a lot of people do like the sleekness and having a bigger viewport here. So I'm going to go to window, come back down to load layout, and I'm going to come down to default editor layout, and that's going to bring us back to how they want us to really interact with unreal engine five. And if you need to add anything to your scene is right over here under main, under create. And this is where audit place actor stuff is. And so it kind of just gives you a pull down window instead of having it inside of a panel there. So, you know, whatever you're more comfortable with feel free to use it.
Jonathan Winbush (07:05): So the main thing in this demonstration that I want to show you is how we could quickly create what mega scans used on our rule. Engine five, Whitney at night, Illumina technology. And if you're not familiar with Whitney and I is basically, if we have a high polygon object, we don't have to use any normal maps or any displacement maps. We can take like a really high polygon object straight from zebra, SJ or mega scans with even like a million polygons on it, bring it directly into unreal engine and with their new technology, that thing just runs like a breeze. We don't have any type of delays. We don't have to decimate our models or anything. And with luminous is basically from my understanding, it's going to be a replacement for Ray tracing. So limited, it's going to be effecting your lights, your shadows, your reflections, everything that we were kind of amped to inside of unreal engine fourth, Ray tracing.
Jonathan Winbush (07:52): We're going to get faster results with limited technology and unreal engine five. And if you guys would like to take a deeper dive into it, I'm actually going to leave this link for you guys. So you can see the official documentation for unreal engine five, they're early access. I would suggest that everybody go through it. If they really want to understand how to knit Knight and limited technologies work. If I just scroll down through this screen here, you can see that it gives a pretty good explainer about everything that's going to be inside of unreal, engine five, you know, the interface changes and all the things that work and don't work as of right now, because remember this is a beta and so certain things aren't going to work. Like I know offhand, the [inaudible] tool is kind of iffy right now inside of unreal engine five is so I'm not going to display that, but I am going to display the stuff that works.
Jonathan Winbush (08:36): Okay. So again, back in the unreal engine five, I'm going to come over to content and then I'm going to come down here to where it says, get content. And I'm going to click on quick. So bridge. So basically what quick sell bridges is giving you all the assets that we have for free through mega scans. And so what these are is, you know, there's a whole bunch of different. We have a whole bunch of different landscapes. We have, you know, all types of materials. It's a really cool library. It has thousands of items. We have some for religion here. So if you're not familiar with quick, so bridge is completely free with your epic games account. And the reason that we were able to access it inside of unreal engine is because it's all integrated now. So in the past it was two completely different platforms you had to download quick.
Jonathan Winbush (09:20): So bridge separately from unreal engine, but now it's all built right in, which is really cool because a version that's built in actually has all the models with nanotechnology already built into it. So let's go over here. I'm going to come over to home. And then I'm going to come over here to collections. And which, if you're brand new to Quicksilver and unreal engine, I would suggest everybody come to collections because this is kind of like a curated gallery and where they put all the different things. Like for this example, I'm going to use this Arctic ISIS snowpack here, which is really cool. But if you scroll down, you can see that we have some like Renaissance type buildings. We have some Nordic coastal cliffs, we have sand dunes. And so let me click on something here. Let's say like dystopian, slums. And so it's going to show you the renders that they created internally using the different assets.
Jonathan Winbush (10:11): And if I click on assets, these are all the assets that they use to make those renders, which is really cool. So it's showing you exactly what they did to make that scene there that you see here under renders. And if I come back over to collections and I'm going to go to the Arctic ice and snow, you're some cool renders that we can make in there as well. And if I click on acid, this is better because it's actually showing us some of the 3d models that they used her as well. So before we could start downloading everything here, you want to make sure that you're signed in. So up here in the upper right hand corner, you're going to click on the head there and it's going to say to sign in. So I'm going to click on this. And then I'm just going to sign in with my epic games account.
Jonathan Winbush (10:53): And once we're signed in, we should be good to go. So I'm going to click up here again, and I'm going to come down to preference and under preference. This is going to allow us to put a library path where we want to have all of our stuff safe. And so with nanotechnology, a lot of these models can get quite large, like even up to 500 megabytes is. So you're going to want to make sure that you pick somewhere that has a lot of space, and then you're just going to click save. And then if I scroll down here, you can see that I have some of this stuff downloaded already. And then the ones that have the green arrow, that means that we can actually download these. And so caveat, if you're going to be used in the nine night type models, it might take a little while to download.
Jonathan Winbush (11:29): So make sure you have enough time to download those. So if I do click on like the snow hill here, if I come over here to my right hand side right here, under medium quality and click on this, you can see that we have a selection for night-night and which this is what we want to use. This is what we all have been waiting for. So I'm going to click on that night and then we can actually just download it. And which already have some stuff already downloaded within the night technology. Like if I click on this one here for the snow embankment, I already have it downloaded. And so it's as easy as just clicking add. And you can see right here in the lower left-hand corner, it says successfully export it. So I'm going to come back to unreal engine. Then I'm going to come down here to my lower left hand corner, where it says content drawer and click on that.
Jonathan Winbush (12:12): And that's actually going to bring up our content browser and under mega scans, 3d assets, you can see that we have our snow and bay in here. And so from here, it's as easy as basically just clicking and dragging it into our scene here, which is really cool. So if I scroll on my will, it's just going to push inward. Like, so, and then if I want to turn, I'm going to hold down the right click on the mouse. That's going to turn my camera head. And then from here, it's kind of like moving in the first person video game. So if I hold down the w that's going to move forward. If I hold down the S the moves backwards, the a on my keyboard and who's left in the D moves, right? Then if I hit the E, that goes up in the queue, it goes down.
Jonathan Winbush (12:58): So if you play any type of computer games, like call of duty or dumb, it moves exactly how you would inside of a video game, but make sure you're holding down the right click on your mouse button to navigate. So we have a snow embankment here, but we have this platform here and it doesn't have any type of materials. So I could just actually add like a snow material here. So I'm going to come back to content, come down to quick. So bridge, and let me scroll down here. I think I have some snow already downloaded. There we go. I have the fresh one, swept snow here, already downloaded, and then set the highest quality that we could pick. So I'm going to click on add, and they successfully export it. So I'm going to minimize this again. Then I'm going to come down here to the content drawer.
Jonathan Winbush (13:40): And this time over here, under my mega scans, we have a new folder for surfaces in which is already selected. So I'm just going to click this snow, drag it into my scene here. And you can see that the shaders are compiling. It should work pretty fast, but now we have some snow in here, which is really cool. So if I click on my snow embankment, I can actually move this up a little bit in which we're getting some snapping, and I don't want that. I want to freely be able to move this. So if I come over here into my top panel over here on the right, we should see some stuff highlighted in blue. So if I click on this one here, that what they say, what a snapping, and now I can freely move this around, but let me click on my rotate tool here.
Jonathan Winbush (14:22): So I'm gonna click on this right here. This is rotate. You can see that it's still snapping when it rotates and that's controlled by this one right here. So if I turn this off, it's no longer rotating and increments. And that's what these numbers are right here. So if I turn this back on, then I click on this 10. This allows us to move it in increments. And so right now, default, it's at 10. So say that I wanted to snap in like 45 degree increments. And if I click on here and move it over, now, you can see each time it's snapping in a 45 degree angle and same thing right here for the movement. If I click on this for the snap sizes, let's say if I do it to one, turn this back on, click on my selection tool in this snapping, but avenue increments of one.
Jonathan Winbush (15:12): So it's snapping, not as much as it was before when it was on 10. So let me move this down. A tablet somewhere around there. And then this is scaling snapping right here. This arrow does kind of pointing up to the right hand side, but I'm just going to leave that on. I don't really want to miss with that. And just for fun right here. This is the camera speed. So right now, by default, it's on four. So let me turn this all the way up to eight, and this is going to move our camera really fast whenever we use the WASD. So if I right click on my mouse, hit the S button. You can see that it's going super fast when we're navigating around the scene. So I'm going to come back over here and click on four. And let's say, I'm going to hold S I'm just going to go somewhere distant into my scene.
Jonathan Winbush (15:56): And let's say that we get lost. Like we can't find where we're at. We're working in a really large scene. It's quick and easy to get back to where we need to be. If I come over here to my row outliner, and I'm on the snow, and Bankman right here, I'm just going to select this and double click. And this snaps is right back into where we need to be. So if you ever get lost, all you have to do is find your item inside the row, outliner DoubleClick. And it's going to take you right back to where you were before. So I'm going to move this down a little bit. This is looking pretty cool, but let's add some other stuff in here as well. So I'm going to go back to Cooksville bridge. Let's look for some more stuff that I have downloaded.
Jonathan Winbush (16:32): I have this a bank man here as well. I'm going to click on add, all right. And we should have it added to the scene. I'm going to minimize it, come back down to my content drawer. And here we go, we have this snow and bank mint. It's just as easy as clicking and dragging into my scene. And there we go. So you can just start placing it quick and easy, just like that. So at this point, I always say, it's kind of like messing around with Legos. You know, you just have your scene here. You just click in a dragon, everything into your scene. So I don't want to bore you guys building out an entire scene and unreal engine. You know, this could take hours or minutes, depending on how much detail you want to put in here, but let me take you to a Saint that already have built. Should I could show you somebody the difference between lumen and Ray tracing a side of a scene.
Jonathan Winbush (17:24): So this is the same that I built and set an unreal engine five. I did it completely the same way that I just showed you guys using the mega skins assets. Nothing too crazy. All I did was click and drag a bunch of assets that I liked inside the library, bringing it into unreal. I just kind of placed them exactly where I wanted this right here is just a cube with some type of metal material on there that I also got from the mega scans library. I just want to show some core reflections on inside of the scene. Here. We have our son in the distance there. We have some volume metric clouds are running in real time. And so for this demonstration here, I wanted to show you guys how we can actually build out this completely real time atmosphere and lighting. So I'm going to come over here to my details panel, and I'm going to strip out all the lights.
Jonathan Winbush (18:08): And then I'm going to show you guys how to build this from scratch. All right. So it looks like we have a blank slate here, but we actually don't like if I click on my landscape, they could see that I have some geometry in here, but we have absolutely no lights. So to get started, I'm actually going to come up here under main, where it says create, I'm going to come down here to lights, click on direction or light. If I look over here and my world outliner and as a directional light. And so I kind of want to maybe organize this a little bit better, and there you go. You can see our lights slowly starting to come in. It doesn't look any good yet. That's because we have to, you know, dialing in some of the attributes here, which I'll show you here in a moment.
Jonathan Winbush (18:46): But first I'm going to click on main. I'm going to right click and I'm going to create a folder and I'm going to name this one, mega scans. I'm just going to drop Bama, mega scans, assets, and everything into that folder, a dislike to do this, to kind of organize everything. Actually I could drop my Cuban hair as well and the landscape and that way it should keep it clean. So you guys could see what I'm bringing into the world. Outliner is. So I'm going to get started with this direction or light. I'm going to select this. And then down here under the details panel, I'm going to move this up and under location under transforms, you can see on the right-hand side, we have this arrow that kind of looks like it's making a U-turn. Now this is going to actually reset our property values here.
Jonathan Winbush (19:28): So what I'd like to do, especially for a direction or light is start at absolute zero. So I'm going to click this and you can see that our X, Y, and Z is all zeroed out or rotation is already zeroed out as well. But if I click on this reset value here, you can see that it actually put our Y at a negative 45 degree angle, which brings some light into our scene and to put our sun at a 45 degree angle here. And which is why it looks really blown out. And we're getting these heart lights in which we could doubt all of these attributes. And if I come down here under intensity versus Lux, I'm actually going to do 3.16. And just by default, unreal usually says that 3.16 gives you kind of like a more natural sunlight vibe to your scene there.
Jonathan Winbush (20:12): And our scene. Isn't really looking at great still. So I'm going to come up here to my left hand side, where it says create, I'm going to come down to visual effects and I'm going to add a post-process volume. And what this is going to allow us to do is kind of dial in some of our lighting settings here. So if I bring up my details panel here again, if I come down here under bloom, I'm going to turn on my method here and intensity in which I'll show you some examples here later, once we have everything dialed in, but I'm going to scroll this up, come down to exposure. And I want to come down here to where it says metering mode. I'm going to click this on, come over auto expose basic. And then under exposure compensation is zero initiative. Give us more accurate lighting whenever a dialing our lighting's in.
Jonathan Winbush (21:00): And there's one more setting that we want to have here. So under men, Evie and max, Evie, I'm going to turn both of these on and put them both around one. So now whenever a dialing in our lighting, we're not going to get any type of overexposure or any kind of funkiness. We should be able to just dial everything in. And I think that's going to be it for right now. So let's start adding some more stuff to our, our sky and our clouds in the atmosphere here. So I'm going to come back over to create and under visual effects, I'm going to add a sky atmosphere and then under directional light, I need to click on one more setting. So I make sure I have directional light selected. I'm going to scroll down here, just keep scrolling. It's closer to the bottom, the setting that we need, but right here where it says atmosphere, sunlight, I'm going to turn that on.
Jonathan Winbush (21:51): And there we go. So once you have your direction or light and your sky atmosphere in there, you want to come down here to where it says atmosphere and cloud, turn our atmosphere, sunlight. And then that gives us our environment there, but we still don't have any clouds. So I'm going to come over here to create again, come down here to visual effects. Let's add some volume metric clouds in which bill. Now we have our clouds here and everything, and what's cool is if I come over to my direction or a light, and we scroll back up to my rotation here, if I start rotating this, you can see that it's actually affecting our environment here. So let's say we want to have it there. That looks cool. That looks like, kind of like a sunrise over there. And if I scroll this over to where we can start seeing our son a little bit somewhere around there and actually let me, I don't want it to be totally dark.
Jonathan Winbush (22:44): And this is where, you know, this is where your art direction comes in. There we go. We can see the sun poking in right there, which I think looks kind of cool. Yeah. Somewhere. Let's say somewhere around there. And before I start really dialing all the sin, let me add some atmospheric fog in here somewhere will come back up to create visual effects. And I want to add some exponential height fog, and you can see that it really fogged it out. And so if I come here under my details panel where it says fog density, that should, before I do that, I want to scroll down here to volumetric fog, select this. Then I'm going to come up to my fog density, scroll it down a little bit. There you go. So you can see how it's really affecting our atmosphere here. Some are around there could be cool.
Jonathan Winbush (23:34): So we just want like a little bit of atmosphere occasion in here. So as I'm playing around with my lighting, I'm noticing that my post-process volume isn't doing anything. So if I click on my post-process volume here, then actually select it in my scene. If I click on the G key here, that's going to bring up this box. And so if I click the GQ on my keyboard, that kind of makes everything disappear in their scene just to make it cleaner. But if I click it again, then we can kind of see all the items that we need. And so this is why I missed it, because I didn't realize that it's only affecting everything that's in this box here is. So in order to have our post-process a volume effect, everything in the scene, I need to make sure I have it selected. And my road outliner.
Jonathan Winbush (24:19): And then down here under search, I'm going to type in UNB. And that's going to give us a shortcut to this right here, which is Unbound, infinite extent. So if I click on this and there you go, you start seeing flash. And that means that everything that we did inside the post prostate volume is now happening throughout our entire scene. So I'm going to click on the X here. Then let me go back to my directional sunlight. I'm going to put it back into the position that I had it before. And there we go. So now we have the lens flare that I wasn't getting before. And that's because now we're being affected by our post-process volume. So I'm going to come back down here to post-process volume. I'm going to come down here under bloom, and you can see if I turn it up, that's actually going to turn up the intensity of my lens Fleur there, which could look cool, you know, depending on what you're going for, artistically in the fresh scroll down here a little bit as well.
Jonathan Winbush (25:18): It should give us some lens flares. There we go right here and you can actually turn up more of the intensity there. If you want, turn it down, I'm gonna hit control Z. We can actually control the Boca size here. And this is all work in real time in your camera, which is really cool. You can change the threshold if you want, which I think I'm just going to leave that at default. And then you can add a bucket shape if you want. If you have some type of gray scale image, there are black and white, you could change the shape in there. And I think maybe for this example, something I don't want to go too crazy. So maybe bring our focus size up to that. Maybe our intensity down at like 0.1. So we're just getting like a little halo effect in there.
Jonathan Winbush (26:05): And I think that's going to be yet for a delighting is so let me see if I could get some better reflections in here. If I come over to create and then come down to visual effects, looking at is fair reflection, capture, or a box. I usually just go with the box here. So that's going to bring it to the middle of our scene and I'm just going to drag it until we get somewhere around here. And then if I scroll up in my details panel, make sure I have that selected. I'm going to come down to scale and I'm just going to make this like 5,000. So to really engulfs my scene here, then if I come over here, actually, if you look right here, it says, reflection need to be rebuilt. And so what that's going to do is basically just give us some better reflections in our facility here.
Jonathan Winbush (26:49): So if I come over to bill brought reflection, captures, this should only take a moment. So we have a better reflections in there, but still a little bit hard to see. Cause we only have one lighting source right now. We have our son that's often the distance. It actually just got covered by the clouds, which is kind of cool to see. You can see that the clouds are moving in real time on their sky. Here, there you go. You see the sun starting to poke through the clouds again. So that's really cool. You know how that stuff is interacting with each other. But let me add a couple of lights here in the scene. Like I want to have this obelisk kind of be maybe our focal point that we kind of look towards. And so I'm going to come over here to create, come down here to lights, come down here to point lights.
Jonathan Winbush (27:29): And I'm just going to navigate this around my scene. Some are around here, like, so then I'm going to come over here to movable and my details panel. And then for my intensity, maybe bring it down to, to click on light color here. Let's maybe add actually I could do a color picker. So somewhere around there, it could be cool actually make it a little bit brighter. So I just like having a little bit of like a blue hue in there, somewhere like that. It don't be afraid to put like a bunch of lights in your scene, depending on what you're going for. So if I hold down the all key on my keyboard left click, and just once it turns yellow, if I just left click and drag, that makes a duplicate in our scene. So I could really just start going around my scene and kind of put in more lights in here as I see fit.
Jonathan Winbush (28:26): And this is basically how I did it for the other scene there as well. So you could really just go into town, just kind of dialing in all your attributes. So you could really spend a lot of time just even dialing in just the lighting and your scene to how you see fit. So from here, this is basically how I lit my scene in everything. It's not exact because I don't have the exact attributes there, but let me pull up my previous scene and I could show you guys the difference between lumen and Ray tracing. So here I am back in my original scene, I'm actually just going to click on my scene here, click on something in here and click G just to clean it out a little bit. And so I want to really look at my cube here because I have some nice reflections on here and everything.
Jonathan Winbush (29:07): And if I come over to, let's see my post-process volume right here, and I'm going to look at my details panel. So I'm actually going to just scroll it up so we could really see everything down here. If I keep scrolling down to where we have global elimination now, right here under method already have a selected on, in is selected under lumen. Now, if I select this, it gives us a couple of more options. So we can actually have no global illumination. We can have a screen space and we can have Ray tracing. So let me show you the difference between the different versions here. So if I click on Ray tracing, this is what the scene looked like. It would rate tracing. This is pretty much what we got with unreal engine four. You know, you have to switch up your lighting a little bit to make it look better.
Jonathan Winbush (29:51): This doesn't look bad, but it doesn't look as good as lumen. So let's see what screen space looks like. So you saw a little bit different, especially there in like the shadows. Let me go back to Ray tracing. You want to really focus in on this area here. There you go. So it gives us a little bit of unrealistic shadows in there. And if I click on none, this is what it looks like. But see what happens when I click on lumen, it looks like a completely different scene. Like lumen really makes this shine. It makes the highlights. It makes the shadows, everything look that much more realistic and it gives us a cool effect. So same thing with reflections here, I have lumen selected. So let me click on Ray tracing. You can really see in the cube there, like we do get some nice reflections in here and everything is better than a screen space, which this is what screen space would have gave us.
Jonathan Winbush (30:43): So you could see where Ray tracing was a big update that we were used to in the last version. But once we click on lumen is night and day, like it looks really phenomenal there. And that's basically the difference between Ray tracing and lumen and the cool thing with lumen. It actually works with not only Nvidia, but AMD cards as well. So you have to look at the specs and see exactly what they recommend that you have for your system. But with Ray tracing that only worked with Nvidia cards, but there's new limited technology. If you have an AMD machine, you should be able to take advantage of it as well, which is really great for everybody out there. We can all take advantage of this really cool technology. So this is basically the demo that I want to show you guys getting set into unreal, engine five, hopefully this gave you a good starting point to really go in there.
Jonathan Winbush (31:29): Explore that. As I was saying before, a lot of this stuff is in beta is so take that with a grain of salt. It might work a little bit differently how it worked in unreal. Four, you'll find some stuff doesn't work yet, but hopefully over the next couple of months, we're going to keep getting continuous updates to it, which makes it a lot better, a lot faster and a lot more acclimated how we're used to an unreal engine four. And then by the time I found a release comes out, this thing is going to be amazing. So what I would suggest is basically going into unreal, engine five, playing around with it, and then you want to learn unreal engine four, because everything that we know on four is going to be even better in five. And so that's just going to give you a good foundation for witnesses.
Jonathan Winbush (32:09): Finally released. As you can see, unreal engine five is already starting to showcase some incredible power and we're only an early access is so over the next couple of months, engine five is going to continue to be fine. And it's only going to get better and faster from here, but still, if you're ready to make that next jump into 3d design, their barrier entry is only a few clicks away. If you liked the video, please subscribe and click on that bell icon. So you'll be notified for the next free tutorial and check out my YouTube channel on the link below. She could see even more amazing techniques, unreal engine
ENROLL NOW!
Acidbite ➔
50% off everything

ActionVFX ➔
30% off all plans and credit packs - starts 11/26

Adobe ➔
50% off all apps and plans through 11/29

aescripts ➔
25% off everything through 12/6
Affinity ➔
50% off all products

Battleaxe ➔
30% off from 11/29-12/7
Boom Library ➔
30% off Boom One, their 48,000+ file audio library
BorisFX ➔
25% off everything, 11/25-12/1

Cavalry ➔
33% off pro subscriptions (11/29 - 12/4)

FXFactory ➔
25% off with code BLACKFRIDAY until 12/3

Goodboyninja ➔
20% off everything

Happy Editing ➔
50% off with code BLACKFRIDAY

Huion ➔
Up to 50% off affordable, high-quality pen display tablets

Insydium ➔
50% off through 12/4
JangaFX ➔
30% off an indie annual license
Kitbash 3D ➔
$200 off Cargo Pro, their entire library
Knights of the Editing Table ➔
Up to 20% off Premiere Pro Extensions
Maxon ➔
25% off Maxon One, ZBrush, & Redshift - Annual Subscriptions (11/29 - 12/8)
Mode Designs ➔
Deals on premium keyboards and accessories
Motion Array ➔
10% off the Everything plan
Motion Hatch ➔
Perfect Your Pricing Toolkit - 50% off (11/29 - 12/2)

MotionVFX ➔
30% off Design/CineStudio, and PPro Resolve packs with code: BW30

Rocket Lasso ➔
50% off all plug-ins (11/29 - 12/2)

Rokoko ➔
45% off the indie creator bundle with code: RKK_SchoolOfMotion (revenue must be under $100K a year)

Shapefest ➔
80% off a Shapefest Pro annual subscription for life (11/29 - 12/2)

The Pixel Lab ➔
30% off everything
Toolfarm ➔
Various plugins and tools on sale

True Grit Texture ➔
50-70% off (starts Wednesday, runs for about a week)

Vincent Schwenk ➔
50% discount with code RENDERSALE

Wacom ➔
Up to $120 off new tablets + deals on refurbished items


All-Access Pass

Unlimited access to 50+ courses, unlimited critique, live events, and 24/7 community. Join School of Motion All-Access today.
