
Learn After Effects the Right Way
Master the After Effects interface and build a real animation skillset. Enroll in All-Access to unlock AE Kickstart and 50+ other courses.

Animating shapes in After Effects is fun, but time-consuming. Wouldn't it be great if there were a few tricks to speed it up?
Motion Designers spend a lot of time animating different shapes. While this process can be time-consuming, rushing through often means creating lifeless animations. How do you quickly add personality to your shapes without sacrificing quality? Today, I’m going to show you a great trick to quickly animate rounded shapes in After Effects.
I'm about to show you my biggest trick to animating a perfect smear and distorted shape every time. As revisions and changes come in—and they will—this method gives you complete control to quickly adjust your timing and spacing.
By the end of this tutorial, you’ll know how to better control your shapes so you can focus on the basic principles of animation instead of fighting the software and endless quest for plugins.
How to Add Squash and Stretch to Animations More Efficiently
{{lead-magnet}}
Squares, not Circles
In this tutorial, we're going to employ the Principles of Animation—namely Squash and Stretch, Anticipation, and Exaggeration—to animate a bouncing ball. It's a very simple shape and movement, but you'll see how a few changes to your workflow keep the entire process as efficient as possible.
First we are going to need a new comp:
- 1080x1080
- 24fps
- 1 second long
Since we know we're making a circle, it's easy to just head to the Shape Tool and grab an ellipse...but that's not how we're going to work today. Instead, grab a rectangle. Trust me on this.
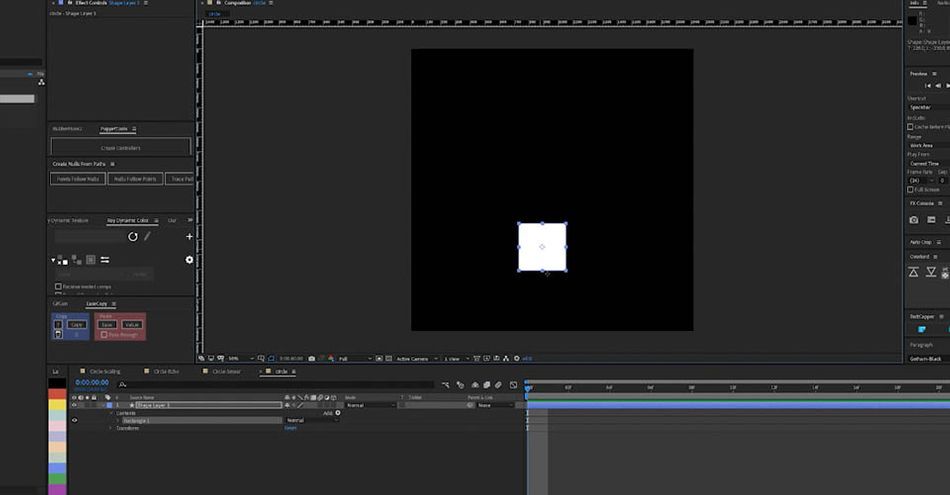
Hold Shift as you drag out the shape to get a perfect square. Next, I'll click on my Layer, go to Positions, and separate those into X and Y.
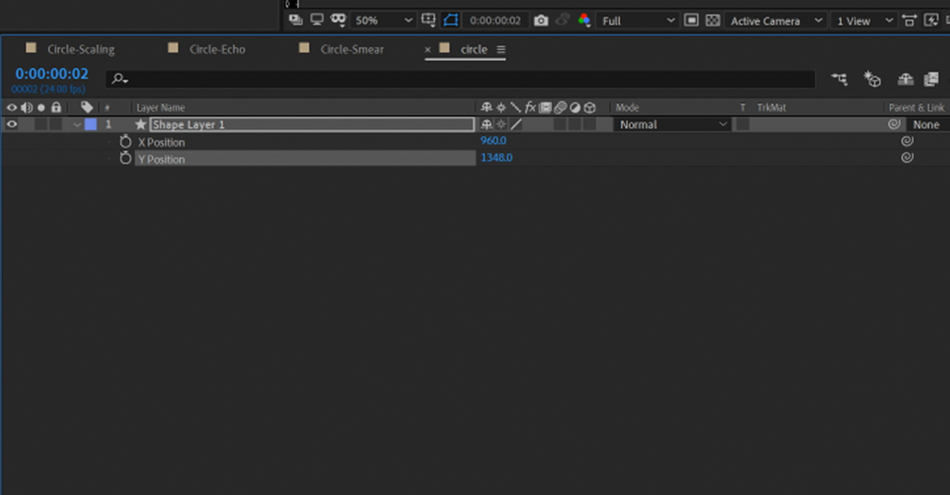
Today, we're only focusing on the Y position. I want to build up to that initial bounce, so I won't set keyframes right at the start. Finding the right frames for your animations takes time and experience, and you'll get better with practice.
I'll set a key frame, move forward 8 frames, then drag the object while holding SHIFT and adding another keyframe.
If I copy the first keyframe and paste it 8 frames later...
Now I have a clean start and stop point.
To turn this square into a circle (we are bouncing a ball after all), I go to Rectangle Path and Right Click, scrolling down to Convert to Bezier Path.
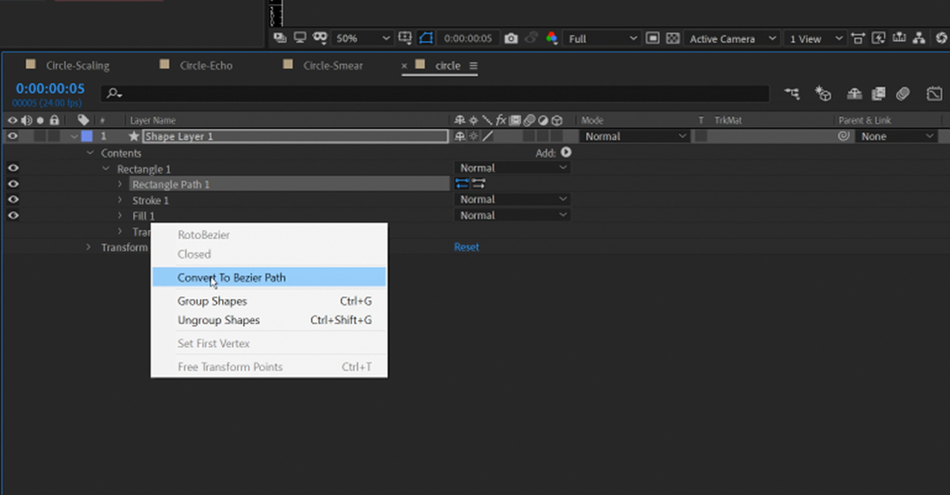
This gives us the option for Bezier Handles. If I add Rounded Corners and drag the radius...
Now we have a perfect ball shape and a nice, clean bounce...which looks just terrible. Now that we have a strong foundation, let's build our animation.
Grab that Graph Editor
I'm going to click on my Y position and go into my graph editor. I like to have both my Reference Graph and Value Graph up. I can grab the Bezier Handles and start affecting the movement so it becomes a bit more natural
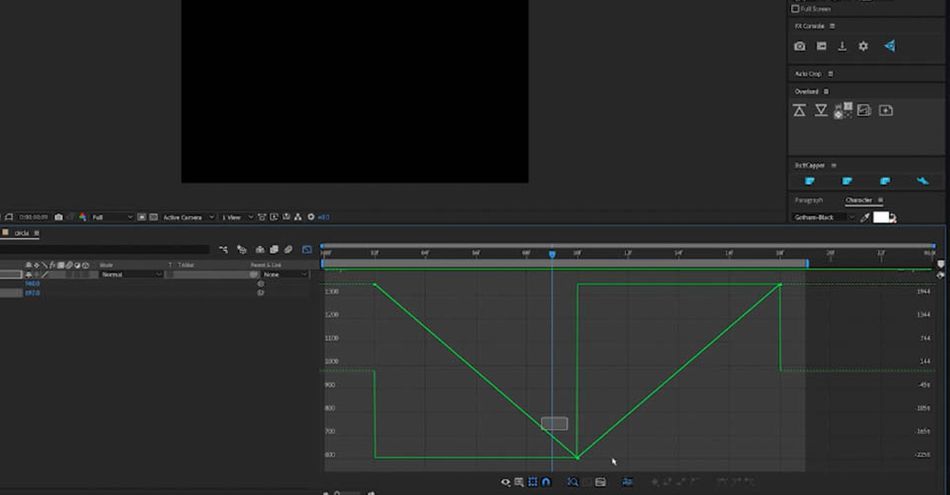
A nice bounce should move quickly at first, ease at the top (get that sweet hang time), and then accelerate down with gravity. Now we have something that moves better, but doesn't look right. That means we need to add Squash and Stretch.
Squash and Stretch
When you film something in motion, you likely capture motion blur. This occurs when the object moves while the lens is exposed. Since there is no lens capturing an image here, we have to employ a key Principle of Animation: Squash and Stretch.
When an object impacts, it should squash down. When it moves quickly, it should stretch. Since we already set ourselves up with a simple object and defined keyframes, this is going to be a snap.
SQUASH
The first thing I want to do is grab my keyframes for my Path and my Rounded corners. This is my circle in its perfect shape. Then, I'm going to squash it down.
Once I'm satisfied that I can feel the Weight of the ball, I want to move a few frames forward so the ball is in the air. By copying the keyframes of the original shape and pasting them in the timeline, the ball is back to its true form.
This is starting to look really good. Now it just needs a sense of speed. That's where the Stretch comes in.
STRETCH (SMEAR IF YOU'RE FANCY)
So now we get into the keyframing,which is the best part. A smear should only last a frame or two, it’s going to act as our motion blur and really help sell the speed of this.
Find the two frames where the ball is moving the fastest using the graph editor. Using a ruler to define the “backstop,” we are going to hit an imaginary floor and bounce back from it.
On the other end of the movement, pull the object all the way to the "floor" and have the rest snap into it, causing a slight squash at the end. After a few tweaks...
This is just a quick sample, so make sure to check out the video for even more tips!
Check you out now!
And that's how it's done! Pretty straight forward, and you can layer this technique in so many different ways. Now it's your turn. Using the same tips I just shared, make your own short animation and share it on social media with #TearsForSmears, and tag @schoolofmotion and @ssavalle. We can't wait to see what you create!
If you’re looking to step up your AE game, or get a better handle on the foundation, be sure to check out Animation Bootcamp and After Effects Kickstart. Each course is packed with lessons to get you to your next level.
-----------------------------------------------------------------------------------------------------------------------------------
Tutorial Full Transcript Below 👇:
Steve Savalle (00:00): I'm about to show you a great trick to quickly animate rounded shapes without ruining them or your sanity in the process.
Steve Savalle (00:16): Hi, I'm Steve Savalle, a freelance animator designer and educator, and sometimes animating is just hard or other times you just want to see other people's techniques. Okay. So today I'm going to show you my biggest trick to animating a perfect smear and distorting a shape. Every time animating shapes is super fun. It is hands down. One of my favorite things to do as an animator, and it's a very popular trend right now. The other thing is it really gives you an opportunity to push and rely on the basic principles of animation. Today. We're going to do that. We're going to focus on squash and stretch, which is going to give us an amazing sense of the weight. We're going to look at anticipation. There's going to be a little bit of buildup, and we're going to have exaggeration to an extent also known as smears. We're going to create this to give us a sense of speed in this fake motion blur before we begin, be sure to download the project files in the link below. So you can follow along with me.
Steve Savalle (01:10): All right. So let's make a new comp, we're going to go 1920 by 1920. It's just named this circle. So we stay somewhat organized, 24 frames. A second is perfect. And we're going to go with just a second, just because today we're going to be talking about the technique, not creating a finished piece, so let's hit. Okay, let's go through, or just try to keep this organized and now knowing that we're going to do circle, and then we're going to have that nice bounds by default. It's really quick and easy to go and to your shape builder tools and just using an lips. I like to do it a completely different way though. I will go in and I will actually use a rectangle and holding shift. I'm going to pull out to get a perfect square shape. You'll see that my anchor point snaps to the middle, click onto my layer, go to my position, and I'm going to separate those dimensions right out the gate.
Steve Savalle (01:58): I'm a right click separates. So that way I can tackle these individually. Today, we're only focusing on the Y position. And then we want this to be in the center of our comp our center of our comp is going to be half of our comp width. So if we go into comp settings, 1920, we know if we go nine 60, we'll be in the dead center. So we're creating just a nice, easy, nice, quick bounce. And we want a little bit of buildup in the beginning. So I'm not going to set a key frame for the Y position right here at the start, because I want at least two frames where it kind of builds up and you'll get better over time of assessing and knowing how long things should take. So I'll set a key frame here. Let's go forward. Let's say eight frames.
Steve Savalle (02:39): We'll pull our object up holding shift, then let's go forward another eight frames. And then I'm just going to copy and paste that key frame. So I know I get a perfect start and stop point. So I'd get a nice clean loop. So if I watch this, this looks terrible. And you're like, how does this become a circle? How does this become appealing in any way? So right out of the gate, I want to show you one of my favorite tricks and I've treated this kind of the same way, how you could treat a rectangle or a square in Adobe illustrator. I'm going to go through I'm just to roll down to the rectangle path, converts a Bezier path. Now this gives us the option to have Bezier handles if we want, or just our 90 degree hard edges, which is perfect for this case.
Steve Savalle (03:20): Cause then I'm going to go in, I'm going to hit add, and I'm going to go to brown corners. What that's going to do is it's going to give me a radius option and I'm going to hold control shift H on a PC, which if you watch our toggle mask shape, path visibility turns on and off so I can see it. And I'm going to pull this until it becomes a perfect circle and they don't really want to go too much further past that. So I'm just eyeballing it and ends up being about 1 66. The reason why I don't want to go too much past that is cause we're going to animate this. And if we shoot this up to 500, well trying to get into 500 and then maybe we go back down to a hundred on the radius at another point of this animation, it's just going to get sloppy.
Steve Savalle (04:00): You're going to rush through 400 points before even getting to anything. So we're going to just keep that at 1 66, we're going to watch this and now we have just a nice clean ball bounce. Let's move this key frame over with terrible movement. So we're going to grab our Y position. We're going to go into our graph editor. I like to animate with both my reference graph and value graph up. That's just my personal preference. So we're going to start to pull out these Bezier handles, I'm holding alterate now and I'm clicking and I'm just trying to create what would be a nice ball bounce, which means we're going to leave the ground fast. We're going to ease at the top. So we get that nice little hold and then we're going to go screaming back down into our contact point. So if I set up my Ram preview area here and here and we watch Passable and might've been a little bit too extreme,
Steve Savalle (05:06): I just want to make sure that this is solid first before I do any squash and stretch or any smearing. Because if I just, this later on down the line, uh, I may have to go backwards and start adjusting the squash and stretch, and it just becomes more of a pain. So I make sure that this looks really good first, then anything I do from this point on, I know is just going to be icing on the cake. Now let's talk about getting into squash and stretch. I have a comp here where I have just a basic ball, bounce going, and here's a couple of issues that can happen right out of the gates. I animated this ball with the anchor points in the middle because by default it should be, or it will be close to middle. Now, if you were to animate a ball bounce and you wanted to do anything with scale with squash and stretch, a lot of people will actually use scales.
Steve Savalle (05:56): So they'll this box and they'll start scaling it in the X and scaling it in the Y. So now if I show my rulers hitting control, semi-colon it kind of works. But as I start to leave the ground, and if I start to counter animate things, I may have points where the shape isn't resting on the ruler, it starts to get sloppy. And then the other part is if I scale in the why now, because I didn't move my anchor point, I've created more issues because now I should be on this ground plane, but now I have to go in and I have to start counter animating, and that's going to get sloppy because if I do that and I start to move forward, there can be times where maybe I dip below. And this is my opinion. I don't like seeing any shape distortion where it's just scales because it's not giving me any sense of weight.
Steve Savalle (06:41): I don't feel like this. Thing's getting heavier and trying to pin itself to the ground. I'd love to see some of those heavier points kind of hit and push off the ground rather than it always being that center contact point. So that's why I do it a little bit different. I'll go in and knowing that we've created this using a square, I'm going to hit control shift. H just so I can see my visibility again, I'm going to twirl down my options. I'm going to go into my path. I'm going to set a key frame. I'm going to go into my rounded corners. I have a key frame here. And then using the quick key with the layer selected, I'm going to hide everything except for the properties that I have animated for me. This makes it a whole lot cleaner when I get into animation. So right out the gate, we know we have a perfect shape. We need that kind of squash stretch. So I'm going to do is I'm going to go forward two frames before we even leave the ground. I'm going to grab this and I'm going to start to move it down. And I'm an awesome move it out a little bit.
Steve Savalle (07:37): Might be a little bit too much. And if you look at this, all right, now, we're starting to get a little bit more sense of weight, but it still feels a little sloppy. You look at, and you're like, Steve, this isn't much different than scaling, but that's where our radius comes into play. And this is where I said, don't go too high on the radius because now holding control shift, H I'm gonna hide my visibility again. I'm going to just start to kind of create what I feel is a nice shape that this circle would go down to. So now, if I scrub pull up, pull down a ruler, you can see, I stay on my ground plane. I distort, and I actually feel that sense of weight. And as we fly back up into the air, all I have to do is take these key firms from the very beginning.
Steve Savalle (08:18): And I'm just going to copy and paste them into place. So we get this right back up. Nice sense of weight. The other thing is, now that we come back towards the ground, we also want to feel that squash and stretch. We want it to feel like it's made contact. So I'm gonna do the exact same thing. I'm going to grab, set these key frames. Cause I know I want it to be a perfect circle. And once it hits, I'm going to grab my squashed point right here. I'm gonna copy and paste those and then move forward. Just a couple of frames. And these are just rough key frames right now. Amanda moving them along. It's just to give me a sense, Hey, is things working?
Steve Savalle (09:01): So we're now out the gate. We're looking at this and this already starts to feel much better. We get a nice squash and stretch. We feel like the shapes actually deforming. Let's have a little bit of fun. Now we want to do some smears. We want to add that little bit of, you know, motion blur. And if we look at our example, it's just a quick little snap. You don't want it to smear the last more than two frames. So here's what I want to point out. I love echo echo works amazing for a lot of types of movement that you can get in a case of a ball bounce or when an object follows the same path that it's traveling. It can break a lot. So I'm going to show you this, like it's a poor, stupid infomercial where somebody can't pour a cup of water without using this product that they're trying to sell you.
Steve Savalle (09:45): But if we move forward, you can see what echo does is it starts to repeat that shape and it looks at the time and seconds. So if I go negative one, it will be one second before echo kicks in. We need that to be far less than that. So it will go negative 0.0, zero one. As we start to go, we can't see much. So we'll move the number of echoes up. Now we're starting to get a little bit of that smear, which looks really good, except for, as it starts to follow the same path. You'll see we go down, we hit the ground and as it's flying back up, the object never followed it all the way to the ground. Um, I mean, technically it did. If we go in and we start doing decay and intensities, we can see that, but it just becomes a lot of you're messing with the program.
Steve Savalle (10:31): Now you're not allowed to just be creative. You're fighting tools and that's never a good way to work. The other reason why I like doing this with a square is let's just say you like doing scale and you're like, cool, Steve, I'm just going to do scale. And I'm like, all right, I got it. If I go in here and I troll this option down, I go into contents lips and I right click and I convert that to a Bezier pass. So I actually can mess with the handles as I move forward. And I want to squash, or if I want to stretch this, start to pull this off, you're going to see you're going to like kind of a weird taper and it may work for what you're looking for. I personally don't tend to go that route because now I have four points.
Steve Savalle (11:12): I have a lot of handles. And if I'm even like the slightest bit off on anything, you're going to start getting really weird and organic sloppy shapes in my opinion, just not a clean way to work. So let's undo all of that. Let's go back into our circle and now we have this thing set up with a square. So we're going to have 90 degree edges. It's much easier to adjust a shape like this. So we want that smear to be at our fastest point. So it looks like we've go the quickest in between frame three and four and a five. We start to slow down. So what I'm going to do is I'm just going to try to copy and paste some key frames. So it's essentially the same thing all the way up. This is more of a cell animation approach where you're forcing it to do what you want it to.
Steve Savalle (11:58): And I'm just going to grab this path. I'm going to look at the frame before we're at the ground. Let's go to this frame, let's grab these key or these points, let's pull it down and let's say it got stuck to the ground for a frame on the second one. We're going to move forward. I just hit control, right arrow to go frame by frame or left arrow. We can even pull that down just a little bit further. So it's more of an abrupt snap. So let's look at this. And if I need to, if this starts to get a little bit too sharp, I can go in and I can adjust my radius. That becomes way too much of an old for me, but either way I have control and I have control quickly. And if I watch that, that looks good. So now if I do a Ram preview, I get a nice, beautiful, quick smear.
Steve Savalle (12:41): I wasn't over here messing with all of these tools, counter animating. I wasn't dealing with all these weird Bezier handles. Just got to go in and make those adjustments. So now if I'm working with a creative director and he looks at this, or she looks at this and he's like, ah, that's too much. I don't like it. It's literally as simple as me just going in, grabbing these and moving it up. So now we have a little bit less, it takes seconds versus becoming more problematic. And sometimes that's the name of the game. Being able to have quick turnaround. So we go back and if I want it also on the bottom, I'm going to look at where's our fastest point. Where do we travel the most? And here we had a two frame smear. So we know we hit the ground at frame 18. So let's go 17 and 16 is where we'll have a smear. Let's grab this, move it over. Let's go here. I'm going to copy and paste those same key frames. I'm going to drag this thing rather than, oh, I'm going to drag it down to our hip point. I'm going to move forward a frame that looks nice. Everything looks like it's collapsing in on itself. And if we watch now, we get a nice little snap back. All you did was a basic ball, bounce with a square and then using rounded corners to get there.
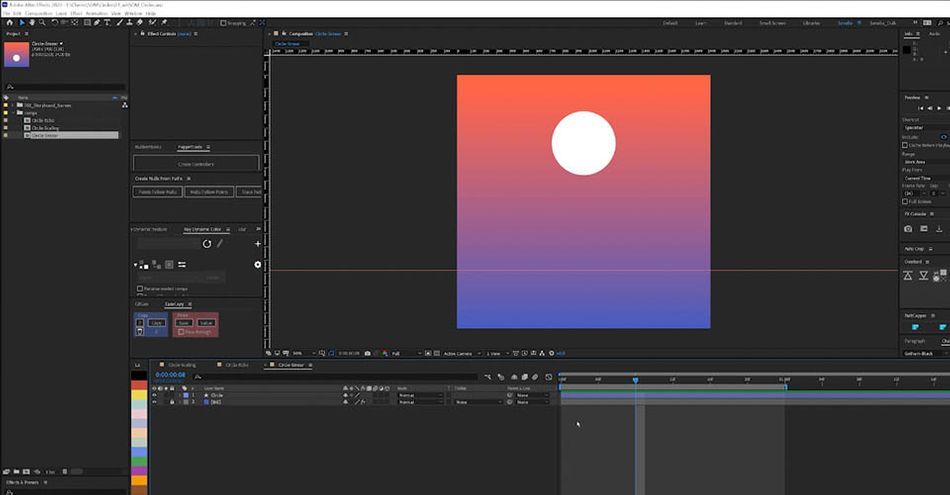
Steve Savalle (13:58): All right. So in this example that you're seeing right here, that I created with Allen and the furrow, you can see that I have this same principle happening, the exact same technique that we just talked about. You can see that that's what I'm using to kind of launch this out into outer space, but you'll notice that it happens at an angle. Now, if we jump back over into our comp, we'll just name the circle. So it stays somewhat clean. If I want this thing to happen at an angle, I can't necessarily just go in and rotate it because then we're going to get weird hiccups. So we're going to do this in the most user-friendly way. I'm going to on a PC heating control, shift all to why create an all object. If you want, you can also go into layer, new null object and find it there.
Steve Savalle (14:42): We definitely recommend learning your quick keys. I'm going to move this down to the floor anywhere. Essentially. I want this to rotate from is where I'm going to put this. And I'm just going to go to our parent link and pick whip from the circle to our, no, I can name this rotate. So I'm nice, clean and organized. And since these both work together, my preferred way of working is I'll color them the same thing. So it's easy for me to see. I can go in here. It's just try to rotate this scroll 30 degrees. And if we watch it now we're shooting out on an angle. And if we need to make any adjustments or changes, I can always go back, set this to zero and go back and mess with my key frames that way. Or if we're say back at 30 and I say, ah, that's not far enough.
Steve Savalle (15:28): I want that to actually go farther. Well, all I'm doing is a Y position move. All right. And that's it. I'm going to go in, let's zero this back out. So we're at the ground level. We can go in, we can move this back to the center. If I want, I can always create a background. I'll just steal this one that I have with a ramp with background colors, throw it over here, drop it to the bottom. And if you want to get in and you want to start making cash shadows or any type of ground shadow, and this possibility is to do that one little quick bonus technique at the very end, what I love to do control alt Y it's going to create an adjustment layer. If I go in, let's grab an eclipse lip stool straw, what our cash, it would be like.
Steve Savalle (16:10): Let's just imagine the light shining down here. I mean, we could spend days just talking about lighting and I'm going to add a levels effect. Let's go in and let's just kinda dark in this up a bit. Now, holding control shift H turning off my visibility. You'll see that in doing this, I'm creating more of a darker tone. Now, why I love doing this stuff with adjustment layers, like go in and spend some time. You'll animate this, obviously as an object leaves, the ground, the shadow is going to become lighter to grow larger, but if a client's watching this and they want the background to be a different color, maybe, um, I show this and they're like, Hey, can we flip this background color? All I have to do is swap colors. And my adjustment layer is darkening. Whatever the color value is underneath it.
Steve Savalle (16:53): So if I poorly show, you can see how my shadow color changes depending on what the color is under. So it's just another way that makes my life easier. Long-term with clients and making quick adjustments. And that's it, it's pretty straightforward in so much fun when you're not fighting the program anywhere near as much. And you can just focus on your principles of animation once you get that done, be sure to post this and tech school motion and myself in this so we can check out your progress and don't forget to hit the subscribe button and the bell icon. So you'll be notified when we released another video. And finally, if you're looking to step up your after effects game or get a better handle on the foundation, be sure to check out animation bootcamp and after effects, kickstart, each course is packed with lessons to get you to your next level.
ENROLL NOW!
Acidbite ➔
50% off everything

ActionVFX ➔
30% off all plans and credit packs - starts 11/26

Adobe ➔
50% off all apps and plans through 11/29

aescripts ➔
25% off everything through 12/6
Affinity ➔
50% off all products

Battleaxe ➔
30% off from 11/29-12/7
Boom Library ➔
30% off Boom One, their 48,000+ file audio library
BorisFX ➔
25% off everything, 11/25-12/1

Cavalry ➔
33% off pro subscriptions (11/29 - 12/4)

FXFactory ➔
25% off with code BLACKFRIDAY until 12/3

Goodboyninja ➔
20% off everything

Happy Editing ➔
50% off with code BLACKFRIDAY

Huion ➔
Up to 50% off affordable, high-quality pen display tablets

Insydium ➔
50% off through 12/4
JangaFX ➔
30% off an indie annual license
Kitbash 3D ➔
$200 off Cargo Pro, their entire library
Knights of the Editing Table ➔
Up to 20% off Premiere Pro Extensions
Maxon ➔
25% off Maxon One, ZBrush, & Redshift - Annual Subscriptions (11/29 - 12/8)
Mode Designs ➔
Deals on premium keyboards and accessories
Motion Array ➔
10% off the Everything plan
Motion Hatch ➔
Perfect Your Pricing Toolkit - 50% off (11/29 - 12/2)

MotionVFX ➔
30% off Design/CineStudio, and PPro Resolve packs with code: BW30

Rocket Lasso ➔
50% off all plug-ins (11/29 - 12/2)

Rokoko ➔
45% off the indie creator bundle with code: RKK_SchoolOfMotion (revenue must be under $100K a year)

Shapefest ➔
80% off a Shapefest Pro annual subscription for life (11/29 - 12/2)

The Pixel Lab ➔
30% off everything
Toolfarm ➔
Various plugins and tools on sale

True Grit Texture ➔
50-70% off (starts Wednesday, runs for about a week)

Vincent Schwenk ➔
50% discount with code RENDERSALE

Wacom ➔
Up to $120 off new tablets + deals on refurbished items


Learn After Effects the Right Way
Master the After Effects interface and build a real animation skillset. Enroll in All-Access to unlock AE Kickstart and 50+ other courses.