
Learn After Effects the Right Way
Master the After Effects interface and build a real animation skillset. Enroll in All-Access to unlock AE Kickstart and 50+ other courses.

Clean up your workspace and rid yourself of messy precomps and alpha mattes with this professional shape layer workflow
Alpha mattes and messy precomps quickly clutter up your workspace and break as soon as you infinitely rasterize them or make them 3D. We’ll show you how to build single-layer shape “precomps” utilizing groups, merge paths, and simple path expressions so you can kiss those redundant matte layers goodbye... forever.
I’ve been a motion designer for almost ten years. Along the way I’ve picked up some After Effects workarounds that save me from daily Adobe-induced frustration migraines. One of these techniques is a shape-layer workflow I utilize in almost every project to avoid layer clutter and over-complicated matting and precomping issues.
In this tutorial, you’ll learn:
- How to create a clean layer workspace
- How to utilize shape groups
- Advanced ways to use merge paths
- A few simple path expressions
Advanced Shape Layer Techniques in After Effects
ENROLL NOW!
Acidbite ➔
50% off everything

ActionVFX ➔
30% off all plans and credit packs - starts 11/26

Adobe ➔
50% off all apps and plans through 11/29

aescripts ➔
25% off everything through 12/6
Affinity ➔
50% off all products

Battleaxe ➔
30% off from 11/29-12/7
Boom Library ➔
30% off Boom One, their 48,000+ file audio library
BorisFX ➔
25% off everything, 11/25-12/1

Cavalry ➔
33% off pro subscriptions (11/29 - 12/4)

FXFactory ➔
25% off with code BLACKFRIDAY until 12/3

Goodboyninja ➔
20% off everything

Happy Editing ➔
50% off with code BLACKFRIDAY

Huion ➔
Up to 50% off affordable, high-quality pen display tablets

Insydium ➔
50% off through 12/4
JangaFX ➔
30% off an indie annual license
Kitbash 3D ➔
$200 off Cargo Pro, their entire library
Knights of the Editing Table ➔
Up to 20% off Premiere Pro Extensions
Maxon ➔
25% off Maxon One, ZBrush, & Redshift - Annual Subscriptions (11/29 - 12/8)
Mode Designs ➔
Deals on premium keyboards and accessories
Motion Array ➔
10% off the Everything plan
Motion Hatch ➔
Perfect Your Pricing Toolkit - 50% off (11/29 - 12/2)

MotionVFX ➔
30% off Design/CineStudio, and PPro Resolve packs with code: BW30

Rocket Lasso ➔
50% off all plug-ins (11/29 - 12/2)

Rokoko ➔
45% off the indie creator bundle with code: RKK_SchoolOfMotion (revenue must be under $100K a year)

Shapefest ➔
80% off a Shapefest Pro annual subscription for life (11/29 - 12/2)

The Pixel Lab ➔
30% off everything
Toolfarm ➔
Various plugins and tools on sale

True Grit Texture ➔
50-70% off (starts Wednesday, runs for about a week)

Vincent Schwenk ➔
50% discount with code RENDERSALE

Wacom ➔
Up to $120 off new tablets + deals on refurbished items


Download the project files and follow along!
How to properly use shape groups in After Effects
Alpha mattes and precomps can be useful tools for increasing the complexity of an animation or combining several visual elements in a complicated design, but they make your timeline messy and introduce frustrating glitches and comp failures when infinitely rasterizing precomps or making layers 3D. Let’s work around this by taking advantage of After Effect’s shape layer tools.
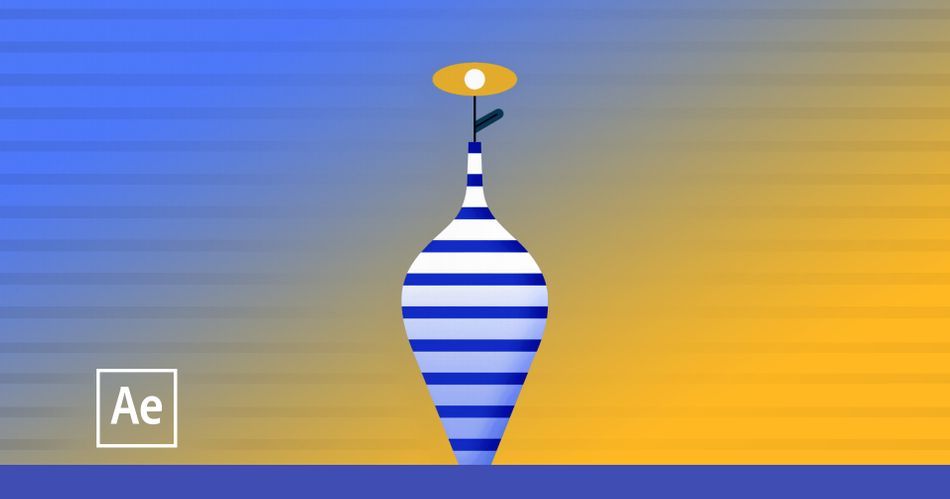
In the tutorial, I'll go through how to design and animate a vase, but let's start with something a little simpler: a pair of eyes.
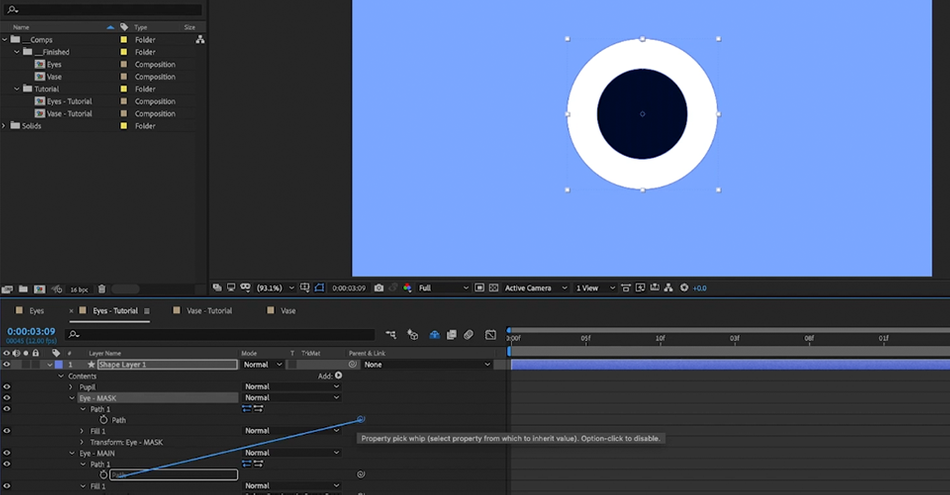
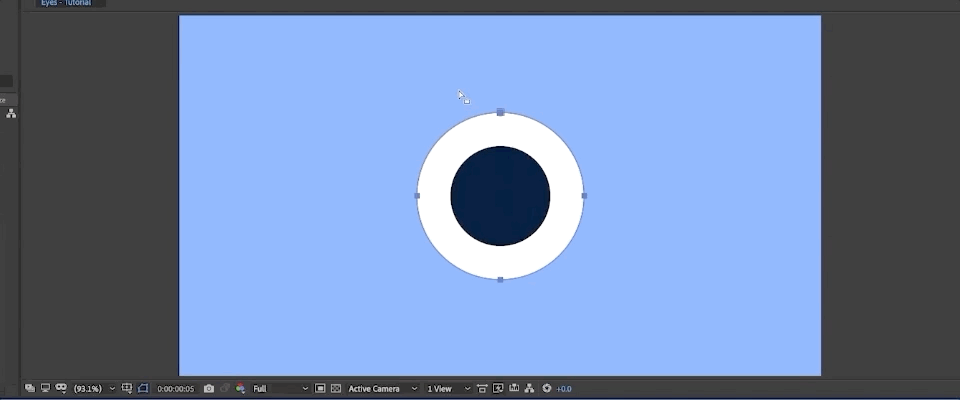
The first thing we'll do is open a new comp and grab the ellipse tool. We'll twirl that down to 500x500, duplicate, and name our two layers "Eye Main" and "Pupil." I'll change the color of the eye layer to white and shrink the pupil, and now we have a nice, simple eye.
To get a nice blink, I don't want to just use the dimensions as that wouldn't be realistic. Instead, I click on Path and Convert to Bezier Path, which provides me better control.
I'll duplicate this layer, rename it "Eye MASK," and pick whip the path of the mask to the main layer.
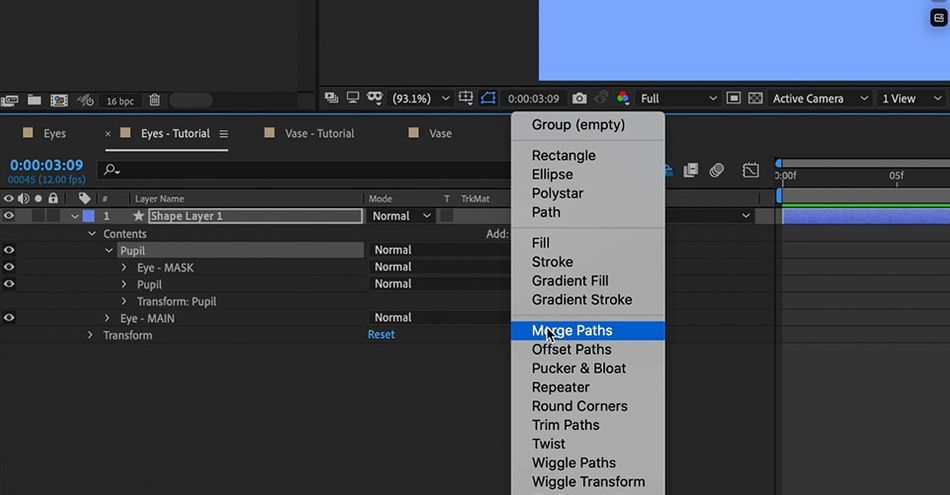
I'll highlight both the eye mask and the pupil, hit Command G, and now I've grouped those two together. I'll rename this entire group "Pupil." Now I just need to make it so the pupil itself can mask through the eye.
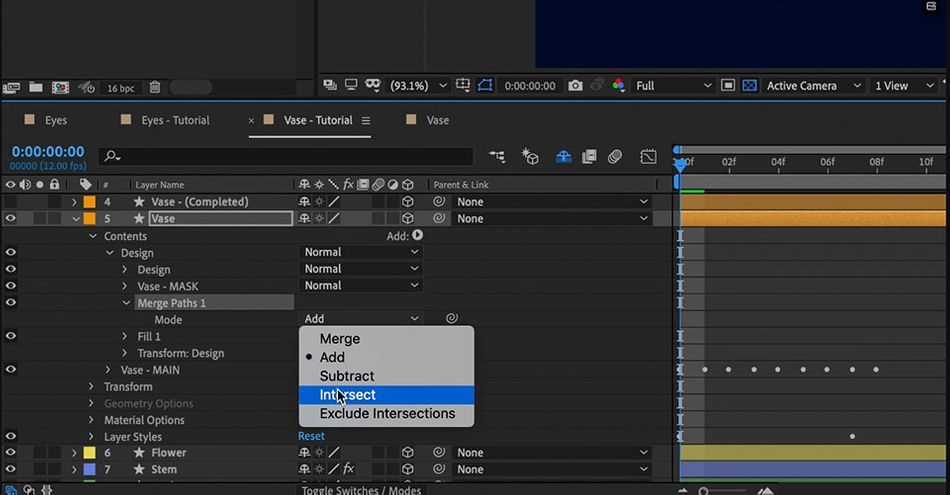
Select the pupil group, go to the Add drop down, and select Merge Paths.
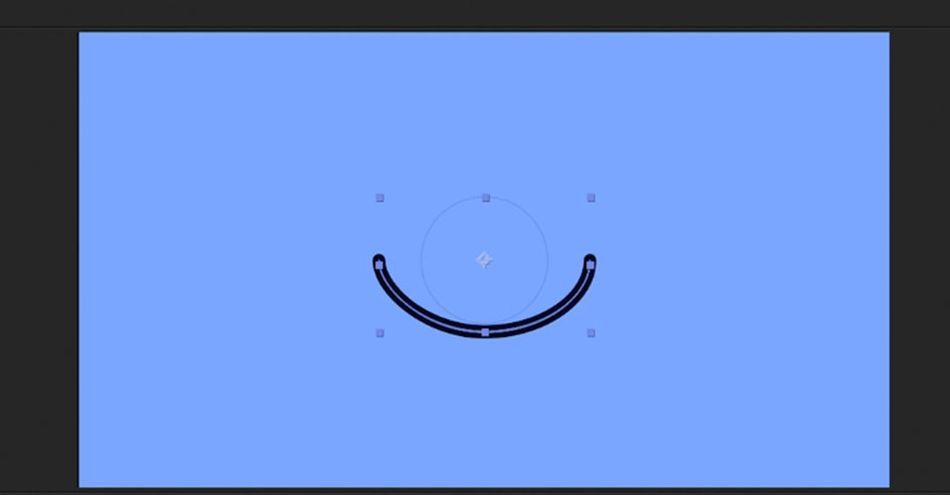
Make sure the fill is the same as the pupil. Twirl down the Merge Paths drop down and select Intersect. Now you have a masked layer. Now if you animate the eye shape, the pupil is properly masked. Let's animate a very simple blink.
By copying keyframes and just moving a few frames forward, we can quickly set up the basic start and end points for our blink. Then we'll easy ease, adding keyframes if it looks too fast or unrealistic (not that you're really breaking the uncanny valley on something this simple).
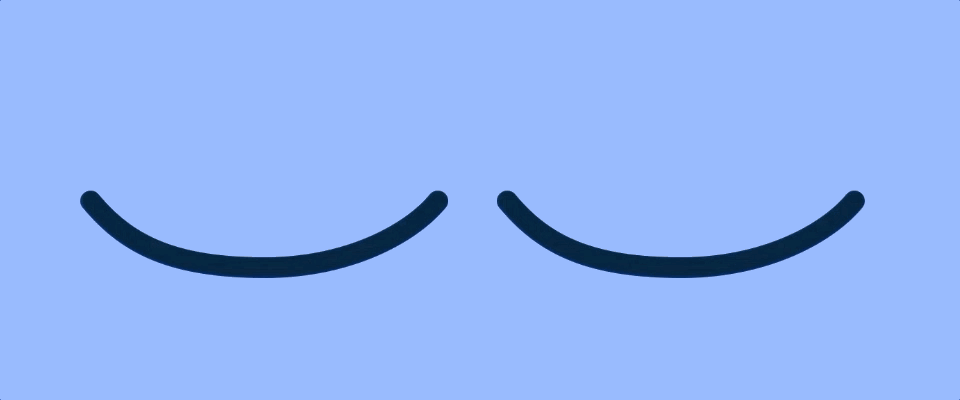
You'll notice that there is a small sliver of white when the eye is closed. A quick fix is to add a stroke to the eye and animate it on the blink.
I took it a bit further, adding some eye movement (and an entire ghost), but you get the basic idea of how to group and what is possible. Now it's time to get more advanced.
Animating within shape groups in After Effects
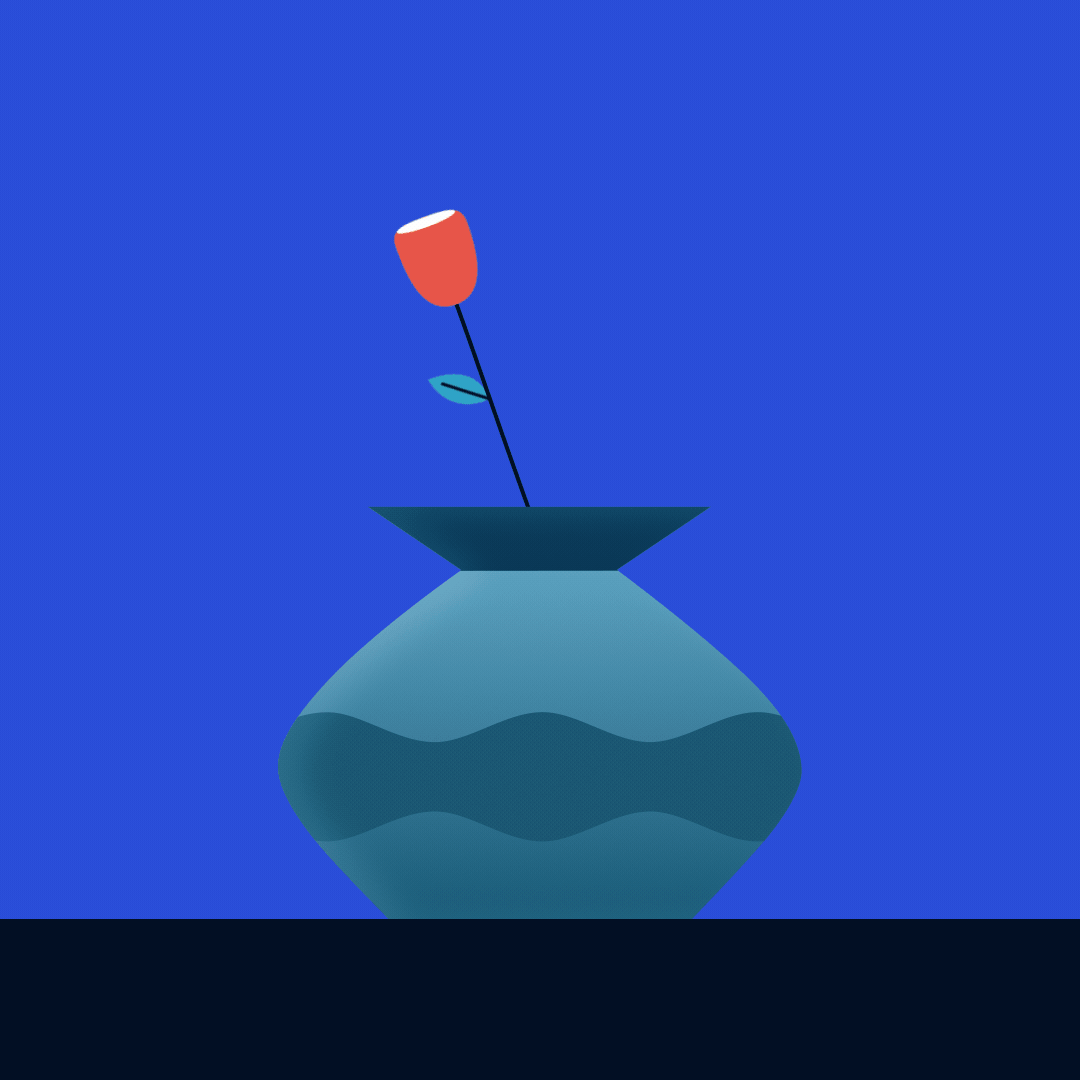
Now we're going to animate this vase and give it a bit more personality.
.gif)
One way of building this scene would be to break out all of the shapes on their own layers and duplicate the main shape with property links, but as you can imagine, this quickly clutters up the timeline.
Additionally, we could precomp the main shape and apply one mask as a silhouette layer at the top of the precomp, but as soon as we infinitely rasterize this precomp in the main composition, everything breaks. Instead, we're going to use our knowledge of grouping layers from earlier. This is a great time to follow along with the project files.
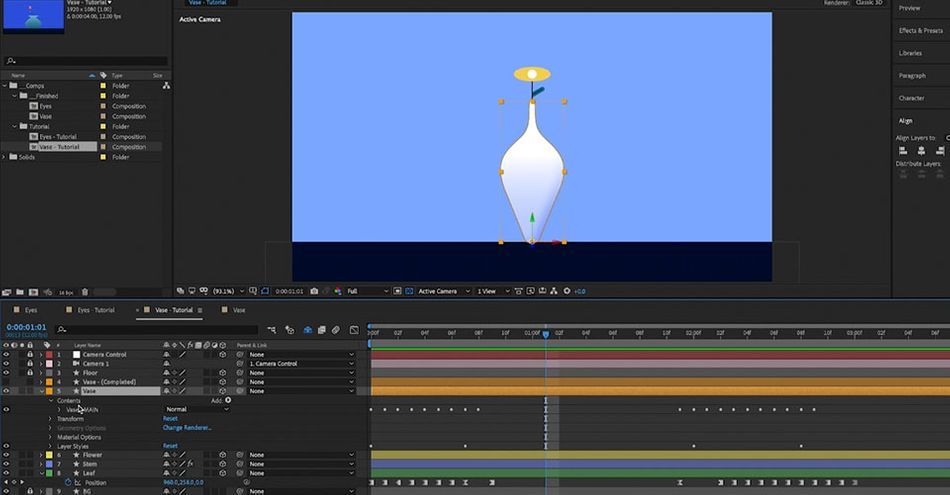
You'll see that we have the vase layer minus the inner shapes, with keyframes for that squishy animation. Duplicate the layer and rename it "Vase Mask." Twirl it open, pick whip the path just as before, and you can get rid of the Gradient as well.
How to use Merge Paths in After Effects
Now highlight the Secondary Shape and the Mask Shape and press “Command + G” to group these shapes together. With this new group highlighted, navigate to the “Add” dropdown on the right and select “Merge Paths”.
Twirl down the Merge Paths effect and change the dropdown within to “Intersect”.
Delete the stroke layer that was added and change the fill color to our desired color. Voila! Now you can animate the shape inside its own layer and it will be perfectly masked inside of your main shape at all times. No precomps, no alpha mattes, no mess.
You can also change the Fill to a Gradient Fill if that suits the look you’re going for. If you want to add more shapes into the mix, go ahead and duplicate the Secondary Shape group and paste in another shape or create one yourself using one of the shape tools or the pen tool. Delete the original secondary shape but keep the mask layer and everything will work just the same.
If you want to see just how wild things can get from here, watch the full video above!
Things to keep in mind when using these advanced After Effects techniques
There are a few drawbacks to this approach that should be mentioned. For starters, you can’t make this Merge Paths trick work with strokes. The stroke will automatically close the shape where it intersects with the mask.
I work around this by simply making a fill shape that looks like the stroke I’m trying to create, but it is a less-than-perfect fix.
Additionally, you can’t apply effects to the secondary shapes independent of the original shape, such as a glow or blur, since all the layers including the original layer and the mask are on one single shape layer. Here, you’ll unfortunately have to resort to the classic matting and precomp methods, clutter and all.
Despite these drawbacks, this approach has saved me time and sanity by keeping my projects simple, compact, and iterable.
Take on an advanced After Effects course
If you’re ready to continue your education, check out Advanced Motion Methods from School of Motion. You'll learn how to structure animations according to geometric proportions found in nature, deal with complexity, create cool transitions, and learn tips from a seasoned After Effects veteran.
-----------------------------------------------------------------------------------------------------------------------------------
Tutorial Full Transcript Below 👇:
Alex Deaton (00:00): Are you tired of cluttering up your workspace with alpha mattes and messy pre comps, the break, as soon as you infinitely rasterize them or make them 3d fret no more.
Alex Deaton (00:17): Hi, my name is Alex Deaton and I've been a motion designer for almost 10 years along the way. I've picked up some after effects work arounds that saved me from daily Adobe induced frustration migraines. One of these techniques is a shape layer workflow. I utilize in almost every project to avoid layer clutter and over complicated matting and pre-computer issues. And this tutorial I'll show you how to build single layer shaped pre comps, utilizing groups, merge paths, and simple path expressions. So you can kiss those redundant matte layers, goodbye forever to make things easier. You can download the project files I'm using in this video to follow along or to practice this technique. After you're done, watching details are in the description.
Alex Deaton (01:04): Alpha mats and pre comps can be useful tools for combining several visual elements in a complicated design, but they make your timeline messy and introduce frustrating glitches and comp failures. When infinitely rests, rising pre comps or making layers 3d let's work around this by taking advantage of after effects, shape layer tools. We're going to start with a pair of eyes because this is a really, really simple way to use this trick. I use it all the time and it'll get you sort of, uh, oriented with the methods here so that you know what you're doing before you move into something a little more complicated like that vase. So let's jump into an empty empty comp here. So the first thing we're going to do is just go up here and grab an ellipse and, uh, real quick, we're going to twirl that down and change the size to a 500 by 500 seems about right, get rid of this stroke.
Alex Deaton (01:53): I'm going to duplicate it. And then I'm just going to name this bottom layer here. I am going to go ahead and call it I'm main. So I know that that's, that's my main eye layer. Then up here, I'm going to name this pupil. Cool. So first I'm going to take this, I layer and change the color to white. Then I'm going to go to this pupil layer and I'm going to shrink it to a, let's say 300 by 300. Great. So now we have our eye and our pupil. So first what I want to do since I'm going to make this eye blink. And I don't want to just, uh, you know, use the dimensions here because that would look a little awkward. I want it to have like a more realistic looking blink. I'm going to change the path here to a Bezier path.
Alex Deaton (02:37): So all you have to do is right click on the ellipse path and click convert to Bezier path. And that way I can animate the handles of the actual, uh, ellipse itself, like, like, so, so then once I have that finished, uh, I'm going to duplicate the eye main layer, rename it eye mask, and then simply pick whip the path of the mask to the, the main layer there. Like, so, and then I'm going to take this, drag it up here, highlight both the iron mask and the pupil and click command G to group those two together. I'm going to rename this whole group pupil. So now that we've got our pupil inside of this group here with our iron mask, all we need to do is make it so that the pupil itself can mask through the eye. This is where all the magic happens.
Alex Deaton (03:26): So you just need to select your pupil group, go up to the ad, dropdown over here and select merge paths. When you do that, it's going to drop the merge paths, uh, along with a stroke and a fill inside of your group, go ahead and get rid of that stroke. We don't need it and just make sure that the fill color is the same as your pupil. I just do a quick command C command V on that to copy it over. Once we have that finished, you want to twirl down the merge paths down and go select intersect. And Wella you have a mask player. Now you can move your pupil all about and you can see it'll stay inside of the eye mask. And this will be true. Even if you go in here and you animate the eye shape, like so, so the next thing we want to do is get the eye moving.
Alex Deaton (04:17): We're just going to animate a little blink, very simple. Just click your path layer here to get that going. And you're going to want to, let's just step forward, two frames. Let's say I'm going to grab this. I'm just going to fold it down into the bottom layer here and then, uh, get out my pin tool. Do the same with these two Bezier handles over here and then sort of maybe bring it up a bit. So it's not so, so much lower than the actual eye. There you go. Okay. So we've got a little blink going, um, then maybe we copy that easy. E's are I hear Trump and just sort of max out that easy ease and okay.
Alex Deaton (05:14): We have a blank. Looks like it's going a little fast though. So we're going to add another key frame in there just to get it to hold for a second. All right. But as you can see, when it closes, it's got this weird little sliver here. There's a quick fix to that. I just want to show you real quick. Something I do all the time. I'll add a stroke to the eye layer. Let's make it the same color as the pupil, which is like a, sort of a dark blue. Oops. Great. And then just, I animate the thickness of the stroke width when it blinks so that we have a nice eye line that appears on the blink. So we don't have some sort of like disappearing ice thing happening there. It's a nice little trick. So go ahead and I'll add a hold key frame on that for the blink.
Alex Deaton (06:08): Take it off when it opens once more, take it off when it opens and then we got to blink. Boom, boom. All right. Now that we've got our blink looking good. It's time to, uh, I think move the pupil around a little bit. Yeah. Let's uh, let's do that. So let's jump in here and I'm going to rename this layer. I first let's jump in here and go to our pupil and select the position of the pupil there. And then I'm just going to set these all on hold key frames. This is something I learned from animates, uh, animate learns series way back in the day. Uh, the one they did on eyes pretty much taught me how to animate eyes. They, they dart around. They don't, they don't sort of like, you know, move around like that. They kind of look. So I pretty much always animate eyes on hold key frames like this, unless I'm doing something really specific. Um, that way it just looks a little more realistic. It looks pretty good. And uh, it's really easy to, because you just go to the place you want to move the eye, select it, move it, hold key frame. Just pretty much puts it right where it needs to be. So we do that. We've got a little Blinky. I, you can see, you can take that wherever you want. You can put it way over to the edge there.
Alex Deaton (07:40): He's looking way off to the side. Think I'm going to move that back in just a bit right about there. Yeah. Looking pretty good. Now we've got a blinking eye within included pupil linens on one layer with only a three key framed properties, which is pretty nifty. Um, so what, why, why am I making a Cyclops? We need two eyes, right? Most, most creatures have two eyes. Well, let's not duplicate this layer and drag it over. Then then you have a whole nother set of key frames to work with a whole nother layer. How about we just go ahead and add a repeater to the bottom of our eye. Look at that, change the number of the copies to two and just sorta move that thing out 600 or so, and then, you know, get these eyes moving right back into the center here. All right. That's looking about right. Cool. Wella go ahead and smack those suckers on a ghost or something.
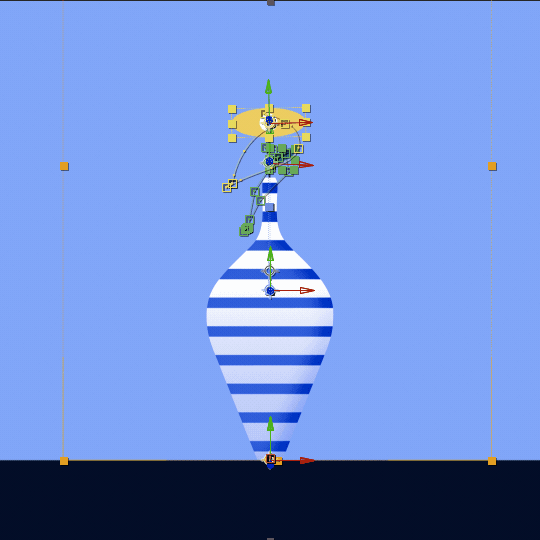
Alex Deaton (08:41): Now that we've got the basics down for how this process works, let's go ahead and kick it up a notch. We're going to be recreating this inner shape I made for this little vase animation here. And it's going to I'm to show you how all of this can be done on a single layer inside of the main shape layer here. I'm going to walk you through that. Step-by-step all right. So what you need to do is just go and jump into the vase tutorial composition here, and that you will see has a vase right here. And then just in case you need to peak at it. It's got the completed vase inside of the same composition, but I've got it turned off, but we're just going to start with the, uh, the plain vase that doesn't have the shapes inside of it and go from there.
Alex Deaton (09:29): All right. So navigate to the base layer and just twirl, open the contents and you'll see, we've got our vase main, and this is, this has got a bunch of hold key frames on it for that squishy animation. I've got a happening. I want you to just go ahead and duplicate this layer, rename it to vase, mask, twirl, that open to the path, and you can actually get rid of the gradient fill as well. We won't need that. We just need the path. So go ahead and grab the path and pick, whip it to the path of the vase main. All right, now that we've got our mask, let's draw on a new shape. All we need here is a long skinny rectangle. So let's just go ahead and plop in four corners there. I'm going to make it extra long. So we have space to move it left and right, if we need to.
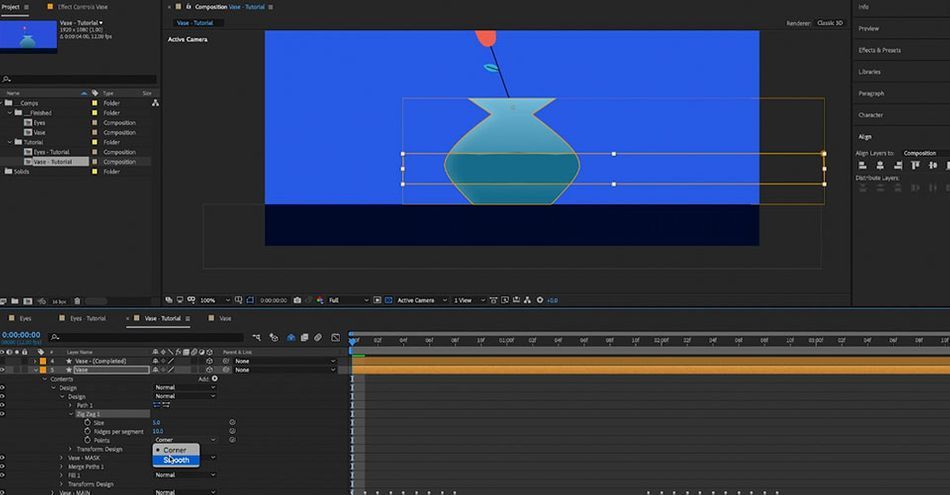
Alex Deaton (10:14): And once you have that built out, just rename the shape to design, and let's go ahead and group that together with the face mask and rename the group design. Now, inside of there, just like the eye, we're going to do the same thing. Head on over to the add, drop down, select merge paths, delete the stroke, uh, this edit a gradient fill. I don't want that. I just want a regular fill. So let's go ahead and do that. Oop, twirl down, merge paths and change the function to intersect. And then go ahead and jump inside the fill color here, and just change that to the dark green at the bottom of the vase. That's the starting color I'm using. Cool. So now that we have our magic mask set up, let's add a few extra AAE shape layer tools. So we can take this to the next level, twirl down the add, drop down and select zigzag, boom, get rid of the stroke in the gradient there.
Alex Deaton (11:09): We don't need them. So you can see we've got our zigzag kind of showing up on the shape there. We're gonna twirl that down as well and change some of these properties. First of all, we're going to make the points smooth instead of, uh, hard corners. And, uh, secondly, we're going to, uh, change the ridges per segment to a 15 or whatever. It looks good to dial in the size of the ridges. And then you'll notice with the rectangular shape, the zigzag makes a wavy line on even numbers like so, so we're the bottom and the topper or aligned with each other and to sort of bumpy in and out shape when it's on odd numbers. So we're going to keep it on odd numbers. We're going to do lucky number 13. All right. So step one here is to animate our path and the position of our design shape so that it moves up to the top when the vase changes to this new color.
Alex Deaton (12:04): All right. So first just set key frames on the path and the position, and next you want to go up to where the vase is at its top, right about there, move the shape up and grab our path and we're just going to make it thinner. Like, so another thing we want to do is inside of our zigzag here just animate the size of the ridges down. That way they will disappear when the, a line animates at the top and we'll be left with just a flat Stripe. So let's get that to the top, put some easy, ease on that.
Alex Deaton (12:51): And then let's go ahead and jump inside of our fill color here for the main shape. And we're just going to change that to a, this blue, that is the color of the first background. Oops. Need to do that on a separate. There we go. Super key frame, push that over there it is. All right. Now we've got our blue, we've got our line animating into the top. That looks great, but we need to add a whole bunch of stripes to it. And right now we don't have any of those. Right. So how do we get those extra stripes? Well, we're going to need to add another tool over here in the shape layer. So go ahead and select your design shape inside of your design group. Go to the add, drop down, twirl that down and select repeater. Okay. So you'll notice that when I added a re a repeater to the design shape inside of the design group that is masking through the vase, there it disappeared.
Alex Deaton (13:51): So this is key. If you're going to add multiple shapes inside of, let's say you wanted to nest multiple shapes inside of the, uh, the same vase mask layer here, or if you want to do something like add a repeater, like we just did. You have to add a merge paths inside of the design layer. Go ahead and kill that. Put it at the bottom. Yeah. And just leave that on add. So what that will do is it'll essentially take all of your repeater shapes that you're just adding here and essentially merged them all into one layer so that the aftereffects can read that shape as a single layer. So it'll function appropriately with the merge paths in the outer group here. Hopefully that made sense.
Alex Deaton (14:38): So here, we're going to go ahead and we're going to crank up our copies to, you know, something like 30 Turrell down the repeater and change our position to 64 on the y-axis. Let's go ahead and put a key frame on the position there, go back to the beginning and you can see that all the copies here have kind of blotted out the bottom of the vase. We don't want that. So we're going to animate them away from the bottom of the vase. You know, about 2 45 looks like it's doing the trick. Go ahead and easy, ease those. Let's go to our top here and make this visible. So as you can see the vase sort of animates up and then the stripes just sort of stop there. I don't really like that. I want them to keep going a little bit. So I'm going to add another key frame out here and then sort of back these stripes down a touch, just so we have like a little extra ease on the back end of this animation.
Alex Deaton (15:35): So the stripes sorta have a, uh, an overhang where they're, they're still settling into place once the vase is done, it's transformed. So I'm just going to really push it so that it goes up into the stratosphere there. And then sorta has this real soft ease when it lands. All right, excellent. We've got our transition going. So we just need to do one last thing. Let's animate those properties returning to their original positions during the second base transform. So I'm going to go ahead here and I'm going to duplicate my position key frame. Uh, so with an Easy's duplicate my repeater duplicatable my path and my size, and then right back down to where we started, just sort of copy all those key frames over and work backwards. We're going to need to copy our color key frames as well, so that it transforms back into the, the green.
Alex Deaton (16:33): We can fiddle with these key frames to get the animation just right. The last thing is I'm going to add a position, key frame on the, uh, the little waves so that they have a slight move to the left here at the end. That way it kind of looks like it's settling after a spin on the vase lands. If you wanted to get crazy too, you could also jump inside of your, your main design shape up here. And let me go up in here and sort of the group comp, you don't have to use a fill. You can use a stroke, although I don't think that would be as a useful, at least in this case, as you can see, it sort of looks a little weird, but you can do it if you were so inclined, let's see what that looks like. Oh, kind of weird.
Alex Deaton (17:26): Kind of cool. Yeah. I don't use this one as much as I do just a plain fill, but it's there for the, uh, using if you wanted to use it. And you could also, if you, so please use a gradient fill, which I actually do use quite a bit, and that'll allow you just to bring some extra dimension to the, the intersecting shape if you want. And what's excellent is that let's say I have a gradient fill just like I do here, just a plain black and white one. You can also do blending modes, uh, from the group layer here on top of your main layer. So let's just put on a multiply boom. Suddenly you've got this whole simple shade thing happening with the shape there that wasn't happening before. So there's all sorts of options, all, all sorts of ways to play around with, with shape layers and, and merge paths and in different sort of blending modes and effects and stuff like that. All inside of shape layers and after effects.
Alex Deaton (18:25): Now, there are a few drawbacks to this approach that should be mentioned. I'm going to jump inside of a new comp here, just to show you what I'm talking about. We'll go ahead and call this comp drawbacks. Perfect. So one of the drawbacks to this approach is that you can't use strokes. So let's see if I wanted to go ahead and draw a little wavy stroke onto this shape. Like, so, and add a merge paths. If you get rid of that fill, you'll see. Even if you change the mode to intersect, it closes the loop. So essentially after effects is reading the stroke and its intersection with the shape it's being masked through as a single shape. So you can't just mask, you can't, you know, the same way you would, if you were to just have a stroke, duplicate the circle layer, and then just alpha map the stroke through the circle layer.
Alex Deaton (19:26): You can't do do that with this method, uh, which is a real shame. I mean, it still has. It's kind of a cool effect and I can imagine there'd be ways to use it, but, you know, oftentimes you just want to be able to mask a stroke through the shape and you just don't have the freedom to do that. With this method, there is a workaround and that is to essentially design a closed shape with a fill and the shape of the stroke that you want. And so then you just go ahead here, swap out a stroke for fill, change that to an opaque color and, you know, do your best. If you wanted it to be, uh, a mano with the line, do your best to replicate the look of a stroke and then, you know, play with it as if it's a stroke. It's not perfect, but that is something that I've done before to replicate the look of the stroke. If I still wanted to use this method, otherwise I would just duplicate the layer and alpha it through.
Alex Deaton (20:33): And then you, you know, just like a typical alpha matte, you, you have all the, uh, advantages there. The problem is, of course you just added two more layers to your comp. I don't like that. So I like to avoid it as much as I can, but you know, it's not perfect. Sometimes you have to do what you have to do. Another drawback to this approach is that you can't add effects to the shape that you have being masked through because of course it will apply those effects to the mask layer since they're all on a single shape layer. So for instance, let's say you wanted to add a blur. Go ahead and add a gauss there.
Alex Deaton (21:10): blur that out. Oh, no. All I wanted to do was blurred my intersecting shape. This is blurred my entire shape. So that's, that's a real bummer and same story as before. If you, if you wanted to, uh, apply a blur to your, your intersecting shape layer, you would just have to do that on a separate layer being masked through, you know, just alpha matted through a copy of the original shape. So not ideal. Uh, you know, it, it does get a little annoying. If you want to add any effect to your intersecting shape at all, you, you have to go ahead and avoid this method, but it is what it is. So that about does it, I hope you learned a few things and feel more confident in using these tools in the future. If you're ready to continue your education, check out advanced motion methods from school of motion. You'll learn how to structure animations. According to geometric proportions found in nature, deal with complexity, create cool transitions and learn tips from the seasoned after effects veteran. If you liked this video, please subscribe to the channel and hit the bell icon. So you'll be notified when we dropped the next tutorial. We'll see you next time.
Learn After Effects the Right Way
Master the After Effects interface and build a real animation skillset. Enroll in All-Access to unlock AE Kickstart and 50+ other courses.