
Start Your 3D Journey in Cinema 4D
Master the essentials of 3D modeling, lighting, and animation in C4D. Enroll in All-Access to unlock C4D Basecamp and 50+ other courses.

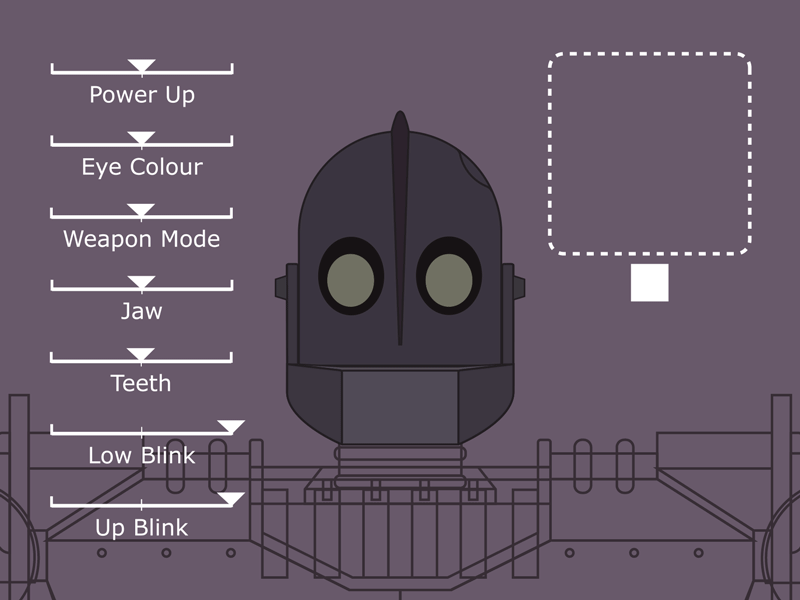
Enhance your character animation workflow by building joystick and slider controllers natively in Cinema 4D.
One of the most popular After Effects tools ever created is the amazing Joystick n' Sliders. This tool populated Instagram with awesome character rigs, all while taking the strain out of the process. Our thumbs were very thankful. But why was it so popular?
It all comes down to the simple and intuitive design for controllers. Now you might recognize how Joystick n’ Sliders operates, but did you know that this workflow actually originated in 3D? And that you can easily replicate this workflow in Cinema 4D?
Take a step-by-step journey with EJ Hassenfratz as he ties together Cinema 4D’s Pose Morph, 2D Vector Fields, and Driver Tag. These all work in unison to build one super slick joystick and slider rig -- ready to animate your characters much, much easier.
So hook some caffeine to your veins, cram a donut in that open mouth, and let’s crack open our laptops. It’s time to learn how to create joystick and sliders in Cinema 4D.
Joystick and Slider Style Workflow Tutorial
ENROLL NOW!
Acidbite ➔
50% off everything

ActionVFX ➔
30% off all plans and credit packs - starts 11/26

Adobe ➔
50% off all apps and plans through 11/29

aescripts ➔
25% off everything through 12/6
Affinity ➔
50% off all products

Battleaxe ➔
30% off from 11/29-12/7
Boom Library ➔
30% off Boom One, their 48,000+ file audio library
BorisFX ➔
25% off everything, 11/25-12/1

Cavalry ➔
33% off pro subscriptions (11/29 - 12/4)

FXFactory ➔
25% off with code BLACKFRIDAY until 12/3

Goodboyninja ➔
20% off everything

Happy Editing ➔
50% off with code BLACKFRIDAY

Huion ➔
Up to 50% off affordable, high-quality pen display tablets

Insydium ➔
50% off through 12/4
JangaFX ➔
30% off an indie annual license
Kitbash 3D ➔
$200 off Cargo Pro, their entire library
Knights of the Editing Table ➔
Up to 20% off Premiere Pro Extensions
Maxon ➔
25% off Maxon One, ZBrush, & Redshift - Annual Subscriptions (11/29 - 12/8)
Mode Designs ➔
Deals on premium keyboards and accessories
Motion Array ➔
10% off the Everything plan
Motion Hatch ➔
Perfect Your Pricing Toolkit - 50% off (11/29 - 12/2)

MotionVFX ➔
30% off Design/CineStudio, and PPro Resolve packs with code: BW30

Rocket Lasso ➔
50% off all plug-ins (11/29 - 12/2)

Rokoko ➔
45% off the indie creator bundle with code: RKK_SchoolOfMotion (revenue must be under $100K a year)

Shapefest ➔
80% off a Shapefest Pro annual subscription for life (11/29 - 12/2)

The Pixel Lab ➔
30% off everything
Toolfarm ➔
Various plugins and tools on sale

True Grit Texture ➔
50-70% off (starts Wednesday, runs for about a week)

Vincent Schwenk ➔
50% discount with code RENDERSALE

Wacom ➔
Up to $120 off new tablets + deals on refurbished items


Download the project file and dive in!
3 Things You'll Learn in this Cinema 4D Tutorial
There's a lot covered in the tutorial, so here's a quick overview of what EJ will be teaching you. Trust us, these techniques are going to boost your workflow efficiency in Cinema 4D. Think of how many more cookies you’ll be able to eat with all that free time!
SETTING UP POSE MORPHS
Using Pose Morph in Cinema 4D can be a little bit tricky, but with a proper set up and a little guidance you can navigate the murky waters of the unknown.
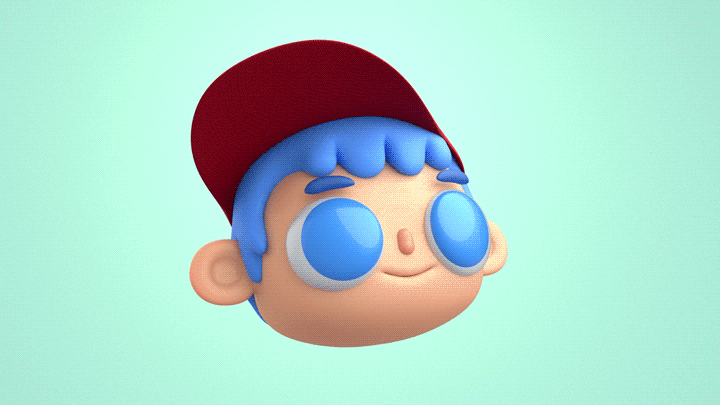
Learn from EJ, as he shows you which parameters and transform properties need to be stored in Pose Morph for each varying mouth pose. Using simple pose morphs, you can easily set up animations - such as eyebrows going up and down - by storing different poses of your eyebrows in a Pose Morph.
Note: If you have a rig with Deformers - like a Bend or Skin deformer that will animate your character - be sure to check the ‘Post Deformers’ box so it will be applied after those deformations.
.gif)
3. USING 2D VECTOR FIELDS
The joysticks you can add in Cinema 4D aren’t all that different from the ones controlling the old Atari 2600. In C4D, this joystick UI is called a 2D Vector Field.
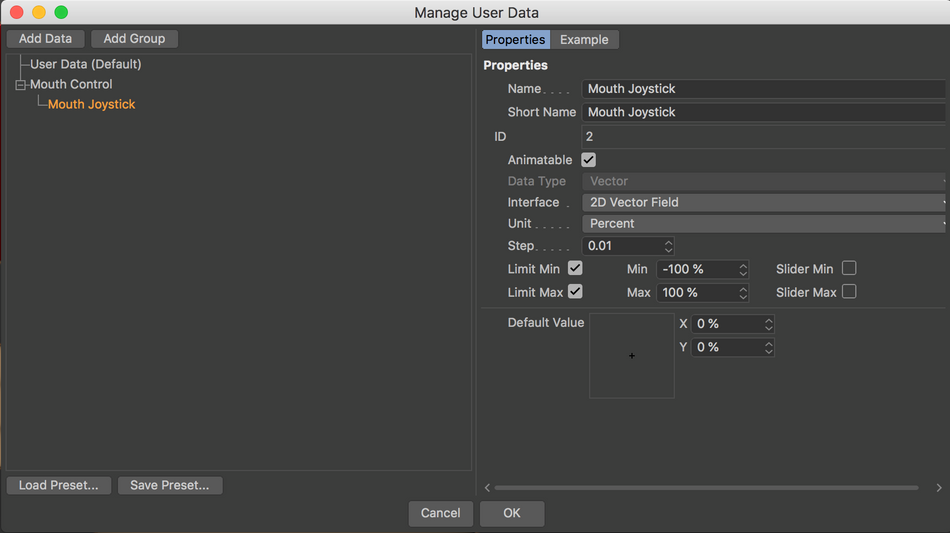
In C4D, this joystick UI is called a 2D Vector Field. To set up, you’ll create multiple poses for each of the mouth shapes you want to morph between and create custom User Data for your joystick UI.
Learn how to properly set up the a 2D Vector field as well as prepping it to send information to the driver tag that will tie this all together.

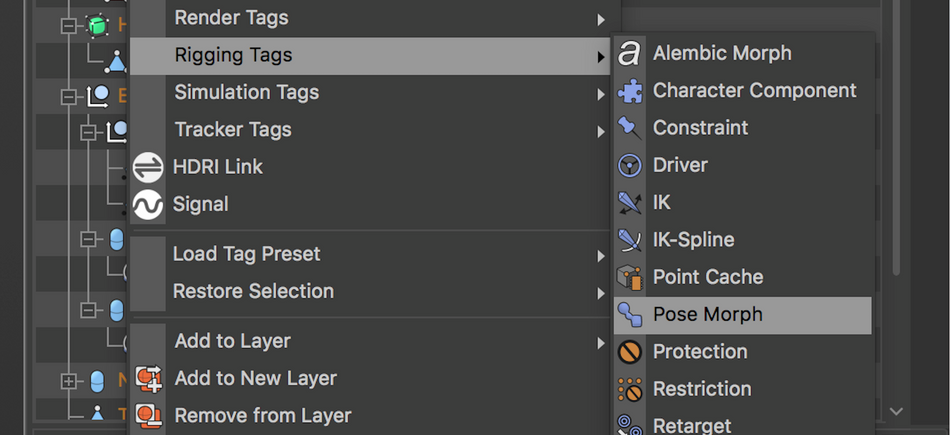
3. ADDING A DRIVER TAG
To get this whole shebang working, we’re going to need to make the joystick UI actually drive the poses we set up earlier, and that’s all done with the aptly named Driver Tag.
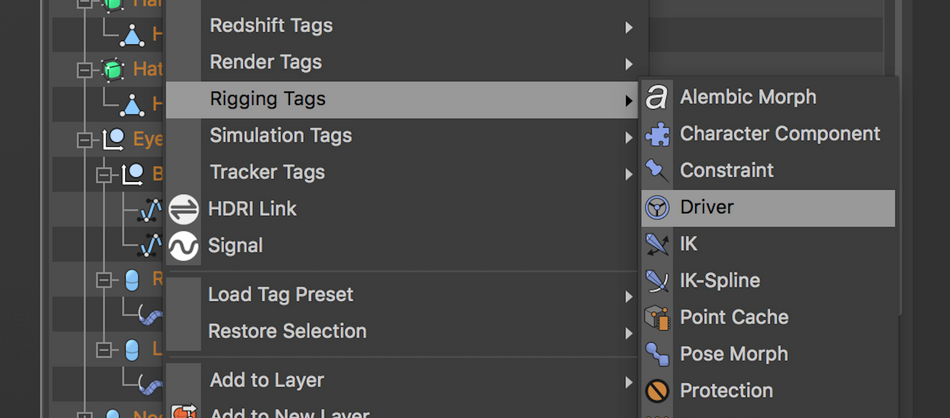
The Driver Tag allows you to set up which poses you want to be assigned to which part of your joystick UI areas. Then you simply need to plug in the 2D Vector Field joystick UI and Pose Morph Tag that you want the joystick UI to drive, allowing you to control the morphing between the poses you set up with the joystick control. Buckle up - you’re ready to animate.
.gif)
Start Mastering Cinema 4D
Hopefully this tutorial opened your eyes and raised your eyebrows to the possibilities of Pose Morphs and the Joystick and Slider workflow inside of Cinema 4D. This workflow isn’t only for character work but for "mography" type of animations as well. We highly recommend you play around with this technique as it really can change the way you work and animate in 3D.
If you're ready to climb the Cinema 4D mountain, it's time to enroll in Cinema 4D Basecamp.
This class, led by EJ himself, is designed for artists with little to no experience with the software. The course will get you up to speed with all of the key aspects of Cinema 4D.
From Day 1, you’ll be learning best practices; no bad habits to unlearn later. The course features exercises and challenges based in the world of Motion Design projects.
We can’t wait to see the incredible work you’ll do with this amazing software.
-----------------------------------------------------------------------------------------------------------------------------------
Tutorial Full Transcript Below 👇:
EJ Hassenfratz (00:00): In this video, I'm going to introduce you to the ever popular joystick and slider workflow. That's actually native inside of cinema 4d. Let's go ahead and check it out.
Music (00:12): [intro music]
EJ Hassenfratz (00:21): Unless you've been hiding under a rock, you've probably heard of the after effects plugin by the very talented Mike Overbeck called joysticks and sliders, that allows you to interpolate between different poses to create complex animations very easily. Now you see this being used a ton to easily rig up character face and mouth animations inside of two Dean it's actually based on an originated from the concept of using joysticks and slider controls for facial animation inside of 3d. And that's what we're going to be covering today, showing you how to build that joystick and slider workflow inside of cinema 4d. Go ahead and be sure to download the free project file. So you can follow along. You can find that download link in the video description character, we're going to be animating, and we're going to animate the eyebrows here and the mouth, which is actually part of a mesh here you can see.
EJ Hassenfratz (01:12): And basically what we're going to do is use something called a pose morph tag, or a blend shapes, which is what it's also called in other 3d apps to kind of control and store poses of our geometry. So like positions or, uh, you can see my eyebrows are made up of splines. So even like spline distortion, mesh distortion, if you, you know, move polygons or points on a mesh like the face here, what a pose more, it does, it stores all that stuff and allows you to blend between different poses or deformation states, which is really, really cool. So when I've taught around, let me just go ahead and show you really quick, what the pose morph tag does. So what I'm going to do as I got my eyebrow group here, and what I'll do is I know I want to morph both of these eyebrows.
EJ Hassenfratz (01:57): Okay. I want to move them up and maybe adjust the splines here to kind of maybe have them arch a little bit more. Uh, so two things I want to record the position and then also the points on the spline. So what I'm going to do is on this eyebrow, no I'm going to right click good rigging tags and go to pose morph. Now, what pose morph allows you to do is store a bunch of these different options here. So business and scale rotation points, UVS parameters. So think of parameters like a bend, a former strength like that. Strength parameter is a parameter. It would store that a user data, which is like custom user data and hierarchy, which is very important for us specifically because we have two splines that are going to drive our eyebrow geometry, which is basically just capsules that are being deformed by a spline wrap and being deformed by the splines.
EJ Hassenfratz (02:49): So basically all we need to do is really just move these spline points around and move the position and stuff, and we should get a really nice eyebrow animation. We get to check on all the things we want to store. Now, you know, we, we know we want to adjust points. We know we want to move position. We could move scale. One of the rules of thumb is I always put, I always check on way more than I really need here. Uh, and the thing is, is that it's way easier to uncheck some of these options than to go back and check them back on because it can totally screw everything up. So I always like to, you know, go a little overkill. So I know I'm going to store position. So I'm going to check that on. And one of the annoying little things is that the moment you check on one of those little mixing options, it's going to dump you into the tag tab.
EJ Hassenfratz (03:33): So all you need to do is go back into your basic tab and you can go and continue checking on some of these options. So, uh, even though I don't think I'm going to use that, I'm just going to check on scale, same thing with rotation. I know I'm definitely going to need to store points because I'll be moving the points on the spline around the really cool thing is you can actually animate between two different spline deformations, which is really cool. So you can animate splines using a pose morph, which is really cool. Uh, no parameters, no user data. I am going to need to check on this hierarchy. And this is very important because you see, I have the pose morph tag applied to my eyebrow Knoll. If I did not have this hierarchy checked on the pose morph tag is going to look at only this object that it's applied to for any kind of changes or deformation and position scale rotation.
EJ Hassenfratz (04:18): Any of these options we have checked here, but with the hierarchy on, it's actually going to look at not only the object that's applied to, but any other children underneath in the hierarchy underneath this parent? No. Okay. So that means both these eyebrows and if we even change anything with the cylinders or anything like that, so all of these are parameters. So if we did want to change like the radius or height or anything like that, we would need to go back into the basic tab and make sure we turn on the parameters option here. If we did not check on the parameters, it would not store any of the, uh, parameter items here, like radius Heights, segments, anything like that. Okay. Uh, so now we can go back and I think we're all good here. Once we're done checking on all the items we want to mix together, we are going to go into the tag tab and you're going to see, we have a base pose, which is just your pose that we start out with and then a new pose by default that we can then morph into.
EJ Hassenfratz (05:14): Okay. So we're just, it's very aptly named, we're just pose Morphin, Morphin into poses. And, uh, you can see that we're currently in our edit mode. Okay. So this is where we can select any of our poses here and, you know, change anything. Okay. So points on our, uh, eyebrow here, any of that kind of stuff. Uh, and then once we're done, we can go into the animate mode and see what that looks like. Okay. So I'm in edit mode. We can double click on this initial pose that we have here, and let's just name this left eyebrow up. Okay. And then what we can do on this pose with this pose selected, we can go to our left eyebrow and we can go into our, just a move tool here. So maybe what we'll do is hold the shift key down and move this up, maybe 35 centimeters.
EJ Hassenfratz (06:01): And that's important because I want to match the right eyebrow here. And then I'm going to go into my point mode here and maybe go to my, let's go into my front view here. And there's my spline. And I can actually move these points, change the busier handles here. And the cool thing about this is, is because we have that splined points, the points option activated on our pool's morph boop, right there. It's actually going to store all of these edits. We're making to the points on the spine, which is super, super cool. Again, pose morphs are really great for just, you know, animating between different, uh, spline, uh, deformations. Uh, so that's looking good. So we have that, let's go back into our perspective view here, and let's go into our tag and let's go to anime. And now you'll see there's our left eyebrow up in the strength of this pose is a hundred percent.
EJ Hassenfratz (07:03): Now, if we bring this down to zero, you can see we're actually back to our base pose, the pose that we started out with. Okay. So you can see that we can then go ahead and click this little key frame.here in animate this going up or down. So we'll go back to edit. And so we just animated or, you know, stored a morph pose of our left eyebrow. So let's go ahead and add a second pose and I'll double click to rename this right eye Raul bro up. Okay. And we're going to do the same thing with our right eyebrow spline. So I'm going to go into my move tool. And again, it will hold the shift key down to move this up to 35 centimeters and you can see there, we have, that's why I wanted to make sure that we're moving these up the same amount in centimeters on the Y.
EJ Hassenfratz (07:53): So now we can go ahead and let's also go into appoint mode on this right. Eyebrow go to our front view and let's go ahead and change the arc, make this a little more of a arking eyebrow and just adjust these Bezier handles, adjusting the points on the spline, looking good. And again, you probably want to be more exact than I am right now, but, uh, I'm not going to tweak these points forever. And there we go. So now with this eyebrow up, we can, we can actually, we don't even have to go into anime mode. We can actually just adjust this strength right here to see what that pose that right out, eyebrow up. When we remove the strength, we're again, going back to that base pose. And if I click on the left eyebrow up, you can see that's that full pose. So you can see that our mode set to selected.
EJ Hassenfratz (08:41): So whatever pose we select, that's what we're going to see in our little edit mode. So right. Eyebrow up. You're not seeing anything that's because the strength is as you will present. Okay. So I can click on my left eyebrow up. That's our left eyebrow pose that we in this pose and that's my right eyebrow up that is stored in this post. You can see back and forth, Hey, how's it going? How's it going? So a lot of fun stuff we can do. Now we can go into animate mode. And again, there's our eyebrows here. Now these are your sliders. Okay. Joysticking sliders. These are your sliders. You want a HUD interface for that, just click on any of these little poses and just drag and drop them into your viewport. Boom, there's your sliders. Now what you're going to want to do is if I de-select that pose more, if you're going to see that those little UI elements go away.
EJ Hassenfratz (09:32): So if you right click on any of these little UI elements, you can actually go and say, you know what show always. So even when I'm not selecting the pose, morph tag, always show this UI element. I'll do the same thing for the pose morph, right. Eyebrow. So always, and now you can see, you can key frame right here and adjust these little sliders. So there's your, there's your sliders right there. So we're, we're halfway done. And again, using the power of pose morph, which are really cool, but you might be thinking, you know, what, if I want to go above a hundred percent, you can see that we can actually go over a hundred percent of the low 0% to get some really accentuated pose. Morph is basically just like adding on to the pointy formations and just kind of continuing them out. Okay.
EJ Hassenfratz (10:19): They're not clamped. Uh, which is really cool. The one thing with the sliders here in the UI is that they are clamped. We can't go below 0%. We can't go above a hundred, but if we actually click this little twirl down button here and then click and drag, you can see that we're unclamped, we can actually go above a hundred percent and below 0%. So we can maybe bring this, uh, eyebrow down a little bit, you know, or, you know, do whatever kind of poses we want. We have a lot more flexibility. If you want to get back to your default stages, right. Click reset the default, right. Click reset to default. And there's both of our poses at zero. Or you can just go ahead and just hit this reset sliders. Okay. So really cool stuff. But you might be wondering, okay, well, what if I want to control both of these, uh, eyebrows at once?
EJ Hassenfratz (11:08): Maybe I want both of the eyebrows to go up at the same time and go down at the same time. So I want like one slider control. That's controlling both of them. Well, that's actually fairly easy if I go and you can see that if I bring both of these strengths up and I just select one or the other one goes down, because I'm only seeing the deformation or the pose morph of one of the eyebrows. But if I go and change this edit mode to just selected, I can actually say, you know what? I want to see this in place. Which means that both my left eyebrow up in right elbow down are at a hundred percent. So I'm actually seeing that in the edit mode. So it's not just seeing what's selected. You're seeing everything all added up at once. Okay. So you're seeing all the poses both left and right eyebrow up.
EJ Hassenfratz (11:53): And what if we wanted to say, you know, what, store this as oppose, and then we can actually have both of eyebrows working at once. So what I'm going to do is go ahead and hold the shift key down and then click this add pose. And what that's going to do is going to create this brand new pose. And if you select this, you can see that it's actually controlling both of those little morphs there. So if I change the mode from, in place to selected, now you can again see like, okay, I'm left eyebrow, that poses selected. And I'm only seeing that right elbow, right. Eyebrow up. I'm only seeing that pose zero. That's actually both of our eyebrows up at once. So basically just holding that shift, modifier key and adding that add pose actually stores that current, uh, morph that you're seeing with that edit mode sets in place.
EJ Hassenfratz (12:41): And you store that as a new post. So this, if we double click here, this is both I browse up. Okay. And then we can go into animate mode. There's are both eyebrows up. I can drag and drop that into our UI, close that and right. Click show always. And then we can animate both of these. So this is really cool because we can animate all these individual, all of these, both of these, uh, individual eyebrows, and then have both of the eyebrows go up and down with that overall, both eyebrow control. So a lot of flexibility, you're building all these sliders and basically we're just building these pose morph poses, and then just going into enemy mode and drag and dropping them into our UI for easy access and easy key framing. Again, we're just selecting, clicking on that little dot and filling it in and there's our key framed pose.
EJ Hassenfratz (13:34): Okay. So we can just key frame that. And we got that little, you know, the rock eyebrow going on, which I always liked to like the flash, the rock eyebrow every now and then. So that is your sliders. Okay. And those are our eyebrows. Now, what if we wanted to add some animation and morphing to the mouth to have, you know, whatever kind of mouth movement that we want? Well, that's where a joystick will come in handy. All right. So let's go on our head mesh here. So this is the mesh that has the mouth connected to it. Okay. Then the mouth and the head and the ears, little ears going on there. And basically what we're going to want to do is I only want to affect the mesh and basically the points and polygons on this mesh and the middle right. Click on the head, go to rigging tags and pose morph.
EJ Hassenfratz (14:25): And there's our good friend, the pose morph again, we've already been introduced to, uh, this little guy. So what we're going to do is just go ahead and figure out, okay, well, what do we want to store here? And I just said that, you know, if we go into a point where we can move these points around, around the mouth and make it open and, you know, do whatever we want with a little bit of, you know, point manipulation and polygon movement on the face. So basically what I'm going to do is again, I'm going to kind go over. I'm going to check on points again. It's going to dump me into this tag tab. Let's go back to our basic tab and then just check on position scale. Cause I might actually scale some of these points and you know, one, the store there rotation, we can do that too.
EJ Hassenfratz (15:06): Uh, but everything else, we don't need hierarchy because the only thing we need to edit is this object that this pose morph tag is applied to, which is the head. Okay. So we're done here. Let's go to our tag tab and let's go ahead and let's create our first morph pose. Let's go into our tag tab and create the first pose that we want a more fin to, which could be, let me just double click this and just have this be a mouth open. Okay. And then what I can do is really get in here, zoom in, go into point mode and just start selecting points and just moving them around. Okay. So I can select both these points. Whoops. It's like both these points, move them down, get this point, move that down. And you can see that this is a little difficult to, you know, be selecting points here.
EJ Hassenfratz (15:54): And you know, I have to use my forum view and really not sure which parts of the mouth that you are selecting. So one of the things I like to do is there's this mesh, we're dealing with an inside of the mouth and we can't really get to all the points, uh, predictively, uh, Hey, there's, there's one of the pieces that I want. So what I like to do is kind of adjust this. So I'm only seeing the polygons that I want to actually be manipulating. So what I'm going to do is go into my polygon mode and I'm going to grab my loop selection tool by going to UW and then L for loop selection and selecting this little loop selection of the inner points there. And then I can grow this loop selection to loop to there, grow to the surrounding, uh, polygons by going to you and then Y for gross election.
EJ Hassenfratz (16:44): And you'll see there, or I got the, uh, the inner loop and then this new outer loop of the mouth, and actually don't need this outer loop. So I'm going to hold the command key down and just click off that outer ring. And then what I can do with the mouth and then inner to Interloop selections in the mouth select that I can go to select and just go to hide unselected. So this is going to hide all the polygons that I don't currently have selected now. So this allows me to now look inside the mouth and really get all of these points that I'm looking for, uh, without having to, you know, dig through, uh, any of the little points and stuff. So there's way less points I have to worry about. Okay. So we can go ahead and move those points up. Let's grab where my rectangular selection by hitting zero and select this point and this point and move those down.
EJ Hassenfratz (17:42): So now we're opening the mouth here and now this is so much easier to predictively these points and maybe have these two points go up and you know, I'm not going to tweak this forever, but basically you can see that I'm just, you know, adjusting the points on the mouth to make it look like the mouth is open. Okay. So let's go ahead and see what this looks like with all the other polygons, uh, added back again. Okay. So let me just let, let me just open that just a little bit more. Boom. And then what we're going to do is go back into polygon mode. Cause that's the mode that we actually did that hide selection with. So if I go to my polygon mode, go to select and then go to unhide, all boom, we just got back all of our polygons here and, you know, maybe we adjust view more things, do whatever we want to do.
EJ Hassenfratz (18:40): And, uh, I would say that this is looking pretty good for, for, for what we need. Okay. So there's your mouth open. We just adjusted all those points. So let's go back to our pose, more fear for the head and there's our most open, Y Y Y you can see that, that just that pose more of stored all those point movements that I just had. Okay. So we can go to animate and adjust this. Now we don't want to slider for this. We actually want to be able to morph into different types of, you know, phonetic mouth shapes. So we have like, ah, you know, this kind of phonetic shape for the mouth for an R sound. Uh, we can also go back into edit mode at any time and adjust this, uh, pose if we wanted to tweak it. So we got this mouth open pose.
EJ Hassenfratz (19:31): Okay. So what I'm gonna do now is, uh, I'm going to stick with this pose and just basically change this pose into like an Ooh kind of mouth. Okay. So what we're gonna do is right. Click on the mouth open pose, and you can see, we have all these different options here. And what I'll do is just go ahead and copy and paste this. So what that's going to do is just paste that pose or duplicate it. And now I can go ahead and let's name this, uh, uh, Ooh, Ooh up. So it's going to be like, Ooh, kind of shape of the mouth, like, oh, shape of the mouth, but it's going to be positioned upward. So now I can go again. I think, you know, these points are spread out enough. The only thing I need to worry about is when I'm doing these rectangular selections, I'm not selecting, uh, you know, the back of the head here.
EJ Hassenfratz (20:21): Okay. So I'm going to have the four up view going and see, I just selected some points back here. So I'm going to hold the command key down and just click and drag to de-select those points. And actually a better way to do this is just grabbing that loop selection that we had. So U L and I'll grab this outer loop and then this inner loop of polygons, and I can scale this and kind of just scale this down and move this. And, uh, then that kind of makes a little O shape for the mouth.
EJ Hassenfratz (20:57): Oops. And this is just a way easier way to do this. So you L for loop selection and holding the shift key down to add to that selection. And we'll position this up a little bit, and again, I can always adjust these points here, make sure you're looking at this from all sides. So it doesn't look weird and just kind of move these points around and good. You want some good, uh, polygon flows as well. So make sure that, uh, everything's looking good there, like you knit these up scale this down, I would say that's a pretty good, oh, mouth. Okay. So he's like whistling or saying, oh, oh no, EGA. You're, you're terrible at modeling. Uh, so there's our, oh, okay. And then let's do a oh, down. So like kind of sound. So we're just going to go ahead and right. Click copy, right. Click paste. And there, we can rename this, uh, like Ooh, down to like, oh, down and go in. We select all these points. You L to get the loop selection on the inside and then the outside, and just get the TKI for scale and just move these points down. We can adjust this, just these points out here.
EJ Hassenfratz (22:28): And we've got a little bit, something like that. Nothing too crazy. Maybe make the mouth a little thinner and now let's see what this looks like in compared to the Ooh, up there's the, ah, down and see what that looks like. And then the mouth open and the mouth close. That's our base pose. Okay. So one last thing let's go ahead and just make a, like an E like, if you were going to say E like the E sound, we need like a, like a thinner kind of smile. So for that, we're just going to go ahead and right-click that mouth open, go copy, and then right. Click and go to pace. So there's our mouth open, uh, duplicated, and this will be, uh, like a thin smile. Okay. So for this, I already got the loop selections going. I can just scale this down and, uh, Walla, I mean, that's basically it just scale down these points, maybe, uh, move some of these points around just holding the shift key to add to selection and just tweak this a little bit, grab these bottom points here.
EJ Hassenfratz (23:50): So basically you, what you want, like the mouth shape, that would be like an E okay. We're seeing EGA. How would your mouth distort to C E something like that? So that's what that's looking like. E you know, I always like to, you know, it's good to like, look in a mirror or something to, to see like how your mouth distorts. It's also really good, uh, you know, mouth morph shapes, or mouth shapes for cartoon, mounts and stuff online that you could always reference as well, if you really want to get a nitty-gritty in it. Uh, but I would say that's looking like a goodie, like a good E kind of a mouth shape. Okay. So we got base pose with the mouth closed. So this just mouth closed, we can even rename our, uh, base pose, not clones closed. There we go. Mouth closed, open.
EJ Hassenfratz (24:45): Ooh. Uh, then smell E. Okay. So, uh, who, uh, E so we got, you know, uh, enough, uh, mouth shapes that we can make this, this little person talk. Okay. So those are all the kind of things that I'm going to have now. And I don't know why I had that lock on. I'm just going to make sure that that's not on, don't need to lock that. Uh, but I'm just going to go into animate mode now. And, uh, whoa. Uh, I got a Google cleft palate, uh, going on there. Uh, but basically what this is, is just all of these poses mixed together on top of one another. Uh, so what we can do is just, this is really terrifying. Look like, look at, so I'm just going to hit reset sliders, and that'll bring all of our, uh, morph strengths down, back to zero.
EJ Hassenfratz (25:32): So we're seeing our base pose. And now all we need to do is build our joystick interface. So we can go ahead and like morph and use the joystick to morph between, uh, all those mouth shapes to then, you know, make our, make our guy talk. So what we're going to do to create our joystick UI is to create custom user data. You notice if you select anything in your hierarchy here, you see this a little user data option. And basically what ad user data allows you to do is kind of like your own custom, you know, slider, uh, expressions and effects that you could build, like custom effects and after effects, common, similar thing here. So we're just going to go and just add user data, and I'm just going to have it added to our head group. No, it's important where you put it.
EJ Hassenfratz (26:15): Okay. I'm just going to have it there. So you always know like where to go to get to those settings. And there's already a data, uh, option here. I'm just going to go ahead and delete that. And I'm just going to add group and drag and drop this out from underneath that use a date or default a little group, and just rename this, uh, mouth control or mouth, the mouse control. And then I'm just going to add some data to that. And if you scroll down that mouth control, there's our data, and we can reign a rename this to mouth joystick. Okay. And what you can now do is we need to choose the right type of data. That's going to give us that joystick kind of interface, that little block with the little diamond inside the, that we can use as a joystick. So the data type that we're going to need for that is a vector, okay.
EJ Hassenfratz (27:03): Data type vector for the interface can see this is the default vector, but what we're going to want to choose is 2d vector field for the interfacing. And see here is our little joystick interface. Okay. So it's just called a 2d vector field. And then for the unit, we can just choose percentage because that's basically what we're dealing with with our pose morph, it's dealing with percentages of pose more strength. Okay. So what we can do now is, uh, we want to set the default value of our joystick to be right in the middle. And that's just going to be 50 and 50 here. So that's just going to be the default state of our joystick, of course. Okay. And then I'm just going to go ahead and click. Okay. And you're going to see that on this head group. No, there's my new tab.
EJ Hassenfratz (27:48): My custom user data in there is my mouth joystick and those values are changing. Now, if I want to get this back to its default, I can just right. Click and go to reset to default, but you can see that, okay. We have the joystick interface, but how do we get this connected to driving that pose more? Okay, let me just reset this again. So how we can do that is by using something called a driver tag. Okay. And you're going to want to apply it to the object that you have your user data applied to. So in our case, this head group, no, there's the mouth control. I'm going to right. Click on that head group and I'm going to go to rigging tags driver. Okay. And this gives you like a little, uh, the resolution of what that little vector field will look like.
EJ Hassenfratz (28:36): Like how many poses do you want to store in whatever direction your joystick will go. Okay. So in the upper left, what's that pose and the downward direction of that joystick, what's that pose that it's going to morph into. So you can see that we don't have a current driving parameter. There's nothing driving this driver tag, no one at the wheel. So what we're going to do is just say, you know what? We want that mouth joystick user data that we just made, uh, the, the 2d vector field. We want that to be the driving parameter. What do we want to drive? We want to drive our mouth pose more. Okay. So right there. And actually, you know, we should probably rename these pose morphs to a highbrow and mouth just because if you have multiple pose morphs, you want to keep everything, uh, keep everything straight.
EJ Hassenfratz (29:24): So mouth pose morph. Okay. And you can see that as I click on these little dots and you can see that the resolution is set by these numbers here. So basically how many points in your grid do you want? So resolution of one and three. So if you just wanted like mouth closed, uh, in mouth open, or, you know, like, oh, face up here, closed mouth and open mouth, you can do that and just move the joystick up and down. But we want to have a full range of joystick motions where you can move the joystick all around and get different types of poses. Okay. So right now this middle portion, this middle dot where our joysticks at the direct center is going to be are just default posts. So it sets off. If I click it in hold, you can see there's all of our different poses that we can morph into that we have set in that pose more.
EJ Hassenfratz (30:13): Okay. So the middle is going to be off, let's click this up dots and we can change the parameter for that up position of the joystick to, uh, that up. Okay. And then for the down position to have this be a, the mouth wide open. Okay. And then for the right position of our joystick, let's have this be the thin smile. And then for the left point, let's have this be that, uh, that, uh, Ooh, down, uh, downwards. And what you're going to see now is if I go into my pose, morph tag, make sure that the enemy mode is set. Uh, it's not in edit mode, but it's an animal mode. I can go to my mouse control. Let's actually just drag and drop this mouse, joystick user interface into our, uh, HUD here. And boom, check that out. We're, we're controlling. There's our joystick.
EJ Hassenfratz (31:10): We are controlling the mouth movements here, Baba, Baba BA with this driver tag, this 2d, uh, vector field, which is our joystick. And we can move this around. Now, you're going to notice if I go to the corners though, it's just going to default back to that off state. And what if I actually wanted to have this be, you know, if it went to the corner, actually wanted this to be a blend of our top position and our side position. So what, what can we do to do that? So what I'm going to do is go to my driver tag in, in these corners, you're going to see these corner points. You're going to see that the parameter set the off. So that's that default pose with the mouth closed. But where I can say is actually just check on this mix option and all of the corners and what this will do and see that the mouth moved a little bit there is it's actually going to mix between the two closest points that's near it.
EJ Hassenfratz (32:03): So if it's in this corner, it's going to be a mix of the thin smile in the mouth, open in this bottom corner here. And you can see that that is the case. So there's a thin smile. And as I move down, it's going to go to the mouth open. So it's going to be a combination between the thin smell mouth open. If I go into this corner, it's going to be a combination of the down and the mouth open. So we're getting this really weird, like overextension of the mouth and the upper right's, uh, we're getting some really weird distortion, but that's a mix of the Ooh, down and the Ooh up. Okay. So we can get all types. We get way mouth shapes when we set these corners to mix. And now we got something looking pretty good. So we can key frame this to make this, make the, this guy talk. Right. So let's go ahead and do that. So let's go and I can right click here and go to reset the default. Now, make the joystick go back to the center position. I'll just set a key frame right there, and then let's make this guy say key frame. So key. He sounds so like that. Okay. And we'll set a key frame, so key, and then maybe we'll move this down a little bit. So key and then we'll have full for frames. So full fo like maybe a mouth shape like that. So key.
EJ Hassenfratz (33:35): So the us over here, so key Fu reigns over, or that's that kind of mouth kind of shape key for three aim. So the mouth would be open. So frame key [inaudible] and then the mouth would be closed. And the nice part about the mouth closes, we can mix this to whatever we want. So key frame, or I can just right. Click go to reset the default for fully closed mouth. Just set a key frame there, free key for regime, kind of like that, but you can definitely fine tune that a lot better, uh, than I just did. But hopefully that gives you a good idea of how you can use, uh, joysticks and sliders, which is basically, you know, came from 3d, uh, use this kind of workflow, uh, in cinema 4d to animate your characters, uh, and stuff like that. Now you can use this even for, if you want it to rotate the head or bend the head or anything like that, but maybe that's kind of the benefit of building a character in 3d.
EJ Hassenfratz (34:49): You don't need to set up a slider for this head tilt or anything like that because it's simply rotation, uh, key frames. So you don't even really need to set that up, which is, uh, pretty nice. Right? So again, we can, we can go ahead and we got our sliders for our, you can see how everything's starting to, uh, overlap here. I'm not sure what's going on with right click and remove this. And then let's say we wanted to move these things around. What I'm going to do is hold the control key down and I can move these. You can see if I click and drag, it's not gonna work, but if I hold the control key down, I can move this wherever I want move any of these sliders where I want anywhere in the, uh, interface here. So whatever I want to do here.
EJ Hassenfratz (35:34): And then again, if I uncheck that, uh, head, no, that's, uh, joysticks going to go away. Somebody who right. Click show always. So that will always be in my, uh, viewport. And I can key frame this, however I want. So here I have my animated head with the mouth being driven by just anime, that joystick, and then having the eyebrows, moving, animating those sliders for those eyebrows. Now, one of the best things about this whole workflow is at any time I could go ahead and edit any of these poses. Okay. So let's just say, you know, maybe for the E parts of our mouth movement, right about there, uh, I'm not really digging like the email I want to go in and adjust that mouth post. So what I'm going to do is I'm going to go and I want to adjust that thin smile.
EJ Hassenfratz (36:24): Now I'm not going to be able to select the points and adjust anything because that driver tag is going to lock me out of making any kind of point, uh, changes or anything like that. So what I need to do first is go to the basic tab of my driver tag and de-select this enable, okay. And what this allows me to do is go into my pose, morph tag on my head in I'm still in edit mode, and now I have these points selected. Now, what I can do is just zoom in here. And, you know, I could just scale these points or if I wanted to, you know, fine tune and adjust these points, I could, you know, go in select individual points, but you know what? I'm not going to do that. I'm going to leave these points selected. I'm going to show you a different way.
EJ Hassenfratz (37:09): We can edit the mouth because one of the big pains in the bud is you want to have, you know, the, the point on this side of the mouth also moved the same as this side of the mouth. You want it to be symmetrical all the edits that you make. And so instead of selecting these points, we can actually use a different tool and that tool is going to be in our mesh menu. And we're going to use a sculpting brush, and we're just going to grab a grabber graph tool. And this is going to allow us to grab points. Now, the great thing about the, any of these sculpting brushes is that we have the ability to adjust the size, of course, but in the symmetry tab, we can actually check on if we want to have this symmetrical, uh, edit. So I'm just going to check on this X, uh, X parentheses YZ, and you can see there's this dot on this side.
EJ Hassenfratz (37:55): There's also a corresponding dot on the other side. So if I move any of these dots, you can see that I'm symmetrically, uh, also editing the points on the other side. So this is really great when I'm adjusting, say the mouth. Okay. So maybe we can have like the E let's just zoom out to see what this is actually going to look like. So the E looks a little bit more like this. Okay. So I think that's looking good. We just edited that pose again. We made sure we selected the pose we want to edit, and now we can go back into animate mode and that should all update. Now, again, we need to have that driver tag back on. So we're going to go to our driver tag, go to the basic tag, a basic tab and just check on enable. And now if we move this joystick to the right, with that updated, uh, fin smile pose and looking really nice.
EJ Hassenfratz (38:51): So joysticks and sliders, my friends, hopefully this kind of opens your eyes to the possibilities inside of cinema 4d and using this familiar workflow that a lot of people got introduced to an after effects and using it where that inspiration first derived from inside of 3d. What I hope that this tutorial kind of opens your eyes and raise your eyebrows a little bit at the possibilities of using the pose morph tag and the joysticks and slider workflow. That's actually native inside of cinema 4d. As you know, that's where that whole workflow kind of started in the world of 3d. So, uh, highly recommend you play around with this workflow. It's not just for character animation. You have a lot of very MoGraph kinds of use cases that you can discover, uh, that can totally changed the way that you animate inside of cinema 4d. Now, if you want to keep up to date on all the latest happenings, not only in MoGraph, but 3d as well, be sure to subscribe and definitely check out our courses page to see what kind of courses you can take to take your career to the next level. Well, that's it for me, hope to see you in the next one. Bye everybody.
Start Your 3D Journey in Cinema 4D
Master the essentials of 3D modeling, lighting, and animation in C4D. Enroll in All-Access to unlock C4D Basecamp and 50+ other courses.