
Create Stunning Visual Effects in AE
Learn compositing, tracking, keying, and rotoscoping in After Effects. Enroll in All-Access to unlock VFX for Motion and 50+ other courses.

Learn Some Advanced After Effects and Cinema 4D Techniques by Diving into the Project Files for "Bumble," from Bullpen
If you're not familiar with Holdframe, you should be. The site is an amazing resource for Motion Designers, allowing you to download project files from industry pros to pick apart and learn from. Some of the projects are free, and the more elaborate ones are paid, but everything has been vetted and curated by the site's founder, Joe Donaldson, to meet his stratospheric standards.
In this video, Joey will "unbox" the project files from Bumble, a short film produced by Bullpen. He'll pull out a few of the hundreds of things you can learn by digging around a project like this, and will explain some of the concepts and techniques used in the film's production. Everybody, including Joey, will learn something in this one.
Prepare yourself for some truly awful bee puns.
MoGraph Unboxing: Project Files from the Short Film, "Bumble"
What are you going to learn in this tutorial?
Bullpen, the studio behind "Bumble," is amazing. You'll learn some professional workflows that may be new to you, but might just supercharge your creativity. The film uses 3D passes in a way that most beginners have never seen, so listen up!
Using Render Passes to Colorize a film
Bullpen made the bold choice to render the entire film in greyscale, leaving the color choices to be made in composite through the use of render passes and clever After Effects-ery.

Bullpen used the Arnold renderer on this project, and used an army of image and utility passes to create the look of the film. You'll get to see how they used and abused Cinema 4D and After Effects together to achieve total control over the colors of every object.
USING AOVS TO KEEP YOUR OPTIONS OPEN IN COMPOSITE
Bullpen's use of AOV's (Arbitrary Output Variables) is really brilliant here. Find out how they gave themselves total control over the look of the bee character's stripes.
CREATING SMOOTH, APPEALING ANIMATION
Learn how the filmmakers created lifelike, appealing animation in the film. Often, Motion Designers shy away from using brute-force keyframing to achieve their vision, looking instead for clever rigs. You'll find examples of both, here.
The animators used time-worn tricks like "sleight of hand" and editing to get around some potentially very complex challenges. These are the tricks you'll want to have in your toolkit to help you work faster and smarter on your own projects.
BRUTE FORCE THE TRICKY SHOTS
There are a few shots in the film that look like they could have been done with a complex, technical solution. However, often you'll find that experienced animators aren't afraid to get their hands dirty with lots of manual keyframing, giving them total control over the movement.
While this may seem like working "harder, not smarter," it's often faster and easier to just start animating rather than spending lots of time figuring out a clever rig to animate one shot out of an entire film. Bullpen's work ethic is present in these files.
USE LOTS OF LAYERING AND COMPOSTING TO ACHIEVE A LOOK
Bullpen used multiple passes, layers, and compositing tricks to get the exact look they were after. You'll get to learn how an experienced 3D artist can plan ahead while building their 3D scenes to give them plenty of options in the compositing phase.
CREATING 2D ELEMENTS THAT CONNECT WITH THE 3D SCENE
Bullpen leveraged the flexibility of After Effects to add things to the film that would be trickier to do in 3D. For example, the wings on the Bee were actually created in After Effects via the external compositing tag.
The spiderweb shot also saw plenty of After Effects compositing love, with the animators adding some very subtle details that helped add charm and appeal to the shot.
Never Be Afraid to Fail
The incredible team at Bumble took some big risks to put this awesome movie together. They trusted their experience to guide them through the most difficult shots, and that something you only learn from dozens of past mistakes. But what if you don't have those life lessons just yet?
We've reached out to the industry giants and have cataloged answers to questions we wish we could have asked when we started out.

In our free eBook Experiment. Fail. Repeat. you'll find insight from artists like Ash Thorp, Jorge R. Canedo E., Erin Sarofsky, Jenny Ko and Bee Grandinetti! Download it, add it to your Kindle, dropbox or Apple Books and have it with you anywhere you go!
Download the Free eBook Experiment. Fail. Repeat.
Wanna Learn More Compositing Tricks?
If you loved the clever usage of render passes in this film, you might enjoy our compositing masterclass, VFX for Motion. In this 12-week interactive course, industry legend Mark Christiansen will teach you all about roto, tracking, comping, and effects integration in After Effects.
Join the next session of VFX for Motion and let our Teaching Assistants and your fellow students push your work to the next level. Let our staff know if you have any questions, and have an awesome day!
-----------------------------------------------------------------------------------------------------------------------------------
Tutorial Full Transcript Below 👇:
Joey Korenman (00:00:00): Joey here. And even though I'm Jewish, Christmas came early courtesy of our friends at hold frame today I'm unboxing the cinema 4d and after effects, project files from Bumble, a short film from the talented folks at bullpen. Let's dive in
Joey Korenman (00:00:22): Picking apart someone else's project files is an amazing way to learn new tricks. Our friends had hold frame of hooked us up with project files from a short film called Bumble. And today I'm going to unbox them with you and see what kind of advanced tricks we can learn together. Make sure to check out this video's description. If you'd like to grab the full set of project files for this film, plus some breakdowns and extra material from the filmmakers. All right, first let's watch the film and I thought it might be good to get a truly unbiased opinion alongside my own. Here you watch this. Okay.
Music (00:01:40): [intro music]
Joey Korenman (00:01:53): Pretty awesome.
Girl (00:01:59): He ran down like the big flower. It had so many tiny little yellow finger and it's like,
Joey Korenman (00:02:06): Yep. All right. So I have a whole bunch of questions about how this was made. And fortunately I have the project files courtesy of hold frame. Now, if you haven't heard of hold frame, it's an amazing resource for motion designers and animators to download projects from some of the best artists in the world. It's basically like having access to the source code for some of your favorite work. And it's an incredible way to pick up some advanced tips and secrets. So here are some of the questions I want to answer by digging through the projects first, how did they achieve the look of this film? I know it's 3d, but it kind of looks 2d. The colors and the overall aesthetic are really cool. And I want to know how they pulled it off. Second. How did they do the spiderweb scene? This is one of those. How the hell did they do it things? And I suspect it's less complicated than I'm imagining third. How did they get the seeds to pop off? I'm curious, did they brute force this? Did they simulate it? I don't know. And finally, what other tricks will we discover? I know I'm going to be surprised when I check out the projects and I'm hoping to learn some new things to add to my bag of tricks. All right, let's start in the cinema 40 project files.
Joey Korenman (00:03:17): So to begin, I'm checking out this PDF that came with the project and it has a lot of really cool details about how the project was actually executed, including some links to animatics, which is great because this is normally a step that you don't see as someone viewing a short film. So let's take a look at the 3d animatic. And one of the things I'd like you to notice is how simple the scenes are. The bees themselves don't have any shading or texture. And in fact, there's not even wings on them. And so you might be wondering like, I am how the heck all of this got put together. So let's go into the cinema 40 project and take a look. So this is the second shot in the film, and let's kind of dive in and take a look at what's going on here.
Joey Korenman (00:04:01): So the first thing that I want to call out is that bullpen used the Arnold renderer for this. And I'm assuming that that's just a combination of an aesthetic choice. They liked the way that the Arnold renderer looks, but also they probably just know that render it really well. So I'm going to go into the extensions and open up an IPR window so we can see the Arnold render. And I'll just dock this over here on site. This IPR window, by the way, is basically an interactive render window. So I can scrub through the animation and very quickly get an idea of what my Render's going to look like. And you are probably wondering where the hell the color is. Well, as you can see, looking down here in the materials, there is no color in the scene and that is on purpose. We'll find out why when we get into after effects, but in short bullpen, decided to leave all decisions about the final color of these 3d objects to after effects to the compositing phase, which frankly I think is brilliant.
Joey Korenman (00:05:02): But if we zoom in there is lighting, there is shading. And even with this flat sort of grayish white color, it still looks pretty cool. And by colorizing it in composite bullpen had a ton of flexibility. Now you're probably noticing that this bee also has no wings in addition to having no stripes or color. So what the heck's going on there, let's close the IPR window so we can zoom in and take a look and let me leave the scene camera here so we can zoom in. So if I click on this B you can see that the B is essentially just a pill shaped object, and it's already been made editable, but parented underneath it. I do see an object or a null called wings and parenthood under that there is some geometry. So let's turn this back on. You can see by these two red traffic lights that the object has been disabled in both the viewer and the renderer.
Joey Korenman (00:05:53): So by holding option and clicking, I can turn those back on. So if we sort of scrubbed through, we can see that there are actually wings on the B and they are indeed moving. So why don't we take a look at the animation that's going on there. So to do that, I'm going to hit shift F three, to bring up my timeline. And I can see here that there are rotation key frames on the pitch rotation, property of each wing. And if I hit tab, I can also check out the graph editor for this. And I can see that these are sort of rhythmic wing flaps, and they're just repeating over and over again. There's not a lot of personality or thought to it at this point. And so what my gut is telling me is that bullpen did this so that they could actually have more control over what the wings were doing by not rendering them in cinema 4d, but instead rendering them later on in after effects.
Joey Korenman (00:06:49): If I play this scene, you can see what I'm talking about. The wings are indeed moving, but not with a lot of character. And it could be a lot more interesting, but of course, if you animated them in cinema 40 and then changed your mind, and one of the wings to pause or to flutter, as soon as the be landed, you'd have to, re-render the whole thing that would be obnoxious. So here's what they've done. There is a null that is parented underneath the main small B body. And there's this little tag on it. If we click on that, you can see it's an external compositing tag. And what that's going to do is it's going to allow bullpen to export the position, scale and rotation information about what this Knoll right here is doing. And to then parent 3d objects in, after effects to it.
Joey Korenman (00:07:31): So if I zoom out and I play this animation again, you can see that the null is following the beat. Now, why is it not following the rotation? Well, it actually is, but there's a setting up here that you may not know about. This setting will toggle between showing you the world coordinates or the object coordinates for any object. And so if I click this, now you can see that this null object is bringing with it, the position and the rotation information, which would make it really easy to parent links to this and after effects. So let me turn these wings back off. Now, another thing that's missing are the stripes on the B. So in addition to having no color, there's also no stripes. And it seems like that would be a difficult thing to add in aftereffects without some kind of information. So how is this working?
Joey Korenman (00:08:16): So this is actually one of the things I learned looking at this project, which I'd never actually used before, because I don't use cinema 4d as much as I used to. So check this out. So what we're seeing here in the IPR window is the beauty pass of this render. That is typically what you see when you hit render inside of cinema four deep. And you can see that there's all sorts of shading going on here. And generally it looks pretty nice, even though there's no color, but Arnold, like all renders is capable of spitting out other passes. Now you might be familiar with the render settings in cinema 4d, and there is a big multipass button here where even using the standard renderer in cinema 4d, you can add a whole bunch of image passes and utility passes to use in composite. Arnold works the same way up here in the IPR window.
Joey Korenman (00:09:02): You can see that currently we are displaying the beauty pass, but I can switch this and see other passes. Now, of course, there's an alpha channel being generated and there's a whole host of other channels that we can sort of take a look at. Now there's some that you're probably familiar with, like ambient occlusion. These are the shadows created by objects that are very close together, sort of self shadowing. And you can layer that in to make your 3d render look more rich, but what are some of these other ones? So things like web now, there is no web in this shot. So I'm assuming that that's a path that's only active in a different shot, but I'd like you to look at the B pass. Huh? Now that's interesting. What the heck is going on here. If we click on the B body itself and look at that piece of geometry in the object browser, we can come over here and see that there's only two materials applied to this.
Joey Korenman (00:09:53): And they're actually both identical, which makes me think that maybe a one was accidentally duplicated, but neither of them have stripes down here in the material browser. There is a material that has stripes on it, and if I select it and I go over to assign, it's not actually assigned to any objects. So what the heck is happening here? All right. So in order to clear this up, I'm going to open up a separate scene that will make AOVs a little bit clearer for you. So this is a really simple scene, two spheres, some lights. If I hit command R and render this, you can see it looks amazing. Now let's say that the camera was somewhere else, say over here. And I wanted the ability in composite to manipulate this back sphere separately from this sphere. Well, I need a mat for that. And so of course I can select that sphere in the object browser, right?
Joey Korenman (00:10:47): Click go to render tags and add a composite tag. And then in the compositing tag settings down here, I can turn on one of the object buffers. Now, what this is going to do is it's going to create a mat for this object in object buffer one. And if I actually want to render object buffer one, I just need to go into my render settings, make sure multipass is turned on and add that object buffer as a channel. And there we go. If I hit shift R to do a quick picture of you render, you'll see here's my beauty pass. And then if I go to single pass mode, I can see my object buffer. You might already be familiar with this, but AOVs are actually a newer feature to cinema 4d. They've been around in third-party renderers for a while, but in cinema 4d, they were just added in our 21.
Joey Korenman (00:11:37): So here's how they work. First. I need to go into my material settings here, and it's important to note that this is a node material. When I created it, I went to create materials, new node material. And this is a newer feature that came out in our 21. And this is the feature that allows you to use AOVs natively in Semaphore deep. So if I go to the node editor by clicking this button, this is the node tree that is actually creating the material for me. And if you've never used this, it may look like a bunch of poppy in Balderdash, but it's really powerful. And it adds some new features that you can't really get with normal materials. So without getting too deep into how node materials work, this node right here defines all of the channels that the material contains. And this node over here is the diffuse channel and all of these settings and options that go along with that.
Joey Korenman (00:12:30): Now you'll notice down here in material one, there is an AOV channel and I can pipe things into it if I want to. So for example, I can click on the material node here and I can go to the AOV. Multipass is section here, and I can add a new pass and let's give it a name. Let's call this sphere two. And then I can actually just click on this to fill that AOV with a color white let's say, and then I can say, add to render settings and close this. If I go into my render settings here, you'll see that the AOV has been added to my multipass section automatically. And so now if I hit render, you'll see that nothing has changed. However, if I hit shift and are to open the picture viewer, here's my beauty pass, but I also have an AOV pass. And because this material is on both spheres, they're both filled with white. So if I wanted to separate them, I could maybe name this material a one command drag to make a copy and named this OTU. And then in oh two, I'll go to the note editor and I'll change this AOV ID to, to all swap out the material that's on sphere two with this new one, go into my render settings and make sure that AOV channel two has been added, which it hasn't. So let me add that right now.
Joey Korenman (00:13:51): And then I'll hit shift R and you can see now those AOVs are working exactly like object buffers, which is nice, but that's not why these are so cool. Let's go back into the note editor for this first material. And let me just remove this AOV pass that's on there. So now I'll add a fresh one and let's call this one checkers over here in my assets. I can find a shader that will generate a checkerboard. So I'm going to grab that, drop it into my node tree. And I'm going to pipe the result into the color channel of my Checker's AOV. So now let's close this down. If I hit command R nothing changes, but if I hit shift R here's the beauty pass, but notice that AOV one has a checker pattern in it. Now, AOV two is filled with white. We haven't changed anything there.
Joey Korenman (00:14:43): So why is this useful? Well, there's a lot of ways that this could be useful, but just to demonstrate one, let's go back into the note editor, remove this checkerboard, and let's look for a shader that can give us some noise. And we can just add maybe a basic noise shader to our node tree pipe, the result into the color channel of the AOV, maybe change the noise type to something. I don't know. We're interesting. And now if we close this down and we do another render and we look at that AOV, you'll see that now this AOV has that noise pattern on it. And this can be really useful if we wanted to say, have a mat that would let us color, correct. Just certain pieces of this sphere to add, say some grunge to it or something like that. Or if say there was a texture that we had mapped to the sphere with stripes and things like that.
Joey Korenman (00:15:34): We could have an AOV that would give us a mat for just certain parts of that texture, because it's based on the texture space and not just the object itself. It's a lot more versatile than an object buffer. And that's why AOVs are so cool. And now here's another really simple scene with a sphere, some lights and a simple texture, and this time or back using Arnold. So the IPR window is open and you can see that we've got a beauty pass here. We have an alpha pass. And also I have set up an AOV for Arnold to called checkers. And this has the checkerboard pattern on it. Now notice in the object manager, the texture that's on the sphere is this blue texture. It's not this checker texture down here. And so to add an AOV that references a certain material on an object, you can add the Arnold custom AOV tag.
Joey Korenman (00:16:25): You can give that AOV a name and tell it what material to use. And then you set it up in your render settings and you can now access and render it. And just to show you how useful this could be. If I move my camera around, you'll see the IPR is updating for me. And so if I had some animation on this, if this sphere was rotating, I would not only be able to color correct the beauty pass in after effects, but I would also have this mat that's checkerboards that I could use to do whatever I want to change the color on that part of the sphere to brighten or darken or mess with the hue or blur or do anything else I want to. And because it's texture base, it sticks to the object. So hopefully now you understand what AOVs are and why they're so cool. And you also hopefully now understand how the bullpen team managed to get a mat so that they could create stripes on the B in after effects. They created an AOV using a striped material. So now there'll be able to color correct the bee to look any way they want. And they have a mat just for the stripes that doesn't interfere with the beauty pass, pretty slick.
Joey Korenman (00:17:31): Another pass that I wanted to call out, which I thought was really cool is the facing ratio AOV. And essentially what the facing ratio pass is telling us is what angle we are looking at each piece of the object in comparison to the camera. So things that are looking at the camera straight on, like this surface of the B are white and things that are sort of turning away and almost perpendicular to the camera, they get darker. And it's almost like the, for negotiator in cinema 4d. And I'm imagining that bullpen use this past to get some interesting compositing effects. So I have learned a lot about how the sort of did look development for this just by breaking this apart. Now, I want to look at some of the animation.
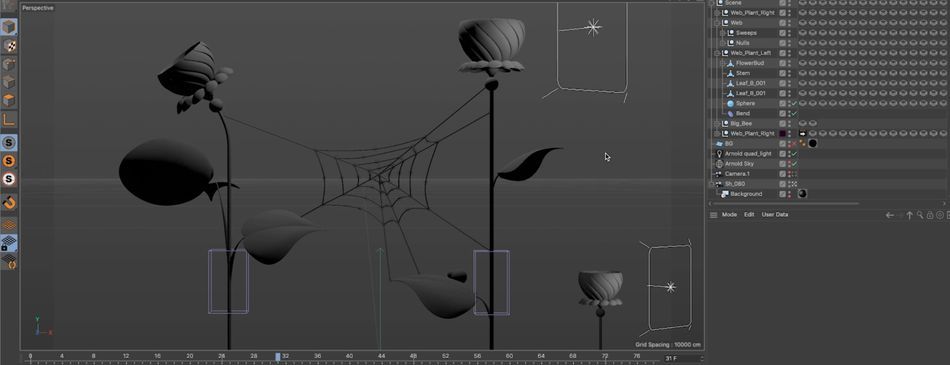
Joey Korenman (00:18:18): So this is shot seven. This is where the bee lands on a flower and the weight of the bee pulls the flower over in this kind of sad pose. Now, when you just watch it, it may seem like a very simple scene. There's not too much going on, but I want you to look closely here, look at how much animation is really happening. There is the sort of overall animation, the primary animation of the plant bending like this, and the B is sort of attached to it, but then watch all these other little leaves. They're all sort of overlapping and reacting to that primary animation. Now, how are they doing that? It's really well done. And it looks almost like it's simulated and some people might actually see this and think that this is some sort of elaborate dynamic simulation. Well, let's take a look.
Joey Korenman (00:19:06): So the way that this is constructed is you've got each leaf having its own object here. And what's very interesting to me is that these leaves are actually outside of the hierarchy of the main plant. That's kind of fascinating. So if I just sort of turn all of these leaves off for a second, so they're not distracting us. You can see that we've got this plant composed of a cylinder and a sphere, and there are some copies of little pedals that go around. And in fact, the bee itself, this piece of geometry here is actually inside of the hierarchy for that plant. And the reason that they did it that way is because then the bend deformer that's in there will actually work on everything. It will work on the bee and the flower at the same time. That's really clever. If I turn the bend off, you can see that this is basically what is being bent this entire setup, including the beat.
Joey Korenman (00:20:03): Now that's really clever because it lets them get away with doing this in a simple way, versus having to set up constraints or something more elaborate. And the way they edited this helps that to look, this shot begins with the bee already touching the flower. So they don't need a B to land on it and then have the flour Ben, they can just do it all in a separate shot, making it a little bit easier to rig. Now, how did they make the beef fall off? Well, this is one of the oldest tricks in the book. What they have here are two copies of the beef. So if we go back in time here, when the bee is sort of swinging through the air, this copy of the B here that is within the hierarchy, that's being bent. That is the bee that is visible.
Joey Korenman (00:20:39): And if you look here, you can see that the traffic lights are green, but at some point in time, I'm guessing right with these key frames are watch boom turns red. And that means that something else must've turned green. So if I go back a frame, aha, look up here, look at this big bee layer that layer turns on and notice it is outside of the hierarchy of the plant, but it's in the exact same spot. And so then that one can just sort of move. Now, there's a lot of really nice animation going on here. I'd just like to point out that even just something simple, like this bend has a lot of nuance to it. If we open up the timeline and take a look at this, you can see there's a lot of key frames on the bend. If we just look at the strength, you can see that there's a really nice curve with some overshoots and then it kind of dips again.
Joey Korenman (00:21:28): And this is really, really well done here. And all of that love that the animators put into it definitely shows. Now let's turn these leaves back on. Cause I want to point something out now at first I was confused because the leaves are like I mentioned, they're not inside of this plant. No that's being bent. And so what that means is if we take one of these top Leafs, for example, me, zoom in here as the plant is bending and moving, the leaf is moving with it, but there's no constraint tag on here. If I move over, you'll see there's no constraint tag. And if you don't know, a constraint tag is a really cool tool in cinema 40. That would let me essentially parent this leaf to this stem right here, but they didn't do that. And I don't know why maybe they just didn't have time to set it up or maybe they thought it would be quicker to just do it this way.
Joey Korenman (00:22:16): But in any case, if I open up the timeline, if I open up the properties of that leaf, you can see that the position of the leaf was manually key, framed. Some poor animator, literally had to go through this animation and move the leaf so that it appeared to stick to the stem. Now you might be thinking, oh, that's not very clever. And they could have done it in this way, nicer way. And Chris Schmidt definitely wouldn't have done it that way. And you are correct. However, does it matter, would you have even noticed that just watching the piece and this is a very fast way to animate that allowed them to have total control and to add all kinds of character to this. So each of these leaves, believe it or not is manually key frame to both in position and rotation to get a little bit of wiggle out of them and also to make them stick to the stem. And I just thought that was really cool and brilliant.
Joey Korenman (00:23:06): Now here is what I thought was one of the coolest shots in the piece, which is the beef flying through the spiderweb. Pretty nifty. Now, when I saw this, my first reaction was probably the same reaction. Most animators have, oh, they must have used Houdini or soft body dynamics or something to make it work the way it did. Well, of course they did it in a much smarter way than that. So first let's just zoom in and see how they actually constructed the spider web. And I just want to point out if you get really close to it, you can see it's just a bunch of sweeps connected together. If you get too close to it, the illusion that it is indeed a spider web is broken, but of course it's small in the frame like, and so this is an example of knowing how much detail you actually need in your model based on how close to camera an object is.
Joey Korenman (00:23:54): And this is why storyboarding and animatics are so important. Now, how did they actually construct the web? Well, this is actually really, really cool. What it appears they did was to take a whole bunch of NOLs and to arrange them probably on some sort of piece of geometry that they built to create something that looks kind of like a spider web. Then they created a series of sweeps like this. And what they did was they swept a circle spline, which is why these are small, thin little tubes. This is a thin little circle spline, and they swept it along a tracer. Now, if you've never used a tracer before, they're really handy, it will let you feed in a bunch of objects and it will create a spline that connects those objects and those objects can even be animated. So you can see that this tracer here is connected to null 11, 17, and 16.
Joey Korenman (00:24:44): And so it is literally following those NOLs. So if I select them down here and I right click and say select objects, now those NOLs are selected. And I want you to watch as this animation plays out, notice that those null objects do move. All of those NOLs are animated as the B hits the web. And it happens really, really fast. Let me change my camera here and get a better look at the web. And I'm going to turn my B off for the moment. So all of these little circles here, these are showing you where the nulls are and the three that I have selected, you can see that as we get towards the impact, boom, they all move and it deforms the web in real time. It's really cool. I can actually move these Knowles around and you'll see it changes the shape of the web.
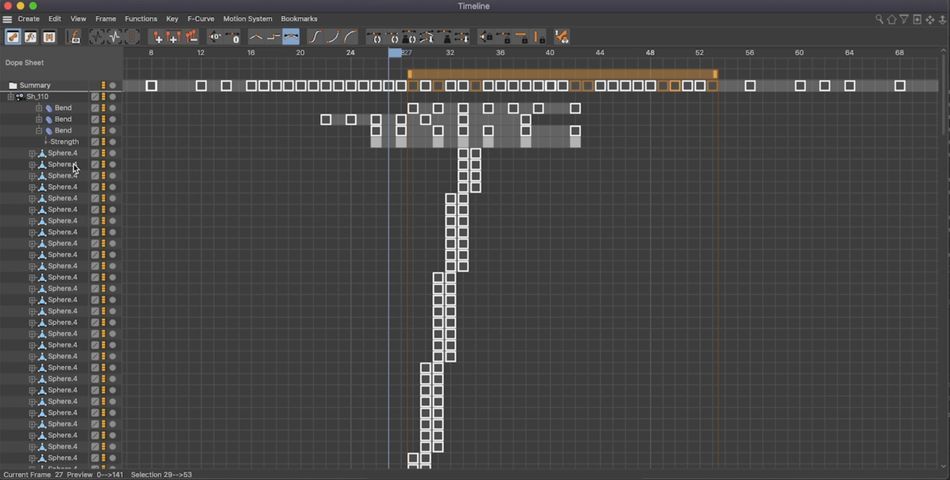
Joey Korenman (00:25:31): So it was a really slick way of rigging this in a simple way and also easy to animate. Now, if I go one frame further, you'll see that part of the web turns off. So again, this is just some simple, slight of hand to make it seem like the bee broke the web, but literally all that's happening is a part of that web is being turned off. So let's explore this a little bit deeper. If we come down here and we click on web and go into the timeline, we can see just how many key frames are being used here. You can see this really long column of key frames on all of these sweeps. Those are the key frames for visible in editor and visible and renderer in likely those are the key frames that are turning parts of the web off. And so you can literally see on this frame, we have turned off parts of the web, not all of it though, because some of it remains and the Knolls themselves just have a little bit of position animation on them.
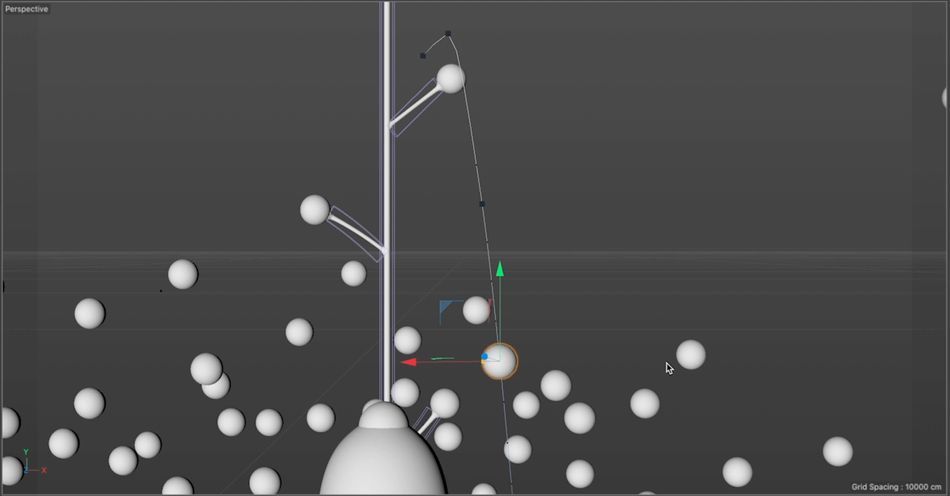
Joey Korenman (00:26:24): And that's kind of all there is to it. Now, there is something that I noticed is missing from this. And if we look at the original shot, you'll see there's this little wispy piece of web that kind of falls down after the bee flies through. And I'm not seeing it here inside of cinema 4d. Uh, and so I'm guessing that we're going to discover some shenanigans. Once we get into after effects, I wanted to show you one more shot in cinema 4d before we go into comp. And it is this shot, because again, this is another shot where I thought did they simulate this? Did they use X particles or something fancy? So it's a really simple shot. You basically have the bead just kind of coming down and knocking all of the seeds off and leaving a few remained. And what's great is you can actually see exactly how they animated these.
Joey Korenman (00:27:15): This is a Ben deformer and you can see it being animated. If I click on that bend, deformer go into the timeline. There it is. And there is that nice oscillating animation curve, which if you've taken animation bootcamp, you will recognize immediately now, how did they get all of the seeds to fall off? Well, before I answer that I'd like you to consider, if you were the animator being asked to animate this, you might spend a day or two trying to figure out some clever way to use physics, some sort of simulation, maybe particles to get this to work. So let's actually dive in and look at how they did this. Now, first of all, as the bee comes down, I can tell you that not every single one of these balls is actually being animated, because look at how many there are. And it seems like some of them are probably just turning off.
Joey Korenman (00:28:04): So if we go into our timeline shift F three, you can see that indeed, there's a lot of these spheres that only have two key frames on them. And if we open them up to see what those key frames are visible in editor, visible and render, that tells me that a lot of these are just being turned off on certain frames, which is smart less to animate. If we go way down here, you can see that some of the spheres are actually being animated. There are key frames on them, and you can see that the key frames don't really have much rhyme or reason, which tells me that a human touched every single one of these layers, which I love. Now let's confirm this. So if we go and find a seed like this one, which is falling, you can actually see the motion path.
Joey Korenman (00:28:50): Every single one of these that is falling was hand animated, pretty wild. Right now I know that plenty of cinema, 40 artists would rather die than do that much hand animating. But I got to tell you that sometimes that's the best way, and you shouldn't be afraid of that, even though there's a lot of these, you find yourself getting into a groove and you're just key frame and away, and you animate a few of them and you know, probably took an hour or two to do it. But look at how much control you have, look at how you can get a nice spread, some fall close, some fall far away. You can have some fall sooner or later, slower, faster. These are things that it's pretty tricky to do and to control accurately with dynamic simulations. And so I was really pleased to see that bullpen went the extra and just hand animated the shot. All right, there are a lot more really cool things inside of the cinema 4d sees for this. But I think we've looked at plenty for now. Let's go into after effects and see how they can positive this film.
Joey Korenman (00:29:54): All right, we're in after effects, I have opened up the project and this looks quite a bit different, doesn't it? So it's hard to imagine how we got from those colorless gray scale renders out of Arnold to this. So let's just start exploring. And the first thing I want to note is just how organized all of this is the entire film has been laid out, shot by shot, and this is how you do it. People it's just a lot easier to navigate. If I want to know how the shot is comped, I can just double click. Uh, and bullpen was nice enough to provide pre-rendered P and G sequences. So it's easier to kind of move around like this as we explore. So why don't we start with shot one, because even just with this shot, there's lots to talk about. So let's go ahead and double-click this pre-com do you go inside and it's going to take a minute to render because there's a lot going on here.
Joey Korenman (00:30:46): So just in this first shot, there are 39 layers. Most of them are pre comps. Now I'm not going to go through every single one, but I am going to go through a few just to give you some idea as to how extensive the compositing is in this project. One thing I like to do sometimes if I'm going through someone else's project is to go layer by layer and solo the layer so I can see what's going on. So let's start here with the background. So this looks fairly simple on the surface, but let's go into the pre-com for it. So just this background layer has nine layers and three of those are pre comps. Now they are the same pre comp, but you can see how this is like a Russian nesting doll of comps. So let's just keep going all the way down.
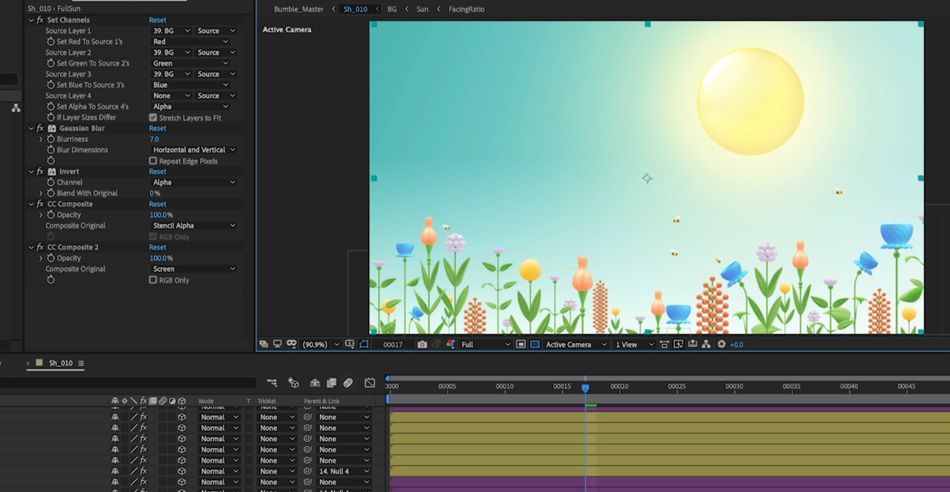
Joey Korenman (00:31:33): So we are now a few pre comps deep. I can actually push the tab button to see exactly where we're sitting and there is yet another pre-camp called facing ratio. Let's check that out. And finally we are at the bottom, so let's see what's going on here. So let me solo the bottom layer, which is just a black solid, a white solid on top. So I think we're going to be finding a lot of leftover layers layers that don't actually need to be there. This black solid obviously doesn't need to be there because the white solid is covering up. And sometimes if you're working on a short film and you've got a lot of composite thing to do, you don't perfectly clean up your after-effects projects. And in this case, I'm going to forgive bullpen. So let's double click on this layer. So this is a render right out of Arnold of the facing ratio pass of the sun.
Joey Korenman (00:32:20): If I double-click this layer, this is the actual render of the sun. So you can see that it's basically just a sphere or maybe it's even sort of a flattened disc. You can see that there's some nice lighting. There's kind of a rim light around the edge of this thing. And so this is the beauty pass. And then this is that facing pass. That is basically like a funnel it's showing you how much of the object is facing the camera. How much is sort of turning away from it. So in this comp, basically all that's going on is we have the facing ratio pass of the sun using the actual render of the sun as an alpha mat. Most likely because if I look at this layer again and I hit option four, I can see there's an alpha channel there. Okay, wonderful. Now, one thing I would like to point out is that this image has been scaled down and positioned where it should be in the frame.
Joey Korenman (00:33:13): They didn't actually place the sun there in cinema 40 and hit render. They decided to place the sun where they wanted in comp. Now, if we go back up the chain here, this is where it starts to get really interesting. Let me turn off this alpha checkerboard. So the way that this sun is constructed is through a few different layers, and this is how they're colorizing everything in this film. So at the bottom, we have a yellow solid with a color on it. There is a levels adjustment on it, which I'm guessing is just used for convenience to sort of push the yellow into a more saturated place. And it's using that sun beauty pass as an alpha matte to get this nice circle. Then the next layer here, fire solo, that this is actually just this beauty pass here, but it's composited over that yellow circle in screen mode.
Joey Korenman (00:34:03): So now we're bringing back some of that nice highlight. And then finally, there's an adjustment layer that is using as a Luma inverted mat, the facing ratio comp that we just looked at. So if I turn on that adjustment layer, you can see that basically it's just darkening the edges. So let's zoom in here for a minute because this is pretty interesting. And I think a good example of why having all of these render passes can be useful. If I turn on the facing ratio layer and solo, you can see that it's basically giving me a mat where the edge of an object is black, because it's starting to turn away from the camera and the center is white. So using that as a luminance map for an adjustment layer, it gives me the ability to only mess with the edges of an object in a really, really targeted way.
Joey Korenman (00:34:55): So after all of those steps, we now have a yellow sun. And what's interesting is that in this background, the sun layer down here is turned off. There's a lot of extra stuff here. So let's kind of walk step by step through this. So we've got a white solid with a gradient ramp with a very specific gradient on here. After that, we've got two copies of the sun layer. The first copy is blurred quite a bit, as you can see, which kind of acts as a nice gradient around the sun. So it's actually a really clever way of creating a gradient from blue to white, and then feathering in this yellow color to, you can see that they've also filled that sun with a less saturated color. And then above this blurred layer we have yet another blurred layer. This is actually a pretty good trick to stack blurs because that way you can get an area that's a little bit more well-defined in the middle while still having a really big sort of outer Corona there.
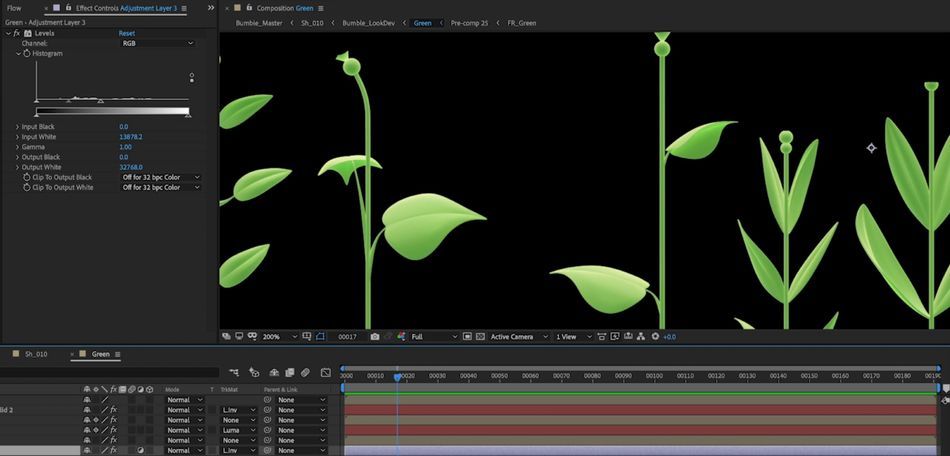
Joey Korenman (00:35:52): And then the last two pieces are a novel object that was probably used just to scale things and move them and a shape layer, which is a gradient ramp in soft light mode. So if I set this to normal, you can see that this shape layer just has a gradient ramp on it. That's sort of darkening this corner and leaving this white. And if I set that back to soft light, it's just creating a little bit of a vignette effect. So look at how many steps were taken just to create the perfect background for this shot, which we haven't even looked at yet. And now we are back in the main shot, and I'm just going to go layer by layer here, turning on some of these flowers. And you can see essentially these are all the exact same comp just placed. And what's really cool about this is that this lets you do the layout of your shot in after-effects instead of cinema 4d.
Joey Korenman (00:36:48): So if we solo all of these and I decided that it would feel really nice. If this orange flower here were sticking up a little higher, I can go find it there it is to lip to, and I could just move it up or move it down or scale it up. You have a lot of control when you do your composite and after effects in this way, you have literally an insane amount of control versus doing all of this in cinema 40, which would create much longer render times with all of this geometry. And then if you wanted to change one flower, you'd have to rerender the whole thing. So this is awesome. Now, how did they get the flowers to look this way? And why don't we use that same tulip as an example? So both of them actually did, which is pretty cool is they created a look dev comp and what they did was render out one of each flower like this.
Joey Korenman (00:37:35): And some of these flowers do animate in later shots, but in a lot of shots, they're just backgrounds. So these are just stills and you can see they've gotten each flower to look exactly the way they want. And then if you go back to the original shot we were just looking at, you can see they've simply masked out the flower that they want to use for each layer. So if we want to focus on this to low, we can go through and solo each layer to try and find that tulip. So this layer is named bludge pedals. All right. So that is one of the layers we're going to need. And then we're going to want the stem for that as well. So let's just go through and try to find the stem. Okay. And you can see that all of the stems are on this green layer.
Joey Korenman (00:38:13): So here's our two lip. Here's the stem let's start diving in now inside of this green layer. So what we have here at the bottom is a green solid, that is being Luma matted out by this layer here. And this layer is just the alpha matte for all of the green parts of these plants. After that we have this layer in screen mode. And if I double click that, you can see that this is the beauty pass of the render. So we're screening the beauty pass over a flat green color. And I want to point out a couple of things. If I zoom in and I take a look at say this leaf, you can see how soft and almost two D this is looking, but look at the original render here. This doesn't look as soft and as too deep, but it's because of the way it's being composited that we're getting this neat look.
Joey Korenman (00:39:03): Now there's also some effects on this layer. That's being screened. So let's turn those off and see what we have. So to start with, we are tinting the layer so that white is not really white. It's got a little bit of a yellowish cast to it. So that's actually a really nice color trick is to never let your highlights be white, never let your shadows be truly black, have them be warmer or cooler. And then there's also a levels of fact, which you can see is lowering the white output so that it's not so bright. Just lowering it a little bit and messing with the gamma quite a bit, to give a little richness to the mid-tones in that beauty pass, which is helping get this look after that, then there's a, another copy of the beauty pass. But this time in multiply mode, now, why would they have the same pass in multiply and screen mode?
Joey Korenman (00:39:52): Well, what this is letting them do, it's actually very clever is it's letting them separate the way they colorize the shadows and the highlights from their beauty pass pretty slick. So you can see that on this multiply pass. They've also let me turn these effects off. They've also tinted the darks so that they're green and not just black. And then they've done a levels adjustment here to brighten them up a little bit after that there is an adjustment layer that is using this pre-com as a Luma inverted mat. So let's turn that adjustment layer on and then see what's going on. So it was probably pretty obvious that adjustment layer off on is adding a lot of brightness to these leaves, almost like a glow. So let's go into this pre compency, what we're looking at. So this pre-com is basically the facing ratio pass of each plant.
Joey Korenman (00:40:43): And I can tell because they've added the letters fr, and if I go into this pre-camp I can see that I've got a white solid and then the facing ratio pass that is now being matted out by the luminance of the alpha Chandler here, you might be asking why did they need to create a track map for the facing ratio? Well, let's find out if I turn off and don't use a track mat, you can see that the render out of Arnold is actually giving us a black background here, and you can get some weird edge artifacts if you have a black background, but your compositing this over something that is lighter. And so this is just a really nice way of creating a white background for this to composite on top of. So let's set this back to Luma matte and we're good to go.
Joey Korenman (00:41:34): So now that we know that this pre-com is the facing ratio passes and this adjustment layer, which is definitely brightening, things is only being applied on the inverted luminance of that facing ratio. We're getting really deep in the woods here. You can kind of see what's going on. So let me zoom in on one of these leaves and play with this. You can see it even better if I bring this back to where it starts and I crank it up, you can see that it's really brightening up everything, but not equally. If I look at the underside of this leaf, it's not really brightening that, but it is brightening the top a whole lot more. And so this is kind of giving it this interesting sort of brightened glow look, right? So again, it's just sort of playing around. I'm sure that bullpen spent a lot of time experimenting to get it, to look this way.
Joey Korenman (00:42:20): And finally, we have one more solid here that has another pre-computer that a, this looks like this is some other interesting paths. So let's take a look at that in a minute, but let's turn on this layer and you can see that it's not doing too much. I'm noticing it a lot right there. It's just kind of knocking down some of those highlights that got a little bit too bright. Let's go into this pre competency what's going on here. So I have the white background. We've got this pre comp, which is the ambient occlusion pass. So we're taking the ambient occlusion pass and the areas that are darker, we are filling with this green color. And I'm assuming that the reason bullpen did that if I just kind of before and after this is because some of these areas were getting a little bit hot and this just knocks it down a little bit.
Joey Korenman (00:43:05): It's a really smart way of using ambient occlusion. The ambient occlusion pass remember is black and white, and this is just kind of a nice way of putting some color into it. And so after all that, we have these nice, really interesting looking green stems and leaves. So now that you've seen how the green was achieved, you can probably imagine how the rest of the color was added to this film. If we go into the blue Ridge pedals comp, which that might be my favorite pre-com name of all time, there is a lot of pieces to this, but again, every piece is just making a minor adjustment here, let's start at the bottom. So we've got a fill effect on a layer that is basically the alpha channel of this tulip. We're then covering up the top portion of that with the orange. And we have, we must have some sort of custom map for that.
Joey Korenman (00:43:53): So if I double click this, you can see that here is my render pass my AOV, just for that portion of the flower, which made it really easy to add the orange right, where they wanted it. Then there is an adjustment layer that is applying levels of fact only two areas of certain limits. And this is just the beauty pass. So this is interesting because what they could have done is just taken the beauty pass and screened it over this. But instead they used an adjustment layer and use the beauty pass as a Luma matte, which it's kind of interesting because then instead of just screening white over these colors, you're actually color correcting these colors. So I don't know, maybe you have a little bit more control. So now we have another orange solid that is being Luma matted by another pre-camp. And this pre-camp is using something called a glass pass, which looks sort of like a, a specular pass.
Joey Korenman (00:44:45): It's sort of a lot shinier than a, than the beauty Paslode. And so I'm guessing they just thought, well, I like these shiny parts and maybe this flower needs to be a little bit shinier. So they used that as a mat and using an orange solid, uh, with a fill effect on it, as opposed to color correcting it. You can be very, very precise if I want this to have a little bit of blue in it, I can change the color and look, I get, I get blue there. Um, but you wouldn't want to do that because that looks awful. So after that, we've got looks to be another copy of the beauty pass, but it's been tinted. So the blacks are a little bit warmer and then the levels have been pushed and it's in multiply mode and it's using as a Luma matte the pedals matte.
Joey Korenman (00:45:33): So you can see what this is doing. And again, a lot of these things that bullpen are doing, they may seem kind of like a convoluted way to get a look, but as a composite or you have so much control when you do this, I could crush the blacks a little bit and bring up some more of that color from the bottom and from the shadow areas. But if I didn't want to do that, I could do the opposite. I could take the white input and crush that, which is going to bring some of that area down. If I wanted this to be slightly more saturated, I could just add more saturation to the color. So there's a lot of control you have when you set up your passes this way, next layer. So this layer is just sort of brightening up the screen area a little bit.
Joey Korenman (00:46:13): And it's using as a mat, this set up here, which is itself a, pre-con probably composed of other mats, kind of a smashed together. Then we've got this layer here and this layer is really interesting. It's adding a little bit of lighting just on that green part. So it's using this green bulge pre comp, which is a map for the green part, and it is in screen mode with a little bit of a tint on it. Again, it's not white. See if I turn that off, it's such a subtle thing, but it's the devil's in the details. If I have that tint effect off, then that highlight is just white. If I turn it back on, it's a little bit of warmth to it. And the levels effect just sort of knocks down most of this because otherwise it gets gnarly and it just leaves the highlights.
Joey Korenman (00:46:55): And there you go. So then we have another layer here in multiply mode, doing a similar thing, except on the shadow side, we've got an adjustment layer here that you can see as bringing out some nice highlights on the green section of this. And it's got a Luma inverted mat, which is composed of this pre-camp, which looks like it's probably the beauty pass or the facing ratio. It's kind of hard to tell it's the facing ratio. Yeah. You can see it if you kind of dig deep enough. So that facing ratio is a perfect use for it. You just want a little bit of light on the edges will facing ratio gives you that it can let you constrain your color correction to edges. You've got another adjustment layer here that is super subtle. It's just doing a little bit of brightening right there. And then we've got a, another green solid, the sort of knocking down some of the highlights in there.
Joey Korenman (00:47:49): And then finally we have another copy of the beauty pass, screened over everything. Let me turn that on. And it is using this mat right here. So it's only screening back over the two loop itself. And if I sort of turn that on and off, you can see just beefs up the sort of specularity the shininess just a little bit. So let me unsold all of these. And it took all that work just to get that one flower, to look a certain way. And you're probably thinking this is insane. So I kind of want to try one thing really quick. So I set this up really quickly. I just wanted to show this to you. I took the original beauty pass and I removed all the effects, put it in normal mode, a hundred percent opacity. And I just put it next to this and I want to zoom in, and I want to ask you that if I gave you this render, and I said, I want it to look like this. There is not really a straightforward way to do that. It really is about taking all of the passes that I've given you and using a whole bunch of compositing tricks to achieve this look. And it's really hard to aim at this. Sometimes it's kind of one of those things where you have to experiment and you can tell bullpen definitely did a lot of experimenting because there's a lot of layers that are turned off. There's things. They try that they abandoned and that's how it's done.
Joey Korenman (00:49:17): So we already talked a lot about how they did the color and you can imagine how much work it was. Every single thing in this film was colorized in that way with that level of detail. And I wanted to talk about one more aspect of color, which is the stripes on the B, because I thought it was so interesting the way they did that. So let's go into shot two and take a look. All right. So here is shot two, and there's a lot going on. There's some pre comps. I want to point out really quickly that this background is completely different than the first background we looked at. And this is one of the beautiful things about having so much of the look of your film done in after effects. If you decided that you wanted the sun a little bit more overhead, a little bit off to the side, it's really easy to do that and see everything in context.
Joey Korenman (00:50:07): If you're creating all of that here and not doing it with say a sky object in cinema 40, all right. So let's go into this. Pre-com here and take a look at the B and the B is its own. Pre-camp several pre-concept facts and let's just zoom in and take a look at this. So here is essentially our B layer, and there's not even any wings in this, in this comp at all. And we still have a few other pre comps in here. So let's go into those and see what we're looking at. So this comp here, you can see this is using that AOV pass that had the Stripe texture on it. And if we go back, this pre-com is just the beauty pass. So you see there are no stripes, but you have all of the lighting and all of that nice shading.
Joey Korenman (00:50:54): So how is this built up? Well, start at the bottom. So we're starting with a yellow solid, and it's using as a luminance mat, this Stripe AOV. Now it's been filled with gray. The levels have been knocked down. I'm not sure why yet, uh, but let's go to the next layer, which is also a yellow solid, and it is using this layer as a Luma matte. So let's try to understand what's going on here. So this layer looks like just a PNG sequence and notice that this end of the B has a white Stripe on it. If I recall correctly, if I go into this pre-camp though that has been inverted. So they've done some compositing, several pre comps deep. If you, uh, if you really want, you can go grab this project from whole frame and, and dig through to see how they inverted that.
Joey Korenman (00:51:41): But basically they have one version of that mat that has the stripes in different places. And so what they've done is they've been very, very picky about what color this base sort of dark color is. And then what color this yellow Stripe part is then after that, by the way, Stripe, the part that is actually what, um, entomologists call this part of the B. So then after that, we've got another yellow solid. When we turn that on, we can see that this yellow solid is creating the highlights on the B. It's doing that because it's using as a Luma matte, this B render pre-camp, which is built off of the beauty pass. So that is how we are bringing back the highlights. And here, I want to show you another thing that's cool about this because they have a yellow solid, and you can see they've, uh, they've boosted the lightness of it so that it's based off of this color, but it's just brighter now.
Joey Korenman (00:52:36): And the way that they're applying it selectively to create these highlights is by using the beauty pass as a Luma map, they can put a level's effect on the beauty pass. So if I turn that off, you can see that the beauty pass is a lot flatter, right? But if you turn that back on, I could boost those whites and I could crush those blacks. And I could create a much harder edge to the B if that's the look I was going for, but obviously that's not. And I didn't make this film. So I don't get to make decisions like that, but I'm just showing you just how much power you have over the look of this thing. You can get drastically different looks by messing with the levels, using this as a Luma matte the way they did. And then finally you have one more layer here.
Joey Korenman (00:53:18): If we turn it on, you can see that that creates the shadow at the bottom. So that's basically doing the same trick as this layer here, that's using the beauty pass as a Luma matte. This is using the beauty pass as an inverted Luma matte. So it's catching the darker parts of it. And this is letting bullpen create shadows that are very precisely colored the way they want. Now, if we go back and look in context, you can see that having a warm colored shadow like this, it plays really nicely off that cool background, and it was a really smart color choice.
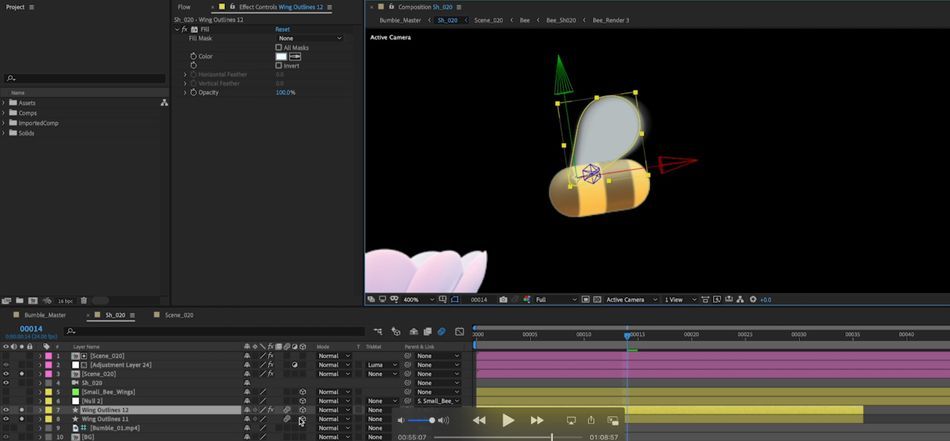
Joey Korenman (00:53:53): Cool. So then they basically just done a lot of work to get the colors of this scene, to look exactly the way they want. And back in the master shot, they've added wings to the B. Now, how did they do that? So let's solo this layer for a minute. This is the pre-render that doesn't have the wings on it. And I want to turn on this layer, the small B wings. Now, when I turn this on, you'll see that there is a solid layer here that has key frames on it. There's actually a key frame on every single layer. This is what happens when you add that external compositing tag and cinema 4d. Remember how I showed you? There were wings in cinema 4d, but they'd been turned off. And then their place was a no object with an external compositing tag. Well, that comes into after effects.
Joey Korenman (00:54:36): And you can use CINAware to extract that and to bring that in and you get a key frame on every single frame and it matches perfectly. If we go frame by frame, you can see how it follows the B. So this is fantastic. What this lets us then do. If I turn this off is to then create wings by just creating shapes, really simple shapes. You can see that all bullpen had to do was create a little shape layer here to have them make them 3d. And then they are simply parented to this Knoll, which is itself parented to small B wings. What's great about this is if we hit you to open up all the key frames and we go into the graph editor, you can see that they were able to control how the wings sort of slowed down as the B came to a stop.
Joey Korenman (00:55:27): And they were able to make that creative choice in the context of the final shot, they could see how the colors were playing, how your eye was going to be directed to a specific part of the frame. And then if they wanted the wings to do something different, they could literally just change the key frame. And after effects like this and the wings would react differently. It's really, really smart that they did it this way because now they have control up until they hit render for the very last time. Now, the way these wings look is really interesting. So I'm going to hit shift command H to hide all of my outlines. And I want to take a look at this as I go frame by frame through this, you can see that the wings are basically flapping open and closed once every frame in the beginning part of this animation.
Joey Korenman (00:56:11): So they're moving really, really fast. And the motion blur creates this great illusion that they're flapping even faster. If I hit command K and I go to advanced, I can look at the motion blur settings, and it looks like they have been messed with here. So the shutter angle is two 40. Meaning there's going to be a lot of motion blur more than you would normally have. What's cool about this is the rest of the render. Doesn't have motion blur the B itself coming out of cinema 40, no motion blur, but the wings motion blur. And so that gives you the illusion that this scene was shot with a high shutter speed, but the wings are going so fast that there's motion blur it a really clever way of getting that look.
Joey Korenman (00:56:55): So here's another thing I wanted to call out. That was pretty clever. There's an adjustment layer in each scene, and they're all kind of dialed into tastes, but this adjustment layer is essentially compositing a blurred version of the shot back on top of itself, but it's only blurring certain parts of the image it's using as a Luma matte the shot. Now, why would it do that? Well to find out why don't we crank this up? You can see that it's really just kind of blurring the edges of things, right? It's not blurring everything. And so it was set to two. It's very, very subtle, but if I turn this off and then on, I mean, gosh, you can barely tell you really have to like stare at the pixels over here by the, to see any difference, but it just sort of softens the image ever so slightly in this imperceptible way. And what that's going to let us do is get away from the hard edge sort of 3d look. And that's one of the reasons that this film looks so nice. It looks very 2d. So here is the final rendered shot, and this is just one shot of many in this short film. Hopefully it's starting to Dawn on you, just how much work this kind of thing can take. If you care about it, as much as the bullpen crew obviously did.
Joey Korenman (00:58:08): All right. So we talked a lot about how bullpen colored this film. Let's talk about some of the other things that I thought were really interesting inside of the after effects comp and this shot is a perfect example. So in this shot, the larger B kind of hovers over the small beam. Let's kind of go to the middle of the shot here and you can see right in here, the shadow starts to overtake the petals of the flower and the B. And initially I thought, okay, they probably just did this in 3d. They would literally create a light and have the larger B move between the light and this flower in this be casting the shadow. So it would be realistic and that's not what they did. So let's solo these layers layer by layer. So let's first turn on the background. And again, I want to point out basically every shot has a custom background pre-camp so that they can shape where the sun is precisely where they want.
Joey Korenman (00:59:01): It's just a level of detail. You don't normally see you've got the camera, then you've got this pre-con shot in here. So let's go into here. All right. And we can do the same exercise here. We can go layer by layer. And first we're just sort of turning on these background flowers, which are just kind of there. And again, what I love about this is I can move them around. I can create a different composition. If I want to. Here is the green part of the flower. Here are the pink flowers and here is the be excellent. And finally there is the adjustment layer that adds that gosh, and blur. All right. So let's take a look at what's going on here. So you might notice that the shadow is happening there, but you can barely see it. It's very subtle and there is no shadow being cast on the B is there.
Joey Korenman (00:59:48): Hmm. So let's unsold all of these and go back one layer. So the shadow must actually be happening in this comp and if it's not happening in 3d, that means there's somehow faking it in after effects. So let's take a look. So there's an adjustment layer here with a gosh and blur on it. So I'll turn that on. And that's just softening things even a little bit more. Then we have one of the wings here and you'll notice in this case, it's actually folded up against the B. There's not even any animation on this layer. Then there's another adjustment layer. And this adjustment layer has a mask on it. Let me turn this on. This adjustment layer is only affecting the wing. And you can see that because it's using as an alpha matte, a copy of this wing layer. Now, are there more efficient ways of doing that?
Joey Korenman (01:00:31):Yes, there are. But that is one of the things that in after effects, you kind of have to pick your poison. You can just copy your layer and use it as an alpha matte. And it's quick and easy and easy to see, or you can use set mats, which has its own gotchas. Um, but there are a lot of duplicate layers in this film because of how much control bullpen wanted. So I want you to notice the mask on this adjustment layer, how it's animated by hand to create that shadow effect. If I turn off the outlines, you can see that it's creating that hard edge shadow just on the wing. So now let's go up here. You've got another adjustment layer that is using as its Luma mat, the mat for the B. So this adjustment layer is only affecting the beat. And what's really cool about that is you're getting a different shadow on the B than you are on the wing, which is sort of physically accurate.
Joey Korenman (01:01:28): That is actually what would happen because the wing is farther away from the B. And so the shadow would be cast in a different place. That'd be very hard to do in 3d. And because they've done it this way, just manually drawing masks on adjustment layers, they could control it and get exactly the movement and the shape they wanted. So let's keep going. There's another adjustment layer here. And this adjustment layer is using as its map, an alpha mat for the green part of the flower, right? So this, this adjustment layer is only going to operate on this green part. And so as we go forward in time, there we go. You can see that it's creating a shadow there, and the way they're doing that is really cool. They're using a levels effect. This is awesome because what it means is I can be really heavy handed if I want to, or I can be like bullpen and be just really subtle and nice, right?
Joey Korenman (01:02:23): You can see that really what they're doing is they're just kind of beefing up the very light shadow that was actually showing up, uh, by ducking the white output, which is really nice, subtle way to do it. And then there's one more adjustment layer here that is on the pedals themselves. And it's using as a mat, this alphabet for the pedals and this adjustment layer has its own mask on it, which you can see is quite a bit more complicated. They are sort of mimicking the 3d shape, the form of these pedals and what that would look like with a shadow falling on it. So for this entire shot, they're really cool cash shadows. They were all created by hand with masks and adjustment layers and after-effects, and here is the final comp shot in all its glory in, I think I actually like it more knowing how the shadow was faked in after effects. I think it's so brilliant.
Joey Korenman (01:03:19): Now here is another really great example of the little finishing touches in sort of handmade details that can really bring a shot to life. So there's a few details that I want to call out on this shot, because I think the shot is just so beautiful. So first of all, I want you to, again, and notice that this background is different than all the other ones. There's an extra sort of light area up here and down here. And that's done very deliberately because you have a white spider web that you need to see in the center of the frame. So the center of the frame needs to be darker than the rest of it. And so they very carefully shaped the gradient by hand to make your eye go exactly where they want it to go. Very, very cool. There's also some really nice compositing work that went into these blue cups here to give them that nice edge lighting.
Joey Korenman (01:04:09): I just thought it was so pretty and I wanted to see how they did it. And so just to walk you really quickly through how they did it, we can sort of do our little trick and go so low. So they have the sort of base color. They've got a screened copy of the beauty pass. They've got an adjustment layer that is using the facing ratio as an inverted Luma matte. Then they've got another blue layer here. That's just bringing in a little bit more color into the shadows. That's using a sort of a modified version of the beauty pass so that they could get the shadows to, to be used as a luminous map. Then you've got another layer here and one more layer at the top set to screen mode. And just to show you the attention to detail here, let's look at this cup in the corner, this final layer brightens that she has a little bit, that's what it's doing.
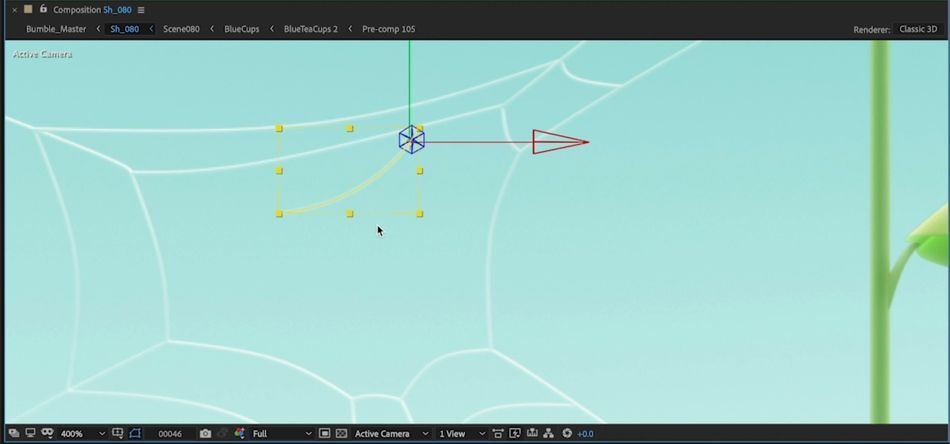
Joey Korenman (01:04:58): I'm not even sure it hits these other two. It does a little bit. It's just, it's just subtly affecting the highlights just a little bit, just not so much, but a little bit. And sometimes that's the difference between having it really pop off of the frame and not, and in this case, it does now let's at the spiderweb because to me that is one of the coolest parts of this entire film when the bee flies through it, there's this moment where this little dangly comes down. I remember in cinema 40, we couldn't find that thing. So let's go into this web pre-camp and take a look at what's going on. So this is the render of the spiderweb straight out of cinema 4d. And you can see that it's a very, very simple element. Now it's been composite stud against the background in screen mode, which is really cool.
Joey Korenman (01:05:44): If you look at the web render, you can see there is a lot of dark areas of it, right? Because this is solid geometry in cinema 40, but to make it look more like a spiderweb, they rendered it separately as a separate pass and composite it just the web in screen mode. Now where's that little wispy let's find that. So if we zoom in here and we kind of stepped through frame by frame, as the bee approaches, the web, you can see a few things happen. First of all, there's a copy of the web up here. And what that's being used for is as the beat makes contact, there is one frame. Let me turn off my outlines here. There's one frame where it bullpen wanted a little bit of the web to actually be on top of the B as though it had broken through.
Joey Korenman (01:06:28): But part of it was still in front of the Bee. If I turn this off, you can see what that's doing. And we're talking about one frame people, literally one frame, and then it's gone, but it's a little detail that, that lets you know, that the animator kissed this. So then there's this shape layer and this is kind of the unsung hero. So let me turn my outlines back on and let's zoom in close so we can see what's going on here. So what bullpen did was literally hand animate with a shape layer, this little piece of web coming down, I'm going to solo this just so you can see this and let's open up the key frames. So you can see this literally was just hand animated. There was no Newton used. There was no doing no fancy pre copying or puppet pin, literally a shape layer and lots and lots of key frames and doing things like this obviously takes longer. It's more tedious, but you get more character to your animation. Sometimes for example, look at what happens when the web sort of swings through, look how quickly it stops and kicks back and overshoots. It has this character that would be hard to get this whipping action. That'd be pretty hard to get if you actually rigged this and set it up and tried to simulate it or animated in some other way, by just doing it old school, you can get exactly the character you want in that little tiny detail adds so much to the shot.
Joey Korenman (01:07:54): There are hundreds of other little nuggets throughout this project file, but I just tried to pull out some of the coolest ones that I thought could be useful. And maybe your things that you could use in your next project. So I hope you learned a ton from watching this and please leave a comment below. If you want to see more MoGraph unboxings like this one hit subscribe. If you want more motion design training like this in your feed and check the description to grab the entire set of project files from hold frame, including a complete breakdown of the project from bullpen, the original animatic files and a whole bunch of extras you can dive into that's it for this one, I'll be around. That's really, that's awful. Edit that out.
Music (01:08:46): [outro music].
ENROLL NOW!
Acidbite ➔
50% off everything

ActionVFX ➔
30% off all plans and credit packs - starts 11/26

Adobe ➔
50% off all apps and plans through 11/29

aescripts ➔
25% off everything through 12/6
Affinity ➔
50% off all products

Battleaxe ➔
30% off from 11/29-12/7
Boom Library ➔
30% off Boom One, their 48,000+ file audio library
BorisFX ➔
25% off everything, 11/25-12/1

Cavalry ➔
33% off pro subscriptions (11/29 - 12/4)

FXFactory ➔
25% off with code BLACKFRIDAY until 12/3

Goodboyninja ➔
20% off everything

Happy Editing ➔
50% off with code BLACKFRIDAY

Huion ➔
Up to 50% off affordable, high-quality pen display tablets

Insydium ➔
50% off through 12/4
JangaFX ➔
30% off an indie annual license
Kitbash 3D ➔
$200 off Cargo Pro, their entire library
Knights of the Editing Table ➔
Up to 20% off Premiere Pro Extensions
Maxon ➔
25% off Maxon One, ZBrush, & Redshift - Annual Subscriptions (11/29 - 12/8)
Mode Designs ➔
Deals on premium keyboards and accessories
Motion Array ➔
10% off the Everything plan
Motion Hatch ➔
Perfect Your Pricing Toolkit - 50% off (11/29 - 12/2)

MotionVFX ➔
30% off Design/CineStudio, and PPro Resolve packs with code: BW30

Rocket Lasso ➔
50% off all plug-ins (11/29 - 12/2)

Rokoko ➔
45% off the indie creator bundle with code: RKK_SchoolOfMotion (revenue must be under $100K a year)

Shapefest ➔
80% off a Shapefest Pro annual subscription for life (11/29 - 12/2)

The Pixel Lab ➔
30% off everything
Toolfarm ➔
Various plugins and tools on sale

True Grit Texture ➔
50-70% off (starts Wednesday, runs for about a week)

Vincent Schwenk ➔
50% discount with code RENDERSALE

Wacom ➔
Up to $120 off new tablets + deals on refurbished items


Create Stunning Visual Effects in AE
Learn compositing, tracking, keying, and rotoscoping in After Effects. Enroll in All-Access to unlock VFX for Motion and 50+ other courses.