Create Stunning Visual Effects in AE
Learn compositing, tracking, keying, and rotoscoping in After Effects. Enroll in All-Access to unlock VFX for Motion and 50+ other courses.

How to Track and Replace a Screen in After Effects
Stop avoiding motion tracking. It's an important VFX skill to add to your MoGraph set — and mastering the Tracker in After Effects can translate to much more than screen replacement; it's even useful in Futuristic User Interface (FUI) design.
Plus, it's not nearly as complicated as many motion designers think. We can — and will — have you tracking and replacing computer screens in After Effects in a single minute.

That's right: Birmingham-based motion designer, director and SOM alum Jacob Richardson is back with another Quick Tip Tutorial.
If you don't have footage for this exercises, download the project file and use what we've provided.
How to Replace a Screen in After Effects: Quick Tip Tutorial Video
{{lead-magnet}}
HOW TO REPLACE A SCREEN IN AFTER EFFECTS: EXPLAINED
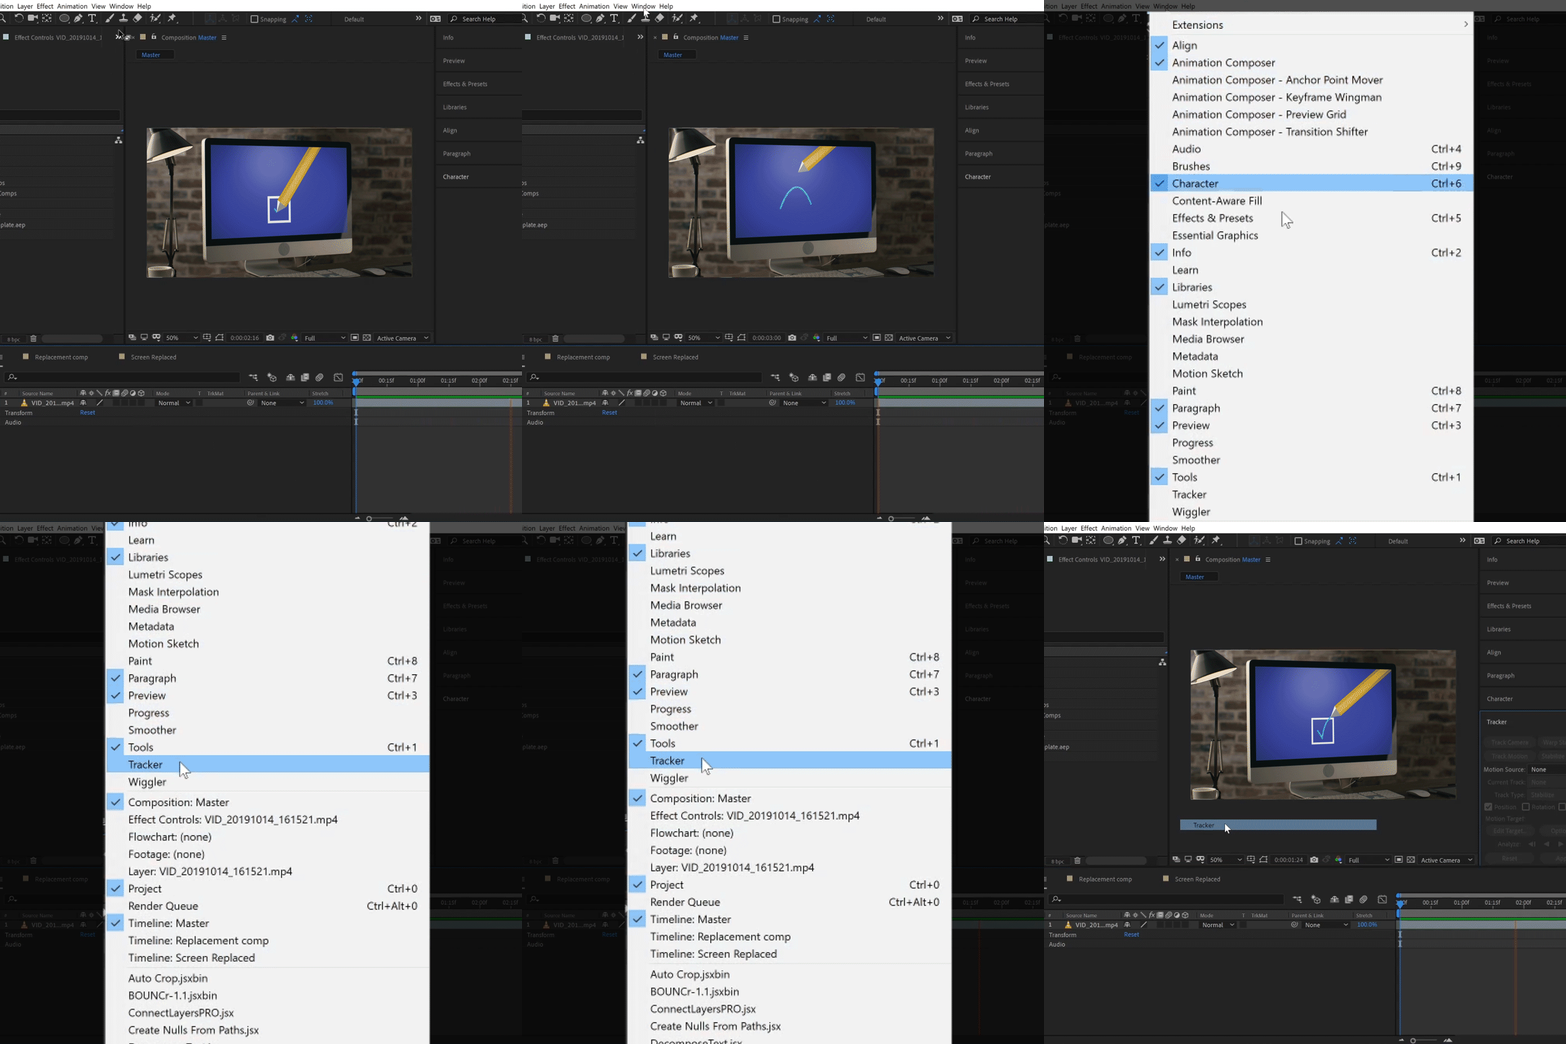
STEP 1: SET UP THE TRACKER WINDOW
Before you start tracking, you'll need to ensure your Tracker settings are correct so After Effects knows which footage and type of tracking you'll be using.
To set up your Tracker window:
- Open the Tracker window
- Select Motion Source
- Click Track Motion
- Set Track Type, Perspective Corner Pin

STEP 2: DEFINE THE TRACKING POINTS
As soon as you've established your Tracking settings, four Tracking points should appear in your Composition window; if you don't see them, double-check your Tracker type.

To define your Tracking points, move each point to align with each corner of the computer screen, so the corner is centered in the two Tracking boxes. If necessary, increase the size of the boxes to improve your tracking accuracy.
If your footage begins with the computer screen off screen, find and use a frame that displays the entirety of the computer screen; we can analyze forward or backward later.

STEP 3: ANALYZE THE FOOTAGE
To start tracking:
- Set the time indicator to your tracking starting point
- Open the Tracker window and click the Analyze forward play button

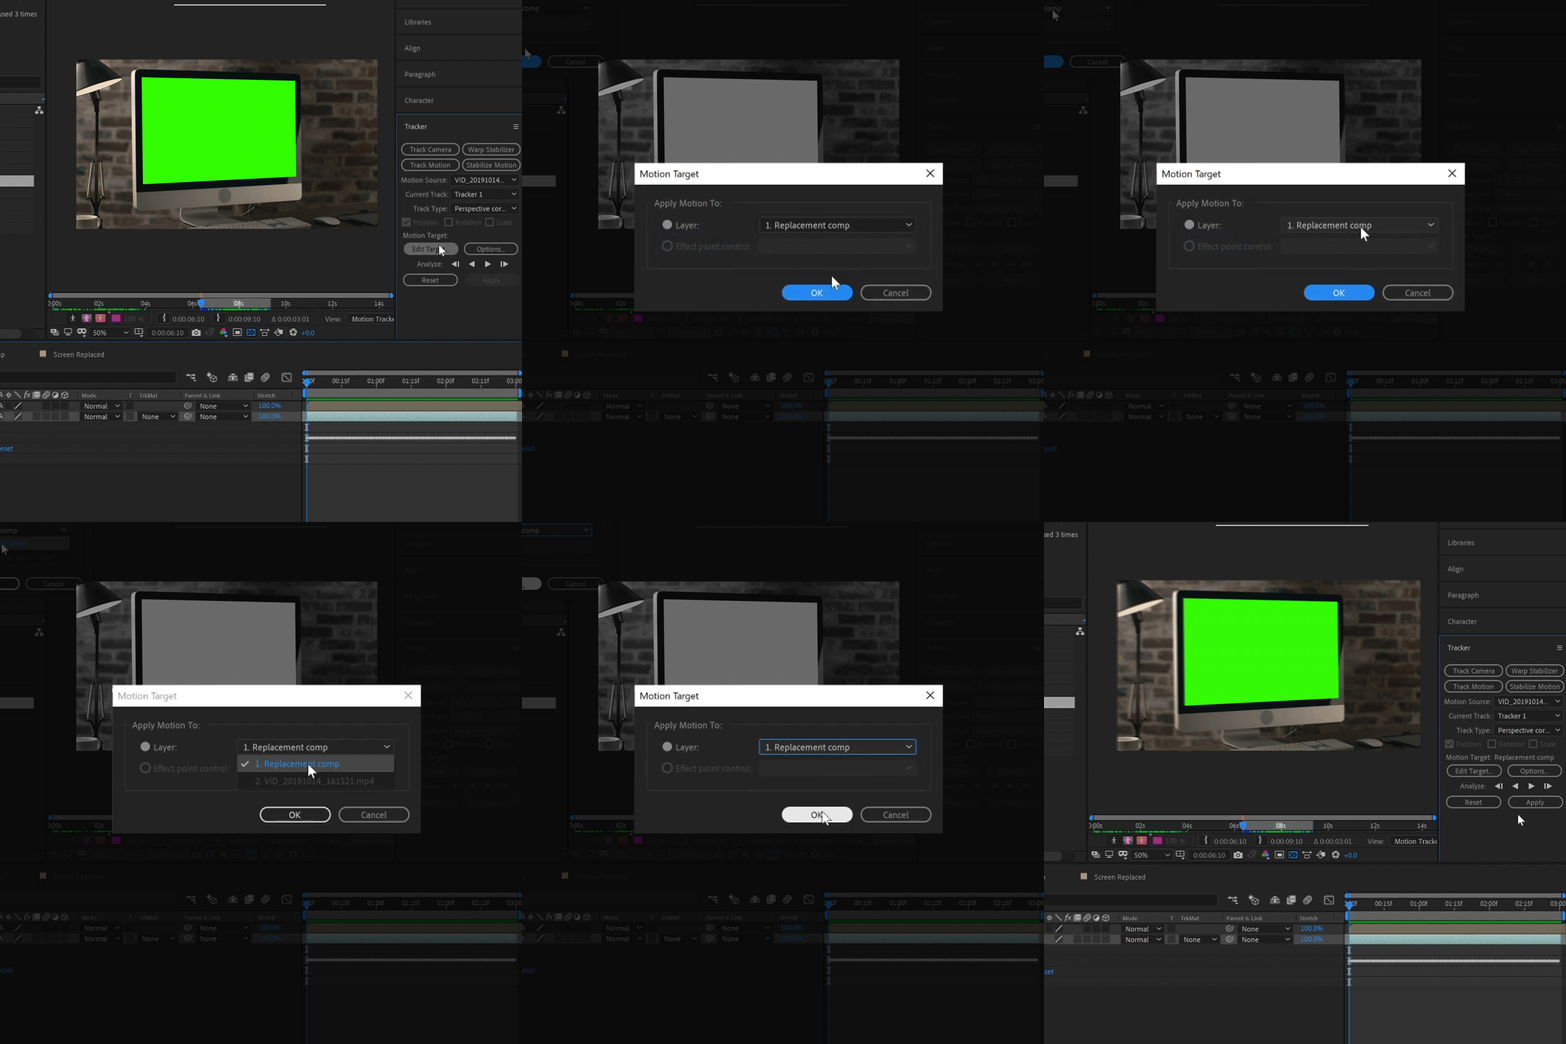
STEP 4: APPLY MOTION TRACKING DATA
By clicking that Play button in the previous step, we instructed After Effects to key frames with positional data on the layer we tracked. In our fourth and final step, we have to apply that information to our replacement footage.
To transfer the tracking data to the target layer:
- Set the current time indicator
- Open the Tracker window
- Click Edit Target
- Select the replacement layer, and click OK
- Click Apply in the Tracker window

After Effects will place your shot in the scene, with your four corner tracking points applying their positional data to your replacement footage.
Not happy with the result?
If you want to re-track your footage, delete the keyframes that were placed on your replacement footage and repeat the process, broadening the tracking point boxes so there are more pixels for After Effects to analyze.
INSPIRED?
If you want to learn more about visual effects for motion design, our VFX for Motion course is right for you.
Taught by industry icon Mark Christiansen, this intensive After Effects course will empower you to create world-class compositions combining live-action footage and motion graphics.
At the course's completion, you'll be skilled in advanced compositing techniques including keying, rotoscoping, tracking, matchmoving, color correction, and more.
VFX for Motion is packed full of exclusive, in-depth lessons developed by Mark, author of the After Effects Studio Techniques series of books that helped launch a generation of visual effects artists. Also included are interviews with some of the biggest names in VFX, and hundreds of downloadable project files.
Along the way, you'll get your work critiqued by professional motion designers and connect with fellow artists.
ENROLL NOW!
Acidbite ➔
50% off everything

ActionVFX ➔
30% off all plans and credit packs - starts 11/26

Adobe ➔
50% off all apps and plans through 11/29

aescripts ➔
25% off everything through 12/6
Affinity ➔
50% off all products

Battleaxe ➔
30% off from 11/29-12/7
Boom Library ➔
30% off Boom One, their 48,000+ file audio library
BorisFX ➔
25% off everything, 11/25-12/1

Cavalry ➔
33% off pro subscriptions (11/29 - 12/4)

FXFactory ➔
25% off with code BLACKFRIDAY until 12/3

Goodboyninja ➔
20% off everything

Happy Editing ➔
50% off with code BLACKFRIDAY

Huion ➔
Up to 50% off affordable, high-quality pen display tablets

Insydium ➔
50% off through 12/4
JangaFX ➔
30% off an indie annual license
Kitbash 3D ➔
$200 off Cargo Pro, their entire library
Knights of the Editing Table ➔
Up to 20% off Premiere Pro Extensions
Maxon ➔
25% off Maxon One, ZBrush, & Redshift - Annual Subscriptions (11/29 - 12/8)
Mode Designs ➔
Deals on premium keyboards and accessories
Motion Array ➔
10% off the Everything plan
Motion Hatch ➔
Perfect Your Pricing Toolkit - 50% off (11/29 - 12/2)

MotionVFX ➔
30% off Design/CineStudio, and PPro Resolve packs with code: BW30

Rocket Lasso ➔
50% off all plug-ins (11/29 - 12/2)

Rokoko ➔
45% off the indie creator bundle with code: RKK_SchoolOfMotion (revenue must be under $100K a year)

Shapefest ➔
80% off a Shapefest Pro annual subscription for life (11/29 - 12/2)

The Pixel Lab ➔
30% off everything
Toolfarm ➔
Various plugins and tools on sale

True Grit Texture ➔
50-70% off (starts Wednesday, runs for about a week)

Vincent Schwenk ➔
50% discount with code RENDERSALE

Wacom ➔
Up to $120 off new tablets + deals on refurbished items


Create Stunning Visual Effects in AE

Learn compositing, tracking, keying, and rotoscoping in After Effects. Enroll in All-Access to unlock VFX for Motion and 50+ other courses.
