
All-Access Pass
Unlimited access to 50+ courses, unlimited critique, live events, and 24/7 community. Join School of Motion All-Access today.

New Capabilities Abound in Maxon's Cinema 4D Release 21
Maxon recently released the next generation of its professional 3D modeling, animation and rendering software, Cinema 4D R21 — and we've enlisted our 3D Creative Director EJ Hassenfratz to break down all the powerful new features.
“With R21, we have overhauled virtually every aspect of how our customers choose, download, purchase, license and manage Cinema 4D,” said David McGavran, Maxon's CEO.
Indeed, Release 21 includes a completely new Caps and Bevel system, new Field Force dynamics, interface speed enhancements, broader integration with popular hardware and software technologies, enhanced volume modeling, and new subscription pricing.
Cinema 4D R21 Review
This is not your ordinary software or hardware critique.
In this official SOM product review, EJ uses real-life examples to demonstrate how the latest version of Cinema 4D (2019) will improve your workflow.
BOOSTED CAPS AND BEVELS
In Cinema 4D R21, the new Caps and Bevels feature "is more than just fancy fonts and text." With improved constraints and internal bevels, Delaunay cap skinning, a new bevel preset library and the ability to create your own bevel profiles, this release is all about flexibility and efficiency.
Expect to speed up your workflow!
Plus, caps and bevels are integrated on all the spline-based objects, like lathe, loft, and sweep — "for unlimited possibilities."
THE POWER OF FIELD FORCES
As Maxon explains, "animation is fundamental to Cinema 4D."
In Release 21, the powerful software comes with character animation enhancements, as well as Fields workflow improvements.
The all-new Field Force dynamics object allows you to control dynamic forces in your animations.
With the Channel Mix Field, you can convert between values, colors and directions in Fields to vary the strength of effects.
Particles, in particular, appear to receive a significant workflow uplift with the new Field Force feature, including lots of new ways to control and change how your particles interact with objects and each other.
Set your field to repel or attract, act as a wind direction force, etc., or let loose with random particle growth paths.
As you create your particle system, use the vector lines to visualize the dynamic force direction, and view changes in real time as you experiment.

Also part of the Field Forces suite are the Mixamo Control Rig and weighting improvements.
With the Control Rig, you can easily add, edit and combine character animations by applying and adjusting mocap data from Adobe Mixamo.
The improved weighting in Release 21 comes from an enhanced Weight Manager, which uses new bone glow options, volumetric and heatmap modes and built-in algorithms to help you animate more lifelike characters.
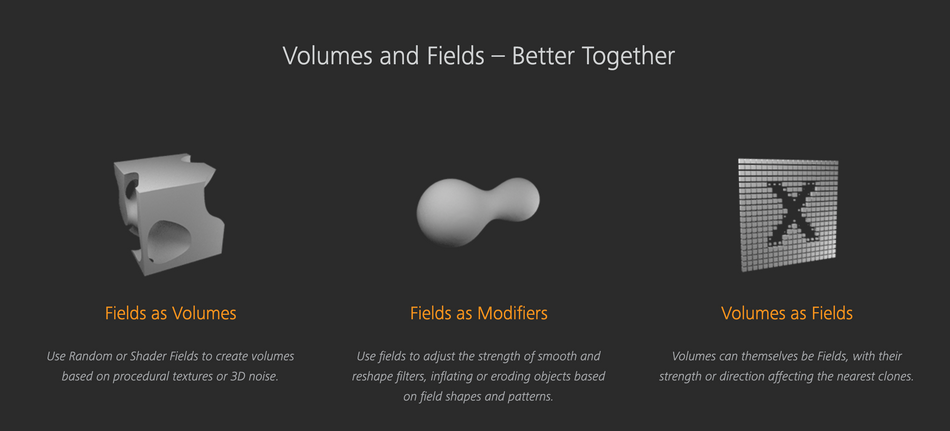
PUMP UP THE VOLUME
Last year, Maxon introduced Cinema 4D's OpenVDB-based Volume Builder and, based on user feedback, has streamlined the workflow for R21.
First and foremost, there's no more hunting and digging — the new Volumes Builder button appears in your tool palette right at the top of the UI.
With Vector Volumes, direction values can be used in the Field Force or Target Effector to guide particles, dynamic effects and MoGraph objects, so you can create forms based on shape outlines.
Vertex Maps for Curvature, meanwhile, allow you to clone onto the curvature of volumes, as well as use volumes' curves to apply rust or damage effects via materials and deformers.
Most significant, perhaps, is the Cache Layer, which enables the storing of results from multiple VDB layers for a more efficient workflow when building models and adding effects. These caches can be used for later adjustments or cleared at any time.
UPDATED UI FOR IMPROVED UX
The addition of Volumes Builder to the tools menu is not the only R21 enhancement to Cinema 4D's user interface. There's a whole new look and feel, designed for an improved user experience.
In Cinema 4D R21, expect:
- Sharper display
- New user data-based defaults
- The Commander, which remembers your most recent action
- Asset Inspector, which helps you identify the assets in a scene, fix links and collect files
- Multiple UV enhancements, including a faster, anti-aliased Texture/UV view, new UV Transform Tool for easily modifying UV points and polygons, and UV ruler display, as well as quantized UV transformations, and snapping support for UV points and edges
- Organized layer tagging, divided by functional category and accessible via right click
- Custom icons
- Texture linking
- Improved connectivity with other applications
- Dark Screen Support, making it easier to focus on your work
CONTROLS AT YOUR FINGERTIPS
When it comes to menus, everything has changed in Cinema 4D R21.

It may be frustrating at first to work with your menu options swapped around, but a closer look suggests much thought was put into the new layout.
Not ready for this change? No problem. Fortunately, you can easily revert back to the R20 legacy menus with a quick click at the top right corner of the application.
CINEMA 4D FOR ALL
One of Maxon's most monumental changes to Cinema 4D with Release 21 doesn't influence the product at all; rather, it levels the 3D playing field:
"R21 introduces Maxon’s '3D for the Whole World' initiative which aims to put professional 3D software within easy reach of every aspiring artist. This includes availability of a singular version of Cinema 4D, more efficient installation and licensing, and new low-entry subscription pricing."
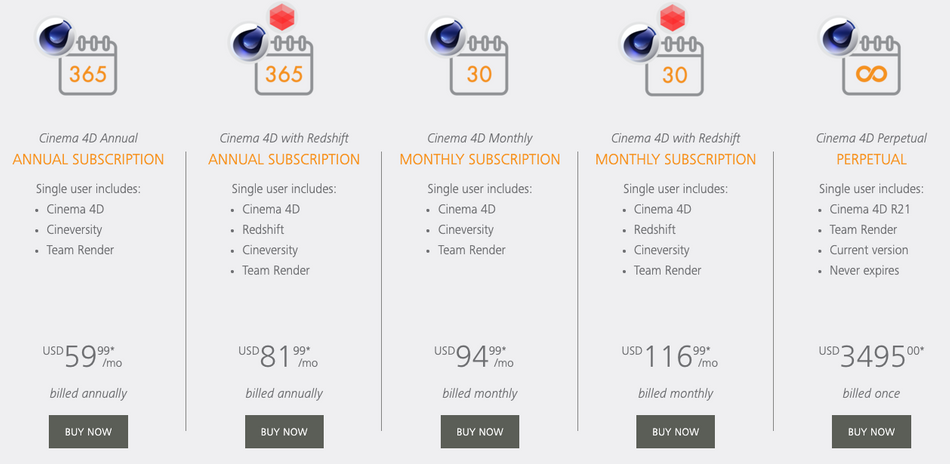
With the release of Cinema 4D R1, Maxon now offers five different pricing models:
A SOUPED-UP CINEMA 4D SYNOPSIS
Adding 3D to your toolkit is one of the best ways to up your value and expand your capabilities as a motion designer.
With the new pricing options and enhanced features of Cinema 4D, there's never been a better time to master the world's leading 3D animation software — and there's no better way to learn than with School of Motion (97% of our alumni recommend us!).
CINEMA 4D BASECAMP
Taught by our very own EJ Hassenfratz, who helped us review the application's Release 21, Cinema 4D Basecamp is designed for artists with little to no experience in the software; in mere weeks, you'll know your way around.
Plus, when you sign up for a session of Cinema 4D Basecamp, Maxon will provide you with a short-term license of Cinema 4D for use in this course!
Learn More About Cinema 4D Basecamp >>>
FREE TUTORIAL: CREATE A CLAYMATION IN CINEMA 4D
SOM founder and CEO Joey Korenman created a tutorial that'll teach you how to make a shader that looks like clay, and animate something that looks like stop motion — all in Cinema 4D.
-----------------------------------------------------------------------------------------------------------------------------------
Tutorial Full Transcript Below 👇:
EJ Hassenfratz (00:00): It's Christmas in July in time for a new cinema, four D release. And this one is unlike any other release before let's check it out.
EJ Hassenfratz (00:19): In this view, I'm going to be covering some of the most notable new features added to cinema 4d art 21, as well as some of my favorite aspects of those big new features. Now, if you want to follow along, be sure to download some of the project files. You can find that link in this video description. All right. So let's actually hop in a cinema 4d and see what has changed within the app. And once you watch them before D you're going to be greeted with this new quick start dialogue that is kind of Maxons' answer to the quick start dialogues in Adobe products. So like after effects Photoshop, you get that launch screen. And you're going to see that we have the recent files that we have here that you can select. There's also templates that will be populated as this gets updated.
EJ Hassenfratz (01:03): And you're also going to have this new file button and open button right in this little quick start dialogue. Another cool thing is that you're going to have a list of updated Cineversity tutorials that you can check out and get familiar with as well as spotlighted series like this one from yours, truly, that is all about injecting character into objects using just deformers. Now this is always going to be updating. So it's always going to be a fun little surprise. Each time you launched cinema 4d to see what tutorial content is going to be here. So really cool stuff. But once you close out of that quick start dialogue, you can then feast your eyes on the updated UI and interface. First thing you're going to notice is that everything is slightly darker, and this is the help with contrast and a make this interface a little bit easier on the eyes.
EJ Hassenfratz (01:54): You're going to notice that this is the same kind of darker gray that was added to Adobe products when it launched to creative cloud. So we've got that really nice, darker, slick UI. Another big improvement is all the icons are much crisper, and this is because with our 21 there's new high res display support. Okay. So that means that this is going to be looking really nice and snazzy on HD monitors. Okay. So another thing you'll notice is that some of the icons are a little bit different or have been updated. A lot of the menus have been switched around now. I'm actually in the old school menu, but if I go back to the cinema 4d menu, you can see that things are kind of grouped differently. Okay. Now, if you're not quite happy with all of the new groupings and a lot of this is actually pretty intuitive, the new way, all these menus are grouped.
EJ Hassenfratz (02:50): You can always go back to the old way by going to the cinema 4d legacy menu. And that'll bring everything back to how was laid out before, at least in this top bar menu. Now, another thing you're going to notice is that we have a whole bunch of new icons up here and actually reorganized the icons as well. Let me just start from the left and move to the right. One of the things that I think is going to be a huge help is the docked reset PSR button. So if I move anything in my scene and I just want to reset the position, scale and rotation. So let me just rotate this and click that reset PSR, bam. It's going to reset all of my coordinates back to their default. And this is just going to be a really handy thing to have docked
EJ Hassenfratz (03:36): I would always dock this manually, but it's great to have this docked already. So because I use this button all the time. So let's move on to the right, can see these new render icons looking pretty snazzy, uh, primitives box. Everything is pretty much the same here, but as we move down and dig into these menus and you can see Andy spline menu, there are these new splines subtract and all these bullion commands that you can just select two splines and execute one of these. So this is a bunch of new features in the spline menu. You can see that we have a different grouping of objects in this generator menu here. Okay? So this is all different. And we have our extrudes in their own menu too. And then we have this whole menu for cloner objects and MoGraph objects. We have runway fracture in here, and we even have our effectors in this menu as well.
EJ Hassenfratz (04:30): There's a new volume button that has all the volume builder. All you measure all this stuff here, fog, smoothers, vector, smooth, there's all these new kinds of things in this new button. So there's been enough updates to the volume system that it deserves its own button. And speaking of deserving, its own button is the whole fields list here. So all the field objects now has its own designated button. And here we have our deformers menu, which is pretty much the same, same kind of layout and in the same position as it is in older versions of cinema 4d. And nothing's changed with the four or the cameras or the lights really. So that's it for this top bar. Another thing you're going to notice as far as the layout is if you right, click on anything, tags are going to be grouped again in a different way, but way more intuitively, okay, so new groupings, but everything makes sense in where everything is grouped together.
EJ Hassenfratz (05:27): So we have render tags and that's what your find your compositing tag and display tags and external compositing tag. You don't have to dig through those that old cinema 4d tags and keep scrolling down and trying to find things. So I really dig that new layout. And again, I dig the new layout of that top bar menu as well. So that's the interface let's move on to some features. So the first big feature that I'm going to cover is caps in bevels and this kind of really changes the way that you work with not only motor texts, but any object that allows you to use caps. So not only Mo Tex, but an extruded object, a loft, a sweep, anything like that, anything that has this caps option. Okay. So the most obvious choice is to just jump into our mode, text object here. And if you're like me, uh, early on in my career, I worked with a lot of 3d type.
EJ Hassenfratz (06:21): And one of the hardest things to do was to create chiseled type or get really nice. Bevels on your texts. Well with [inaudible] caps and bevels, you can create chiseled texts by simply moving a slider and bam, we have chiseled text, okay. This is incredible. This is something that I wish was in cinema 4d a long time ago. We have the ability to adjust the sharpness of that chisel, or if we just want like a nice little bevel there, but one of the main problems with bevels and previous versions was if you made that bevel size too large, you'd get really janky edges. And when I say really janky edges, let me show you what those jenky edges looked like. If we check off this avoid self intersections, there's that junkiness right there. So this new way that Semaphore D R 21 calculates bevels is way more powerful and way nicer than in the past.
EJ Hassenfratz (07:19): There's this whole new set of possibilities now with creating 3d type and just modeling in general modeling shapes again with extrudes and sweeps and all that good stuff. One of the really cool features is the ability to load bevel presets. So we can have this whole stepped option here. And what this is going to bring up is this curve editor. And this allows you to really fine tune exactly what your bevel profile shape looks like. Okay. So you can get really in there, get some really nice intricate beveling on your 3d type or whatever objects, uh, that have caps that you're you're then adjusting. So really great stuff. And I'm actually going to cover this feature in more depth in its own standalone tutorial. So be sure to check that out because there's a lot here, uh, that is very handy to use. Uh, one of the other things that's really nice is when you were dealing with materials, so say I have a new material here.
EJ Hassenfratz (08:17): Let's maybe make this like a purple or something like that. And I want to apply that just to the cap. So what you do in the past, as you add on that material, you'd have to remember what that selection tag name was. So like, see one for the front cap. We don't have to memorize what you need to put in here anymore, because with cinema 4d [inaudible], if you go to the selection tab here, we can actually check on whatever option or polygon selection that you want even add selections in this will then go in slave the start cap. There is going to create a tag here in we'll just simply and drop that tag into that selection. And there we go. So no longer need to memorize anything. Let's maybe do the start bevel. You can see that the start bevel is our one we'll just drag and drop that in there.
EJ Hassenfratz (09:08): And there you see, we just have that, uh, purple material on just that front rounding. So really handy kind of quality of life improvements as far as, uh, polygon selection and ed selections go. So captain bevels been a long time coming finally gets an update. I love it. Hopefully you'll enjoy it as well. Now I'm to a relatively smaller feature, but a quality of life enhancer for sure is the new project asset inspector. Now what the project asset inspector does is replaces the old texture manager, because it's not just limited to just textures. We now see all of the assets in our scene, whether it be GI files or WAV files, like any audio files we're using in our project file. And of course, you know, any image files we have as well. So this is your one stop shop for managing all the assets in your project.
EJ Hassenfratz (10:03): So one of the best things about this new way to, you know, manage all of your project assets is we can now go into our preferences here and for our files, we can actually go ahead and change link assets to project, to use the absolute path. So what this means is now you don't have to create those texture folders or those little T E X folders for every single project that you're working on. You actually work in a way more efficient way in your cinema 4d file. Isn't going to look for that T E X folder every single time. So huge quality of life improvement there. Now, if you are a character animator or anyone who uses Mixamo in brings in that Mixamo mocap animation and applies it to any characters in cinema four D R 21 has a great new feature called the Mixamo control Reagan.
EJ Hassenfratz (10:55): What it actually does is allows you to use this mixed mode control rig that's built into the character object and allows you to set up that character object to link to your Mixamo mocap rig. And you're able to kind of adjust an animate on top of your mixed mode control rig. So before you had to manually set up all of these little controllers, just like the spine controller here, and if you want to adjust the head, you'd have to set that up too. And now you can just easily like animate this head kind of Bob and like that if you want it to. So it gives you this whole nother layer of control over your Mixamo rigs. So very powerful stuff, something else as we're talking about, uh, characters and all that good stuff is in [inaudible], they improve their auto weeding algorithm that will allow you to save time, not having to go back and maybe up or repainting some of the janky results you might've gotten in the old auto waiting features in older versions of cinema 4d.
EJ Hassenfratz (12:02): Another great feature is how you can actually cash specific layers. So a cash layer will work as like an adjustment layer in after effects of Photoshop, where it'll cache everything underneath. And what that means is that you can bake out or cash some of your geometry and be able to freely, you know, adjust something like this random view it here without it needing to recalculate everything. So I can go ahead and like move this random field up a little bit, and it's taken a little bit to calculate, but it's a lot faster than it would have been had. It had to calculate everything underneath this cache layer. As you can see, I have quite a bit here. And one last thing that's a really cool update is the ability to create a curvature map off of your volume measure. So that'll create a Vertex map and you can use this for things like grunge maps or dirt maps that you can deal and use with materials.
EJ Hassenfratz (12:57): Another really nice addition to cinema 4d R 21 is the new Intel open image de noiser. That is actually a post effect. So basically the good use case for this is if you're just kind of concept thing, you need to throw out a bunch of images or an animation, give it to a client. Uh, you can see that this is a very quick render. It's only 21 seconds, but it is grainy as all get out. Now, what you'd want to do is not send a client this and have the client ask all kinds of questions. Like why does this look so crazy? What we could do is go to our render settings, go to our post effects. And right here we have the new Dean noiser. Okay. So let's go ahead and render this again and see what this will look like after that de-noise is then applied.
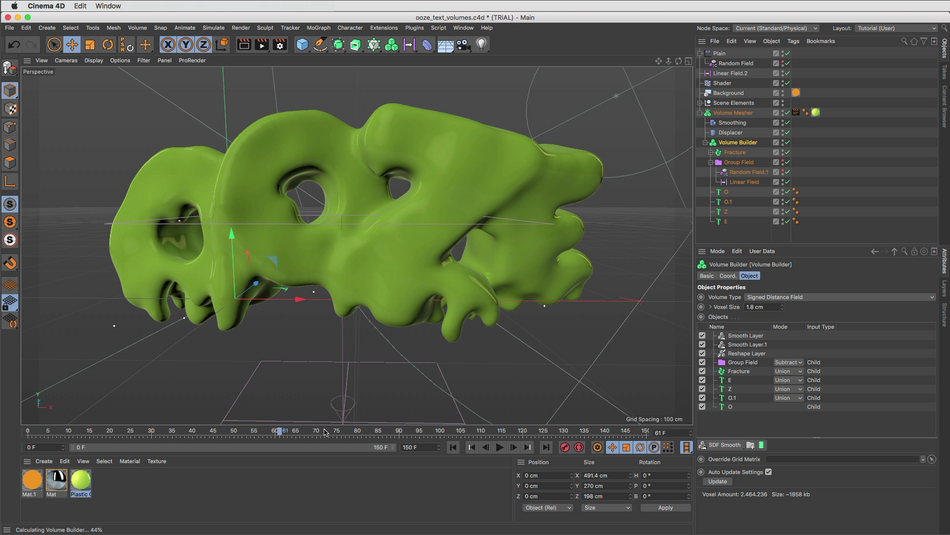
EJ Hassenfratz (13:39): Now it is a post effect, so you're not gonna actually get to see the effect until after this image is done doing its rendering and all these buckets are going to be finished, but you can see that adding this de-noise or effect will not actually add that much time to our overall renders. We had 21 seconds. Boom, look at that, that edit a single second and look how much nicer and smooth this looks like. Let's go back to our original grainy render. And this is our de noised soda. Can we are living in the future, ladies and gentlemen, check that out. That's just really, really cool. And this is good enough to, you know, send to a client. They don't have to worry about the graininess or anything like that. And we're not jeopardizing all of our render time. So when Jane feature that was added to our 20 was volume modeling and in our 21, it gets a much needed feature and that is the ability to cash your volume builder.
EJ Hassenfratz (14:35): And that includes even animation. So we have this brand new cash layer. You can cash animation. So I have this Uzi texts that really played back very slowly in my viewport. You cash that whole entire animation. And while LA you now have the ability to easily scrub in your timeline and actually see your cached volume animation caching was something that you wouldn't be able to do before you would have to bake out as a limbic. So this new cash layer is a massive update to the volume modeling workflow. So let's jump into our cinema 4d node system here. You'll notice that the interface has kind of been revamped a little bit looks nice. It's very snappy, very snazzy looking. And one thing that's going to be really cool as far as the future of the node system in cinema 4d is that it's going to allow for multiple render engines, including third-party engines to use cinema 4d node system.
EJ Hassenfratz (15:37): So specifically red shift got acquired by maxon it. It's going to be very interesting to see how integrated Redshift and the cinema 4d native nodes kind of co-exist and intertwine there. So that could be very cool in the future. And one of the big things too, the note system is the arbitrary AOVs that have been added. Now you might be wondering what the heck is an AOV. Basically what an AOV is, is like an object buffer for any aspect of a material. So let's just say we have our little, let's just get this little material here. It's like a gold flake material, as you can see, applied on my little, uh, plus sign there. I just have some noise and it's overlaid onto a diffuse and that's creating our little nice gold flake material. Okay. So what if I wanted to just render out the gold flakes generated by the noise as a separate pass, as an object buffer?
EJ Hassenfratz (16:38): Well, that's where the AOV comes into play. So what I can do is go to my inputs tab here on my main material, go to this AOV multipass is and click add. And what this will allow me to do is the plugin V result of my noise that has an alpha, uh, added basically, or we're controlling the capacity there, plug that into my color, and I can render this out as its own separate path. So you can see that the AOV idea is one sporks, just like the object buffer system. And then I can just click add to render settings, and I'll go to my render settings here. You'll see, there's my AOV again, added just like an object buffer and it sets a one. And what I can now do is just render this to picture viewer and what you'll see as this renders out our scene, you'll find in the actual layer tab here, we have this single pass and we can actually see what the AOV looks like.
EJ Hassenfratz (17:33): So let's go back to image. This is going to slowly render on my trashcan Mac pro here. And if I go to single pass, now check that out. We have an object buffer for just that gold flake noise on my material here, which is really, really cool. So now we can go ahead composite this add color correction to just that isolated noise. And again, AOVs add that extra layer of control, allowing you to composite your materials, any very streamlined and logical way. The same way you can layer up different object buffers in after effects or Photoshop can do the same thing with different aspects, different layers of textures on a single material using this new AOV system in cinema 4d R 21 with cinema 4d, our 21 Maxon is aiming to make 3d accessible for the whole world with their new licensing and inexpensive subscription model pricing.
EJ Hassenfratz (18:37): And that alone is the big show stealer. So this is kind of the biggest quote unquote feature and it's the subscription model. So basically what this does is it breaks down that initial barrier of that high price tag for that full version of cinema 4d, which was about $3,500. And now you can get this annual subscription, which is billed annually, but it breaks down to about 59 99 a month. So the other thing to mention is that there is no longer all these separate versions of cinema 4d, like broadcast or studio where broadcast only has some features. And if you want all the features, you got to grab studio, it's none of that anymore. Everything is the studio version. You get all the features when you buy cinema four D. So that's a great thing as well. Now with the annual subscription, you can also get Redshift bundled in there, and you'll see this updated price of 81 99, again, billed annually.
EJ Hassenfratz (19:39): So you'll pay that upfront and you'll get that full year of that subscription. Now you can also buy just a single month subscription here, and you can see the price here is 94 99. And if you want just a single month with cinema 4d and Redshift, you can see that that is a hundred and sixteen ninety nine. That's again, billed monthly. Now a lot of you may be thinking, well, I don't want to commit to a subscription. I just want to own something because I think we all had that feeling when Adobe went to subscription, we still wanted that one copy that we wanted to always own and not have to worry about updating or subscribing to anything. Well, at least for now, you can do that and just buy that perpetual license that you own forever never expires. It's cinema four D R 21, and you'll be billed that original price tag of the old studio versions, which is that $3,495.
EJ Hassenfratz (20:36): So if you just want to straight up by R 21, you can do that and you don't have to be locked into a subscription or anything like that. So a lot of flexibility who knows how long they'll keep this perpetual license here. So if you're on the fence, you just want to straight up by our 21. Now's the time to kind of get, uh, get that going. So that is the new subscription and licensing. Again, the licensing is a much more streamlined system. You don't have to wait for codes or anything like that, or a physical copy. They're not shipping physical copies, it's all online. You get your copy activated. You just log into your max on account and fire up your version of cinema 4d, which is really cool. And [inaudible] the whole subfield system has been updated to make it more intuitive. Now here's an example of a way I would typically use a subfield in that is using a freeze layer.
EJ Hassenfratz (21:32): In one thing you can modify is the radius of that freeze layer, say by using freeze layer growth now to add a sub field, you need to dig into a menu, add that random field in all of those random settings would be deep inside that whole tab system. And it's kind of laborious to keep going back and forth through those Hinz settings. But now in cinema four D R 21, you can see that the subfield, if a layer, if a field layer has a subfield option like this freeze layer here, you can see it's represented as a child folder. And you can see this radius here. What we can do is you simply add a random field, place it in that radius folder, and you can see that you no longer have to dig through menus or anything like that. You can actually just access that random sub field in the normal fall off tab menu there.
EJ Hassenfratz (22:22): So we can go ahead just that radius. And now we can have more organic, uh, freeze layer growth, which is really, really awesome. Another fun addition to the field layer system is the ability to use fueled masks. So typically before you were just limited to using different blending modes to add or subtract effects or mask them off in our 21, you have the ability to select a field like a random field, create a mask and use another field to mask that effect of that parent field, which is really cool. So here I have a spherical field masking the effect of that random field to wherever that's physical field is. So it's just an added layer of functionality to your field layer lists, where you utilize these field masks to work just like layer masks in Photoshop or after effects. One deep new feature that was added in cinema 4d or 21 was field forces.
EJ Hassenfratz (23:20): Now you may be familiar with your old particle forces, your attractor deflector all that good stuff, but the field force is all these forces kind of combined into one and allows you to use fields to affect particles, as well as any dynamic objects. It's this whole new way to manipulate particles and anything that you can apply dynamics to. So we're even about cloth engineers. So it's very, very powerful. It's very deep. Uh, it's also something I'm going to be covering in its own very own tutorial. So be sure to check that out, but one of the things I'm most excited about in addition to the particles, I'm not a, self-admittedly not a big particle guy is just the ability to affect dynamics in a whole new way. So one of the things that I always like to try to do was use particle forces with dynamic objects.
EJ Hassenfratz (24:13): So here I have a very simple scene, and this is a workflow that I always like to do is having some dynamic objects be attracted and kind of clean to another object. So you can see, I have this attractor set to this plus sign. It's just made a child of it. And you can see that the problem with using an attractor is even if you're using a falloff shape, this is actually the volume of the object. It's always going to attract to that access center. You can see all of these fears just kind of hovering around here. Now with field forces, you can actually visualize what the particle force or the dynamic force direction is. You can see if we use this object, this plus sign as a field force, a field force volume, we're actually going to attract to this actual surface. And you can see all these little vector lines, basically vectors are the direction in which that force is polling.
EJ Hassenfratz (25:12): And you can see all these lines pointing, not to the access center of our object, but to the actual surface, you can see vector lines pointing here. And if I go ahead and hit play, I have this rotating little plus sign, and you can see all of these vectors kind of updating. You can see that my spheres are not being attracted to the center of the object, but just the surface of the overall object, the actual volume of the object miss was previously not able to be utilized in older versions of cinema four D. So you can now take into account the actual surface of a volume to have particles fly across it, or in our case, right here have dynamic objects kind of clean to that overall surface of that volume. Now I might not be saving the absolute best for last. I think it's part of the best thing that is happening to cinema four D as it's being updated here.
EJ Hassenfratz (26:10): If you weren't aware, the team at Maxon is actually slowly rewriting the core code of cinema 4d. So eventually everything's going to be much faster. Everything's going to be multithreaded and all that good stuff. Now, the fruits of that labor in this version is the fact that the timeline threading is much better. So now when you have the timeline open, you're not going to lose any speed in your viewport. Now in previous versions, you can have a bunch of key frames in your timeline and would actually affect your viewport playback. So again, it's not the best feature, but it is part of this major arking work that's being done to cinema four D and you're going to slowly see again, the fruits of that labor, uh, or the mushrooms of that labor, I guess, I don't know, uh, as, as the versions progress, we should be seeing a much snappier viewport in much snappier features.
EJ Hassenfratz (27:10): Overall. Now we've only just scratched the surface on all of the new features that have been added to cinema 4d are 21. Now, if you want to know about all of the features that have been added to our 21, be sure to check out the article that's in the description of this video, where we're going to have a bunch of handy links to max on site that lists all of the new features, as well as more information about the new subscription tier pricing. It's such an exciting time to be getting into cinema 4d. Now that that cost barrier has been lowered with that new subscription model. Now we're going to have a lot more in-depth training on some of the R21] features that I think are going to be really important. We're talking about caps in bevels field forces and the mix of control rig. So be sure to stay tuned for that. Now, if you want to keep up with all the latest 3d and MoGraph industry news, be sure to hit subscribe and I'll see you in the next one. Bye everybody.
ENROLL NOW!
Acidbite ➔
50% off everything

ActionVFX ➔
30% off all plans and credit packs - starts 11/26

Adobe ➔
50% off all apps and plans through 11/29

aescripts ➔
25% off everything through 12/6
Affinity ➔
50% off all products

Battleaxe ➔
30% off from 11/29-12/7
Boom Library ➔
30% off Boom One, their 48,000+ file audio library
BorisFX ➔
25% off everything, 11/25-12/1

Cavalry ➔
33% off pro subscriptions (11/29 - 12/4)

FXFactory ➔
25% off with code BLACKFRIDAY until 12/3

Goodboyninja ➔
20% off everything

Happy Editing ➔
50% off with code BLACKFRIDAY

Huion ➔
Up to 50% off affordable, high-quality pen display tablets

Insydium ➔
50% off through 12/4
JangaFX ➔
30% off an indie annual license
Kitbash 3D ➔
$200 off Cargo Pro, their entire library
Knights of the Editing Table ➔
Up to 20% off Premiere Pro Extensions
Maxon ➔
25% off Maxon One, ZBrush, & Redshift - Annual Subscriptions (11/29 - 12/8)
Mode Designs ➔
Deals on premium keyboards and accessories
Motion Array ➔
10% off the Everything plan
Motion Hatch ➔
Perfect Your Pricing Toolkit - 50% off (11/29 - 12/2)

MotionVFX ➔
30% off Design/CineStudio, and PPro Resolve packs with code: BW30

Rocket Lasso ➔
50% off all plug-ins (11/29 - 12/2)

Rokoko ➔
45% off the indie creator bundle with code: RKK_SchoolOfMotion (revenue must be under $100K a year)

Shapefest ➔
80% off a Shapefest Pro annual subscription for life (11/29 - 12/2)

The Pixel Lab ➔
30% off everything
Toolfarm ➔
Various plugins and tools on sale

True Grit Texture ➔
50-70% off (starts Wednesday, runs for about a week)

Vincent Schwenk ➔
50% discount with code RENDERSALE

Wacom ➔
Up to $120 off new tablets + deals on refurbished items


All-Access Pass
Unlimited access to 50+ courses, unlimited critique, live events, and 24/7 community. Join School of Motion All-Access today.