
Create Stunning Visual Effects in AE
Learn compositing, tracking, keying, and rotoscoping in After Effects. Enroll in All-Access to unlock VFX for Motion and 50+ other courses.
Worried about rotoscoping? Don’t even know what that means? Let’s go over the new Adobe update so you can level-up your vfx game.
If you’re looking at working on visual effects, you’ll need to learn how to separate and composite footage and images. One of the first steps to this is learning the time-consuming technique known as “rotoscoping”!
The task of rotoscoping is fairly simple, but it takes some time. I’m Zeke French, a content creator, editor, and long-time After Effects user.
I’ll walk you through the basics of rotoscoping as well as some common mistakes you might make when first starting out. Then we're going to look at the powerful update to After Effects with Rotobrush 2. Here’s what you can expect from this tutorial:
- A brief look at what rotoscoping is
- Why you would want to use rotoscoping
- How to use the rotoscoping tools After Effects provides
- How to creatively use your rotoscoped assets
The Power of Rotobrush 2 in After Effects
{{lead-magnet}}
What is Rotoscoping?
Rotoscoping began as a practice in the 1900s. Artists would trace real footage as a direct reference for their animation. It's how so many of the early animated shorts and features included such realistic movement for human and humanoid characters.
In modern times, rotoscoping is a tool for motion designers and VFX artists that covers a wide range of effects. In simple terms, rotoscoping isolates assets so they can be easily manipulated - it's like a manual green screen.
Artists are able to use a number of programs to achieve this effect, but we'll be focused on Adobe After Effects. Understanding this tool will allow you to properly isolate and composite images in order to enhance your videos, as well as opening up the options for a number of slick effects that help you stand out.
Why should you learn rotoscoping?
With rotoscoping, you can apply an effect only to one specific object, or to everything except a specific object. This allows us to draw the viewer's eye using blurs, glows, and a huge number of other adjustments... both simple and complex.
Rotoscoping is a tool you can use throughout your career. Whether you work with simple designs or do complex VFX for feature films, you will learn to love the rotobrush. New motioneers tend to be a little shy diving into this skill, as they've no doubt heard a few horror stories.
The truth is that it takes practice, but it is a superpower waiting to be unleashed. With a little effort, you can quickly:
- Gain control of the composition's alpha layers and transparency
- Isolate objects to then apply visual effects
- Move objects within a scene, or remove them entirely
- Place new items around or behind the key object
All of this allows you to deploy the principles of design to guide your audience's attention and focus wherever you would like them to go. So how exactly do you that?
How do you use the rotoscoping tools in After Effects?
In After Effects, there are a couple of ways to rotoscope. The most common is the tried and true method of applying a mask.
.gif)
THE MASK TOOL
To begin, you simply grab your Mask tool, select the object, refine, and isolate. This works fine for simple objects (such as the ball above), but becomes far more complex and time-consuming with more detailed objects (such as the car we'll do next).
Once you keyframe the mask, you'll have to manually adjust to your object as it moves across the screen. The results will be good, but it will take more of your time and energy.
Up until the most recent updates, this was the primary way to rotoscope in After Effects. It was consistent and effective, but took patience. However, with the new update came the Rotobrush 2 tool...and it has completely changed my workflow for this task.

ROTOBRUSH 2
The new Rotobrush 2 takes away a lot of the manual work, saving you a ton of time. However, it might not be as consistent and won't be great for every context. You'll have to experiment to find the best balance of works for you.
So how do we use it? First, select the Rotobrush Tool from the bar at the top of the screen. Also, make sure your composition frame rate is the same as your footage. That will save you a lot of frustration down the road.
Size your brush up or down so you can more effectively select the object.
Paint over the object and After Effects will automatically select it and highlight with a purple edge. Then you can hold SHIFT and continue to paint to refine the selection, or hold ALT and paint to remove areas you don't want.
Depending on how you'll be using the object, you can get more or less detailed. For our purposes here, I can feather the edges and achieve the desired effect.
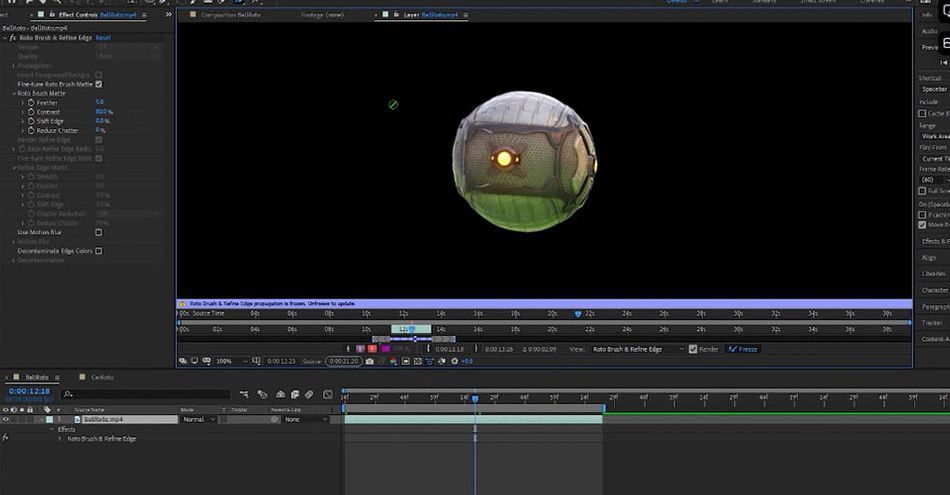
Next you want to click the drop-down menu next to Quality and select Best. You'll now see a green frame at the bottom of the screen—your workspace for the clip. Press Spacebar and the program will propagate forward, tracking the object.

The program tracks the ball with barely any input from you, using the guidance from the original selection to continue forward frame by frame. Now we click Freeze in the bottom right, which will cache our analyzed frames.
You'll notice that your timeline at the bottom has turned a purple color to indicate that those frames are cached. Now you can adjust your Matte however you need, to perfect the selection and dial in for the next steps.
With this element isolated, I can apply effects to only my selected layer to create a more dramatic image. For example, if I use Find Edges...

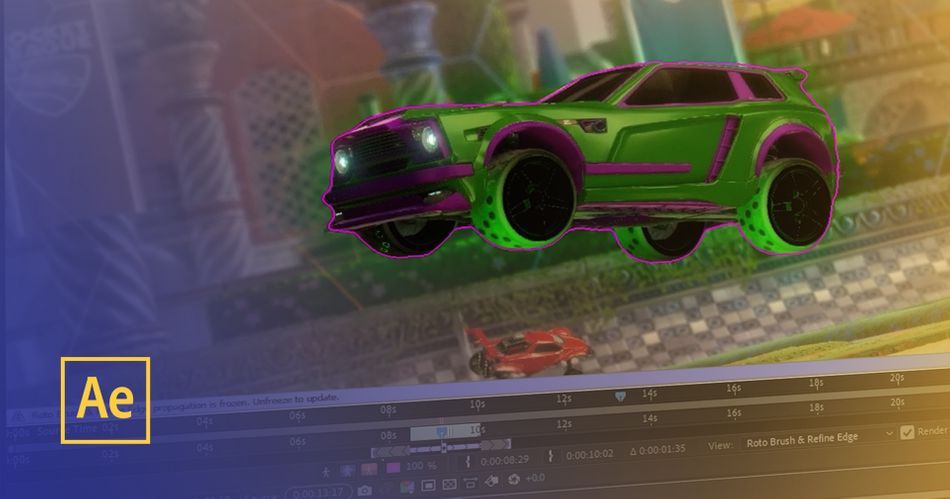
Now let's take a look at a more complicated object. We want to select this car, so we can apply effects when it collides with another car in the video. A simple mask won't work here, so let's use a combination to achieve the desired effect.
.gif)
We select Rotobrush 2, paint the middle of the object, and then refine our selection until we're satisfied. Again, we change Quality to Best, press Spacebar, and watch After Effects take the wheel.
.gif)
Uh oh, did an AI just blow your mind?
Click Freeze to cache your frames, and take a moment to marvel at how this easy that was. Anyone who's been in the industry has a knee-jerk reaction toward rotoscoping ... but it doesn't have to be a painful experience. In fact, with Rotobrush 2, it can be pretty fun.
Now, this isn't without drawbacks. With more complex objects, the edges can sometimes be a little janky, or the tool might pick up on objects in the background. Use Clear Chatter and manually drop unwanted areas and you'll be on your way.
So now that we have our car separated from the rest of the footage, what do we want to do?
Getting creative with Rotobrush 2 in After Effects
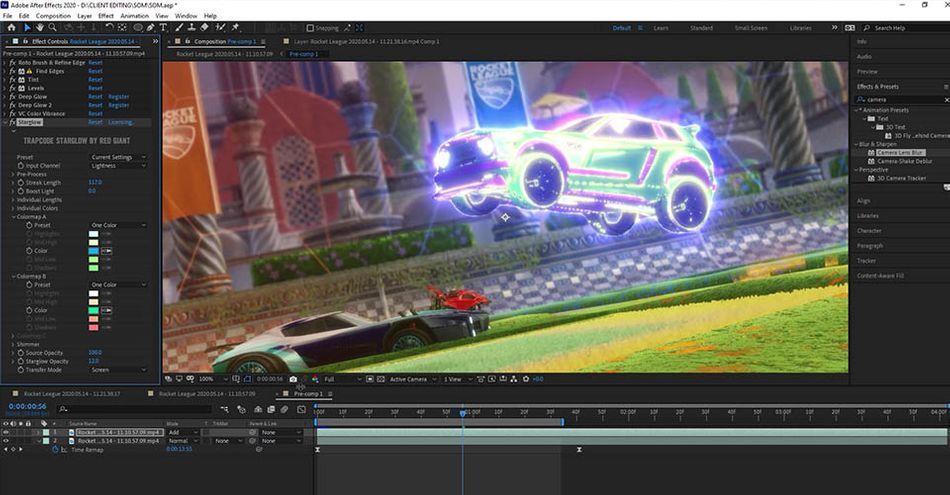
What you do next is up to you, and it couldn't be easier. I liked how Find Edges looked, so let's try that.

Add a glow, throw on some crazy colors, or drop a few effects between the car and the background. You can do anything now that you've isolated the object...and it took you, what, five minutes?
With this skill, you can add all kinds of amazing effects to your work (or your client's work) with ease.
Now you know the whole (roto) scope of this invaluable technique
There you have it, by understanding and implementing these pretty basic techniques, we’re given the ability to produce some pretty awesome things. We covered the function of rotoscoping, some practical ways of going about it using the new rotobrush tool, and how easy it is to apply some creative effects after we’ve isolated our layers. Now take what you've learned and bring your next project to a whole new level.
Put your visual effects in motion
Also, make sure to check out VFX for Motion from School of Motion. Instructor Mark Christiansen will teach you the art and science of compositing as it applies to Motion Design. Prepare to add keying, roto, tracking, match-moving, and more to your creative toolkit.
-----------------------------------------------------------------------------------------------------------------------------------
Tutorial Full Transcript Below 👇:
Zeke French (00:00): Are you worried about rotoscoping? Do you not even know what that means? Let's go over some of the basics so that you can level up your VFX game.
Zeke French (00:15): Hey, I'm Zeke French, a content creator editor and longtime after effects user. If you're looking at working on visual effects, you'll need to learn how to separate and composite footage and images. One of the first steps to this is learning the time consuming technique known as rotoscoping. The task of rotoscoping is fairly simple, but it definitely takes some time. I'll walk you through the basics of rotoscoping, as well as some common mistakes you might make when first starting out. Here's what you can expect from this tutorial. A brief look at what rotoscoping is, why you would want to use. Brodo scoping how to use the rotoscoping tools that aftereffects provides and how to creatively use your rotoscoped assets. Also make sure to check the link in the description so you can grab the project files for this and get the most out of this lesson. Let's check it out.
Zeke French (01:00): Okay. So what is rotoscoping rotoscoping started as an animation technique in the early 19 hundreds, where animators would draw over real life footage as reference to get realistic motion for their characters and objects while the technique hasn't necessarily changed. Uh, we now use it for a myriad of different purposes and our context specifically, we're kind of using it like a manual green screen. So say I want to add a glow to this car specifically because he just got hit by this other car here. So what we need is to isolate the car from the background, and once it's isolated, we can go in and add a glow or whatever, and it only affects the car. That's what we're using rotoscoping for. So in our context, rotoscoping allows us to affect the specific parts of our video that we want to apply our effects to, or maybe exempt those specific parts from applying effects too.
Zeke French (01:51): So I can also add a blur to the background, say if I want everything, but the car in focus and it works. So how do we do it? And after effects, there are a couple of ways the tried and true method is just masking an object. You take one of your mask tools. You trace the object, refine your mask a little bit, and you have your object isolated. I can now add, you know, anything I want to the, to the top layer. The problem with doing this manually is that it's manual. So I've, I've created the mask for this one frame, but if I scrub forward the mask doesn't track the object. So I have to manually go in key frame the mask, follow along with the ball, and it's a time consuming process. So this it's not that complicated for just this ball. However, once you start trying to mask a more complicated object like this car, the time quickly adds up.
Zeke French (02:47): So up until this most recent after effects update, this was really the only consistent way that we could wrote a scope and after effects. However, with this new after effects update, they have added the rotor brush to tool, which has changed my workflow for all this stuff. It's not perfect for every context, but it does a pretty great job specifically for this context. So how do we use it first? You want to come up here and select the rotor brush tool next you double-click on the layer that you want to work on also quick to make sure your composition frame rate is the same as your footage frame rate. Otherwise you can run into some issues. Okay. So first thing I'm going to do is hold control and hold down, click and scroll my mouse to the right and left. And you can see that changes the size of my brush.
Zeke French (03:30): Now I have this green cursor with a plus in the middle, and if I hold click and drag around my object, I've now highlighted the ball with this pink layer. And I can click a little bit more and add to my selection, or if I've messed up apart, I can hold alt and drag over it. And it removes it from my selection. So I'm just going to work and refine this a little bit and for what I'm doing, it doesn't really need to be that perfect because, uh, I'm not isolating the car on a black background or anything. So the edges aren't super important because I can just kind of feather any details that might show up that I don't want to have. Okay. So after I've come to a place that I like with my selection, I want to come to quality and click best.
Zeke French (04:09): This takes a little bit longer, but the results are worth it. And you can see this little green frame down here. This is my workspace for the clip. All I need to do now is press space bar and my clip begins propagating forward. And you can see almost like magic. The outline just starts following the ball perfectly. This is with no manual input or anything at all. I just selected the one frame and let after effects do its thing. Okay? So now you can see in almost no time at all, it's almost perfectly isolated the ball with almost no manual input at all. So once I have a selection, I'm happy with, I click freeze down here and what this is doing is caching or like locking down our analyzed frames so that I can go in and mess with the mask without having to worry about re propagating my clip.
Zeke French (04:55): And you can see once I've done this, this timeline down here has turned this kind of purple color. And that means that my frames are cashed. So now I can scrub through pretty easily and my frames are locked in. So now we can go in and refine our mat a little bit further. If we want to, if I was using a clip that had motion blur on it, this is video game footage. So it doesn't, I would select use motion blur. And if there was any, uh, like color fringing around the edge of my object, I would click decontaminate edge colors. Again, this is video game footage. So I don't have any of those issues. So now I can use these little buttons down here to help me refine my mask. So if I click this, it places our selected object in white and the background in black, and it can help me see the edges of my object, which look fine right now.
Zeke French (05:38): I can click here and it puts it on a black background. This is the one I like working on the most, just because it shows me clearly what my object looks like. This looks pretty good. I don't even think I need to adjust anything, but I'll go ahead and show you what each one does. So feather obviously affects the feather of the mask. So if I drag it up, it softens our edges contrast is like the sharpness of the edge. So I can use it in conjunction with feather to kind of smooth out my hedge shift edge. Just kind of nudges the edges of the clip a little bit and then reduce chatter, which is probably the most useful tool. Just reduces the chatter and the jagged edges along the edges of our object. But like I said, this looks pretty much perfect for what I'm using it for. So I'm not even gonna bother messing with these. And now we have our isolated ball. I can do whatever I want now. So the reason why the new rotor brush works so well is Adobe has started using AI in their projects. So I believe this is called the sensei AI, and, uh, it's essentially magic. So now if I go back to my main composition, I can apply something fun, like find edges or something, and look, it only affects the ball.
Zeke French (06:43): So what about a more complicated situation like this car here? Same technique. I come up, click my rotor, brush, double, click my layer, go across the middle of the object and then refine my selection a bit further. I come here to best, and then I press space bar to propagate forward and look flocked in no problem at all for AI powered the Doby after effects Superman. So I'm going to go ahead and speed this up and you can see again in less than 30 seconds, it's gone through and isolated our clip. I'll go ahead and click freeze to catch our frames and let this run through. So I want to use this example to show some of the drawbacks of the rotor brush tool. So you can see that it starts picking up this car in the background. The edges are a lot more noisy and just overall the car isn't exactly clean, went on a black background.
Zeke French (07:36): So for our purposes, this is fine. We can get away with these kind of little jenky bits, however, with reduced chatter and a couple other options, like maybe feathering our edges a little bit more. We can clean up a lot of that with pretty much no problem. So as you can see in most contexts, this is going to work pretty well. It's just something to keep in mind that if you have a complicated background or something, obscuring the object, it's not perfect. And you might have to do some manual work. If you want a really, really clean edge in every situation. Again, for us, it doesn't really matter because I'm just applying effects to the car. I don't need the edges to look perfect and that's pretty much it. I got the boring work out of the way. I let the computer do it for me in about two minutes.
Zeke French (08:15): And now I can do all the fun stuff I liked how find edges looked. So let me maybe add that and invert it. And then I'll, I'll add a tint and then I'll add levels to, to up that contrast. I just want the highlights here and then I'll add a, I dunno, a deep glow, maybe a day, uh, some color to it. And in no time at all, I have this cool effect around the edges of our car and what I'm doing to the car. It doesn't really matter. I'm just using this to show you the flexibility of the technique. You get the isolation done really quick with the rotor brush. You just let it handle it for you. And I don't have to worry about, you know, manually going in and masking each frame for each object. Every time I want to add something, I just can mess around and do I want it's awesome.
Zeke French (08:56): So there you have it by understanding and implementing these pretty basic techniques. We're given the ability to make some pretty awesome things, almost effortlessly. Also, if you like this, make sure to check out VFX for motion from school of motion instructor, mark Christianson will teach you the art and science of rotoscoping. As it applies to motion design, prepare to add king Rodo tracking match, moving and more to your creative toolkit. If you're looking for more ways to improve, make sure to subscribe to this channel and hit the bell icon. So you'll be notified when we drop the next tip. Thanks for watching.
ENROLL NOW!
Acidbite ➔
50% off everything

ActionVFX ➔
30% off all plans and credit packs - starts 11/26

Adobe ➔
50% off all apps and plans through 11/29

aescripts ➔
25% off everything through 12/6
Affinity ➔
50% off all products

Battleaxe ➔
30% off from 11/29-12/7
Boom Library ➔
30% off Boom One, their 48,000+ file audio library
BorisFX ➔
25% off everything, 11/25-12/1

Cavalry ➔
33% off pro subscriptions (11/29 - 12/4)

FXFactory ➔
25% off with code BLACKFRIDAY until 12/3

Goodboyninja ➔
20% off everything

Happy Editing ➔
50% off with code BLACKFRIDAY

Huion ➔
Up to 50% off affordable, high-quality pen display tablets

Insydium ➔
50% off through 12/4
JangaFX ➔
30% off an indie annual license
Kitbash 3D ➔
$200 off Cargo Pro, their entire library
Knights of the Editing Table ➔
Up to 20% off Premiere Pro Extensions
Maxon ➔
25% off Maxon One, ZBrush, & Redshift - Annual Subscriptions (11/29 - 12/8)
Mode Designs ➔
Deals on premium keyboards and accessories
Motion Array ➔
10% off the Everything plan
Motion Hatch ➔
Perfect Your Pricing Toolkit - 50% off (11/29 - 12/2)

MotionVFX ➔
30% off Design/CineStudio, and PPro Resolve packs with code: BW30

Rocket Lasso ➔
50% off all plug-ins (11/29 - 12/2)

Rokoko ➔
45% off the indie creator bundle with code: RKK_SchoolOfMotion (revenue must be under $100K a year)

Shapefest ➔
80% off a Shapefest Pro annual subscription for life (11/29 - 12/2)

The Pixel Lab ➔
30% off everything
Toolfarm ➔
Various plugins and tools on sale

True Grit Texture ➔
50-70% off (starts Wednesday, runs for about a week)

Vincent Schwenk ➔
50% discount with code RENDERSALE

Wacom ➔
Up to $120 off new tablets + deals on refurbished items


Create Stunning Visual Effects in AE
Learn compositing, tracking, keying, and rotoscoping in After Effects. Enroll in All-Access to unlock VFX for Motion and 50+ other courses.