
All-Access Pass
Unlimited access to 50+ courses, unlimited critique, live events, and 24/7 community. Join School of Motion All-Access today.

Learn the importance of time remapping with this After Effects video tutorial.
Did you know that you can remap how your compositions play out over time inside After Effects? Time Remapping is one of the most exciting features in After Effects, and the creative possibilities of this feature are endless.
So in this tutorial we're going to take a look at time remapping and how it can radically change the way you work in After Effects. So keep reading as we take a journey through time!
Time Remapping in After Effects Tutorial
Let's take a look at this incredible feature with this tutorial from Jacob Richardson.
{{lead-magnet}}
Time Remapping is Awesome
Time remapping is an extremely useful feature but it isn't going to find it's way into every project you create. However, when you call upon its name, it will feel like you're winning a workflow award.
There are a lot of ways that you can use the time remapping tool. One of the most obvious ways is simply the ability to make your composition play out faster or slower.
What's really neat is that anything that is native to After Effects is frame rate independent. Unlike footage, the layers and effects built inside of After Effects don't have a set frame rate.
This means that animations that use native shape layers can be slowed down and sped up without looking choppy. If you were to stretch video footage, you would only be able to go so far before the footage looked choppy.
How to Access Time Remapping in After Effects
Here are the steps you'll need to take to enable time remapping in After Effects:
- Right-click your pre-comp
- Near the top of the menu, hover over "time"
- Click "Enable Time Remapping"
- The keyboard shortcut is Ctrl+Alt+T
If done successfully, you will see keyframes placed at the beginning and end of your layer. You can now start to move around each of the keyframes and even add additional keyframes.
Cool Things to Try with Time Remapping
Here's a fun experiment with Time Remapping, you can start with a linear move and then turn it into a pre-composition

Once it's inside a pre-composition you can now enable time remapping and we can start to play with the speed graph. Let's give this animation some life and make it more interesting.
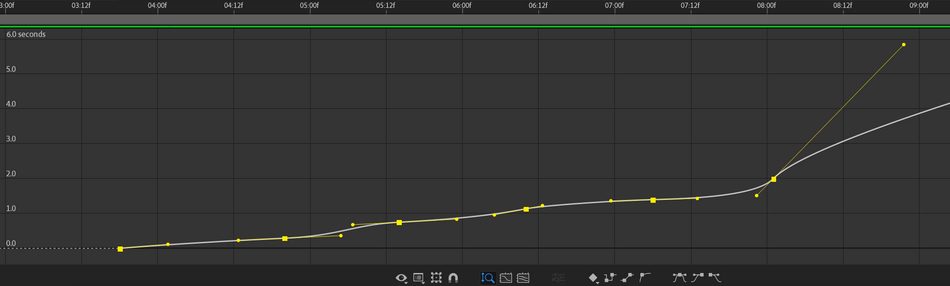
Each one of the keyframes were set to easy-ease, and then the bezier handles were moved to where the animation could dynamically flow. Below is the end result, after a little bit of compositing.
x
With just a little bit of time remapping, you can bring animations to life! This would have been fairly difficult to do with just animating the offset values of the stroke.
SOME GOOD THINGS TO KNOW
By default there are two keyframes set, but you're allowed to place more than that. If you're going to place more keyframes then we would suggest that you place them before moving around the default keyframes.
Ready to Learn More About Animation?
Are you ready to take your animation skills to the next level? Check out Animation Bootcamp. Animation Bootcamp is our most popular course, and for a good reason. It has helped transform motion design careers across the globe. Not only will you learn how to master the graph editor in Animation Bootcamp, but you'll learn the principles of animation alongside hundreds of other students.
If you're ready to dig deep, and take on a challenge, head on over to our courses page to find out more!
Animation Bootcamp Final Project
ENROLL NOW!
Acidbite ➔
50% off everything

ActionVFX ➔
30% off all plans and credit packs - starts 11/26

Adobe ➔
50% off all apps and plans through 11/29

aescripts ➔
25% off everything through 12/6
Affinity ➔
50% off all products

Battleaxe ➔
30% off from 11/29-12/7
Boom Library ➔
30% off Boom One, their 48,000+ file audio library
BorisFX ➔
25% off everything, 11/25-12/1

Cavalry ➔
33% off pro subscriptions (11/29 - 12/4)

FXFactory ➔
25% off with code BLACKFRIDAY until 12/3

Goodboyninja ➔
20% off everything

Happy Editing ➔
50% off with code BLACKFRIDAY

Huion ➔
Up to 50% off affordable, high-quality pen display tablets

Insydium ➔
50% off through 12/4
JangaFX ➔
30% off an indie annual license
Kitbash 3D ➔
$200 off Cargo Pro, their entire library
Knights of the Editing Table ➔
Up to 20% off Premiere Pro Extensions
Maxon ➔
25% off Maxon One, ZBrush, & Redshift - Annual Subscriptions (11/29 - 12/8)
Mode Designs ➔
Deals on premium keyboards and accessories
Motion Array ➔
10% off the Everything plan
Motion Hatch ➔
Perfect Your Pricing Toolkit - 50% off (11/29 - 12/2)

MotionVFX ➔
30% off Design/CineStudio, and PPro Resolve packs with code: BW30

Rocket Lasso ➔
50% off all plug-ins (11/29 - 12/2)

Rokoko ➔
45% off the indie creator bundle with code: RKK_SchoolOfMotion (revenue must be under $100K a year)

Shapefest ➔
80% off a Shapefest Pro annual subscription for life (11/29 - 12/2)

The Pixel Lab ➔
30% off everything
Toolfarm ➔
Various plugins and tools on sale

True Grit Texture ➔
50-70% off (starts Wednesday, runs for about a week)

Vincent Schwenk ➔
50% discount with code RENDERSALE

Wacom ➔
Up to $120 off new tablets + deals on refurbished items


All-Access Pass
Unlimited access to 50+ courses, unlimited critique, live events, and 24/7 community. Join School of Motion All-Access today.