
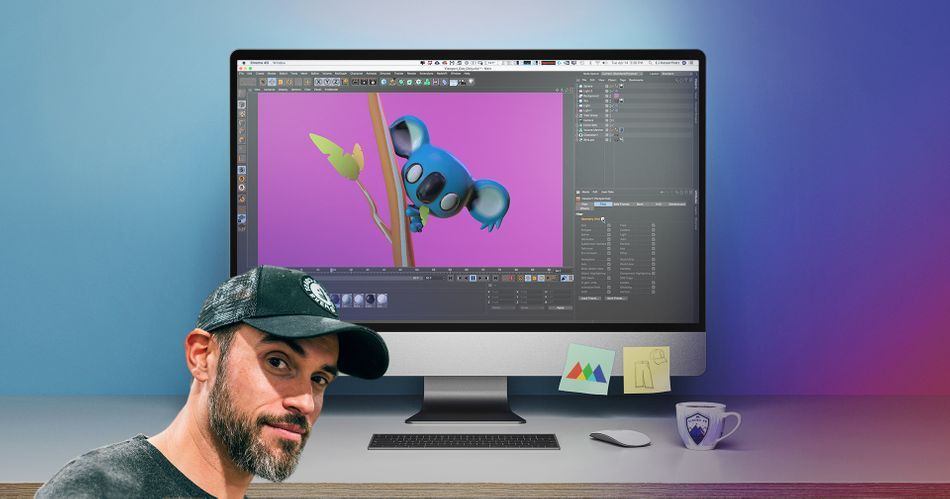
Start Your 3D Journey in Cinema 4D
Master the essentials of 3D modeling, lighting, and animation in C4D. Enroll in All-Access to unlock C4D Basecamp and 50+ other courses.

Crank Your UV Workflow to 11! We're Looking at the Top New Features of Cinema 4D S22 from Maxon
Just seven months after the release of Cinema 4D version R21, Maxon surprised the 3D world with an unexpected treat. S22 adds a number of highly anticipated features aimed at enhancing your UV workflow. We were so excited, we sent a highly-trained team of seven EJ Hassenfratzes undercover to steal us a copy.
This is the first drop outside of the typical annual Fall release window, so think of S22 (S standing for subscription) as an early access gift...but only for MAXON subscribers. Don't be jealous; there will be another release later in the year that will have all the S22 features—and many more enhancements—with the perpetual license upgrade option. If you want to have an edge with frequent updates, you oughta subscribe to Maxon!
Now grab some popcorn, wrap yourself up in a blanket with EJ's face on it (we know you own one) and check out the top new features in Cinema 4D S22!
First Look at the Top New Features in Cinema 4D S22
{{lead-magnet}}
UV Workflow Improvements
Let's get down to business. S22 is headlined by UV workflow improvements, and rightly so. It's not only one of the most commonly requested features, but it's also been one of the most difficult areas in an app that prides itself on ease of use. I'm sure I'm not alone when I say that, up until now, I’ve avoided UVs in C4D altogether.
WHAT ARE UVS?
For those that may not be familiar, let's begin by answering the question...what is a UV? UV's are the names of the axes of a plane, since XYZ are already used for coordinates in 3D space. UV Unwrapping is the process of flattening out a 3D model into a 2D representation for texture mapping.
Think of a stuffed animal: It's made by sewing together separate pieces of flat fabric based on a sewing pattern.
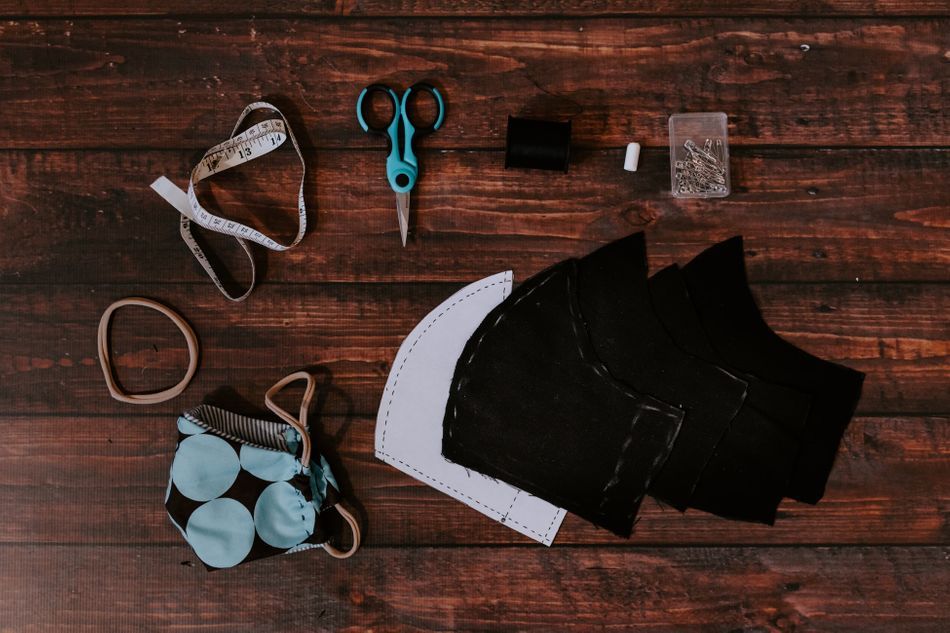
Basically UV'ing is the process of defining seams and then unsewing or unwrapping a model at its seams to flatten it out to easily texture.
S22 greatly improves this entire UV unwrapping process—especially for newbies—by allowing users to easily understand and visualize the UV process. It simplifies how 2D UVs relate to your 3D model. So here's Uvee the Whale who we are going to unwrap like a stuffed animal whale so I can show the similarities to that sewing process.

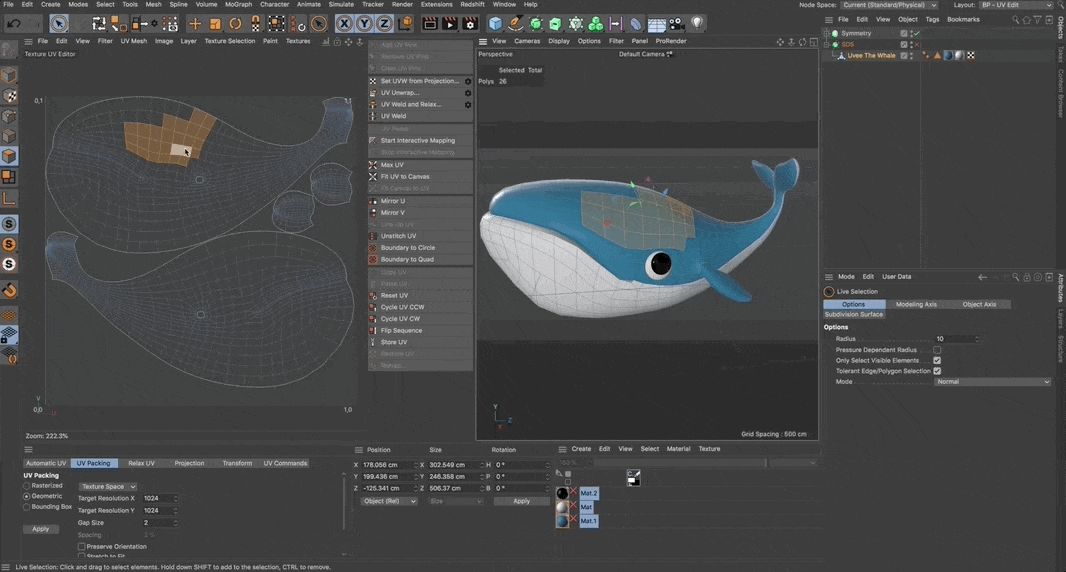
To start editing the UVs, we'll head into the aptly named UV Edit Layout (Layout > BP - UV Edit). You'll notice that once we're in the interface the layout doesn't totally change once you go into the Bodypaint layout like it did in previous versions. Menus were in different places and things were pretty confusing...to say the least. With S22, it's extremely easy to see your UVs. With new view modes like UV Seams, you can now see seams (which are the borders of what your UV islands are called) in both the 2D UV Editor as well as the 3D view, along with other new visualization modes like multi-color islands mode (View > Multi-Color Islands) that allow you to see the UVs on all the separate islands, and UV Connectivity to see seam relationships.
Another long awaited update is the abilty to use UV maps (or load your own) to see map distortion (Attributes Manager > Back > Texture > UV Map)
(Reset by going to Texture > Empty Canvas)
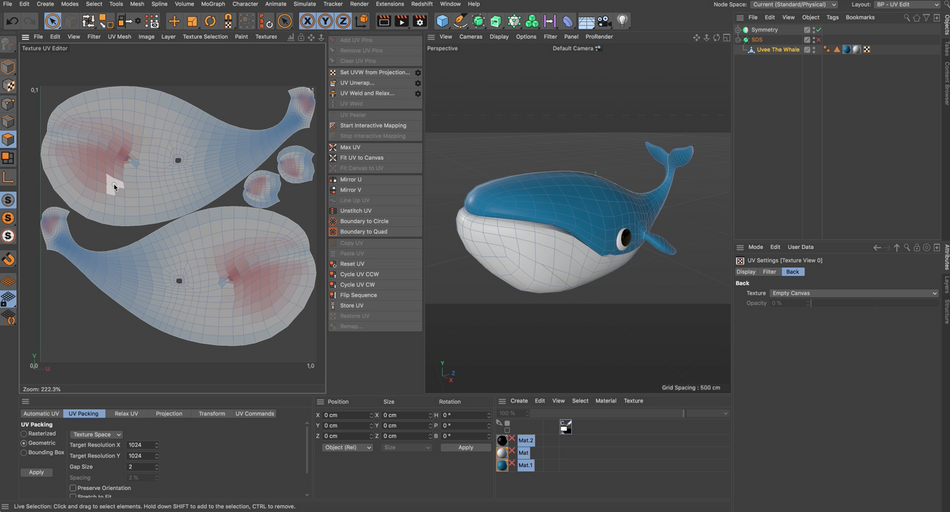
Another useful new visualization mode shows UV distortion via a heat map so you can see which polygons are squashed or stretched in relation to the 3D mesh (with blue being stretched and red being squashed), as well as easily being able to view overlapping polygons. All these visualization modes help you better see and understand the relationship between your 3D mesh and 2D UV view.
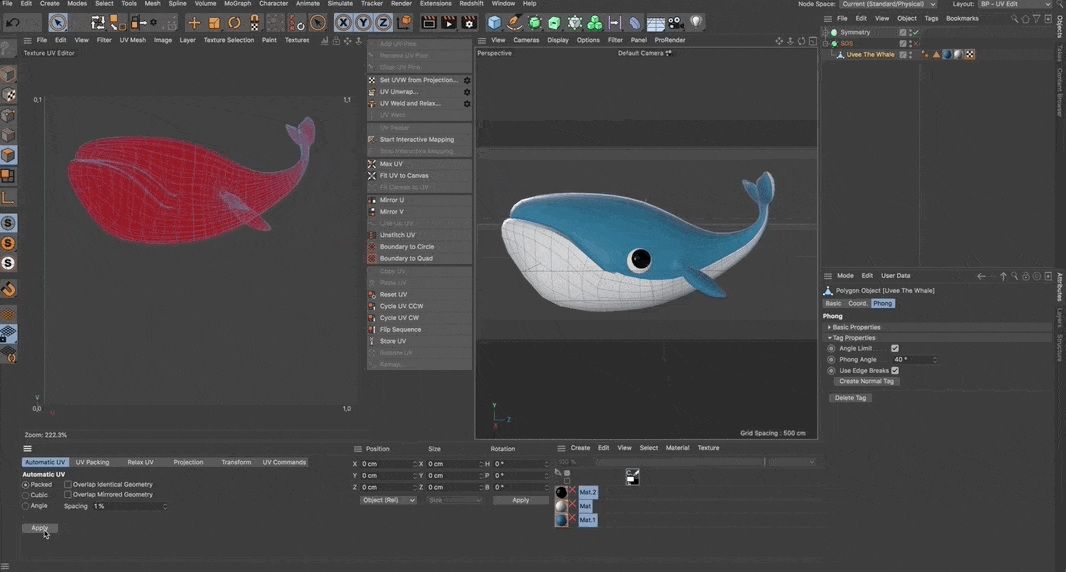
NEW AUTOMATIC UNWRAPPING ALGORITHMS
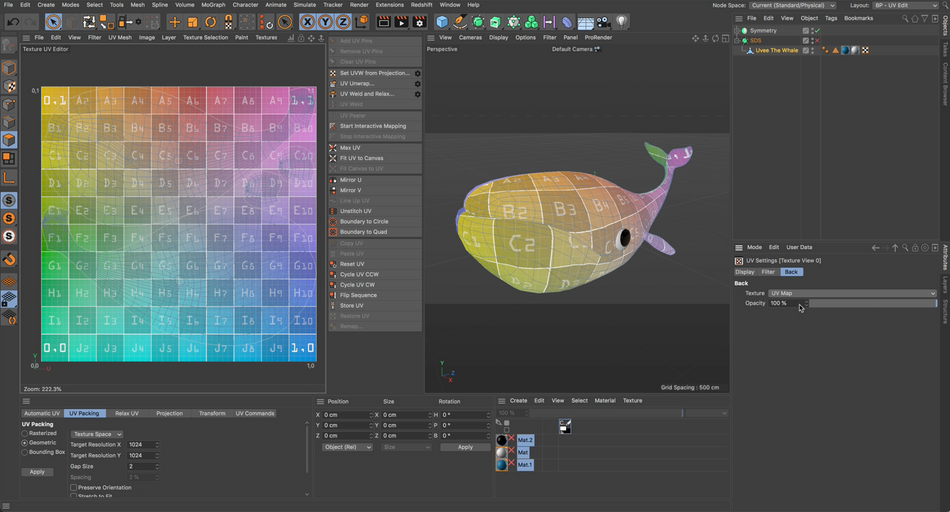
So now that you have a better idea of what a UV is and a little bit about what unwrapping means, let's cover the new unwrapping workflows. With S22, there's a new automatic unwrapping algorithm that's implemented in Set UVW from Projection that automatically generates a UV map from the chosen projection type. From here you can use Automatic UV and choose the new Packed option and BAM! We have a useable UV map with a single click of a button.
This auto unwrapping map is great for beginner users who just need a good UV map. All this to say we can probably go beyond my old go-to method of UV Mapping called "Let's try Cubic and cross our fingers."
I'll talk a bit more about how useful this automatic UV algorithm is and how it's great for exporting to game engines and AR apps later on.

ITERATIVE UV UNWRAPPING
For those of you who want to get your hands dirty with unwrapping your own UVs, S22's got you. Now there's a way easier workflow for UV unwrapping.
To UV unwrap, first set your base UVW from a projection type. Next, you'll define pins or just jump into defining seams. Seams are basically like making cuts...it's the reverse of sewing, where instead of stitching those sewing patterns together, you're trying to figure out where to cut to be able to flatten out your 3D model into a sewing pattern, or UV Map.
Selection Tools
One thing that speeds this process up immensely is the unified selection workflow that allows you to select points, edges, or polygons in either view, and it’ll select in both 2D UV View and 3D Viewport. Pretty awesome right? This was a huge pain point before, where there were separate selection tools for each view and you had to keep remember which mode to be in. It was...confusing to say the least.
There's also new shortcut keys and selection tool enhancements to help with the UV unwrap process, like being able to double-click an island to select that island. Defining seams is much easier too, utilizing:
- Shift double-click in edge mode to do loop selection
- Speaking of Loop Selection, the Loop Selection Tool automatically stops at boundary edges now
- And the Path Selection tool has been improved

So once you have a seam selected, click UV Unwrap to unwrap that seam. You can then add another seam to your selection in either view and click 'UV Unwrap,' and keep going through the process interactively to get to your desired end result.
Not happy with a result? You can undo and choose another seam. The new Mirror UV selection command will streamline your UV workflow by allowing you to make mirrored selections quicker. This powerful and iterative way of UV unwrapping is very forgiving and allows for more experimentation as far as testing which seams unwrap to the best end result.
UV WELD & RELAX COMMAND
Which allows you to easily weld two UV vertices based on edge selections. Do do this, make an edge selection in either the 2D view or 3D viewport, then select in the UV Edit layout UV Edit > UV Weld & Relax. Along with the new iterative UV unwrapping commands, it drastically speeds up your UV workflow.
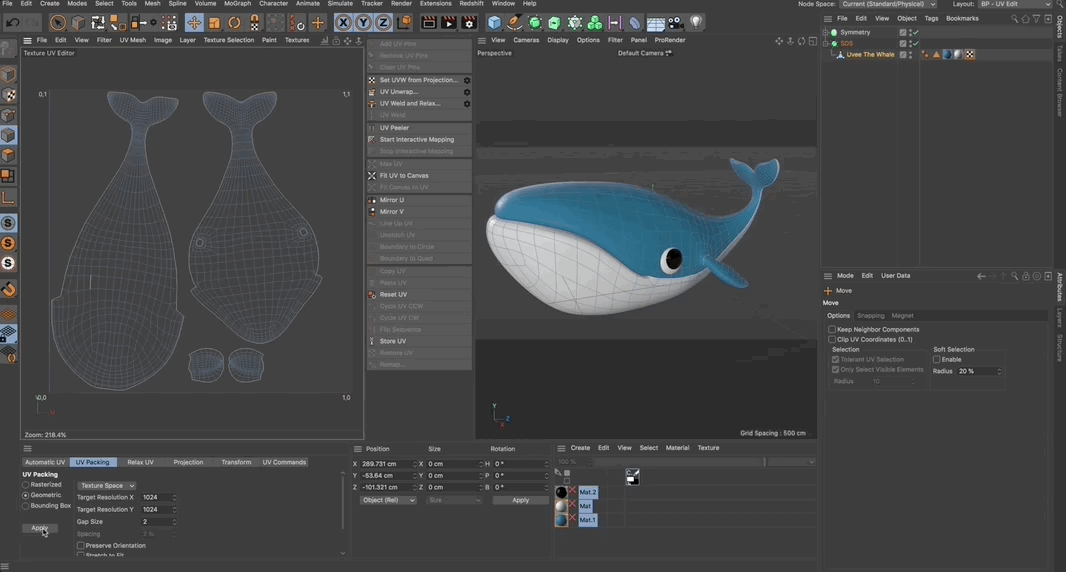
NEW UV PACKING ALGORITHMS
Then you can realign your UV islands to optimize and fill your UV space by utilizing the new UV Packing algorithms. Inside the UV Packing tab, there is a new Geometric option that optimizes packing while making sure to keep your islands intact. You must select all islands or none. You can’t select a single island to repack a single island.
All of these new UV features dramatically improve and speed up the UV unwrapping workflow, and MAXON announced that they're going to continue working on improving these UV workflows and much more for a release later this year!
New Future Viewport
The viewport has been progressively updated to look more visually pleasing. In S22, MAXON has removed the strong dependency on OpenGL, and on Mac moved to support Apple Metal. So what are the benefits of this new viewport?
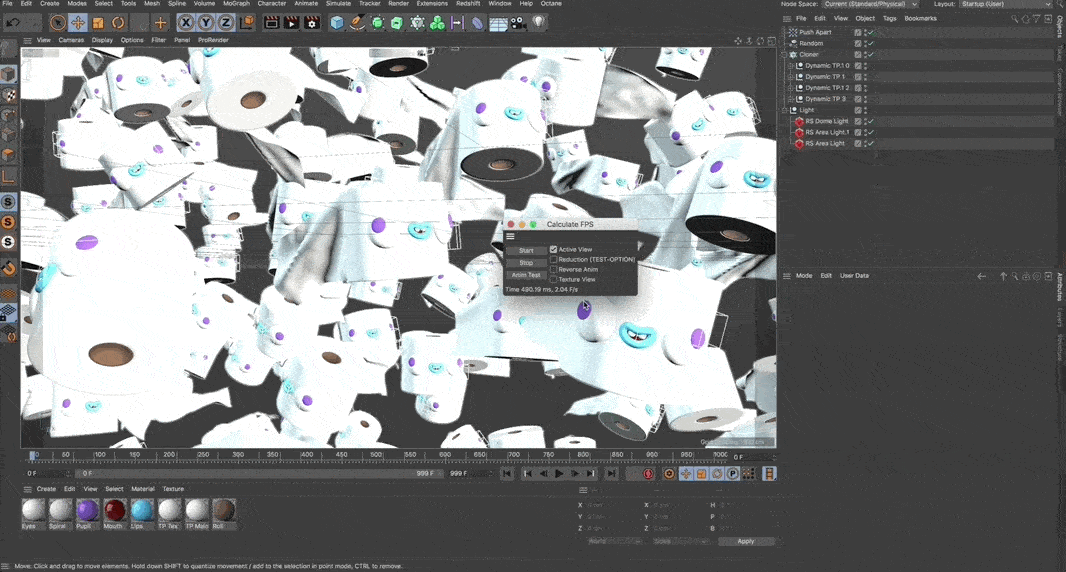
For one, the new viewport calculates Multi Instances much faster. It's crazy fast to navigate your scene vs R21. (Using Calculate FPS, you can see the difference between scenes in the old viewport vs the new one.)
Hair also looks much better in the new viewport using Hair Object Hair Lines display with Accurate CPU Material and Enhanced Shading activated. It does not cure baldness unfortunately...

Viewport Filter options have been reorganized and can now be saved as presets, so you can save different presets for different workflows. And there's also the new Geometry Only mode. You can check out your scene without any clutter, and render a quick play blast with only your geometry visible using Viewport Render. There's also a new Viewport downrez so you can tame heavier scenes.
ALL MODELING TOOLS OPTIMIZED UNDER MODELING CORE
Over the past couple releases, the modeling commands have been migrated to the new modeling core. With S22, this migration is basically complete. This means you have better selection tools with more reliable results, better vertex maps, and bevels have been given a speed boost. Bevels now allow for better preserved UVs, to name a few benefits.
Magnet Tool and Brush Tool share a lot of the same features now.
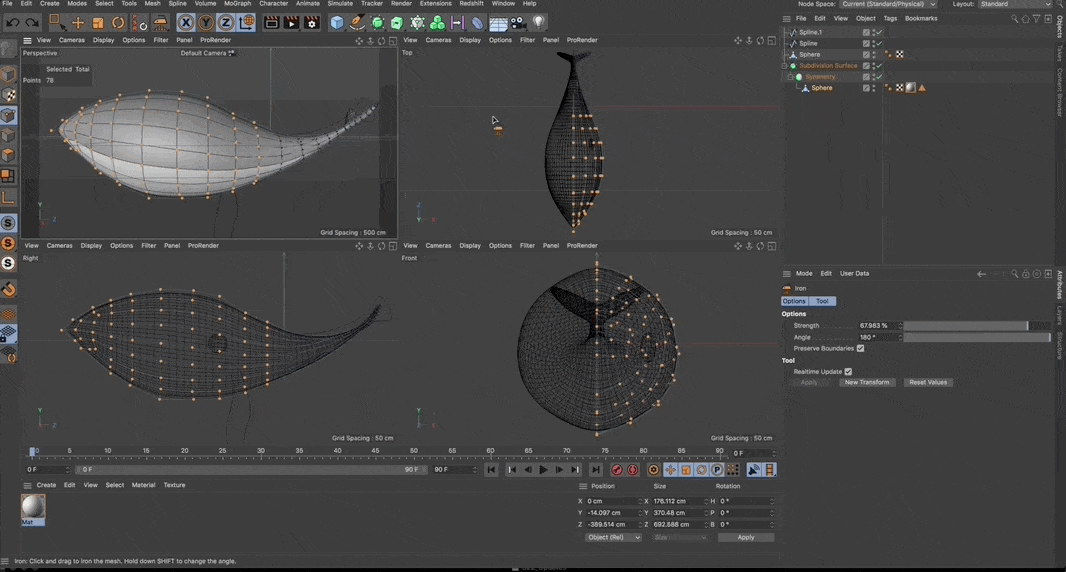
And one of my favorite tools (that helps cover my horrible modeling skills), the Iron Tool, now respects boundary edges so you can iron with more control.
AUTO EXTRUDE DIRECTION
Extrudes work in the direction of the spline shape. 'Nuff said.
ANIMATION WORKFLOW IMPROVEMENTS
- Restriction Tag Improvements: Now you can use up to 12 inputs. In the past, it was only 6 per tag.
- Constraint Tag Improvements: Added Initial State for Constraint Tag: there's an added initial state. If activated, the constraint object will reset to its initial state when rewinding the time to the first frame of the project.
- Object Selection Improvements: Spline Objects Selecting spline in viewport was always something a bit tricky, especially when using the Character Object. Now it should select properly.
- Timeline improvements: In the timeline, you can now copy-paste multiple object tracks at once if the hierarchy matches. So you can copy animation tracks from one character rig hierarchy and paste it to the same hierarchy of another character.
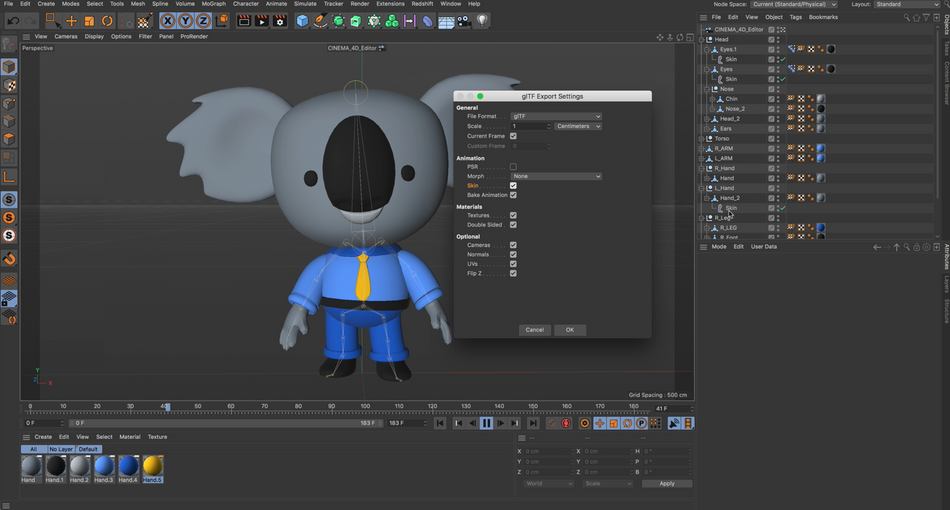
glTF Export
Now this next feature is for folks who work with game engines or AR & VR. With Cinema 4D S22, there's a new glTF exporter. If you're not familiar, glTF is a common 3D file format compatible game with engines and AR and VR apps such as Adobe Aero. It’s called the JPEG of 3D because of its efficiency.
- It was previously available via MAXON Labs but is now built-in
- Great for 3D product visualizations for websites
- Supports PSR and Joint/Skin animation - does not support PLA
- Vertices can only have 4 weights assigned by 4 joints
- Material wise, C4D's Reflectance Channel translates really well and supports Base Color/Metallic Value and Roughness Value) and Texture Maps
- Doesn't support multi-layer Reflectance Channels though
For textures, it's a little more complicated. If you're using shaders like noise or tiles, you need to bake out those shaders. In previous version of C4D this would be a pain.
This is where the new bake UVs function—that utilizes the new auto UV algorithm I talked about earlier—comes in handy. This baking method is perfect for situations where you just need to quickly export models with textures intact to game engines or AR/VR applications, or to quickly generate a UV map to start painting onto. Say I have an object with multiple materials mapped onto it using various projection methods (a.k.a. the janky old way to do this, Cubic, Flat, etc...). With S22, you're now able to bake those textures into a single image texture using the Bake Object command that then runs that new the automatic UV's algorithm. (Object > Bake Object > Check on Single Texture/Turn off Keep UVs)
Once you have textures baked, you can export out to glTF format and utilize it in Adobe Aero, or view it quickly on the web by dragging and dropping your file into the browser window on the Babylon Sandbox site!
x
Simply put, Cinema 4D S22 offers a huge number of improvements to your UV Workflow. If you were having trouble in the past, or avoided UVs in C4D like me, this is the upgrade you were waiting for. Congratulations to Maxon for the great work!
Want to Learn More About Cinema 4D?
We get it. You're watching EJ tear into Cinema 4D and you want to know how to step up your game too. That's why we put together Cinema 4D Basecamp!
Learn Cinema 4D, from the ground up, in this intro to Cinema 4D course from EJ Hassenfratz. This course will get you comfortable with basics of modeling, lighting, animation and many other important topics for 3D Motion Design. You’ll learn basic 3D principles and best-practices, laying the foundation to tackle more advanced subjects in the future.
-----------------------------------------------------------------------------------------------------------------------------------
Tutorial Full Transcript Below 👇:
EJ Hassenfratz (00:00): Well, Maxon just surprised the 3d world by dropping an unexpected, shiny new release called S22. So stick around to learn more
EJ Hassenfratz (00:17): Cinema 4D S22 is the first release outside of the typical annual fall release cycle. You know, S22, the S stands for subscriptions. So you can think of this as an early access bonus release for subscribers only. Now put down your pitchforks because later in the year, Maxon is going to release another update. That's going to have all of the S22 updates along with many more enhancements, along with the perpetual license upgrade option. So I guess if you want to keep up to date with all the latest and greatest and more frequent updates, you just got to smash that maxon subscribe button. Now, if you want to follow along with this video, be sure to download the free project files. You can find them in the description below, all right, onto the juicy stuff. S 22 is headlined by UV workflow improvements and rightly so, it's not only been one of the most requested features users wanted improved for years and years and years and years and years, and years and years. But it's also been one of the most painful to use areas in an app that really prides itself on its ease of use. And I'm sure I'm not alone when I say that up until now. I've totally avoided UVS and C4 D altogether. So for those that may not be familiar, let's begin by answering the question. What's the UV?
EJ Hassenfratz (01:40): Well, UVS are the names of the axes of a plane. You can see that in our two views here, our texture, UV editor and our normal 3d view, we have the X, Y and Z coordinates that are of course used for coordinates in 3d space. And UVS are basically the names of the axes of a 2d plane or a polygon. Now, how do you get a 3d object into a 2d UV? Well, UV unwrapping is the process of flattening out a 3d model into a 2d representation for texture mapping. So if you think of a stuffed animal like this stuffed animal, well here, it's made by sewing together separated pieces of flat fabric based on a sewing pattern to create one sewn together, stuffed animal, this happy little whale. And basically you being is that same process of basically defining seams and then unselling or unwrapping a model.
EJ Hassenfratz (02:41): And it seems to flatten it out to again, easily texture now S 22 greatly improves this entire UV or unwrapping process, especially for newbs. It allows newcomers to easily understand and visualize the UV process and how to do UVS actually relate to our 3d model. So here we have UV, the whale took me a long time to come up with that name. And what we're going to do is unwrap him like the stuffed animal. Well, so I can show you this similarities to that whole sewing process. So to start editing the UVS or to even view the UVS, we're going to head into our body paint, UV edit layout. Now the first thing you're going to notice is that number one, the layout isn't completely jumbled. If you've used body paint in the past, the menus were all over the place, the object manager wasn't here, the attribute manager wasn't here left was right up, was down.
EJ Hassenfratz (03:39): It was a little bit confusing to say the least. So this is really nice that everything kind of stays in a kind of typical standard cinema 4d layout. So you're not trying to figure out where things are. So that being said, let's go ahead and view our UV. So here's my UV editor. If I go and use the one key in two key, I can pan and zoom just like in my perspective view here, and to view the UVS, I'm just going to go ahead and select my object. And what I can do is then select the edge mode. And you're going to notice that I can actually select an edge in my 3d view. And you can see in the 2d view, what edge is represented there. So it's so easy to see the relationship between your 2d view and your 3d view. Like I can select all this stuff.
EJ Hassenfratz (04:28): I can do a UL loop selection and you can see there's the loop selection selected there in the UV editor. Now, one thing you can see is if I get out of my selection here, so there's a lot of different visual representations of how you can view your UVS. So if we go into the view menu here, let's go to UV connectivity. And here you can actually see visually represented by color the seam relationships. So you can see the orange matches with this orange theme. You can see on the little thin seams where that relates to this fin island over here, it's red, and this is red and this is yellow. And this seam is yellow. So a lot of different ways to visualize seams. We can also choose something like multicolor islands and wow. It just got really tropical here. It's the tropical whale.
EJ Hassenfratz (05:19): And you can see that this UV island, so individual groups of UVS are called an island in. You can see that on our whale, this pink island is right there. You can see that represented in our 3d view. Here's our yellow UV island here. You can see that's different, different color there. And then on other side, there's our other fin or other flapper. And then right here, that's orange. Okay. So we have this visual representation, that's color coded UV island mode. Let's go ahead and let's try another one. Let's do distortion and distortion is very interesting because it shows you the distortion of your polygons via a heat map with blue being your, your UVS, your polygons are stretched and red, meaning that your UVS are actually squashed and you can easily see if you have any overlapping polygons as well. If we go into that view.
EJ Hassenfratz (06:21): Okay. So another way to check distortion is by utilizing a UV map. So if we go to configure, I'm going to go to this back tab here. And right now the texture is just empty, but we can load in a UV map and you can see that it's going to apply UV mapping you and see the distortion on your model and see how well your model is wrapped for not knowing anything about unwrapping. I think, you know, I did an okay job. I don't know, but you can also adjust the opacity here and you can also load your own UV map as well. Okay. So I'm just going to turn that to UVA canvas.
EJ Hassenfratz (07:04): So now that you have a better idea of what AUV is and a little bit about what unwrapping is, let's cover the new unwrapping workflows in S22. So there's a new unwrapping algorithm and it's actually implemented in this set UV from projection. So what I'm going to do, I'm just going to delete my current UV tag here to just blow that whole UV unwrap away. And basically what you can do is you can set UV from projection by just clicking that button. I'm just going to go command for controls, eat and do that. And we can actually click on this gear and choose a like starting projection type so we can choose flats or good friend Kubik use that a ton. Uh, but w what you can typically do is just kind of do like a frontal projection, and you kind of want to have your, your model kind of flat on kind of like that.
EJ Hassenfratz (07:58): And we'll go into just frontal and click. Okay. And you can see that we're, we're using this current view. In our perspective view from here, we can go into the automatic UV tab and utilize the new pact option. So I'll just click apply and boom, we automatically have our whale UV. The whale is cut in unsold by all these different seams here. Now, it's not perfect, but if you need a quick and dirty UV map, you, this is usable right with a single click of a button. So this auto and rapping is great for beginner users who just need a good UV map. All this to say is I can probably go beyond my old go-to method of UV mapping called let's, try Kubik and cross our fingers. Now I'll talk a little bit more about how useful this automatic UV algorithm is and how it's great for exporting to game engines and AR apps a little later on.
EJ Hassenfratz (09:04): Now, for those of you who want to get your hands a little dirty with unwrapping your own UVS as 22 has a way easier in iterative workflow for unwrapping UVS. So let's just go ahead and delete this UVW tag, and let's go into edge mode because the way to UV unwrap is you need to first define your seams via edge selections. Now, seams are basically like making cuts. It's the reverse of sewing, or instead of stitching your patterns together, you need to try to figure out where on your model are the best areas to try to cut your model using these edge selections, and be able to flatten out your 3d model into those little sewing pattern pieces or UV maps is 2d UV maps. So this is actually way easier to do now with the improved selection tools in S 22. So things like the loop selection.
EJ Hassenfratz (09:55): If I go and grab my loop selection by hitting you, and then L you can see that no longer do you have that boundary edge option here because the loop selection two automatically stops at boundary edges now. So where I can do is kind of select right here, grab this loop selection and to cut this, all I gotta do is click on UV unwrap, and UNC. We just sliced UV the whale into pieces. Okay. So the great part about this is, is we can continue adding cuts and seams and kind of experimenting and seeing what is the best way to unwrap our model. So let's just say, we want to then unwrap the fin. So I'll grab this selection and we'll grab the improved path selection tool by hitting you, and then M if you ever forget what it is, just think, um, that's the dad joke quota filled for the day, and I'm just gonna select this path.
EJ Hassenfratz (10:56): Okay. So the loop selection held down the shift key to add to selection, grab this path. Now, what we need to do is then mirror this on the other side. And in previous versions, you'd have to do this manually, but in S 22, there's this new mirror selection tool, which saves you so much time. Do you just click this? You can see we just mirrored that selection on the left Finn, I guess the right fin, if it's the whale view, and then we can just go ahead and do UV unwrap, and there's those two fins on their separate UV islands. Now we can also maybe try out some different cuts. Maybe we want to try out if we can, you know, cut the tail here, let's just do this. And then we'll mirror that and UV unwrap. And now we just got a giant hole in our fence.
EJ Hassenfratz (11:47): So that was not a smooth move. So I'll just undo that. And that's fine. And this is the great part about this. As we can kind of experiment and audition different cuts to see what's the best way to unwrap our model. Now, another cool feature is you can go ahead and select edges directly in your view and see where they're at on your 2d UV view. And you can say UV, well-done relax. Now, this is a new feature that you can go ahead and iteratively UV, well-done relax, and kind of stitch different edges together and combine them together. You see, we have a little bit of overlapping UVS there, so I'll just go ahead and command or control Z to undo that. But just to say that this new UV Weldon relax is a new feature. That again, drastically speeds up your workflow. You can weld together as many edges as you want to seams as you want.
EJ Hassenfratz (12:42): And again, it's part of this whole new iterative way to work. Now, once you're done unwrapping your UVS, you can then utilize some of the new UV packing algorithms that have been added into S 22, namely the rasterize and geometric. Now, what UV packing allows you to do is realign your UV islands here and optimize them to fill up your UV space. So I can just go ahead and choose this geometric hit apply, and you can see that this fills up the space much better and kind of clumps these objects together. So we can add more islands into this. And if we ever needed to adjust any of these islands after the fact, it's very easy to do that. You can just go into polygon mode and double-click to be able to easily select an island and bring up your UV transform tool or command T, and you can easily just grab and rotate and scale your islands and reposition them any way you would like. And this is helpful also when you bring up the UV map as well. So you can position these islands to look correctly on your UV mat. Now, all of these UV features altogether dramatically improves and speeds up the whole UV unwrapping process and added bonus maxon announced that they're going to continue working on improving these UV workflows and much more for a release later this year.
EJ Hassenfratz (14:10): Now the viewport has been progressively updated to look way more visually pleasing in an S twenty-two. Maxons remove the strong dependency on open GL and on Mac. They've actually moved to supporting apple metal. So what are the benefits of this new viewport you may ask? Well, for one, the new viewport calculates multi-instance is much, much faster using calculate FPS. We can actually see the difference between scenes in the old viewport versus the new viewport. And you can just see how much faster it's crazy fast to be able to navigate a very massive big scene with a lot of clones and navigated really fast compared to our 21. It's pretty amazing how much faster it is, know what this new viewport hair also looks much better using the hair object, hairlines display with accurate CPU material and enhanced shading activated. Fortunately does not cure baldness and the viewport filter options have been reorganized and can now be saved as presets.
EJ Hassenfratz (15:19): So you can save different presets for different workflows. And there's also the new geometry only mode. So you can actually check out your scene without any of that clutter, Marie Kondo your scene and render out a quick play blast with only your geometry visible using viewport render, but there's also a new viewport downriver. So you can tame heavier scenes that way as well. Over the past couple of leases, the modeling commands have been slowly being migrated to the new modeling core. And with S 22, this migration's basically done. This means that you have better selection tools with more reliable results. As I showed you in the UV workflow, it's got better Vertex maps, and bevels have been given a speed boost and they also have better preserved UVS to name a few benefits. Another thing is that the magnet tool and brush tool have been upgraded to share a lot of the same features.
EJ Hassenfratz (16:17): And one of my favorite tools that really helps cover up my horrible modeling skills, the iron tool now respects boundary edges. So you can iron with more control. Now, if you've never used the iron tool before holy cow, this, this is like a modeler's best friend, especially a newb modeler's best friend. It helps iron out all your Genki geometry that you may be building, uh, and kind of cover up your shortcomings. And it actually helped me a lot modeling, uh, UV the whale, as you can see here, another update is with the extrude object auto extrude direction. Now extrudes work in the direction of the spline shape. So no longer do you have to define specific axes to get the extruded in the right direction. So nice little quality of life feature.
EJ Hassenfratz (17:14): Now this next feature is going to get people who work with game engines or AR and VR, really excited because with cinema 4d S 22, there's a new glTF export, or now this was previously available via maxon labs, but it's built in now, which is awesome. If you're not familiar with glTF glTF is a common 3d file format compatible with game engines and AR and VR apps. Like my, one of my favorites, Adobe arrow, and it's called the JPEG of 3d because of its efficiency. And it's great for three product visualizations for websites, a lot of other applications now in cinema 4d, if you want to export out as glTF just go to file export in navigate to glTF. Now this has a lot more settings and a lot more compatibility than like FBX or even OBJ for a lot of these, you know, game engines and stuff like that.
EJ Hassenfratz (18:08): And the settings are pretty straightforward. You have to file formats to choose from the glTF version and the binary version. I've noticed that some websites and some apps like Adobe arrow prefer the binary version of this file format. So just so you know, both of them are in here. It can support animation. So position scale rotation, animation, key framed animation. It also supports certain types of morphs like pose morph in any morphing PLA animation. And unfortunately it doesn't support like baked point cash or anything like that. Basically you really have to just deal with morphing PLA animation. It also supports skin, which is perfect for our little quality here that is rigged with Mixamo and has all of its animation driven by key frames and skin deformers. So that is supported. That's great for anyone who is into animating 3d characters. Those one thing to keep in mind when exporting out joint or skin animation, is that a lot of apps only support a certain amount of weights assigned to a single Vertesi.
EJ Hassenfratz (19:19): So for apps, like say Adobe arrow, you only have a vertices, have four weights assigned to it by four separate joints. So, one thing you want to do is when you are exporting out your character animation is to check your weights and see how many weights are influencing a single Vertesi. In one way you can do that is by double clicking your weight tag on your objects, and then just hovering over all of the vertices. And you can see how many vertices are kind of influencing here. So if you had an app that only supported four verses, you can see that all of these, most of these vertices have more than that for now. If the app happens to support six or up to six, then your you're good, then so always pay attention to the app that you are exporting to and see what those limitations are because they do very well.
EJ Hassenfratz (20:12): Let's move on to materials and glTF supports cinema 4d based materials really well. Actually it supports your basic color channel to derive color, and it supports a single layer of C4D reflectance. So it's poor, it's your specular or roughness value. So that means that if you want to control the level of reflection, you would control it via the roughness as the reflection, strength doesn't do anything in that kind of glTF export format. So just to say that if you want something really diffuse, make sure your roughness is up really high. Let's move on to textures where there's a few things to keep in mind when exporting out using glTF. Now, if you're using shaders like noise or tiles, or you're using polygon selections or anything like that, you need to make sure that you're baking out those textures and exporting out a UV. In, in previous versions of cinema 4d, this would actually be a pain, but this is where a new bake UVS function that actually utilizes that new auto UV algorithm that I talked about earlier comes in handy.
EJ Hassenfratz (21:25): This baking method is perfect for situations where you just need a quick and dirty UV map to help you export models with textures and TAC to game engines or AR or VR applications. So here I have my UV, the whale, and I've textured this guy using a bunch of different methods. I have this texture here right here. That's a polygon selection. I have this just base blue material. I have a material that's actually utilizing a Vertex map. You can see right here, this little Bailey, I don't know what the, the underbelly with that, that thing is utilizing some noise. And I'm utilizing an alpha that is coming from a Vertex map to just kind of mask out the noise to just a certain parts of the object of our character here. And then I also have just some flat map projection spots that, uh, you know, this is the, that cross your fingers and choose cubic, uh, kind of deal.
EJ Hassenfratz (22:30): And this is, you know, your old jenky way of just cobbling together, a bunch of textures and mapping them, do it using different projection methods. And, you know, if you just save this out, you you'd have no way to translate this to glTF and export this out to another app. But now that we have the new baking method, we can easily do this and combine all of these different map, textures into one image, texture that we can export out. So to do that, we're going to select the object. We want to bake out. We are going to go to object and we're going to choose big objects. Now, the one thing we need to keep in mind is we do not want to keep UVS because what this big object commands is going to do, if we have this unchecked is used that auto UV algorithm and create one for us automatically.
EJ Hassenfratz (23:19): So I'm going to choose replace objects. Let's do maybe two K here and a, we can just choose whatever format we want and we'll bake. You'll see, there is that auto UV that was just created. If we hop on over to our body paint, UV edit, you can see that even though we had no view V before that baking command just helped us out and made one for us, which is really cool. So now we have the single image texture, and one of the things you're probably yelling at me through your monitor about is all of this weird janky stuff like what's going on. If I render this, we have all these smudges. It's like UV, the whale got into some magic markers and just went to town on his face. Now, the problem with this, isn't actually having anything to do with the UV unwrapping.
EJ Hassenfratz (24:10): It's all about the fact that we're using a subdivision surface here to subdivide our model after the UVS are applied. Now, typically, you know, you could just bake the SDS in and then do that bake, uh, the bake object option. You won't run into this issue, but since we baked the base geometry, Amber subdividing it, we have to pay attention to this subdivide UVS option because it's actually how the subdivision surface is handling the UV. Okay. So right now edge is no bueno. It's not working well at all. We're getting those smudges. So what we need to do is just change this from edge to boundary. And you'll see in our viewport that updated, if we render this Walla, it looks fine. And the only problem now is the fact that interview port, we know this renders fine, but our viewport, it looks like garbage.
EJ Hassenfratz (24:59): We have all of these weird seams. Now, if we want to improve that and actually get rid of all the seams and our viewport, all we got to do is go into our material that has that baked out texture, just go into the viewport options and for texture, preview size, just go to no scaling. And we'll see the full Rez version of our texture applied to a model. And it's looking nice. Looking good, no more seams, no, uh, garbage lines. So we can render that. And we're, we're good to go there too. Okay. So we just needed to change that one thing in the subdivide UVS, we basically generated a UV map, baked it out and baked all our textures with a single click of a button, essentially. And now we're ready to go ahead and export this out via glTF to use in game engines or any AR VR apps like Adobe arrow.
EJ Hassenfratz (25:49): So we'll go to export glTF. And the only thing we need to worry about here is of course that we have textures enabled, and we also need to make sure that we have UVS enabled too. Cause remember we generated UVS that are then applying this texture, mapping this texture to our geometry. So we need to make sure we're exporting those as well. And all these other optional items are fine to just leave checked on. We'll just click. Okay. And you're going to bake a glTF tamp and that's just temporary. It'll actually export out a actual glTF file and we'll allow we're ready to go. Now you have to do is just navigate to a website that supports glTF that you can test this out in a web browser, like sandbox dot Babylon, js.com and simply drag and drop your glTF file into the browser window.
EJ Hassenfratz (26:38): And while LA there's UV the whale, and we can change the type of lighting in our view. And I mean, this is, this is what's really cool about glTF is you can easily take your models from cinema 4d, export the Mount into glTF format and start rocking and rolling in the world of AR VR and even play around with things like Adobe arrow and getting your characters in there. And it's just really cool to see your work outside of a computer monitor in, in like a, an iPhone or something like that. That's only a few of the many enhancements coming to cinema 4d as 22. Now we'll be covering more of these features more in depth, like UVS in the future. So stay tuned for that. Now, if you want to learn more about all of the features that were added to cinema 40 S 22, be sure to check the description, we're going to have links to Maxon site. That's going to list all of the new features and a lot more information. Now, if you want to keep up to date on everything, cinema 4d and the industry as a whole, be sure to subscribe and I'll see you in the next video.
ENROLL NOW!
Acidbite ➔
50% off everything

ActionVFX ➔
30% off all plans and credit packs - starts 11/26

Adobe ➔
50% off all apps and plans through 11/29

aescripts ➔
25% off everything through 12/6
Affinity ➔
50% off all products

Battleaxe ➔
30% off from 11/29-12/7
Boom Library ➔
30% off Boom One, their 48,000+ file audio library
BorisFX ➔
25% off everything, 11/25-12/1

Cavalry ➔
33% off pro subscriptions (11/29 - 12/4)

FXFactory ➔
25% off with code BLACKFRIDAY until 12/3

Goodboyninja ➔
20% off everything

Happy Editing ➔
50% off with code BLACKFRIDAY

Huion ➔
Up to 50% off affordable, high-quality pen display tablets

Insydium ➔
50% off through 12/4
JangaFX ➔
30% off an indie annual license
Kitbash 3D ➔
$200 off Cargo Pro, their entire library
Knights of the Editing Table ➔
Up to 20% off Premiere Pro Extensions
Maxon ➔
25% off Maxon One, ZBrush, & Redshift - Annual Subscriptions (11/29 - 12/8)
Mode Designs ➔
Deals on premium keyboards and accessories
Motion Array ➔
10% off the Everything plan
Motion Hatch ➔
Perfect Your Pricing Toolkit - 50% off (11/29 - 12/2)

MotionVFX ➔
30% off Design/CineStudio, and PPro Resolve packs with code: BW30

Rocket Lasso ➔
50% off all plug-ins (11/29 - 12/2)

Rokoko ➔
45% off the indie creator bundle with code: RKK_SchoolOfMotion (revenue must be under $100K a year)

Shapefest ➔
80% off a Shapefest Pro annual subscription for life (11/29 - 12/2)

The Pixel Lab ➔
30% off everything
Toolfarm ➔
Various plugins and tools on sale

True Grit Texture ➔
50-70% off (starts Wednesday, runs for about a week)

Vincent Schwenk ➔
50% discount with code RENDERSALE

Wacom ➔
Up to $120 off new tablets + deals on refurbished items


Start Your 3D Journey in Cinema 4D
Master the essentials of 3D modeling, lighting, and animation in C4D. Enroll in All-Access to unlock C4D Basecamp and 50+ other courses.