All-Access Pass
Unlimited access to 50+ courses, unlimited critique, live events, and 24/7 community. Join School of Motion All-Access today.

Learn How to Leverage Adobe Aero to Create Immersive Augmented Reality Experiences with Your 3D Animation Designs from Cinema 4D
Augmented Reality (AR) is a hot topic in the tech world, as we reported from Adobe Max earlier in 2019. A foreseeably democratizing force in AR, Adobe's Project Pronto would combine the benefits of video prototyping and AR authoring in one cohesive system, allowing non-technical designers to express AR design ideas; meanwhile, for professionals, the already available Adobe Aero, an Adobe Max Sneak in 2018, allows designers — with no coding experience — to create AR experiences that blend the physical and digital worlds. Plus, with Aero you're not confined to Adobe apps. In fact, it's never been easier to incorporate your animated Cinema 4D objects and characters into an immersive and interactive AR experience.
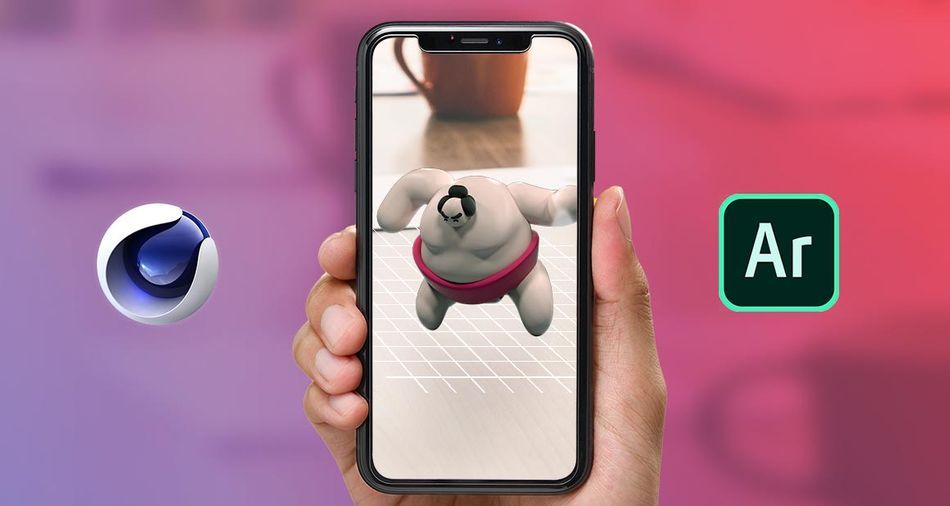
In today's tutorial from School of Motion 3D Creative Director and Cinema 4D Basecamp instructor EJ Hassenfratz, we demonstrate how to use Adobe Aero to create AR experiences using your C4D assets.
Augmented Reality with Cinema 4D and Adobe Aero: Tutorial Video
{{lead-magnet}}
Augmented Reality with Cinema 4D and Adobe Aero: Explained
Available with a Creative Cloud subscription, Adobe Aero allows you to design and animate interactive AR experiences without the need for code.

Aero works with PSD files, 3D objects and characters, and even pre-built characters from Adobe Mixamo (which now has its own Send to Aero button) — and comes with several 3D starter assets, including primitive shapes, furniture, plants, product packaging, frames, typography, animated assets, and more.
PREPARING YOUR CINEMA 4D ASSETS FOR AUGMENTED REALITY IN ADOBE AERO
To optimize your Cinema 4D assets for use in Adobe Aero, you'll want to focus on rendering and processing:
- Polygon Count
- Materials
- Textures
- Animations
AERO-SUPPORTED POLYGONS
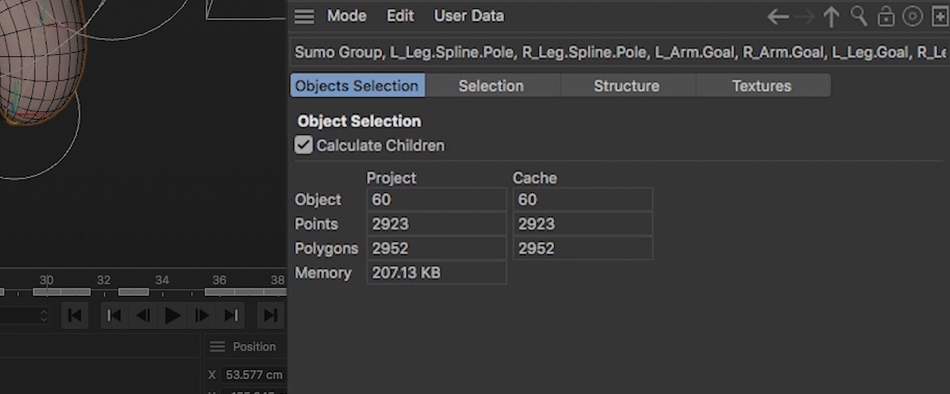
Adobe Aero supports 130,000 polygons. To determine the number of polygons in your scene:
- Select all of your objects
- Go to Mode
- Select Project Info
AERO-SUPPORTED MATERIALS
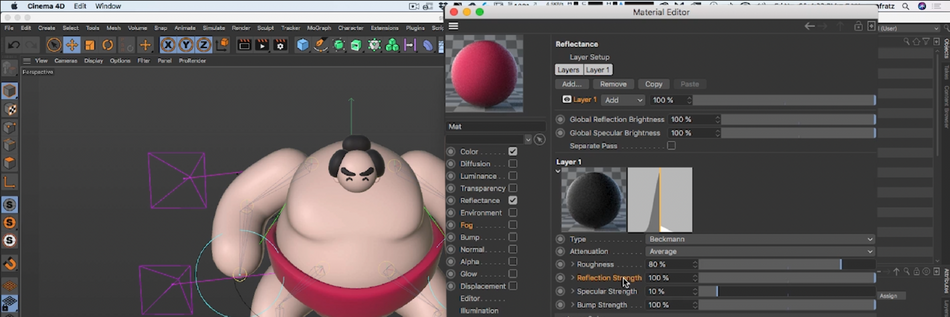
Aero supports physically based rendering and standard materials from Cinema 4D, including base color channel, specular/reflection, ambient occlusion, and emissive and alpha materials.
AERO-SUPPORTED TEXTURES
To be applied properly, Aero requires that all textures be image based, and all image-based textures must be scaled down to 2k or below and saved in a 1:1 dimensional ratio.
AERO-SUPPORTED ANIMATIONS
Aero supports the following animated parameters:
- Position
- Scale
- Rotation
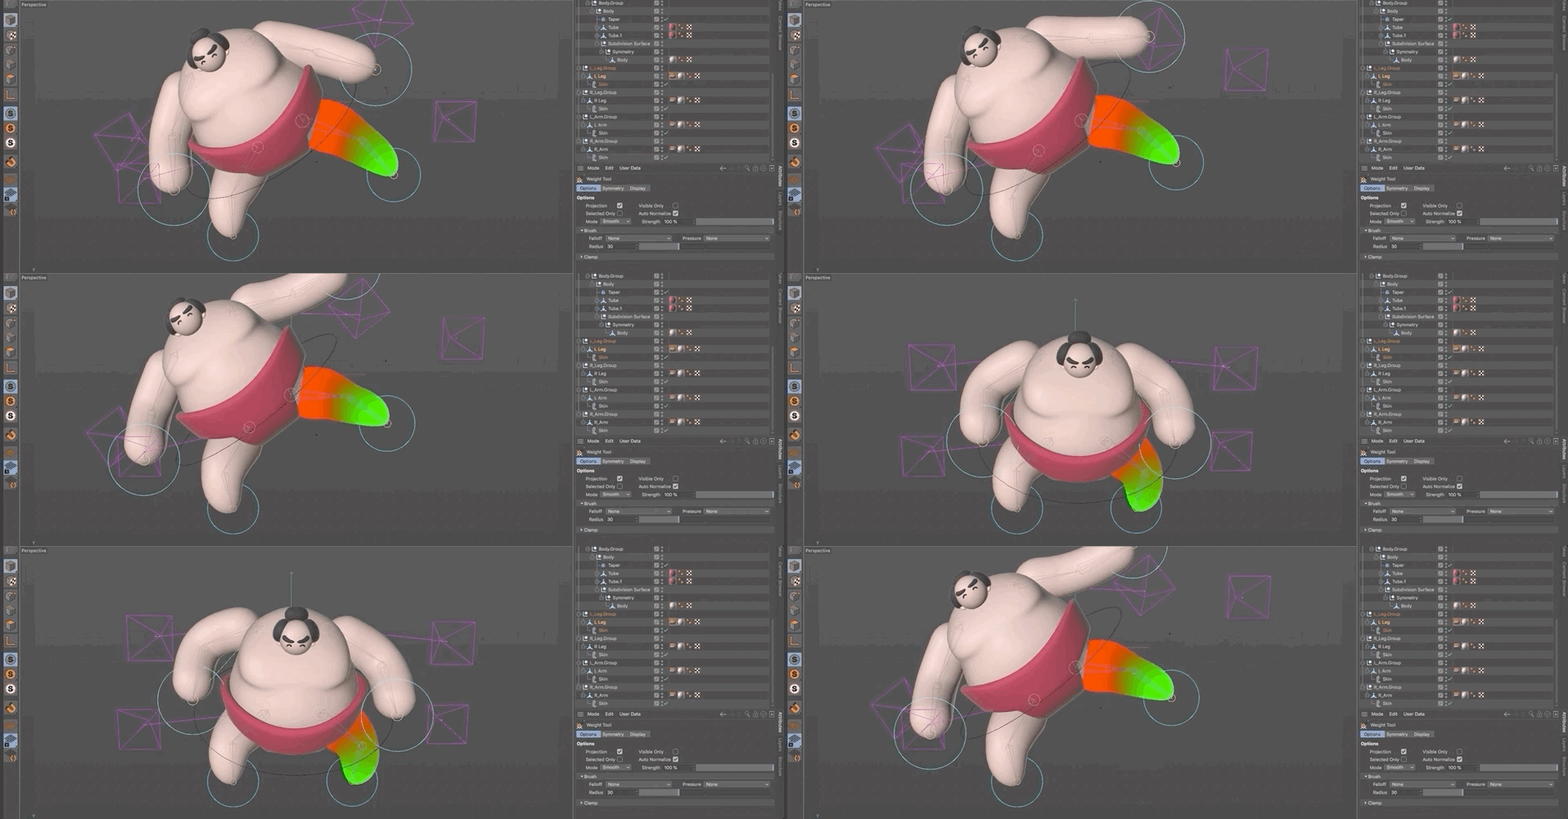
- Joint/Skin with Weights (limited to six joints per vertex)
Aero does not support:
- Pose Morph
- Point Level Animation
- Fluid
- Cloth
- Dynamics
- Softbody Dynamics
That means that, if you've been using deformers to dynamically drive animations in Cinema 4D, Aero will not support the Jiggle, Displacer, Spline Wrap, etc.
You can still use the Mograph Cloner and Rigid Body animation for setting up your scenes; however, they'll need to be 'baked' out with PSR keyframes.
EXPORTING CINEMA 4D FILES FOR ADOBE AERO
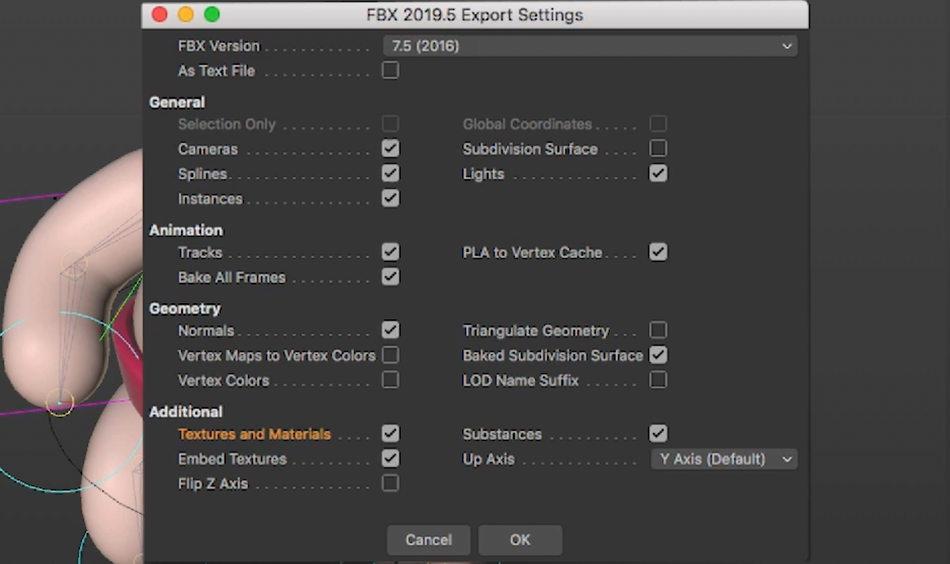
To save your Cinema 4D assets as files that can be used in Adobe Aero, export to the FBX file format:
- Click File on the top left
- Click Export
- Select FBX
- Uncheck Subdivision Surface
- Check Baked Subdivision Surface
- Enable Textures and Materials & Embed Textures
- Click OK
And then, once the files have been exported, locate the "tex" folder and compress it with your FBX file.
UPLOADING YOUR 3D MODEL TO ADOBE AERO
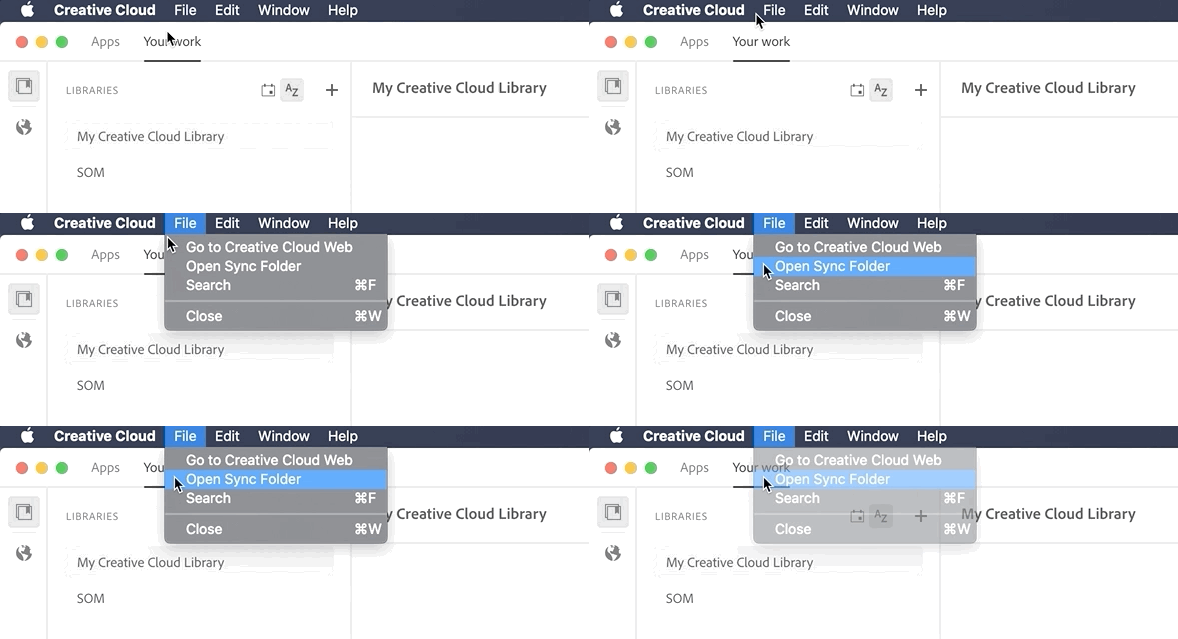
To access your 3D files in Adobe Aero, upload them to Creative Cloud:
- Launch the Creative Cloud app
- Go to the Your Work tab at the top left
- Click the File menu
- Select Open Sync Folder
- Drag and drop your newly compressed file into this folder
PLACING YOUR 3D MODEL IN ADOBE AERO
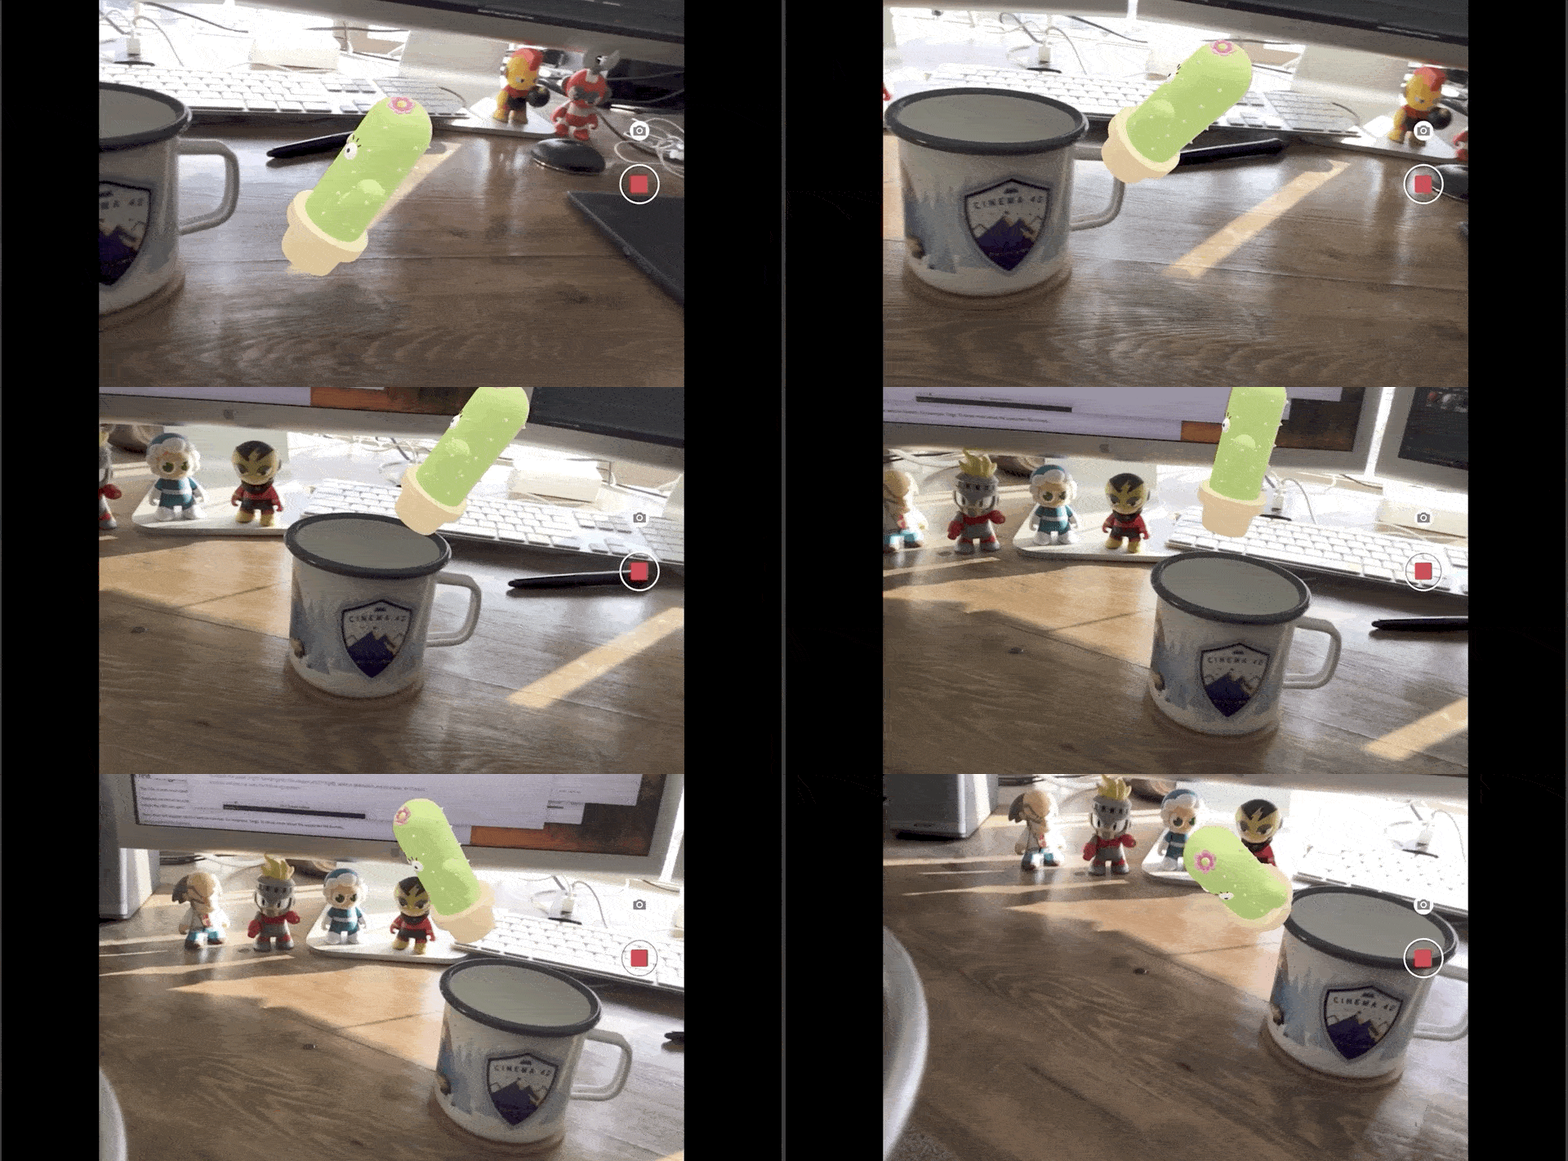
Once you've set up your scene in Adobe Aero, tap the + icon to add the file you stored in Creative Cloud, and click Open.
Mastering Cinema 4D for Incredible Adobe Aero Assets
If using in-app 3D starter kits isn't for you, and you want to create your own assets for use in Adobe Aero, you'll want to master Cinema 4D — and there's no more effective course online or off than Cinema 4D Basecamp from School of Motion, created and taught by Cinema 4D expert, 3D rig and tool developer and creator of this tutorial, EJ Hassenfratz.
In Cinema 4D Basecamp, you'll learn modeling and texturing, compositing, keyframes and other animation methods, cameras, staging and lighting.
And, as with all of our courses, you'll gain access to our private student groups; receive personalized, comprehensive critiques from professional artists; and grow faster than you ever thought possible.
-----------------------------------------------------------------------------------------------------------------------------------
Tutorial Full Transcript Below 👇:
EJ Hassenfratz (00:00): With Adobe arrow, it's never been easier to take your cinema 4d, animated objects and characters and transform them into immersive and interactive AR experiences. You won't want to miss this.
Music (00:15): [intro music]
EJ Hassenfratz (00:23): One of the biggest barriers to entry for motion designers to get into the world of AR with the sheer amount of complexity, coding, and scripting that needed to be involved to get an animated object or character from cinema 4d or any 3d app and into AR with all that animation and information and tack with Adobe arrow, it completely removes those barriers and allows you to program your own interactions and bring in animation from cinema 4d with no coding experience required. It's so easy that anyone even my mom could create their own AR experience. So it's crazy. I think Adobe era is going to be a game changer and I can't wait to see where Adobe arrow takes us as far as getting average motion designers into this new medium and new platform. So let's go ahead and jump in and discover how easy it is to get cinema 4d animations, or just regular 3d objects into AR with Adobe arrow.
EJ Hassenfratz (01:22): Now, before I jump into center 4d, there is a slight update to mix ammonia. If you don't know about Mixamo comes with your creative cloud subscription, but it automagically can rig and animate your character using mocap data. It is fantastic if you haven't played around with it yet, I highly encourage you to try it. But if you want to do character stuff, there is this button that has been added to those website that you can directly send a character with animation, apply to it like any character from this characters menu here, you can upload your own character, but then you can go to the animations and you can actually apply your own animations to your character and click this, send to arrow button, and it'll actually save it to your creative cloud file library, where you can then just directly bring that into Adobe arrow and place it anywhere in reality, using AR.
EJ Hassenfratz (02:15): So this is a really cool update to easily just get an asset, create a character, create an animation and send it to arrow just to play around with it. So I wanted to mention this right off the top, that there is this new center arrow button that you can use characters or upload your own and just send it directly to arrow through mixed modes website. Let's go ahead and talk about if you wanted to create your own character or your own object with animation in cinema 4d and how you can get that into arrow. All right. So here is my little animated Sumo character slamming his leg down. Now what we're going to do our aim is to get this guy from slamming his leg in cinema 4d, and having him do that projected on my computer desk that I'm sitting at right now in AR using Adobe arrow.
EJ Hassenfratz (02:59): So to make that transition, there are a few things you need to keep in mind when building assets for AR, because what you're doing is you're going from a fully loaded computer with a lot of computing power. And what you're going to be doing is trying to view that same thing in AR space, using a mobile device that has way less power. So we need to be mindful of how we're building things, animated objects, or just regular objects or characters in cinema 4d to have it actually play back on a mobile device. So one of the few things that you need to keep in mind, and this first thing that I'm going to talk about is something you should keep in mind, even when you're just not even working for AR, but actually just working in normal workflow. And that one thing is polygon count.
EJ Hassenfratz (03:42): So if I go to display garaging, as you can see all my polygons here, one thing to know about arrow is that there is a limit of 130,000 polygons. Now, if you want to get a sense of how many polygons you are seeing is made up of just go to your mode, go to project info. And what I'm going to do is just select a single object in my object manager, go command or control key a to select all. And let's just go back into our project info panel here. If we go to the object selection, you can see, we have a whole bunch of polygons here. It's 2000, almost 3000. And one thing you're going to notice is that we are not even calculating things like primitives here. So primitives very important to also kind of dumb down the rotation segments or any kind of segments to not have something that's super, super dense like that.
EJ Hassenfratz (04:35): When you start seeing a polygon density that is almost black here, that is way too much. So let's bring this down to like 65. So you just need enough detail to make this look nice and smooth. Okay. So let's just say, let's go and make all these primitives editable. Same thing with our subdivision surface subdivision surface and any generator object, or also things that need to be taken into account. So if you have a very high subdivision renderer, bring that down to just have this look smooth enough. So something like two is pretty good for here, and let's just make that subdivision surface editable. And now we have all editable objects here. Now we can go ahead and hit command or control a, to select all. And then let's see what our project info says as far as our polygon count goes. So in this simple scene, we have over 7,000 polygons.
EJ Hassenfratz (05:28): So polygons can add up. So if you have an even bigger, more detailed character or detailed objects, always keep track of how many polygons you have. Because again, something as simple, like this is over 7,000 polygon. So that is a biggie. Keep your primitives and your subdivision surface in all your generator objects, have those subdivisions just high enough. So you get the form of your object and it looks smooth, okay. With a single character like this, I probably could have made more subdivisions, but you know what, even if you have more subdivisions, it could slow down in Aero. So let's go out of display, grudge, shading, and just get back to our normal shading. And let's actually talk about Shane. Let's talk about materials. So what arrow supports is your basic one of the mill kind of standard material. Okay. So I have some just standard materials here.
EJ Hassenfratz (06:18): If I double click here, you can see that I only have color and reflectance going on here with a Beckman, a type of reflection. So your standard default reflection type in that is what arrow support. So it supports specular. It supports reflection and it supports the blurriness of that reflection. Okay. So one thing to keep in mind with that is that in arrow, it's not actually going to reflect objects in your, your, your real world scene. So if you have a computer monitor, it's not actually gonna like sense that there's a computer monitor, read that and reflect that computer monitor onto your object. It's kind of going to have like a kind of fake HTRI reflection that makes it kind of look like it's fitting in the scene there. So don't really worry about like accuracy. It's not going to reflect things in your actual room or my table, but it does a pretty good job.
EJ Hassenfratz (07:13): Okay. So one thing to keep in mind with materials, again, it supports the basic color channel that you can choose a color. It can support textures as well. One thing to note about textures though, is that you need to have the base texture scale down to about two K and Adobe recommends that materials are on a one-to-one. So, you know, 128 by 128, kind of like a square, but for my little character here, I'm not using a texture or anything like that. I'm just using color. Uh, another thing to keep in mind, as far as textures go, is that if you're using say a noise shader or like a tile shade or anything like that, you need to bake that out into a texture and actual image file, like a PNG or JPEG for it to work. Okay. This also accepts alpha as well. If you do have some kind of alpha, so those are the things to keep in mind, but if you're just doing plain old color and reflectance, you are good to go, you just really need to set that up.
EJ Hassenfratz (08:11): The typical way you would. Uh, one thing to keep in mind is that when you bring the reflection into arrow, the reflection strength is really not going to do anything. So say you want a very subtle amount of reflection. You're going to really want to blur and create more roughness to blur out that reflection. So it's a lot more subtle. So I'll give this a value of like 80 roughness for this little band here, and then maybe for the ski. And I have a little bit of roughness, maybe 50%. So you can have like somewhat shiny skin. Okay. And same thing with the hair. Maybe we crank up a little bit of roughness there. So it's even more slight and you can also, you specular and up that strength, or just add a whole nother layer of specular here, if you want it to. So we can get our, you know, specular here and, you know, crank that up if you wanted to.
EJ Hassenfratz (09:05): Uh, but I'm actually not going to use any specular at all. I'm just going to go straight reflection here. Okay. So that's all you really need to know about materials and textures. Let's move on to animation. So arrow supports all position or translation, scale and rotation. Those are all fully supported. So if I go into my timeline here, you can see, I have all these position, key frames on say the torso and the head, all that good stuff. And the other thing that it supports is joint animation with skin deformers with weights. So if I go to my leg here and I command or control double click on that weight tag, you can see that the animation that is coming from those joints and being applied via the weights and the skin deformer, these will translate nicely to arrow. Now, one thing to keep in mind is that we have weight influences on each vertices here.
EJ Hassenfratz (10:02): Okay. And what that means is that we have two joints influencing the mesh of our character here. Now with this character, it's very simple, you know, it's just using two joints for the legs and the arms. But one thing that's very important is that in arrow, the weight influence on vertices are six joints per Vertex. So for a leg with two joints, we're good because we only have two joints influencing each Vertex at any given point, but say you have facial animation or you have fingers. There's a lot more joints to influence vertices. So that's where you can get into trouble. So you can only have so much of a complex type of rig for it to translate over to arrow. Okay. So another thing to keep in mind is that pose morph point level animation, fluid clock dynamics, and soft body dynamics are not supported.
EJ Hassenfratz (11:00): So if you had anything animated with like a spline wrap or something that I had for this initial animation is I had a jiggle to form around this guy's belly. Cause of course, I mean, I need to get some jiggle on that little belly going on there that could not be export it out because if I wanted to bake a juvenile former, I would need to bake it out to PLA or point level animation. And point level animation is not supported by Adobe arrow. So that kind of stinks. It's a limitations kind of a limitation of a lot of AR these days, but maybe in the future, we'll get that full support. So if you wanted to get around something like, uh, you have MoGraph cloner animation, or you had rigid body animation, this all would need to be baked out to PSR key frames using your typical, uh, going into the timeline, say this leg had, you know, rigid body dynamics on it.
EJ Hassenfratz (11:52): I would and drop this leg into here and then just go to function, bake objects, and then miss make sure that we're baking to position scale and rotation there. Okay. So again, PLA is not supported. So if you can bake say MoGraph cloned animation that has dynamics applied to it. You could still bake out the position, scale and rotation of that. MoGraph a cloner movement via factors or via dynamics using this bake objects command. Okay. So with my setup here, I'm all good because I'm using position scale and rotation and I'm getting animation via skin deformers and weights in joints. And basically that is the, those are the two major ways to get animation from cinema 4d and into an app like Adobe arrow. Okay. So we're all good. Let's get ready to export. So got this animation. What I'm going to do is go ahead and go to my file.
EJ Hassenfratz (12:47): And we're going to go to export now the main file format that makes sense for cinema 4d users to export into arrow is FBX. Now glTF is also supported. It's a major, uh, AR format. And at the time of recording this tutorial, the only way to get glTF formats out of cinema 4d is via a plugin that you can download off of the max on lab's website called glTF export that we'll have in the description section. You can get the link there, but check that out if you want to do that, but you don't even need that for the Adobe Aero workflow because FBX works really nicely from all of my tests. So let's go ahead and choose FBX here. And basically the only setting you really need to worry about is number one, subdivision surface. So I did have a subdivision surface here, but I made it editable.
EJ Hassenfratz (13:44): You could do that. Or if you have a live subdivision surface, you can have that big down automatically by unchecking subdivision surface. And just making sure this bake subdivision surface is checked on to make sure that when you have a live subdivision surface, it actually breaks out to that smoother, highly subdivide surface. And that is then the end result. If you have a live subdivision surface in here, and you just have this checked on this subdivision surface, what's going to happen is that the subdivision surface is just going to go away. And what you're going to be left is with that chunky, uh, base level of geometry. Okay. So if you have subdivision surfaces, make sure you uncheck that and make sure you bake subdivision surface, or you can just make it editable. Like I did by selecting that object and hitting the C key to make editable.
EJ Hassenfratz (14:35): Now, one thing to point out is if you have live primitive objects in your scene or sweeps or extrudes, you know, generator, objects like that, anything other than subdivision surface, those will automatically be baked out. So you don't have to make everything editable. If you don't want to, once you export out as an FBX, it'll just bake all those primitives for you automatically. Now, what we're going to do is basically all of these settings are good. If you have textures and material, make sure that's checked on and the embed textures. And, but right now I don't have any textures. I just have those base materials. So we're all good here. I'm going to click. Okay. And I'm just going to go and save that to my Sumo joints folder there. And it's going to export our FBX here. Now what we can go ahead and do is open our creative cloud menu here.
EJ Hassenfratz (15:25): And we're going to click on this little globe and just click on cloud documents. And what this is going to do is launch into our creative cloud browser here. And you can see, I have some documents here. What we're going to do is we're going to go into our sinked files and let's go in, bring our file that we just saved out our FBX file. Let's go into our folder here. So there's my Sumo joints FBX file. Now, if you actually had an image texture as a material, what that will save out as is a textures folder. If you have those separate textures in this separate texture folder, make sure you zip the FBX and the textures in a single zip file, and then upload that resulting zip file to the creative cloud, uh, sync files area here. So you can actually utilize an arrow, can read those textures and apply them.
EJ Hassenfratz (16:23): So, uh, but for our instance, I don't have any image textures here. I just have straight up, uh, color channels and material and reflections. So I'm just going to go ahead, click open. You can see, I already have a little Sumo object here, uh, but that's the copy. So now what we can do is we have this same to our creative cloud, and now you can access this FBX file from Adobe arrow. So let's hop over into my iPad and let's get my Sumo onto my computer desk. All right. So here we are in Adobe arrow and let's go ahead and create a new scene. So what we're going to do is going to go to our lower left here and create new. And what we're going to do now is slowly pan our device to track the surface of my table here. And you can track as far and wide as you want.
EJ Hassenfratz (17:10): And you can see, I can even get my monitor here to register as a 3d plane, which is really cool. Hey, there's my Sumo character in my computer. And there we go. We've got all of these surfaces here. Now let's go ahead. And we're just going to tap to create an anchor point. Okay. And now we're going to be able to do is click this lower left plus button here, the plus circle. And we saved our FBX file to creative cloud. So I'm going to click on creative cloud and that's going to bring up our creative cloud assets. And here is my Sumo joints. Copy FBX file. So I'm going to select that and we have no preview. I'm just going to click open in the lower right here and it's going to start calculating. I'm just going to tap to place that asset right there.
EJ Hassenfratz (17:53): And it's thinking, it's thinking in that boom, there's my Sumo, my sumos up there, but my Sumo is down here too. Let's go ahead. I'm just going to pinch to scale this guy down. I can click to move just kind of scrub around here and that's looking good. And now what I can do, it's not moving, but what I can do is quickly go ahead and add and apply that animation from our skin deformer and apply it to our characters. I'm just going to click on the character. I'm going to go to behaviors here in that bottom menu, and here's where we can make our object interactive. So what we're going to do first is create a trigger. Now we have three sets of triggers. One is where it just starts at the beginning of the, the, uh, experience. So you don't need to trigger it any other way.
EJ Hassenfratz (18:41): It just starts automatically. You can have it trigger by touch. So you just touch and tap on your screen, tap on the object to start that animation. Or if your device enters a certain proximity of the character or the object, it will then trigger the animation that way. So a lot of flexibility as far as how to trigger in animation. So I'm just going to do, let's start with a touch. Okay. So once we do that, we now have to define an action. This is like so great because it's all like little nodes and there's no programming whatsoever. Okay. This is so cool. Like I'm, uh, I'm not technically inclined, but like in, this is so easy for me. And that's, that's what I love about Adobe arrow. So here we go. Let's click on action. Look at all these actions we have. So we have just general animate where we can actually, you know, create our own motion path by just clicking on our, our, uh, screen and moving our finger around.
EJ Hassenfratz (19:36): Uh, we can also add a bounce or, you know, move or scale or rotate all this stuff. And what I'm gonna do is I'm gonna just going to focus on bringing our animation from cinema 4d and applying it to our characters. So I'm going to go into anime and you're gonna see there's my subject, my FBX right there. Okay. But then we have the animation here and we have [inaudible] key frame, scale, key frames, translation, key frames. I'm just going to keep it at quartz herniation. And I'm going to click the play button in the top right of this window. And you can see there is our character. Now it's animating, but it's not animating correctly because the right leg here, I'll zoom in here. You can see that the right leg, the sumos right leg it's are to our left is not planted on the ground.
EJ Hassenfratz (20:21): It's kind of going through now. This is a little bit of a quirk that I've, I've noticed them kind of work through what I found that fixed it is. If you go to Quattrone and key frames, change it to something else and then hit play. Now, you'll see that, that, that fixed that. I don't know why, but I can go back to quad Turney. And you'll see if I hit that play button again, it's, it's fixed. It's actually recognizing the skin to former animation now and not just the position rotation that was applied to the torso of my character. So, uh, what's cool is we have the option to change the play count so it can loop, you know, however many amount of times that we want. So we can also have this set to just loop infinitely. Uh, but what I'll do is have this play three times and you can even have a delay.
EJ Hassenfratz (21:06): So the moment you touch the character, maybe it has like a three second delay before it actually plays. So we can, you know, maybe do that, give it a second of delay. Let's go back to the top here and let's hit play and you'll notice a delay and there it goes. And now it's going to do it three times. You can see that the foot is no longer planted again. So what I'm gonna do is I'm just gonna flip back and forth to this. [inaudible] hit that play button again. We're going to get that delay. And now it's, it's planted again. So a little bit of a quirky kind of thing, uh, to go back and forth between the quants hernia and in the translation. Uh, you can see that we actually lose the, uh, the planting after the first loop. So let me just turn off this delay, cause we don't want to wait.
EJ Hassenfratz (21:53): I don't want to wait and let's hit play again and see if that fixed it so that fixed it. So going back between translation, key frames and quantity and key frames seems to fix that pivot issue. So I don't know if you'll discover this issue in your own animation, but at least that's how I figured how to get past that little, little bit of a hitch in this animation. So once we're good, once we have the amount of play count and everything, we can now hit that bottom check bark, a check mark there, and we could either program another action or we can just be like, okay, that's cool. That's all I want this character to do. Uh, and now what we can do is we can actually, you know, say you want to record this and post it to Instagram, get them grams, get those likes.
EJ Hassenfratz (22:37): What we can do is go from edit mode to preview mode. And you're going to see that this is actually just going to play automatically. And you'll see that that's because the behavior is set to touch there. So what, what happened there? So let's go back to preview. And again, this is another one of those little hitches that like it'll play automatically, but if you go back to edit and then back to preview, it will wait for your touch. It'll wait for you to touch the character. And so before I even touch the character where I'm going to do is click the record button on the right side there. That top little camera button is if you touch that, you can actually just take a snapshot and it will automatically save to your eye photos, library, your photo library. So what I'm going to do is I'm just going to hit the record button and now I'm recording this whole screen capture here.
EJ Hassenfratz (23:26): Okay. So now I'm going to, I'm going to touch my character and that's going to trigger my stopping animation. He's so mighty, he's so tough and I can touch it again and trigger that three, a animation loop all over again, which is really cool. So I can create my own little cool choreographed animation looking good. I'm just going to stop, uh, recording now. Okay. So that's cool. I can even go ahead and I have this scene laid out. I can share this scene with this character in those movements to, uh, anyone else as an Aero experience or a reality file or this universal scene description and what this will allow someone else to do is you can send this project file over and they can actually play it and open it in their own environment when they bring it into their own Adobe arrow, uh, app.
EJ Hassenfratz (24:18): Okay. So if your client wants to look at this and see the animation and see the, uh, interaction kind of stuff and play around with it, you can save these, uh, little files and send them, and they'll just open up Adobe or on their end, open up that scene file. They'll have to track their own, uh, room and own a environment, but then they can go ahead and do those same triggers and see that same animation that we are right now, which is really, really cool. So again, we recorded that. So I can go into my photos here and there is my photo. Okay. There's the, my animation and there's my V or my video, at least that I recorded. So I can go ahead and send this to, you know, Instagram or wherever you want to show this, tweet that out, get all those dope likes.
EJ Hassenfratz (25:05): And this is just really, really cool. And again, I think if you, if you create a single still frame, that'll show up here as well, but let's hop back into Adobe arrow. And what I'm going to need to do again is just rescan my surface. And there's my little character. Again, let's go and scan over here and I'll tap to place in there. Now let's go and do a different, uh, behavior actually, let's, let's just go ahead and delete this. And so I just showed you how to apply your animation from cinema 4d and bring it in here, but what if we wanted to add a different character? So I happen to have a different non-animated character that I made in cinema 4d gets this little cactus character. I'm just go ahead and open that number's going to tap to place that here and use it.
EJ Hassenfratz (25:48): Here's my little character, my little cactus lady, and I'll position this character there, and I'm going to click on it. And there's no animation that I applied to this, but the cool thing about Adobe arrow is it was that easy to bring in my animation from cinema 4d that I didn't in cinema 4d. It is just as easy to program your own animations to a, a static model static object. So what I can do is go to behaviors again and I'll make this object interactive. And what I'm going to do is I'm going to just gonna have this, uh, this animation, the whatever animation I'm going to make. I'm just going to have it play at the start. So I'm not going to trigger it by touch or anything like that. And let's go ahead and choose a, uh, an animation let's let's try bounce.
EJ Hassenfratz (26:31): Bounce is super fun. So let's go ahead and just going to hit that play button in the top, right of this little menu here. Whoa, you went all the way up. Let's go in, just scroll down. You can see this. Why offset it sets a one. I'm not sure if it's like one yard or what that was, but what I'm going to do is just bring this way lower to maybe, uh, let's do about one and let's see what that looks like. So that's a tiny hop it's very slow. So let's go down even more than that. Let's adjust the duration. The duration is how long that jump animation takes. So it's about two seconds. Let's bring that down to like 0.5 seconds and let's go ahead and hit that top right play button there and okay. We've got a little brisk jump. Nice jump.
EJ Hassenfratz (27:14): Cool. Cool, cool. And we can also adjust the Y offset and Z offset, but I'm just gonna know use that Y offset, just so it jumps straight up looking good and just hitting the play button over and over again, to do that. Uh, one other thing that's really cool is we can have like a little decaying balance so we can adjust the rebounds. So I'll add like two rebounds and go to the top and hit that play button. You can see that this is a little too fast, uh, so we can go and maybe adjust that duration and hit play again. We've got this cool squash and stretchy bounce, uh, with no coding just by, you know, using these very intuitive controls. Uh, we can also adjust like the, the easing we, we have linear key frames right now can do easy and ease out.
EJ Hassenfratz (27:57): Uh, let's see what that looks like. So that doesn't look very realistic. So as we're doing bouncing, so let's just stick with linear. And again, we have that play count again, we have the back and forth. We have infinite, we have that delay just like we had, uh, with our other option before. So that's cool. We can program that. Uh, but I'm just going to X out of that, because what I want to do is I want to choose a different action. And what I'm going to do is go back into our animates. Now I notice I mentioned that I didn't actually key frame anything at all from cinema 4d, but one of the cool things is, is this is a static object. I can actually program and create my own new animation here just by clicking in, you know, moving my finger on my iPad, on my iPad in basically choreographing and doing like a motion sketch kind of deal where it's tracking or recording all the movement of my finger on the surface of my iPad and create an animation that way.
EJ Hassenfratz (28:51): So let's create new animation or we have the option to fix this character to the ground. I'm just going to turn that off because what I want to do is have this character jump over my cinema 4d base camp mug here. Okay. So let's go turn that off, fixed to ground. And you can see on the very top there, it says to record the animation, we're going to hold this, hold the object for three seconds. And once I do that countdown take off. Now, it's going to what let's hold that again. 3, 2, 1. And now I'm moving this around and it's tracking my finger. So I'm just moving my finger along the surface of my iPad. Uh, my iPad. Let's have it jump over the cup. Boom, jumped over the mug. Let's jump over again. And this is recording all of my movements right now. You can see that little record button doing it, doing the thing blinking, and you can jump back and forth.
EJ Hassenfratz (29:49): And this is just so much fun. So there we go. I just recorded all that animation and now we can preview it by hitting the play button there. And there's my animation that I created my little motion path. So it's kind of like cappuccino in cinema 4d, where you can record the movement. And this is really cool. Now, if I go and hit the little, uh, settings icon to the right here, I can adjust the past smoothing there. And you can see that this is behaving as a car as if it's like going over a hill or, you know, it's almost like an aligned a spline kind of behavior. But if I click here, I can make this act as like a helicopter and what that's going to do. It's going to recalculate this animation here. And if I try to hit play again here, it's still doing its things still calculating.
EJ Hassenfratz (30:36): But what this is going to do is remove that align to spline. And let's see what this looks like. Now. It looks like it's traveling like a helicopter where it's not kind of angling down and this is super cool. It's going back and forth, going back and forth. Really, really awesome stuff. Whoa, jumps over the mug. Cactus jumps over the moon. That's a, that's a fairy tale book, right? Cactus jumps over the mug. Uh, but this is just the power of Adobe arrow that you can do something like this. And again, uh, you know, we could save this. So let's save that out. We'll click the lower right checkbox there, and let's go back to when our preview mode. And now we can, again, record this animation and save this animation and we can move our iPad around, get whatever angle we want. Be our little digital director here.
EJ Hassenfratz (31:26): There he goes. There, she goes, jumping over the mug and we'll stop recording that. And we can see that and show that to the world. So just incredible. The amount of power and control you have to create your own AR experiences. Using Adobe arrow is just so much fun. And I've been wanting something like this for a very long time. That takes all the programming away from programming, your own animations, programming, your own AR experiences. And I am super excited to see where Adobe arrow takes us. And I'm really excited to see what the community is going to start making, especially a C4 D community. I want to see a bunch of little animated characters and all that good stuff. So that's it, that's it. That's Adobe arrow living in crazy times, man. It's incredible to see what Adobe arrow is doing right now and what the future of AR can possibly be in creating content in AR when those barriers, all those technical barriers can be dropped. So if you want to keep up to date on not only a, our news, but industry news in general, be sure to hit that subscribe button and please like really appreciate that. And I will see you in the next one. Bye everybody.
ENROLL NOW!
Acidbite ➔
50% off everything

ActionVFX ➔
30% off all plans and credit packs - starts 11/26

Adobe ➔
50% off all apps and plans through 11/29

aescripts ➔
25% off everything through 12/6
Affinity ➔
50% off all products

Battleaxe ➔
30% off from 11/29-12/7
Boom Library ➔
30% off Boom One, their 48,000+ file audio library
BorisFX ➔
25% off everything, 11/25-12/1

Cavalry ➔
33% off pro subscriptions (11/29 - 12/4)

FXFactory ➔
25% off with code BLACKFRIDAY until 12/3

Goodboyninja ➔
20% off everything

Happy Editing ➔
50% off with code BLACKFRIDAY

Huion ➔
Up to 50% off affordable, high-quality pen display tablets

Insydium ➔
50% off through 12/4
JangaFX ➔
30% off an indie annual license
Kitbash 3D ➔
$200 off Cargo Pro, their entire library
Knights of the Editing Table ➔
Up to 20% off Premiere Pro Extensions
Maxon ➔
25% off Maxon One, ZBrush, & Redshift - Annual Subscriptions (11/29 - 12/8)
Mode Designs ➔
Deals on premium keyboards and accessories
Motion Array ➔
10% off the Everything plan
Motion Hatch ➔
Perfect Your Pricing Toolkit - 50% off (11/29 - 12/2)

MotionVFX ➔
30% off Design/CineStudio, and PPro Resolve packs with code: BW30

Rocket Lasso ➔
50% off all plug-ins (11/29 - 12/2)

Rokoko ➔
45% off the indie creator bundle with code: RKK_SchoolOfMotion (revenue must be under $100K a year)

Shapefest ➔
80% off a Shapefest Pro annual subscription for life (11/29 - 12/2)

The Pixel Lab ➔
30% off everything
Toolfarm ➔
Various plugins and tools on sale

True Grit Texture ➔
50-70% off (starts Wednesday, runs for about a week)

Vincent Schwenk ➔
50% discount with code RENDERSALE

Wacom ➔
Up to $120 off new tablets + deals on refurbished items


All-Access Pass

Unlimited access to 50+ courses, unlimited critique, live events, and 24/7 community. Join School of Motion All-Access today.
