
Learn After Effects the Right Way
Master the After Effects interface and build a real animation skillset. Enroll in All-Access to unlock AE Kickstart and 50+ other courses.

Let's make the most of the new Waves and Tapered Strokes features in After Effects!
Animating in After Effects is easier once you understand the tools that the software provides. If you're fighting to make organic waves or stylized environments, it's probably because you don't know all of the abilities available to you. Once you learn to work within the program, you'll be amazed at what you can create.
Today, we're going to be looking at the new Taper and Wave stroke options available for Shape Layers within After Effects. You won't need any plugins or extras to follow along, which means you can get started right away. In this tutorial, we'll show you:
- How to create wavy hair for your characters
- How to animate waves and curves in After Effects
- How to use the Tapered Stroke tool
Getting Started with Wave and Taper in After Effects
{{lead-magnet}}
How to use Wave and Taper in After Effects
To test out some of these new tools, we'll be drawing basic shapes and creating simple animations. Once you have those down, you can easily apply the same techniques to more complex creations.
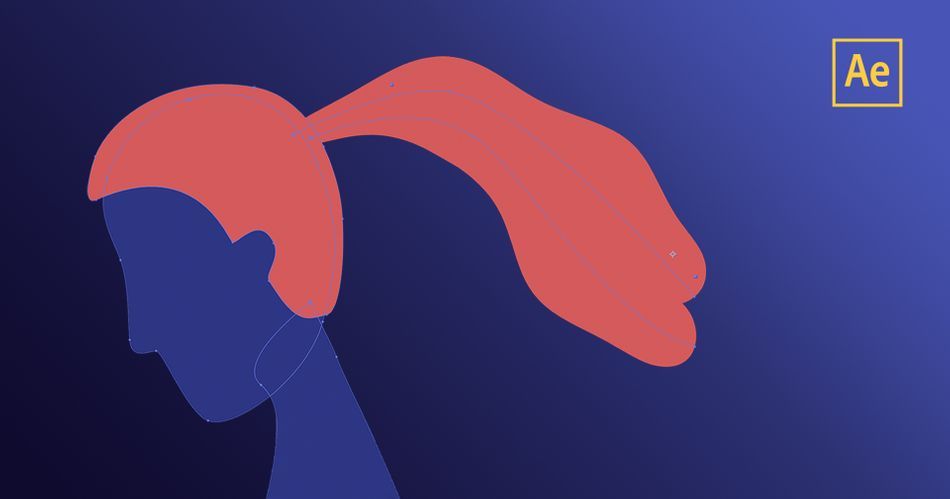
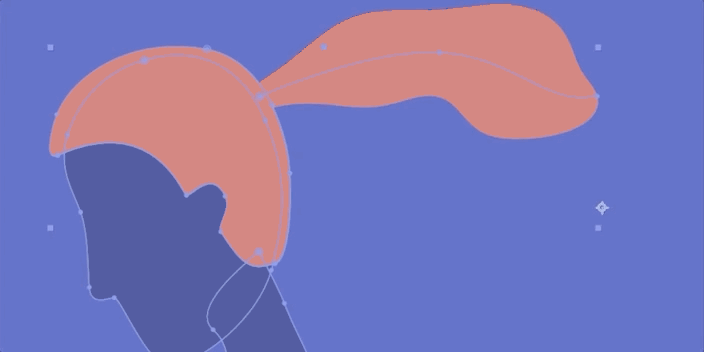
For this example, pretend a client has asked you to create a character with hair waving in the breeze. Sure, we could draw a ponytail with a path and animate the path and...ugh, I'm tired just thinking about it. Or...we could just use the new Stroke tool.
MAKE A PONYTAIL
To get started, we need a single shape layer with a person's head.

With the Contents Group selected, I'll grab my Pen tool and draw a simple ponytail. Click+Drag to grab those Bezier handles until you have the shape you want. Make sure Stroke Width is set to 100%. I know it looks funny now, but just you wait.
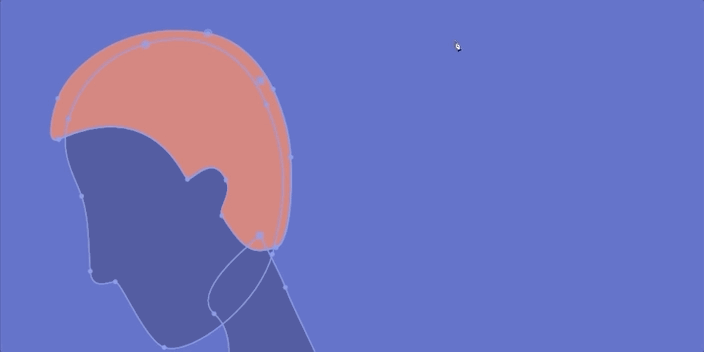
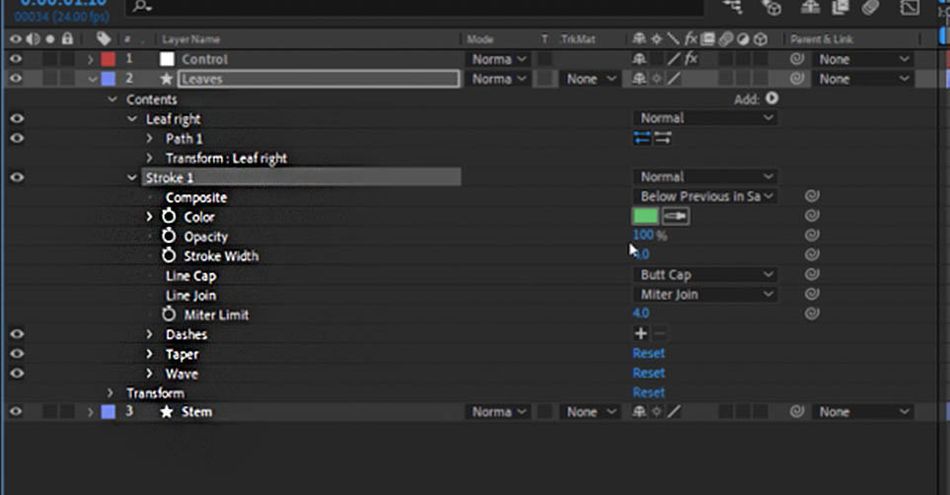
Twirl down in the group and delete the Fill so you only see the Stroke. In the Stroke group, twirl down and select Taper. Below that, you'll see Wave, which we will get to in just a minute.
Change Line Cap to Round Cap to remove the harsh edges of the ponytail. Now go back to Taper and set Start Length to 60% and the End Length to 40%. You'll notice that if you overlap these numbers, your shape shrinks rather quickly. You can adjust these to your liking, but let's stick with my numbers for now.
You can also adjust your Start Width and End Width to your liking as well. Now this ponytail still looks a little sharp, which is where our Ease comes into play. With Start at 10% and End at 30%, my ponytail is looking a lot better.

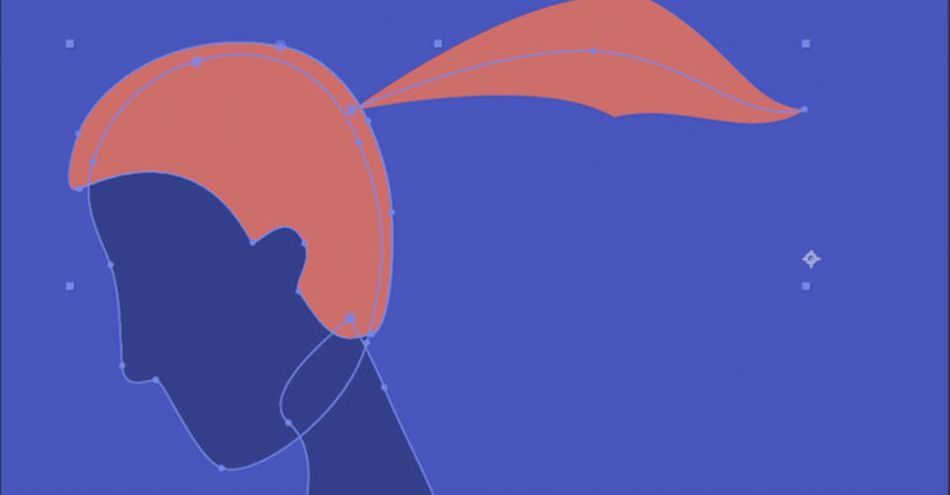
ADD A WAVE TO A PONYTAIL
Now it's time to twirl open our Wave settings. The Amount is how much wave we'll be adding to our Stroke. As I increase the number, you can see the waves appear.
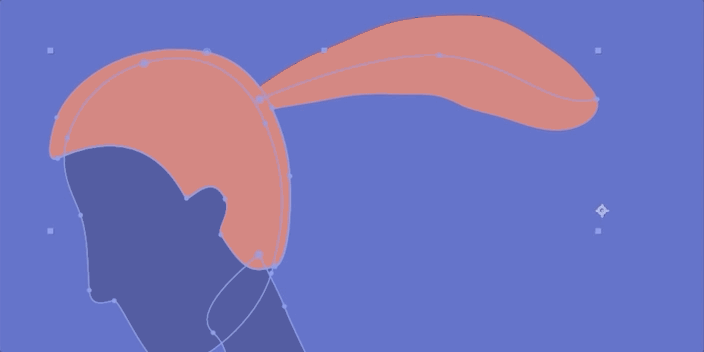
Wavelength is going to be how long the waves are. Drag those numbers up and down and find the number that works for you.
Finally, we get to Phase, which is what we'll be animating to get that ever-present wavy look. In the negative, the waves move away from the head. In the positive, they'll wave toward the head. So let's set a key at the start of our timeline, move the Phase in whichever direction we want, and add a key at the end. Now we preview the look!
Now that you have the animation set, you can mess around with some time() expressions, adjust your Stroke width or positioning, and add in environmental details to really sell the look.
How easy was that?
How to create a growing fern leaf
Now we're going to use all the techniques we just practiced to create a fern that grows new leaves as we watch. Growing animations are very popular, and clients love to see these types of animations. While you may not be asked to create this exact project, these skills translate to a number of real-world briefs we've seen.
CREATE A GROWING STEM FOR YOUR FERN
First, very simply, grab your Pen and create a stem.
Delete your fill, just like last time, and set the color to a nice green. Adjust your width to about 25% and we'll move to Taper.
I'm going to set End Length to 100% and End Width to around 60%, since I don't want the tip to just disappear at the top.
Now add a Trim Path. Set the Start to 0% and the End to 100%. Add a keyframe, move forward twenty frames or so, and add another keyframe. And voila.
Now it's time to add some leaves!
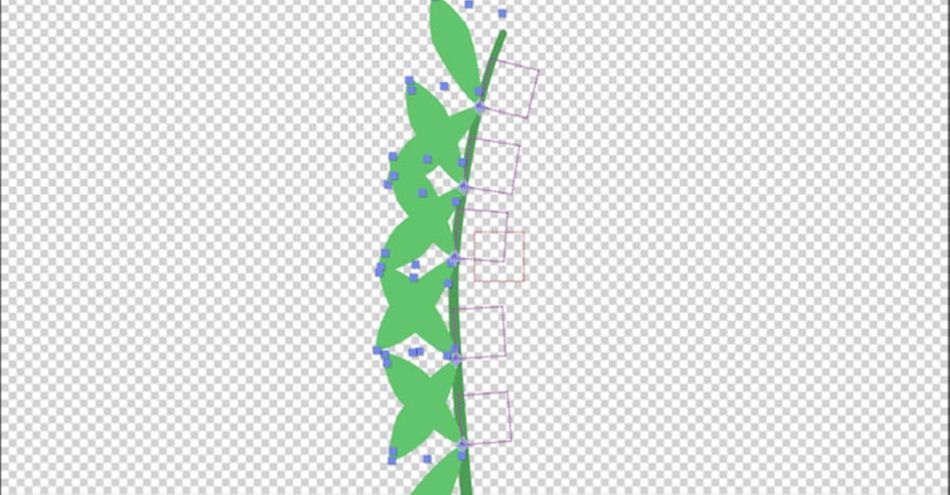
ADD LEAVES TO YOUR FERN
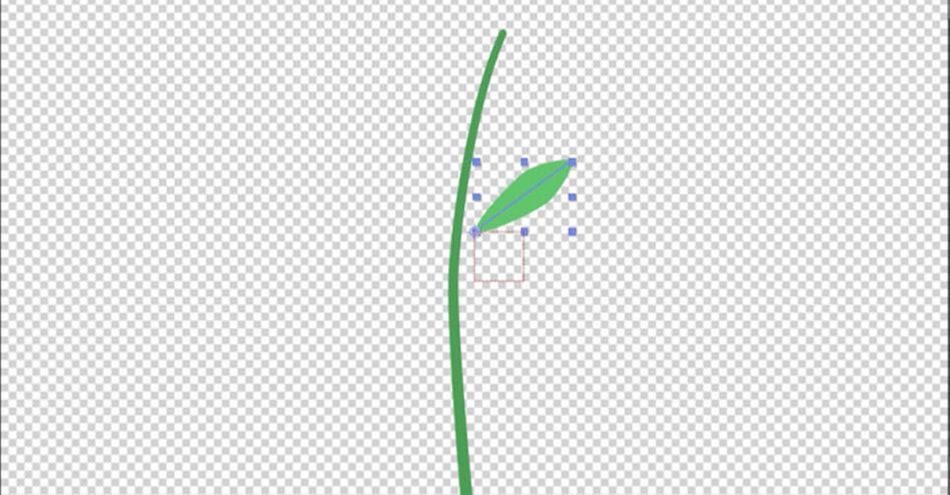
We'll start in much the same way we have this entire tutorial. Grab that Pen, draw your leaf's spine, and delete the fill. I'm also going to adjust the color so it is a little brighter than the stem, just so things look a bit more interesting.
Next, we'll pull the Stroke group out of the Leaf Group.
This way, when we duplicate the leaves on the left and right side, those Stroke settings apply to everything.
Adjust your taper and easing until the leaf looks right, and adjust the anchor point so it actually lands near the stem.
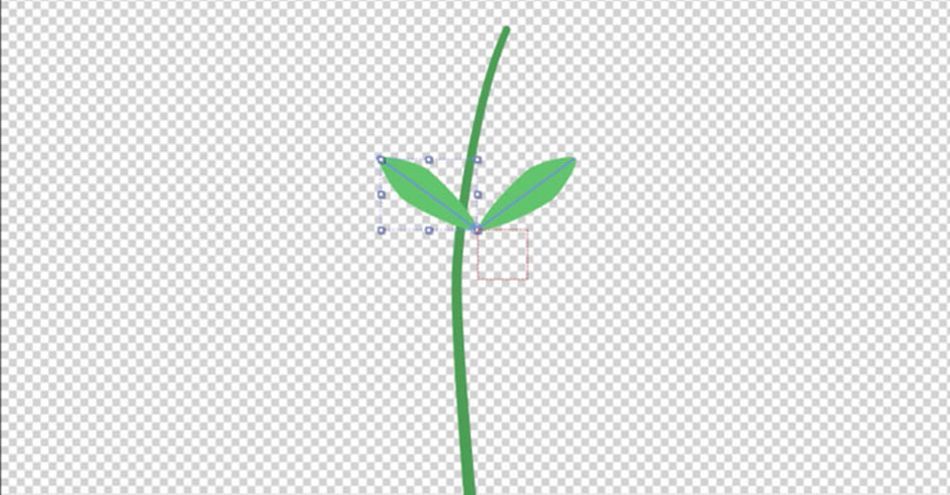
Before we start animating, let's duplicate with CTRL+D (CMD+D on Mac). In Transform, change the scale to -100%, which will create a perfect copy in the opposite direction.
Now because we took the Stroke group outside of these leaves, we can now control them both. Just as we've done before, add a Trim Path, and let's make these leaves grow along with their stem.
Set the Start to 0% and the End to 100%. Add a keyframe, move forward twenty frames or so, and add another keyframe. I think we'll also need to animate that Stroke Width, since the leaves don't seem to be growing organically. With a few quick adjustments...

We're almost done. Now it's time to use a nifty little tool in After Effects.
CREATE NULLS FROM PATHS IN AFTER EFFECTS
You'll find this tool in the Window Menu.

Go to your Stem Group and Select Path. You'll now have three options. Points Follow Nulls will create points at the start, end, and where there are Bezier handles. Nulls Follow Points reverses the information for creating a path. Finally, and what we'll be using, will be Trace Path. Select that, and a new layer will be created.
Delete the keyframes that are automatically created, but you can see under Progress how the new layer moves along with the growth of the Stem. Let's start at a spot early on, say 13%. Now we hold Shift and drag Parent from the Leaves to the Trace layer.
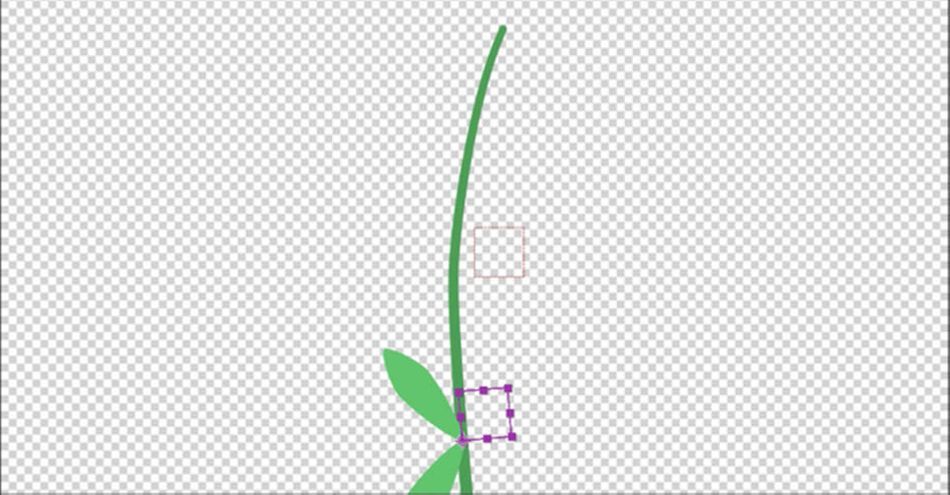
We'll have to rotate the leaves to have them face correctly, but we'll get there in a moment. First, let's duplicate this trace layer 4 more times (we need a lot of leaves). Then duplicate your Leaves layer 4 times as well. Hold Shift and pick whip each new leaves layer to their corresponding Trace Path.
Now select the new Trace Paths and, in the search bar, type Progress. This will make it easier to quickly adjust the start points for each leaf pair. I'm going to space these evenly along the growth path of the stem. Since the path is connected to the Stem, these leaves will appear to grow from there instead of from thin air.
Uh oh, these leaves are growing wrong! We still need to fix the rotation. Too easy.
Select all of the leaves layers, hit R, input 90 degrees, and voila.
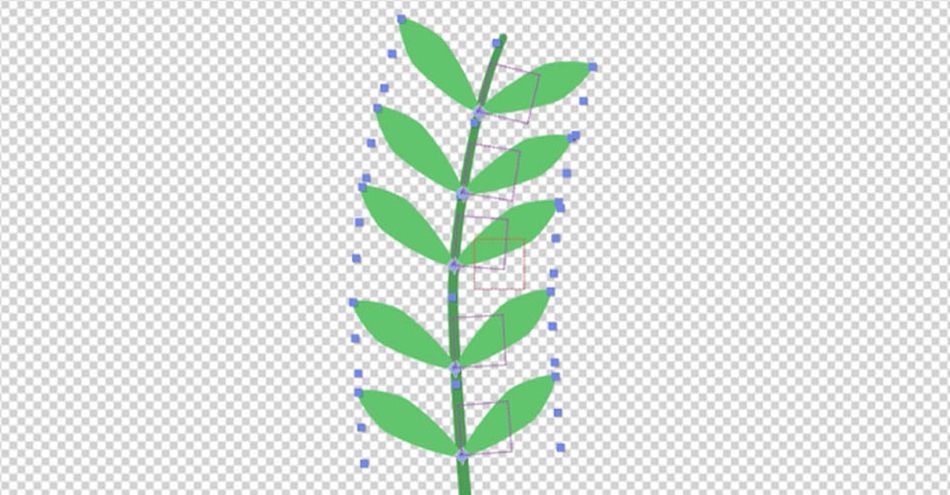
Now the leaves all start growing at the same time, which doesn't work. Another easy fix. All we need to do is drag the animation on the the timeline to match the frame where the stem and leaves intersect.

Now all we need to do is a few fine touches. We'll adjust spacing, fix the size of the leaves so they have some variation, and we've just quickly made a growing fern!

Now that you have these new tools in your belt, what else can you create?
WANT TO LEARN MORE?
If you enjoyed this journey into some simple shapes, discover the hidden techniques behind organic motion design animation in our essential course, Animation Bootcamp!
Animation Bootcamp teaches you the art of beautiful movement. In this course, you'll learn the principles behind great animation, and how to apply them in After Effects.
-----------------------------------------------------------------------------------------------------------------------------------
Tutorial Full Transcript Below 👇:
Sarah Wade (00:00): Hello everyone today, I'm going to show you all of the magic tucked down inside the shape menu with the new wave and tapered strokes features and aftereffects.
Sarah Wade (00:19): I'm Sarah Wade. Welcome to another school of motion tutorial. You won't need any plugins for this. We're going to use all things that already exist inside your after effects. So this is going to be really fun in this tutorial. We'll cover how to utilize the shape menu and after effects, how to create taper stroke effects, how to create wave stroke effects, how to automate a strokes wave, using a simple expression and how to animate faster with the create notes from past script, don't forget to grab the free project files in the link below so that you can follow along.
Sarah Wade (00:57): What I'm looking at here is a single shape layer with a person's head, right? So let's say you've got this person and they look kind of like just a stylized human and your client comes and says, you know what? We want this person to have a ponytail and could you make it wave in the wind and just sort of flutter? And you're going to think, oh gosh. Okay, sure. I could frame by frame that I could draw ponytail with a path and I could animate the path. And that's going to take a while, or you can use the awesome features tuck down inside the shape menu to add a wavy waving tapered stroke. So I've got this one shape layer here. I've got a hair group in it already. Uh, I'm just going to make a new group actually. And we'll just call this ponytail.
Sarah Wade (01:40): In fact, I'm just going to keep this layer selected content selected. Grab my pen tool. I'm just going to draw, just click dragging to pull out those busier handles. She's got to make a ponytail like that. So I've got a stroke there and a fill. I don't really need, uh, the fill at all. I'm just going to use the stroke. So let's rename this by hitting the enter key. And I call this ponytail and let's go down in here. Let's just delete this fill. All I need is the stroke. And it just looks like a line, not a big deal, right? We're going to make it look like some flowy wavy hair with just a few things. Now, if I dig down into the stroke menu, you'll see that in here below dashes, there's a taper section. We're going to use that. And then below that there's a wave section, which we are going to use in a minute to get our fun flowy motion.
Sarah Wade (02:33): So first let's make the stroke the same color as the Herricks. That would look funny if it was a little bit different. Okay, we've got our struggle. We've got our color. That's the basic start shape of our ponytail. Now I'm going to go into this taper section and start playing around. Uh, it's not going to show up with a four point stroke with, so let's go ahead and make that bigger. Uh, I think I like about a hundred hundred works. That's going to be a nice thick ponytail on the window. It looks a little funny, right? But we can change that really easily by going to round cap. That looks a little less funny, but now it looks kind of like a worm coming out of this person's head, right? Not quite the effect we're going for. That's where the taper comes in. So if we go down here, we've got these length units under taper.
Sarah Wade (03:16): This can be a little bit confusing. So there's start links. And that is basically saying how far you want the taper to go. So as I'm dragging this up zero up to 100 tapers from the start to a hundred percent of the stroke, we're going to go to about, let's say 60. Okay. So that's our start taper. Now we also have an end taper. And so the end length is how far from the end we're going to taper. So if we drag that up, notice it's shrinking our start because we're overlapping now, right? So we're going a hundred percent from the end and it's making everything kind of skinnier. We're going to just go, let's say 30% from the end. And then we've got a little bit in there that sort of overlap. Well, it doesn't overlap. It's kind of in-between. So we go 60%, one way 30% the other way.
Sarah Wade (04:10): And then we've got like a 10% of tapered right there. Um, that's kind of looking a little bit rough on the air. So let's try taking this all the way to 40. Okay. Not quite the look I'm going for, but it's starting to look like a ponytail. Right. And it's just a stroke. If we didn't have to draw a path around this whole thing, we didn't have to do any of that stuff. It's just already starting to look like hair. Okay. Now we've got start with and end with, and those should be pretty straightforward. That just tells me, okay. I want my start to be. So remember our stroke with is a hundred and we want our start with, to be, let's say, oh, let's see what looks right. Let's just drag this and see, you know, I think that 26% let's go to 25 just cause I like even numbers.
Sarah Wade (04:56): I think that looks about right. Okay. And the end with, I don't know, I kind of like it to a point, but that nice soft. If we just drag it up a little, it gives that nice soft sort of round cap there. That's kind of fun too. Okay. We've still got the middle, not looking quite like we want. Right. We've got a meeting at a point here and that's where these eases come in. You can actually ease the amount of the taper, which gives you a lot of power. So for the start ease, let's keep it pretty low. And then actually let's keep it at zero because that's basically how fast it's going to ramp up. So a really big ease then it's really quickly going from, it's basically easing along the length of that. So if this is zero and this is 60, where we had that start length of the start taper, if we ease it to 50%, it's basically going to get to full width about 50% through that length.
Sarah Wade (05:52): Remember that length is like the first 60% of the stroke. I know these numbers can get a bit confusing. We don't want it to be quite that big, but we don't want it to be zero either. Let's go with about 10 and then the end ease. That's where we're going to start to get rid of that kind of lump there in the middle. In fact, let's even drag this back a little bit to maybe 30. And then remember when we had that little bit of straight in the middle, it didn't look quite right before, but now if we start playing with this ease at the end and ease at the start, we're going to get that looking a lot better. So let's get that end, ease up a little bit to kind of smooth that out. And we might keep dragging these numbers around a little bit.
Sarah Wade (06:37): Right? So I don't want quite that much point. I want to just sort of adjust the length of the start and end taper until it looks just about. Perfect. In fact, if I overlap those tapers a little bit, that's smoothing it out really nicely. Okay. It's starting to look pretty cool. I'm not super happy with that end ISA. Let's drag that up a bit more. We'll make the ease really big and then let's make that end with a little bit smaller. So it's not quite so fat. Okay. It looks like a ponytail, right? We still haven't met our client's goal of this ponytail sort of waving in the wind. So that's when we get into the wave function right here, we've got wave amount, the units, the wavelength and the face. So the units, that's just how you're calculating it. We're just going to leave that set pixels.
Sarah Wade (07:31): The amount is how much wave we're going to add to this. So when I start dragging it up, take a look at that ponytail. Now this person has got curly hair, right? We can go up here with the stroke wit and make it bigger. And it's like getting super stylized and fun. Right? I'm going to take that stroke with back down a little bit. In fact, let's set it at 150. I think that's going to give us the thickness we need. That's what the wave amount does. We just want to subtle, subtle kind of thing here. So let's cut that down to let's try 30%. We'll see how that looks wavelength again. That's going to be how long the waves are. So if I drag it back, lots and lots of waves. If I drag it out, that's going to be a little more subtle.
Sarah Wade (08:14): Right? And you can see, as I'm dragging this, it starts to look like what your client asked for. Right? I want this ponytail to just sort of wave in the breeze. And then we get into the fun. Here is the phase. So the phase is what you want to animate to get that ever present wavy sort of motion. And you'll notice if I'm dragging it left to the negative, that's actually making it kind of wave away from the head. If I drag it to the right into the positive, it's kind of waving toward the head. So I wanted to wave sort of away from the head. So that's the way I'm going to go as negative. I can animate this. I could key it, right? So I can set a key here. Let's set this at zero and then I could set key all the way at the end of my comp to let's say let's just drag it a little bit and then let's press space to preview.
Sarah Wade (09:06): That looks pretty good. Right? Okay. That's one way to do it. I could also, this is, let's just get rid of these keys. Let's go back here and set this back to zero. Uh, I could animate this with an expression and expressions are not that scary. If you're just, you can use expressions a little bit or a lot. And if you're just dipping your toes in, this is a really quick way to do this. I can hit the alt key click on the face. And then here I can type time times let's say negative 20. Okay. I'm going to click off of that. No errors. All looking good. No, I'm just going to play. Okay. That's a little too slow. So let's go down here and let's increase this to, let's say negative a hundred and we'll see what that looks like. And basically when you're doing this expression here, you're, you're telling it to change the phase over time times, negative a hundred.
Sarah Wade (10:01): So the negative just makes it go down instead of up. And you're just saying change it over time. So now if I press the space bar, that's looking pretty good, right? I'm going to make a few more adjustments to this, but overall, I think this is kind of what my client was looking for. Now. There are a lot of things you can do after the fact, right? So this is animated. It's wavy. Maybe the base is a little bit, it's a little too thick. We can just go up here and change that. Start with, to make that a little bit smaller. Maybe not quite in that small let's stop that preview.
Sarah Wade (10:37): Do something like that. And maybe we want to edit the path a little bit. Now that we see it waving, maybe we should have started with a straighter path because the wave is giving it some of that flowy kind of gooey feel that we want. So we can easily edit the path, the path editing stuff here can be a little bit confusing if you don't understand how it works right off the bat. So ponytail, I'm going to open this path up. And if I click on this path and I want to edit it, you'll notice that it, it moves the whole thing. That's not what I want. If you want to just move points, keep your selection tool selected and then click off of the path, click on the path group, but not the path itself. And now you can start moving around. Those handles one point at a time and it's not going to edit the entire thing. So let's, let's try and pull on this handle out. Maybe we'll get a real kind of fun, like, you know, eighties style ponytail, right? Big hair kind of stuff going on here.
Sarah Wade (11:40): That's given me a little bit of a funky effect there. And so you can get funky effects when you're using the tapered strokes and you have paths that are really kind of bendy and stuff. So you just want to be mindful of that fact. Maybe if we pull this back, it's going to be a little bit better. Cause we're getting a little bit of points there. So if you adjust the path like right here, you might want to go back in and adjust the tapering, or you can just keep playing with the path until that goes away. But see right there, that's not that little sort of jump there. It's not something I want. So I'm an adjusted by just changing this path a little bit and now let's press space bar to preview and make sure that we're not getting any weirdness. That's looking pretty good.
Sarah Wade (12:24): Right? Okay. I'm, I'm pretty happy with this. So let's say you want to just try out some other things again with the path and the shape stuff. You've got a lot of flexibility. Let's say we want the ponytail to be fat at the start and skinny at the end, I can just go up here to this little button here and reverse the path. And now we've got a completely different ponytail, right? So the one click it's waving the other way and we want it to still wave away. We just go down to that expression and we just take out that negative. And now we've got a whole bunch of animation. Now this taper needs to be adjusted here, but you can start to see the power of this, right, with just a few clicks and just one teeny tiny itsy bitsy beginner expression. You've got a whole bunch of animation that if you were to have animated this path, that's going to be a whole bunch of path keys, right?
Sarah Wade (13:16): I mean, animating paths is great for some things, but if you can jump ahead and not have to set all those path keys, that's going to put you ahead in the end. So we did a lot of stuff here really quickly. I'm going to go back to that other shape ponytail because I like it better. And that's what I want you to get in this file. If you choose to download this file. So again, to reverse that direction, I'm just going to go up here, reverse the path magic, right? That's a lot of animation for very little work. Another thing I can do here, if I want to add even more variation is I can still work with all those other fun things that you're probably familiar with with the strokes, like trim paths. So let's add a trim path here. So let's say I want the end of the trim path to just sort of get a little bit longer and a little bit shorter.
Sarah Wade (14:04): So let's see this key out here was set at a hundred and let's set this beginning key back to 86 or 85. We'll go to the end of our comp control C control V. I just went to the end because in case I wanted to loop this, that's one sort of drawback of using that quick time expression that we use down here. If you want it to loop this, I think the most easy way to do that is to get rid of this expression and just key it, do the phase from, you know, let's say zero to negative, whatever, and then back to zero and that's going to give you something nice and looping, uh, the same way that we did for this trim path. So now the trim path is kind of getting little longer and a little shorter. And that's just giving us a little bit more variation on top of that wave.
Sarah Wade (14:53): I'm still not super happy with that there. So let's go back into those taper settings and let's make that start taper to get rid of that bump. So see how that bump gets bigger if I shorten the start taper. So if I make it a little longer, it's going to smooth that out of it. So that takes care of that little lump. Let's press our play, make sure it's totally taken care of. That's looking pretty good. Now, if you wanted to make more of these, you can take all of these taper settings, all of this stuff out, a couple more strokes, and you've got, you know, even thicker multi stranded ponytail. So if we want to do that, we've got our stroke here. We've got our path up here. So all this stuff is applied to the path, right? We've got a trim path, got stroke.
Sarah Wade (15:38): This is still all in one shape layer. In fact, it's all in the layer of the head. So if I move this layer around, everything's going to go with it, right. I can just, you know, move the position. It's still a person I don't even have to worry about, you know, doing all this separate linking layers, parenting, none of that stuff. Okay. So we're going to add a couple of other strands here. We'll select that ponytail group. When I grabbed that pen tool, let's see, add one here. And again, let's go back to that path because it didn't work out why I didn't drag when I was drawing it. So it made a sharp point. I'm just going to alt click that to make it nice and smooth. And then because I wanted this path to have all the same stuff that the other path has in the ponytail, all I've got to do is grab path one.
Sarah Wade (16:31): I'm going to control X and I'm going to drop it in here and drag it above that term path and above that first path. And now look at that. It's got all the same stuff. So everything in this ponytail group that is above the trim path and the stroke again, the stroke is where we set all that stuff for the, the taper and the wave and the animation, any stroke that I've put now in here, as long as it's above the term path and the stroke, any path I put in here is going to get all that stuff. So I can again, edit this, make sure I'm just selected on the path and not the actual path that the path group that's looking pretty cool. Okay. Let's see what that looks like now. Lots of complexity, right? Just a little bit of work. Stop that and drag this down. That's like a pretty cool, not very much time for a whole lot of value.
Sarah Wade (17:26): Okay. Now we're going to use those same techniques that we just use to create that ponytail, to create a Fern leaf that grows one leaf at a time. So first thing I'm going to do, I'm going to grab that pen tool. I'm going to make a stem, just going to all drag it. There. Let's go ahead and work that for text so we can make it just a little more bendy at the top. Okay. That is going to be our stem layer. I'm going to drill down into this, into the contents, then delete the fill because I don't need it. Uh, I'm going to set this to just pick a nice green that's going to work out well. And then let's go ahead and quickly set up our stroke stuff. So let's go with the stroke would have, let's say 25. That's going to look good.
Sarah Wade (18:15): Getting back into that taper. We're gonna go ahead and do a taper from the end, all the way to the start. And then I'm going to make sure that end with is set to a little more than zero because I don't want it to disappear at the top. I'm going to set that to the round cap and we've got a plant stem to make it grow. I'm going to go ahead and add a trim path to that. Opening that up. I'm going to set a key for the end. Go forward. 20 frames, set another key for the end, back to the start, make it zero and our stems growing. Okay. Now we want to make some leaves for this stem. Let's close up that stem layer and select it, and we're going to make a new shape pencils already selected. So let's go ahead and just make a straight line.
Sarah Wade (19:07): Now that I've got this in here, I'm going to drill down. This is shape one. We're going to call it leaf, right again, I'm going to set that stroke color. Let's open up the stem and make sure that we match the color here. Actually let's not match the color. Let's make a little expression control so that we can control the color from that. I'm going to go up here to layer new knowledge object. I'm going to call this control in that I'm going to add two expression controls. Actually, we'll just do one and duplicate it. So we've got one expression control called color. I'm going to call this stem color and I'm going to duplicate it. And I'm going to call the next one leaf color. And now I'm going to connect these to that. Okay. So this is our leaves. Go ahead and drag that.
Sarah Wade (20:04): Whoops. Okay. We forgot to lock that. So this is what happened. We were looking at this and then we clicked away and it went away. So what I can do to make that not happen is just toggle this little lock button here on your effect controls. And now I can click away, go into the leaf color, drag that up to there, close that up and go to the stem of color. Drag that to there. Now I can change the color by setting this one. So that's not quite the stem color. Let's go with a darker stem color, maybe something around like this, and let's make the leaf color for now. We'll do it almost the same. And we'll just make a little bit lighter. Okay. Now let's get into getting our leaves growing and looking like leaves. So let's close up that stem go back into that leaf, right?
Sarah Wade (20:58): And first let's delete this fill. We're not going to need it. Let's take the taper and well, let's take all the stroke stuff and we'll pull it outside of leaf. So this means when we duplicate this leaf, right, to create a left leap, the stroke stuff that we set here will apply to both of them. I'm going to go ahead and make that with something a little bigger that looks about right. I'm going to go ahead and adjust that taper. So let's do a start taper up to there. We'll do an end taper as well. And then we're going to play with the easing of both of those so that they look a little bit more natural looks pretty good.
Sarah Wade (21:41): Okay. That's looking pretty good. I've got a leaf looking leaf. Let's go ahead into that leaf. Also unjust adjust the anchor point a little bit so that it matches right there. The center in that layer, it doesn't have to be exact, but pretty close because of what we're going to do with this, to attach it to the stem. Um, and you know what, that looks a little bit square there. So I'm going to go ahead and adjust that in length. Just a little bit more. Maybe that start length a little longer. Okay. That's looking pretty good. Now. I want to make this grow. Uh, actually let's duplicate it first and then we'll make them both grow the same way. So we've got our leaf, right? I'm just going to control D and that's going to create my leaf left. And all I'm going to do is go down in here to the transform.
Sarah Wade (22:36): I'm going to unlock the scale and scale it to negative 100 X. Now they're attached at the middle. They're not lined up with the stem. We don't have to worry about that right now. Okay. We've got two leaves and because we moved that stroke outside of them, it's affecting both of them. So now I can go into that stroke and I can add a trimmed path and let's again, animate that trim path. Let's go, we'll set it to zero here and then we'll go. Let's just go 10 frames and we'll set it to a hundred. Okay. That's going to look pretty good, but it looks kind of funny at the beginning, right? I think we need to also animate that stroke wit so let's go ahead and set a key here. So forward 10 set the key there, and then we'll start it at. Maybe let's say 10. I think 10 is going to do it.
Sarah Wade (23:33): Okay. I think that's looking pretty good. All right, now that we've got our set of leaves and our stem path, we are going to use a nifty little tool and after effects create Knowles from paths and that's going to help us to attach these leaves to the farm. So mine is already here to get to it. You'll go to window. And then when you scroll down here, you start to get into, uh, all of your kind of scripts and add ons create. And from past is going to be right here. So past the first two lines and you will get to it. So how we're going to use this is we're going to go to the stem, select the path. And then, so there's three options here. You can create points that will follow the Knowles. So meaning it will make a start point and an end point or an at a middle point, it'll physically do it at the Bezier points.
Sarah Wade (24:25): Um, you can adjust that accordingly so you can either make it so the points follow the Knolls. Meaning if you animate the knowledge, the path animates accordingly, uh, you can make it so that the Knolls follow the paths. Let's say you are attaching something to the stem, like the leaves, and you want the Knowles to follow the points. That's how you would do it, or how we're going to do it. We're going to use trace path because this is a cool little trick. So path selected. I'm going to hit that trace path. And it's made this new layer here. If I had the you to expand that, I see that it's got some keys here on progress. And now what that is is it's taking it from the beginning of the path to the end, right? That's what that progress indicator is. I don't need the keys on this.
Sarah Wade (25:05): So I'm going to go ahead and select them and delete them. But I want this to exist about that far up the path, right? So that's where my first leaf is. If I go to where my stem has grown, this will help me to see it a little better. Okay. So I've got one at 13% and let's see where it was. Our leaf or leaf is right here. And I am going to shift parent this leaf to that and see how it snapped right into place. It's not rotated correctly. That's okay. We can fix that by just rotating it. But before we do that, I'm going to go ahead. And I'm going to duplicate this four times and I'm going to duplicate this four times. And again, I'm going to shift hold shift while I pick what to attach each of these leaf duplicates to the corresponding trace path. And they're still all showing up in the same spot, but that's because I have not changed that progress indicator. So to do that quickly, I'm going to select those four layers and I'm going to type in progress and that's just going to make it a little easier to find each progress set, then drilling down through them. I want to put this one almost at the top. This one a little bit below it. Just scroll down a little to see the next two it's about there.
Sarah Wade (26:37): Okay. So those are all about evenly spaced. We don't have to be super particular about this. Okay. Now, when we grow our leaves, they're all growing at the spots where we put those knots. Now the leaves are rotated a little funky. So we're just going to grab them all at the archi, set those each to 90, that's going to get them straight. Boom. We have a Fern leaf and every leaf is growing. Now, the leaves are growing before the stem. That's an easy fix. I can just wait until the stem gets to each point. So this is where the first one should grow. And this is where the second one should start to grow.
Sarah Wade (27:20): And I didn't even use this. That's okay. You would want to add your easing before you time it out like this. Okay. But this is going to look pretty good. Right? So it's growing leaves are coming out. Let's see if we do control a control. You let's just easy ease all of these really quickly. I can't use the key code for easy ease while I'm recording in the software. So we're going to have to do it the old school way. Okay. Now that we've done that, we're going to go back in here and just check that it's still lining up and that none of the leaves are growing before they're supposed to. So we can probably put some of these a little bit sooner. Maybe we start this one a little bit sooner and we start this one a little sooner.
Sarah Wade (28:12): And I think this last one is going to be able to start sooner as well. Okay. Let's play that through. That's like pretty cool. The last thing I want to do here is I want to make these scales a little bit different as it goes up. So I'm just going to do this manually. The top. I'm going to make that one, the smallest next, smallest. Next smallest. We'll leave that one at a hundred and we'll make that bottom one. Maybe a little bit bigger. Let's move the second leaf up. I'm going to go in there and I'm going to find that effect, trace path progress. I'm just going to move it up a little bit. So it looks a little bit more spaced properly, and actually let's make it even a little bigger. Okay. I'm pretty happy with the way this looks now. So I've got my leaf growing.
Sarah Wade (29:02): The next thing that I want to do is, um, just to illustrate how flexible this kind of thing is, right? We've very quickly made a growing stone with a bunch of firmed leaves and we can affect the colors by just changing the color up here. Right? I want pink leaves with blue stems. I've got it right? Like this is pretty cool. This is pretty flexible. So let's undo that. I'm going to stick with green. Now you're starting to see the power of this. You've set this up with a controller with some color effects. You've got all of your leaves controlled by that. You've got trim paths, making them grow. This is awesome. If you want to take this a step further and hook those colors up to the essential graphics panel, making it easy for you to duplicate and edit this leaf, download the project file where you'll get to see Fern leaves, where I've just quickly duplicated this eight times and every leaf is growing so that I can very quickly drill down into those essential properties for each of these leaves. And I can make all of the leaves different colors. So let's say I want some of them to be pink with Pinker leaves. I can quickly do that. I have not changed my Fern leaf comp, which if I click on it, go into it here. It's still green. But now it's set up with essential graphics. So click to download the project file so you can see how that is set up. And I hope you've enjoyed this tutorial, exploring all of the wonderful flexibility available to you in the shape layer stroke settings.
Music (30:34): [outro music].
ENROLL NOW!
Acidbite ➔
50% off everything

ActionVFX ➔
30% off all plans and credit packs - starts 11/26

Adobe ➔
50% off all apps and plans through 11/29

aescripts ➔
25% off everything through 12/6
Affinity ➔
50% off all products

Battleaxe ➔
30% off from 11/29-12/7
Boom Library ➔
30% off Boom One, their 48,000+ file audio library
BorisFX ➔
25% off everything, 11/25-12/1

Cavalry ➔
33% off pro subscriptions (11/29 - 12/4)

FXFactory ➔
25% off with code BLACKFRIDAY until 12/3

Goodboyninja ➔
20% off everything

Happy Editing ➔
50% off with code BLACKFRIDAY

Huion ➔
Up to 50% off affordable, high-quality pen display tablets

Insydium ➔
50% off through 12/4
JangaFX ➔
30% off an indie annual license
Kitbash 3D ➔
$200 off Cargo Pro, their entire library
Knights of the Editing Table ➔
Up to 20% off Premiere Pro Extensions
Maxon ➔
25% off Maxon One, ZBrush, & Redshift - Annual Subscriptions (11/29 - 12/8)
Mode Designs ➔
Deals on premium keyboards and accessories
Motion Array ➔
10% off the Everything plan
Motion Hatch ➔
Perfect Your Pricing Toolkit - 50% off (11/29 - 12/2)

MotionVFX ➔
30% off Design/CineStudio, and PPro Resolve packs with code: BW30

Rocket Lasso ➔
50% off all plug-ins (11/29 - 12/2)

Rokoko ➔
45% off the indie creator bundle with code: RKK_SchoolOfMotion (revenue must be under $100K a year)

Shapefest ➔
80% off a Shapefest Pro annual subscription for life (11/29 - 12/2)

The Pixel Lab ➔
30% off everything
Toolfarm ➔
Various plugins and tools on sale

True Grit Texture ➔
50-70% off (starts Wednesday, runs for about a week)

Vincent Schwenk ➔
50% discount with code RENDERSALE

Wacom ➔
Up to $120 off new tablets + deals on refurbished items


Learn After Effects the Right Way
Master the After Effects interface and build a real animation skillset. Enroll in All-Access to unlock AE Kickstart and 50+ other courses.