

Learn After Effects the Right Way
Master the After Effects interface and build a real animation skillset. Enroll in All-Access to unlock AE Kickstart and 50+ other courses.

If you're an After Effects beginner, this video will show you 3 powerful tips that will upgrade your work instantly.
Designers from just about every discipline are realizing the huge career benefits one can get from adding motion to their arsenal. After Effects is the big-dawg as far as Motion Design software goes, and it can have a steep learning curve. When you're starting out, it's very helpful to have a few "go-to" tricks up your sleeve to make your work stand out.
In this tutorial, After Effects Kickstart instructor Nol Honig will show you 3 powerful tips that are meant to help beginners produce work that feels like they've been at this for years. You learn a bit about the curves editor, some adjustment layer voodoo, and an animation trick that will fool everyone!
If you have loins, you may want to gird them.
ENROLL NOW!
Acidbite ➔
50% off everything

ActionVFX ➔
30% off all plans and credit packs - starts 11/26

Adobe ➔
50% off all apps and plans through 11/29

aescripts ➔
25% off everything through 12/6
Affinity ➔
50% off all products

Battleaxe ➔
30% off from 11/29-12/7
Boom Library ➔
30% off Boom One, their 48,000+ file audio library
BorisFX ➔
25% off everything, 11/25-12/1

Cavalry ➔
33% off pro subscriptions (11/29 - 12/4)

FXFactory ➔
25% off with code BLACKFRIDAY until 12/3

Goodboyninja ➔
20% off everything

Happy Editing ➔
50% off with code BLACKFRIDAY

Huion ➔
Up to 50% off affordable, high-quality pen display tablets

Insydium ➔
50% off through 12/4
JangaFX ➔
30% off an indie annual license
Kitbash 3D ➔
$200 off Cargo Pro, their entire library
Knights of the Editing Table ➔
Up to 20% off Premiere Pro Extensions
Maxon ➔
25% off Maxon One, ZBrush, & Redshift - Annual Subscriptions (11/29 - 12/8)
Mode Designs ➔
Deals on premium keyboards and accessories
Motion Array ➔
10% off the Everything plan
Motion Hatch ➔
Perfect Your Pricing Toolkit - 50% off (11/29 - 12/2)

MotionVFX ➔
30% off Design/CineStudio, and PPro Resolve packs with code: BW30

Rocket Lasso ➔
50% off all plug-ins (11/29 - 12/2)

Rokoko ➔
45% off the indie creator bundle with code: RKK_SchoolOfMotion (revenue must be under $100K a year)

Shapefest ➔
80% off a Shapefest Pro annual subscription for life (11/29 - 12/2)

The Pixel Lab ➔
30% off everything
Toolfarm ➔
Various plugins and tools on sale

True Grit Texture ➔
50-70% off (starts Wednesday, runs for about a week)

Vincent Schwenk ➔
50% discount with code RENDERSALE

Wacom ➔
Up to $120 off new tablets + deals on refurbished items


Download this FREE After Effects Project!
What are you going to learn in this tutorial?
After Effects is a deep program, and it will take you a while to really get the hang of it. Fortunately, though, there are some cool tricks that you can start using right away to help your work stand out while you're still learning the ropes.
Learn to Use Eases in Your Animation
After Effects makes it easy to use keyframes for simple animations, but your movement will look stiff and robotic if you don't learn the art of easing.
Get Acquainted With The Speed Graph
Don't be afraid... it's just a graph! The speed graph is one of the tools you'll be using frequently to finesse your movements.
Discover The Power Of Adjustment Layers
Adjustment layers let you apply "instant" looks to your work once you've figured them out.
Create Your First Effect Stack
Every motion designer has their favorite effects combo they use to get certain looks. Nol is about to show you one of his favorites.
Learn the Sleight-of-Hand Animation Trick
Once you learn this trick, complex transitions that you could never figure out will seem comically easy.
Don't learn After Effects alone!
If you're ready to take the plunge into the world of After Effects, why not learn with a group of artists from all over the world and an industry pro at the ready to offer guidance and critique? Check out the #1 After Effects training course on the planet, After Effects Kickstart.
Our team is standing by to answer any questions you have about this course or any other class in our curriculum. Please let us know if we can help you in any way!
-----------------------------------------------------------------------------------------------------------------------------------
Tutorial Full Transcript Below 👇:
Nol Honig (00:00): Hey there I'm Nol Honig freelance motion designer, award-winning teacher, and occasionally a guy who wears ties in this quick video. I'm going to show you three tips to instantly improve your work in after effects. If you're just starting out, this is definitely for you Learning the tricks of the trade. And after effects is super important. If you want to be a professional motion designer, I teach workflow tips like these and a bunch of other good habits in my after effects kickstart course. So check that out. If you really want to understand the fundamentals of after effects, also, you can download the project files that I'm using in this video to follow along or practice these techniques. After you're done, watching details are in the description.
Nol Honig (00:54): My first tip is using easy ease and the speed graph to make your movements and after effects feel more interesting and or more natural. So I've got this scene here, which is just a beach ball that kind of gets thrown up and then falls back down again. All right. And right now this feels super weird and stiff because by default, after effects puts linear key frames into your animation. So basically if I select one of these key frames and I click here on this button and what we can see here is that the speed is constant throughout both of these moves, it doesn't accelerate or decelerate, and this is why it just doesn't feel very natural and why it feels super stiff. And after effects has a command built right in that fixes this, and it's called easy ease. So I'm going to take the key frames that I want to put easy, ease on.
Nol Honig (01:47): I'm going to right click on here and go down to my key frame assistant. And here you can see here easy ease. And the keyboard shortcut is F nine, which is a really good one to remember because you'll probably be using this a bunch. Okay. So I'm going to do that right now. You can see that it's converted the diamond shaped linear key frames into these hourglass shaped frames or ease key frames. And if I press this button and jump back into the graph, you can see at a glance that this is now very, very different looking. So the way this works is that the speed here is starting at zero and it's getting faster and faster. And then it's decelerating or decreasing back down to zero right away. This is going to feel much more naturalistic than the linear key frames. So let me show you what this looks like.
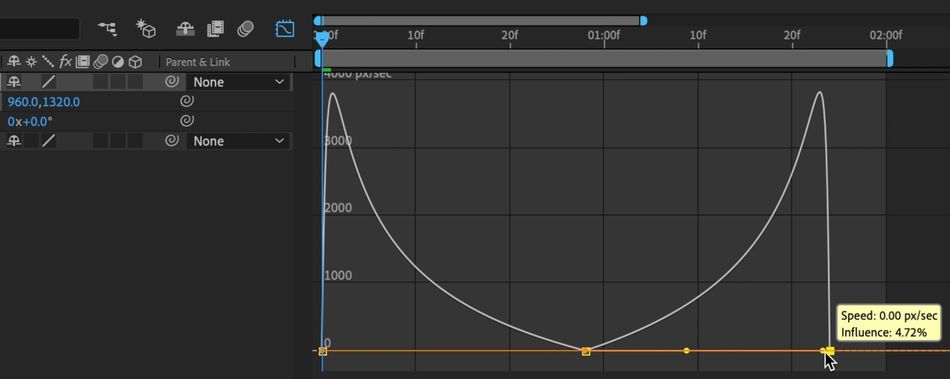
Nol Honig (02:31): So it's not perfect, but it's definitely feeling better. And what you can see is like what I was just saying, it sort of speeding up and then it's pausing and then it's speeding up again and pausing as it gets back down right toward the end. And actually it's that end bit there. That for me, makes it look very non naturalistic because as things fall, they increase in speed or at the very least stay at a constant speed once they start falling. So I'm going to show you how I would adjust and, uh, give this a much more naturalistic feel. So when I on these points and these points in here correspond exactly to my key frames, by the way, when I click on here, I get these handles. Okay. And the handles allow me to adjust how fast the speed increases in decreases as it comes in and out of these key frame points.
Nol Honig (03:21): Okay. So what I want to do is set this, so that at the top here, it's got a nice big pause. Okay. Because this is a light object and it's changing direction. It's going from moving up to now starting to move down. Right. So I want to put a big pause right here. So what I would do is I'd pull these handles out a whole bunch and that would essentially create the pause, right? So I'm going to do this on both ends going into the key frame and coming out of it. And I'm going to try to keep this basically symmetrical. And then right here at the beginning, I don't want this to start slow and then get faster. I want it to be moving quickly right away. Like somebody just let go of it out of their hand. And the force of their arm moving up is making this move really quickly.
Nol Honig (04:05): Okay. In fact, it's at its fastest part right at the start. So I'm going to select this and I'm going to drag this back until this peak is starting right here at the beginning. Okay. I'm going to go here to the end and I'm going to do the same thing so that this again is roughly symmetrical as well. Right now, you see I've created this shape and if we read this in the graph, it starts out fast and gets slower and it's got a nice big kind of pause to it. And then it gets faster at the end. Right. And I'm kind of exaggerating this a little bit more just to look at it. This animation looks like now.
Nol Honig (04:38): Yeah. And it's completely different, right. Just because of those adjustments. And now it actually feels kind of like a beach ball and it wasn't hard. You just kind of had to consider how it should move and then make these adjustments accordingly. My second tip is about using adjustment layers, which are super useful in after effects. In this case, in particular, I want to talk about using an adjustment layer with two effects on it, poster, eyes, time, and Ruffin edges to give my animation a kind of instant look upgrade. So it just made this animation. And here it is, it's got some kind of stretchy boxes and type that moves around. Right. And as we all know, after effects is great for creating animation. But if you're just getting into this, what you might not realize is that people also use after effects for creating unique looks for their animation.
Nol Honig (05:29): Once they're already finished, or once the animation is done. And a great way to do that is by using adjustment layers. Okay. So here's the animation and its default state. And let's just say, I want to make this entire thing feel more like old school and hand animated. So in this case, I only have three layers here, but, um, in most projects I have more like a hundred. Okay. So it would be pretty inefficient to apply a bunch of effects to every single layer. Instead, I'm just going go up here to layer and new and adjustment layer. And if you're into keyboard shortcuts like myself, you'll notice that this is option command. Y okay. Nothing's really changed basically, except for that. It's made an adjustment layer and it's put it up here on the top. And the keen after effects, observer will notice that it's put this sort of half, you know, like a black and white cookie half moon button on here, which means that it's an adjustment layer.
Nol Honig (06:24): Okay. And basically now this is a place where I can put effect, right? So I'm going to start out by going up here and putting a time posterized time effect on here. posterized time is super good. It basically allows you to create a kind of false frame rate for your composition. That's different from your original compositions frame rate, right? 12 frames per second is a kind of very traditional old school animation frame rate. Right. So I'm hoping that that will give this a different feeling, which feels a little bit more like that. So check that out. Yeah. And you can see right away that it's got a different feeling. It's kind of got like a jittery sort of stop motion field. Basically what it's doing is it's just displaying each frame a certain number of times, rather than changing on each frame, it's like holding each frame in this case, like three frames and then it changes and then it holds, and then it changes, right?
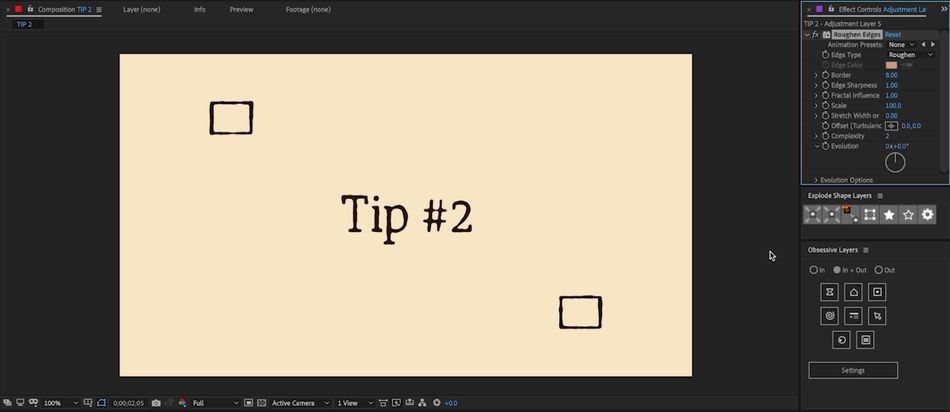
Nol Honig (07:17): So it gives it more of this kind of staccato jittery feeling, which is actually quite pleasant. Uh, I really liked the way it looks and I should point out by the way about adjustment layers, that they only affect things that are below them in the order stack and not things that are above them. So now just to keep this nice and tidy, I'm going to name this poster as time. Okay. And now I want to create a new adjustment layer. Uh, so in the air, a new adjustment layer. Okay. And I want to put this one. In fact, I have to underneath the poster eyes time, like I was just talking about, because I want the next effect that I'm going to put on here to be effected by the post drives time. And that effect is here under stylize Ruffin edges. And when I put this on right away, you can see that it's given the type and the boxes here instead of the kind of hard lines that they originally had, it's given them a nice kind of organic weirdness to them.
Nol Honig (08:20): Right. So it's sort of aged them or kind of weathered them a little bit. So in this case, it's going to give this, plus the postdoc is time. It's just going to give a really nice kind of handmade quality to this. Right. And so automatically it looks like, I don't know, some like 1890s weather beaten ship animation or something. I don't know. So, uh, you know, even in the parts of this animation where nothing's moving, like at the beginning and the end, um, we can create some little kind of motion in there which will make it feel even more kind of handmade. Okay. And the way that I'm going to do that is to get in here to my rough edges and this evolution right here. Okay. This basically, as you twirl this dial here, it just creates a kind of a different look for the rough-in edges.
Nol Honig (09:09): Each time you change the number here a little bit. Right. So, um, what I can do is set the spec to zero and go back to the beginning of my comp and make a key frame for this, and then go somewhere here after my animations over and just change this to some big number, I dunno, like 10 whole rotations or something. Okay. And remember it, because this is underneath the posterized time adjustment. Uh, it won't be that crazy. Right. Uh, and in fact, I should also name this rough edges just to be nice and neat. Okay. Now let's check out what this looks like. Yeah. And that looks super cool and just has this like very handmade feeling. And it really wasn't that hard. It was just a matter of, you know, basically putting a couple of effects and making a few adjustments and it really changes the feeling of the animation, quite a lot.
Nol Honig (10:03): Tip number three, isn't really an effect or a technique or something kind of cool like that. Uh, instead I want to talk about an idea. The idea is basically that if you need to hide or finesse and abrupt change on screen the best time and the best way to do that is to do it while the objects are moving quickly. Just say you have the word. Yes. And you want to change it into the word? No, let me demonstrate to how one way that I think you could do this and kind of hide that change. Right. So first thing I'm gonna do is I'm just gonna, um, make a quick animation with the word. Yes. And I'm going to kind of have it start over here and oops. I'm just going to, I don't know, go 15 frames and I'm going to move this over here.
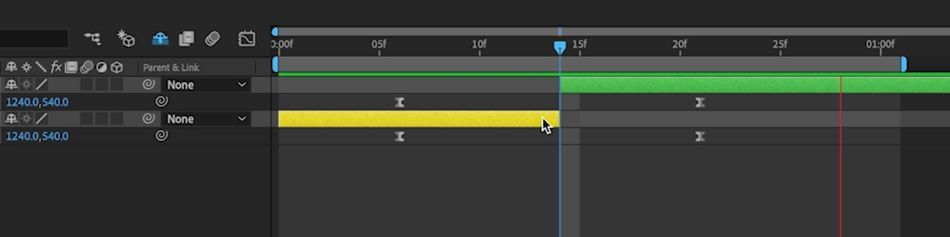
Nol Honig (10:50): Okay. And then I'm going to take this, these key frames and I'm going to copy it here and I got to paste it onto the no. So right now they're just both moving together. Okay. And I'm actually going to press you to show my key frames. I can move this back a little bit. So there's a little bit ahead and tail on the animation. And then I'm going to press F nine to put easy ease on those key frames. You remember that from earlier, and then basically I'm going to jump into the graph editor again by pressing this button. And now we can see the familiar hump of the E's key frames in the speed graph, right. As I was saying before, the best place to hide this change that I'm going to animate is while it's moving the fastest. And so the way to really emphasize that, or, or to hide that even better is to have this move even faster here in the middle.
Nol Honig (11:42): So what I'm going to do is take this handle here and pull this so that this is, I'm not going to crank it up to a hundred percent, but to like 90% influence there. So like that, I'm going to do the same on the other side. Okay. 90% influence. Now you can see here that sort of between this frame and this frame, it's moving the fastest. Because as you remember from before in the speed graph, the bottom line here is zero and it just gets faster as it goes up. So it's slow or stopped here. And then it's slowly getting faster and faster and faster. And here is the peak of this animation. If I, um, take my you word yes. Now, and trim this right here at that peak, and then move one more frame and then trim the word. No. So that it starts right here.
Nol Honig (12:29): Right? I've now trimmed this right at that point where it is moving fastest, as you remember right now, it should look like this. And that's pretty seamless. I mean, you could animate the word yes. Morphing very quickly to the word. No, but I think this is pretty much just about as effective. And obviously if you pulled these handles more and it was moving faster, or if this animation was quicker, the change could happen even kind of faster. Um, so I think this is a really, really good thing to think about when you're first getting into animation or motion design. And I just want to point out that this isn't only with position here. Okay. So I set up this other comp where I've already kind of got it animated, but I used rotation and I kind of did the same thing. I just switched it from one to the other wall.
Nol Honig (13:18): It was at the fastest rotation point in the animation. And, you know, it's just really, really seamless. So I just wanted to point out, it's not only with position it's when it's moving at its fastest in whatever the animation is that it's doing hit subscribe. If you want more tips like this one and make sure to check the description so you can download the project files from this video to practice with. And if you really want to understand after effects and get experience using it with the help of industry pros, checkout after effects, kickstart from school of motion. Thanks for watching everybody. And don't worry. You do not have to wear a tie. If you take the class.
Learn After Effects the Right Way
Master the After Effects interface and build a real animation skillset. Enroll in All-Access to unlock AE Kickstart and 50+ other courses.


