

Master After Effects Expressions
Go from copy-pasting code to writing your own expressions with confidence. Enroll in All-Access to unlock Expression Session and 50+ other courses.

Quickly give your layers organic movement with the Bounce Expression in After Effects.
What if you dropped a basketball and it didn't bounce? You'd probably think something was off, right? Well, the same is true in animation. Motion Design is all about the communication of ideas, and replicating movements found in the real world is an essential part of telling a compelling story. This is why it's so important to give your animations weight and mass like objects found in the real world. And this my friend is where the bounce expression comes into play...
If you're looking for a quick way to add a bounce to any layer, then this After Effects bounce expression is just for you. At first glance it can seem very daunting, and honestly it's super complex. But, don't let the complexity of it scare you away! I'm going to break down what you need to know so that you know how to use the bounce expression in your After Effects projects.
Credit to Dan Ebberts, a coding wizard, who created this bounce expression.
The After Effects Bounce Expression
The bounce expression is great because it only takes two keyframes to create a bounce. After Effects will interpolate the velocity of your layers' movement to help determine how the bounce will work. The math that goes into making this bounce expression is pretty darn nerdy.
Feel free to copy and paste this After Effects Bounce Expression below. Don't worry, you don't have to know how this entire expression works to use it.
e = .7; //elasticity
g = 5000; //gravity
nMax = 9; //number of bounces allowed
n = 0;
if (numKeys > 0){
n = nearestKey(time).index;
if (key(n).time > time) n--;
}
if (n > 0){
t = time - key(n).time;
v = -velocityAtTime(key(n).time - .001)*e;
vl = length(v);
if (value instanceof Array){
vu = (vl > 0) ? normalize(v) : [0,0,0];
}else{
vu = (v < 0) ? -1 : 1;
}
tCur = 0;
segDur = 2*vl/g;
tNext = segDur;
nb = 1; // number of bounces
while (tNext < t && nb <= nMax){
vl *= e;
segDur *= e;
tCur = tNext;
tNext += segDur;
nb++
}
if(nb <= nMax){
delta = t - tCur;
value + vu*delta*(vl - g*delta/2);
}else{
value
}
}else
value
Don't let that scary expression monster scare you away. I'm going to show you the parts of the expression that you'll need to worry about and what they do to affect the bounce. So in the end we'll only be focusing on the top three lines. It's not that scary...

CONTROLLING THE BOUNCE EXPRESSION
When working with the bounce expression in After Effects there are three different portions that you will want to make changes to:
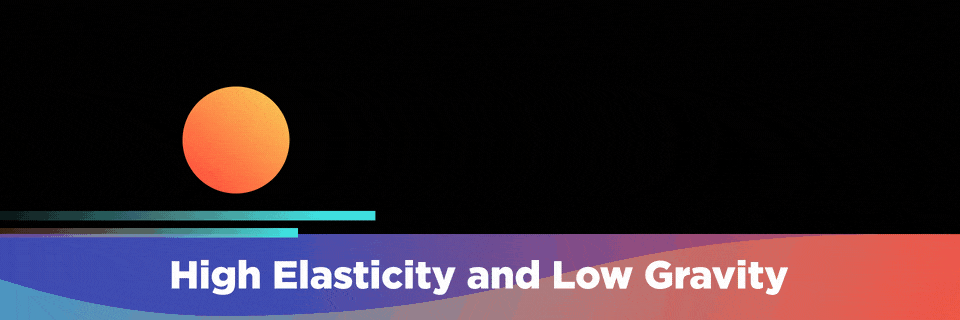
- variable e - controls the elasticity of the bounce
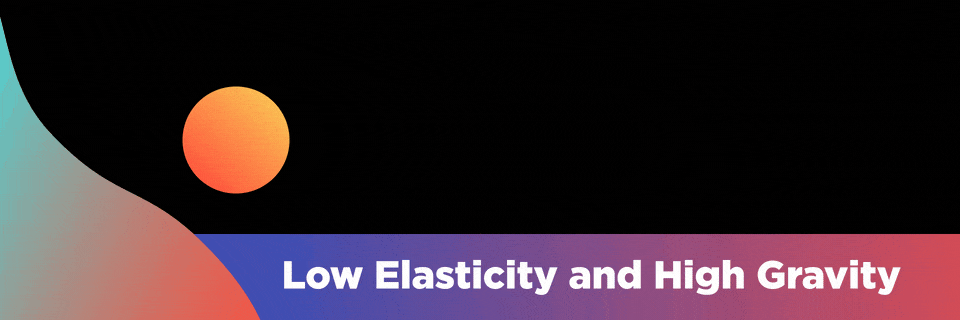
- variable g - controls the gravity acting on your object
- variable nMax - the maximum amount of bounces that are allowed
What Does Elasticity Mean?
For elasticity, imagine you have a bungee chord attached to your object. The lower the number you give for e the more stiff the bounce will look. If you're looking for a bounce that feels loose, just raise this value.
The example below bounces better than a Mega Bounce XTR which is the Rolls Royce of bouncy balls, but I personally prefer like a Wham-O Superball because it has a similar coefficient of restitution for a better price... but I digress.
What is Gravity in the Bounce Expression?
In the bounce expression gravity works just how you would think gravity should work, the higher the gravity the heavier the object will feel. If you increase the gravity value you will make the object seem heavier. Once your object completes its initial contact it will start to finish the remainder of your bounce quicker and quicker.
{{lead-magnet}}
The Pros and Cons of the Bounce Expression
The bounce expression is an amazing example of just how powerful expressions can be in After Effects. But, you will quickly find out that this expression is a one-trick pony. It will be very useful for bringing in layers that just need a simple bounce, but it's no substitute for a solid understanding of how to create a bounce. In fact, the 'ball bouncing' exercise is probably the most popular animation exercise used for training aspiring animators.
If you want to learn more about organic movements in After Effects, make sure to check out our tutorial covering the graph editor in After Effects. Joey goes over how to start implementing organic bounce movements in your workflow and how you can obtain a bounce without using expressions!
BEYOND THE BOUNCE
I hope that you now feel equipped to use the bounce expression in your After Effects projects. If you'd like to challenge yourself to learn more about After Effects, animation and expressions check out Expression Session!
Expression Session is included with School of Motion All-Access—unlimited access to 60+ industry-leading courses, a supportive community, and credentials that matter.
Take Your Skills Further with Expression Session
Want to go deeper? Check out Expression Session, available with School of Motion All-Access.
ENROLL NOW!
Acidbite ➔
50% off everything

ActionVFX ➔
30% off all plans and credit packs - starts 11/26

Adobe ➔
50% off all apps and plans through 11/29

aescripts ➔
25% off everything through 12/6
Affinity ➔
50% off all products

Battleaxe ➔
30% off from 11/29-12/7
Boom Library ➔
30% off Boom One, their 48,000+ file audio library
BorisFX ➔
25% off everything, 11/25-12/1

Cavalry ➔
33% off pro subscriptions (11/29 - 12/4)

FXFactory ➔
25% off with code BLACKFRIDAY until 12/3

Goodboyninja ➔
20% off everything

Happy Editing ➔
50% off with code BLACKFRIDAY

Huion ➔
Up to 50% off affordable, high-quality pen display tablets

Insydium ➔
50% off through 12/4
JangaFX ➔
30% off an indie annual license
Kitbash 3D ➔
$200 off Cargo Pro, their entire library
Knights of the Editing Table ➔
Up to 20% off Premiere Pro Extensions
Maxon ➔
25% off Maxon One, ZBrush, & Redshift - Annual Subscriptions (11/29 - 12/8)
Mode Designs ➔
Deals on premium keyboards and accessories
Motion Array ➔
10% off the Everything plan
Motion Hatch ➔
Perfect Your Pricing Toolkit - 50% off (11/29 - 12/2)

MotionVFX ➔
30% off Design/CineStudio, and PPro Resolve packs with code: BW30

Rocket Lasso ➔
50% off all plug-ins (11/29 - 12/2)

Rokoko ➔
45% off the indie creator bundle with code: RKK_SchoolOfMotion (revenue must be under $100K a year)

Shapefest ➔
80% off a Shapefest Pro annual subscription for life (11/29 - 12/2)

The Pixel Lab ➔
30% off everything
Toolfarm ➔
Various plugins and tools on sale

True Grit Texture ➔
50-70% off (starts Wednesday, runs for about a week)

Vincent Schwenk ➔
50% discount with code RENDERSALE

Wacom ➔
Up to $120 off new tablets + deals on refurbished items


Master After Effects Expressions
Go from copy-pasting code to writing your own expressions with confidence. Enroll in All-Access to unlock Expression Session and 50+ other courses.


