

Learn After Effects the Right Way
Master the After Effects interface and build a real animation skillset. Enroll in All-Access to unlock AE Kickstart and 50+ other courses.

How the Disk Cache in After Effects Helps Your Workflow.
You may or may not have heard of the disk cache in After Effects, but as you’ll come to find out the disk cache is a huge deal in After Effects. In fact it's not just a huge deal, it's a massive deal, and a crucial piece of your workflow.
Whether you've know it or not, you’ve been using disk cache for as long as you've been using After Effects. The Disk Cache is such an essential part of the Motion Design process that we thought it'd be helpful to talk about what disk cache is and how it can help you in After Effects.
What is Disk Cache?
Technically a Disk Cache isn’t just an After Effects thing, it's far more reaching than that, because most software utilizes some type of disk caching. Essentially what disk cache means is that the software holds data that has recently been read and stores it in a cache, so that way when it needs to read it again it can do so more quickly.
How Does Disk Cache Work in After Effects?
When you put together a comp, After Effects stores rendered frames and images using the RAM preview, this is so adjusting and editing of your comp goes more smoothly. AE won't cache frames that can easily be rendered, such as solid colors or text, just frames where composites have taken place and preview rendering is necessary. Now there are two ways that AE is pre-rendering and caching your comp. Let’s take a look at both.
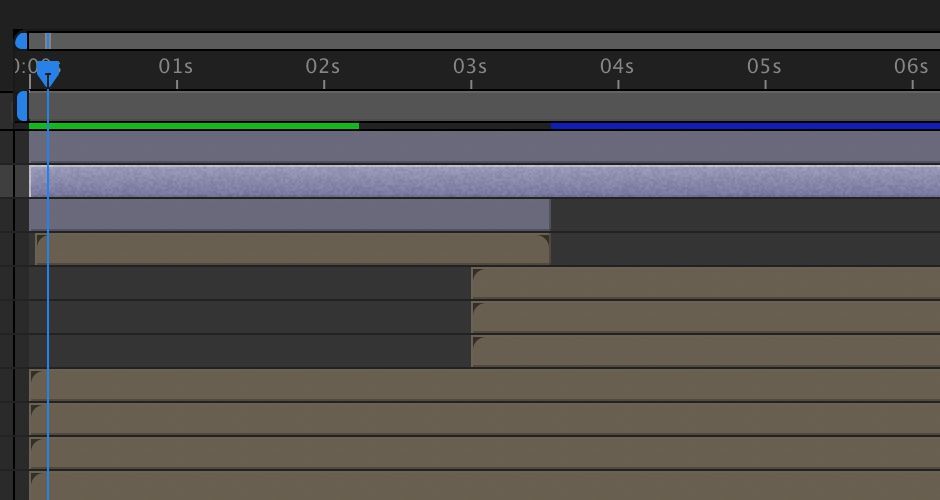
DISK CACHE
- Saved to: Hard Drive
- Indicator: Blue Bar
Disk cache just as we mentioned above, where data from the preview render is stored in a cache directory. This allows After Effects to read the data quicker, thus giving you a faster preview. You can see that your comp has been cached to the disk by seeing a blue bar in the time ruler of the Timeline.
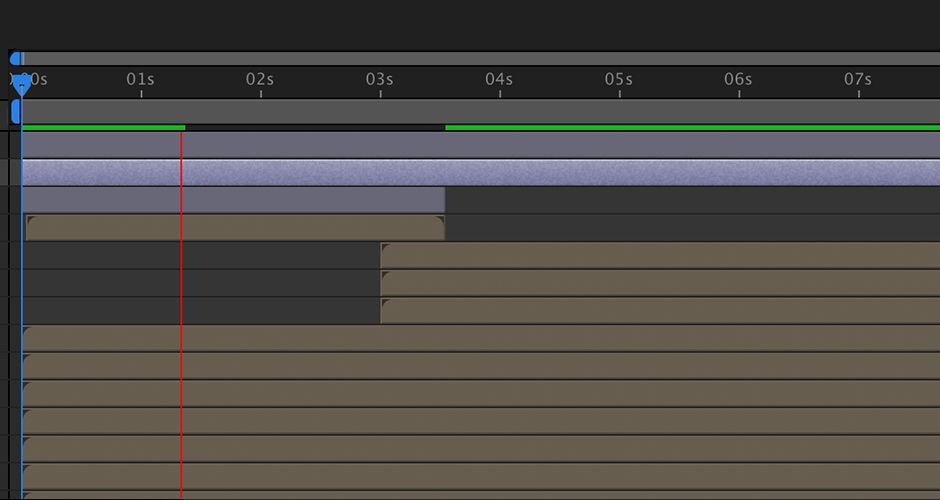
RAM (RANDOM ACCESS MEMORY) CACHE
- Saved To: RAM
- Indicator: Green Bar
After Effects will cache RAM Preview frames within its RAM Cache in the same way that it caches data to the disk. This again is all a way for After Effects to increase its productivity for the user by not having to re-render a comp every single time you hit the spacebar. You can see RAM Cache working by finding a green bar in the time ruler of the Timeline. When you preview your timeline After Effects will move any necessary footage from the disk cache into your RAM Cache for playback.
Is Disk Cache and Ram Cache Using Hard Drive Space?
Kinda, both will utilize storage space on your computer. However, RAM preview will store to RAM and be erased when After Effects is closed. Disk Cache will store on your hard drive and will not be deleted when you close the software.
You should also note that over time your cache can get quite large and take up a lot of space on your Hard Drive. However, don’t worry you can clean things up and purge your system of that used disk space.
HOW TO ADJUST YOUR DISK CACHE SIZE
To see just how much space your disk cache is taking up, navigate to After Effects > Preferences > Media & Disk Cache. In the menu you can change the potential size of your disk cache. If you use After Effects a lot you can crank that number up to as much as you want. After Effects recommends that you use an SSD on a separate hard drive from your footage.
HOW TO CLEAR (PURGE) THE DISK CACHE IN AFTER EFFECTS
There are two ways to purge and clear out the Disk Cache. The first is to head up to Edit > Purge > All Memory & Disk Cache. Just be aware that this will purge your RAM Cache as well. The second option is going to be to head over to Preferences > Media & Disk Cache. Here you’ll find an option to “Empty Disk Cache.”

HOW TO CLEAR (PURGE) THE RAM CACHE IN AFTER EFFECTS
If you need to purge your RAM Cache before you quit After Effects then head up to Edit > Purge > All Memory. This will take care of the RAM Cache, just be aware that you’ll lose your preview progress and you’ll need to run RAM Preview again.
SO... IS THIS INFO REALLY GOING TO HELP ME OUT?
A big part of becoming a great designer in After Effects is working efficiently and quickly. One of the ways you can focus on creating stuff instead of waiting on your computer to render is by utilizing Disk Cache and RAM Preview to your advantage.
Take Your Skills Further with After Effects Kickstart
Want to go deeper? Check out After Effects Kickstart, available with School of Motion All-Access.
ENROLL NOW!
Acidbite ➔
50% off everything

ActionVFX ➔
30% off all plans and credit packs - starts 11/26

Adobe ➔
50% off all apps and plans through 11/29

aescripts ➔
25% off everything through 12/6
Affinity ➔
50% off all products

Battleaxe ➔
30% off from 11/29-12/7
Boom Library ➔
30% off Boom One, their 48,000+ file audio library
BorisFX ➔
25% off everything, 11/25-12/1

Cavalry ➔
33% off pro subscriptions (11/29 - 12/4)

FXFactory ➔
25% off with code BLACKFRIDAY until 12/3

Goodboyninja ➔
20% off everything

Happy Editing ➔
50% off with code BLACKFRIDAY

Huion ➔
Up to 50% off affordable, high-quality pen display tablets

Insydium ➔
50% off through 12/4
JangaFX ➔
30% off an indie annual license
Kitbash 3D ➔
$200 off Cargo Pro, their entire library
Knights of the Editing Table ➔
Up to 20% off Premiere Pro Extensions
Maxon ➔
25% off Maxon One, ZBrush, & Redshift - Annual Subscriptions (11/29 - 12/8)
Mode Designs ➔
Deals on premium keyboards and accessories
Motion Array ➔
10% off the Everything plan
Motion Hatch ➔
Perfect Your Pricing Toolkit - 50% off (11/29 - 12/2)

MotionVFX ➔
30% off Design/CineStudio, and PPro Resolve packs with code: BW30

Rocket Lasso ➔
50% off all plug-ins (11/29 - 12/2)

Rokoko ➔
45% off the indie creator bundle with code: RKK_SchoolOfMotion (revenue must be under $100K a year)

Shapefest ➔
80% off a Shapefest Pro annual subscription for life (11/29 - 12/2)

The Pixel Lab ➔
30% off everything
Toolfarm ➔
Various plugins and tools on sale

True Grit Texture ➔
50-70% off (starts Wednesday, runs for about a week)

Vincent Schwenk ➔
50% discount with code RENDERSALE

Wacom ➔
Up to $120 off new tablets + deals on refurbished items


Learn After Effects the Right Way
Master the After Effects interface and build a real animation skillset. Enroll in All-Access to unlock AE Kickstart and 50+ other courses.


