

Learn After Effects the Right Way
Master the After Effects interface and build a real animation skillset. Enroll in All-Access to unlock AE Kickstart and 50+ other courses.

Let’s fix the dreaded ‘Cached Preview’ error in After Effects.
If you’re reading this article then chances are you probably have just recently received the dreaded ‘Cached Preview Needs 2 or More Frames to Playback’ error in After Effects. This error usually leaves me feeling like this... but that doesn’t mean you can’t do something about it. In this article we’re going to talk about how to fix this common error. If you follow all of the steps below there’s a good chance that you’ll fix this error in only a matter of seconds. If you just want to fix the error you can follow the steps below, but first we thought it’d be helpful to talk about why you get this error in the first place.
What's the 'Cached Preview' Problem?
After Effects previews compositions by creating temporary video files that are stored on your machine. These files are known as ‘cached’ preview files and they come in two flavors: Disk Cache and RAM Cache files.

RAM cache files are the preview video files that After Effects plays when you hit the spacebar. The bright green bar at the top of the timeline indicates the portion of your composition that is playing off of your RAM. Most of the time when you get the ‘Cached Preview Needs 2 or More Frames to Playback’ error it is because there is not enough room on your RAM (memory) to load these temporary video files. Because After Effects utilizes RAM to playback preview files it’s advised that you have at least 8GB or RAM if not more in order to ensure that you have enough memory to playback large compositions.
Disk cache files are temporary video files that are typically rendered in the background while you’re working in After Effects. After Effects does not directly preview video from the disk cache. Instead video files from your disk cache are loaded into your RAM cache when you’re ready to preview. You can tell if a frame is rendered in the disk cache by looking for the dark blue bar at the top of the After Effects timeline. Disk cache files can be stored anywhere you want. You can even control how big your disk cache can get under the preferences menu.
How to Fix the 'Cached Preview' Error
Here’s a step-by-step guide for fixing the ‘Cached Preview Needs 2 or More Frames to Playback’ error in After Effects.
1. PURGE RAM CACHE (MEMORY)
The first thing you should do is purge your RAM. This will erase any temporary cache files currently stored in your memory. To do this navigate to Edit>Purge>All Memory. This will reset your RAM cache from scratch.
2. EMPTY YOUR DISK CACHE
You can also try emptying your disk cache. The fastest way to do this is to navigate to Edit>Purge>All Memory and Disk Cache. This will (obviously) purge both your RAM and Disk Cache.
3. CHANGE RAM RESERVED FOR OTHER APPLICATIONS
After Effects allows you to set how much RAM is available for other applications. This is especially important if you have multiple applications open at the same time. If you use After Effects a lot I recommend giving After Effects as much RAM as you can. Navigate to After Effects>Preferences>Memory… From the popup menu change the value of ‘RAM reserved for other applications’ to a low number.
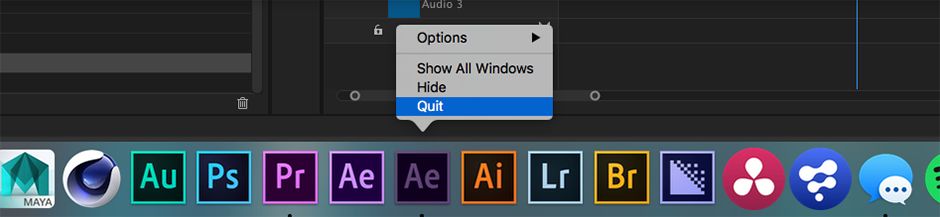
4. CLOSE OUT UNNECESSARY APPLICATIONS
If you have a lot of applications open on your machine you may need to close them out so After Effects isn’t competing for memory. I have a nasty habit of leaving Premiere Pro open when I’m working on After Effects projects. Go ahead and close out any unnecessary applications. This includes Spotify and iTunes. Just listen to music on your phone if you can’t stand the silence.
5. CHANGE PREVIEW QUALITY
The fastest way to reduce the size of the file being written to your RAM is to reduce the preview quality on your machine. To change this hit the menu at the bottom of the composition panel. By default it should be set to ‘Auto’. If you have a complicated project that won’t render go ahead and reduce this to half, third, or quarter. There’s also some handy keyboard shortcuts for doing this:
- Full: Cmd + J
- Half: Cmd + Shift + J
- Quarter: Cmd + Opt + Shift + J
6. INCREASE DISK CACHE SIZE
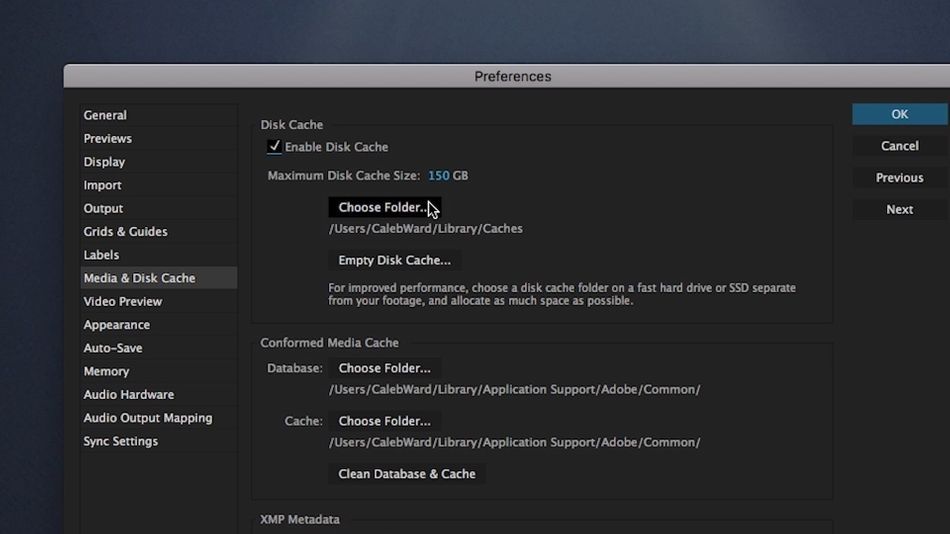
You also might be running into an issue where your disk cache is simply not large enough to effectively render in the background. To troubleshoot this go to After Effects>Preferences>Media & Disk Cache. Once the popup window appears increase the size of your disk cache. I like to keep mine above 50GB, which should be more than enough for most projects.
7. UNCHECK ‘REDUCE CACHE SIZE WHEN SYSTEM IS LOW ON MEMORY’

Some people have found success by navigating to After Effects>Preferences>Memory… and deselecting the ‘Reduce cache size when system is low on memory’ button.
8. CHANGE DISK CACHE LOCATION
One common problem that people have when it comes to rendering in After Effects is placing their project files and their disk cache on the same drive. This can bog down your machine as After Effects will read and write files simultaneously to the same drive. Instead it is recommended that you separate your disk cache and project files across two separate drives. I typically have my project files on an external SSD and my disk cache on my local storage.
To change your disk cache location navigate to After Effects > Preferences > Media and Disk Cache and select ‘Choose Folder’ under Disk Cache.
9. SAVE AND CLOSE AFTER EFFECTS
While it may seem obvious sometimes this error can be often be solved by simply closing out After Effects and opening it back up. In my experience this will fix the problem for a few preview renders, but the error will likely pop-up again.
10. CLEAN DATABASE & CACHE
If you’ve made it this far and are still seeing that dreaded error it’s not the end of the world, but we will need to start getting creative. Try cleaning the database and cache by navigating to After Effects > Preferences > Media and Disk Cache. Once you’re there, hit ‘Clean Database & Cache’.
11. SET WORK AREA TO THE APPROPRIATE DURATION
Sometimes this annoying error can be fixed by setting your work area to the exact length that it needs to be. You can very quickly change your previewable work area by using the B and N keys to set the start and end of your work area.
12. SET YOUR REGION OF INTEREST

You’ve likely accidentally set your region of interest once or twice when working in After Effects, but this little-used tool can actually be very helpful when you’re trying to preview a small portion of your video frame in After Effects. In short, After Effects will render a smaller portion of the video instead of the entire frame. You can activate the ‘Region of Interest’ tool by navigating to the small region of interest button at the bottom of the composition panel.
13. OPTIMIZE YOUR EFFECTS
Not all After Effects are created equal. Some effects like the Lens Blur effect are simply much more intense on your machine than say a Fast Box Blur effect. Before you give up on your project try changing out any effects that may be unnecessary for your scene.
14. ORGANIZE YOUR PROJECT

Ask yourself if you’ve organized your project in an efficient and practical way. A project with hundreds of pre-comps and unnecessarily large asset files could possibly benefit from some better organization. It may be tempting to want to just hop into a big project and start animating, but this is actually a fast way to get lost in a disorganized project. Spend some time on the front-end to plan out your project and you might not end up with the ‘Cached Preview’ error.
15. RENDER INSTEAD OF PREVIEWING
While this is certainly not what After Effects was designed to do one solution that could work would be to render out your project in the Render Queue instead of previewing the project in After Effects. For example, if you’re working on a huge Element 3D sequence it might make sense to work in the wireframe preview mode until you’re ready to export. In a way this method of animating is very similar to a 3D pipeline, we’ve just been spoiled by After Effects’ quick previews inside of the composition.
16. OPTIMIZE YOUR MACHINE

It’s time to take a look at your computer. We all know that After Effects is an incredibly intense program to operate. If you’ve optimized your project and are still receiving an error it might be time to consider upgrading your hardware. The first place to look would be your RAM (because that’s where RAM cache is stored), but honestly if any part of your system is lacking it can bring the whole animation process to a screeching halt. Go check out Adobe’s recommended system specs to get an idea for the type of machine you should be running. Sure a system upgrade can cost some money, but if you’re working in After Effects every day it is definitely worth it.
So that is every way that we were able to find that could potentially fix the ‘Cached Preview Needs 2 or More Frames to Playback’ error in After Effects. If you want to learn more about After Effects check out the rest of the site here on School of Motion. Hopefully this error hasn’t completely ruined your day, but look on the bright side... a bad day in After Effects is better than a good day at a ‘normal’ job.
Take Your Skills Further with After Effects Kickstart
Want to go deeper? Check out After Effects Kickstart, available with School of Motion All-Access.
ENROLL NOW!
Acidbite ➔
50% off everything

ActionVFX ➔
30% off all plans and credit packs - starts 11/26

Adobe ➔
50% off all apps and plans through 11/29

aescripts ➔
25% off everything through 12/6
Affinity ➔
50% off all products

Battleaxe ➔
30% off from 11/29-12/7
Boom Library ➔
30% off Boom One, their 48,000+ file audio library
BorisFX ➔
25% off everything, 11/25-12/1

Cavalry ➔
33% off pro subscriptions (11/29 - 12/4)

FXFactory ➔
25% off with code BLACKFRIDAY until 12/3

Goodboyninja ➔
20% off everything

Happy Editing ➔
50% off with code BLACKFRIDAY

Huion ➔
Up to 50% off affordable, high-quality pen display tablets

Insydium ➔
50% off through 12/4
JangaFX ➔
30% off an indie annual license
Kitbash 3D ➔
$200 off Cargo Pro, their entire library
Knights of the Editing Table ➔
Up to 20% off Premiere Pro Extensions
Maxon ➔
25% off Maxon One, ZBrush, & Redshift - Annual Subscriptions (11/29 - 12/8)
Mode Designs ➔
Deals on premium keyboards and accessories
Motion Array ➔
10% off the Everything plan
Motion Hatch ➔
Perfect Your Pricing Toolkit - 50% off (11/29 - 12/2)

MotionVFX ➔
30% off Design/CineStudio, and PPro Resolve packs with code: BW30

Rocket Lasso ➔
50% off all plug-ins (11/29 - 12/2)

Rokoko ➔
45% off the indie creator bundle with code: RKK_SchoolOfMotion (revenue must be under $100K a year)

Shapefest ➔
80% off a Shapefest Pro annual subscription for life (11/29 - 12/2)

The Pixel Lab ➔
30% off everything
Toolfarm ➔
Various plugins and tools on sale

True Grit Texture ➔
50-70% off (starts Wednesday, runs for about a week)

Vincent Schwenk ➔
50% discount with code RENDERSALE

Wacom ➔
Up to $120 off new tablets + deals on refurbished items


Learn After Effects the Right Way
Master the After Effects interface and build a real animation skillset. Enroll in All-Access to unlock AE Kickstart and 50+ other courses.


