Start Your 3D Journey in Cinema 4D
Master the essentials of 3D modeling, lighting, and animation in C4D. Enroll in All-Access to unlock C4D Basecamp and 50+ other courses.

Want to move your projects between Cinema 4D and After Effects?
I'm always amazed at the number of people that don't realize that Cinema 4D and After Effects integrate really well with each other. Despite being developed by two different companies (Adobe and Maxon), C4D and After Effects have some pretty deep integrations that make them play really well together.
In this article, we are going to discuss how to take advantage of this amazing workflow between After Effects and Cinema 4D.
Why Should I Move Between Cinema 4D and After Effects?
Great question! Well the short answer is there are a LOT of reasons why you might want to link Cinema 4D and After Effects together, but here are a few of our favs:
- You can utilize the power of the mograph module in Cinema 4D for complex and powerful animations inside After Effects.
- Adding 3D elements to your explainer video. Maybe a robot???
- Adding 3D Photorealistic content to your tracked footage.
- Using Cinema 4D for dynamics, but After Effects for creating shapes and textures.
This article will take a look at these different workflows and give you a step-by-step process to follow along. So without further ado, here's our first example.
1. Using Cinema 4D's Mograph Inside After Effects

Between Cloners, Fractures, Tracers, and Effectors the MoGraph module in Cinema 4D is an indispensable tool to use on your projects.
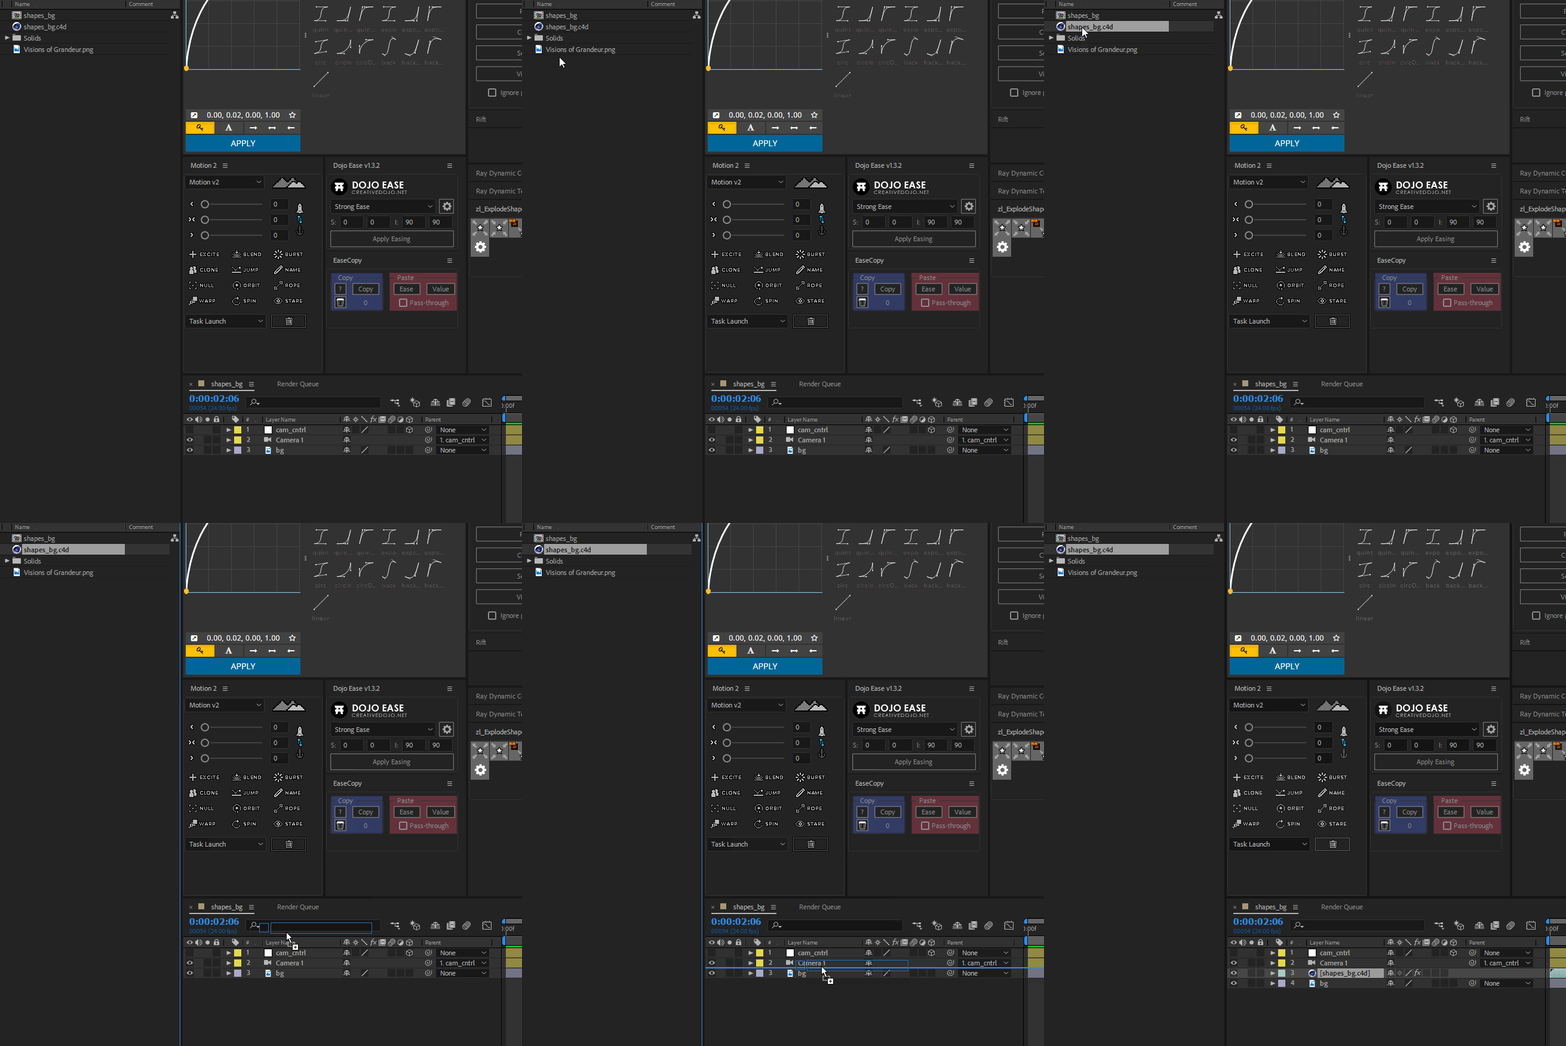
Once you set up your Cinema 4D scene, just import that Cinema 4D project into your After Effects project (did you know it was that easy?), and drag the project onto your timeline.
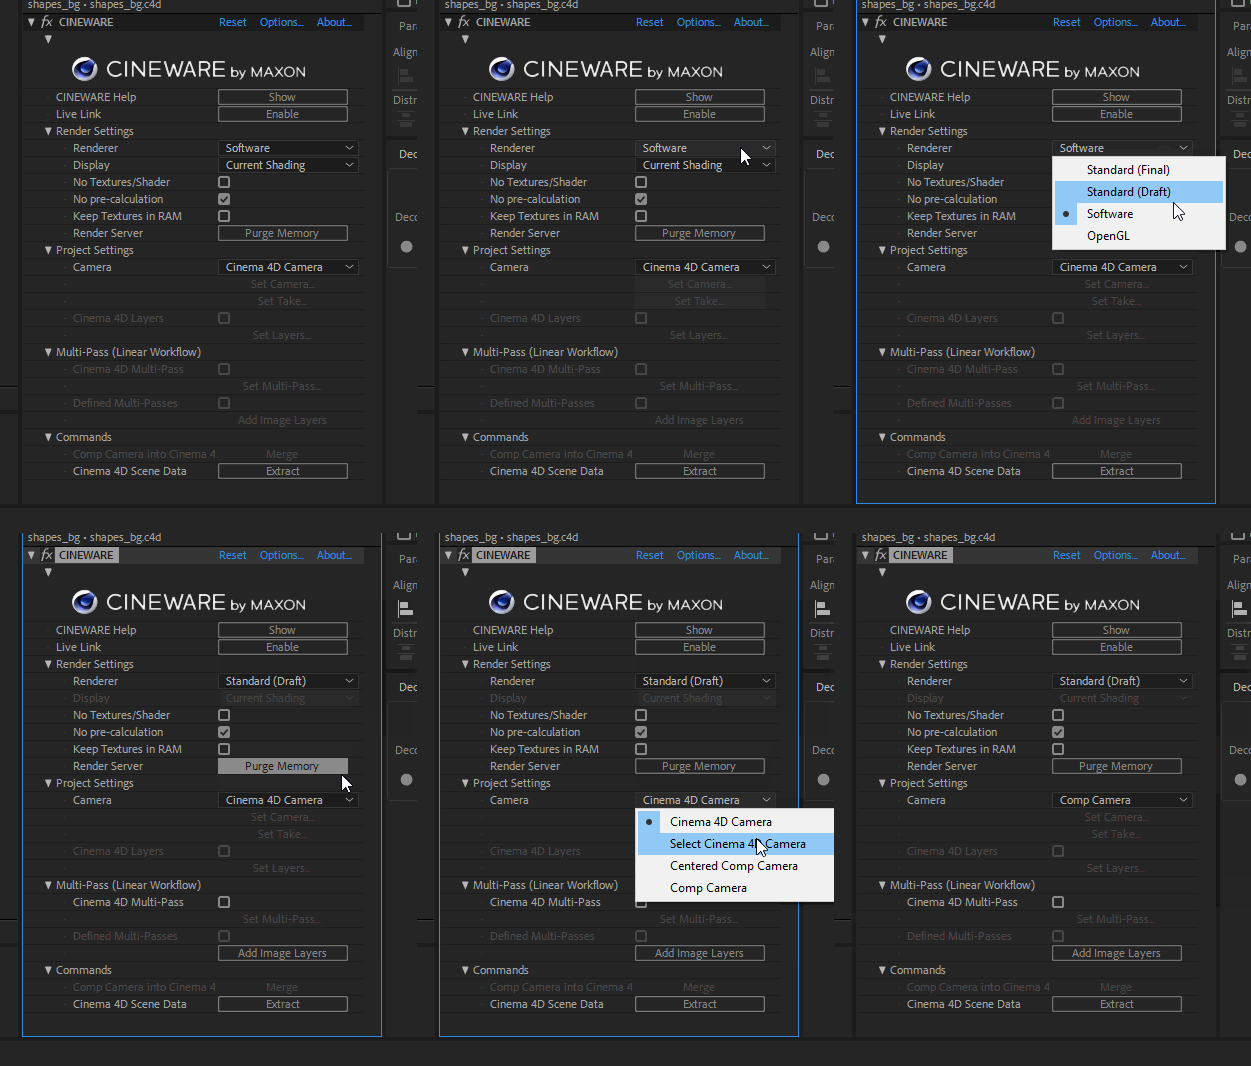
In the effects panel of your Cinema 4D layer, change the renderer to Standard (either Draft or Final, but make sure you use Final when you finish), and set the camera to your “comp camera.”
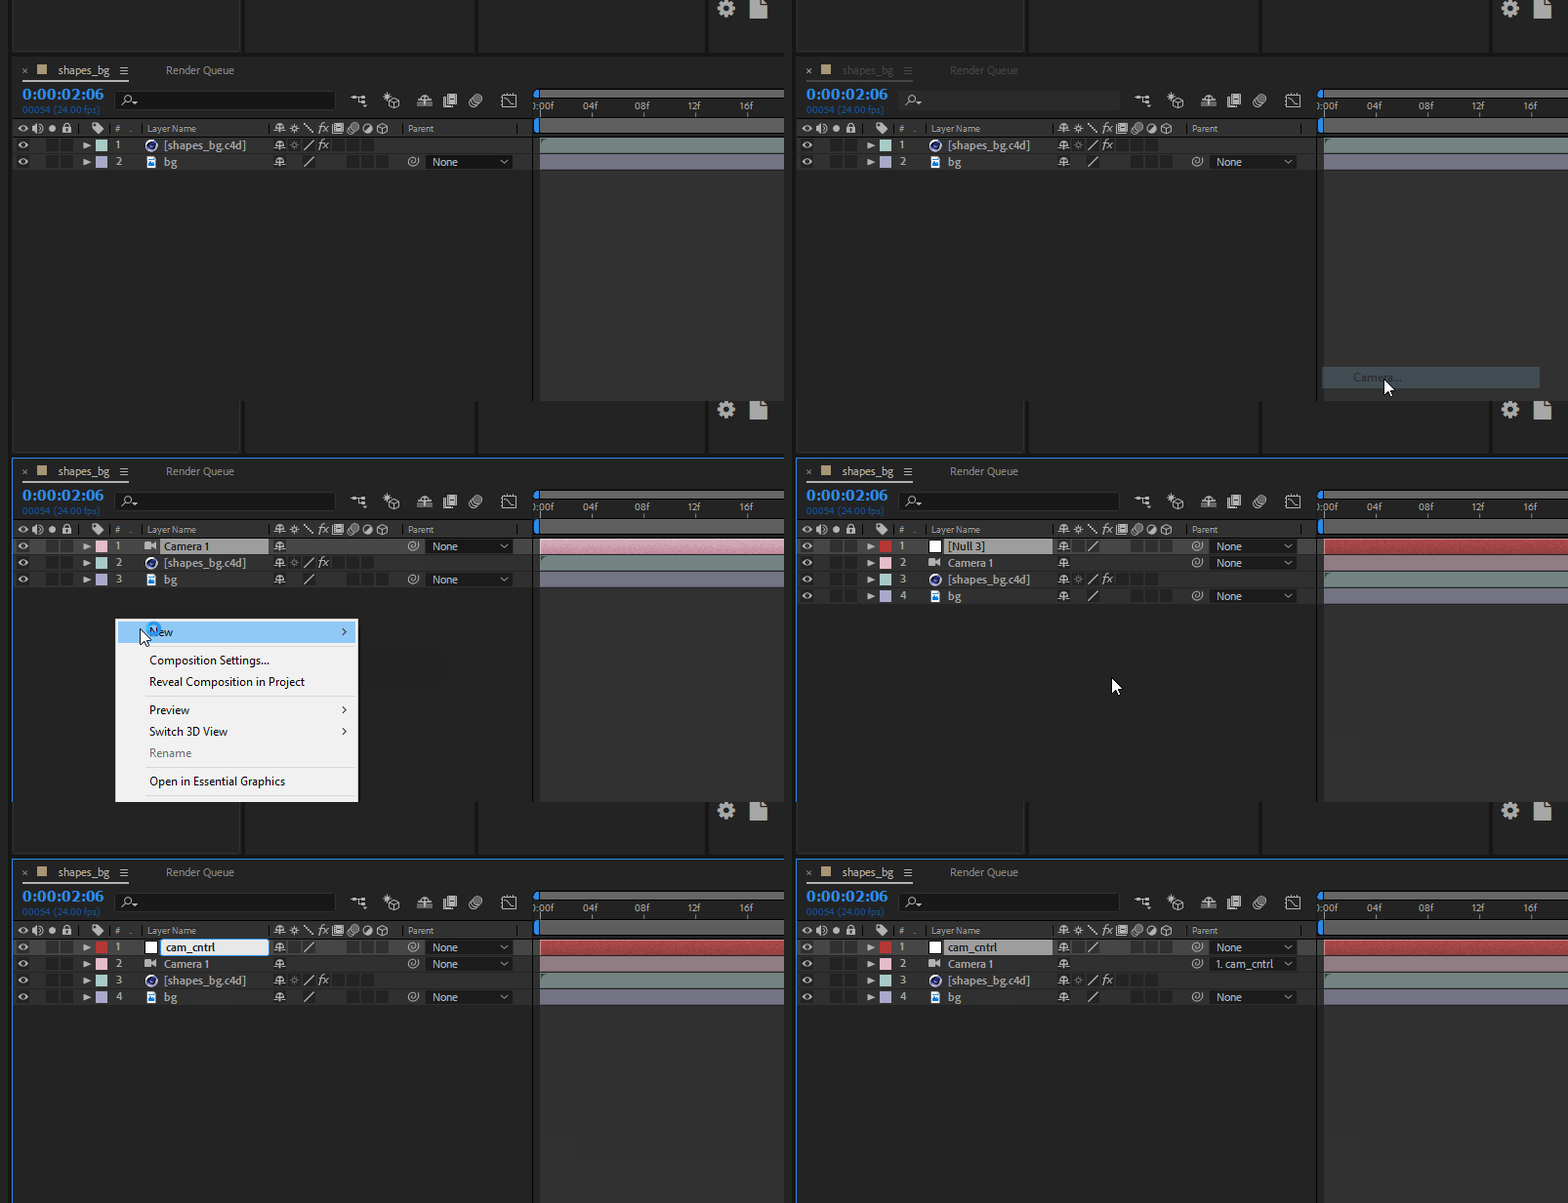
Add a camera and a null to control it, and center your composition!
Any changes you make in Cinema 4D will automatically update inside your After Effects project. You can add any effects, masks, animation, etc. to that Cinema 4D layer like you would anything else.
2. Adding 3D Elements to Your Explainer Videos

I know, everyone loves robots, as do I. Here, I created my robot with basic shapes and a little rigging. EJ Hassenfratz covered a lot on this topic in Modeling Rubberhose Style Characters in Cinema 4D.
In this instance, I did the same thing as before, except used Cinema 4D’s camera instead of the “comp camera.”

The background is just a solid color inside After Effects. That shadow? It's just a disc inside Cinema 4D, with a black material and the transparency at 98%.


Once you add the disc to your scene, position it under the robot, add a "PSR" constraint, check "maintain original," and finally un-check "rotation." That way, the robot is affected by the position, not the rotation.
Confused? Just follow the GIFs below.


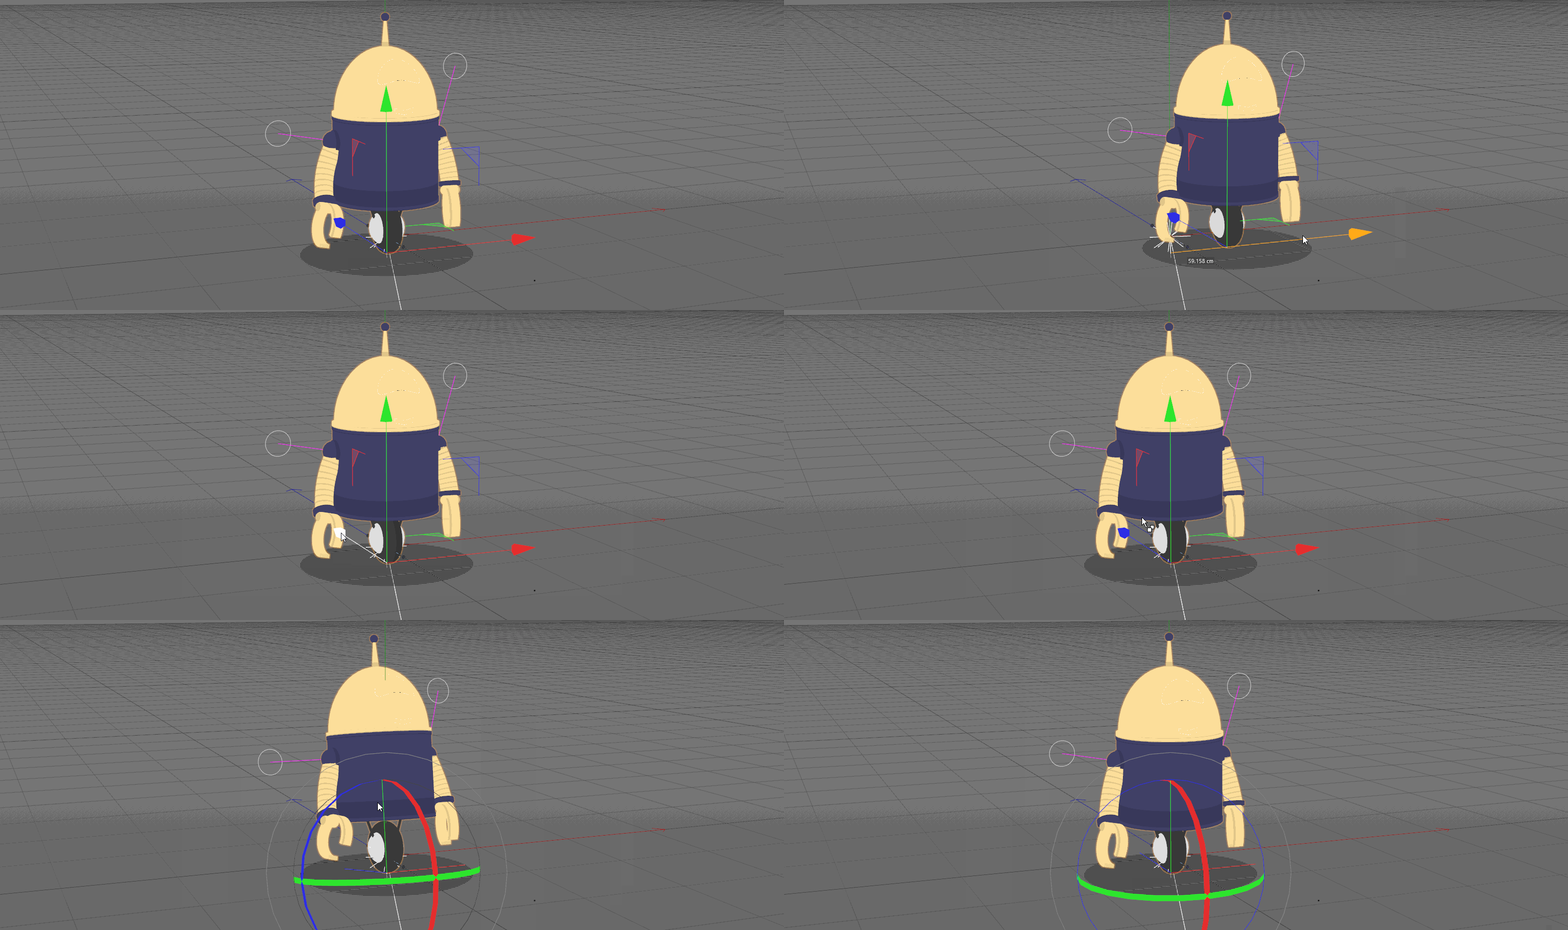
Yay for robots! Now all you have to do is import that sucker into After Effects.
3. Add 3D Photorealistic Cinema 4D Content to Your Tracked Footage in After Effects
This has been covered in many, many tutorials, and the workflow hasn't changed much in the past few years. Sean Frangella did a great, 2 part in-depth tutorial on the workflow here. Any problems you might encounter or questions you might have should be answered there.
Sort of know the workflow but need a refresher? Here are the basic steps (screens shots are directly from the tutorial).
1. Track footage with 3D Camera Tracker (surprise, surprise).

2. Select your nulls, right click, and "Create Nulls From Camera"
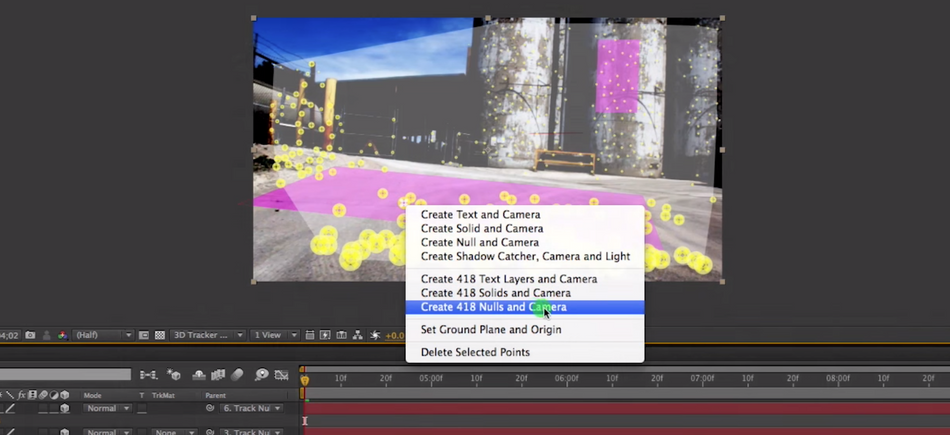
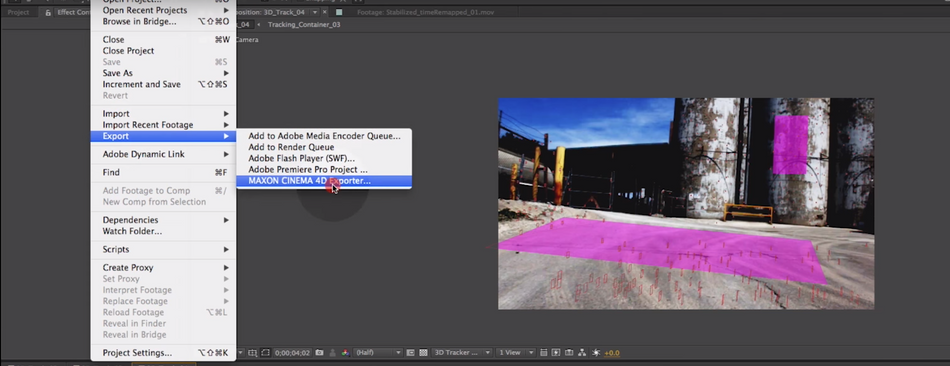
3. With your composition selected, go to File > Export > MAXON CINEMA 4D Exporter
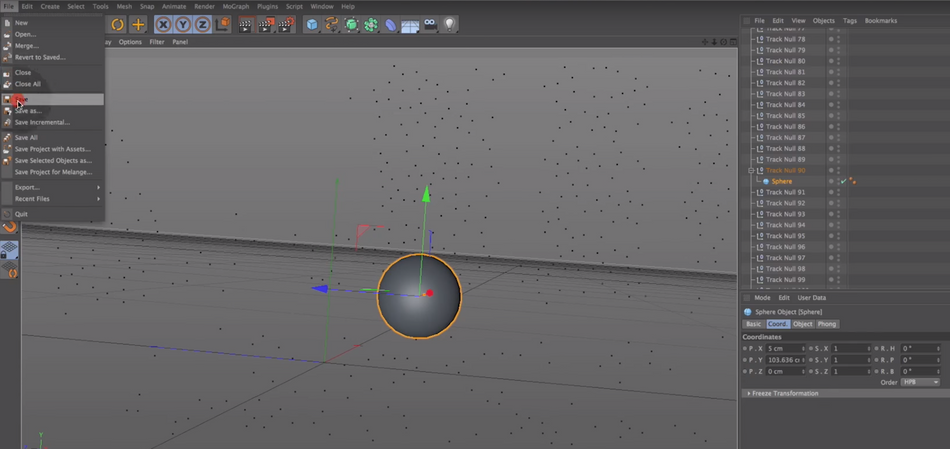
4. The export is now a .c4d file. Open that in Cinema and, viola! Your scene with all your nulls is in there ready to go.

5. Add geometry to the scene. You can use the nulls position data to line it up.
6. Open that same .c4d file inside of After Effects and drag it to your timeline, just like before.
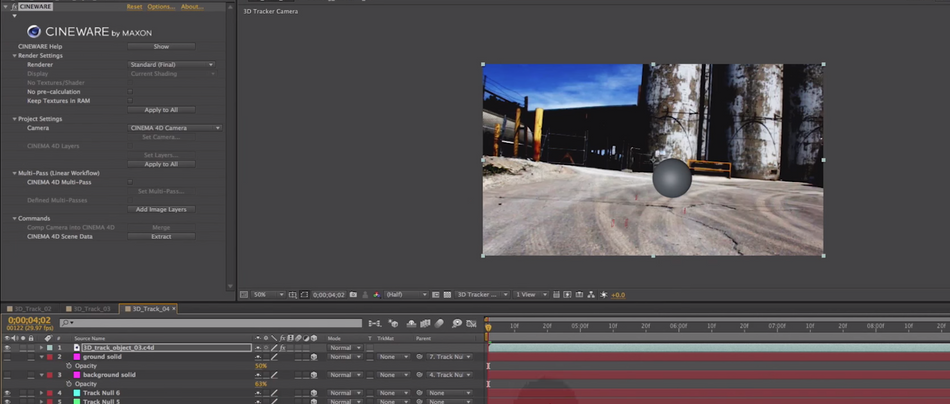
There ya go! 3D, inside of After Effects, tracked to your scene.
Anything you do inside of Cinema 4D (lighting, texturing, modeling, render settings, etc.) will update automatically inside of After Effects.
Part two of Sean Frangella's tutorial goes into detail about creating and adjusting lights, textures, and render settings to blend 3D with your live footage.
4. Using Cinema 4D for Dynamics, but Using After Effects to Create Shapes and Textures
Lasse Clausen made this awesome script that takes nulls from Cinema 4D, and pops them right into your After Effects composition!
What does this mean???????
Well, right off the bat, you can run simulations of wind, gravity, etc, and attach your shape layers to the nulls that Cinema 4D creates, in just one click! (Yeah, you read that right...)

Head over to the AEC4D page and watch the tutorial to see other situations where this can be used.
STILL FEELING OVERWHELMED?
No problem, we've got you covered.
- I have a fun, short, and simple slideshow that you can download (for free). If you need someone to take 10 minutes and show you the basics of 3D, terms, and workflows, get it here.
- If you're more of an eBook person there's also a complete 2D/3D Motion Design Dictionary PDF here on School of Motion
- Want to go from zero to 3D ninja using Cinema 4D? Check out our Cinema 4D Basecamp Course.
ENROLL NOW!
Acidbite ➔
50% off everything

ActionVFX ➔
30% off all plans and credit packs - starts 11/26

Adobe ➔
50% off all apps and plans through 11/29

aescripts ➔
25% off everything through 12/6
Affinity ➔
50% off all products

Battleaxe ➔
30% off from 11/29-12/7
Boom Library ➔
30% off Boom One, their 48,000+ file audio library
BorisFX ➔
25% off everything, 11/25-12/1

Cavalry ➔
33% off pro subscriptions (11/29 - 12/4)

FXFactory ➔
25% off with code BLACKFRIDAY until 12/3

Goodboyninja ➔
20% off everything

Happy Editing ➔
50% off with code BLACKFRIDAY

Huion ➔
Up to 50% off affordable, high-quality pen display tablets

Insydium ➔
50% off through 12/4
JangaFX ➔
30% off an indie annual license
Kitbash 3D ➔
$200 off Cargo Pro, their entire library
Knights of the Editing Table ➔
Up to 20% off Premiere Pro Extensions
Maxon ➔
25% off Maxon One, ZBrush, & Redshift - Annual Subscriptions (11/29 - 12/8)
Mode Designs ➔
Deals on premium keyboards and accessories
Motion Array ➔
10% off the Everything plan
Motion Hatch ➔
Perfect Your Pricing Toolkit - 50% off (11/29 - 12/2)

MotionVFX ➔
30% off Design/CineStudio, and PPro Resolve packs with code: BW30

Rocket Lasso ➔
50% off all plug-ins (11/29 - 12/2)

Rokoko ➔
45% off the indie creator bundle with code: RKK_SchoolOfMotion (revenue must be under $100K a year)

Shapefest ➔
80% off a Shapefest Pro annual subscription for life (11/29 - 12/2)

The Pixel Lab ➔
30% off everything
Toolfarm ➔
Various plugins and tools on sale

True Grit Texture ➔
50-70% off (starts Wednesday, runs for about a week)

Vincent Schwenk ➔
50% discount with code RENDERSALE

Wacom ➔
Up to $120 off new tablets + deals on refurbished items


Start Your 3D Journey in Cinema 4D

Master the essentials of 3D modeling, lighting, and animation in C4D. Enroll in All-Access to unlock C4D Basecamp and 50+ other courses.


