Start Your 3D Journey in Cinema 4D
Master the essentials of 3D modeling, lighting, and animation in C4D. Enroll in All-Access to unlock C4D Basecamp and 50+ other courses.

Sometimes the best way to create a new 3D asset is to capture it from the real world. Welcome to Photogrammetry!
How do you take an object from the real world and bring it into Cinema 4D? You could spend a few hours modeling it yourself...or you could use your cell phone, some free software, and the power of photogrammetry.
{{lead-magnet}}
Hi, I’m Patrick Letourneau: 3D artist, photogrammetrist, and secret crime fighter. You’ve probably heard the term Photogrammetry before, but maybe thought it was a bit too advanced or complicated to try yourself. I’m here to show you the technique for capturing incredible 3D scans of the world using the tools you have at your fingertips.
In this tutorial, you’ll learn:
- What is photogrammetry
- How to capture objects using photogrammetry
- What software to use for photogrammetry
- How to export the model into Cinema 4D and Redshift
.gif)
Photogrammetry is the science of making measurements from photographs. Using multiple input images, software is able to infer super accurate 3-dimensional models that you can put to use. This process may seem complex, but it can be much faster than modeling new assets from scratch. Better yet, you don’t need expensive equipment and complicated software to get started...just your cell phone and some supplies from around the house.

In order to get started, you just need a camera, a computer, and an object.
Okay, that may have been a little too simple. The bare minimum you need is a camera and a computer, but you will obviously get better results with more advanced equipment. What I aim to show you today is what you can achieve with what you already own.
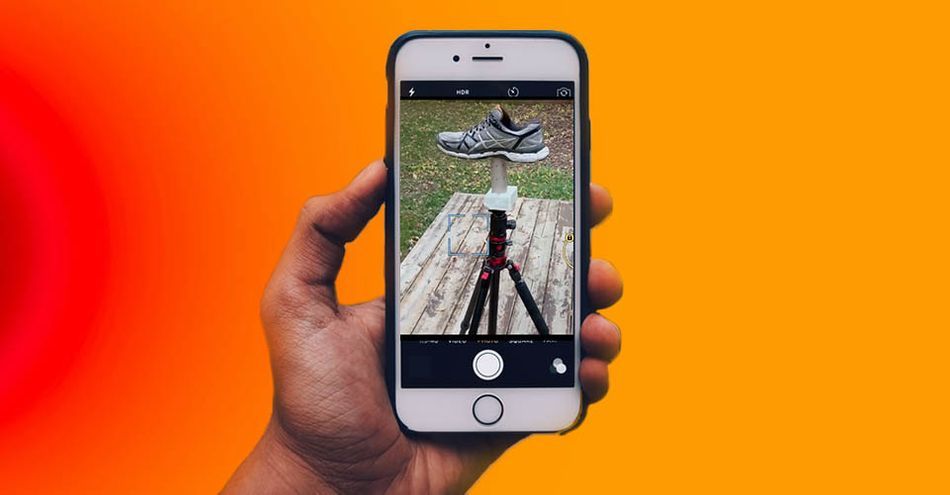
You don't need any prior knowledge or technical skill to get started, but a few things will certainly help. You need to understand basic photography, including lightning control. You'll also want to make sure your object is set up in a way that allows you to capture every angle.
Start with something small, like a shoe, before you graduate to larger captures.
LIGHTING MATTERS MOST
When you capture an object using images, any lighting will be hard baked into the final asset. That's why it's important to have consistent, neutral lighting. Shooting outside on an overcast day is good, using a soft box is better, and building a rig with cross-polarized ring lights is best.
Watch out for harsh lighting, shadows, or direct sunlight.
CAMERA CONTROL IS IMPORTANT
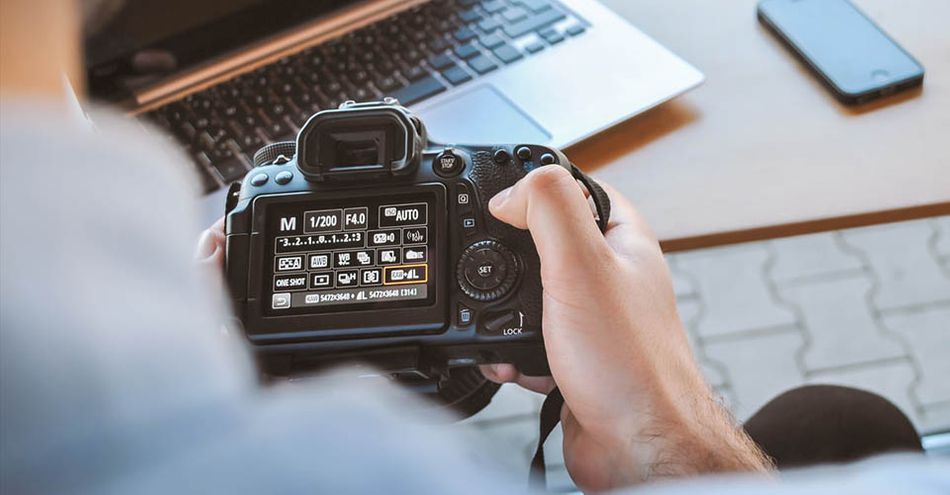
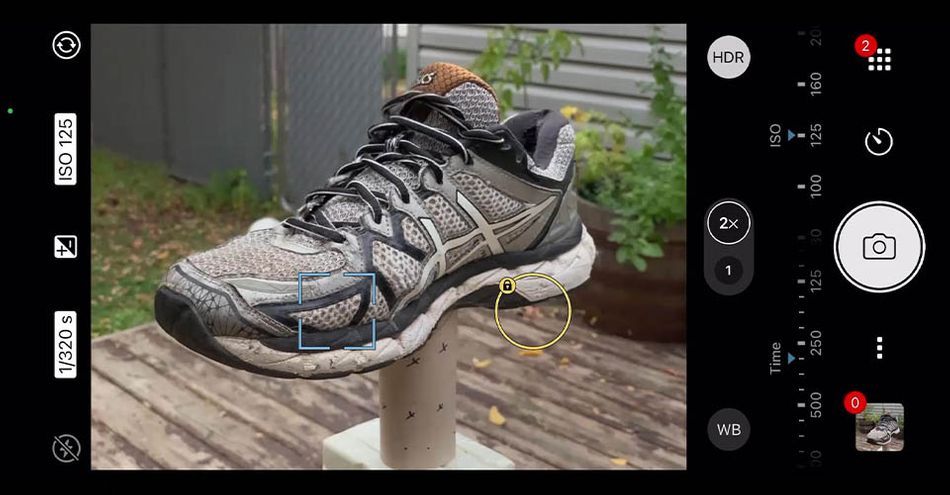
If you're using a DSLR, you'll have access to all the controls you need to capture consistent images at a high-resolution. If you're using a cell phone, you'll likely need to download a photography application that enables exposure and aperture control, raw images, and consistent brightness.
TAKE PICTURES FROM EVERY ANGLE
Once your object is set up (using a tripod, rotating base, or whatever you can MacGyver together), it's time to take some photos. Make sure you make several passes at low, mid, and high angles to capture every side of the object.
Depending on the camera you use, you can select how each image will be captured. Using RAW file formats is best, as that contains minimally-processed data from the image sensor and produces the best results.
PREPARE IMAGES FOR TRANSFER
Before you transfer the images, prepare and organize them for an easier export and better results. If you have to use JPG, lock the white balance and lift the shadows to clean things up. If you're a DSLR user, you can check the color to make sure each photo matches, though this step can be skipped if that is too advanced for you.
For the best asset, I recommend TIFF, but that can be memory intensive and much slower. Since the software I recommend is a "pay per input" model, this can also make it a more expensive endeavor.
Once you have your photos ready to go, it's time to upload them into the rendering software. I recommend Reality Capture, a pay-as-you-go program that provides some great results.
To get started, download the program and open a new project. Drag and drop your images into the project and you'll see them in the bin on the left side of the screen.
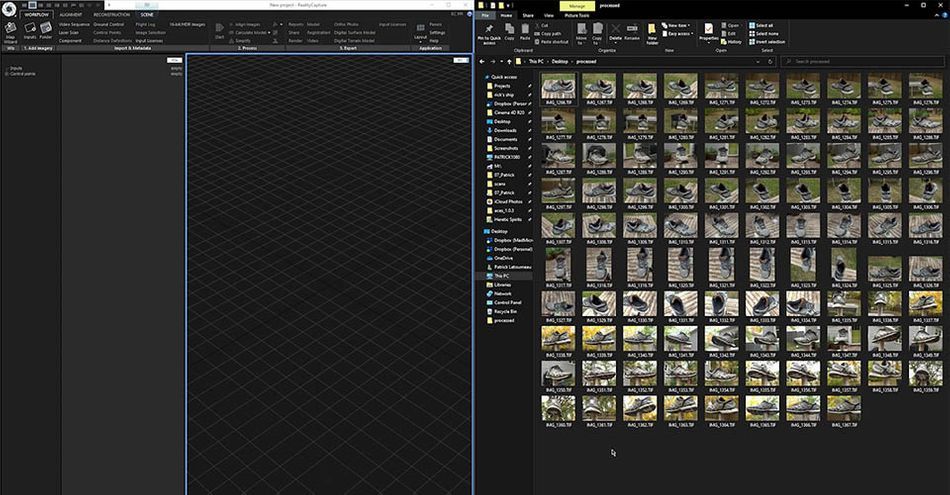
You could just hit START and let the program work out the rest, but let's go through a little slower. Begin by hitting ALIGN. This tells the program to sort through the images and asses the camera's position for each shot, which should create a more accurate 3D model.
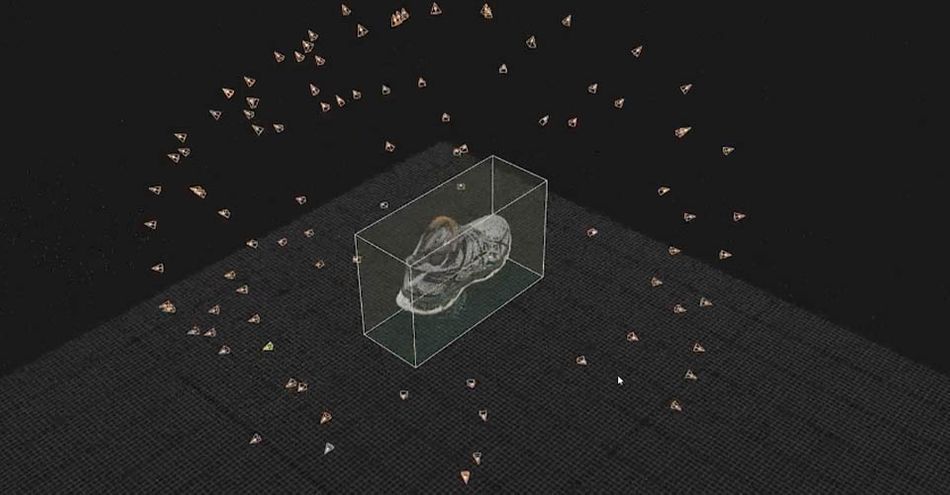
Each cone represents a shot from the camera. This can be useful in locating gaps in coverage, but for our purposes this is looking really good.
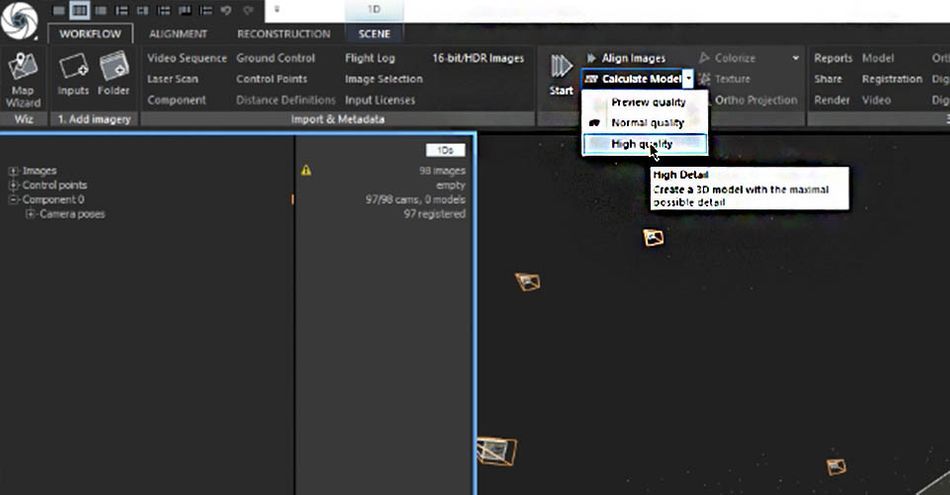
Now that we've checked our alignment, quickly check that all the images had their positions solved (look for flags on files in the bin). Then we can calculate the high resolution model.
How to touch up your photogrammetry scan
Now that we have our model calculated, let's have a look.
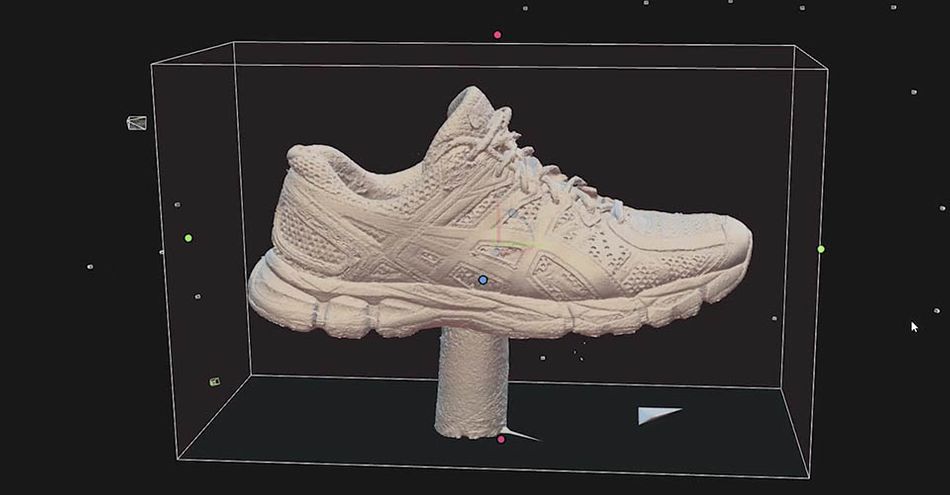
Not too shabby for a cell phone! In fact, this looks pretty good. I can see some jagged edges, a bit of noise in the smoother areas, and we'll obviously need to get rid of the toilet paper roll, but there is no mistaking what this object is.
It should be said that a higher-quality capture (using a DSLR) will provide a more accurate scan and an easier finishing process. Right now, we have two issues: This object is made of 15 million triangles, and it needs some clean up. So let's get started.
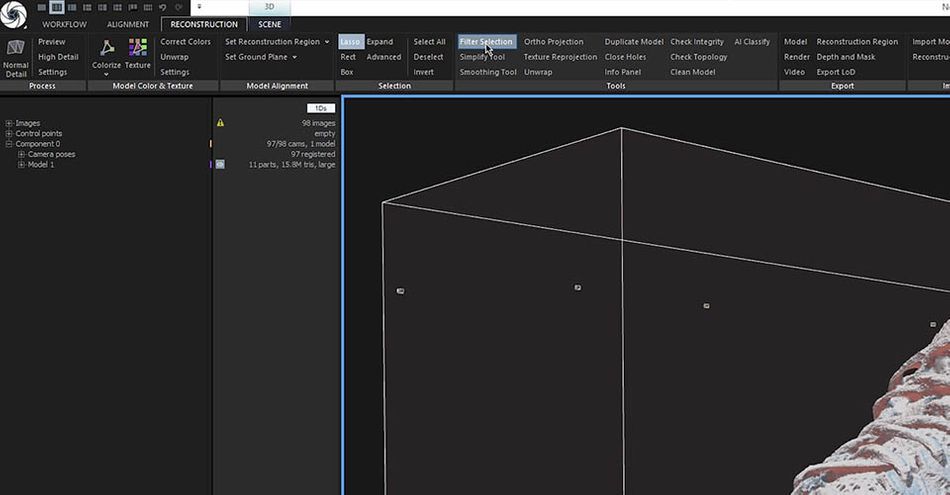
Go to the Reconstruction Tab and grab the Lasso.
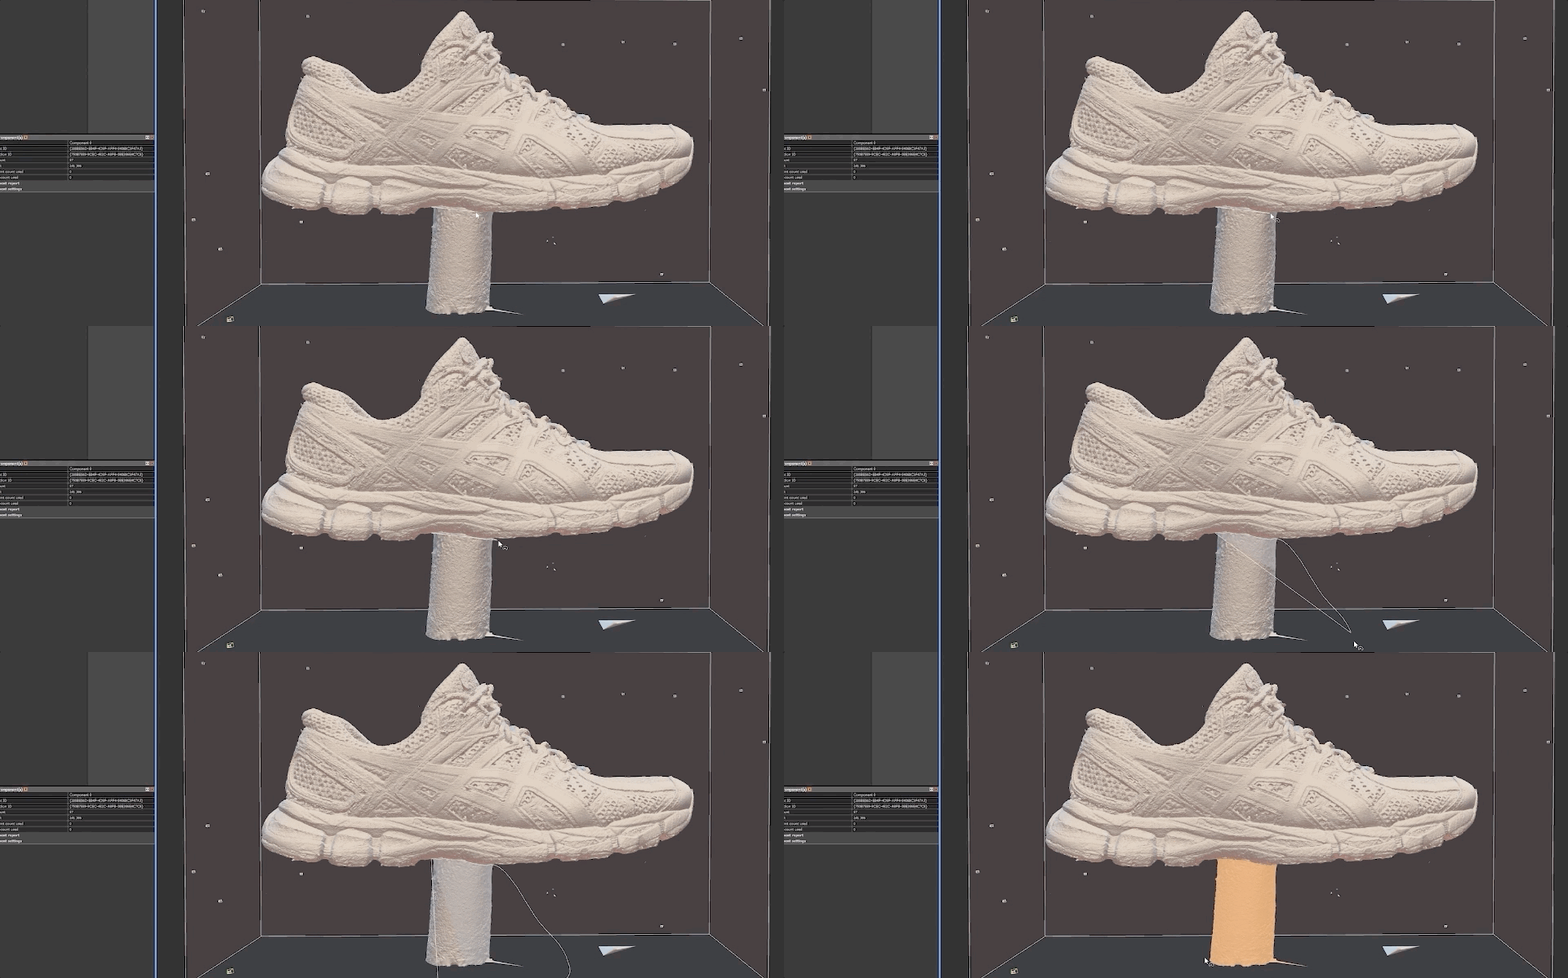
Drag the lasso around the stand and it will highlight. Then go to Tools > Filter Selection.
Now we have a shoe without a toiler paper roll underneath, which is great (unless you were trying to create a shoe with a toilet paper roll underneath, in which case you just messed up big time).
Next we're going to hit Close Holes in the Tools menu, which will pop up a menu on the left side to fine tune the results.
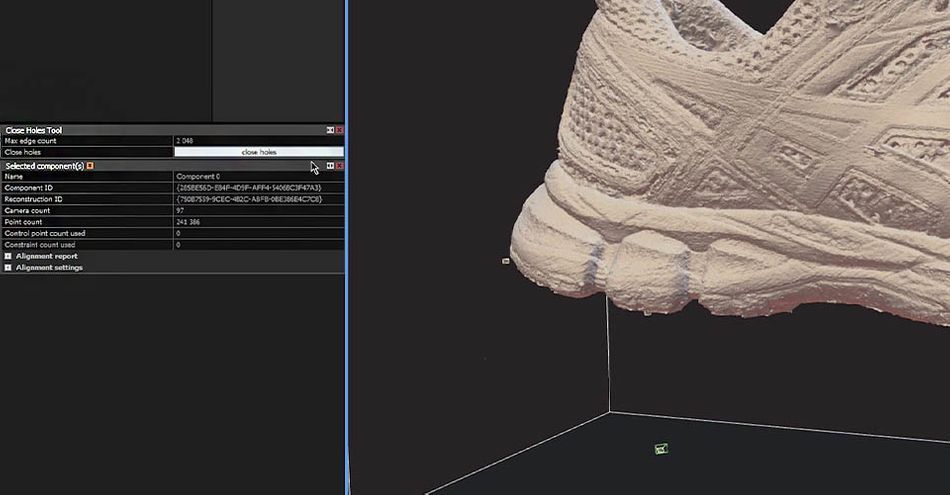
Click Close Holes and the program will auto-fill the area where the toilet paper roll used to be. Now we have a nice, plain shoe just waiting to be finished. Next, we need to simplify the model (15 million polygons is a bit much).
Go back to the Tools menu and select the Simplify Tool. Then, we just hit Simplify.
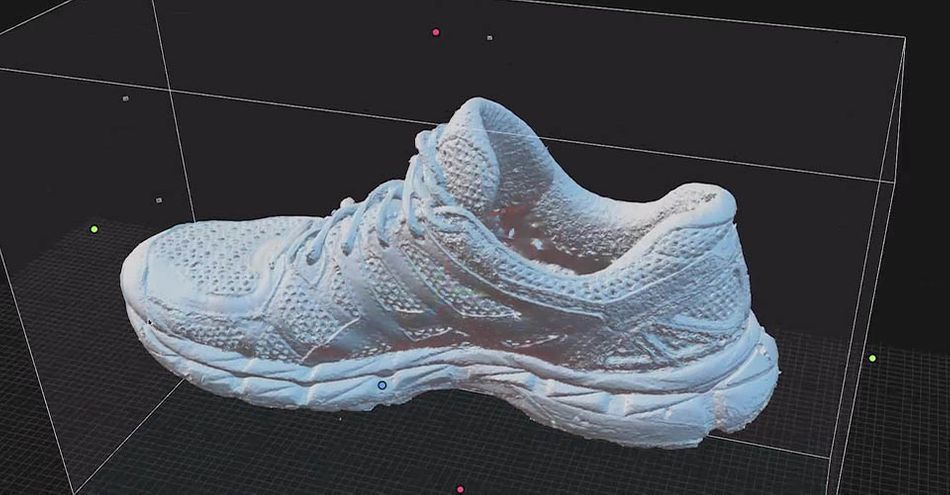
Now we have a model that looks great, if not quite as detailed as before. You'll notice the laces seem less defined, and there are harsh edges. We need to fix our low poly model before applying our high-poly texture.
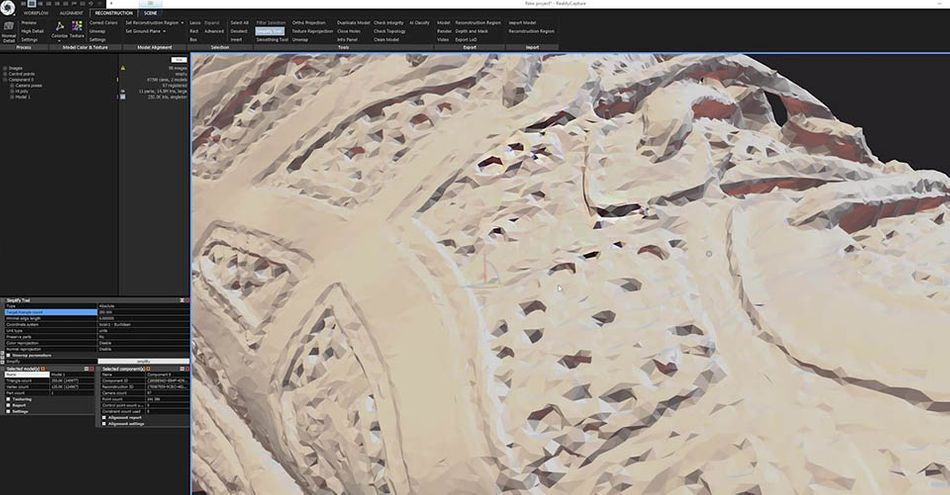
Go back to Tools and select Smoothing Tool. In the pop-up window, increase the iterations to 5 for a cleaner pass. Then let the program go to work.
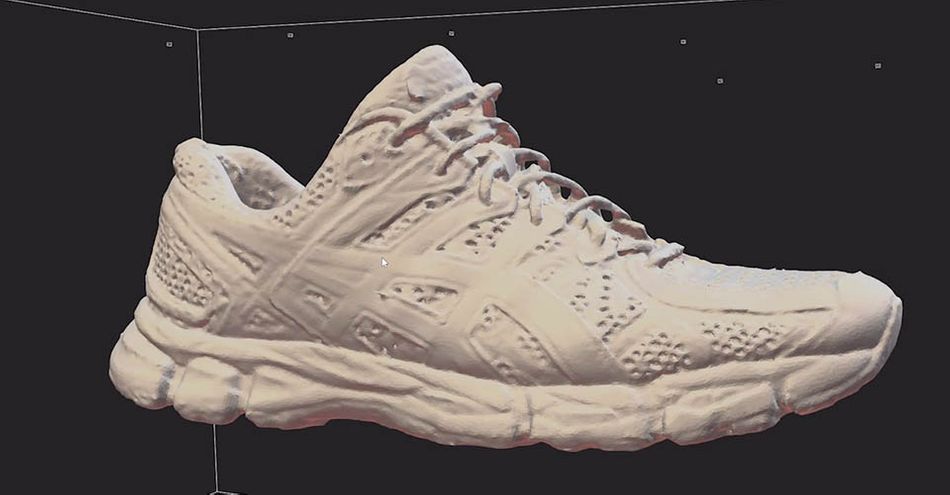
Now we have a smooth, if somewhat melted version, but this will be a much better target for our projected textures. This is also a better target for baking out our normal maps.
How to texture a photogrammetry scan
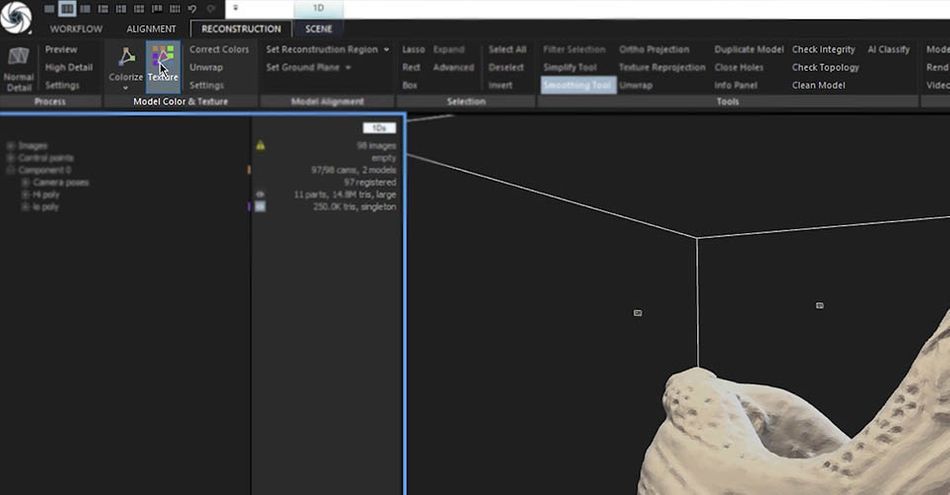
Now it's time to texture our model. First, we'll make sure we select the low-poly version. It's a lot easier to work with 250,000 polygons than 15 million. Then, we just hit Texture. No need to mess with the settings; the program can handle it from here.
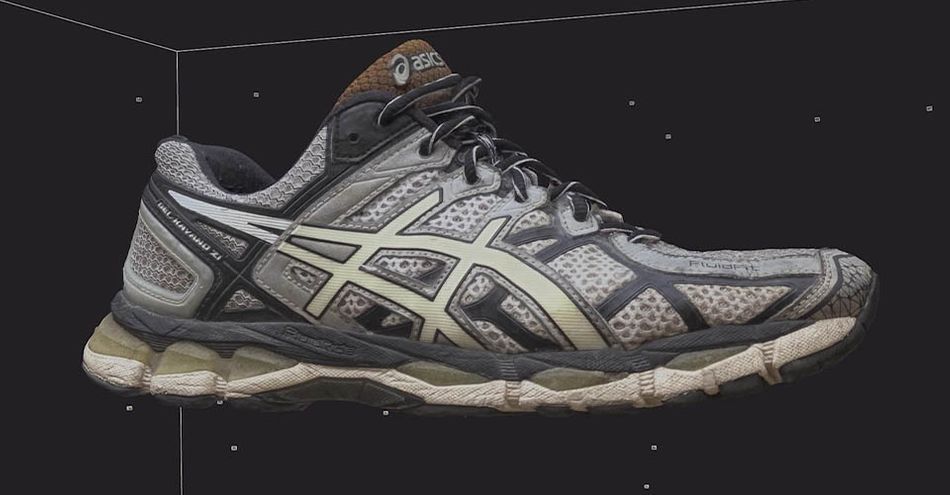
You can see the benefit of shooting on an overcast day, as we have relatively few baked-in shadows (there's a little underneath the laces, but that's unavoidable without a more professional lighting approach). Overall, this looks pretty dang good.
Most of what we're seeing is ambient occlusion that can be processed out so we can light from scratch. Now that the textures are done, it's time to bake on the normal maps from our high-poly model.
How to bake normal maps to a photogrammetry scan
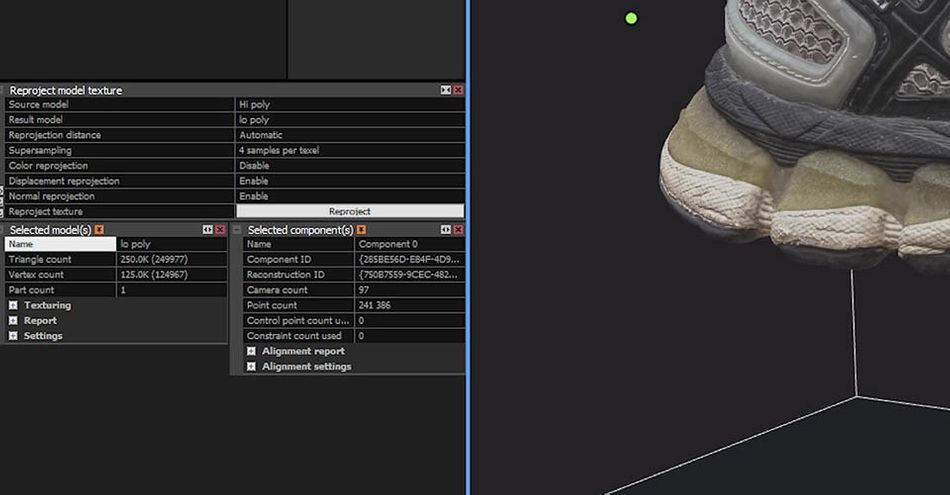
First thing we'll do is deselect the Smoothing Tool and click on the Texture Reprojection tool. Our Source Model will be the high-poly version, and the Result will be the low-poly version. Then we hit Reproject.
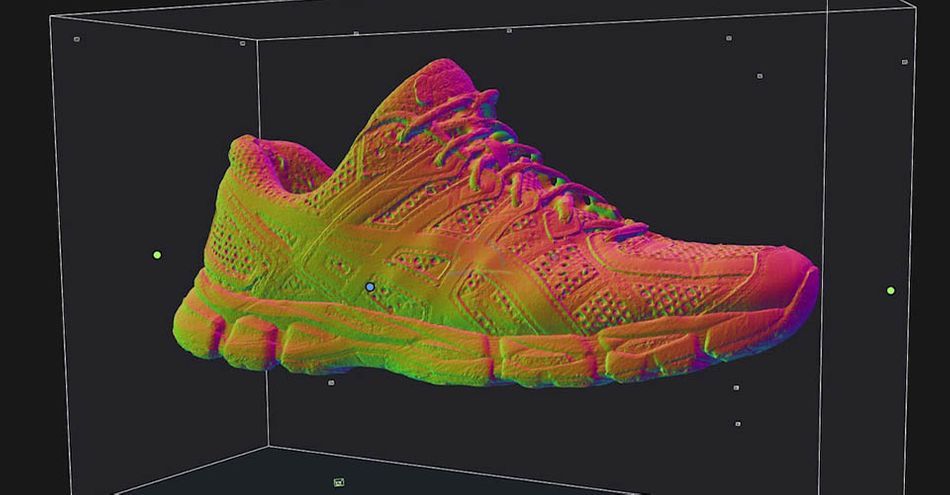
With the Normal Map baked, we get a handy diagnostic view that allows us to diagnose some of the noise. This won't be as much of an issue with higher-quality captures.
Now we can export the model and bring it into our software of choice. In this case, we're headed to Cinema 4D.
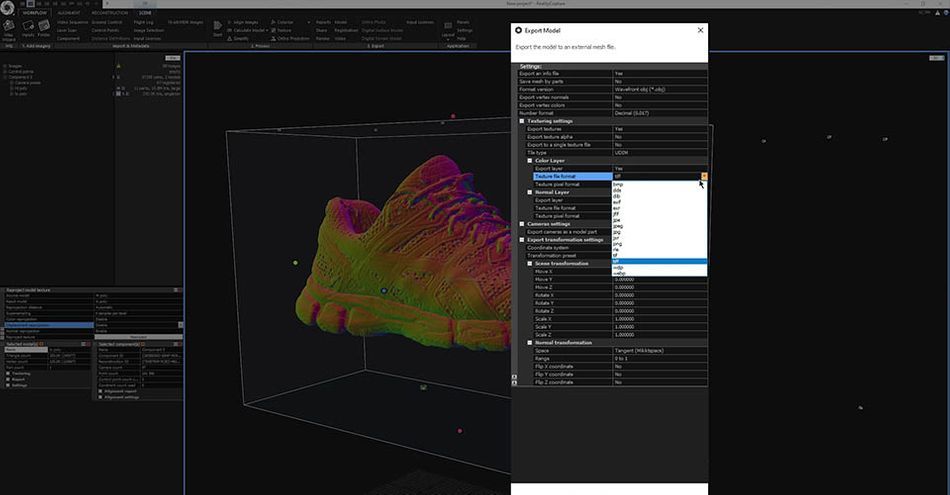
When exporting from Reality Capture is as simple as a few clicks. Be sure you're selecting all the layers, including the textures. A JPG is fine for diffused textures, but textures and displacement should be as uncompressed as possible.
Once Reality Capture exports the files, you can pull them into the rendering engine of your choice. Check out what we do in Redshift in the video above!
It's a Photo Finish
Those are the basics of Photogrammetry. It’s pretty impressive what we were able to achieve with just a cell phone, a tripod, and a toilet paper roll—but the difference in quality when moving to a professional set up is dramatic. If you want to try some out, be sure to share them on social with the hashtag #nogoodphotogrammetrypuns
Cinema 4D Ascent
If you want to learn how to get the most out of your 3D assets, check out Cinema 4D Ascent. Over the course of 12 weeks, you’ll go from beginner to intermediate-level 3D artist that’s fluent in Cinema 4D and familiar with other 3D tools.
-----------------------------------------------------------------------------------------------------------------------------------
Tutorial Full Transcript Below 👇:
Patrick Letourneau (00:00): Sometimes the best way to create a new 3d asset is to capture it in the real world. But what if you don't have any fancy scanning equipment? Well, as it turns out, you can get great digital capture using just yourself.
Patrick Letourneau (00:20): Hi, I'm Patrick Letourneau 3d artists, photogrammetry, NIST, and secret crime fighter. You've probably heard the term photogrammetry before, but maybe you thought it was a bit too advanced or complicated to try yourself. Well, I'm here to show you the technique for capturing incredible 3d scans of the world around you. Using tools you probably already have at your fingertips. Photogrammetry is the science of making measurements from photographs. Using multiple input images. Software is able to infer super accurate three-dimensional models that you can put to use better yet. You don't need expensive equipment or complicated software to get started. Just your cell phone and some supplies from around the house. In this tutorial, you'll learn how to set up objects for capture and adjust them into software, how to clean up and simplify your model texturing and baking normal maps. How to export the model into cinema 4d and Redshift, and the difference in quality between a cell phone scan and a commercial scanning setup. Before we begin, don't forget to grab the project files in the description below so you can follow along. Let's get started.
Patrick Letourneau (01:30): So here's my setup. Uh, as you can see, it's just a shoe on a tripod. I've got a toilet paper roll there to elevate the model. This lets me get underneath it to shoot the sole. So you want to be shooting in a camera app that allows you to control exposure and ISO and things like that. Uh, you don't want to just use your straight up camera app because the exposure will usually change between images and you can't set focus separate from exposure and a lot of the default camera apps. Uh, so here I'm using pro app. This lets me get TIFF images. You want uncompressed images of possible, um, as the compression and JPEG will lower your detail a little bit, but, um, that can be a more advanced step. Once you've done your first practice runs, it's probably fine to use JPEG. So a DSLR makes us a lot easier.
Patrick Letourneau (02:15): Obviously don't need to really explain that. You can see, uh, my movements here, I'm attempting to be systematic and kind of create a dome of pictures around this thing. Um, you know, you'll do a ring above the thing, and then you do a ring at the same level as this, uh, as your subject. And then maybe you can go do some orbits of special areas that haven't been covered previously here. You can see them shooting underneath the soul, probably not going to focus on the bottom of the shoe too much for this tutorial, but it's good to have there as additional imagery. Uh, my main advice would be always overshoot, never undershoot. It's a lot easier to delete extra images and to make images you never took in the first place. In addition, you want to shoot on an overcast day and that is critical for outdoor scans. This, if you've got the sun casting shadows across something, those shadows will get baked into your model and then it becomes really difficult to relate it yourself in your CG application. So remember to shoot in the flattest, most neutral overcast light that you can, the next step up from this, of course, it'd be an a studio where you have a lot of light control, but for today's tutorial, we're just going to talk about this sort of entry-level shooting with a cloudy overcast day.
Patrick Letourneau (03:32): The application we're going to be using today is reality capture reality capture is a really great multi GPU accelerated Kuda application. Probably one of the fastest 3d scanning apps you're going to find. And they have a very unique licensing model called paper input, where you can download this application for free and use it scan all you want. And you only pay upon export. The charge is based on the input megapixels of the images that you're scanning with. So a bunch of really high res images is going to give you a more expensive scan than a bunch of Lorez images. So if you go ahead and download reality, capture, create an account, we'll just hop over to it here. And I'm going to go ahead and drag in all of my processed images that we captured earlier on the iPhone. And we're going to see that they're all in here in reality capture.
Patrick Letourneau (04:25): So I really could just hit start and get a scan out from that. And it would go through all the steps, but I'm going to do this step-by-step. So the first step is tell, align your images, aligning your images has reality captured, go through each image and look for little landmarks, uh, little areas of detail, and try to match them up between images to try to solve the 3d positions of your camera. You can see here that it's already starting to solve the positions. Once it has the camera position solved, it will go through and generate a black to white value for each pixel, trying to estimate the absolute depth, the distance to camera of each pixel. Um, once that's done it can merge all of these depth maps together and you get yourself a 3d model. So just under a minute later, we can see that we have ourselves a shoe here.
Patrick Letourneau (05:12): And if I'm to pull out a little bit and select all the cameras that I have in my project, you'll see little cones representing the position of the phone when each photo was taken, which I think is always really neat to look at. And you can see the strategy of adopted here is to shoot a lot of images in a center row, and then move down a bit, shoot some images, uh, maybe a fewer stops when I'm shooting from below, because we're less worried about that. And moving down again, shooting another ring from above, and then some orphan cameras up here that are shot from the top to try to catch the inside of the shoe. Now that we've checked that all of our alignment seems to be working and we can come down on the left here and expand this component and expand the camera poses and just ensure that all of our images have been solved properly. And we can see here that 97 out of 98 cameras had their positions found, which is pretty good in my books. So the next step is to have the software calculate the high resolution model. And this can take some time based on how powerful your system is so we can just let it do its thing. And we'll be back when it's done.
Patrick Letourneau (06:23): And 22 minutes later, we have ourselves a pretty decent looking scan to find just orbit around this a little bit with right click. You can see there's a bit of noise in some of the smoother areas, but that's to be expected with a cell phone based scan. If you have access to a DSLR, I'd highly recommend it you'll get much cleaner scans. And the capture process will be quite a bit easier. Um, but seeing inside looks like we got the laces captured. We've got some of the inside walls, which is great as I wasn't. Super-duper focusing on those with my capture session more on the outside here. Um, the issue with this is twofold. One it's 15 million triangles, which is just not a fun number of polygons to be working with in any application. And two, we need to do a little bit of cleanup. So we're going to go up to the reconstruction tab here and in the tools area and the selection area, we're going to start by grabbing this lasso. And I'm just going to line up here and click and drag to grab our stand. And then we're going to hold control to add to that selection and just kind of orbit around. It looks like we've got to capture a little more here, so add to that selection.
Patrick Letourneau (07:42): Okay. So we've got our stand selected here and I'm just going to go up to the tools panel and we're going to click on filter selection, and that's just going to do exactly what it sounds like. And it's going to delete whatever we have selected. Once that deletion is done, we can see that we have a shoe without a toilet paper roll underneath it anymore, which is great. The next step is going to be to close up the holes in that model. And we're just going to hit the close holes tool for that. And any time you hit a tool in reality capture that has some sort of options, the dialogue is going to pop up in the bottom left here. This is sort of like your cinema four D attributes manager. And so we're just going to hit close holes and just like that, we have a mesh without holes on the bottom.
Patrick Letourneau (08:26): So no more hole where that toilet paper roll used to be. The next step is going to be to clean up our models a little bit here. Reality capture keeps a copy of every version of the mesh. Every time you do something to it. So it's kind of like a history, an undo history in zebrafish. So I'm just going to X out model one and model two, because we know what we're doing. We haven't made any mistakes here, and we're just going to work with this as our high poly model. Next, I'm going to select model three, which is the one we're currently working on and I'm just going to it. Hi Polly.
Patrick Letourneau (09:02): So the process of reducing the complexity of this model to something that's a little more workable is done right here, inside reality capture. If you were to rig this thing and you need it, perfect quadrangular edge flow and topology, maybe you'd bring it into something like zebra, shh, and uses the refresher on it. Or you could use instant meshes, which is a great free tool. Um, now integrated in cinema 4d. In fact, for performing quadrangular re typology, but since we're not going to be doing much with this other than rendering it, I'm going to say that just triangles will be fine. So we're going to go up here into the tools pallet once again, and we're going to select the simplified tool, simplified tools going to pop up here in the bottom left, and you can see that we can set an absolute or relative type of reduction.
Patrick Letourneau (09:51): We're going to stick with absolute for now. And we're going to say 250,000 triangles is our target with that set. We can just come down here to the bottom and we can hit simplify with our simplification done. You can see that our model is now quite a bit less detailed than it was before, but the spirit of it remains. There are no holes in it, no huge issues. It is however feeling a little bit noisy. And especially when it comes to breaking down normal maps and transferring the quality of the high-risk model onto this low-risk model, we're going to want something that doesn't have all of these sharp 90 degree edges on it. Those just never turn out great. So what we're going to do is we're going to go up to the smoothing tool here. And once again, it's going to come down to the bottom left at the top of our panel, and we're going to up the smoothing iterations to five, just because this is a pretty noisy model. We'll leave smooth and wait, where it is, smoothing type of noise removal, all good. And now we'll hit smooth. As you can see, you end up with something a little more melted looking, but this will be a much better target for reprojection of our textures. So also be a much better target for baking note or normal maps
Patrick Letourneau (11:05): For baking out our NOAA maps. We're going to first want to delete the excess models that we have here, which is just one in this case and delete this noisy model and then come over to model two. And we're just going to rename this low poly. The next step is going to be to actually text her or model. Now that we have this low poly shoe, it's much easier for reality capture to come in and UV unwrap this for texturing. So you've you unwrapping if you're not familiar with it, it's a bit like taking an orange and flattening it out, uh, flattening out the orange peel or a re projecting the map of a globe. So 250,000 triangles is always going to be easier for reality capture any application to work with then 15 million triangles. So with our low poly model selected, we're just going to come up here and going to hit texture.
Patrick Letourneau (11:54): We're not going to worry about sending any options up for this. The defaults are going to be fine. Reality capture is quite good at making sure that the full quality of your photos is represented in your texture with the texturing process complete. After about a minute and 20 seconds, we can see that we came out with a pretty nicely detailed texture. I'm very happy with this. You can see the benefit of shooting on a cloudy day here in that we have no bacon shadows or very few baked in shadows at things like this. Um, and for the most part, this is mostly ambient occlusion that can be processed out. You can run an ambient occlusion node in your renderer of choice and just invert it and apply that to the diffuse color of this model. And you'll sort of clean up some of the shadowed areas here and be more prepared for something that can be lit from scratch. Obviously a cloudy day is not a hundred percent perfect. If you were striving for perfection, you would use something like a light box or ideally a ring-flash around your camera's lens to make sure that you had no shadows and even consistent lighting across each shot.
Patrick Letourneau (13:05): Now that we had the Texas done, the next step is going to be to reproduce the normal map from our high poly model. So I'm going to, de-select the smoothing tool here and just come up to the texture reprojection tool. And over here in the bottom left, you can see that since we only have two models, it's already, pre-populated our source model as high poly and our result model for the low Pauline. So this is going to bake into a normal map, the geometrical details of a high poly model. So you always want your high poly model to be the source, and you always want your result to be onto your low poly model.
Patrick Letourneau (13:41): We're going to disable displacement for this just as displacement is a bit overkill for a model, this simple, and we'll add to the time it takes to calculate. So I'm just going to go ahead and hit reprotect here in the attributes manager with the normal map baked, we can see that we get this handy little diagnostic view that just shows us the results of the normals that have been projected onto our model. Obviously, this is not the final product. This is just a very handy way to be able to diagnose things like these stitches coming across and frankly, some of the noise. But again, that will be an issue with higher quality capture methods, but it's quite excellent for cell phone and, uh, I love the future.
Patrick Letourneau (14:26): So we're going to go right to the export. Now, uh, we're going to go over to the workflow tab and we're going to hit export model. I'm just going to save it as shoo low feelin hit save, and I've already acquired the input licenses for this model. A little screen will pop up with a password prompt that says, Hey, this is going to be a $2 model to export, please input and confirm the purchase. So I went ahead and did that in the TV magic world. And we're just going to check to make sure that all of our outputs are correct here. So we've got a tangent space, normal map that will be created from this world space normal map. We have our normal layer being exported. It's a TIF 32 bit, all very good, our color layer. Once again, 32 bit, we probably don't need TIF. Honestly, a JPEG is more than good enough for diffuse textures. The normal map you're going to want in a less compressed method, more typically, um, and displacement, you just can't compress. So with all our options set up here, um, we're going to keep our texts colors off as well. And for text normals off, we're just going to go ahead and hit. Okay. And reality capture is going to export that textured and colored mesh for us. And the next step is to pull this into our 3d render engine of choice.
Patrick Letourneau (15:57): Moving on. Now we've got our shoe here inside of cinema 4d. I've just dragged and dropped the export OBJ into the viewport. You can see this is pretty low Rez here, feeling really nice and nimble and quick, but down a little plane here. So we get some reflections from the light and put down a rich shift dome light with my favorite Maxime Roz HTRI next step is just going to be to create a Richard material and we'll drag that right to our shoe with a material selected, hit, edit trader graph. We're also going to open up the rich for interview here and we'll hit play.
Patrick Letourneau (16:38): As you can see, we've got ourselves a shiny blobby low-risk shoe here. Um, go ahead and make sure you have photographic exposure turned on. Uh, if you're not working the ACEs color space, photographic exposure is great to keep things from getting blown out. So yeah, we've pushed in here. We can see things are looking pretty low Rez, pretty melted. So let's go ahead and grab the normal map and the diffuse map that we've exported, drag those into the Richard shader graph. And we're going to want to put down a red shift bump map note here.
Patrick Letourneau (17:19): Why are in our normal map, make sure that you switch the input type from height field to tangent space normal. Otherwise you'll get some weird results and we're going to wire it into the overall bump input and you'll see magically, boom. We've got ourselves a high Rez. Nice looking shoe. One thing to take note of is gamma override. Oftentimes with these normal maps, especially coming out of, uh, apps, substance painter, or reality capture, you're going to want to turn on your gamble over right here. Uh, without it, you get the sort of weirdly dark shoe, turn it on. You can see things look normal. We toggle our bump map. You can see the lighting doesn't change drastically. So that's how you know, it's working correctly. If you've got gamma override off and you toggle your bump map and things get kind of dark or weird, that's how, you know, you got to have your game over right on moving on from here, we plug in our diffuse map into diffuse color, and here we go, we've got ourselves a beautifully 3d scanned shoe.
Patrick Letourneau (18:26): I'm still amazed that it came out this good from a cell phone. Um, but there you have it. We can take our light and spin it around and see that going to sell the shoe. So, first thing we're going to notice here is that things are quite shiny, maybe a little bit shinier than they would be in real life. So we're just going to make a quick reference map here. I'm going to pop down a red shift area, light hit shifts, see there to bring up the cinema 4d commander, and we'll just spin her around, scale it down so that it's not overwhelmingly bright and we'll just pop it right behind the shoe as something that we can use to judge the overall specularity of the scene. I'm going to turn off my Domo, actually, you know what, let's keep the dome light on and push in here.
Patrick Letourneau (19:12): And so a great way to cheat a roughness map or a specular map is to, first of all, we're going to disconnect our diffuse color. We're going to come into our object here and we're going to manually set it's color Dow all the way down to black so that we can see just the reflection. So next thing we're going to do is put down a red shift ramp node. We're going to wire a diffuse through the ramp, and we're just going to preview this ramp node on the surface. Um, you can do that by going to tools and connect note to output. I have mine hotkeys to V which I strongly suggest you do because it's a huge quality of life improvement. So looking at this ramp texture, we can see here, um, that we've got black to white. Um, so with the roughness map, you want the rough areas to be white and you want the shiny areas to be black.
Patrick Letourneau (20:03): So I just kind of look at this and kind of judge it here. So I definitely want the shoelace to be highly rough. I probably want this reflective strip strip to be a low roughness. So I'm just going to go ahead and hit invert here on the ramp node. And then I'm going to play with a gamma a little bit, maybe clip the black, a little, and looking at this, this looks like it's probably going to be pretty good for a roughness map. So we'll just go ahead and reprieve you, our material here had fee and we'll take this ramp node and plug it into the reflection roughness input. And so now you can start to see that we're getting some shine here and some roughness here starting to feel a little bit better. Um, another thing you'll want to do is, so we're just going to put down the node for reflection color.
Patrick Letourneau (20:59): Um, so this is for if roughness is how rough your reflection is, reflection color is like a spec map, um, that you probably have played with in the past. Anytime you've downloaded the 3d model, anything like that. So we'll plug our texture into the ramp node and we'll preview this again, and we'll just think about what we want. So we definitely want the laces to be lower brightness. We definitely want the strip to be higher brightness. So let's just go ahead and turn off her invert and bring this down like this. Um, so one fun thing that we can do in the red shift ramp node is introduced noise. And this is sort of the fun, little secret weapon that you can use to break up, um, these ramped textures, because if you're just ramping this one to fuse texture, um, both ramps are going to have very similar fields, but if we push in here and you know what, let's introduce some noise on the roughness one as well.
Patrick Letourneau (21:54): If you introduced some noise, it just sort of breaks things up in a way that doesn't really look terrible at render time. And that also helps sort of keep, uh, features from being identical in the roughness, in the specular. So we plugged both of these in here. Um, so let's take our color ramp into reflection color. Um, so now you'll see that it's not a uniform brightness across the entire surface of the shoe. You know, this is looking at, let's just take a screenshot here. This is looking much better than it was when we just had the shiny, shiny object here. Uh, so we'll just undo those changes and then we'll plug our diffuse right back into diffuse color. And so now we've got a much more realistic looking shoe. Uh, you know, this was kind of a ratty old shoe, so it was not something that was shiny and new. Um, so this is feeling much closer to the junky old shoe that I scanned.
Patrick Letourneau (22:54): So this has been your introduction to 3d scanning in reality capture using your cell phone. Um, I'm going to next go over the differences between the cell phone capture and a capture on a commercial scanning rig that I have. And we'll just kind of go over some of the key differences between those so that you can get an idea of sort of what the ceiling is. Well, I don't want to say ceiling, that might be a bit, um, braggadocious of me, but just to see what's possible with, um, maybe a higher end rig. So we'll be moving out of that next.
Patrick Letourneau (23:30): So now we can have a look here at two scans, one from our cell phone image set, and one from my desktop turntable set up that use really high-risk camera in a ring light that, uh, really blasts out quite a bit of light in it gives me completely flat with no letting information baked in. Um, and we'll get to that in a minute. So just off the top here, looking at both of them, they're pretty close. I think looking at most of the details here, you can't really tell one from the other until you start to, I mean, if you look at the laces here, you'll see the leases are much more melted together in our cell phone data set. And, uh, our turntable setup has much better separation between laces. Um, but that's just the beginning here. If we go down to some more extreme lighting, you can see, especially in the lace area, one works and one is starting to fall apart here overall, still super, super pleased with how the cell phone scan turned out.
Patrick Letourneau (24:20): But, you know, in certain areas it's just not holding up as well as the turntable setup. So, um, what make, it might make it more obvious as if we switched to a clay shading mode here and at the bottom, we have our cell phone scan and at the top we have the scan with the, uh, turntables set up. So I'm just going to bring this down here, real close. And, uh, you know, just looking at this, you can see right away the word fluid ride is very clear in our pro setup and in the cell phone, uh, can't read it. Um, another place to look would be the stitches, the fine stitching detail here. Uh, it's much easier to see in our high-end scanned. Uh, the ridges in the reflective area came in through the, the, the DSLR skin, the cell phone needed not, you can see different textures in this area versus that area.
Patrick Letourneau (25:08): Whereas the noisy scan from a cell phone, you just, you can't really see what's going on there. Um, so yeah, it's, it's, it comes down to the finer geometry. This is stuff that's really gonna show up when you have things under extreme flooding scenarios for most, really, really soft lighting situations. You can usually get away with something that's not entirely clean like this, but it really helps to have this, um, in production, uh, makes a big difference. Um, and so the last thing that I'm going to show you here, and we're going to switch the orders here. Uh, this is our desktop turntable scan here at the top, and this is our cell phone scan at the bottom. So this is us just looking at the diffuse map. So this is the pure texture with no lighting apply to it. And you can see with the turntable set up since we're providing light for the scene from directly around the lens with this ring light, um, you can see that the textures are evenly lit throughout.
Patrick Letourneau (26:03): So the white on the bottom of this shoe looks the same as the white on the side of the shoe. Whereas when you shoot outdoors or in a situation with harsher lighting, we have a light color on the side here and then a much darker color on the bottom. And you can see just looking at them. This one just looks like a flat, you know, if you cross your eyes, it's a totally flat image. This one has lighting information basically baked into it. So even little things like on fluid right here, you can see a little bit of shadowing at the top that only exists when you have lighting. And when you're providing a diffuse map, the goal or an albedo map, I should say the goal is to have no lighting, no reflections anywhere. And, um, you can definitely see the difference here. Um, in terms of flatness, especially in the contour of the shoe, you can see that we start to get darkness down here, whereas up here, it's perfectly even this you would want because you're taking this information and then you're applying lighting to it.
Patrick Letourneau (27:00): And if you have one set of lighting already baked into it, that's going to affect the output. You know, if we w we're going to light this quite extreme from below, or even quite gently from below, uh, you know, the shadow here that we have baked in might cancel out some of that light coming from below. Whereas with this one, it would show up, uh, very, very clearly. And even beyond the shading, you can see, uh, you know, the top here is kind of a blue heat, uh, hue of the sky and the bottom half has the green of the grass, right. Of all that light reflecting back. Um, whereas the, the turntable setup, you can see, we get, we get to really pick up some crazy details and all these crevices, all the Dustin stuff that, um, it doesn't really normally stick out that much, uh, really sticks out versus on this just looks like a little bit like you're looking at a photograph, right?
Patrick Letourneau (27:49): Um, so yeah, this, this is just been a quick little look at, uh, what's possible with a higher end setup, but, uh, you know, we, we achieved something pretty great with this cell phone. I think, I think it came out really, really nice. So those are the basics of photogrammetry. It's pretty impressive. What we were able to achieve with just a cell phone, a tripod and a toilet paper roll. But the difference in quality when moving to a professional setup is quite dramatic. If you want to learn how to get the most out of your 3d assets, check out cinema four D uh, sent over the course of 12 weeks. You'll go from beginner to intermediate level 3d artists. That's fluent in cinema 4d and familiar with other 3d tools. Don't forget to subscribe and click the bell icon so that you'll be notified when we drop our next tutorial. We'll see you next time.
Music (28:35): [outro music].
ENROLL NOW!
Acidbite ➔
50% off everything

ActionVFX ➔
30% off all plans and credit packs - starts 11/26

Adobe ➔
50% off all apps and plans through 11/29

aescripts ➔
25% off everything through 12/6
Affinity ➔
50% off all products

Battleaxe ➔
30% off from 11/29-12/7
Boom Library ➔
30% off Boom One, their 48,000+ file audio library
BorisFX ➔
25% off everything, 11/25-12/1

Cavalry ➔
33% off pro subscriptions (11/29 - 12/4)

FXFactory ➔
25% off with code BLACKFRIDAY until 12/3

Goodboyninja ➔
20% off everything

Happy Editing ➔
50% off with code BLACKFRIDAY

Huion ➔
Up to 50% off affordable, high-quality pen display tablets

Insydium ➔
50% off through 12/4
JangaFX ➔
30% off an indie annual license
Kitbash 3D ➔
$200 off Cargo Pro, their entire library
Knights of the Editing Table ➔
Up to 20% off Premiere Pro Extensions
Maxon ➔
25% off Maxon One, ZBrush, & Redshift - Annual Subscriptions (11/29 - 12/8)
Mode Designs ➔
Deals on premium keyboards and accessories
Motion Array ➔
10% off the Everything plan
Motion Hatch ➔
Perfect Your Pricing Toolkit - 50% off (11/29 - 12/2)

MotionVFX ➔
30% off Design/CineStudio, and PPro Resolve packs with code: BW30

Rocket Lasso ➔
50% off all plug-ins (11/29 - 12/2)

Rokoko ➔
45% off the indie creator bundle with code: RKK_SchoolOfMotion (revenue must be under $100K a year)

Shapefest ➔
80% off a Shapefest Pro annual subscription for life (11/29 - 12/2)

The Pixel Lab ➔
30% off everything
Toolfarm ➔
Various plugins and tools on sale

True Grit Texture ➔
50-70% off (starts Wednesday, runs for about a week)

Vincent Schwenk ➔
50% discount with code RENDERSALE

Wacom ➔
Up to $120 off new tablets + deals on refurbished items


Start Your 3D Journey in Cinema 4D

Master the essentials of 3D modeling, lighting, and animation in C4D. Enroll in All-Access to unlock C4D Basecamp and 50+ other courses.
