Start Your 3D Journey in Cinema 4D
Master the essentials of 3D modeling, lighting, and animation in C4D. Enroll in All-Access to unlock C4D Basecamp and 50+ other courses.

Smooth out your animations with the graph editor in Cinema 4D.
When you’re animating in Cinema 4D, you can get pretty far with big brush strokes using only the mini timeline. If you’re Bob Ross level, you might be able to work using nothing else.
But if you really want to massage your animation with all the little refinements and happy trees, you’ll need to put away the big paint brush and get into using Cinema 4D’s graph editor. We’ll look at some of the core features.

What is the Cinema 4D Graph Editor?
Cinema 4D’s graph editor is not only where you can see and edit all the timing and values of the keyframes in your animation but also how the animation moves *between* the keyframes. That’s something called interpolation. More on that in a bit. So how do we get to the graph editor?
OPENING THE GRAPH EDITOR IN CINEMA 4D
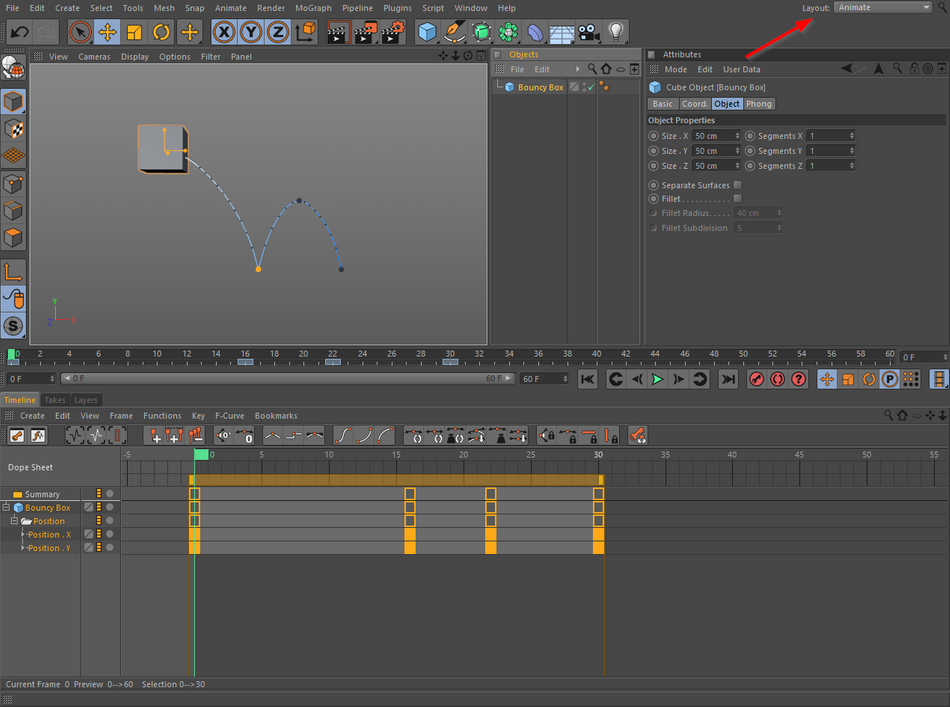
The easiest way to open the Cinema 4D graph editor is to use the dedicated layout menu found in the top right of the interface. Simply select the ‘Animate’ layout and the interface changes up to display everything relevant to animation. You’ll see the graph editor timeline at the bottom. Woot!
{{lead-magnet}}
Another way you can open Cinema 4D’s graph editor is thru the menus (Window > Timeline (Dope Sheet)). This will open in a floating window that you can place wherever you like. If you’re an After Effects user and are keen on keyboard shortcuts, you’ll be happy to know that Shift + F3 opens Cinema 4D’s graph editor too. That’s some dope sheet yo!
NAVIGATION IN GRAPH EDITOR
Ok, now that you’ve got it open, now what? In order to see any keyframes for an animated object, you first gotta select the object in the Object Manager. Boom. You should see some happy little boxes or curves in your graph editor. So how do we navigate around this window? Well, you know how you can move in the viewport pressing the “1” key + click & drag? You can do the same in the graph editor too! Zooming in and out of the window by pressing “2”+ click & drag works the same as well and you can also hold Shift + mouse scroll wheel to zoom. “3” key + click & drag rotates in the viewport but does nothing in the graph editor since that’s a 2d view, silly rabbit.
You can always move/zoom using the navigation icons in the top right of the graph editor’s window. Lastly, hit the keyboard shortcut ‘H’ to zoom out and frame all the keys.
TWO VIEWS: DOPE SHEET OR F-CURVE MODE
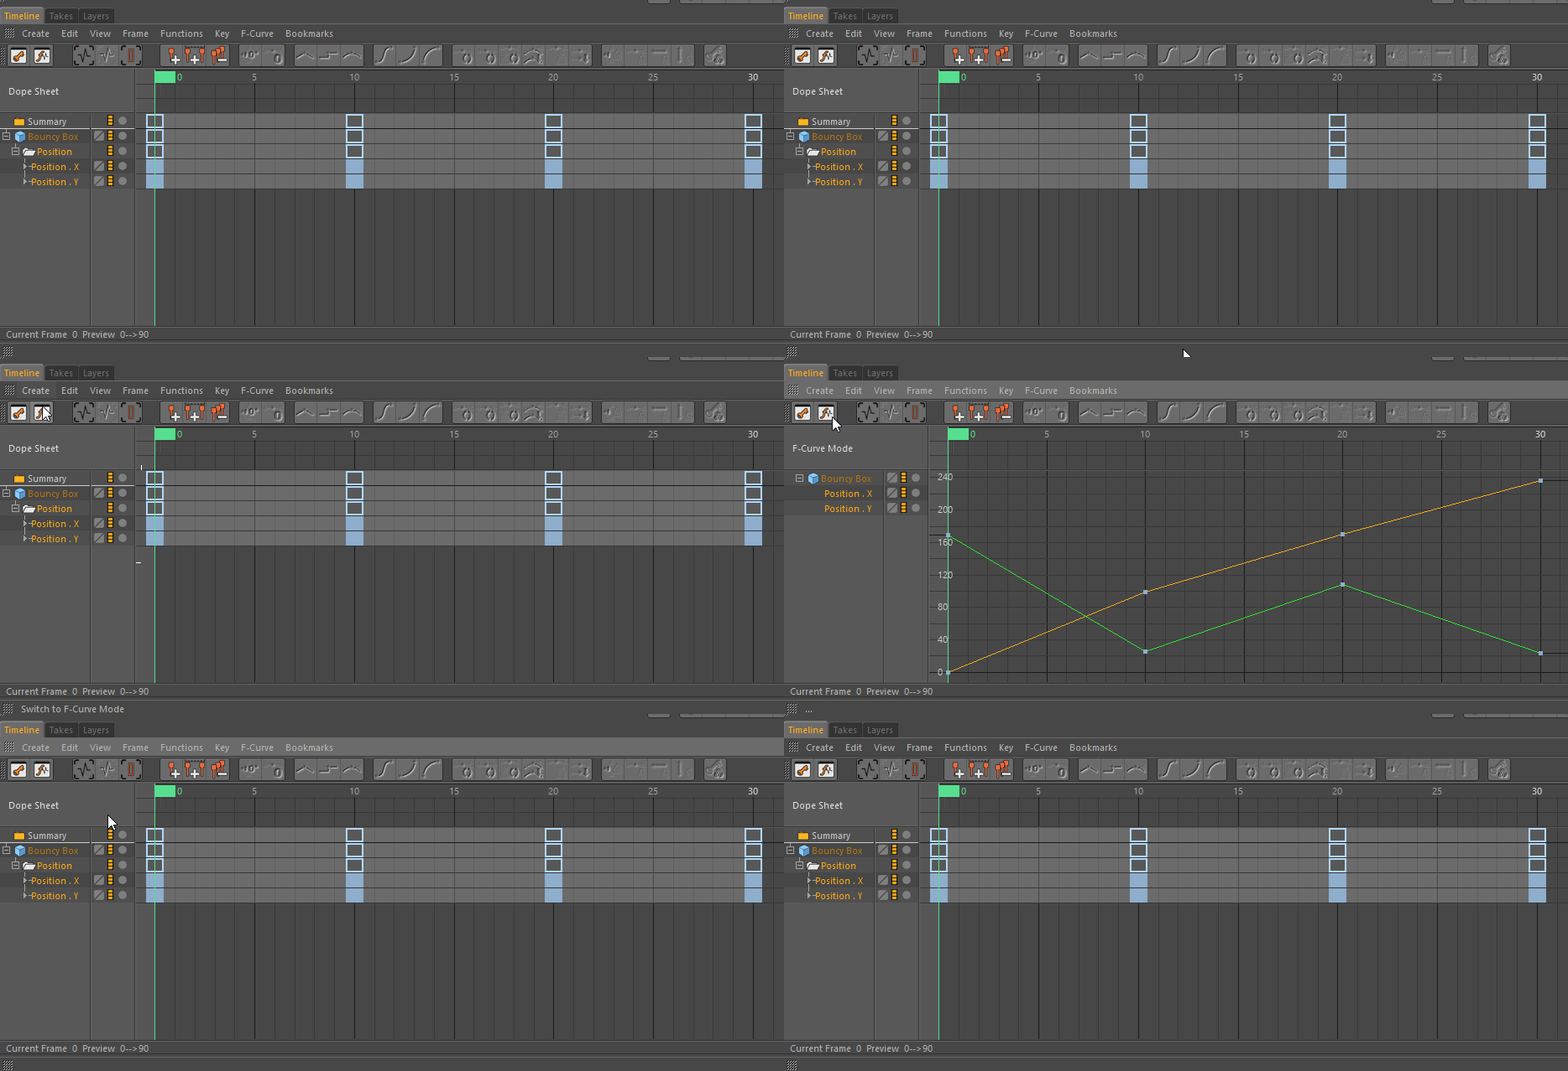
So there’s two modes to the graph editor. The first is the Dope Sheet, where you can see the keyframes as little squares. It’s much like you’ve seen in the mini timeline but here we can do much more. This mode lets you see which of an object’s parameters have animation and can display multiple selected objects as well. It’s a great way to view and retime your animation as a whole.The second mode is the Function Curve mode (or F-Curve for short) which shows the interpolation or how the animation behaves in-between any two keyframes. How you choose to interpolate the keyframes will ultimately define the personality of your animation.

Switch back and forth between the two modes depending on your need by hitting either button at the top left of the graph editor window, or with the graph window enabled, simply hit the “Tab” key to do the switching. If you want the best of both worlds, the dope sheet has a mini F-Curve window. Just hit the twirl button on any parameter.
MOVING/SCALING KEYS
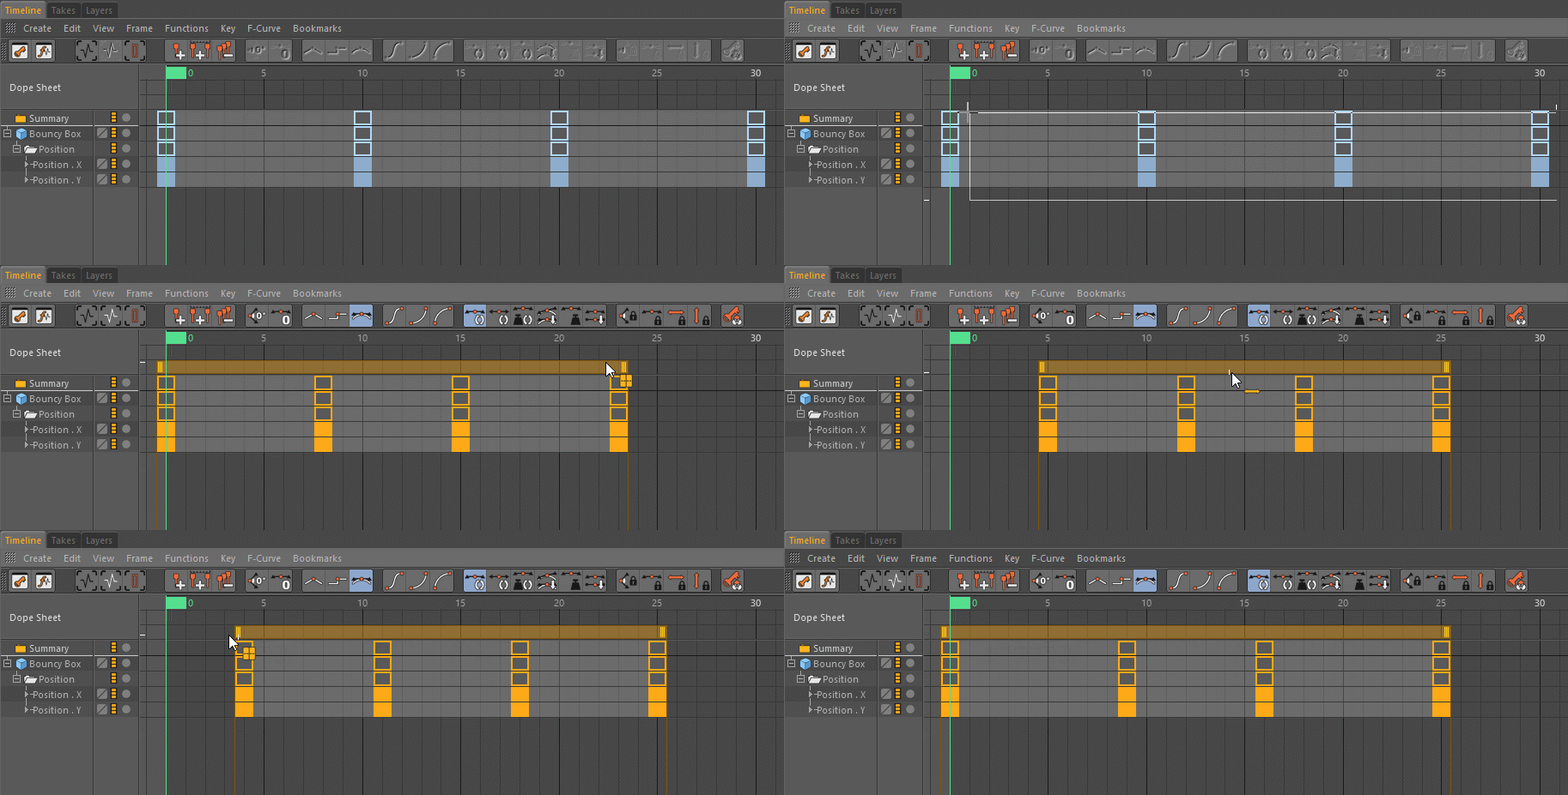
Click on a keyframe to select it or select multiple keys by marquee selecting a range of keys, or by Shift + clicking individual keys. To move the selection, click + drag any highlighted keyframe to the desired frame. We can also expand or compress the timing of selected keyframes as well. A selected range of keys will have a yellow bar at the top in Dope Sheet mode. Drag either end to scale the keys.
MUTE KEYFRAMES OR TRACKS
Hey Agent Smith, tell them keys to shut up! If you want to non-destructively audition an animation without certain keyframes or even whole tracks of animation, you can use the graph editor’s mute function. With keyframes selected in either Dope Sheet or F-Curve mode, right-click and enable ‘Key Mute’. To mute a whole animation track, disable the little filmstrip icon in the column to the right of the track. If you need to see bigger changes to your animation, look into using Cinema 4D’s Take system with this quickstart video from Maxon.
After Effects Timeline equivalents
If you’re an After Effects user familiar with massaging keyframes and F-curves, you may be wondering how to do similar tasks in Cinema 4D’s graph editor. Here are a few common ones:
1. LOOPOUT(“CONTINUE”) & OTHERS = TRACK BEFORE/AFTER
To keep a parameter going on a continued trajectory before the first keyframe and/or after the last keyframe, we can use the graph editor’s Track Before/After function. Select your start/end keyframe and in the menu bar go to Functions > Track Before or Track After > Track Continue.
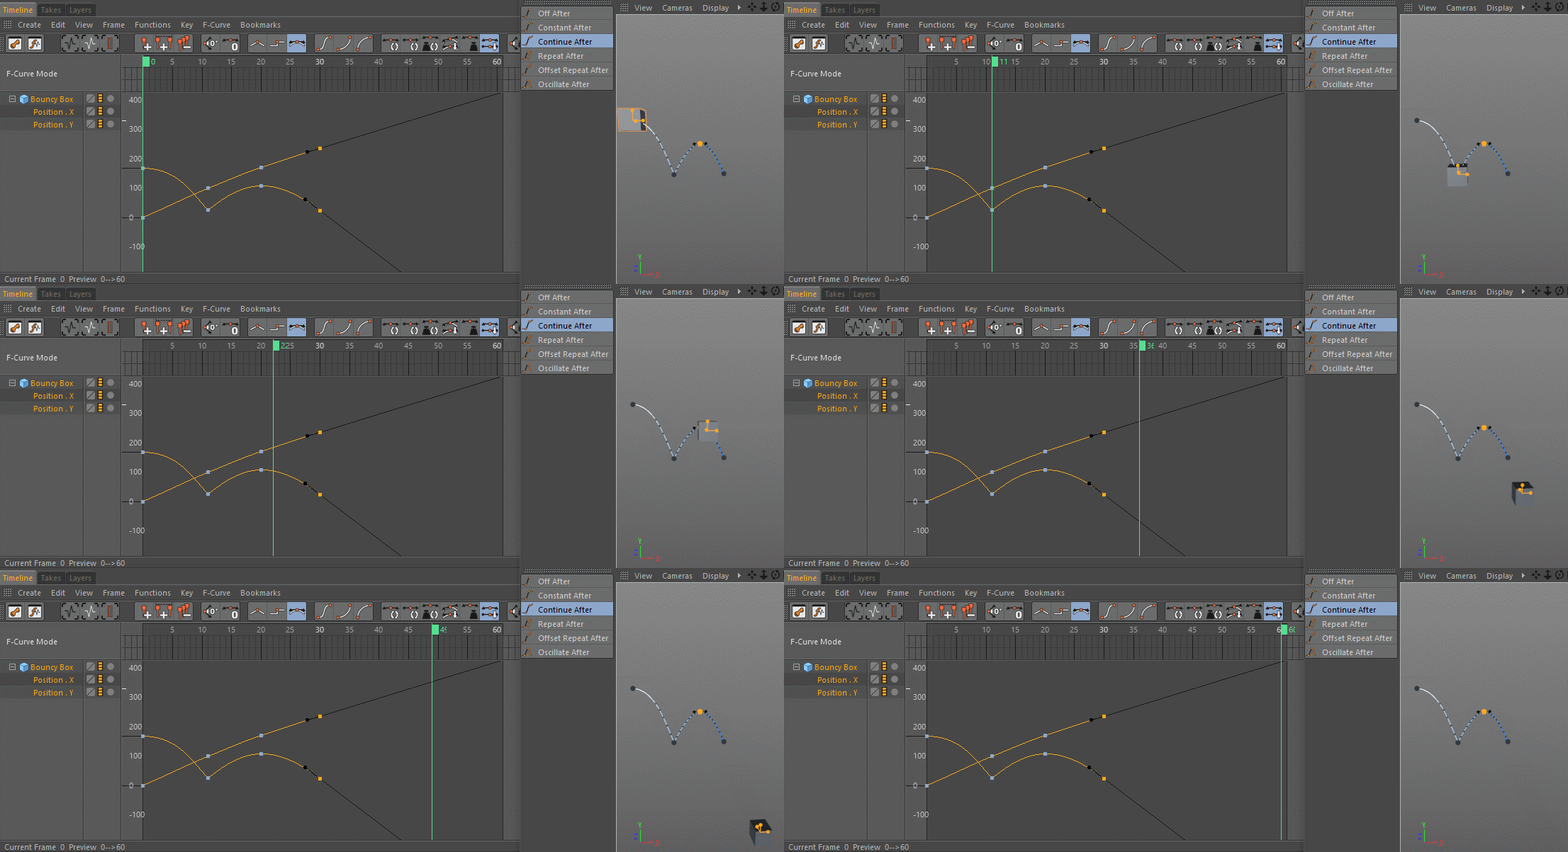
That get’s you behavior like After Effect’s Loop In/Out (“Continue”) expression. There are a few more functions in that menu:
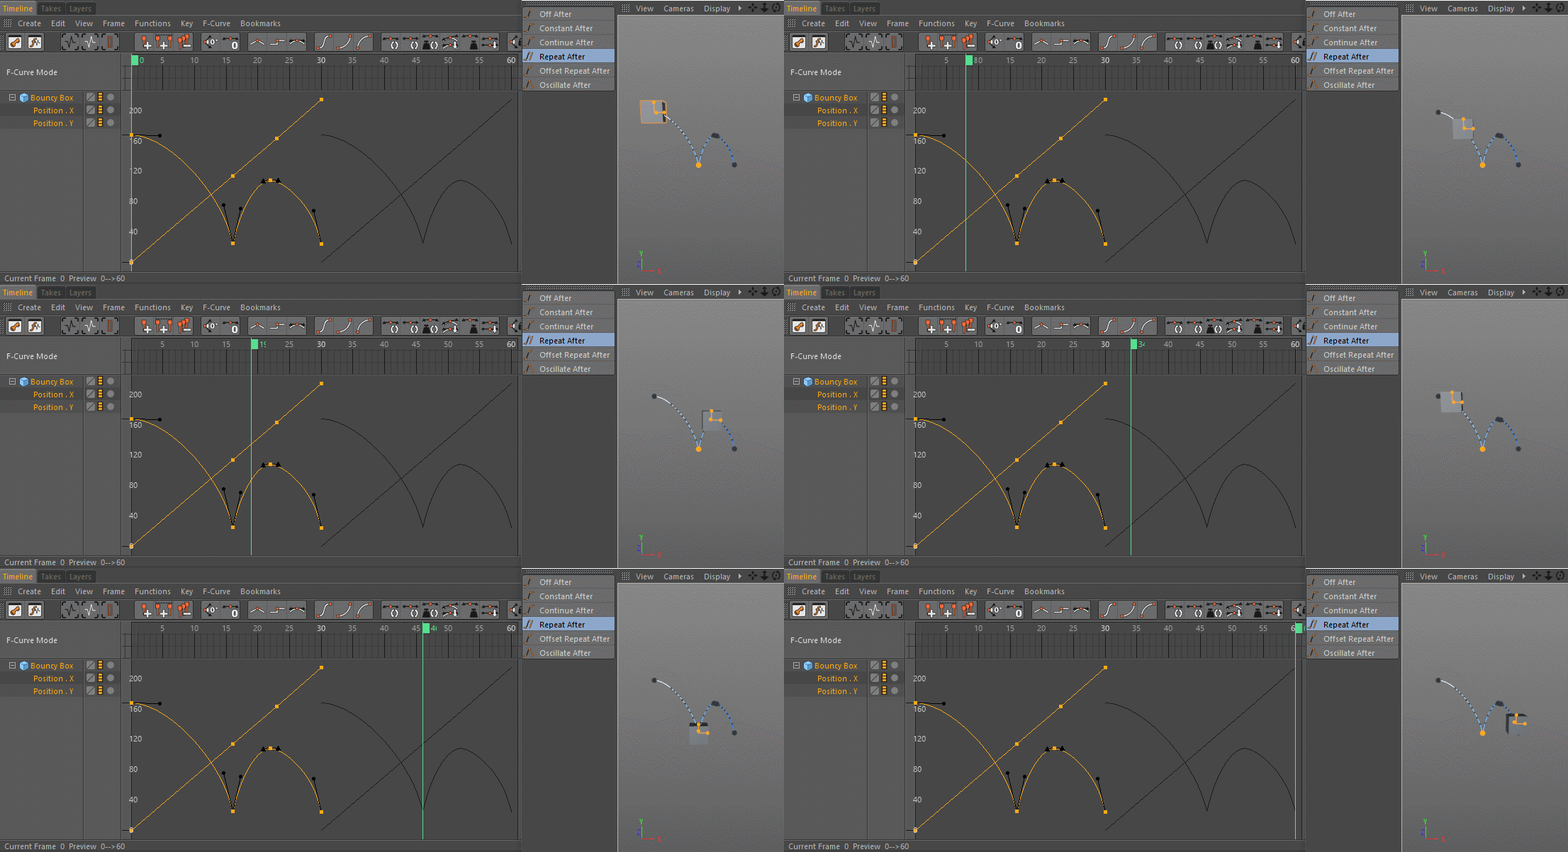
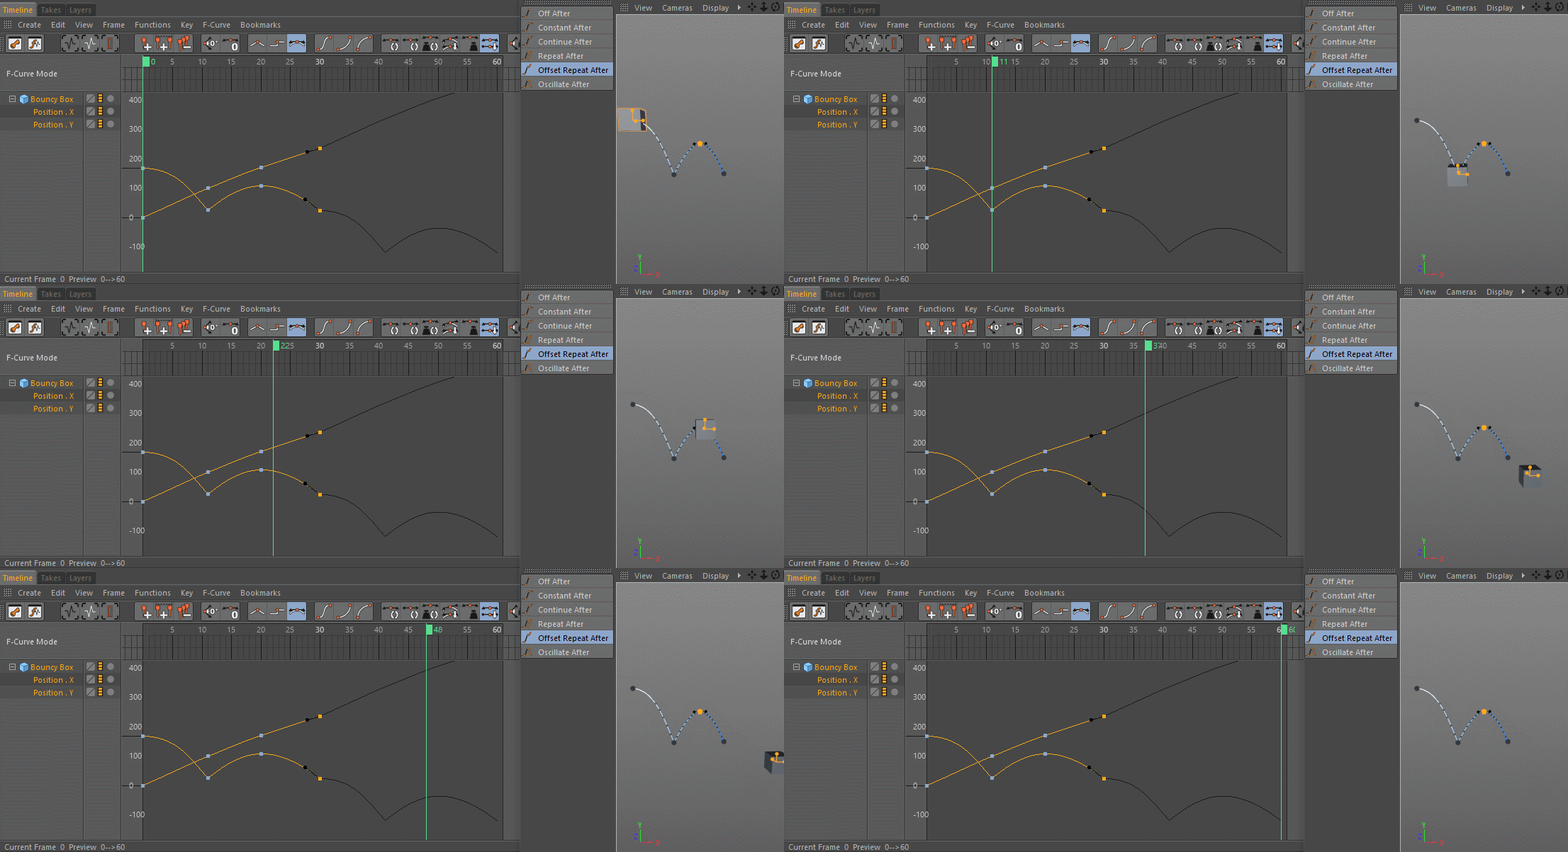
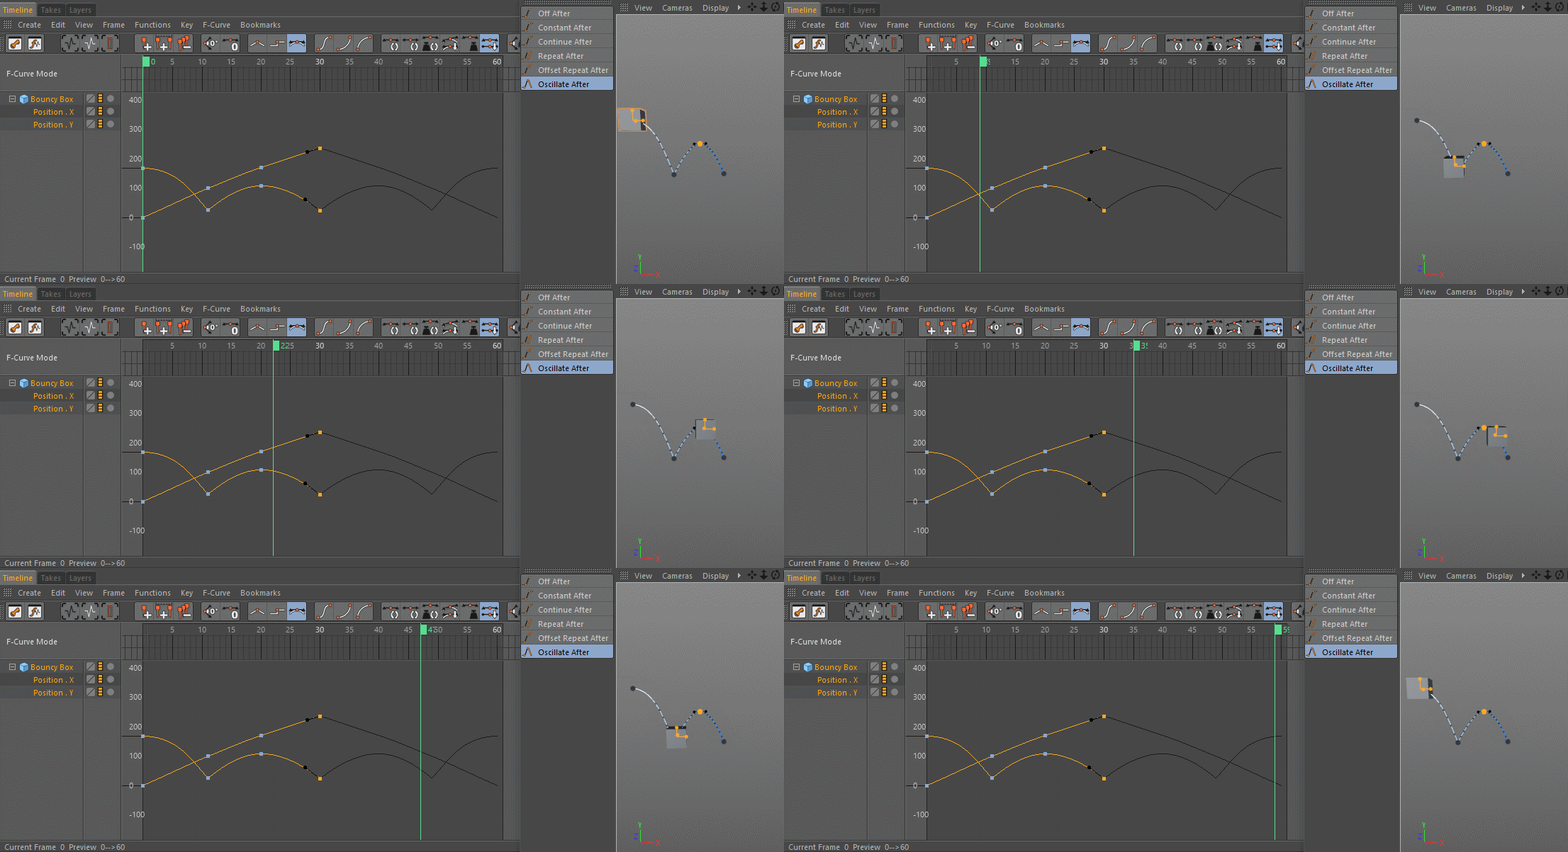
2. ROVING KEYFRAMES = BREAKDOWN KEYS
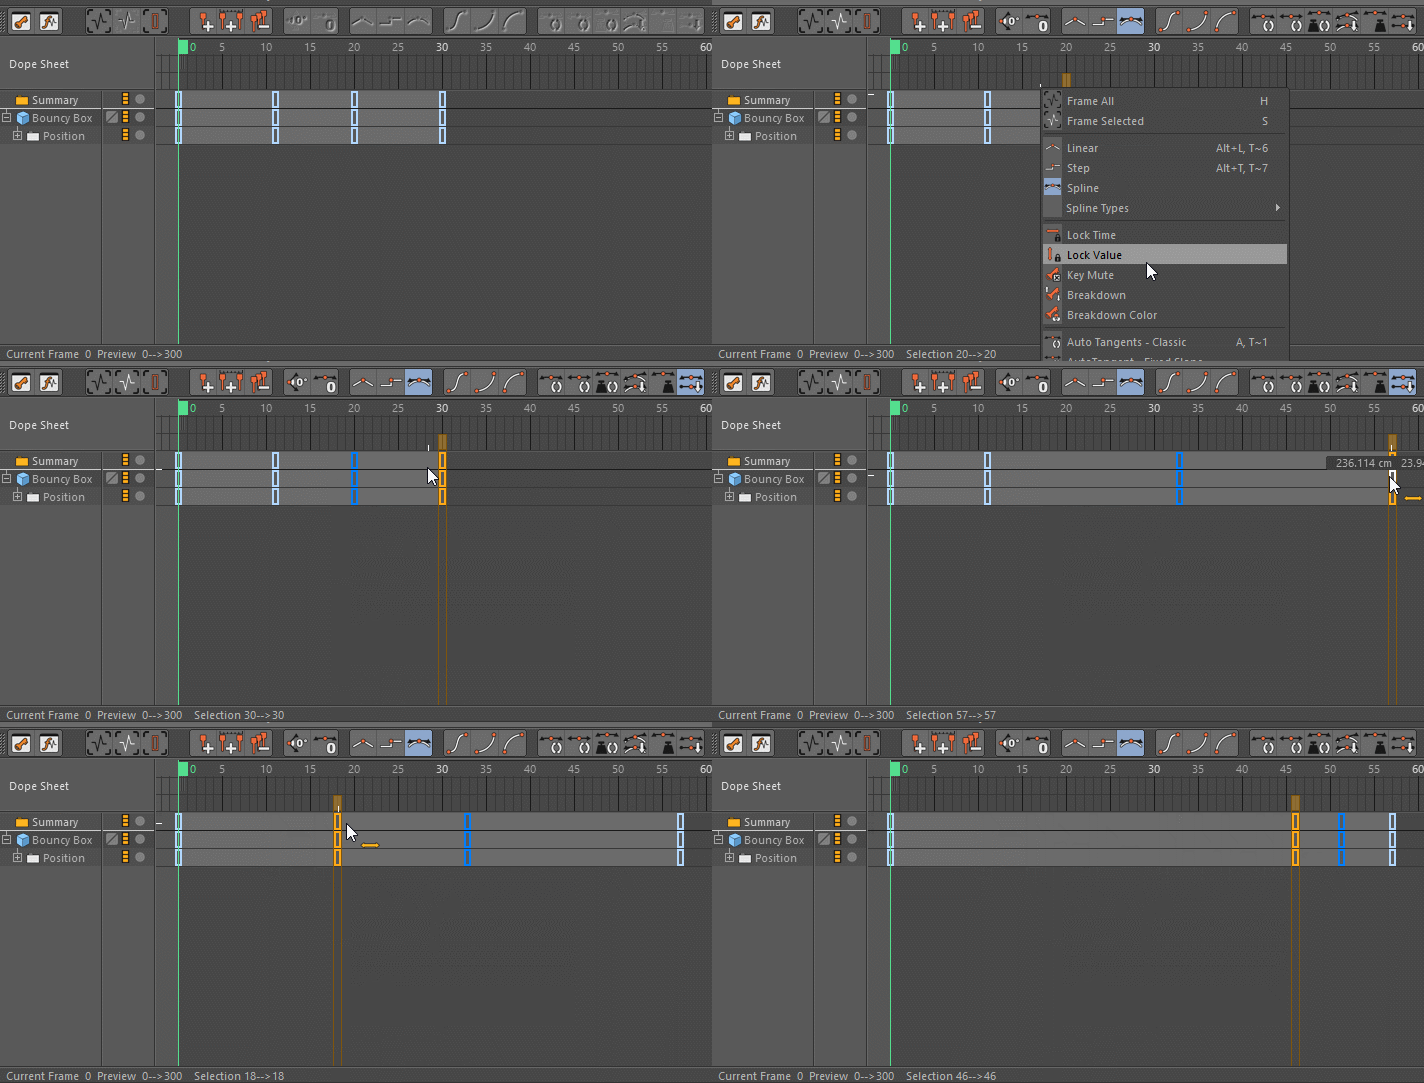
A great feature in After Effects is the ability to have keyframes rove over time as you adjust the timing of your animation. Moving one key in time can dynamically shift others accordingly. In Cinema 4D they’re called breakdowns. With your keys selected, right click and select ‘Breakdown’ to make those keyframes rove over time.
3. WHERE IS MY SPEED GRAPH?
After Effects has a unique way of separating out the value and speed of a keyframe. In the speed graph, you can alter how fast the interpolation happens and by doing so, you indirectly affect the shape of the value’s F-Curve. Likewise, when you alter the F-curve, you are indirectly altering the speed graph.
Unfortunately, in Cinema 4D’s graph editor, there is no direct equivalent to the speed graph.
That is to say, Mr. Pinkman, you can’t directly edit the speed like in After Effects. You can only reference the speed as you alter the F-curve. To see the speed as an overlay in F-Curve mode, in the timeline menu go to F-Curve > Show Velocity.
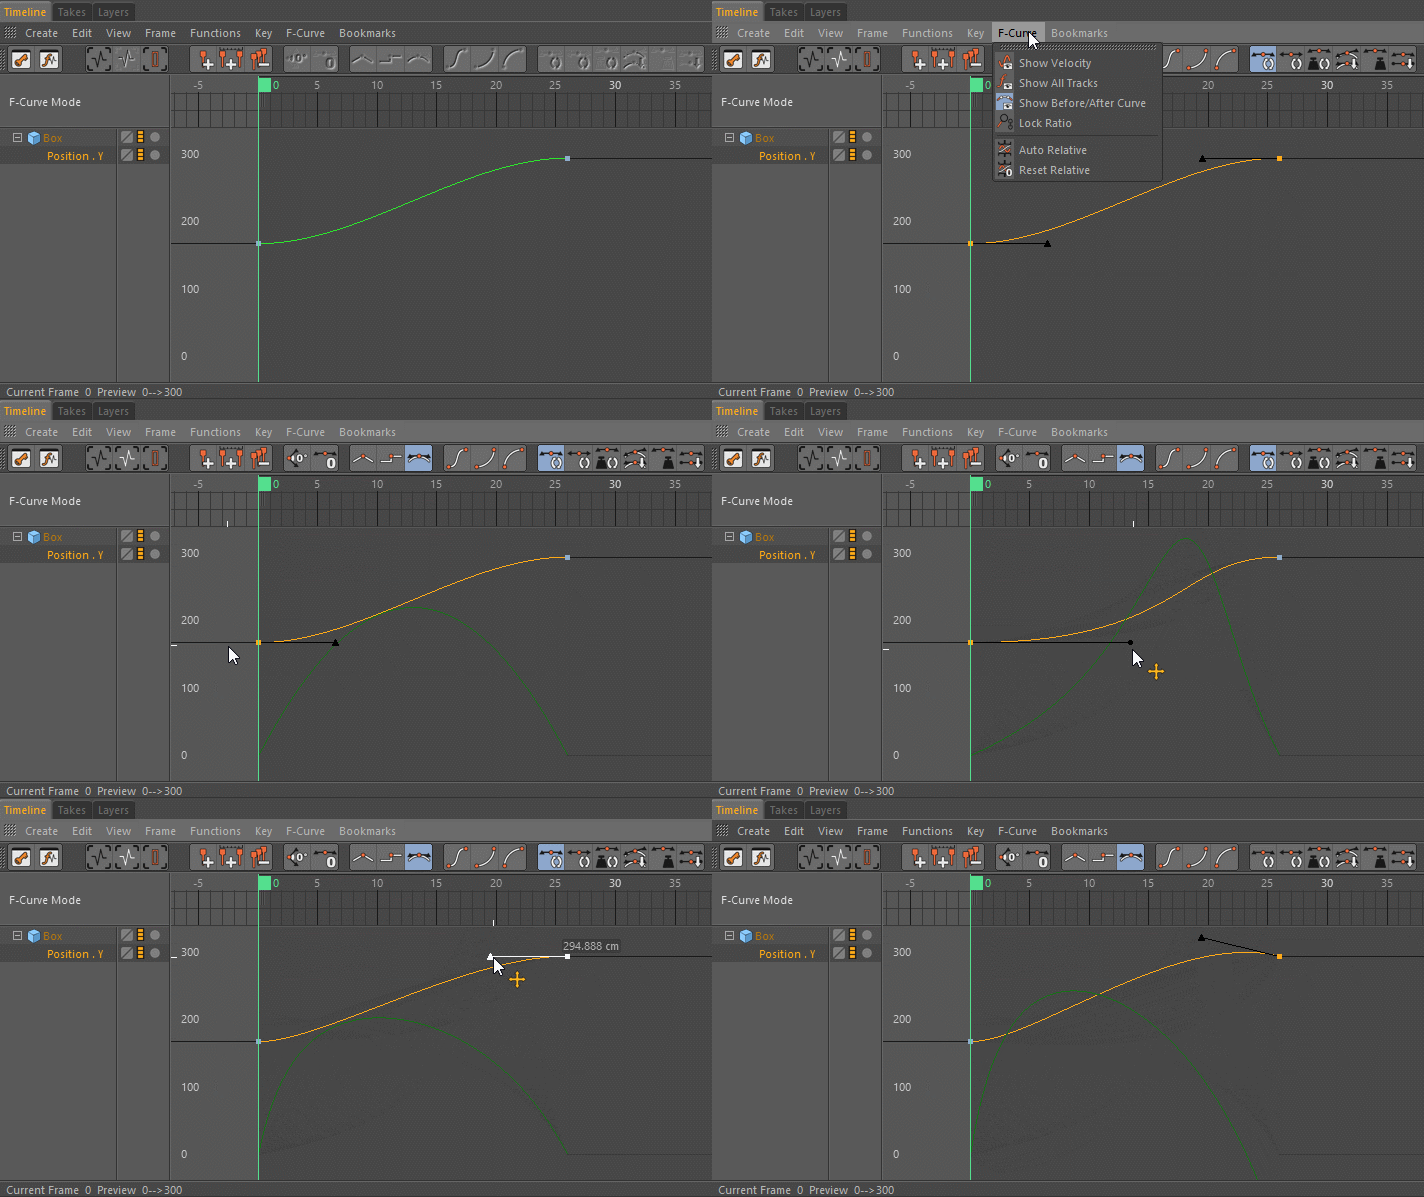
As a bit of a workaround for this, look into using time tracks to control speed. Finessing your animation using the graph editor takes some practice & time but it’s well worth the effort.
ENROLL NOW!
Acidbite ➔
50% off everything

ActionVFX ➔
30% off all plans and credit packs - starts 11/26

Adobe ➔
50% off all apps and plans through 11/29

aescripts ➔
25% off everything through 12/6
Affinity ➔
50% off all products

Battleaxe ➔
30% off from 11/29-12/7
Boom Library ➔
30% off Boom One, their 48,000+ file audio library
BorisFX ➔
25% off everything, 11/25-12/1

Cavalry ➔
33% off pro subscriptions (11/29 - 12/4)

FXFactory ➔
25% off with code BLACKFRIDAY until 12/3

Goodboyninja ➔
20% off everything

Happy Editing ➔
50% off with code BLACKFRIDAY

Huion ➔
Up to 50% off affordable, high-quality pen display tablets

Insydium ➔
50% off through 12/4
JangaFX ➔
30% off an indie annual license
Kitbash 3D ➔
$200 off Cargo Pro, their entire library
Knights of the Editing Table ➔
Up to 20% off Premiere Pro Extensions
Maxon ➔
25% off Maxon One, ZBrush, & Redshift - Annual Subscriptions (11/29 - 12/8)
Mode Designs ➔
Deals on premium keyboards and accessories
Motion Array ➔
10% off the Everything plan
Motion Hatch ➔
Perfect Your Pricing Toolkit - 50% off (11/29 - 12/2)

MotionVFX ➔
30% off Design/CineStudio, and PPro Resolve packs with code: BW30

Rocket Lasso ➔
50% off all plug-ins (11/29 - 12/2)

Rokoko ➔
45% off the indie creator bundle with code: RKK_SchoolOfMotion (revenue must be under $100K a year)

Shapefest ➔
80% off a Shapefest Pro annual subscription for life (11/29 - 12/2)

The Pixel Lab ➔
30% off everything
Toolfarm ➔
Various plugins and tools on sale

True Grit Texture ➔
50-70% off (starts Wednesday, runs for about a week)

Vincent Schwenk ➔
50% discount with code RENDERSALE

Wacom ➔
Up to $120 off new tablets + deals on refurbished items


Start Your 3D Journey in Cinema 4D

Master the essentials of 3D modeling, lighting, and animation in C4D. Enroll in All-Access to unlock C4D Basecamp and 50+ other courses.


