Start Your 3D Journey in Cinema 4D
Master the essentials of 3D modeling, lighting, and animation in C4D. Enroll in All-Access to unlock C4D Basecamp and 50+ other courses.

3D typography is an essential skill for any 3D Designer to master. Here's how to create 3D text in Cinema 4D.
All motion designers use text as part of the visual vocabulary. Creating 3D text in Cinema 4D offers a number of options to help you craft its look to your exact needs. Thankfully, pulling flat 2D text into 3D won’t rip polygons.
How to Create Text in Cinema 4D
Here's a quick list of the steps you need to follow to create 3D text in Cinema 4D:
- Create a Text Object
- Create an Extrude Object
- Drop the Text Object in the Extrude Object
- Adjust Your Type Settings
- Adjust Your Extrusion Settings.
Now that we have the outline let's get more specific.
STEP 1: CREATE A TEXT OBJECT
One of the easiest ways to create 3d text in Cinema 4D is using a text object along with an extrude object. You’ll find the Text Object under the create menu > spline. In the text object itself, type out your text in the text box, adding line breaks with the Return key.
STEP 2: CREATE AN EXTRUDE OBJECT
To create an extrude object go the the generators menu at the top of your user interface (It's the menu with the green icons). Click and hold down the button and select 'Extrude'. Neat!
STEP 3: DROP THE TEXT OBJECT IN THE EXTRUDE OBJECT
To get a preliminary 3D text object going, drop the Text object as a child of an Extrude Object (Create> Generators >Extrude). The main idea here is to do all your type setting work in the Text Object and refine the 3D-ness in the Extrude Object.

STEP 4: CUSTOMIZE THE TEXT
Now comes the fun part. It's time to stylize your text. Let's take a look at some of the things you can easily customize.
Selecting a Font in Cinema 4D:
Choose the font you’d like to use by simply clicking the drop down menu with your type selected. Cinema 4D even gives you a handy font preview. We have some simple type setting tools just below our fonts including left, center and right justification.

Adjusting the Text Parameters:
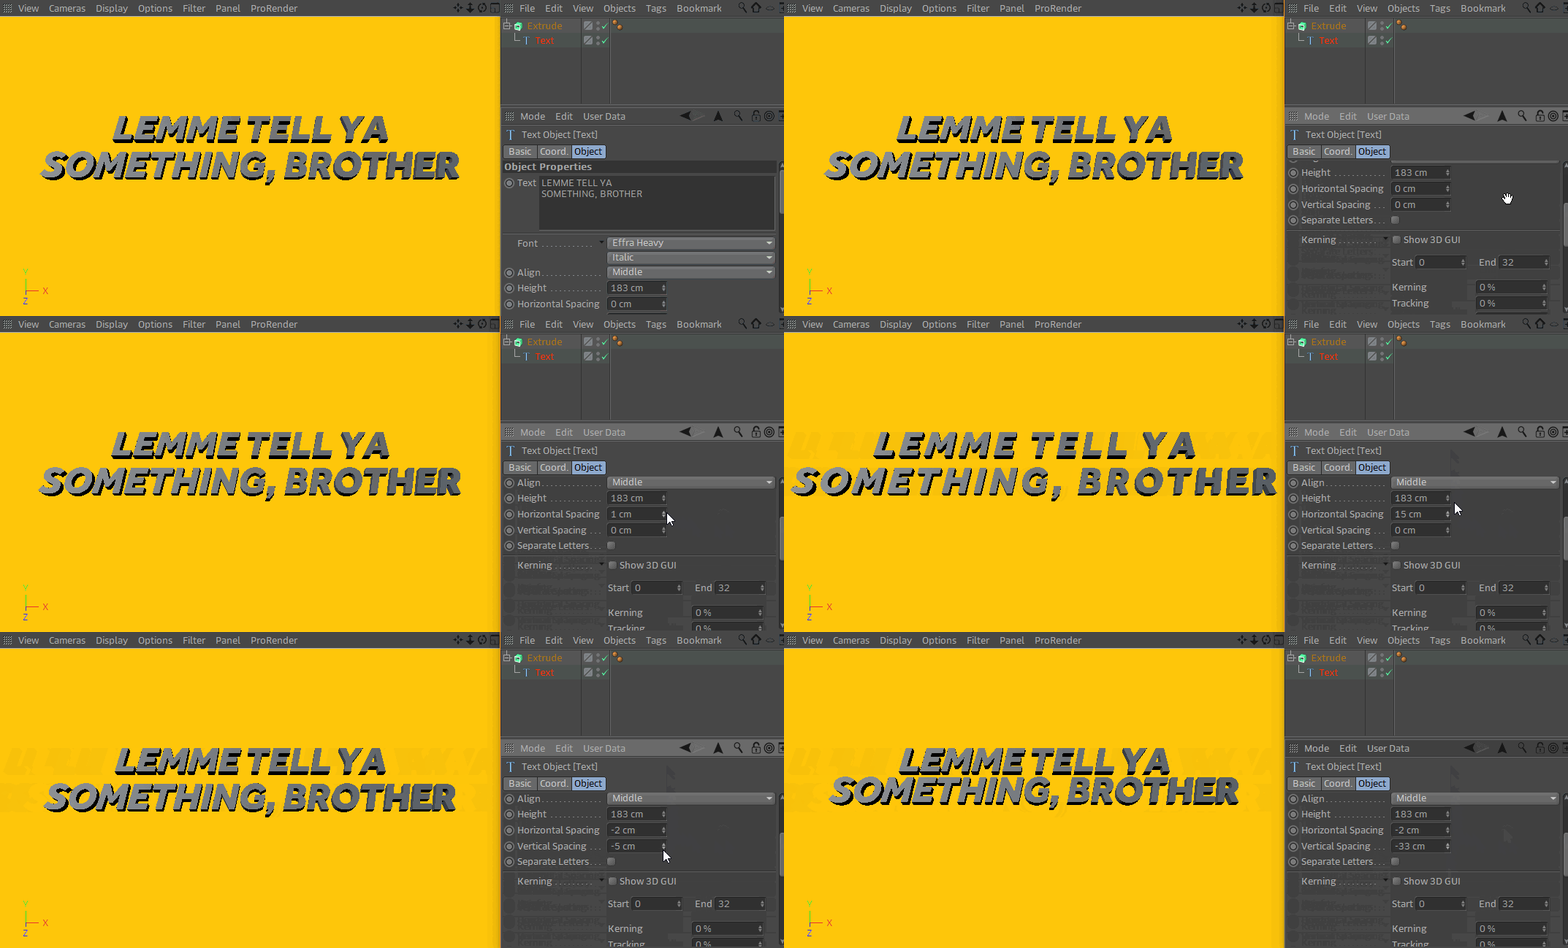
The height parameter controls the overall text object size while the horizontal and vertical spacing controls the corresponding spacing for whole block of text.
Pro Tip: How to Kern Type in Cinema 4D
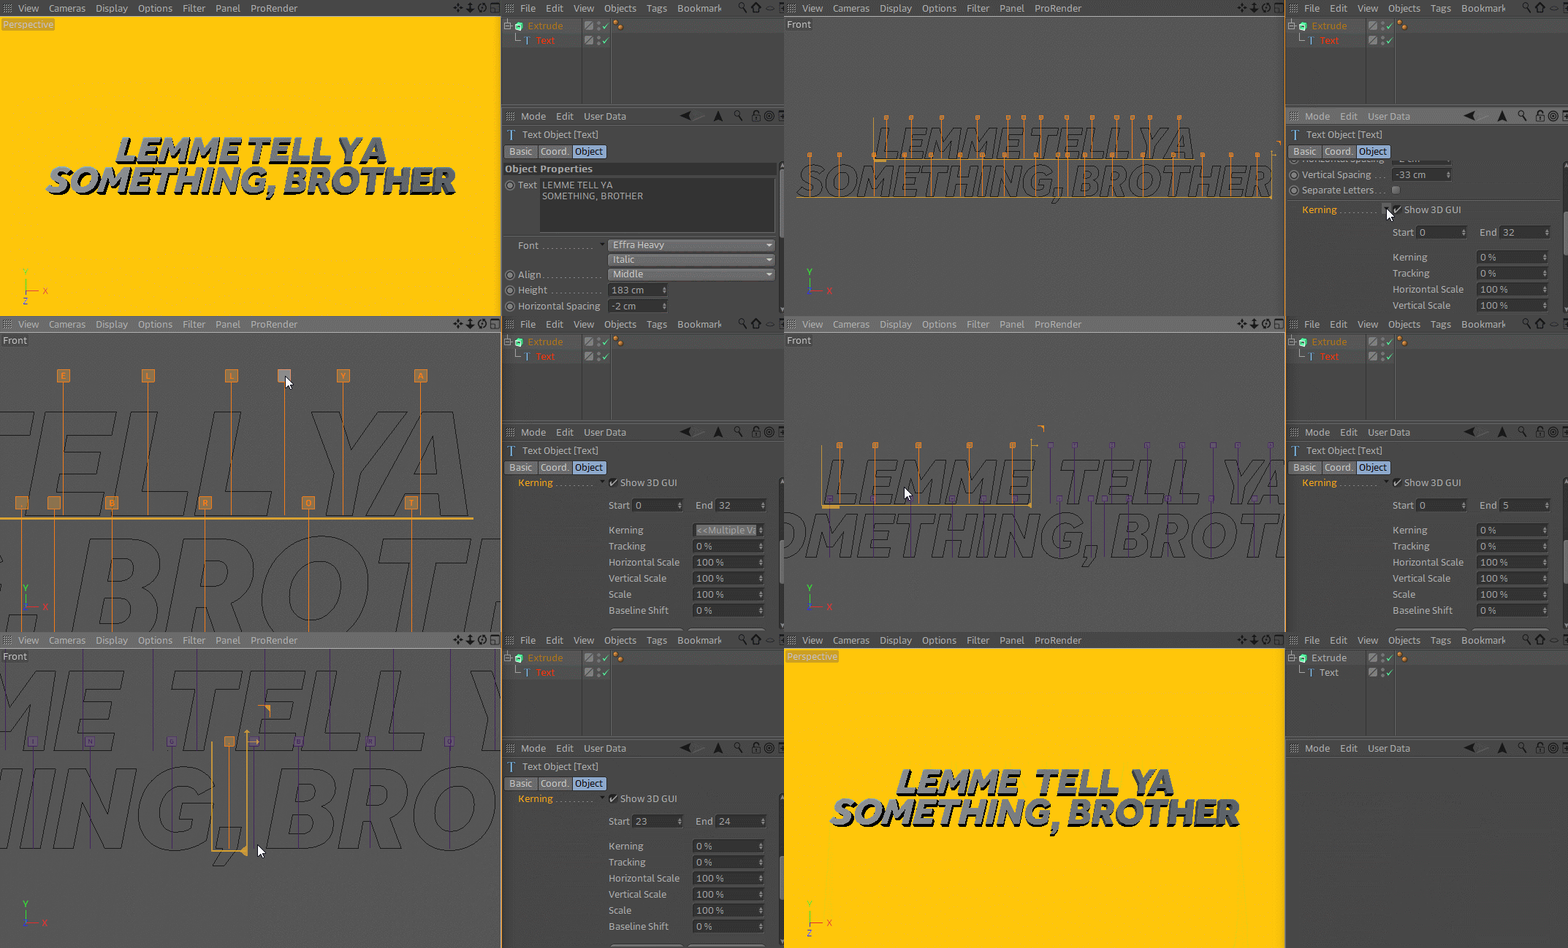
We can get down and dirty with kerning by enabling the checkbox next to “Show 3D GUI”. In the viewport you’ll see handles for each character in your Text Object which allows you adjust the kerning by clicking and dragging. You can isolate which characters you want to affect by shift+clicking the handles or using the numerical start and end values. The GUI handles also allow you to interactively alter the tracking and baseline shift for the selected characters.
STEP 5: ADJUST YOUR EXTRUSION SETTINGS
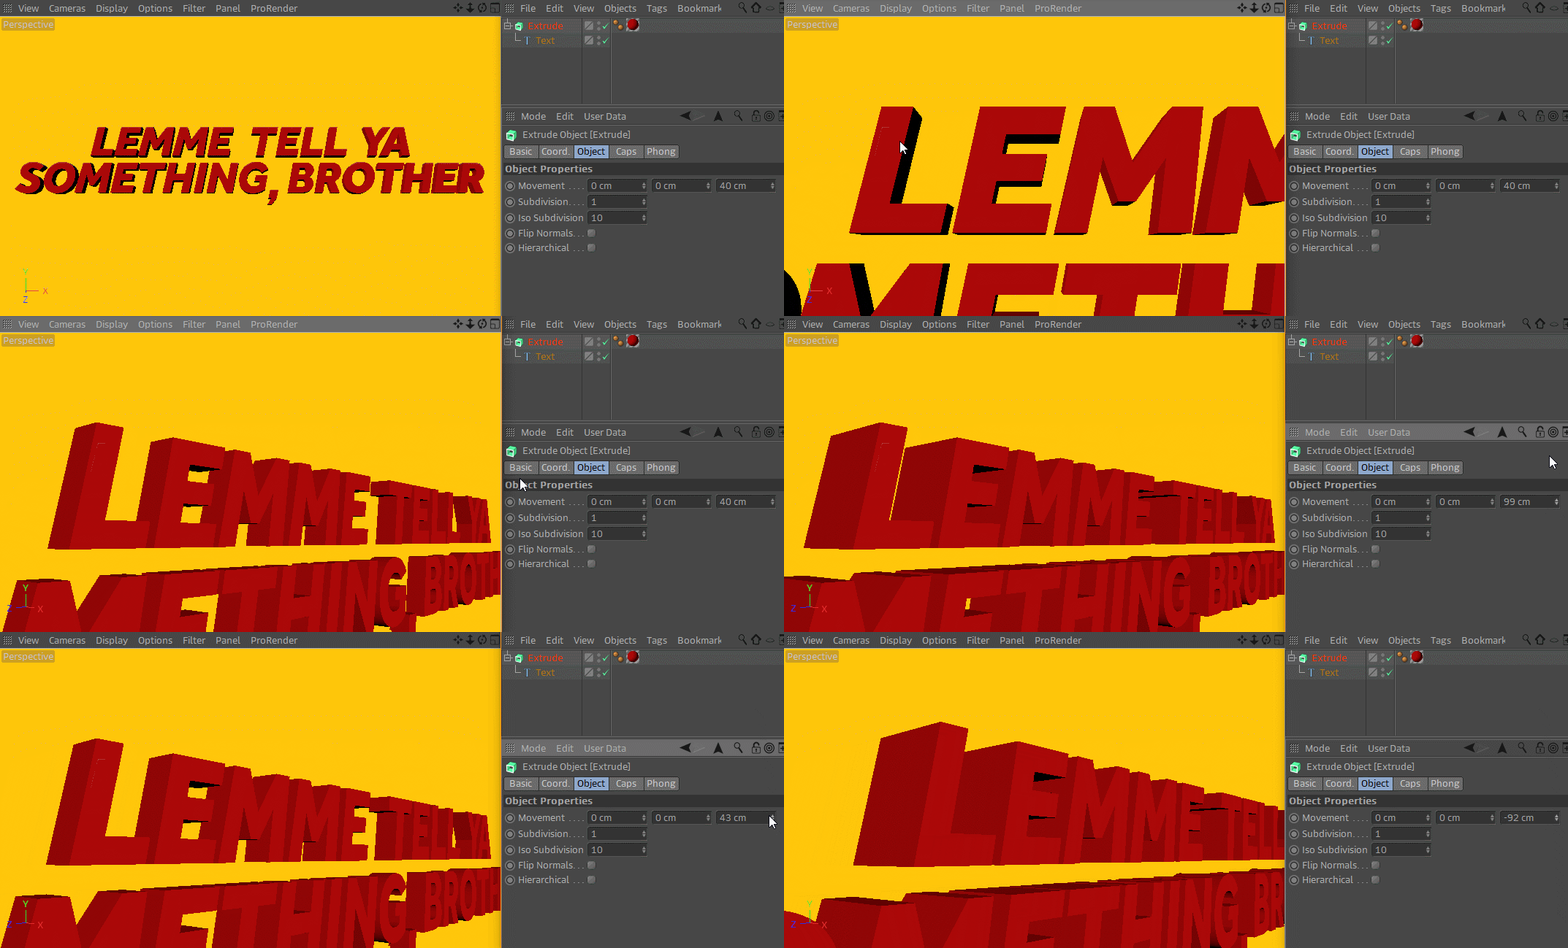
Now that you’ve set the type, go into the extrude object where we can define the parameters that make this into 3d geometry. The first big one is under Extrude Object > Object > Movement. The Z value changes the depth of the extrusion with positive values pushing further back in space and negative values pulling the extrusion forward. Subdivision controls the amount of geometry for the extrusion. Turn this up if you intend on deforming the text. More on this later.
C4D tip: You can have multiple Text Objects under one Extrude Object so that they share the same 3D-ness. Simply add all the Text Objects as children of the Extude and enable the Hierarchical option under Extrude Object > Object.
Using Fillet Caps with Text in Cinema 4D
The next big parameter to 3D text are the Start and End Caps. This is the front and back geometry of your text. Without these, you’d just have a see thru extrusion of text. You can change the caps from the default “Cap” mode to “Fillet Cap” that will bevel the edges of your Text Object. You can change how large and rounded the fillet is with the Steps and Radius parameters.
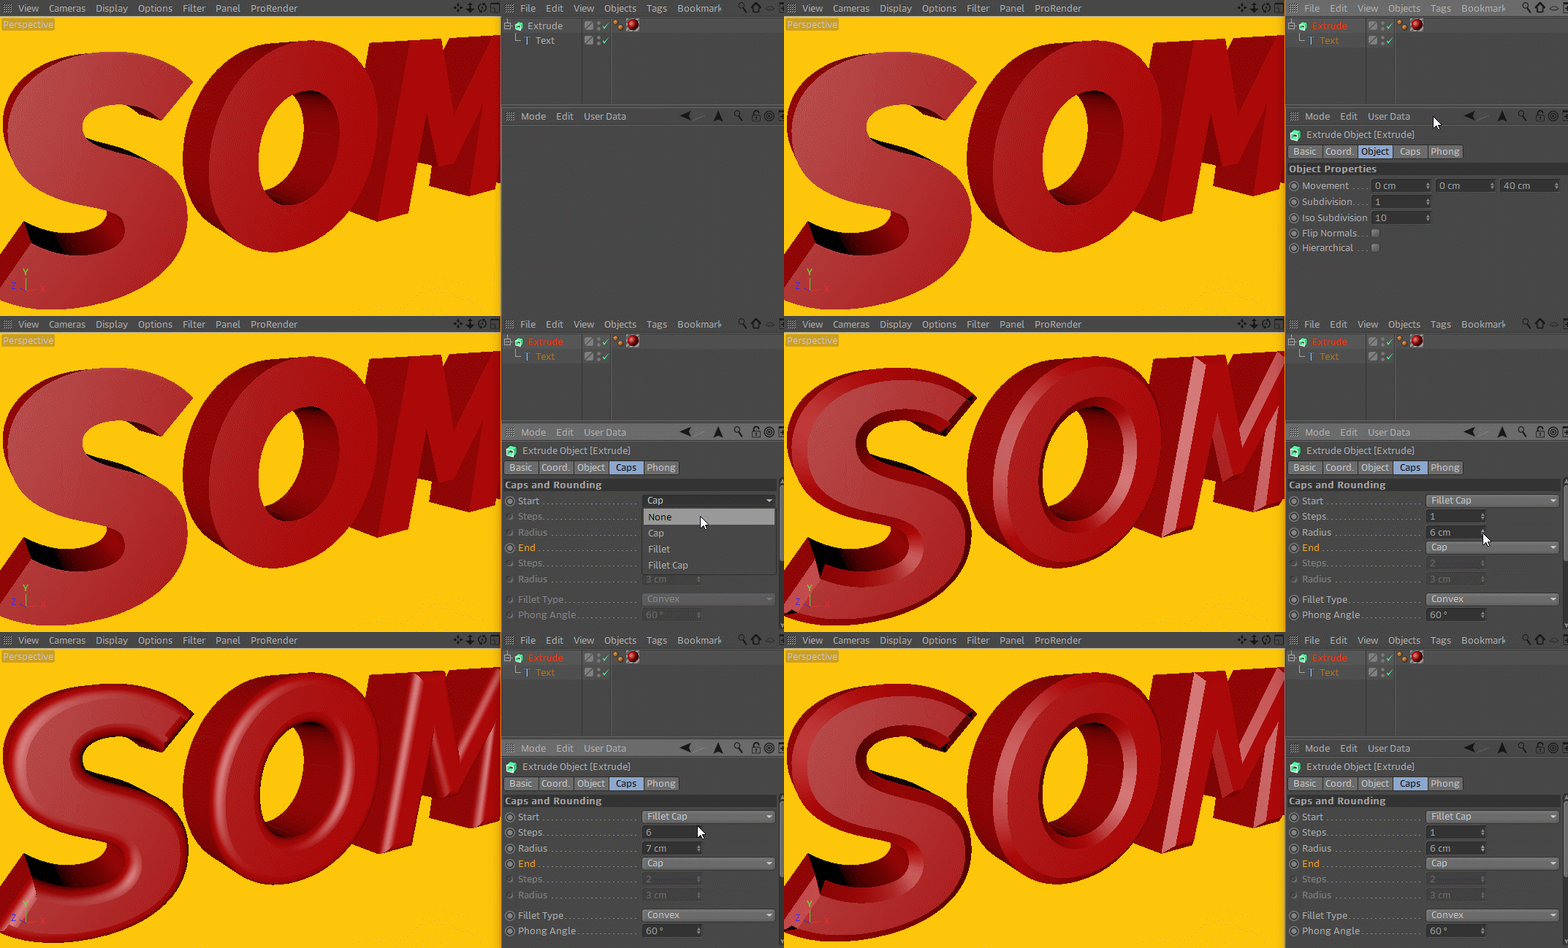
How to Change Fillet Types in Cinema 4D
This drop down changes up the shape of the text rounding.

FILLET OPTIONS IN CINEMA 4D
With Fillet or Fillet Caps enabled, the Extrude Object gives you Hull Inwards and Hole Inwards as optional parameters. Note: Hull vs Hole
- Hull Inwards toggles the beveled cap to either push outwards or inwards from the text.
- Hole Inwards is the same concept but applied to any holes in the text (characters like ‘o’ for example)
The last big parameter for fillet option is Constrain. With Constrain enabled it will try to preserve the object’s extrusion dimensions to the size of the original Text Object. However, with it disabled, the size of the extrusion will depend on the Start and End Radius values.
Adding Material with Selection Tags
The Extrude Object has a few internal (ie. hidden) selection tags that will become useful if you want to add different materials to the text. Specifically, typing in ‘C1’ into an applied material’s selection will limit that material to the front Cap of the extrusion. ‘C2’ selects the back cap. So, for example, if you want the front cap to be red and the extrusion to be black, make sure black is the left most material in the object manager and the red material has ‘C1’ in the selection.

Deforming Type in Cinema 4D
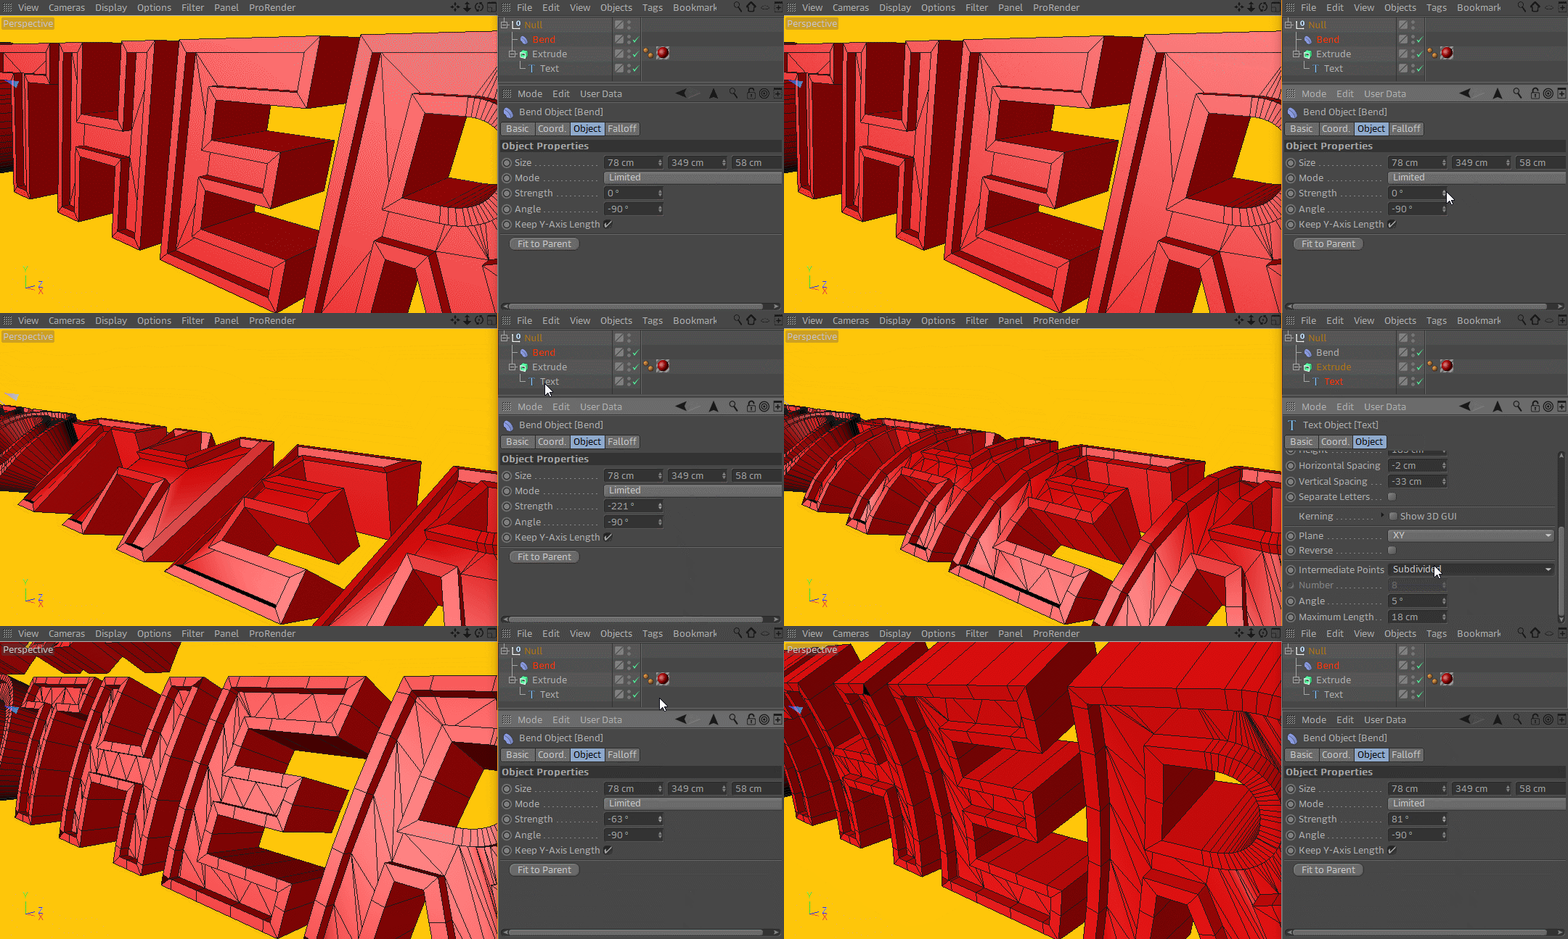
If you plan on deforming the type, you’ll want to pay attention to both the Extrude Object Cap Type and the Text Object’s Intermediate Points. The idea here is to create enough geometry to smooth any bends or twists you’ll subject your text to. For the cap type, Quadrangles with regular grid gets you more predictable geometry but you’ll have to play with the width parameter to find a good balance.
The Text Object’s intermediate points control the number of points on the text spline which in turn defines the geometry of the Extrude Object. Changing the mode from the default ‘Adaptive’ mode to ‘Natural’, ‘Uniform’ or ‘Subdivided’ will give you more control to add the appropriate geo for your deformations.
Using Motext in Cinema 4D
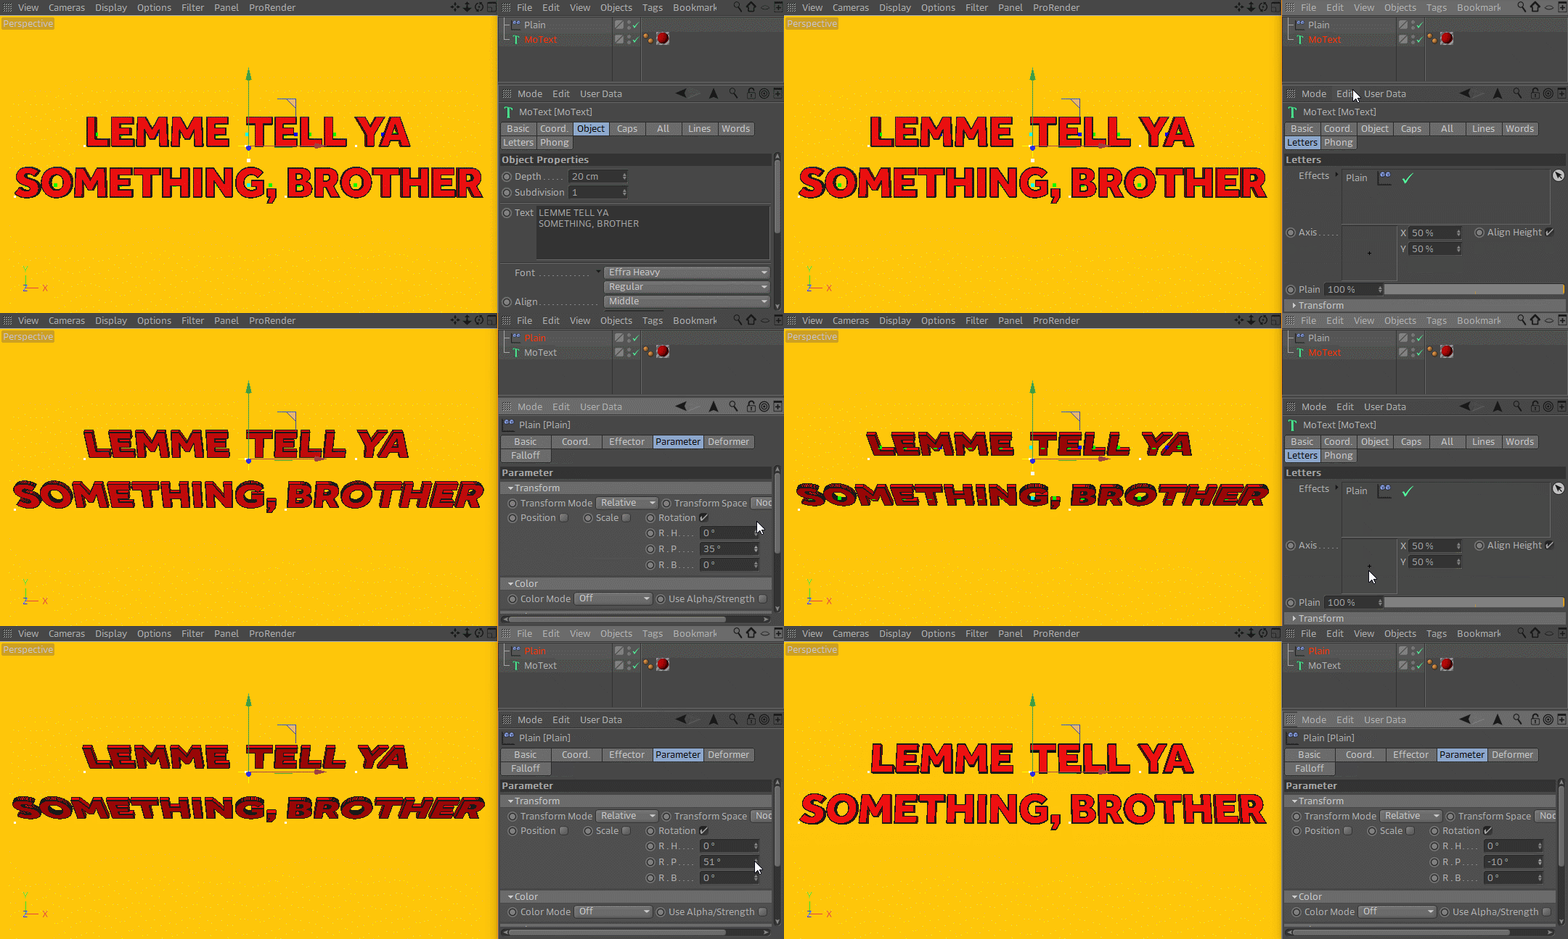
If you have Cinema 4D Broadcast or Studio versions, you can apply all that we’ve covered here to the MoText object (MoGraph > MoText Object), which operates identically as the Text Object/Extrude Object combo with this big addition: You can use Mograph effectors to animate & control each character of your MoText. How do you adjust individual characters using the MoGraph effectors? Glad you asked:
- Simply drop in an effector to one of the ‘Effects’ box to control various levels of the text (All, Lines, Words & Letters).
- Then use the axis parameter to define the center point from which the characters scale or rotate.
Just follow this GIF.
ENROLL NOW!
Acidbite ➔
50% off everything

ActionVFX ➔
30% off all plans and credit packs - starts 11/26

Adobe ➔
50% off all apps and plans through 11/29

aescripts ➔
25% off everything through 12/6
Affinity ➔
50% off all products

Battleaxe ➔
30% off from 11/29-12/7
Boom Library ➔
30% off Boom One, their 48,000+ file audio library
BorisFX ➔
25% off everything, 11/25-12/1

Cavalry ➔
33% off pro subscriptions (11/29 - 12/4)

FXFactory ➔
25% off with code BLACKFRIDAY until 12/3

Goodboyninja ➔
20% off everything

Happy Editing ➔
50% off with code BLACKFRIDAY

Huion ➔
Up to 50% off affordable, high-quality pen display tablets

Insydium ➔
50% off through 12/4
JangaFX ➔
30% off an indie annual license
Kitbash 3D ➔
$200 off Cargo Pro, their entire library
Knights of the Editing Table ➔
Up to 20% off Premiere Pro Extensions
Maxon ➔
25% off Maxon One, ZBrush, & Redshift - Annual Subscriptions (11/29 - 12/8)
Mode Designs ➔
Deals on premium keyboards and accessories
Motion Array ➔
10% off the Everything plan
Motion Hatch ➔
Perfect Your Pricing Toolkit - 50% off (11/29 - 12/2)

MotionVFX ➔
30% off Design/CineStudio, and PPro Resolve packs with code: BW30

Rocket Lasso ➔
50% off all plug-ins (11/29 - 12/2)

Rokoko ➔
45% off the indie creator bundle with code: RKK_SchoolOfMotion (revenue must be under $100K a year)

Shapefest ➔
80% off a Shapefest Pro annual subscription for life (11/29 - 12/2)

The Pixel Lab ➔
30% off everything
Toolfarm ➔
Various plugins and tools on sale

True Grit Texture ➔
50-70% off (starts Wednesday, runs for about a week)

Vincent Schwenk ➔
50% discount with code RENDERSALE

Wacom ➔
Up to $120 off new tablets + deals on refurbished items


Start Your 3D Journey in Cinema 4D

Master the essentials of 3D modeling, lighting, and animation in C4D. Enroll in All-Access to unlock C4D Basecamp and 50+ other courses.


