Learn After Effects the Right Way
Master the After Effects interface and build a real animation skillset. Enroll in All-Access to unlock AE Kickstart and 50+ other courses.

Have you ever wanted to take your awesome Illustrator designs and add a little motion? We’re going to pull some Disney princess magic and bring these inanimate objects to life.
I am constantly creating illustrations or hiring illustrators to design scenes for music videos. Today I’m going to show you some important tips and tricks on how I turn Adobe Illustrator designs into really cool animations using After Effects.
In this video you will learn:
- How to analyze and breakdown a scene to really bring your animation to the next level
- How to import your Illustrator designs into After Effects and animate
- Some Do’s and Don’ts for animating vector art in After Effects
How to Turn Illustrator Designs into Motion Masterpieces
This tutorial is going to be extremely helpful if you are an illustrator that is looking to animate your designs, or if you are collaborating with another illustrator’s designs.
{{lead-magnet}}
How to analyze your Illustrator design and prepare for animation
For me, this is the most important step to creating an animation. I am a visual learner, so I always get a pen and paper to jot down my ideas and plan. The most important thing to is analyze your scene so it is cohesive and really pops.
.gif)
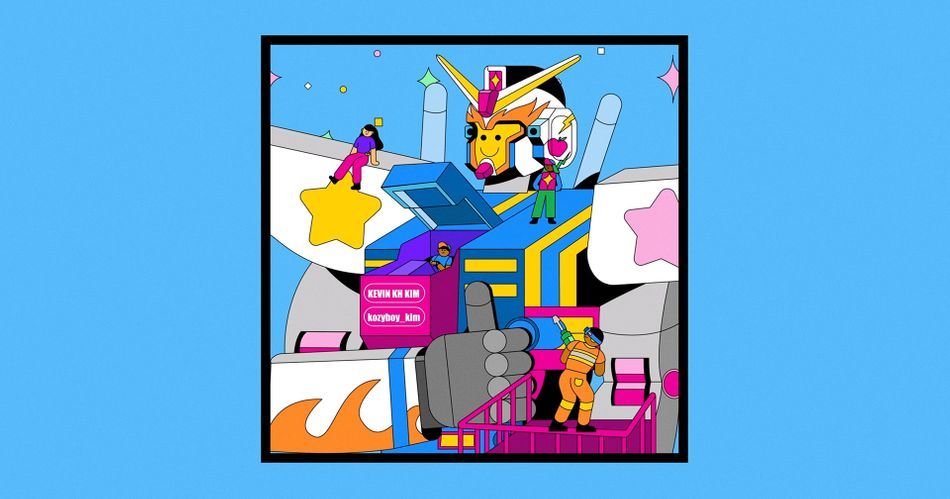
This mind-blowing, amazing, fantastic, beautiful super-awesome illustration was created by Kevin KH Kim. I’ve worked with him many times, and he is absolutely phenomenal...and he was gracious enough to provide us this illustration as an example.
So let’s imagine we were given the task of bringing this scene to life. Our client wants everyone to get along, like a community, and we have a decent amount of creative control.
My first initial idea would be for the robot to give a thumbs up, so I’m gonna write on my robot “thumbs up.” But what does this mean for the scene?
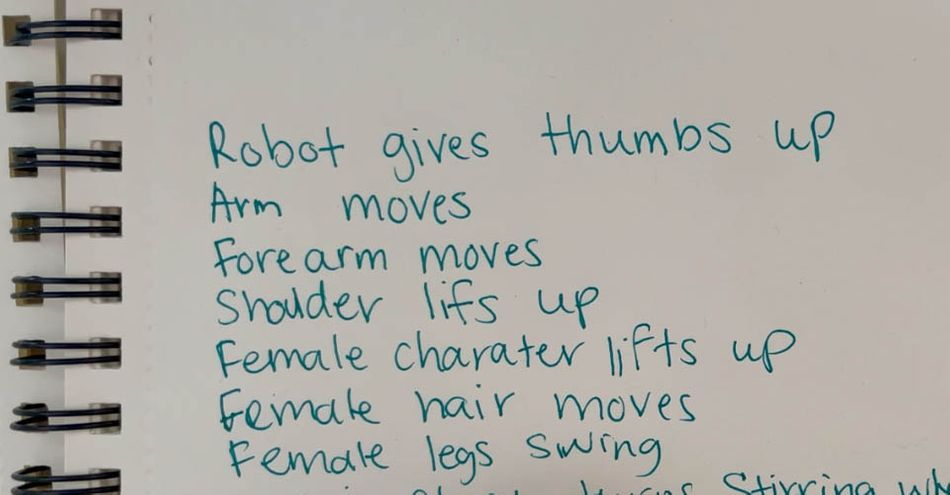
If the robot gives a thumbs up, then that must mean his arm moves, and then his shoulder must move...and if his shoulder must move, the character on his shoulder would move as well. It's important to break down how one character's movement is going to affect everything around them, including the environment.
The goal here is to really break down the cause and effect of your animation. There are so many elements to this that could really take this design to the next level, but if we aren’t connecting the motions together it’s really not going to look like a cohesive piece.

Once I have my character animation concept written down, I also want to break down the environment. I think environment animations are super underrated, and I’ve seen a lot of pieces that could’ve taken it to the next level had the environment been flowing as beautifully as the characters.
I strongly recommend writing everything down before you get to work. This way you won't forget any of your ideas, and you'll be able to come up with a more accurate timeline for your workflow. That's not just important for organization, but to communicate with your client about when the final product will be delivered.
How to import your Illustrator designs into After Effects
In the video above, I show you a neat plug-in that I use regularly to speed up my Ai to Ae workflow. For now, let's take a look at how to quickly bring your Illustrator files into After Effects to animate.
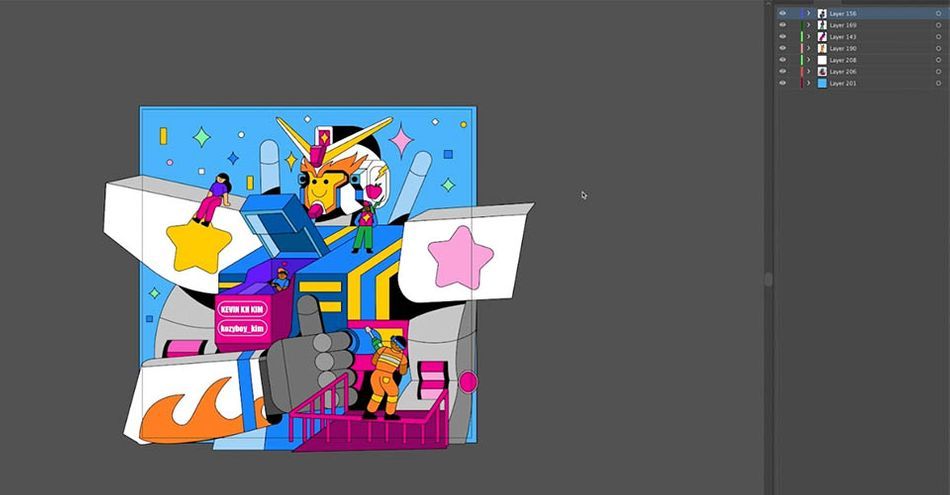
First, let’s make sure that—when you are in Illustrator—your layers are organized. This is going to be extremely important for when you are bringing in the files to After Effects.
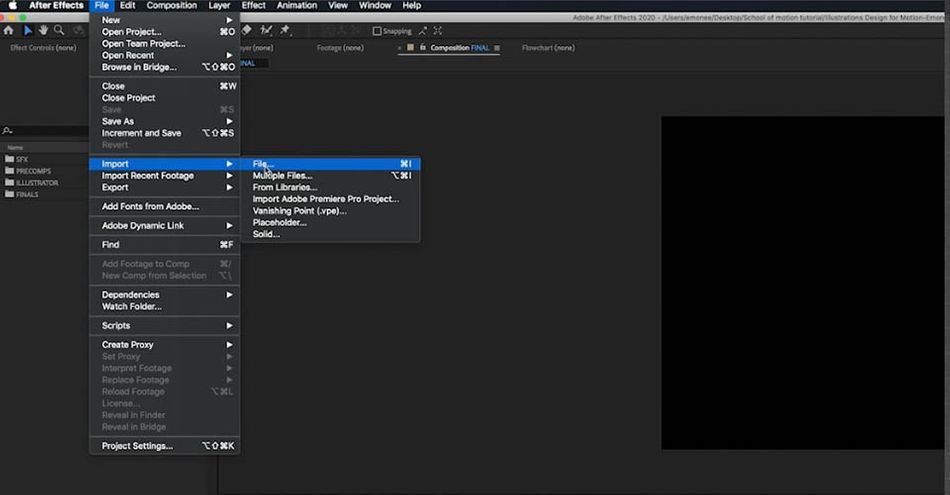
Go to File > Import > File... and select the correct...file (so many files). Make sure you are importing as a Composition rather than Footage so that the file isn't merged together.
Now you have all of your layers in After Effects, and the format is the same compression and layout as we had in Illustrator. To give us more control, we want to convert these into Shape Layers.
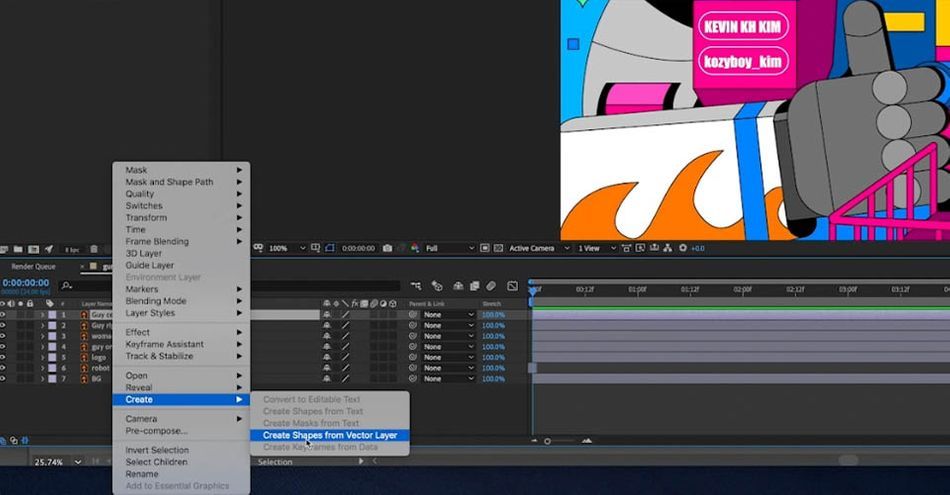
Right-click on the layer and go to Create > Create Shapes from Vector Layer
Now we have two files: the original Illustrator file and the new Shape Layer. I usually delete the Illustrator layer.
So this is why it’s import to make sure your files are organized in Illustrator. Say I have my files scattered everywhere—you’ll see when I convert it to a shape layer, all the layers lay on a different shape layer—when I go to animate the path of one character it is going to be a mess.
Say I want to move his head. I would have to grab the path of every individual keyframe and move it. But when you have it on one layer, you can just highlight all of the keyframes in one section and they all share the same transform settings.
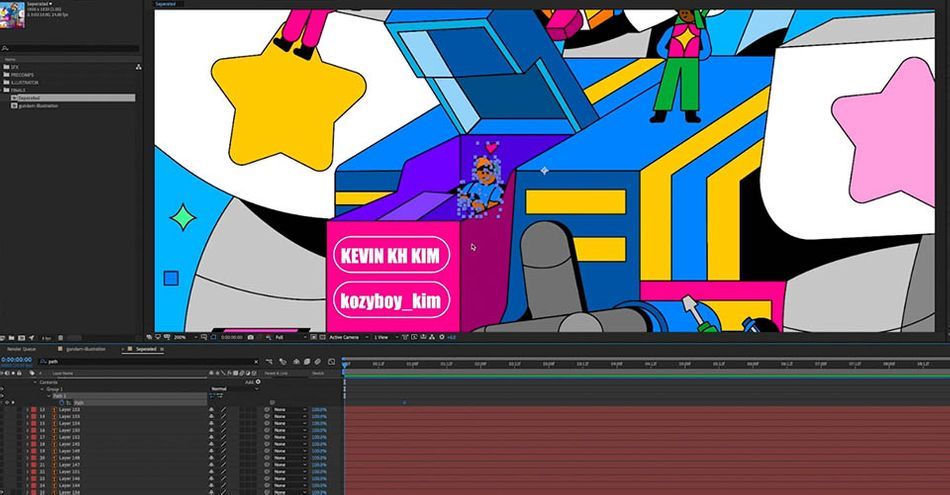
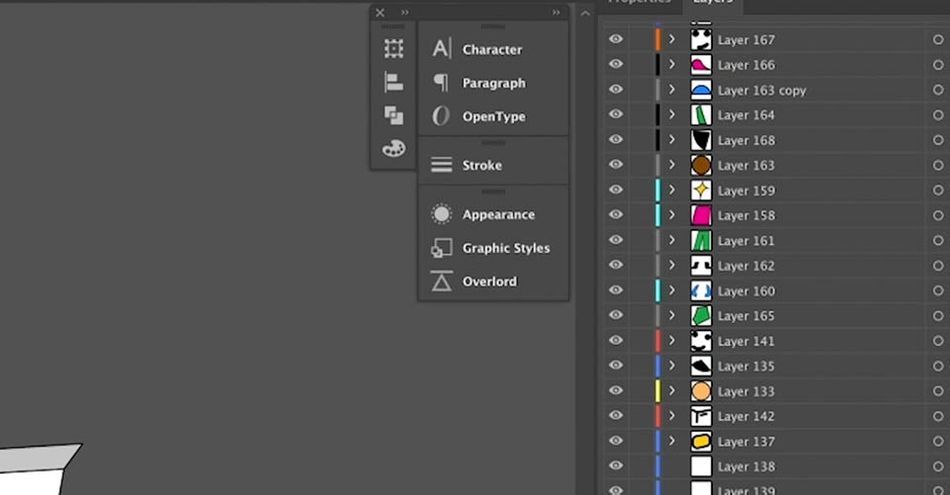
And here’s where the fun part happens. We need to go in and label all of our layers so we know exactly what we are animating. I already took the liberty to label these files for you, but when you are working on your own designs it’s super important to make sure that you label all of your groups in your shape layers.
There are a ton of non-native tools you can find to help streamline your work. A great extension is Overlord from Battle Axe, Adam Plouf's company. It allows you to import shape layers with the click of a button. I don’t want to spend too much time going over those, but if you want to spend some money to make your workflow a little faster I suggest getting this extension.
The Dos and Don’ts of working with Illustrator files
I want to go over some do’s and don’ts when illustrating designs for motion. These rules aren’t written in stone, but they have really helped me and I think they’ll help you too.
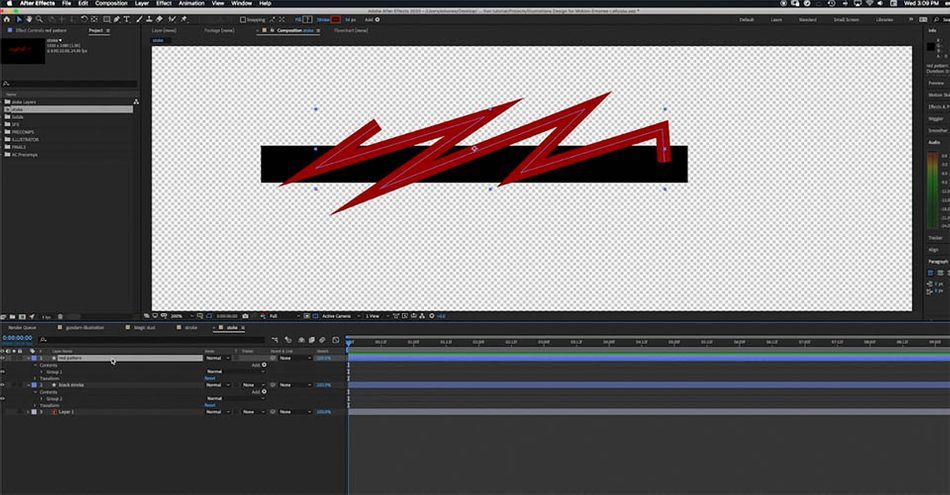
DON’T EVER EXPAND OR COMPOUND YOUR STROKES IN ILLUSTRATOR.
When we go into Illustrator and we want to have a red line go through a stroke, we are unable to use the Shape Builder tool or the Pathfinder because there’s technically no fills that are being registered.
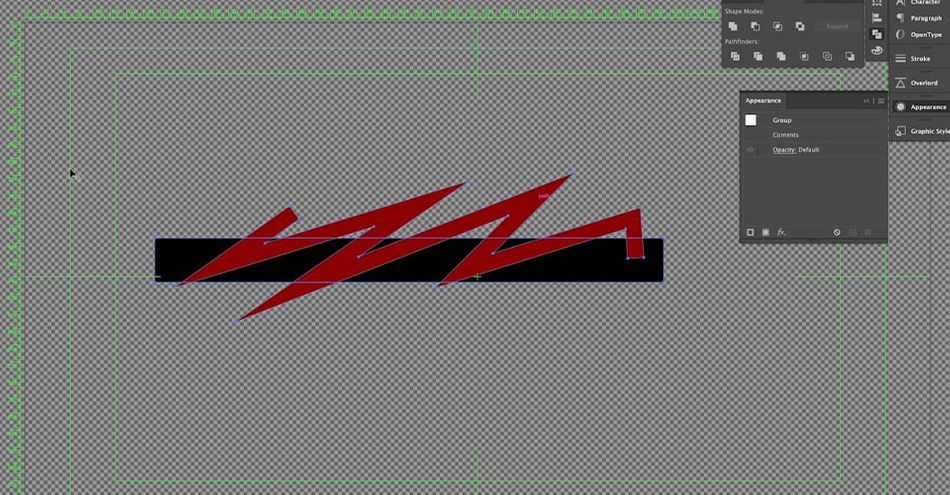
So if you were just designing in Illustrator, you would go to Expand, make these a fill, and take them out so we have an effect that’s working. But when we bring this into After Effects, we’re going to see something a little funny
We lose the ability to add effects normally available in the Shape Layers panel. Compounding and Expanding are destructible tools, which is fine when we are designing but becomes an absolute time-sink when we try it in animation.
DO EXPECT TO RECREATE ASSETS IN AFTER EFFECTS!
If I’m the one designing the artwork, I would simply create it in After Effects using Shape Layers and a Matte.
That way I can animate the red inside without have to spend too much time trying to fit it within the mask.
I often recreate assets for an animation, and I include that step in the timeline of how long this piece will take. For instance, I really wanted to move one of the smaller character's arm during the animation, so I had to create a new Stroke in After Effects to achieve the right look.
WATCH THE VIDEO FOR MORE TIPS!
And lastly...DO have fun ;) Motion design is problem solving and keyframing and rendering...but it’s also art and creation. At the end of the day, animating illustrations should be—and can be—extremely fun.
Now you can be a motion illustrator!
And that’s how it’s done! If you have any questions at all feel free to contact me! Subscribe for more tutorials on motion design and visual effects, and make sure to click the bell icon so you’ll be notified of any future videos.
If you want to learn more about using the motion graphic tips and check out Illustration for Motion.
You'll be empowered to create your own illustrated works, gaining valuable knowledge and insights from one of the top talents in the industry: Sarah Beth Morgan. Thanks for stopping by! We’ll see you next time.
-----------------------------------------------------------------------------------------------------------------------------------
Tutorial Full Transcript Below 👇:
Emonee LaRussa (00:00): Have you ever wanted to take your awesome illustrator designs and add a little bit emotion to it? Well, today we're going to pull some Disney princess magic and bring these inanimate objects to life.
Emonee LaRussa (00:18): My name is Emonee LaRussa. I make two time Emmy award winning motion, graphics, artists, and director. I predominantly make music visuals for artists like Kanye west big Sean, Lil NAS X, and more. So I'm always making illustrations or empowering illustrators to design the visuals for these scenes. So today I'm going to be showing you some tips and tricks on how I turn illustrator designs. It's a really cool animation in after effects. In this video, you will learn how to analyze and break down a scene to really bring your animation to the next level. Converting illustrator files into easy editable layers and some do's. And don'ts that I've learned before we begin, make sure you download the project files in the description below. So you can follow along. This tutorial is going to be extremely helpful if you're an illustrator that is looking at anime, your designs, or if you're collaborating with another illustrators designs. So let's hop right into step one.
Emonee LaRussa (01:14): For me, this is the most important step when creating an animation that many times is overlooked. I'm a very visual learner. So I always get a pen and paper to just jot down my ideas and how I plan to execute the animation from the design that was created. So the big thing here is learning how to analyze your scene to make it really pop and cohesive. This super awesome, amazing illustration was created by Kevin K H Kim. I've worked with him so many times and he's absolutely a phenomenal worker and he was gracious enough to provide us this illustration as an example. So if you guys end up using this illustration, definitely tag him. He's super awesome. And he deserves all the flowers. He could get my first initial idea when looking at this character is maybe giving him a thumbs up. So I'm going to write it down on my paper.
Emonee LaRussa (02:01): Robot gives thumbs up, but now that I have that down, what does that mean for the scene? If a robot gives the thumbs up, then that must mean that his arm moves. And if his arm moves, then a shoulder must move. And if his shoulder moves and this little character on the shoulder would move to the goal here is to really break down the movement, understanding the cause and effect before you even start animating. There's so many elements to this that could really take this design to the next level. But if we aren't connecting the motions together, it's really not going to look like a cohesive piece. Once I have my character animation written down, I also want to break down the environment. I think environment in animations are so underrated and I've seen so many pieces that could have been taken to the next level.
Emonee LaRussa (02:45): Had the environment been as beautiful flowing as the character animation. For me, it's super important to have this written down on a piece of paper, because one, I won't forget what I'm doing. And two, I have a game plan, so I can start coming up with a reasonable for how long it's gonna take to animate. And this is super important, especially when you're working with clients, they always need to know how long it's going to take step two and putting your design and the after effects to animate. So I want to show you two different ways. One, that's a process that's just within after effects and the second one, which is a really cool plugin that I purchase and use regularly. First, let's make sure that when you're in illustrator, all your files are organized. This is going to be streamline the important for when you're bringing in the files to after effects and thanks to Kevin, all of these files like her press.
Emonee LaRussa (03:36): So I'm just going to save this illustrator file so that we can import it into after effects. So next, we're going to import the file by going to file import file, go to the school of motion tutorial folder, and your illustration will be in the illustrator folder. And we're going to import this in as a composition instead of the footage, because we want to have the layer separated and not merged together in one piece hit. Okay. And now when we click in this composition, the way that our format is laid out is the same way that we separated and compress the files and illustrator. So I'm just going to organize and put these where they need to be. So to really give the full experience of animating these illustrator files, we want to convert these over to shape layers. So we have more control of the animations. First. I want to go in and the label, all of these.
Emonee LaRussa (04:32): So I'm going to right click on one of these layers, go down to create and create shapes from vector layer. And as you can see, there's now two files that are labeled guy center and robot. We have our original illustrator file, and now we have this shape layer file. Typically I just delete the illustrator file. And now when I go inside the contents, all of the assets are separated in its own group. I had mentioned before the, your illustrator layers should be organized and kind of put within its own layer because you will now have the ability to highlight all of the paths and animate them at the same time, because they're on the same layer. So if you had different layers for each individual asset, so say I had this character's hair and hat and they were all on separate layers. Then I wouldn't be able to highlight all of the paths and animate them at the same time, I would be able to use the transform settings, but I wouldn't be able to animate the paths on all of these different layers.
Emonee LaRussa (05:31): So now I'm just going to convert the rest of these over to shape layers. And here's where the fun part happens. We need to go in and label all of our layers. I already took the Liberty to label all the files for you, but when you are working on your own designs, it's super important to make sure that you label all your groups in your shape layers. So next, I'm going to show you another great tool and it's created by battleax. So this plugin is called overlord and that you to import shape layers with just a click of a button, I don't want to spend too much time going super in depth into this plugin, but if you got the money to spend, it's definitely worth it.
Emonee LaRussa (06:13): These rules aren't written in stone, but they've helped me. And I think the help you too. So with our first one don't ever expand or compound your strokes and the illustrator, let me show you exactly what I mean. So say we're an illustrator and we have this black stroke and we want this red pattern to go inside of the stroke. So, because it's a stroke, an illustrator, you're not able to use the shape builder tool or the Pathfinder tool because technically no fields that are being registered for the Pathfinder to cut out or the shape builder to cut out. So if we were just designing an illustrator and not looking to animate it, you would just expand these and make it a fill and take it out with one of these tools. But if you decide to do this an illustrator and you bring it into after effects to anime, you run into something a little funky by turning this stroke into a fill, we lose a lot of options under the shape layer, and now it makes it incredibly more difficult to change the path of this field than it would be to change it as a stroke.
Emonee LaRussa (07:13): Something as simple as just changing the size of this box makes it difficult when it's not a stroke. So let's bring this back into illustrator and try it as a stroke. Now, instead of using the destructive tool of expanding or compounding, we could just separate these layers and put a set mat on them or an alpha track mat. So that I still have my pattern in my black stroke, but now I can use all the tools in the shape layer like the taper and the stroke with going this route is just going to make a quicker workflow. And you have new room for possibilities of what you could create, which leads us into our do part of this segment do expect to recreate assets in after effects. So with this piece, I'll show you an example of what I'm talking about. So I had this character sitting in the chest of this robot, and I want his arm to move the steering wheel.
Emonee LaRussa (08:03): But as you can see in the design, the arms are separated, which means it's going to be a lot more difficult to animate these paths if I don't change it. So I'll show you exactly how I recreated it. So I grabbed my pin tool and I created a stroke to make his arm. I made sure to label the file correctly. So I don't get confused. I changed the line cap to round, and then I changed the color of the stroke to match his skin. Then I animated the path of the stroke to make it look like his arm was moving to turn the steering wheel. And because in the original graphic, his shirt is covering his arm. I made sure to put the arm stroke underneath the shirt next I needed to make his arm look like it was inside of the machine, like the original design.
Emonee LaRussa (08:44): So I found this shape layer where this pink panel reside. I copied it and I pasted it in the shape layer where character is and just put the pink panel above all of these layers and save myself from any confusion in the future. I'm going to parent this path to the original bread, this pink panel lives. So no matter how much I change this path on the original shape layer, it's always going to follow it. And just like before, if we move his arm that we need to connect everything else. So if his arm moves then so does his shirt and also his hand moving steering wheel. And for this design, everything has a stroke on it. And because we're already using a stroke, we can't put a stroke on top of a stroke. So what I do is I just duplicate the original arm, make sure to parent it to the original and make the stroke with bigger, at a little bit of easy ease.
Emonee LaRussa (09:32): And there you go. And for another don't, don't forget to make sure that your strokes are all consistent. I've seen this in many designs where a designer goes to add a highlight or shadow, and some of the stroke is cut off. This also can happen with using blending modes and illustrator and importing them into after effects. So if you run into this issue, this is how you solve it here. I just imported my star from illustrator, but when I converted it to a shape layer, the stroke is now cut off to fix this. I'll go onto my contents, duplicate the original shape and put it above all of the groups that I want the stroke to cover. I'll turn off the fill. Then I'll parent the duplicate to the original. I can't tell you how many times I've needed this, but I couldn't figure it out.
Emonee LaRussa (10:17): So now that I know, I want to show you all, so you don't have to go through the headache that I went through. And whenever I do that, I just like to put don't edit on top of it, just so it's a reminder to not touch that one. And the lastly do have fun motion design is problem solving and key framing and rendering, but it's also art and creation. So even though you run into your own unique problems, each time, it's really fun and you gain the knowledge for the project next, which makes your workflow that much easier. And that's it. I hope this was super helpful for you guys. If you have any questions at all, definitely feel free to contact me and don't forget to subscribe for more tutorials on motion design and visual effects and make sure to click on that bell icon. So you get notified for any future videos. Thanks so much guys.
Music (11:03): [outro music].
ENROLL NOW!
Acidbite ➔
50% off everything

ActionVFX ➔
30% off all plans and credit packs - starts 11/26

Adobe ➔
50% off all apps and plans through 11/29

aescripts ➔
25% off everything through 12/6
Affinity ➔
50% off all products

Battleaxe ➔
30% off from 11/29-12/7
Boom Library ➔
30% off Boom One, their 48,000+ file audio library
BorisFX ➔
25% off everything, 11/25-12/1

Cavalry ➔
33% off pro subscriptions (11/29 - 12/4)

FXFactory ➔
25% off with code BLACKFRIDAY until 12/3

Goodboyninja ➔
20% off everything

Happy Editing ➔
50% off with code BLACKFRIDAY

Huion ➔
Up to 50% off affordable, high-quality pen display tablets

Insydium ➔
50% off through 12/4
JangaFX ➔
30% off an indie annual license
Kitbash 3D ➔
$200 off Cargo Pro, their entire library
Knights of the Editing Table ➔
Up to 20% off Premiere Pro Extensions
Maxon ➔
25% off Maxon One, ZBrush, & Redshift - Annual Subscriptions (11/29 - 12/8)
Mode Designs ➔
Deals on premium keyboards and accessories
Motion Array ➔
10% off the Everything plan
Motion Hatch ➔
Perfect Your Pricing Toolkit - 50% off (11/29 - 12/2)

MotionVFX ➔
30% off Design/CineStudio, and PPro Resolve packs with code: BW30

Rocket Lasso ➔
50% off all plug-ins (11/29 - 12/2)

Rokoko ➔
45% off the indie creator bundle with code: RKK_SchoolOfMotion (revenue must be under $100K a year)

Shapefest ➔
80% off a Shapefest Pro annual subscription for life (11/29 - 12/2)

The Pixel Lab ➔
30% off everything
Toolfarm ➔
Various plugins and tools on sale

True Grit Texture ➔
50-70% off (starts Wednesday, runs for about a week)

Vincent Schwenk ➔
50% discount with code RENDERSALE

Wacom ➔
Up to $120 off new tablets + deals on refurbished items


Learn After Effects the Right Way
Master the After Effects interface and build a real animation skillset. Enroll in All-Access to unlock AE Kickstart and 50+ other courses.