All-Access Pass
Unlimited access to 50+ courses, unlimited critique, live events, and 24/7 community. Join School of Motion All-Access today.

Finding references for storyboards can be tricky, but Mixamo has the tools you need.
Are your storyboards in need of panache? Inevitably, you may come across some clients that lack the ability to see your vision due to your somewhat kindergarten stickmen. Perhaps you don’t have the time to step out of the office to photograph your own reference. Luckily, there is a free solution.
I’d like to spread light on Mixamo in a way you haven’t thought of. All you’ll need to get started is a tablet or a printer and the ability to take screenshots. Ready? Let’s do this!
In this article, you'll learn:
- How to interpret the storyboards in a brief
- Selecting your characters and animation poses
- Taking screenshots and moving them to Photoshop
- Building a storyboard using camera placement and storytelling methods
Breaking a brief into storyboards
When a brief hits your table, it’s not the fear of creating the animation that sets knots in your stomach; it’s the storyboarding process.
It’s the extra notes on camera angles and poses. When you don't know where to begin, you're paralyzed. Let's take a look at a fairly simple brief and work on those reading comprehension skills.
The brief reads:
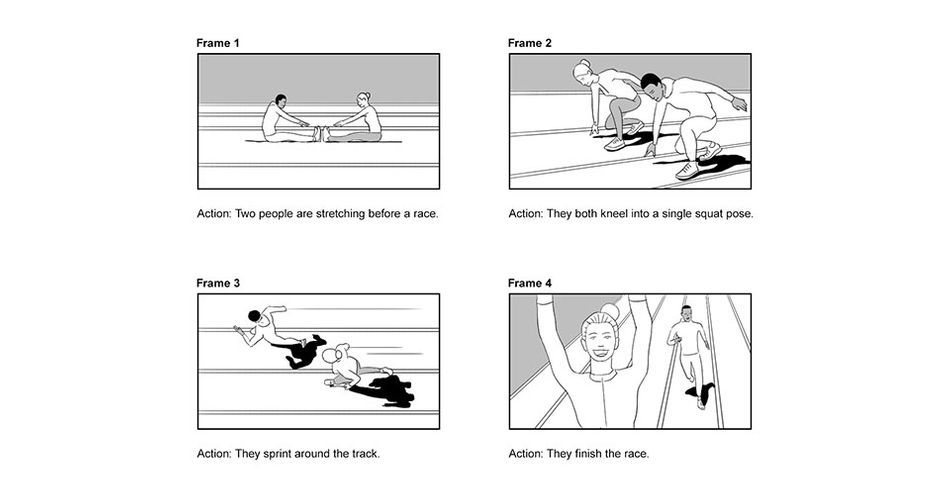
frame 1: Two people are stretching before a race.
frame 2: They both kneel into a single squat pose.
frame 3: They sprint around the track.
frame 4: They finish the race.
Notes: We want to see high energy and dynamism purveyed in these shots.
Consider strong character poses and camera angles to convey this please.Our brand is global, inclusive, and contemporary.

Now, this is a fairly straightforward brief, but you've no doubt come across more complex requests. While there are TONS of reference and stock photos out there to use, that won't always work. Either you can't find the look that you want, or every other artist has already used those exact poses for their projects. What are you to do?
Why use Mixamo to develop storyboards?
The clock is ticking, but you're a savvy motioneer. You decide to make an informed decision based on this article. You type in mixamo.com and head off in search of a new, custom reference.
If you have not used Mixamo before, here’s what you need to know. Firstly, it's FREE! Next, it’s an online library with a smorgasbord of pre-modeled, pre-rigged, and pre-recorded 3D character animations ready for you to click and use. For our purposes, we don’t need to own a 3D package to use these 3D assets.
Choose a Character
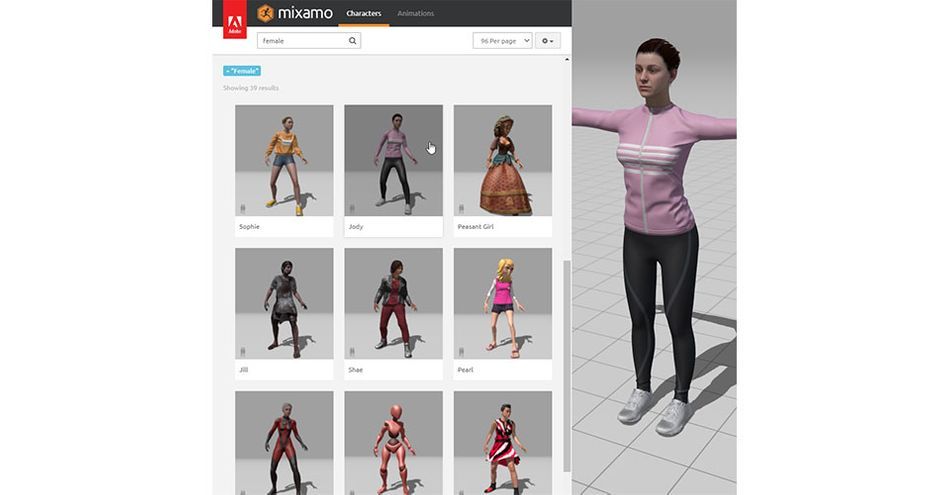
There is a large library of characters to choose from. To get the right characters for the brief, you need to make the correct search. For our client above, we need two runners. Simple search keywords such as male, female, and athlete.
Here are the steps to choosing a character in Mixamo:
- Click on Characters tab
- A list of characters will appear.
- Type in the search bar to specify your search.
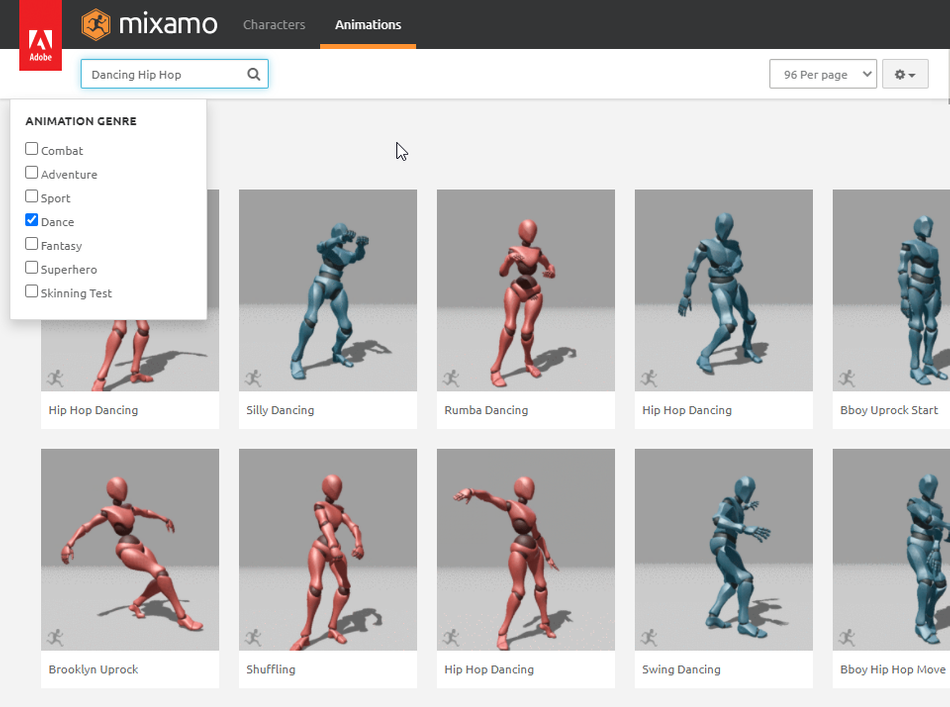
Choose an Animation
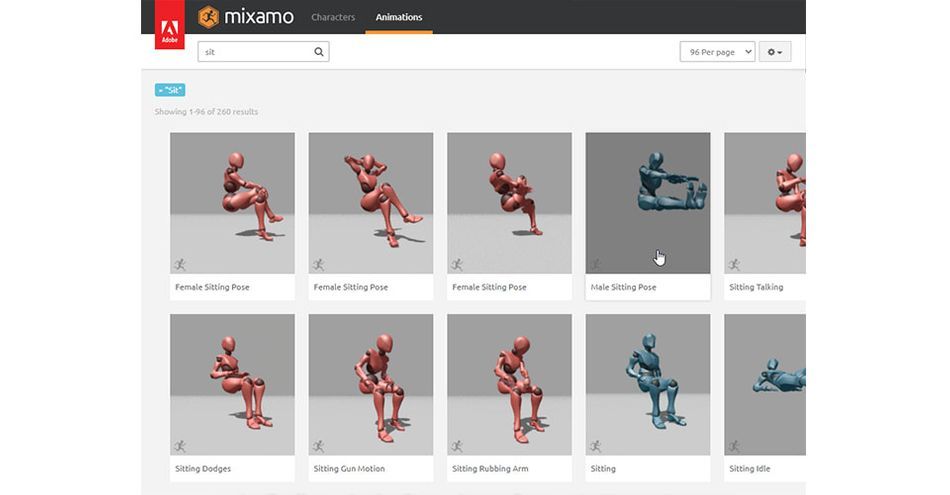
There is also a large library of animations to choose from. We need to narrow down our search keywords to stretch, sit, kneel, run, win, and victory.
Here are the steps to choosing an animation in Mixamo:
- Click on Animation tab
- Type in the search bar to specify your search.
- Once an animation is chosen your selected character will move.
- Blue dummies represent male animations. Red dummies represent female animations.
Taking Screenshots
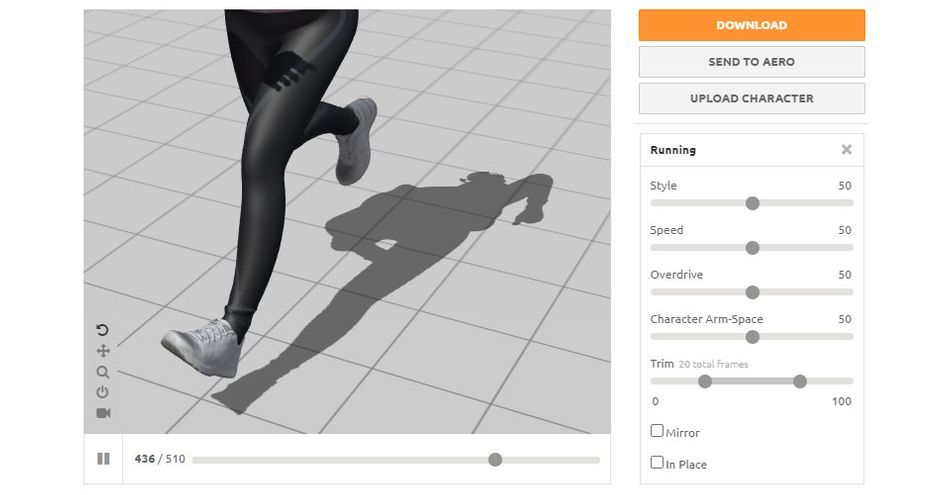
Your character is chosen & moving. Time to take some screengrabs for your storyboard.
To take a screenshot on a MAC - Press Command+Shift+3To take a screenshot on a PC - Press Print Screen Key
There are extra buttons in the animation viewport worth noting for ease of use and more dynamic screengrabs.
Rotate allows you to move around your character to get that perfect angle. (click and drag up or down)Pan allows you to move the scene around. (middle mouse button)Zoom allows you to get closer in better detailed screenshots. (right mouse click and drag to zoom)Reset Camera is for when you get heavy handed with the Rotate and Pan button and have lost sight of your character.Toggle Follow Camera is great for run cycles as it keeps the character in a stationary position and not running off screen. Play button can be set to pause, making it way easier to get the perfect screenshot Overdrive/Speed is the speed of the animation. You could slow down the animation to make screengrab easier. Though honestly using play/pause would work better.Trim shortens or lengthens the animation. Widen up the trim to get more poses.Character Arm/Leg spaces will also help to get more specific with your poses.Mirror checkbox flipsIn Place checkbox works very much like the Toggle Follow Camera button keeping the characters from running off screen
There are a bunch of other settings that you can tweak depending on the character animation you choose.
Storytelling, composition and camera placement.
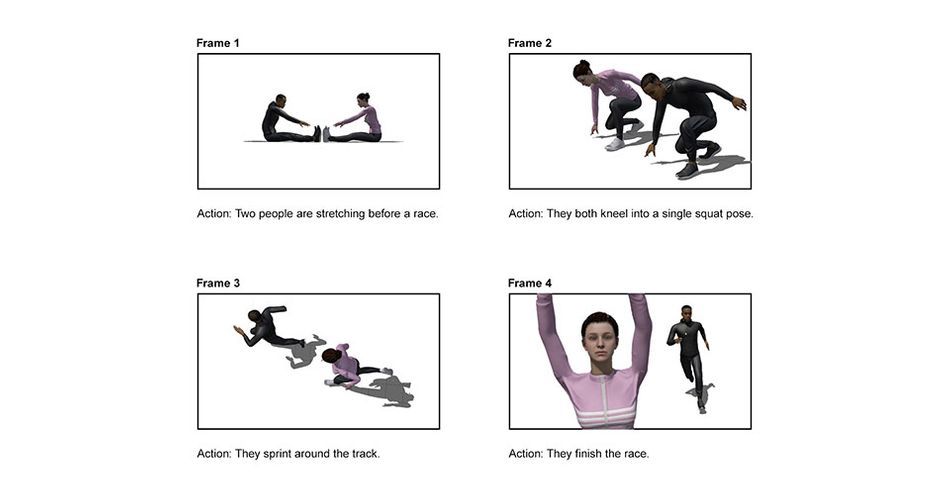
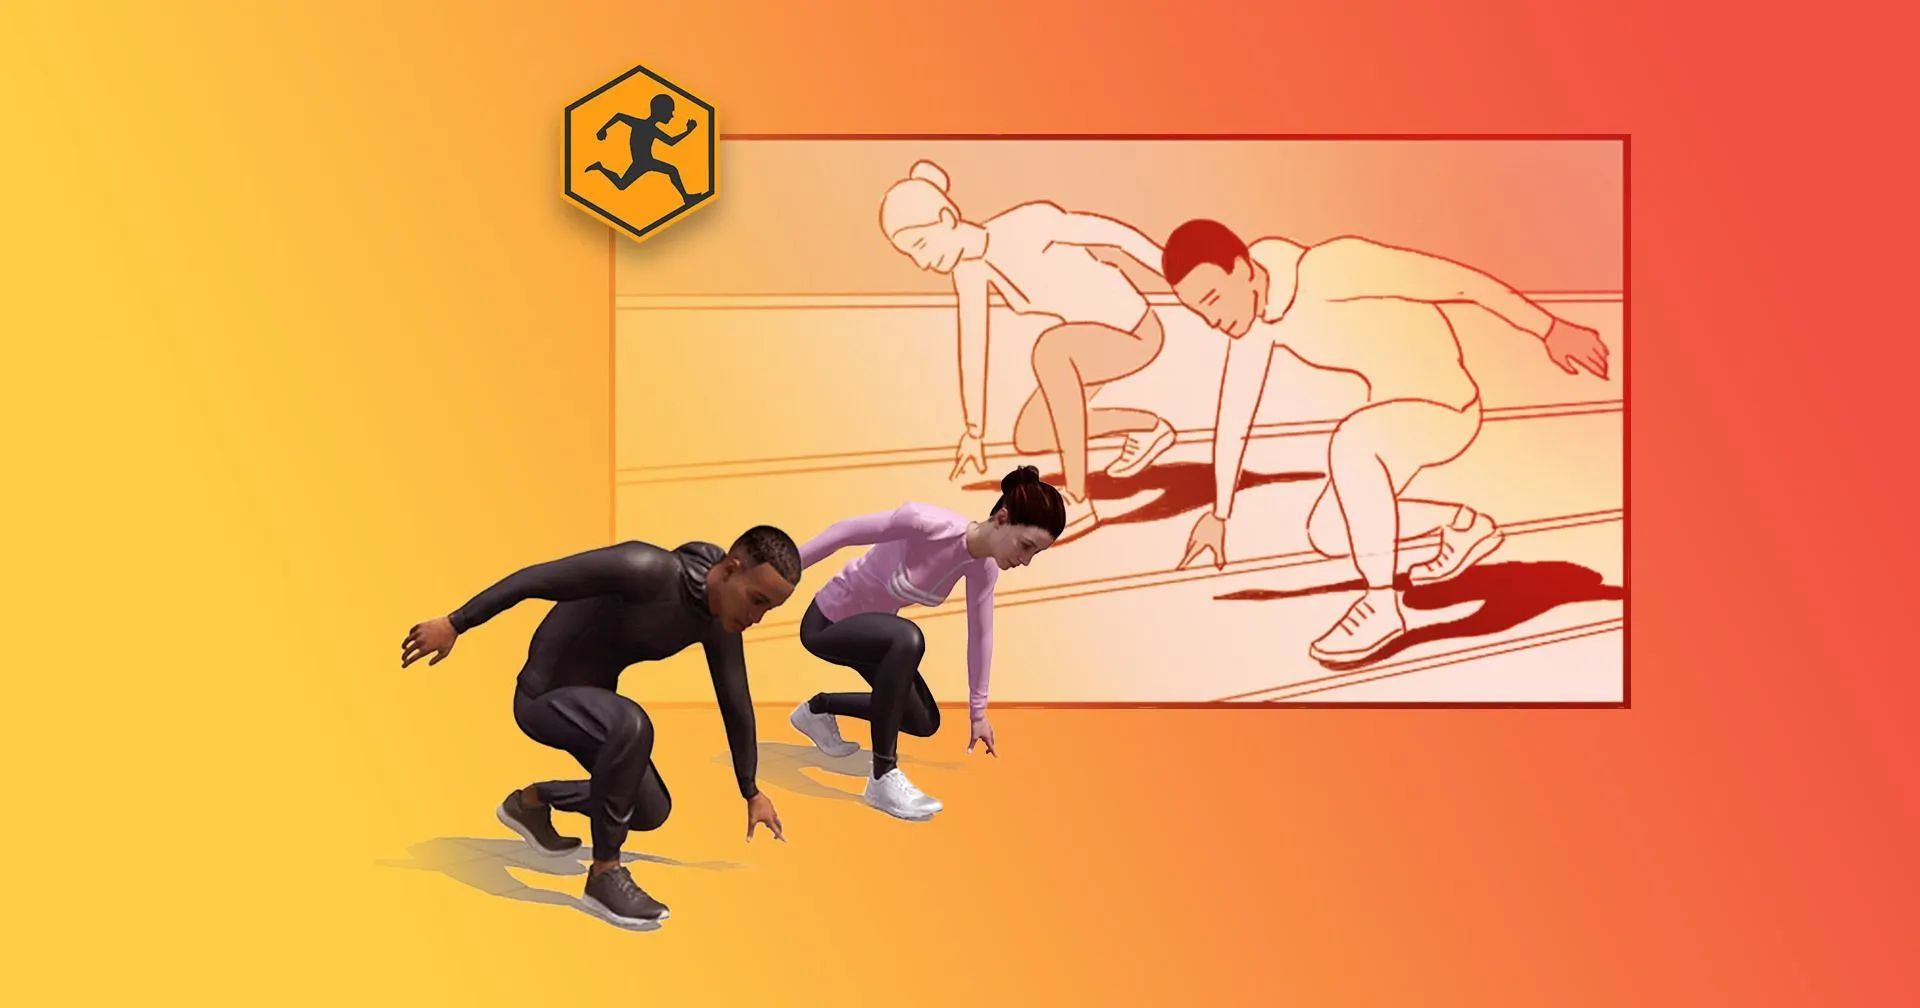
Create a storyboard with 4 frames, including the copy provided from the script.Bear in mind, the client's notes of energy, dynamism, strong character poses, camera angles, and inclusiveness. Now go into Mixamo and start making notes of characters that may suit the story.I chose two sporty looking characters: David and Jody. Compositionally, they contrast well for a more visually interesting story, and we also remain inclusive of race and gender.
Next, I thought about camera angles & staging to better tell the story.
FRAME 1:

I wanted the visual of equalness. So I kept the poses and their scales identical. Also I had the characters points towards each other.
FRAME 2:
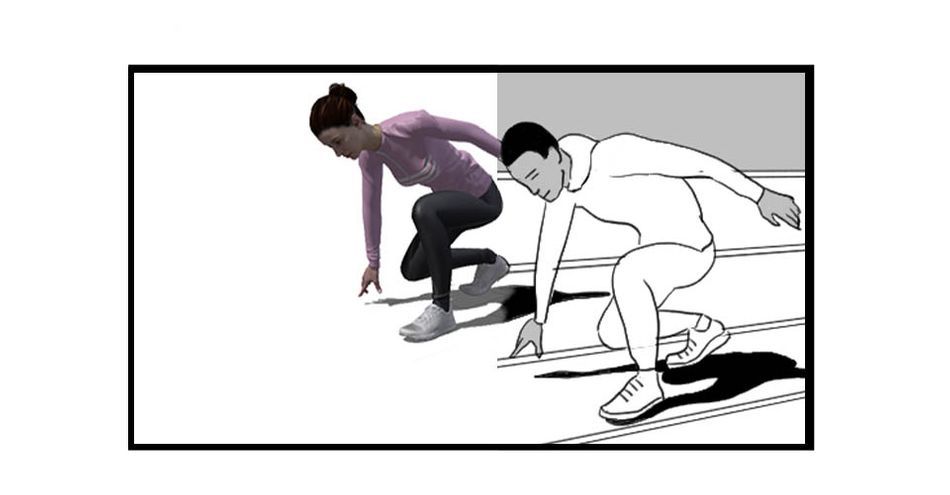
Still in similar poses, yet the only difference was the angle of the camera side view with an ever so slight perspective slant. I also place the woman ahead of the man in a visual advantage point.
FRAME 3:
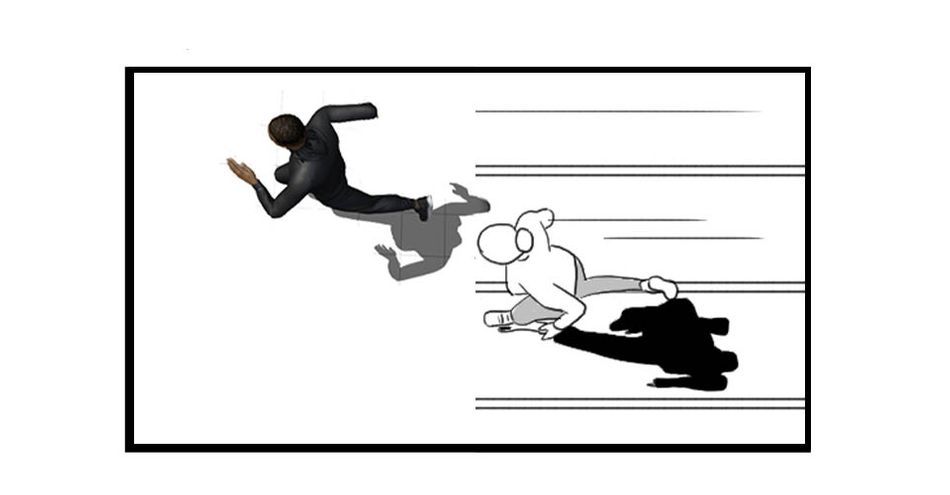
This time I wanted the advantage point to be with the man so I put him ahead of the shot.My camera was this time placed from the top to better sell that the male is in the lead.
FRAME 4:
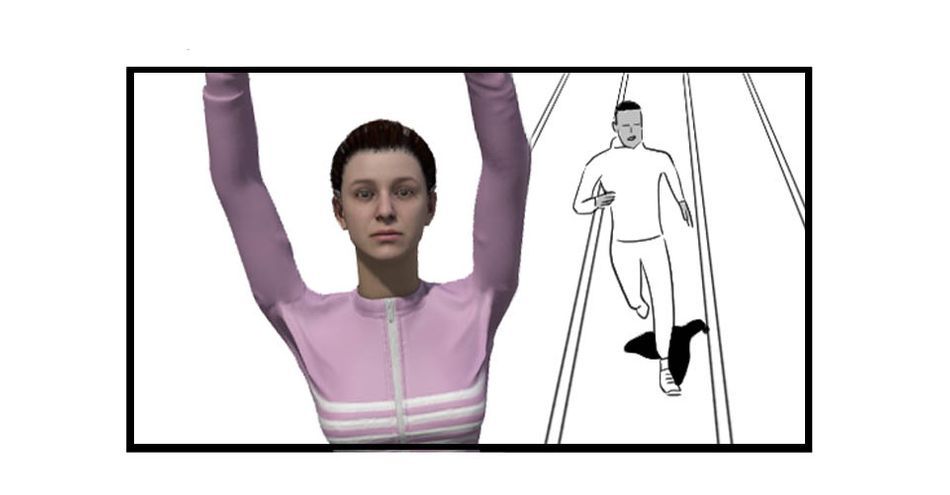
In the final shot, I once again swap the advantage point by placing the camera closeup on the woman’s face to express her joy as she gains ground and wins the race. The male this time smaller and perspective lines leading from guy to girl and girl to guy. Framing the story.
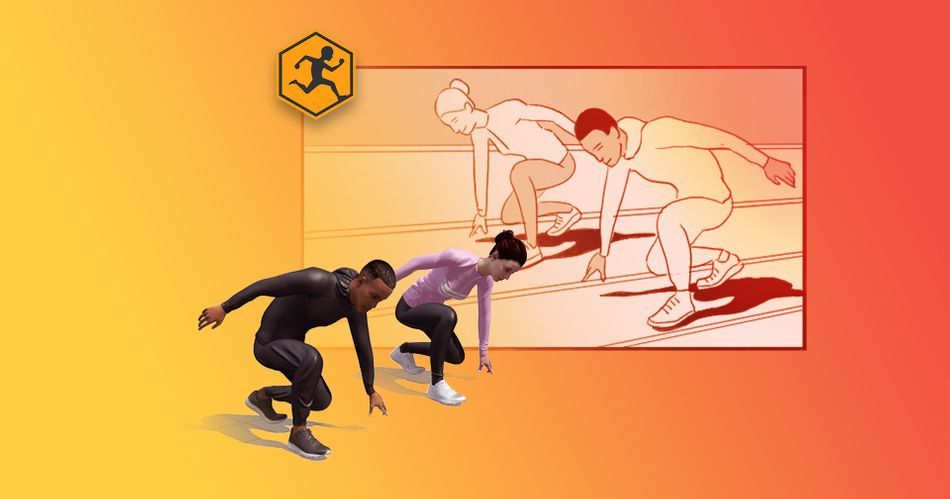
Photoshop
We now have our characters and the story we would like to tell. Take screenshots of your chosen characters in their poses and angles and drop them into photoshop. Right click each layer and Convert To Smart Object. That way you can scale up and down as much as you want without compromising the resolution. Double click the smart objects to open them and use your Magic Wand Tool (W) and Lasso Tool (L) to create vector masks to remove the grey backgrounds off the characters.
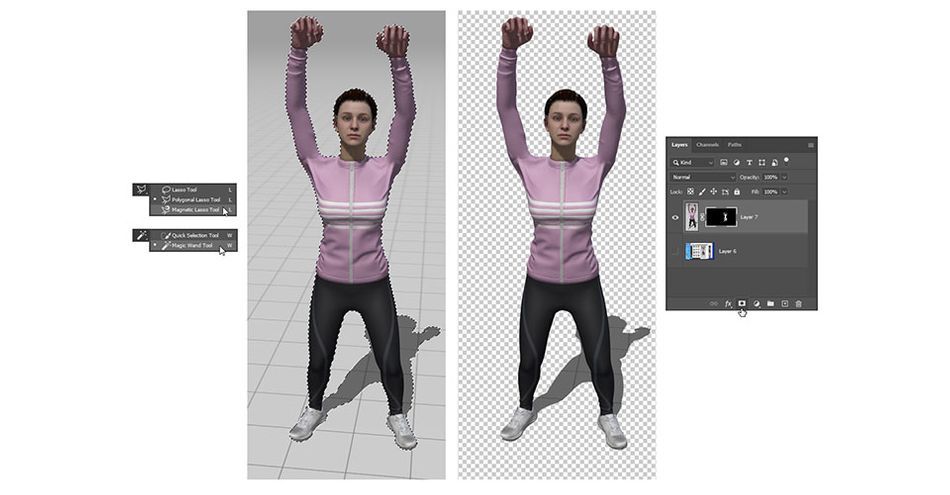
Try not to worry about being too neat with your masking. It’s only for tracing. Set all your layers you’ll be tracing to 50% opacity.
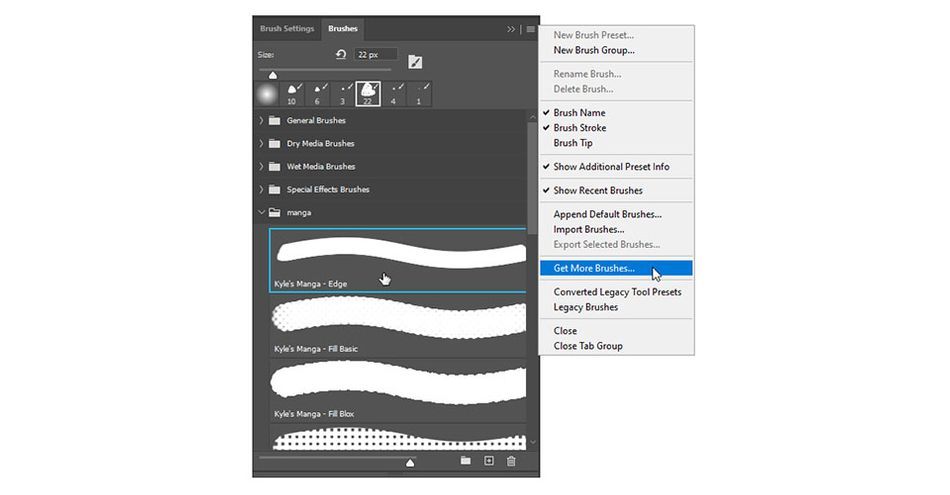
Find a suited brush for a clean storyboard. I chose Kyle’s Manga Edge from the Manga brush collect available free with Adobe. Access knew buttons by clicking the burger button on the brushes panel and choosing Get More Brushes.
Create new layers for your traces. When drawing, try to use clean sweeping gestures. Less detail is more. Also, improvise a little: adding or changing the characters to suit your storyboard better. In scene 4, the female character was missing a hair bun so I added one in. I also made her smile, as unfortunately Mixamo characters facial expressions are neutral.
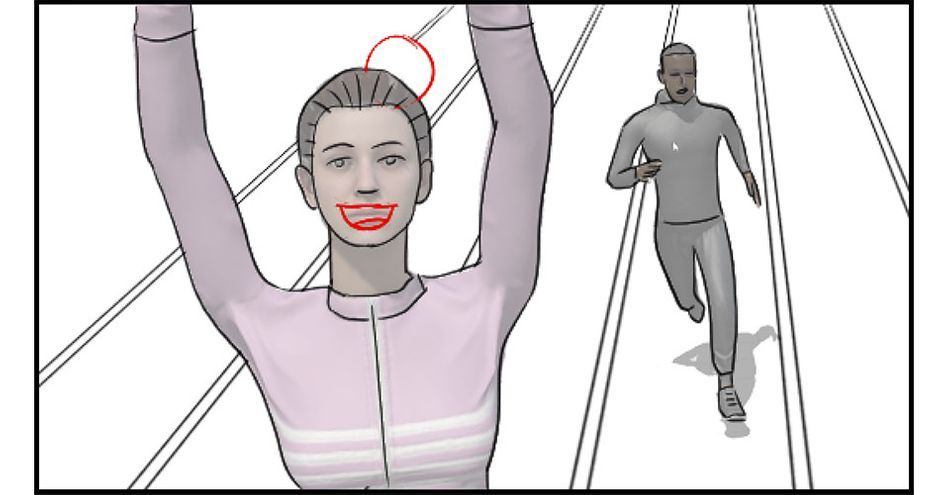
Once all is traced, see if there are more ways to push the concept. I drew the racing track lines to strengthen the camera angles and included some simple tones of black, gray, and white. I also included some directional lines to give the characters a sense of energy and speed.
Becoming A Pro
There we go! An inventive hack to creating slicker storyboards for the not so confident illustrator. If you’d like to further your skills in illustration, concepting and storyboarding I recommend investing in Sarah Beth Morgan’s course - Illustration for motion.
If you loved that little taste of 3D, perhaps you may even consider trying out EJ Hassenfratz’s awesome course Cinema 4D Basecamp. Already a black belt Shodan in Cinema 4D? Become Grandmaster Jugodan with EJ’s advanced course Cinema 4D Ascent
ENROLL NOW!
Acidbite ➔
50% off everything

ActionVFX ➔
30% off all plans and credit packs - starts 11/26

Adobe ➔
50% off all apps and plans through 11/29

aescripts ➔
25% off everything through 12/6
Affinity ➔
50% off all products

Battleaxe ➔
30% off from 11/29-12/7
Boom Library ➔
30% off Boom One, their 48,000+ file audio library
BorisFX ➔
25% off everything, 11/25-12/1

Cavalry ➔
33% off pro subscriptions (11/29 - 12/4)

FXFactory ➔
25% off with code BLACKFRIDAY until 12/3

Goodboyninja ➔
20% off everything

Happy Editing ➔
50% off with code BLACKFRIDAY

Huion ➔
Up to 50% off affordable, high-quality pen display tablets

Insydium ➔
50% off through 12/4
JangaFX ➔
30% off an indie annual license
Kitbash 3D ➔
$200 off Cargo Pro, their entire library
Knights of the Editing Table ➔
Up to 20% off Premiere Pro Extensions
Maxon ➔
25% off Maxon One, ZBrush, & Redshift - Annual Subscriptions (11/29 - 12/8)
Mode Designs ➔
Deals on premium keyboards and accessories
Motion Array ➔
10% off the Everything plan
Motion Hatch ➔
Perfect Your Pricing Toolkit - 50% off (11/29 - 12/2)

MotionVFX ➔
30% off Design/CineStudio, and PPro Resolve packs with code: BW30

Rocket Lasso ➔
50% off all plug-ins (11/29 - 12/2)

Rokoko ➔
45% off the indie creator bundle with code: RKK_SchoolOfMotion (revenue must be under $100K a year)

Shapefest ➔
80% off a Shapefest Pro annual subscription for life (11/29 - 12/2)

The Pixel Lab ➔
30% off everything
Toolfarm ➔
Various plugins and tools on sale

True Grit Texture ➔
50-70% off (starts Wednesday, runs for about a week)

Vincent Schwenk ➔
50% discount with code RENDERSALE

Wacom ➔
Up to $120 off new tablets + deals on refurbished items


All-Access Pass
Unlimited access to 50+ courses, unlimited critique, live events, and 24/7 community. Join School of Motion All-Access today.