A step-by-step guide for importing Illustrator files into After Effects.
You’re about to learn a little skill that will take your Illustrations to a big place; I’m going to teach you how to get your Adobe Illustrator drawings ready for animation in After Effects!

Step 1: Create Your Graphics in Adobe Illustrator
To begin, you should have your Illustrations built in Adobe Illustrator; chances-are, you’ve probably built an object with kinematic limbs or wheels you’d like to roll with. Since #VanLife is all the rage these days, I’m building a little MiniVan Camper for this example.

Don't have an Illustrator file laying around? You can follow along with this example tutorial.
{{lead-magnet}}
Step 2: Group Your Objects in Illustrator
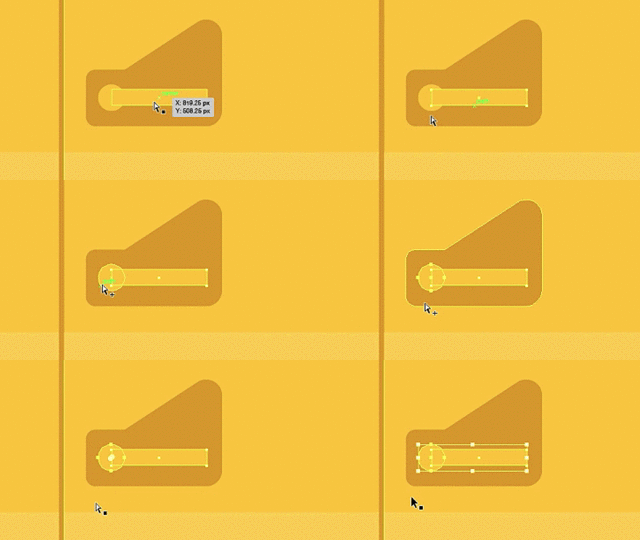
This is a pretty simple step; take any part of the illustration you’d like to individually pick-out to animate. Use Command+G to group these items.
You’ll want to select them individually with the direct select action (A) and select the entire entity with Alt + Shift + Click. This helps to group specific vectors of the illustration you’re working with into their own pieces and speed-up the workflow to grabbing and moving items as we proceed to the next part.
Step 3: Create Layers
After you’ve set up specific groups, you’re going to want to designate your items into layers so you can manipulate them in After Effects to animate them.
Before jumping in, it's best to strategize what individual items you want to control when you animate. It's best to think of how your item has hinges, anchor points, rotations and moves around in your animation.
First, you’re going to want to create a new layer by typing Command + L.
Step 4: Name Your Layers for Organization
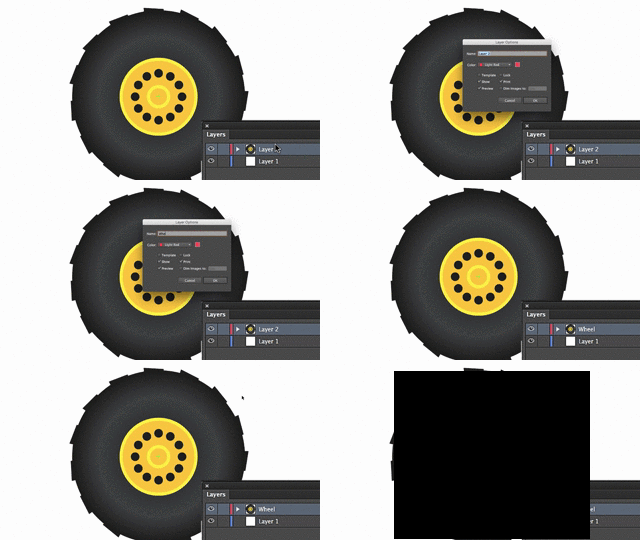
After you’ve created your new layer, you’ll want to name it so you know what specific item you want to animate later. To rename your layer in Illustrator, double-click the new layer you’ve created through the Layers Panel and type in the new name of that item.
Step 5: Bring Your Items into Layers
From here, you will have to pick an Illustrated item to bring into the new layer. Once you’ve selected your item, use command+x to cut your object and Command+F to paste the item into its former location.
Step 6: Save Your Illustrator File
Once you’ve brought all your items into designated layers, and you feel your illustration is ready to turn into an animation, you’re on your way to making a new animation in After Effects. All you have to do is save your AI file into a designated folder. See how quick & easy that was?
Step 7: Import Your Illustrator File into After Effects
Now that you've created some amazing illustrations and prepared them for animation, it's time to hop into After Effects!
Tips for Importing your Illustrator File into After Effects
To bring an Illustrator file into After Effects you just need to use Command+ I, or alternatively, File>Import. When you import your project file, you will see a few options appear; You’ll want to choose to Import as:
- Footage
- Composition
- Composition - Retain Layer Sizes
In most cases, you’ll pick the Composition with Retained layer sizes. What’s the difference between Retaining the layer styles and a standard composition? If you bring-in your file as a composition alone, every layer will be the size of your Artboard in Illustrator; this will require much more work to anchor joints and reposition items where they need to go.
If you import as footage, you’ll be able to import your entire AI file as one item, or you’ll have the choice to select one layer within the Illustrator file.
There’s another way to import your AI file not often-used, and that is to bring-in an AI file into After Effects and convert it to a layered comp in the Project panel. This is a great way to do things if you’re going from an animatic directly into animation.
To do this, when the menu appears for import, bring-in your Illustrator file as “Footage” and select “Merged Layers” under the Layer options menu that appears secondly. Then, in the Project panel, create a new comp out of the AI file by dragging it into the Composition icon. Once you’re in that new comp, you can right-click on the individual file (seen as footage) and select “Convert to Layered Comp”. Immediately after, the comp will turn into a multi-layered comp you’ll be able to create an animation out of.
IMPORTING TEXT
Please note, importing Text from Illustrator isn’t easy; this has always been a request for Adobe sent by many animators and Illustrators for years; maybe one-day we’ll get the update we’ve all been wishing for that magically imports text without an issue. Until then, there are a couple of workarounds.
To import text directly from Illustrator to AE, you’ll first need to keep your Illustrator project file open while working between the 2 programs. Select your text and copy (Command + C), switch over to After Effects, use the text tool (Command + T) and click in your comp, then Paste (Command + V) the text. All the color and sizing, leading an kerning should stay the same as long as your comp in AE is the same size as the Artboard in Illustrator.
When merging text from AI to AE, you will most-likely lose any effects you applied in Illustrator, but if you want to re-apply that style in After Effects, you’ll be able to go over to the Appearance panel in Illustrator to find your effect and the parameters of it to add to your text now that it’s in After Effects.
If you created text on a path, you’ll just want to hop back into Illustrator and use a direct select tool (A). While holding Command + Shift, click on the curve the text was written-on. After you’ve copied that, you’ll want to paste it onto the text in After Effects, then use Command + ` (the little dash next to “1” on your Keyboard) to see everything applied to the layer. You’ll be able to select the mask under Text>Path Options>Path. Following that, you can adjust where on the curve your text will land using the adjustments below or manually with your cursor.
A second option is to install a Third-Party plugin to After Effects that can import text when it’s in an individual layer in Illustrator. This seems to work well, but some concern with sending files back-and-forth between animators is that the plugin may not work on all systems as properly as it would on your computer, resulting in someone’s project file not being able to open or read the text.
CREATING VECTOR SHAPES OUT OF LAYERS
Optionally, you can create animations within the layers; this works especially great for minimalist animation styles where strokes are used as the main asset - but there is a catch to this process; using the Hierarchy system in After Effects can slow-down your workflow in some instances. Creating shapes from layers may also affect your illustration if it includes any vectors or varying stroke widths. If the layer has a lot of detail, this may not be ideal.
To work with shapes from Illustrator layers, you want to right-click your layer in the Comp and select create shapes from layers. This will build you a new layer that contains the native items you built them out of in Illustrator. This isn’t always the most ideal process but it does come in handy for certain styles. Most of the time when I work with shapes from layers I use the Trim Paths on strokes to animate a drawing-on effect, which is the most common approach for this style.
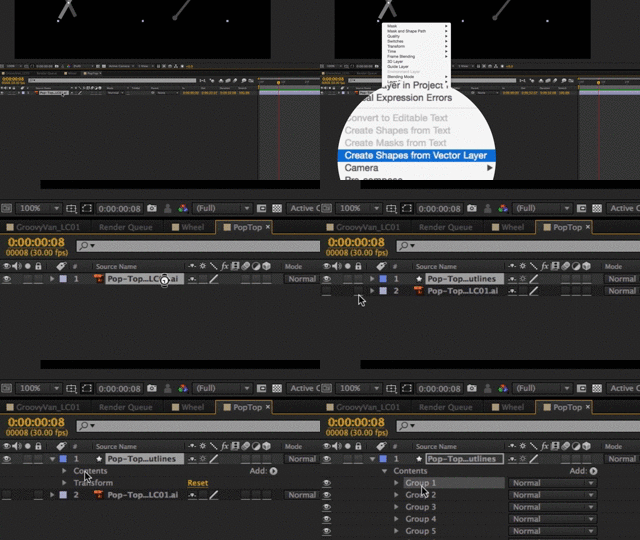
Sometimes, this is a great way to add customizability to your illustrations. In the attached example, and the gravel the van drives on is made into vector shapes. This was to add an effect called “Wiggle Paths” to make the ground appear more rugged.
CONTINUOUSLY RASTERIZE YOUR VECTOR ILLUSTRATIONS
Here’s a part that can end up being critical to your animation; When After Effects imports an AI file, it sees the layer as a raster object; similar to what you’d see in Photoshop. When you scale-up the AI file this way, you will see the edges get more pixelated. Thankfully, because you chose to work with vector you’ll have the option to constantly rasterize the artwork leaving you with clean, crisp edges. All you need to do is click on the “Continuously Rasterize” checkbox beside your layer.
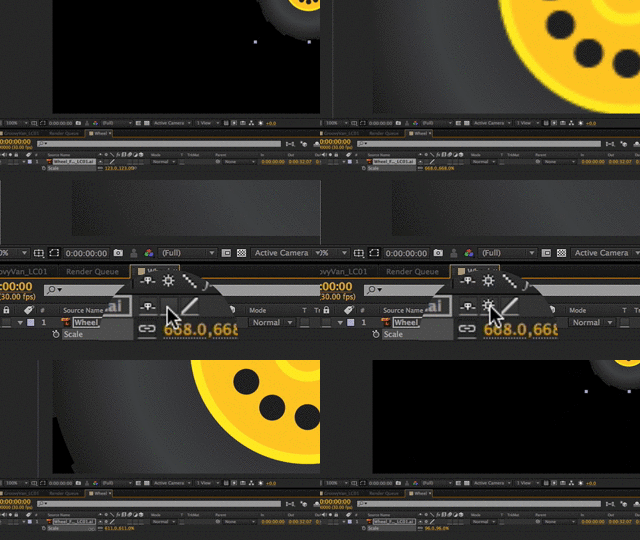
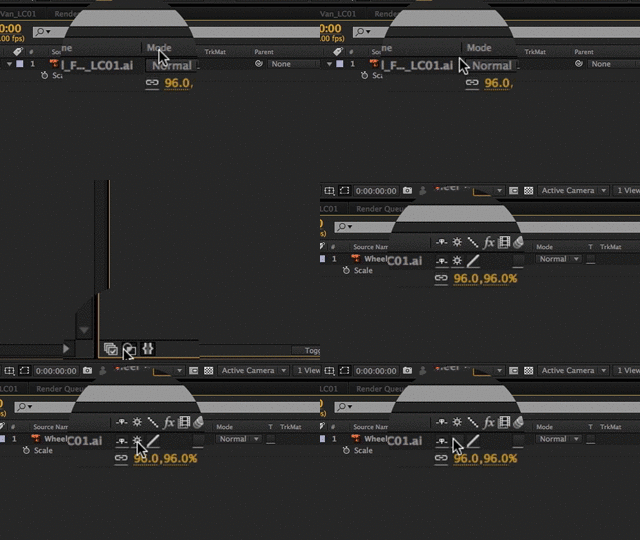
Don’t see it? You may have your Layer switches pane turned off. To enable it, just click on the left-most button at the bottom of the work comp window your illustration is in. We actually have an entire tutorial about Continuously Rasterizing in After Effects.
There's an even better way...
A few months ago Adam Plouff released a new plugin called Overlord that essentially allows you to automatically transfer files between Adobe Illustrator and After Effects. It's friggin' magic and if you do a lot of work in Illustrator work you need this in your life.
Now What?...
Well, now that you’ve brought your graphics into After Effects, it’s time for you to create amazing new animations out of some rad illustrations. Checkout After Effects Kickstart for a fun and easy way to learn After Effects.
Take Your Skills Further with Photoshop + Illustrator Unleashed
Want to go deeper? Check out Photoshop + Illustrator Unleashed, available with School of Motion All-Access.
ENROLL NOW!
Acidbite ➔
50% off everything

ActionVFX ➔
30% off all plans and credit packs - starts 11/26

Adobe ➔
50% off all apps and plans through 11/29

aescripts ➔
25% off everything through 12/6
Affinity ➔
50% off all products

Battleaxe ➔
30% off from 11/29-12/7
Boom Library ➔
30% off Boom One, their 48,000+ file audio library
BorisFX ➔
25% off everything, 11/25-12/1

Cavalry ➔
33% off pro subscriptions (11/29 - 12/4)

FXFactory ➔
25% off with code BLACKFRIDAY until 12/3

Goodboyninja ➔
20% off everything

Happy Editing ➔
50% off with code BLACKFRIDAY

Huion ➔
Up to 50% off affordable, high-quality pen display tablets

Insydium ➔
50% off through 12/4
JangaFX ➔
30% off an indie annual license
Kitbash 3D ➔
$200 off Cargo Pro, their entire library
Knights of the Editing Table ➔
Up to 20% off Premiere Pro Extensions
Maxon ➔
25% off Maxon One, ZBrush, & Redshift - Annual Subscriptions (11/29 - 12/8)
Mode Designs ➔
Deals on premium keyboards and accessories
Motion Array ➔
10% off the Everything plan
Motion Hatch ➔
Perfect Your Pricing Toolkit - 50% off (11/29 - 12/2)

MotionVFX ➔
30% off Design/CineStudio, and PPro Resolve packs with code: BW30

Rocket Lasso ➔
50% off all plug-ins (11/29 - 12/2)

Rokoko ➔
45% off the indie creator bundle with code: RKK_SchoolOfMotion (revenue must be under $100K a year)

Shapefest ➔
80% off a Shapefest Pro annual subscription for life (11/29 - 12/2)

The Pixel Lab ➔
30% off everything
Toolfarm ➔
Various plugins and tools on sale

True Grit Texture ➔
50-70% off (starts Wednesday, runs for about a week)

Vincent Schwenk ➔
50% discount with code RENDERSALE

Wacom ➔
Up to $120 off new tablets + deals on refurbished items


