Start Your 3D Journey in Cinema 4D
Master the essentials of 3D modeling, lighting, and animation in C4D. Enroll in All-Access to unlock C4D Basecamp and 50+ other courses.

Create better models of the polygonal variety in Cinema 4D
You might be rocking the runway with your Cinema 4D models most of the time, until… you don’t.

Let’s look at how to put glam back in that game with these modeling tips in Cinema 4D.

{{lead-magnet}}
Modeling Tips in Cinema 4D
Here's a few of my favorite modeling tips in Cinema 4D.
1. SELECT PARTS OF YOUR MODEL WITH EASE
A big part of modeling is selecting the parts of editable geometry you want to work with. Fill selection lets you use edge selections to isolate polygons easily. Make looped edge selections around what you want to poly select, then switch to fill selection and hover over each isolated area to select the polys.
Another way to select sections of your model is thru the phong break selection tool. Phong who? This detects breaks in the phong shading of your model to define the selectable areas.
Pro Tip: Be sure to use the tag override and use lower phong angles to narrow the selection.
2. CLOTH SURFACE ON FLAT GEOMETRY = LIVE EXTRUSIONS
So you’ve got the Extrude object to extrude splines, but what about flat editable geometry? If you have the Studio version of Cinema 4D, just parent the geo to a cloth surface for a non-destructive & animatable extrusion.
3. BEVEL EVERYTHING
One of the easiest ways to create better looking models is to add bevels. Nothing in real life has razor sharp edges so why should your models?
Bevels allow for geometry to catch highlights and add a level of detail that makes it look less digital. Of course you can model this into your editable geometry with the bevel tool, but an easier way to add a bevel is thru the Bevel deformer which keeps it nice and non-destructive allowing you to fine-tune its look. Simply add the Bevel deformer as a child of the main object.

4. SAVE ITERATIONS, OR ELSE...
It should go without saying that modeling parametrically or non-destructively as possible is always a good way to go since you can always get back to a previous state. But if you need to do some mesh surgery for greater detail or want to lighten up your scene’s playback speed, you’ll want to work with editable geometry. But before you hit that ‘C’ key, make sure to save a copy to get back to, either in a new .c4d file, or stashed in a hidden layer.
5. MAKE GEOMETRY AS LIGHT AS POSSIBLE
A good modeling tip in Cinema 4D is to only make meshes as dense as necessary. It's generally a good thing to have lots of geometry around areas where deformation will happen. However, for rigid bodies knock that geometry down till you have the bare minimum.
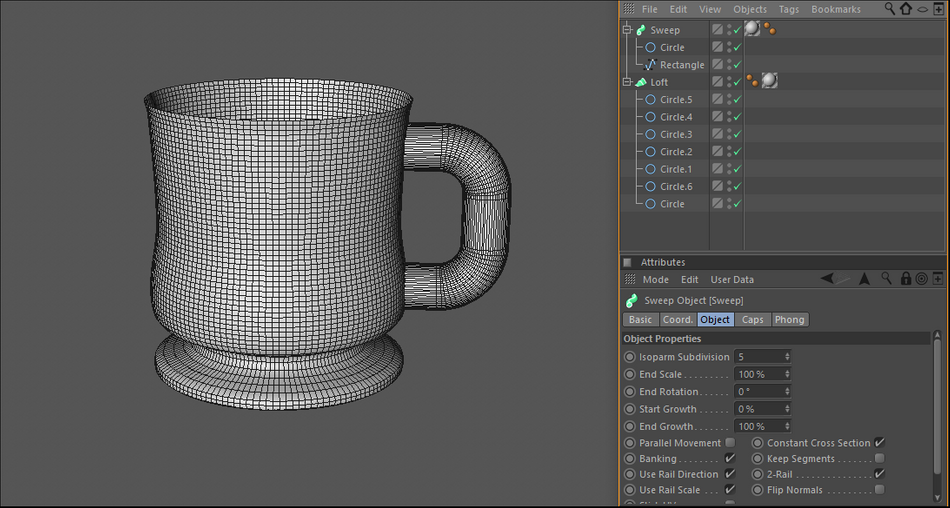
6. USE SUBDIVISION SURFACES
By keeping it light, your scene’s viewport stays fluid and if you need to bump up the resolution, add a Subdivision Surface object to the mix. Set the subdivision editor to 0 or 1 as you work your scene and 2 or higher for subdivision renderer.

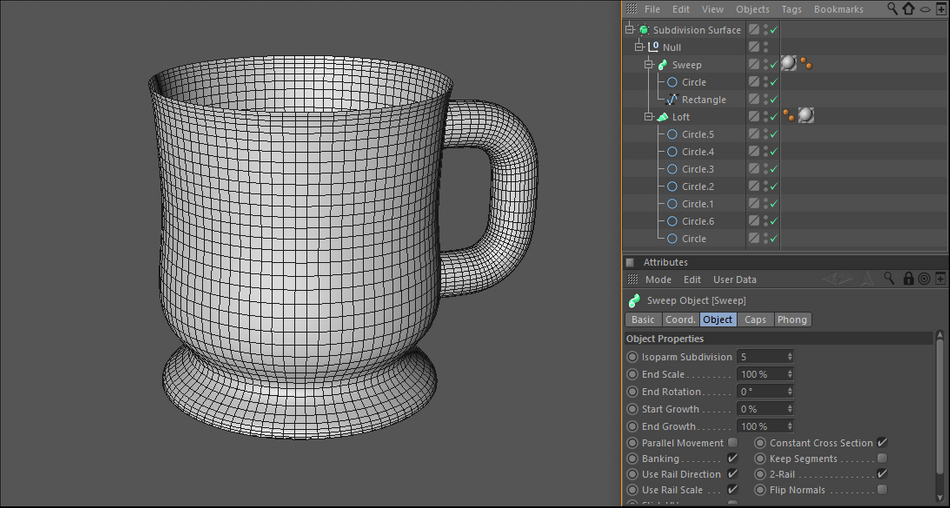
At each level, subdivision surfaces will take a polygon and divide it into 4 with the end result smoothing and rounding your geometry. So smoothing a cube will round it into a ball as you increase levels. Neat!
You can select points, edges and polygons and ‘crease’ or weight them so they don’t get rounded. Simply select the components of your base mesh, hold down the period key as you drag left and right. All the weighted information gets saved in a new SDS Weight tag.
Subdivision surface modeling gets pretty deep so here’s a little rabbit hole for you dive into. And if you really want to go the full monty MILG 11 is where it’s at.
7. USE FALLOFFS ON EFFECTORS AND DEFORMERS AS MODELING TOOLS
Where geometry is complex or dense, you can use falloffs found in the deformers and mograph effectors as modeling tools. How? Take a tire rim for example: What if you wanted to introduce a twist to the spokes of the rim? You could do a soft selection with the rotation tool, but that’s destructive. Instead, put a twist deformer and use a cylindrical falloff to only affect the spokes and not the entire geo of the rim.
Likewise by using a mograph plain effector in point deformation mode and as a child of the rim, we can push and pull geo and limit what geometry is affected by using cylindrical falloff.
To really get fancy, you can play with the spline parameters of the falloff. By the way, did I mention this is all animatable?!

8. TRANSFORM GEOMETRY LIKE PHOTOSHOP
One of my favorite tools for modeling is a free plugin from Welters Cinema 4D plugins called Transform. With Transform you can easily take polygon objects or selected geometry and shear, non uniformly scale, and rotate on edges all using the transform display cage around the object. Welter's page also has a bunch of workflow gems (including the indispensable UV to Object plugin) so be sure to check it out.
9. 5 POINT STAR SPLINE
If we’re honest, we’ve all wrestled with trying to get a simple 5 point star from a spline object to point upward. The fix is simple, rotate the 5 point star -90 degrees on the rotation B coordinate. But now although it points up, the green Y axis tells us it’s really on its side. To fix this:
- Make the star editable
- Enable axis modification mode
- In the coordinates manager, zero out the rotation B value.
Booyah.
Bonus tip: if you need this object often, save it to your library. With it selected, in the object manager go to File > Save Selected Object As.
11. ADD GEOMETRY WHERE OBJECTS DEFORM
Take the star we just made and throw it into an Extrude object. Now add a bend to it and what do you get? Something pretty blocky.

To smooth this out we can add more generated geometry by changing the number of intermediate points on the Star spline. As a result the bend has more to work with. But the center of the star is still pretty blocky.

To add more geometry to the caps of the extrude object, change the cap type to ‘Quadrangles’ & enable ‘Regular Grid’. Yes, this introduces triangles where all quads would be better, but unless we want to take the time to make this editable and manually add our geometry with the Polygon Pen tool, this seems like a speedy alternative.

As with all things in Cinema 4D, there are more than a few ways to accomplish something and modeling is certainly no different. Hopefully these modeling tips in Cinema 4D will help you make some polygonal magic.
ENROLL NOW!
Acidbite ➔
50% off everything

ActionVFX ➔
30% off all plans and credit packs - starts 11/26

Adobe ➔
50% off all apps and plans through 11/29

aescripts ➔
25% off everything through 12/6
Affinity ➔
50% off all products

Battleaxe ➔
30% off from 11/29-12/7
Boom Library ➔
30% off Boom One, their 48,000+ file audio library
BorisFX ➔
25% off everything, 11/25-12/1

Cavalry ➔
33% off pro subscriptions (11/29 - 12/4)

FXFactory ➔
25% off with code BLACKFRIDAY until 12/3

Goodboyninja ➔
20% off everything

Happy Editing ➔
50% off with code BLACKFRIDAY

Huion ➔
Up to 50% off affordable, high-quality pen display tablets

Insydium ➔
50% off through 12/4
JangaFX ➔
30% off an indie annual license
Kitbash 3D ➔
$200 off Cargo Pro, their entire library
Knights of the Editing Table ➔
Up to 20% off Premiere Pro Extensions
Maxon ➔
25% off Maxon One, ZBrush, & Redshift - Annual Subscriptions (11/29 - 12/8)
Mode Designs ➔
Deals on premium keyboards and accessories
Motion Array ➔
10% off the Everything plan
Motion Hatch ➔
Perfect Your Pricing Toolkit - 50% off (11/29 - 12/2)

MotionVFX ➔
30% off Design/CineStudio, and PPro Resolve packs with code: BW30

Rocket Lasso ➔
50% off all plug-ins (11/29 - 12/2)

Rokoko ➔
45% off the indie creator bundle with code: RKK_SchoolOfMotion (revenue must be under $100K a year)

Shapefest ➔
80% off a Shapefest Pro annual subscription for life (11/29 - 12/2)

The Pixel Lab ➔
30% off everything
Toolfarm ➔
Various plugins and tools on sale

True Grit Texture ➔
50-70% off (starts Wednesday, runs for about a week)

Vincent Schwenk ➔
50% discount with code RENDERSALE

Wacom ➔
Up to $120 off new tablets + deals on refurbished items


Start Your 3D Journey in Cinema 4D
Master the essentials of 3D modeling, lighting, and animation in C4D. Enroll in All-Access to unlock C4D Basecamp and 50+ other courses.