
Create Stunning Visual Effects in AE
Learn compositing, tracking, keying, and rotoscoping in After Effects. Enroll in All-Access to unlock VFX for Motion and 50+ other courses.
Want to find the perfect color palette for your 3D creations? Sounds we've got a LUT to talk about!
LUTs, or Look Up Tables, allow you to easily color grade, punch up footage, or add cinematic looks to your projects. So where do you find these LUTs? Is there a store? A bodega? Is it on...the dark web? Let's get started.

EJ here, and we're going to be taking a look at a tutorial from one of our advanced courses, Cinema 4D Ascent. This subject isn't about how to approach your renders, but how to use the tools in Cinema 4D to make them better, more professional, and eye-poppingly gorgeous.
To get started, you will need Cinema 4D. I'll provide the project files, but buckets of paint are useless without a few brushes. Boot up that software and let's get to work.
In this tutorial, we will learn:
- What is a LUT?
- Applying a LUT in Cinema 4D
- Applying a LUT in After Effects
{{lead-magnet}}
What is a LUT?
.gif)
If you're familiar with Magic Bullet or DaVinci Resolve, you've probably heard of the term LUT before. It stands for Look Up Table, and it refers to a table of numbers that convert color values within a frame. You can save and share these LUTS across many apps, which can be super useful when you find a look you like!
It has become a great practice to add these LUTs to your live render view in your 3rd part renderer of choice so you can try out different looks on your compositions before going for that all important final render.
Applying a LUT in Cinema 4D

In order to apply a LUT, you’re going to go to your Redshift Render view. Inside, you’ll find a ton of helpful Global Settings that allow you to apply a number of cinematic effects.
- Color Controls
- Bloom
- Flare
- Bokeh, and many more, including—of course— LUT
Inside the LUT menu, you'll see that you can browse a built-in list of LUTs already available with Redshift.
Once you've selected your LUT location, you'll select your LUT file from the drop-down menu. Using the slider, you can adjust the strength of each effect to audition it for your render.
Now I don’t tend to bake-in these looks in my render. If you have a LUT applied to your Render View, it’ll also be applied as a Redshift Post Effect and will be baked into your render.
Instead, I would recommend making a note of the LUT that you liked the most, render without, and then apply that look in post. You can always add after the render, but whatever is baked in will be there to stay. So next, we're going to apply this LUT to a raw render in After Effects.
Applying a LUT in After Effects
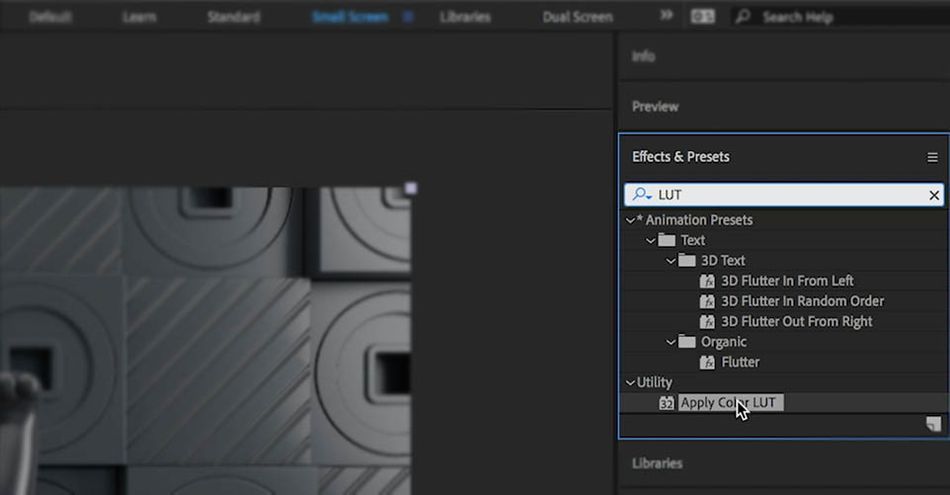
Now we’re in After Effects. To add a LUT here, I’ll first create an Adjustment Layer. Then, all I need to do is go to the Effects and Presets Menu, type in LUT, and click on the ‘Apply Color LUT’ effect and drag it to an Adjustment Layer to apply it.
Now I can dig through my files and choose the LUT that works for me. If you made a note of the LUT from Cinema 4D, you can find it quickly and have that same look from before.
Super easy! And if you want to learn how to do the same thing in Premiere and Photoshop, check out the video above.
Conclusion
LUTs open up a lot of options for establishing style and mood of your renders, and you’ll quickly learn to love them. Do you have a favorite LUT? Share it on social with the hashtag #WhatsLUTGotToDoWithIt
If you're ready to level up your 3D skills, you're going to need to put in the work. That's why we developed a new, advanced course: Cinema 4D Ascent!
Cinema 4D Ascent will teach you the fundamentals of some of the most important and marketable 3D concepts. Over the course of 12 weeks, you’ll go from beginner to intermediate level 3D artist that’s fluent in Cinema 4D and familiar with other 3D tools.
-----------------------------------------------------------------------------------------------------------------------------------
Tutorial Full Transcript Below 👇:
EJ Hassenfratz (00:00): LUTs or look up tables can allow you to add color grades to punch up raw footage or add filmic looks. But where do you find new lots and how can you utilize them in your own renders? Let's find, Hey, motion, yours EGA here. This tutorial comes from our advanced course, cinema 4d assent. And in it, we're going to talk all things LUTs now to follow along. You'll need to have access to cinema 4d. Before we begin, don't forget to download the project file so you can join in on all the fun.
EJ Hassenfratz (00:41): If you're familiar with magic bullet or DaVinci resolve, you've probably heard of the term a lot before now, LUTs, or look up tables, not looking up at tables that makes zero sense or a table of numbers that convert color values in an image or a frame. You can basically think of them as color grades that you can save and share and utilize across many apps. So things like red shift after effects, you can use these same color grades, across many, many apps. And in 3d, it's becoming more and more common to add these lookup tables, these color grades, and bake them directly into your render or utilize them in your Redshift render view and kind of audition different color grades, adjust them and be able to try out a bunch of different looks.
EJ Hassenfratz (01:33): So we'll play a lot. We're going to go to our Redshift menu, head on down to red shift, render view, fire that up and to apply a lot and reveal some other color correction settings, really click this sneaky little gear. That's hiding all those settings from us. So we're going to quick it, and here you go. Here's our lot's controls our color controls. We have a different display mode. You can see what this looks like in linear mode. SRG B adjust the GAM, all that good stuff. I'm going to come back to let very shortly. I'm just going to cover all these other settings super, super quick now to activate something like color controls here. I'm just going to check that box to turn it on. You can see that basically this is your after effects, curve adjustment here, which is really cool, but it's just built into red shift.
EJ Hassenfratz (02:20): There's also an option like this inside of the cinema 4d picture viewer, which is really cool. Just the contrast exposure. So all that's in the color controls. I'll turn that off, twirl that up. Let's go to photographic exposure and check that on here. You can adjust your exposure based on photography, uh, values like f-stop and white point and, uh, vignettes. That's where you'll find vignetting in here, but I'll just throw that up. Uncheck that let's move on to bloom. Bloom is really fun. You can think of this as your like built-in after effects, glow effect, where it takes the over bright areas of your scene and applies some glow again, just like after effects, glow, get some super disco looking, uh, effects going on there. Really cool. I'll uncheck that let's go on to flare and you have to wear 18 pieces. Of course, what flare does if I bring this flare threshold down pretty far, is it also takes those over bright areas in ads, these lens flares, which is really nice.
EJ Hassenfratz (03:22): So flare intensity, the size I'm getting kinda kind of weird. Look in there. It looks like a you're having a hallucination and you're seeing a lucky cat that might work for you. I don't know. I'm just gonna uncheck the flare. And last I'll go to the streak, which is going to add a streak, kind of like what you would see in anthropomorphic lenses. So you can see what that's going on there. We've got these really cool streaks. It's really nice. Again, we'll get the disco disco field disco vibes to the lucky cat. All right. So we covered a lot of those settings. Let's go back to that. I'm going to turn it on. Now in this menu here, you can actually add your own. There's built in Redshift, lots that are in here. And if I just delete this option right here, you can see that there's should be an actual folder path in this lot location that will direct you to the lots that are actually built in to Redshift.
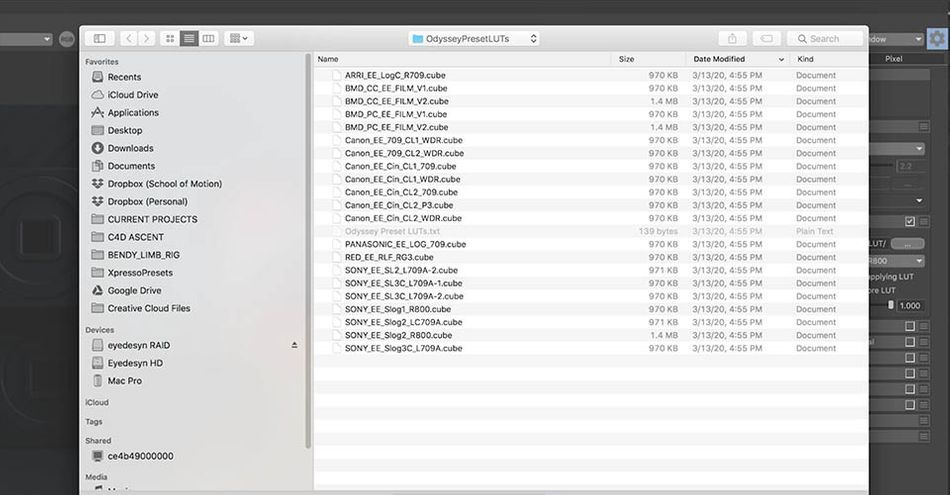
EJ Hassenfratz (04:20): Uh, so you don't have to like buy any or anything like that. For me, I'm on my Mac. So my let location is an applications, Redshift data and LUTs. Now, if I click this button with the dots, basically what you can see is that what files are either in dot cube or dot 3d L, and you can see that here is, you know, my, my applications, Redshift data LUTs folder, and you can see all of these dot cube files now on your computer. You might just want to go and search to see what kind of cube let's you might have. So just going to type in dot C U B E and here, you'll see that I actually have some from octane. So octane comes with its own, uh, cube files as well. So here's where you can just like choose individual LUTs. So I'll choose this.
EJ Hassenfratz (05:05): Kim am land. See what that looks like. So that's pretty dark. You can adjust the LUTs strength here. We can also go and adjust the lot file here. So it actually look at your different lots that are within that same folder structure, which is really nice. You can see what all these do, and actually a lot of these, the Ektachrome, which is kind of interesting. There's also this ag for color Optima that you can also find in octane. So really cool stuff. So you can kind of, again, you can audition all these different lookup tables in color grades and get these kind of filmic effects, which is really nice. I always like to audition a whole lot of them. You know, some of these totally changed the vibe of the scene. Uh, also have some, if I go to DOT's Cub, I'll go all the way down.
EJ Hassenfratz (05:56): You can see that have a lot from, uh, grayscale gorilla grayscale gorilla has a lot of really cool LUTss as well. We got this beach haze, check that out, feeling really beachy, a little beachy, lucky cat there. Um, and again, if you choose a lot, that's any folder structure, it's going to look at all the other ones inside that same folder. So we can see what this one looks like. Battle warmth, Seattle warmth. I can't really read that pulp subtle. I don't know if that's pulp fiction, but different like different film, uh, names, your majesty. That might be from a, I don't know, the crown who knows, who knows swampy, why not? Swampy? Let's go swampy cat. So all that to say is there's all these different types of LUTs that you can load up in audition using the built in LUTs that are within Redshift and available from many sites like grayscale, gorilla, uh, that's always an option, but this is all to say, I wouldn't necessarily bake in these LUTs into this render, but if you did have this lot applied and checked on and you went ahead, changed your render to Redshift, of course, and then went to render to picture viewer, it's going to bake in any of these effects that you currently have turned on.
EJ Hassenfratz (07:17): If you go to your render settings, you can see Redshift post effects. You can see that lot is enabled in this Redshift post effects, render effect is enabled as well. So it's kind of like if you had any post effects like ambient occlusion or GI using standard or physical render, all of those would be applied to your final render and baked in. And that's not necessarily the best course of action. What I would recommend is to have maximum flexibility is, is not applied in here addition, but then make notes of the law that you really like, that you applied in Redshift. And then what you could do is just go ahead and apply this in post, whether in, uh, after effects or whatever. So I would just render out this raw render and apply the LUTs in post. So what am I going to do now is show you how to apply a lot in post using, after effects, premiere or Photoshop. Now, one thing to know about LUTs is any changes in that Lut strength or anything like that. You can't actually resave that out as a lot, like a lots of luck and it remains that LA file. Okay.
EJ Hassenfratz (08:26): So here we are in after effects and I just have a raw render from cinema 4d. That means we did not apply a lots or any color correction using Redshift. And what we're going to do is just do it in post. Like we typically would do our color color-correction with 3d renders. So what I'm gonna do is first go and add an adjustment layer just so I can apply a lots effect to the adjustment layer. And then I can use, uh, the opacity. You just hit T to bring up the capacity to bring that down. Okay. So what I can do is just select the adjustment, hit enter, and just rename this, let gay adjustment to apply a lot. It's really easy. I'm just going to go to the effects and presets menu, just type in L U T. And that's going to bring up the apply color, LUTs utility effect, which you might have never have paid attention to before.
EJ Hassenfratz (09:10): But if I go and click and drag and apply this to the adjustment layer, and what's it going to do is allow you to go ahead and dig through your files and choose a lot. Okay? So I have a bunch of lots here. If I choose in the doc cube, if I do like blue, green, you can see what that looks like. I can adjust the opacity overall. If I want to choose a different LUTs, I can just go into my apply color, let effect and choose a different LUTs can do like every day CC you can see that's pretty dark. Just that. So another thing you could do is like you say, you auditioned a lot in red shift, just remember the name and where it, where the location is, and you could just easily like cool beans. That was definitely cool beans. There it is.
EJ Hassenfratz (09:55): And you can apply it here. You know, it looked good because you tested it out in red shift. And now you could just apply that to the raw render and have the full flexibility of if you are indecisive and change your mind. And you found that maybe not cool beans, but we need a heroic warmth instead because our cat is so lucky, but yet, so heroic, boom, you can do that. So it's always good to stay flexible. So that was pretty easy. And after effects, let me go ahead and show you how to do it in premiere.
EJ Hassenfratz (10:26): No, to apply in premiere, you're just going to make sure you're in your color space and select the tracker or still that you want to apply your luck to go on over to your LaMettry color, go to creative, and underlook just go to browse. You're going to see there's all these lots already built in, but for go to browse, we can go ahead and enter in our dots Cub and search all over the place. And there are our cubes and we can go ahead and choose. One of them. Let's do a afterschool special. See what that looks like and that's that you can adjust the intensity of that lot's effect by using the intensity slider here. And that's, that's basically it easy, easy lemon squeezy.
EJ Hassenfratz (11:15): That'll play a lot in Photoshop. It's fairly easy as well. What we're going to do is go to our window menu, go to adjustments. And right here is this color lookup icon. I'm going to hit that. And what it's going to do is create an adjustment layer automatically here. We can apply a built-in LUTs, if we want to. And then we can go ahead to this layer, adjust the opacity for the strength of that overall effect. We can also go up to the top and just load 3d LUTs. And this is going to give you your file navigation window, that we can go into a lot folder and Walla. We can access all of our Redshift LUTs, use this filmic high contrast, and again, adjust this using the opacity. So super easy ways to be able to load up LUTs, not only in red shift, but also in after effects, premiere and Photoshop.
EJ Hassenfratz (12:07): Now, one final thing I'll add to this whole luck conversation that while it's great to use a lots to audition looks in your render view, it's typically not recommended that you actually render with those lookup tables or those color grades actually baked in. And why that is, is that, you know, clients, they're going to ask for some kind of change. And if it's something like why don't like that much contrast, or I don't like that bluish hue, you know, if you already baked in that color grade, you're kind of left with no other option than the rerender your entire animation. Now, if you actually rendered out your animation without any of that grading, you could easily apply that grade infusion or in after effects. So while it's great to bake it in and render for maybe tests to show a client really for your final render, you want to have the maximum flexibility, render it without any color correction, do it all in post and in your actual final render, give some color grade a leeway.
EJ Hassenfratz (13:03): So that means, again, not using a hundred percent black colors, a hundred percent white colors, having those areas that you can crush those values again in post. All right? And that, that completes my little PSA, lots open up a lot of options for establishing the tone and the mood of a render. And you'll quickly learn to love them. Do you have a favorite lab that you absolutely love using? Be sure to share it in the comments below, and if you want to learn more about 3d checkout cinema 40th sense, our interactive course available at school of motion, make sure to subscribe and click the bell icon. You will always be notified when we drop new tutorials. Thanks for watching.
ENROLL NOW!
Acidbite ➔
50% off everything

ActionVFX ➔
30% off all plans and credit packs - starts 11/26

Adobe ➔
50% off all apps and plans through 11/29

aescripts ➔
25% off everything through 12/6
Affinity ➔
50% off all products

Battleaxe ➔
30% off from 11/29-12/7
Boom Library ➔
30% off Boom One, their 48,000+ file audio library
BorisFX ➔
25% off everything, 11/25-12/1

Cavalry ➔
33% off pro subscriptions (11/29 - 12/4)

FXFactory ➔
25% off with code BLACKFRIDAY until 12/3

Goodboyninja ➔
20% off everything

Happy Editing ➔
50% off with code BLACKFRIDAY

Huion ➔
Up to 50% off affordable, high-quality pen display tablets

Insydium ➔
50% off through 12/4
JangaFX ➔
30% off an indie annual license
Kitbash 3D ➔
$200 off Cargo Pro, their entire library
Knights of the Editing Table ➔
Up to 20% off Premiere Pro Extensions
Maxon ➔
25% off Maxon One, ZBrush, & Redshift - Annual Subscriptions (11/29 - 12/8)
Mode Designs ➔
Deals on premium keyboards and accessories
Motion Array ➔
10% off the Everything plan
Motion Hatch ➔
Perfect Your Pricing Toolkit - 50% off (11/29 - 12/2)

MotionVFX ➔
30% off Design/CineStudio, and PPro Resolve packs with code: BW30

Rocket Lasso ➔
50% off all plug-ins (11/29 - 12/2)

Rokoko ➔
45% off the indie creator bundle with code: RKK_SchoolOfMotion (revenue must be under $100K a year)

Shapefest ➔
80% off a Shapefest Pro annual subscription for life (11/29 - 12/2)

The Pixel Lab ➔
30% off everything
Toolfarm ➔
Various plugins and tools on sale

True Grit Texture ➔
50-70% off (starts Wednesday, runs for about a week)

Vincent Schwenk ➔
50% discount with code RENDERSALE

Wacom ➔
Up to $120 off new tablets + deals on refurbished items


Create Stunning Visual Effects in AE
Learn compositing, tracking, keying, and rotoscoping in After Effects. Enroll in All-Access to unlock VFX for Motion and 50+ other courses.