

Learn After Effects the Right Way
Master the After Effects interface and build a real animation skillset. Enroll in All-Access to unlock AE Kickstart and 50+ other courses.

Get a step-by-step guide to saving a screenshot in After Effects.
Nobody says that After Effects is an easy software to learn, this is especially true when you’re ready to export your first screenshot. You’ve probably made the mistake of clicking the snapshot button (camera icon) only to find that your screenshot is nowhere to be found on your computer.
{{lead-magnet}}
The first few times this happens to you it can be frustrating, especially if you’re used to hitting the camera icon to export frames in Premiere Pro, but have no fear! Exporting screenshots is super easy in After Effects. In fact, once you get the process down it should take you literally less than 10 seconds to get an exported frame. Just follow these steps:
Export a Single Frame in After Effects: Step by Step
Step 1: Add to Render Queuef
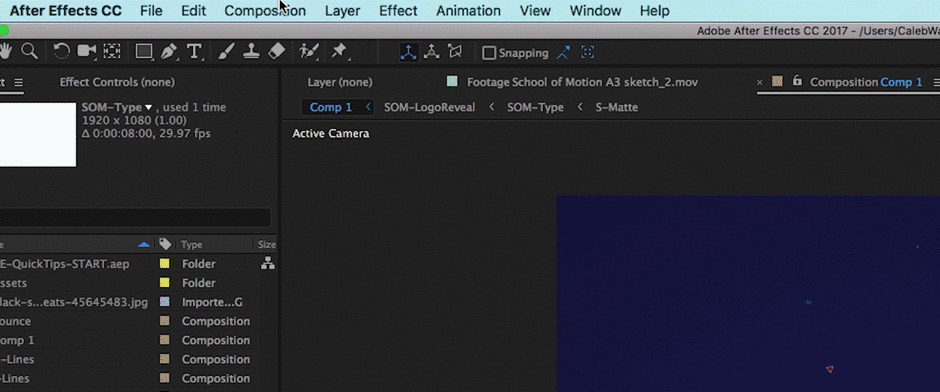
Once you have your specific frame selected go to Composition > Save Frame As…
From this menu, you will see two options: File and Photoshop Layers. Photoshop Layers will convert your composition into a Photoshop Document. This can be useful, but be mindful that this conversion isn’t always 100% perfect. You might need to edit the Photoshop Document before handing it off to someone else in the creative pipeline. Select 'File...' if you want to save your frame in a popular image format like JPG, PNG, TIFF, or Targa.
STEP 2: ADJUST SETTINGS
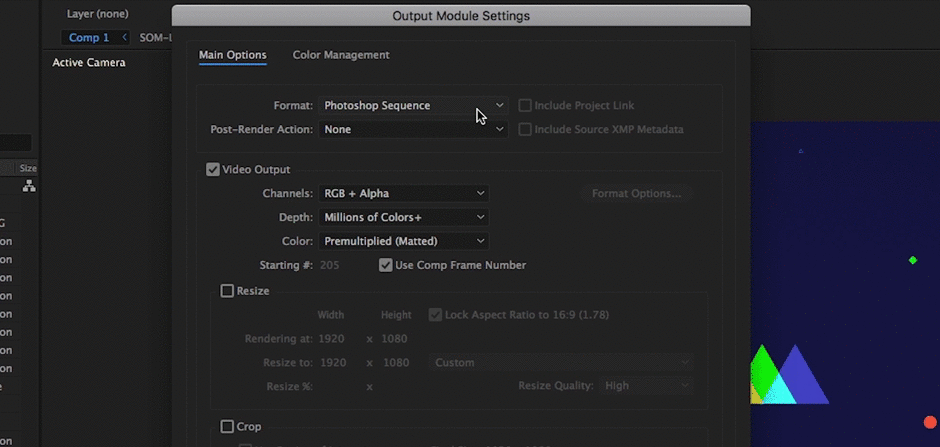
The image file will default to a PSD, but odds are you probably want it in a different format. To change the type of image that will be exported hit the blue text next to the ‘Output Module’. This will open up the Output Module where you can change your type of image to whatever you want under the ‘Format Menu’.
Once you’re done adjusting your settings hit ‘Ok’ and change the name of your image to whatever you want. If you want a full-res image leave the ‘Render Settings’ to the default setting.
STEP 3: RENDER

Simply hit that Render button. It shouldn’t take After Effects more than a couple of seconds to render out your frame.
Saving Image Presets
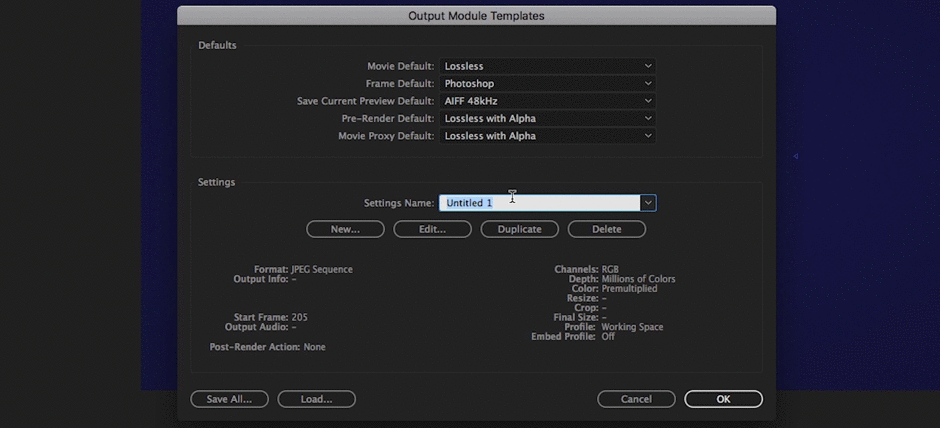
If you anticipate that you will be exporting a lot of single frames in the future I highly recommend creating render presets for various kinds of image formats. On my computer I have presets saved for JPEG, PNG, and PSDs. By saving these presets you can save yourself time when your export images in the future.
Saving a render preset is easy, simply adjust all of your render settings and hit ‘Make Template...’ under the Output Module menu in the Render Queue. You can also save and share these render templates with anyone you like.
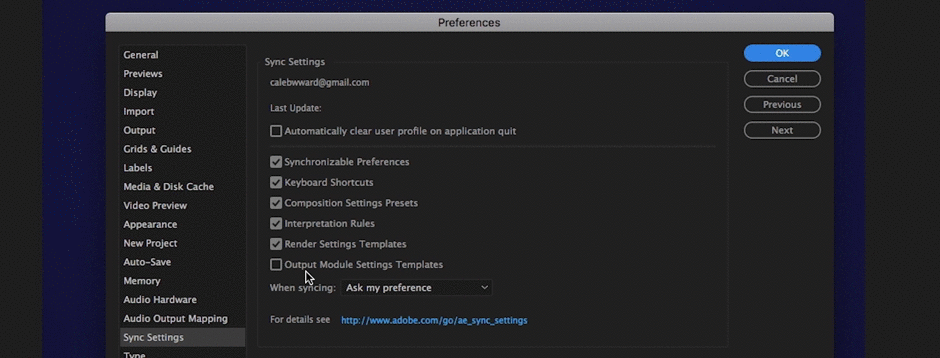
If you use the Creative Cloud (as you should) then you can actually sync these render settings to your account so that each time you login to After Effects your render settings will be synced on the new machine. To do this go to After Effects > Preferences > Sync Settings > Output Module Settings Templates.
Screenshots vs. Snapshots
You may have heard of a feature in After Effects called Snapshots. Snapshots are different than Screenshots. Snapshots are temporary image files stored in After Effects that allow you to recall a screenshot so you can compare two frames in the future. It’s like when you go to the eye doctor and they say 1 or 2… 1 or 2…

You Can’t Use the Camera Icon to save screenshots...
Unfortunately, there’s no way to save a snapshot file. You must use the screenshot step-by-step method listed above. I honestly don’t use snapshots that much in my day-to-day motion graphic work, but I’d be interested to hear about how some of you guys use it on your After Effects projects. Perhaps Adobe will create a screenshot button in the future?
THE PSD PROBLEM...
Remember when you’re saving to a format like PSD, your images might not be exactly similar when you open them up in Photoshop. This is simply because not all of the same effects or transfer modes can be found across both platforms. My best recommendation would be to plan out your projects so that you don’t run into any issues if you decide you want your layers to be editable in Photoshop.
That’s all there is to it. Hopefully you’ve found this article and tutorial to be helpful. If you have any questions please feel free to send them our way. We’d be happy to help in any way.

Master After Effects with After Effects Kickstart, included with School of Motion All-Access.
ENROLL NOW!
Acidbite ➔
50% off everything

ActionVFX ➔
30% off all plans and credit packs - starts 11/26

Adobe ➔
50% off all apps and plans through 11/29

aescripts ➔
25% off everything through 12/6
Affinity ➔
50% off all products

Battleaxe ➔
30% off from 11/29-12/7
Boom Library ➔
30% off Boom One, their 48,000+ file audio library
BorisFX ➔
25% off everything, 11/25-12/1

Cavalry ➔
33% off pro subscriptions (11/29 - 12/4)

FXFactory ➔
25% off with code BLACKFRIDAY until 12/3

Goodboyninja ➔
20% off everything

Happy Editing ➔
50% off with code BLACKFRIDAY

Huion ➔
Up to 50% off affordable, high-quality pen display tablets

Insydium ➔
50% off through 12/4
JangaFX ➔
30% off an indie annual license
Kitbash 3D ➔
$200 off Cargo Pro, their entire library
Knights of the Editing Table ➔
Up to 20% off Premiere Pro Extensions
Maxon ➔
25% off Maxon One, ZBrush, & Redshift - Annual Subscriptions (11/29 - 12/8)
Mode Designs ➔
Deals on premium keyboards and accessories
Motion Array ➔
10% off the Everything plan
Motion Hatch ➔
Perfect Your Pricing Toolkit - 50% off (11/29 - 12/2)

MotionVFX ➔
30% off Design/CineStudio, and PPro Resolve packs with code: BW30

Rocket Lasso ➔
50% off all plug-ins (11/29 - 12/2)

Rokoko ➔
45% off the indie creator bundle with code: RKK_SchoolOfMotion (revenue must be under $100K a year)

Shapefest ➔
80% off a Shapefest Pro annual subscription for life (11/29 - 12/2)

The Pixel Lab ➔
30% off everything
Toolfarm ➔
Various plugins and tools on sale

True Grit Texture ➔
50-70% off (starts Wednesday, runs for about a week)

Vincent Schwenk ➔
50% discount with code RENDERSALE

Wacom ➔
Up to $120 off new tablets + deals on refurbished items


Learn After Effects the Right Way
Master the After Effects interface and build a real animation skillset. Enroll in All-Access to unlock AE Kickstart and 50+ other courses.


