

Learn After Effects the Right Way
Master the After Effects interface and build a real animation skillset. Enroll in All-Access to unlock AE Kickstart and 50+ other courses.

Options For Stabilizing Footage in After Effects.
Unless your name is Michael Mann or Paul Greengrass a stable and smooth shot is what most of us are looking for. Unfortunately for many of us, including myself, we can’t capture a smooth shot handheld to save our life.
Most of us rely on gear to help us achieve the shots we want, which is why we utilize a Steadicam or 3 axis gimbal. However, not everyone can afford this. But don’t fret there is hope. As long as you can capture a shot without it looking like a two year old was holding the camera, After Effects can help you do the rest.Let’s take a look at the options After Effects gives us for smoothing out our shaky footage.
Stabilizer tools native to After Effects
First up let’s take a look at the built-in stabilization tools in After Effects itself and how they can benefit us and our projects. First we’ll take a look at the current standard for stabilization, then we’ll take a look at a useful legacy approach.
Warp Stabilizer
The life-changing stabilization tool that redefined the term 'we'll fix it in post'.
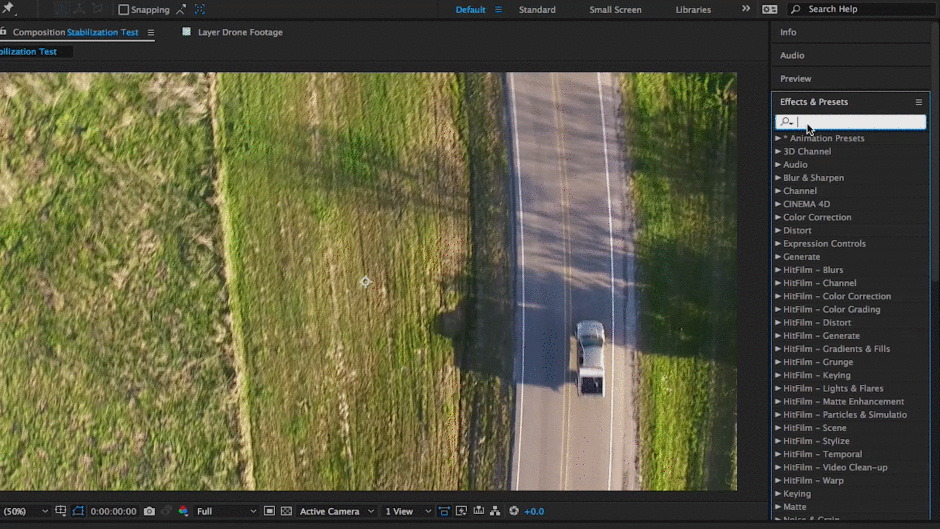
STEP 1: TYPE "WARP" IN EFFECTS & PRESETS SEARCH BAR
The best built-in option for After Effects is the Warp Stabilizer. You can find this listed in the Effects & Presets panel under the Distort tools. Or you can simply head over to the effects panel and type “warp” into the search bar.
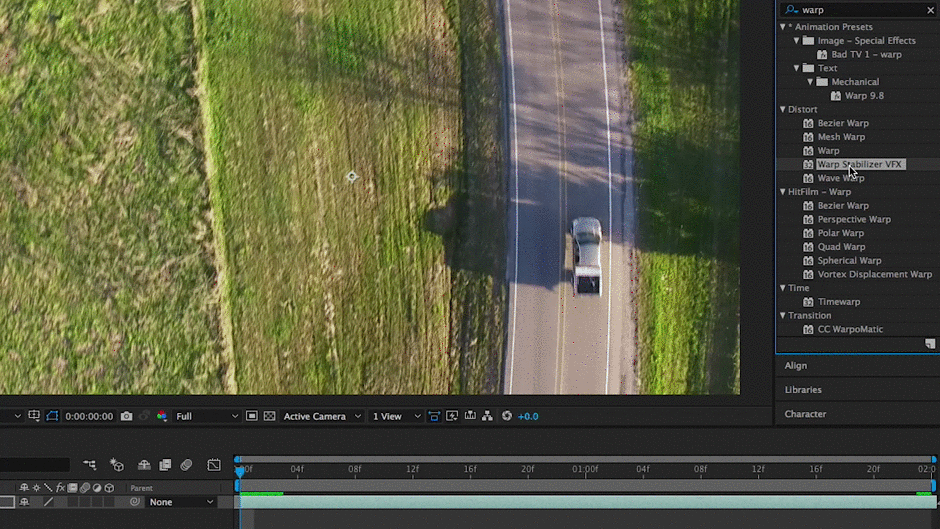
STEP 2: DRAG THE EFFECT TO YOUR LAYER
Once you find Warp Stabilizer you need to apply the effect to the desired layer. To make this happen you can go one of three ways. First you can drag and drop the effect into the layer in the composition window, second you can drop it on the desired layer in the timeline, or third you can double click on the effect with your desired footage layer selected.
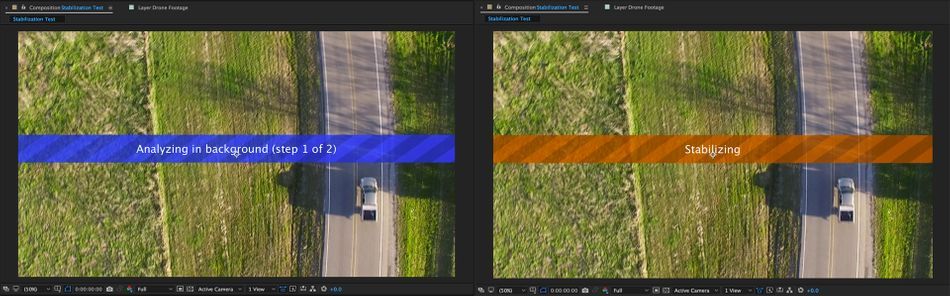
STEP 3: ALLOW WARP STABILIZER TO ANALYZE AND STABILIZE
When warp stabilizer is applied it will automatically run. So at this point just sit back and let stabilizer do its work. The process shouldn’t take too long, and a blue bar will show up across your composition window, this indicates that warp stabilizer is analyzing the footage. Then an orange bar will appear on the composition panel, which indicates that the effect is being applied.
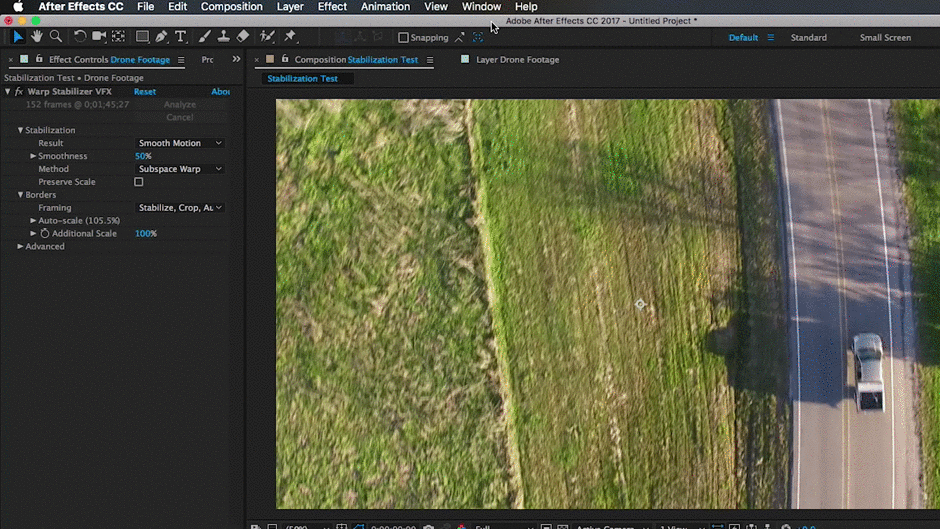
STEP 4: ACCESS WARP STABILIZER IN THE EFFECTS PANEL OR TIMELINE PANEL
Once stabilization is complete hit the spacebar to start a RAM preview. If the stabilization effect needs some adjustments, highlight the layer you applied the effect to and click to reveal the drop-down menu, or head over to the Effects Control panel.

If you want a detailed step by step guide to warp stabilization then head over to Adobe’s Help site where they give you just that.
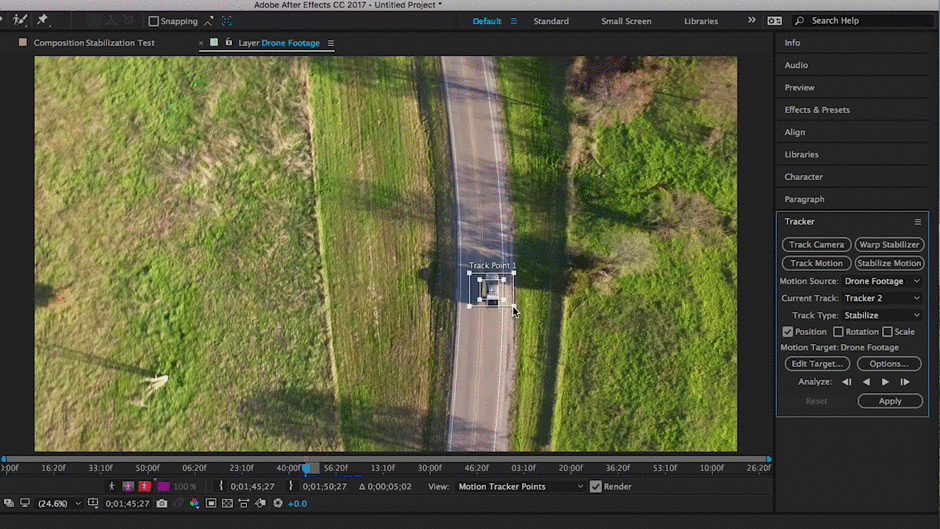
Stabilize Motion Feature
While this feature is an old school legacy feature from the days of the Creative Suite, it's still a part of After Effects today and works quite well. In the example below I'm going to be tracking drone footage of a car driving down a country road.
STEP 1: ACCESS THE TRACKER PANEL THROUGH THE WINDOW MENU
More than likely your version of After Effects has the tracker panel set to open by default, but just in case it isn't open you can head to "Window" in the top menu. Once here scroll down until you find "Tracker" and make sure there is in fact a checkmark next to it.
STEP 2: SET YOUR TRACKING BOX
When you have the tracker panel up click on the “Stabilize Motion” option. You’ll notice once you do this a tracker box will appear within your Layer Panel. At this point you need to find a good spot within your footage for the tracker to work. In the example below I’m tracking a truck my camera op was following with his drone.
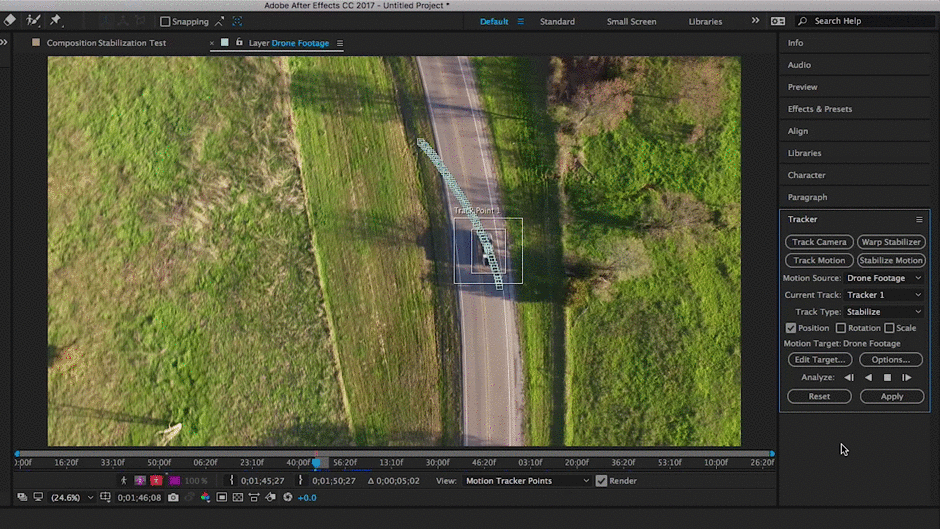
STEP 3: STOP ANALYZING TO ADJUST TRACKING POINTS, THEN PRESS PLAY TO CONTINUE
Once we have tracker box set let's hit the “play” button within the tracker panel. When you do this you should see the tracker box stick to your specified spot or object. If you see your tracking points going a little awry, just hit the stop button, backtrack manually adjust the tracking point, and hit play again to continue the track.
STEP 4: ADJUST EDIT TARGET IF NEEDED, THEN CLICK "APPLY"
Once tracker has finished and your happy with the data, click on “edit target” to ensure that the tracking data will be applied to the right layer. Then head down and click the “apply” button. A dialogue box with apply options. Here you’ll normally want to select “X and Y”.

Now that you're back in the composition panel hit the spacebar to see how well the stabilize motion tracker worked. If you aren’t satisfied with the results you may need to go back and give it another shot. The application for this method tends to be shots with a very definite point of focus that doesn't go out of frame, but it can still be helpful in some scenarios.
For more information regarding tracking and stabilization check out this Help Article from Adobe.
Stabilization Plugins for After Effects
These tools aren't free, but they work like a charm.
1. REELSTEADY
- Pros: Solid Stabilization, Masking, Ease-of-Use
- Cons: Price Point, Analyzing can take a while
- Price: $399
This plugin does offer some higher level technical tools so you can get really detailed with your tracking data, which should ensure that you are getting the best stabilization possible for your footage. While it can get technical, its still a simple-to-use plugin for any user no matter their experience level.
However, note that Reelsteady is a bit pricey at $399.00, but they do allow for a trial version so you can see if it fits your needs. Just be aware that the analysis time can be a little slow.
To get a sense of what Reelsteady can do check out this video that shows you the unstabilized footage with the stabilized footage using the plugin.
2. MERCALLI V4
- Pros: Great Tracking & Stabilization, Ease of use, Customizable
- Cons: Tricky Installation, Not as Many Tutorials as ReelSteady
- Price: $299
Outside of Reelsteady the only other true stabilization option out there is Mercalli V4 from German based company ProDad. Much like Reelsteady, Mercalli V4 offers some robust tools to get the stabilization you need, but at less than half the cost. Mercalli works in After Effects and Premiere Pro so you don't need to send your clips to After Effects for stabilization if that is all the work you need done.
Most may think that a lower cost means lower quality, but that isn’t true in this case. The analysis time for Mercalli V4 is faster than Reelsteady and does seem to stabilize smoother. This is definitely a plugin you should look into.
For an inside look into Mercalli V4 check out this video tutorial from ProDad.
What's the Best Way to Stabilize Footage in After Effects?
All of the options listed here are great. Here's my take:
- If you need the smoothest footage possible use ReelSteady
- If you need to stabilize shake caused by a CMOS sensor (jiggles) use Mercali.
- If you want good stabilized footage for 'free' use Warp Stabilizer.
- If you have a shot with a single point of focus that never leaves the frame use the Stabilize Motion feature.
At the end of the day it really comes down to personal preference. All of the tools listed in this article have free trials so you can try them all and see which one works best for you and your project.
Take Your Skills Further with VFX for Motion
Want to go deeper? Check out VFX for Motion, available with School of Motion All-Access.
ENROLL NOW!
Acidbite ➔
50% off everything

ActionVFX ➔
30% off all plans and credit packs - starts 11/26

Adobe ➔
50% off all apps and plans through 11/29

aescripts ➔
25% off everything through 12/6
Affinity ➔
50% off all products

Battleaxe ➔
30% off from 11/29-12/7
Boom Library ➔
30% off Boom One, their 48,000+ file audio library
BorisFX ➔
25% off everything, 11/25-12/1

Cavalry ➔
33% off pro subscriptions (11/29 - 12/4)

FXFactory ➔
25% off with code BLACKFRIDAY until 12/3

Goodboyninja ➔
20% off everything

Happy Editing ➔
50% off with code BLACKFRIDAY

Huion ➔
Up to 50% off affordable, high-quality pen display tablets

Insydium ➔
50% off through 12/4
JangaFX ➔
30% off an indie annual license
Kitbash 3D ➔
$200 off Cargo Pro, their entire library
Knights of the Editing Table ➔
Up to 20% off Premiere Pro Extensions
Maxon ➔
25% off Maxon One, ZBrush, & Redshift - Annual Subscriptions (11/29 - 12/8)
Mode Designs ➔
Deals on premium keyboards and accessories
Motion Array ➔
10% off the Everything plan
Motion Hatch ➔
Perfect Your Pricing Toolkit - 50% off (11/29 - 12/2)

MotionVFX ➔
30% off Design/CineStudio, and PPro Resolve packs with code: BW30

Rocket Lasso ➔
50% off all plug-ins (11/29 - 12/2)

Rokoko ➔
45% off the indie creator bundle with code: RKK_SchoolOfMotion (revenue must be under $100K a year)

Shapefest ➔
80% off a Shapefest Pro annual subscription for life (11/29 - 12/2)

The Pixel Lab ➔
30% off everything
Toolfarm ➔
Various plugins and tools on sale

True Grit Texture ➔
50-70% off (starts Wednesday, runs for about a week)

Vincent Schwenk ➔
50% discount with code RENDERSALE

Wacom ➔
Up to $120 off new tablets + deals on refurbished items


Learn After Effects the Right Way
Master the After Effects interface and build a real animation skillset. Enroll in All-Access to unlock AE Kickstart and 50+ other courses.


