
All-Access Pass
Unlimited access to 50+ courses, unlimited critique, live events, and 24/7 community. Join School of Motion All-Access today.

Take Your Texture Game to the Next Level with Cinema 4D S22
Cinema 4D is the software of choice for 3D motion designers, but it has always presented a challenge in one area: texturing with UVs. It got to the point that a lot of designers avoided the task altogether. However, with the recent S22 update that Maxon unleashed in April of 2020, texturing with UVs has never been easier. In fact, this can be your new superpower!
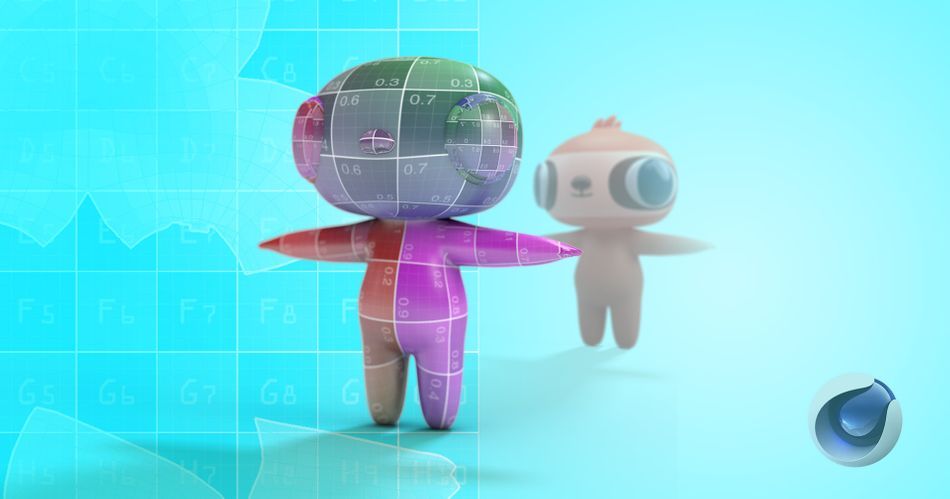
In this article, I'll walk you through the basics of UVs, unwrapping, and the tips you need to be able to successfully texture your own models! Once you understand the process, you'll be amazed at how this improved workflow opens up your creative capabilities. Now slap some butter on a biscuit, it's time for another tasty tutorial!
Texturing with UVs in Cinema 4D
{{lead-magnet}}
What are UVs and What is UV Unwrapping and UV mapping?
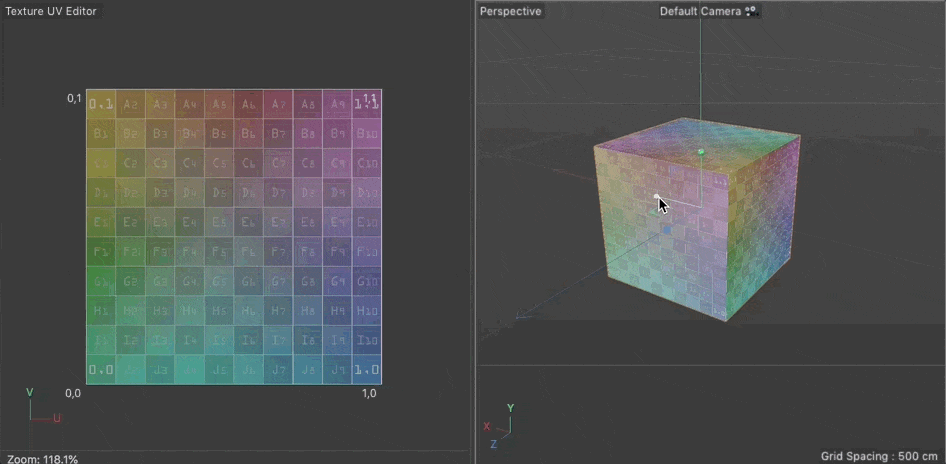
Let's begin by answering the question...what is a UV? UV's are the names of the horizontal and vertical axes of a plane, since XYZ are already used for coordinates in 3D space.
UV Unwrapping is the process of flattening out a 3D model into a 2D representation for texture mapping.
Think of a stuffed animal. It's made is by sewing together separated pieces of flat fabric based on a sewing pattern to create one sewn together animal. UV'ing is the process of defining seams and then unsewing or unwrapping a model at its seams to flatten it out to easily texture.
UV Mapping is then when you apply a texture and map it to your model using those UVs.
UV UNWRAPPING BASICS
So why is there the need for UVs and unwrapping?
Let's drop in a cube. If we have a Cube and we try to wrap a UV Grid texture on it, you'll noticed that the texture looks great. Well, maybe it's just good. Okay, it looks fine.
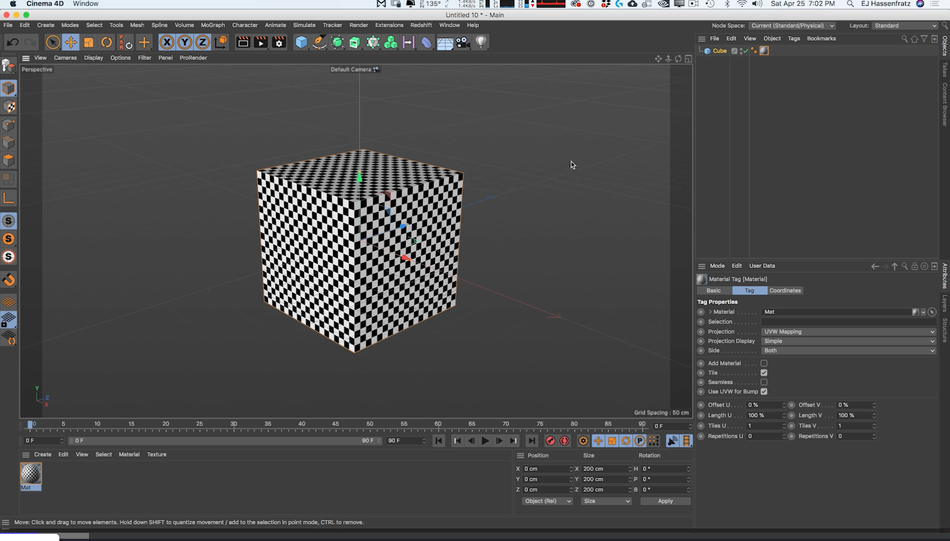
Now what if we scaled this cube along the X axis? The texture stretches, deforming the checkerboard pattern. But why? Notice that UV grid texture is being mapped to a square texture space, and all of those cube polygons are on top of each other, mapping that UV grid texture to each side of the cube.
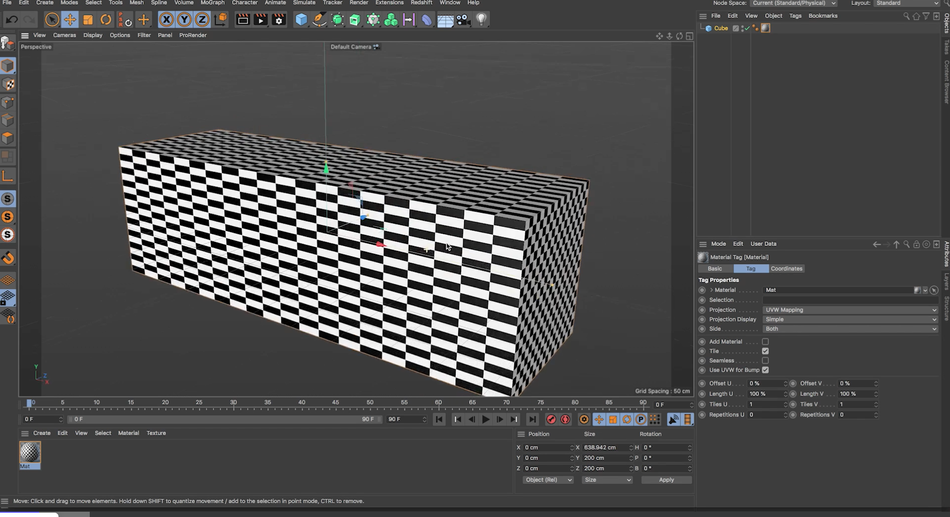
That square grid is now stretched out to fill the scaled up parts of the cube. UV unwrapping is the process of attempting to adjust the texture UVs so they look more like the actual 3D polygons (i.e. a rectangle vs. a square polygon). When your UV 2D polygons resemble the 3D polygons, textures map precisely onto your object so you can apply a texture with minimal distortion or stretching. Using this UV grid pattern is a great way to see the distortion.
Now you may be familiar with the different types of UV projections such as Cubic, Spherical, and Flat. Those might be the only UV workflows you’ve ever used in the past, and I’m sure you’ve realized that these methods only work in specific cases and aren't great for more complex geometry.
With Cinema 4D version S22 and above, there was a big update to the whole UV workflow setup, and now you have an auto unwrap feature that is super nice. With this, you can simply select an object, click Auto Unwrap, and viola—you have a quick and dirty UV map. For some purposes, such as exporting to game engines, this is good enough!
How to Unwrap
Auto Unwrapping has its place, but let's take a look at manually unwrapping.
I mentioned off the top that unwrapping is like unstitching a stuffed animal. To do this you need to define seams by selecting edges. The general rule is you want as few seams as possible.
We don't want a lot of UV islands that make your animal look like patchwork. The seams you do have you want to try to hide along hard edges or on hidden parts of the model—like on the backside of a model that isn't visible to the camera.
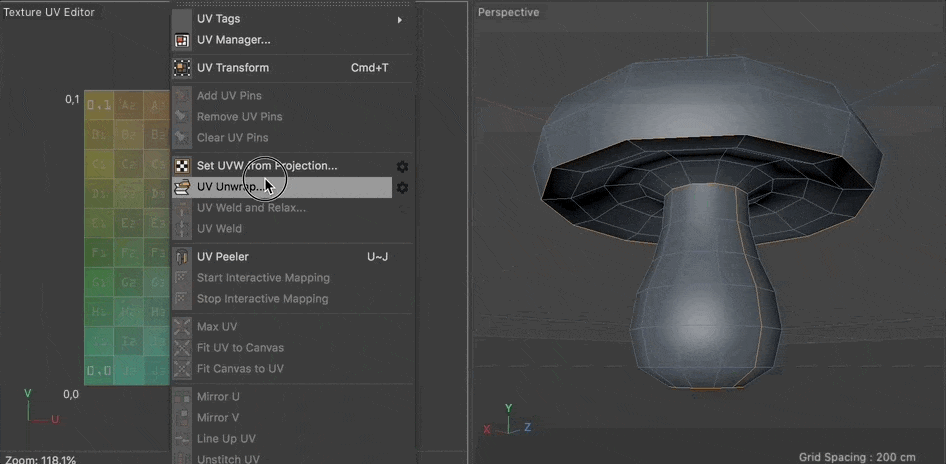
So here's a mushroom character that has a few different elements: We have the flatter top, and then the more cylindrical head area. How you approach UV unwrapping is dictated by the model you're working with, but it helps to visualize how the object could be un-stitched and flattened. Visualize those seams. We then work procedurally and place cuts/seams where they're not noticeable.
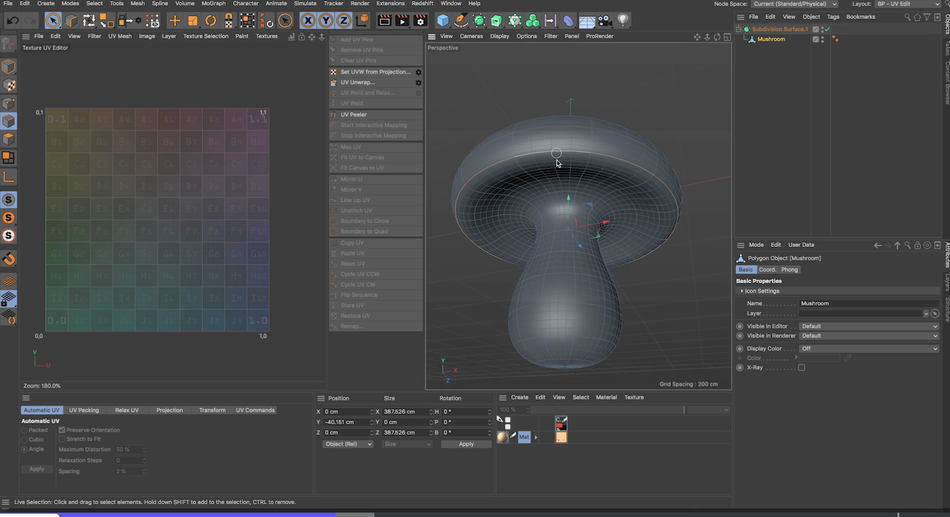
To unwrap this, we can separate out pieces like the top of the cap, the underside part of the cap, and then the base/head. The top of the cap is fairly easy. if you can visualize the seams and how we can flatten this out. To break this into the top and bottom, we can simply do a loop selection U>L and unwrap based on that seam. We can click UV Unwrap. Looking good!
Now we have to work on the base of the mushroom where it's a little more difficult. We can unwrap this like you would a head, where you create a seam in the back of the head and a loop selection at the base of the neck so to speak. This allows us to flatten the cylindrical part as well as the base of the mushroom. Now we won't exactly see the bottom nor the back of the mushroom, so we have some wiggle room there to hide those seams.
With our UV map all good to go, we can then paint directly on this model using Bodypaint, or we can export it out as an image and paint it in Photoshop, and then re-import and apply that texture to our model.
To export out a UV grid as an image, first create a new UV image texture by going to File > New Image.
It's best to save your textures in at least 2K (2048x2048). Then choose a brush size by going to BodyPaint Paint layout, adjust the hardness to 100%, make the brush smaller, and then with all polygons selected go to Layer > Outline Polygons.
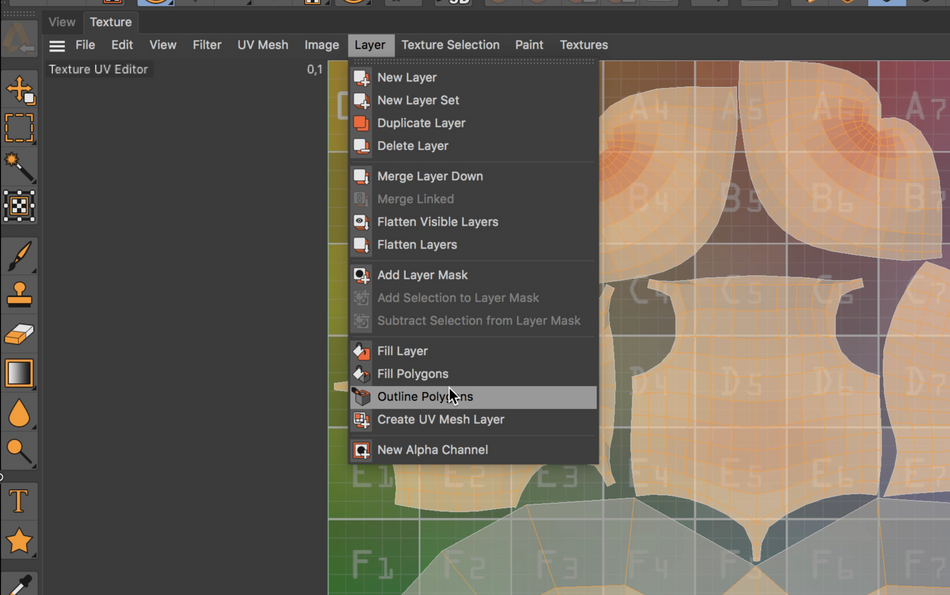
Then go to File > Save Texture As... to save the texture with UV grid to a PNG or TIF, and now you can import into Photoshop and paint on it.
Texturing with UVs Like a Boss
Now that you have a handle on the basic process of defining seams and unwrapping, let's move onto the final boss.
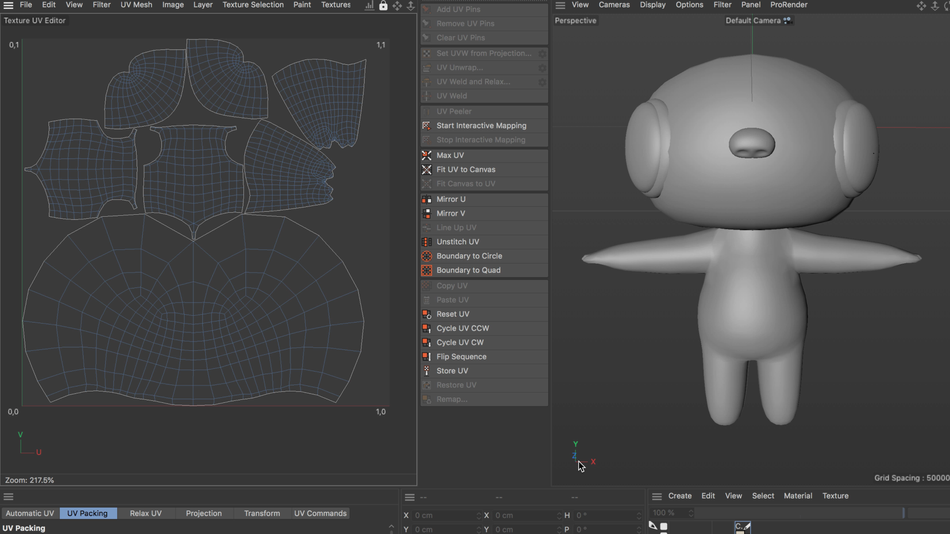
Here we have a more traditional character with a head, torso, arm, and legs. We can approach this much like the mushroom character.
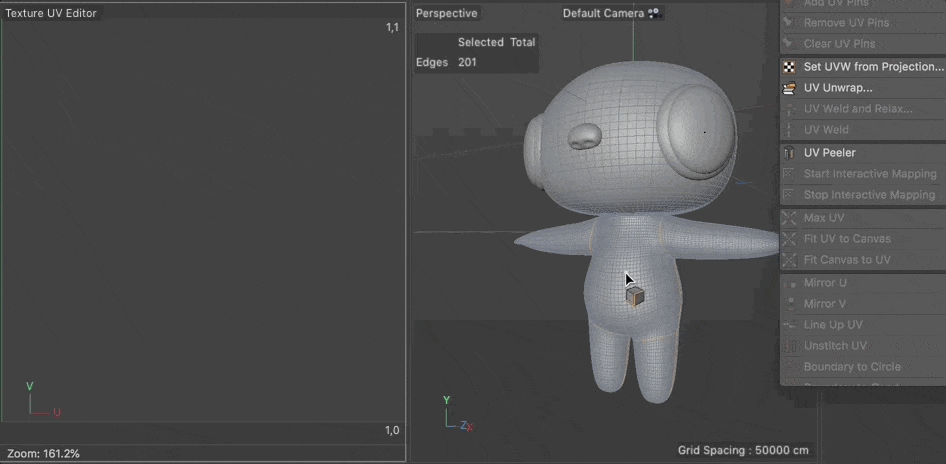
Let's begin with the head. We'll add seams much like we did with the base of the mushroom, where we can make a loop selection around the neck and create a seam up the back of the head. Once you have those seams selected, click UV Unwrap to unwrap those seams. Not happy with a result? You can undo and choose another seam.
Now onto the arms where we can also treat this like the cap of the mushroom where we made a loop selection horizontally to flatten out the top and the bottom of the mushroom. Let's make a loop cut around the armpit, and a loop cut around the whole of the arm so the top will be flat as well as the bottom of the arm.
If you make a selection on one side you can easily mirror that selection by using the Mirror Selection command. Click UV Unwrap and you'll see we flattened out the arms. You can also make the hands separate too and unwrap it like a half stitched glove. Onto the legs!
Depending on the texture you need to ultimately apply, you could unwrap the torso and the legs as one piece. I'll show you how to separate the legs and torso for this example. Let's first make a loop selection at the top of the leg, and then make a path selection at the back of the leg down to the bottom of the foot and click unwrap. (Use SHIFT double click on an edge to make a loop selection) Finally we'll unwrap and flatten the torso by making a loop selection at the waist sides and click Unwrap. It's quick and easy to test out cuts to figure out which cuts on which parts of your geometry work best, and the procedural way to unwrap is really forgiving.
Once you have your model unwrapped into separate islands, you can adjust the islands by using the transform gizmo to straighten out the face so it's horizontal and not diagonal, or adjust the size of an island so the UVs are about the same size on all parts of the model—this will help with any texture mapping.
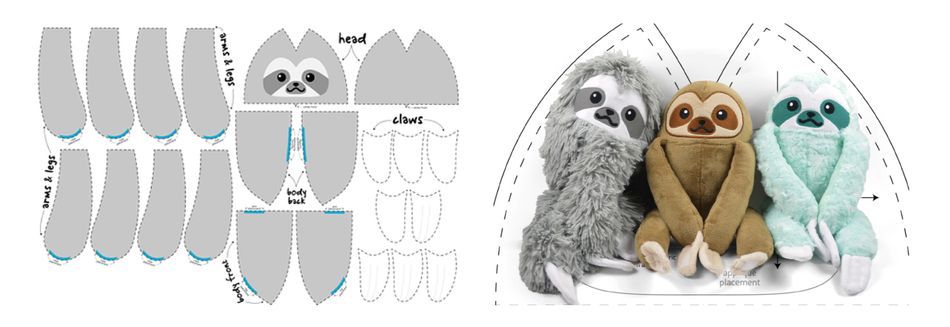
Then you can follow the same workflow as with the mushroom, where you can save out a UV grid outline and paint your textures in Photoshop like I did, then reimport the texture into Cinema 4D and voila, you have a custom material mapped to your objects UVs...faster than a sloth can give a thumbs up!
You may not be able to shoot lasers from your eyes or fly, but you can UV unwrap—and that's pretty much the superhero-equivalent in the 3D world!
Just remember: "With Great Workflow Comes Great Responsibility!"

Want to Learn More About Cinema 4D?
We get it. You're watching EJ tear into Cinema 4D and you want to know how to step up your game too. That's why we put together Cinema 4D Basecamp!
Learn Cinema 4D, from the ground up, in this intro to Cinema 4D course from EJ Hassenfratz. This course will get you comfortable with basics of modeling, lighting, animation and many other important topics for 3D Motion Design. You’ll learn basic 3D principles and best-practices, laying the foundation to tackle more advanced subjects in the future.
-----------------------------------------------------------------------------------------------------------------------------------
Tutorial Full Transcript Below 👇:
EJ Hassenfratz (00:00): UV unwrapping and cinema 4D used to be the bane to everyone's existence. But with the new UV workflow updates in cinema four D S 22, it's never been easier to learn this extremely useful skill. When you wrap your head around what a UV is and the whole process of UV and rapping, it's like you have this super power where you can finally accurately texture your models with ease, and I'm going to be walking you through the whole process of UVN wrapping, cover the basics of UVS and how you can apply it to your own models. Now, if you want to follow along with me, be sure to download the free project files in the video description below
EJ Hassenfratz (00:52): Now you've these are the names of the horizontal and vertical axes of a plane since XYZ is already used for coordinates in 3d space. Now, UV unwrapping is the process of flattening out a 3d model into 2d representation for texturing. Now things have a stuffed animal it's made by sewing together, separated pieces of flat fabric based on a sewing pattern. Two great one sewn together, stuffed animal, basically UV ING is that process of defining seams and then unsiloing or unwrapping a model added seems to flatten it out too easily. Texture UV mapping is then when you apply a texture and map it to your model, utilizing those UVS.
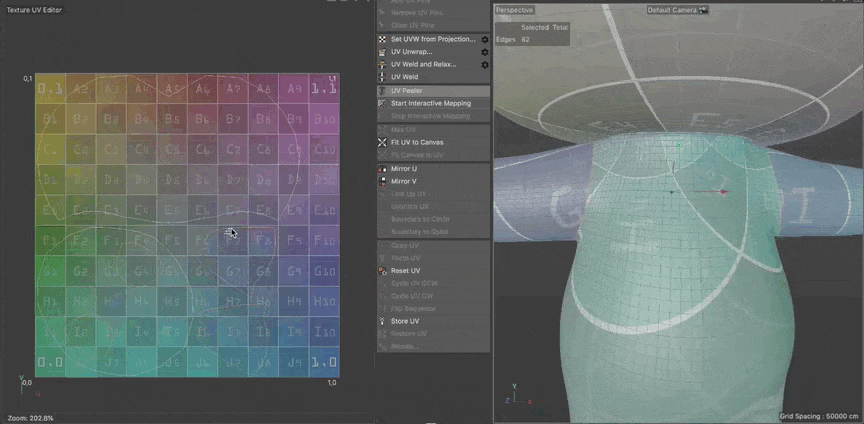
EJ Hassenfratz (01:39): So why the need for U visa and unwrapping it all? Well to demonstrate the why let's just start with a very simple case of a cube. And if we went and double clicked in the material manager down here and opened up the material editor and just loaded up, say a tile texture, or checkerboard texture even, and apply this to our cube, you'll see that this is mapped perfectly, no stretch squares, nothing like that. Now what happens if I make this a little longer, where you're going to see that the texture stretched out on these polygons that we actually made longer. And the reason for that can be made more apparent if we actually go and check out the UVS of our object. And I remember the UVS are just the 2d representation of a 3d object now to be able to generate a UV tag.
EJ Hassenfratz (02:34): What we need to do is make this object editable because we can't edit UVS on a primitive object. Okay? So I'm going to hit C to make that cube editable, and you'll see that that generated this UVW tag, this holds all of the UV information for this piece of geometry. So to view the UVS, we're going to go to our body pain, UV edit layout, and you'll see the 2d representation of our object here. Now, if I go into my polygon mode here and select this polygon here, you'll see that even though this is a pretty long stretched out polygon, it's actually mapped to this UV texture view as a perfect square. And this is why we have this stretched out texture. Okay. So if I select this polygon here and move this around, you'll see that all the UV editor is, is showing how a texture is mapped to a single polygon.
EJ Hassenfratz (03:35): So a UV corresponds with a 3d polygon face. If I hit T for scale, I can scale this down and you'll see that the pattern that grid pattern is actually getting bigger now to easily visualize this. I'm just going to go ahead and delete that material, that checkerboard material, and I'm going to use a UV map instead. So I'm going to go to textures, UV map, and you can actually see a test UV pattern or grid that allows you to basically test how this pattern grid maps to an object and see if there's any issues with the UVS. Like if there's any stretching or anything like that. Because if the pattern is stretched, any texture will be stretched as well. Just like that checkerboard pattern. So the whole process of UV unwrapping is trying to be able to adjust the UVS. So a texture isn't stretched out.
EJ Hassenfratz (04:32): So they're actually more visually representing the actual polygon space. Like this is a very, you know, horizontal polygon here, and it's not represented like that in our 2d UV view. So that's why we need to adjust and play around with the UVS, the 2d representation of those polygons to make it match the actual physical 3d version of that polygon. Now in cinema 4d version as 22 and above, there's a whole bunch of new ways to automatically fix this problem. And this is done by new algorithms, new workflows and things like that. Now the easiest way to fix something like this is to utilize the automatic UV options, which try to automatically take the real 3d polygon space and actually have that represented in the 2d view. So to do that and to utilize the automatic UVS, I'm just going to make sure all of the polygons are selected.
EJ Hassenfratz (05:32): So I'm going to hit command or control a, to select all of the UVS in the texture editor. And I'm just going to go to automatic UVS. Now it makes sense to use the cubic algorithm here cause we have a cube. And if we hit apply, you're going to see that check that out. That polygon here was represented, used to be represented as a square, just like this polygon here. You'll see that if I select a UV here, it will actually show me which polygon is corresponding with. Okay. So if I select this polygon here, you can see that, check that out. We have this UV stretched to the same size as the actual polygon is in our 3d view. Now let's go ahead and bring down the opacity of this UV grid. If you don't see this menu, just go to view configure and just go to this back tab.
EJ Hassenfratz (06:28): And this is where you can adjust the UVS, or you can even load up your own UV map, or just turn off that UV map altogether. I'm just going to turn back on that UV map and you can see as I select each of these UVS, the corresponding polygons that they are representing. So you can see that, okay, if I bring this up, even more of the opacity can see this D one here that is this UV island. So a UV island is basically polygons that are on their own little island space. So this is technically, you know, UV island, its own polygon it's on its own island. And you can see that this is the part of this UV grid texture that will be mapped to this polygon. Now, again, I can move this and you can see that's going to change, which part of this grid texture is mapped to that polygon surface.
EJ Hassenfratz (07:28): Now the whole reason you want to unwrap an object and map UVS correctly is you have this nice even distribution of say grid texture. So you have no distortion. Now, what I want to do now is kind of show how this can kind of all fall apart. If you don't have UVS, accurately represented to how that actual 3d polygon is, as far as the shape, the aspect ratio, all that good stuff. If I go into my point mode here, I can select a point and move this. And you'll see, because we are adjusting this and changing the mapping of this texture notice I'm not actually adjusting the points in the actual 3d object, but just how this polygon is mapping this texture. You can see that if this is not a perfect, you know, in that same shape, that same rectangular shape, how this is getting distorted, because we have this D two here and it's represented in this top corner.
EJ Hassenfratz (08:33):And then we have this D three and it's getting, you know, really jenky right in here. And that's because the UV is trying to map this texture. This really, you know, parallelogram. I don't know if that's really that's no, this isn't a parallelogram, but this polygon kind of shape, uh, and trying to map it as best it can to this perfectly rectangular shape. Okay. So that's the whole thing is what UV mapping does is gives you the ability to fix things like that. Now, not necessarily in the manual way, I'm doing it right now, as I'm just selecting these points and trying to get back to that original rectangular position. But you can see now how we can map a texture accurately without distortion now, because as of right now, these UVS are mapped pretty well to the actual, you know, shape inside of the actual 3d polygons. Now that's a very easy case, just this cube. So let's up the difficulty a little bit and show a way we can actually unwrap something manually.
EJ Hassenfratz (09:41): All right. So here is our mushroom. And what we're going to do is we're going to show an example of when auto and rapping fails you and you have to figure out the whole unwrapping process manually. Okay? So this, this model will do us well to show the limitations of automatic unwrapping. So let's go ahead and we have this, uh, UV tag already applied to it. It's by default basically made this mushroom using a lave object and we can go and visualize the UVS by going to body paint, UV edit. And if I select that mushroom, we'll see the UV grid. And let's see, as far as our UV map, how the texture distortion looks, and you can see that we, we have pretty heavy distortion here. You know, if I turn the subdivision surface on the smooth, the polygons, we have a lot of distortion, especially at the top and bottom again, we use that lave object.
EJ Hassenfratz (10:34): So we have a lot of weird mapping going on and we can actually see why this is, is going to be, you know, truncated like that, by going to point mode and just selecting that point. And you'll see, okay, that point is over here. But one thing you'll notice is if I select this point, I'm also selecting the same point there as well. And if I select all of the points on this left side, you'll see the all occupy the same spot. So we have all these texture, all this side of the texture here, all getting funneled into one single point. All these points are in just this one single point right here. So that's why we have such extreme distortion. So this automatic wrapping is not going to help us at all. Same thing on this side, you can see if I select all the points over here, no bueno there.
EJ Hassenfratz (11:27): There's just all getting stretched and all getting funneled in the top here. Now, what I ultimately want to do is map this. So I can just simply paint on little dots or spots on the top of this mushroom cap and how we can do this is by using something called the body paint 3d paint feature, which is basically like Photoshop for 3d objects, where you can actually paint, use brushes like Photoshop brushes and paint directly onto the surface of an object. So let's go ahead and go into 3d paint layout and to set this up, to be able to be painted on, you can see the little brush tool here, the size, all this good stuff. You can see that I can't actually paint on this just yet. And what we need to do is actually set this up to be painted on. We need to apply a texture to it.
EJ Hassenfratz (12:14): So we can do this easily. By going to the paint setup, wizard, we'll get the magical wizard out and you can see here's our subdivision surface and our mushroom they're checked on by default. So those are the objects we want to set up for body paint. I'll go to next. And what I'm going to do is I'm going to uncheck this recalculate UV. We'll just use the existing UV, even though it's wrong, just because I want to demonstrate why UVS, if they're that distorted, how it can even screw up. If you want to paint on directly onto the surface, uh, everything else here is good, go to next. And here's where we can create a new material. And here is where we can choose what channels we want. So if I go to color, I can choose the default color it'll generate. So maybe, you know, like a mushroom color, something like that.
EJ Hassenfratz (13:02): And then we get to set the texture size. So I just did two case of 2 48 by 2 48, and I'll go to finish. It'll do its thing. You'll see that, that texture, that, uh, the color we chose for the color channels already applied can see in the objects manager, we have this new material here and you can see that this material color six dot TIF. This is our default texture that we're using. If I go to layers, here's that background layer. And we can go ahead and just add a new layer, just like in Photoshop, in paint directly onto that background color. So I'm going to go into my brush and I can choose a color for the brush. So let's say, uh, let's do red and I can adjust the size here. And you'll notice that the brush is represented as a perfect circle.
EJ Hassenfratz (13:50): But if I hover over this 3d object, you'll see that if I just click, this is not a perfect circle in why that is, is because of our inaccurate in bad UVS. Could, you can see how this is really stretched out here. If we went at the top here, we're going to get a really weird distorted, uh, paint brush stroke. And even at the bottom here, I mean, maybe right about here, we're getting close to being a circle and have like a perfect dot. But man, like this is just really distorted, especially as we go down here, like this is just not going to work, but it is cool that we can just paint directly onto the surface here. Uh, but all that to say is we need to do some work on those UVS if we want to just paint dots on the top.
EJ Hassenfratz (14:34): Okay. So let's go into our UV edit mode and let's just delete that texture that we made. You don't need it. And, uh, let's go and zoom out and let's just let this UVW tag. And let's just for posterity. Let's go and choose one of these automatic UV options. So for the cube example, we choose cubic. So we'll go and we'll choose apply. And you'll see that we have all of these UV islands. Now let's go back to our view, configure, bring down this UV map capacity so we can actually see what's going on. And if I de-select, you can see all these UV islands, all these seams, and you can see this like patchwork of seams here represented as these highlighted edges that are highlighted in white. Then you just see how this distortion of this texture, that UV grid is working. It's just, like I mentioned off the top that unwrapping is like unsticking, a stuffed animal.
EJ Hassenfratz (15:30): And how you unwrap something is by defining these seams, which are these edges and white. And the rule of thumb is you want the least amount of islands as possible because if you have too many, you have the current situation that we're in right now where this looks like a patchwork of different fabrics that are stitched together. And if this was a Teddy bear, it would look like one from a horror film because it's, you know, stitched together in weird places. Like maybe an [inaudible] missing. I don't know, but basically this is not going to work for us. Okay. So you also want to be able to have the seams where you can't see them visually. Okay. So if you think of like a Teddy bear, there's going to be a seam at the back of the spine because you don't really see it. Right. And you know, some of these seams are positioned pretty well.
EJ Hassenfratz (16:18): Like this seam right here. If I go to the edge mode and select, uh, go to UL to get a loop selection, this seam right here, that's positioned pretty logistically. Well, because we can't see that seam right there. And even at the bottom, like this isn't that bad. Uh, and even this loop selection here that seems not bad either. Especially if at the end of the day, we're going to apply a different material to the underneath of the cap using like a, a polygon selection, uh, and then same thing with a top. So that's a strategic place to place a seam as if, you know, you're applying a different material on, you know, polygon selection, stuff like that. Uh, that's fair game for seams. Uh, so all that to say, this unwrapping, this automatic UV unwrapping did not go as planned. So maybe we'll try out this pack.
EJ Hassenfratz (17:08): Maybe we'll, we'll get a little bit better a result. So what I'm going to do is I'm going to make sure I have all of my polygon selected. So I'm going to go to polygon mode, I'll select one of these polygons and just go command or control a to select them all. And I'll apply this pact algorithm. Let's see what this does. And you can see that we're back to that same issue we had before where, you know, these polygons are not re represented. Uh, well at all, where if I select one of these polygons here, you can see that, okay, maybe that's mapped correctly, but what about this polygon here? This is much more elongated than what it's visually represented as in our UV map. And again, it's like, we're back to that cube where the polygons are represented accurately in a 2d view.
EJ Hassenfratz (17:54): So that's why you get that stretching. Okay. So pack doesn't work it's triangle and you'll see, this is even worse. Like we have all this distortion it's it's sideways. It's it's this isn't going to work. Okay. So this is where we delete the UVW tag. And we set out to unwrap this ourselves. Now, how you approach UV unwrapping is dictated by the model you're working with, but it always helps to visualize how an object could be in stitched and flattened out to make a 2d, sewing pattern. So visualizing those seams. So again, maybe we have, you know, I know that if I go UL to get a loop selection, if I select this seam right here, I know that I'm going to have like maybe a red material on the top here and another material at the bottom for the underneath of the cap. So this is a good spot to place a seam now to make a seam and to basically cut this, I'll just select that edge selection.
EJ Hassenfratz (18:53): And then just simply go to UV on ramp. Now you'll see that we have two islands. If I go to polygon mode and go to live selection and DoubleClick, this island here, you'll see this as all of these polygons represented right here. And you can see that this UV grid textures mapped flatly to the top here. Okay, I'll go. And my view configure all and bring up that opacity just a little bit. So you can see how that textures mapped. Now, if we were going to do that checkerboard pattern or something like that, this would actually be a lot of distortion, but basically all we want to do is kind of flatten this out. So if I select this polygon here, it looks visually the same way it does in our 3d view. And this will help me when I go to paint on the dots on the top using that body paint, 3d paint, a feature.
EJ Hassenfratz (19:43): Okay. So if I select this bottom island here and I look at that grid texture, you can see, we have a lot of distortion here as well. Uh, especially at the bottom here, not looking too good. So what I can do to fix this distortion is number one, I can go and maybe make a, another cut here, because again, I know that I'll probably have a different texture from C if I do UL to make a loop selection here. So from this point to this point, this loop selection I'll have one material. And then from this loop selection down, I'll have another material. So, uh, another thing that helps us is the seam will probably be hidden anyways. So this is a great place for a seam. So I already have one seam cut. And the great thing about this is we can easily just iteratively add other seams on top of the scenes we already defined.
EJ Hassenfratz (20:30): So I'll just go and click UV unwrap. And you'll see that. Now we have a flat map texture here, and we still all have all the distortion on the bottom of our mushroom here. So we're going to need to approach this a different way. So how you can visualize this is if you were trying to unwrap, say like a sleeve or a cylinder, like a sleeve of a jacket. And basically if you, if you think of how a jacket is, is made, you know, you have the, you wear the wrist is so maybe we have like the cut. So if this is like where the wrist is, we'll have a cut here and opening for our hand. And then there's a seam, you know, somewhere along the back of your jacket, again, again, you, you have the scene where you can't see it. So let's go ahead and place a seam at the back of our mushroom here.
EJ Hassenfratz (21:19): So this is, this is the front and this is the back here. So I will go and make a loop selection here. And one thing I'm going to do is check on this, stop at selections. Cause I already have this loop selection here and I added to it by holding the shift key down. And what I'll do is hold the shift key down here and make a loop selection right between these current, uh, selected loops. And there we go. And so you can see, I have a loop selection at the bottom, the back here, and then right here, and then I'll go ahead and just click UV and ramp. And you'll see that we have a slightly distorted texture here, but it's no longer massively distorted. Now if I go to my live selection mode and double-click this area and can see here is our visual representation of this bit right here.
EJ Hassenfratz (22:09): Okay. And we also have this little area here and that corresponds with that bottom. And again, we're probably not going to see that bottom. So it's, it's fine. Uh, but we kind of flattened this out and made this. So it's not as heavily distorted as we had before. So again, if we applied a grid material to this by double clicking and making a new material, go into effects and going to surfaces checkerboard, and applied that to the mushroom, you'll see that this doesn't map it doesn't look terrible, but it doesn't look great. Okay. So we have the distortion up here and all that good stuff. So we could, if we were actually applying the material to this and not just painting directly onto it, we could do a little bit better work of this. Like we could double-click here. We can go to the transform tool here.
EJ Hassenfratz (23:00): And this is almost like the transform tool in a Photoshop where we can just like rotate this and kind of straighten out how that grid is applied there. Okay. Another thing we can do is select all of the polygons here by hitting command or control a and going to this relax UV. And what this does is it tries to prevent further distortion. So it's trying to fix all the distortion here and we can visualize if there is any distortion on our UV map, polygons, by going to view and going to distortion. And you can see that we have this heat map where anything that's blue is stretched and everything that's red is squashed, and you can see that the heat map is fairly faint. So not a lot of distortion going on, but what we can do is, again, select all these polygons. We'll just use the default LSEM and hit apply.
EJ Hassenfratz (24:00): And you'll see that a change a little bit. What we can do is maybe try the other algorithm and see if that helps at all. And you'll see that. Nope, doesn't really, it doesn't really do that much. Uh, but you can see that I can double click and move all this stuff around double-click this I'm still in my transform tool. And just try to, you know, even this out a little bit. Now, another thing we can do is we know this is kind of cylindrical, uh, to some extent. So what we can do is select this UV island and we can go into this projection method here and we could try a couple things. We can see if cylinder works and you'll see this just made this UV island really big. And I'll just scale this down and kind of move this. And you can see that this actually maps pretty far, you know, pretty well.
EJ Hassenfratz (24:55): We have this distortion right here though. And that's because right here, this should actually be, this polygon should actually be right there. Kind of like got unstitched so I can move this manually over here to fix that. I can also go and select this edge, this edge and this edge, get out of my transform tool here and just go to the live selection and just like these edges and just go to UV weld. And we'll stitch those polygons together. And now what I can do is go into point mode and just start selecting and moving all of these points in kind of straighten them out a little bit and just manually fix it this way. And you'll see that we no longer really have a lot of distortion. So that's one way to fix that again, how you UV unwrap is completely dependent on your model.
EJ Hassenfratz (25:59): So I think that's looking pretty good. Okay. So that grid materials looking. All right. And uh, now we can go and try to paint the dots on this again. So I'm just going to go and delete that material, apply that material that we created before, and let's go into 3d paint, body paint mode, and actually you'll see, we actually have, uh, some paint already on it. So I'll just go to that later. We painted on and just delete it and create a new layer there. So you can see here's my background, go to the paint again, and we'll just make sure that that layers turned on. So again, this is just like painting in Photoshop. You'll see that now cursor is a perfect circle, so I can paint a dot there, but just the size peanut does their peanut diet here, here. And you know, this is really a really cool way to texture a model.
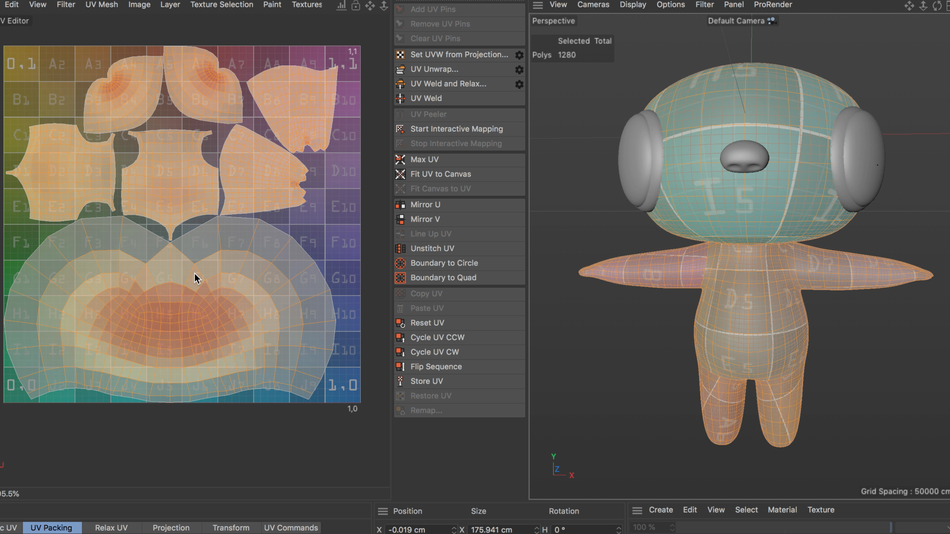
EJ Hassenfratz (27:03): Now I'll be showing in just a little bit how you can actually export out your UV grid. So you can actually paint directly in Photoshop by exporting a material that you can paint on in Photoshop and then reimport into cinema 4d and apply that as a material, apply that texture as a material. So maybe we want to go down here and, uh, let's make a smiley face. So, so there's our, a little mushroom character that we UV unwrapped manually and tried a bunch of different methods of UV unwrapping and, uh, you know, that this worked pretty well. Okay. So now onto the final boss, we are going to try to unwrap an actual character,
EJ Hassenfratz (27:53): Right? So here we go, here is a more traditional character. I'm calling this a Slav, even though it might not look like much of a sloths and that's kind of where textures are really going to help this character. And so that's going to be very dependent on a very good UV map. So, uh, we're going to have to unwrap this guy pretty good because this guy needs some pants or something. Uh, so what we're going to do is we're going to start out just like we did with the mushroom character, where we're going to start defining seams by using loop selections and strategically placing our seams and cuts to properly unwrap this character. Now, again, this, this helps to try to think of how a stuffed animal of this character would be stitched together as well, even visualizing how like a jacket is stitched together will help with the arms and legs or even jeans.
EJ Hassenfratz (28:45): So always thinking of that to help tackle and approach UV, unwrapping a character. So let's go ahead and start by grabbing our loop selection by hitting you. And now I'm just going to zoom in here and let's just grab a loop selection around the neck there. So just like we do at the top of the mushroom cap, we made a loop selection and then we went to on ramp. So we got two islands. Now, one that represents the head. If I go to my live selection tool one double-click here. You can see UK, that's the head and this body that strangely looks like a Slav face is actually everything else. Okay. So what we can do is we have no reference for like what the distortion is, although just by visually looking at that flattened out version, you can see that this is the top of the head, and it's really smushed.
EJ Hassenfratz (29:38): You can see how spread out the actual 3d is those edges. So I'm guessing there's going to be a lot of distortions. So let's check that by going to Dexter's UV map to get our UV texture applied. And yup. I was right. Lot of distortion going on here. So this is not going to be all that great. So what we need to do is we need to think of this head if we want it to flatten out ahead, think of like a Halloween mask where if you wanted to flatten out a mask, you would have to do a lot more than just having a hole at the bottom of the head. Okay. So some mass actually have a seam or a bit cut out the back of the head here, the back of the mask. And that's exactly what we're going to do here. And instead of using a loop selection, I'm going to go and grab my path selection tool by going to U and M for path selection.
EJ Hassenfratz (30:30): And I'm just going to go and right where that loop selection is, I'm going to hold the shift key down to add the selection and just shift in, move on up and add this path selection here and just go right up the back of the head. So right about there is pretty good. We don't want to go so high that we might see this seam, because again, this is going to be a seam. And, uh, with that loop selection and that seam, there let's go and grab UV unwrap, and you'll see that that helped to flatten out in undistort the head there. Now it did nothing to help the body, but you can see on the back of the head, we have all this, a little bit of distortion and, uh, that scene. But again, we're not, we are not going to see that because we'll be seeing the front of the head and what we can do now is we can see if I go to my live selection tool and double-click this head here right now, the head is vertical, but we need to make it horizontal.
EJ Hassenfratz (31:36): So we'll just go to our transform tool and just rotate this, hold the shift key down to constrain to increments of five degrees. And we can just move this down and place it there. Okay. And now we can go ahead and double-click this UV island and, uh, we'll just move this out of the way. Now we need to make sure that all the UV, all the polygons are within this UV maps. So we can just scale this down and that's fine because we're going to be adjusting this UV island anyways, uh, as we start on stitching the arms and legs and all that good stuff. All right. So let's go back to our edge tool and go to our live selection and let's grab our loop tool. So you L to grab our loop selection, and I'm going to grab again, this is we, we need to think of this as if this was a jacket.
EJ Hassenfratz (32:23): So how has a jacket stitch, where you have the stitch rates where the top of the sleeve is by your shoulder, and then you probably have like a seam at the back of your jacket as well. Okay. So what I'm going to do is I'll grab path selection again. So you M and I'll just grab, let's just make sure that this is a nice, complete loop. Yep. This one, this seam doesn't loop. It loops weirdly right there. You can see how it loops in the backside. This is a good cut right here. So actually what I'll do is I'll just click on this, stop at selections and just click right here and hold the shift key down to add to selection. So this will be a seam that goes through the fingers, but then we have the seam on the front side. So I don't want that.
EJ Hassenfratz (33:16): We don't want a seam in the front. So it would be unseemly and rigorous going to de-select these edges here by command or control, clicking and deselecting, these bits here. And de-select that. And I think it's fine to have the seams here in the middle of the fingers, cause you're not going to see them. Right. And that's a good scene. So we have the seam on the left arm. So let's go ahead and mirror this onto the right side. So what I'm going to do is just mirror that selection by clicking the mirror selection tool. And let's see if this worked and make sure that all those seams yet all the seams in there, and you can actually see, whoops, this didn't go all the way through. So why is that? Well, if we go into this little gear here and click on that, you can see that there's this tolerance option. Now, depending on how perfectly symmetrical your model is, you may have to up this tolerance because it's not sensing some of these edges. So maybe let's do a tolerance of five and hit, okay. And, uh, it doesn't look like it did anything. So let's go ahead and it looks like we're just going to manually have to do this. So that's fine. We'll go in here, click that edge, click that edge and this one and make sure all that's all good to go.
EJ Hassenfratz (34:43): So that looks good. And that matches this side. And now for the moment of truth, let's unwrap boom. Okay. And these islands look pretty good. These are the arms right here and looking good. So you can see that this island looks good as far as like we have up and down lines, but you can see, we have this, a little diagonal here, so I can double click on these islands, go to my transform tool and just kind of align this island the same rotational way as this island here, just so we can kind of get that nice and straight. So this like this line right here on the grid is straight. I think that's looking good. Now we can move on to the legs. So this'll be kind of like a, if you think about how we, or how you stitch together genes. Okay. So let's go grab our UL for loop selection.
EJ Hassenfratz (35:43): So you would have a stitch for one of the legs here, right. And then you'd have like a seam down the middle. Okay. And then the seam on the side. So we could do a loop selection, uh, like this, where we have, whoops, let's grab this loop selection. So grab, whoops, you L grab that loop selection again, grab this loop selection here. So you can see how this loops all the way around. And this is basically like, how do you know seams of your pants, uh, would be, uh, a little bit, I guess. Uh, but I think this will look good. And we have a scene here on the inside. We have a seam on the outside. Uh, so if you didn't want the seam on the outside, you could always de-select it. Uh, I guess I'll do that. Let's just, de-select the seam here. And then it's okay to have like a seam go right there and then we'll just go and do that mirror selection. Let's make sure this actually mirrored correctly looks like it did, and we'll go to UV and rep and you can see that now we have way less distortion on legs and here's the leg here. So again, we can also rotate these to be leased in the same direction. So something like this, there we go.
EJ Hassenfratz (37:09): And now all we have left is the torso. So again, if you think of a jacket or a t-shirt, you would have like a seam around the edge here. Uh, let's grab our loop selection again. And what I'm going to do is really select the arm loop. Let's uncheck the socket selection here. So we make sure we're getting all those loops and we'll make this loop selection on the leg and we'll make a loop selection on the neck and let's go ahead and mirror the selection. So we have the loop on the right side of the body, and basically what I'm going to do. You can do this one of two ways, uh, again, depending on what texture you're applying, like, is it fine to have a seam here on the side or do you need to cut around the back of the character and unwrap that way?
EJ Hassenfratz (37:59): So let's do this two different ways. So we can do a seam just down the back here, or we can do a seam around the outside here and have it basically like cut in two and in will flatten out both the front and the back. So this is very dependent on what your texture is going to be. Is it a big deal if you see a seam on the side here, or are you just putting like a basic, like a color channel on it? Uh, so that's very dependent on what you do there. So I think what I'm going to do is I'm just going to split this, uh, right down the side here. So I am going to check on this stop at selections. And it's like that select this right here and to make sure I get this seam, let's see this falls all the way up to right here.
EJ Hassenfratz (38:59): And you'd go right under here, grab that seam. And then we will mirror. It looks like we already got that side. Did we get this seam? No, it would just mirror. And that seam will get selected. And, uh, again, moment of truth, UV unwrap, and you can see how that flattened it out. Uh, and it's almost like we have like a flak jacket, I guess you could say, uh, where we have the bit on the front bit on the back. And the texture is very undistorted, which is really nice. But again, you have the seams right here. So if that's a big deal, uh, you might have to go to the alternate route where you just have a seam down the back, uh, and then you unwrap that way. So I think this is looking pretty good. We have everything kind of undistorted for the most part.
EJ Hassenfratz (39:53): Uh, the head is probably the most distorted thing. So there's one other thing that can help us with, uh, distortion and trying to organize our UV islands and all that good stuff. So the first is, if we look at our view and go to distortion, you can see there's a lot of distortion on the head. Again, this is the heat map where blue polygons are, uh, stretched and red polygons are squashed. So we have a lot of sources in there, a little bit of distortion on the legs. Uh, the torso looks pretty good. Uh, but what I'm going to do is command or control a, to select all these polygons and the main go to this, relax UV and hit apply, and we can do this multiple times. You can try the other ones, see what that does really doesn't change all that much. Uh, but this is a looking a little bit better.
EJ Hassenfratz (40:49): You saw a little bit of movement going on there. And then what we can do, uh, at this point is organize all these UV islands to maximize this texture space. So we want to try to have all these islands fill up as much of this texture space as we can, so we're not wasting the space. Okay. So what we'll do is we'll use this geometric UV packing and just hit apply. And you'll see that now everything's orientated different ways and we're filling out this whole texture square very nicely. And you can see this kind of helped, uh, with how clean this grid looks as well. So now what we can do is let's start, let's go into buddy paint 3d, and we're going to do that. Wizard setup, let's grab our wizard magical wizard. And the only thing we're going to be worried about is just the sloths SDS.
EJ Hassenfratz (41:46): So we can uncheck all these other objects here. So we had the eyes and the nose. We don't want to text you those, and we'll go to the slot SDS and the Slav hit next. We want to use the UVS we already made. So we don't want to recalculate. So we'll uncheck that and single material. That's fine. We can choose the color. So maybe like a slothy, maybe he's gray, like brownish gray, something like that and hit, okay. So that'll be the color, uh, in the color channel of the material that's going to be created. And again, we're going to do two K, so 20, 48 and 2048 for two K uh, texture and finish close. And, uh, here's the brush. And you can see, as I'm kind of going around, let's go to the brush tool and up the size here, you can see that that circle is not getting distorted into a, into an oval or anything like that.
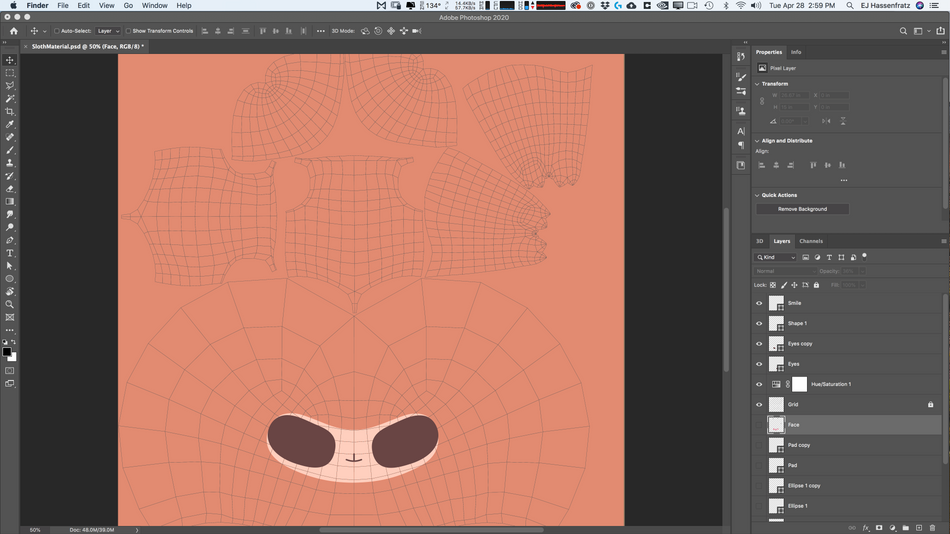
EJ Hassenfratz (42:46): And you can see, we did a pretty good job of UV unwrapping. Now you'll notice the seams here as I go use the paint brush. And remember there, there was a seam there. So if I draw, you know, get like path, so I'll undo that, and this is looking pretty good. So what we can do now is we can either paint details directly on our body paint layout. And what I'm going to do is go to my layers and make sure I'm not painting on the background, but create a new layer. And I can paint onto this. I need to make sure I got a new color. So we'll make this darker. And I kind of paint the mouth like this. Actually, let's do this a little bit better. Let's, let's be an artist here and draw a, so there, we got the mouth and, uh, let's make the dark areas around the eyes.
EJ Hassenfratz (43:40): And so we'll make the size a little bit bigger. And you'll notice that as long as I'm hovering over this object, that's in front of it. I can't paint. Okay. So this is where this projection painting will come in handy because we can actually just paint it behind this eye. And the important part about projection painting. If I paint up here, you'll see that it's just kind of painting flatly on our object there. Uh, so you want to paint in, you know, like a flat view, like a flat projection, and basically I can paint behind this eye and I can do something like this. So make that little IBET here. Now, what you could possibly do as a workflow is, you know, it's kind of hard to paint everything in here. So what you might want to do is paint details like this in clean it up in Photoshop because holy cow, that's not good.
EJ Hassenfratz (44:39): That's not a good job. Uh, but what you could do instead is like, you know, precisely outline where you want that the eye black around the eyes of a Slav is, and just like, just for a guide and do something like this. So like, okay, that's, that's looking pretty good. And if it had like a, you want it to have like a white belly or something, you can just go out of this mode here. We can just paint like a little belly just like that. Maybe that's good enough, you know, that's good circle, DJ. I can do a circle. Uh, maybe there's pads on the, under the pads. I don't know if they have pads on the arms or the hands, but this one will have pads, but you can just easily paint things on like that. Um, maybe on the bottom here, there's pads on the feet.
EJ Hassenfratz (45:33): And again, we can fix this in, in Photoshop. Uh, we can use, uh, some of these other tools here. There's an eraser. We can erase stuff on this layer. Uh, cause again, we're, we're working on this top layer here and the underlying background color, there is a blur tool and, you know, burn sponge, uh, there's a smudge and smear tool. So we can like smear that. And this is because of the UV seems so that's really not gonna probably help us that much. Uh, but just to let you know that there are all these different tools here. So again, very much like Photoshop. Um, but as far as the workflow of using all this stuff as a guide and exporting this out to Photoshop, so you can actually precisely draw on your details and just using this as a guide. Uh, I just want to show you how you can save this out with the UV grid intact.
EJ Hassenfratz (46:26): So what I'm going to do is I'm going to make the brush size about two, a size of two. So it's pretty small. Actually, let's go to like one so pretty small, and this is going to be the brushstroke that will actually be used to highlight all of the UV lions here. Okay. So what I'm gonna do is go to the UV 3d. I'm going to select the object, select the material, go back into the layers. And what I'm going to do is go into this texture tab. This is where we can go to layer and choose outline polygons. But of course it's great out because we don't have any polygon selected. So if I go to my live selection tool, and if these aren't selected automatically just click on one polygon commander, control a to select them all, and we can go to layer outlined polygons.
EJ Hassenfratz (47:20): And actually I'm going to undo that because what I want to do is create a new layer here first. So I apply that grid to this top layer. And now I'll go back to layer, outline polygons. It'll do its thing. It will use the color and the, uh, brush size to make that grid. And let's go and just turn off, let's go back to the view and you can turn off everything, but this top layer and you can see there's that grid. Okay. And if we want to save out all of these layers as the, a Photoshop file, we can go ahead, go to texture, go to file, save texture. As, and since we have multiple layers, let's grab a Photoshop. We'll save out as a Photoshop file click. Okay. And we'll just make this slough PSD. And this will have both the, uh, textured layer, like the guides for the mouth and all that good stuff.
EJ Hassenfratz (48:20): And then the grid layer and then the background as well. So let's go ahead and hop into Photoshop and grab that slot PSD. And here we go, we have the background with that grid layer and then some of the details. So you can see via zoom in right down here, here's the eyes. So those circles are where the eyes would be. So we can actually just go in here and start accurately painting these details, bring the opacity up there. We can accurately place so much more accurate here. I really need to give my, uh, hand-eye coordination on my Wakeham going, but you can see that you can paint in the details here, painting the details here, much better job than I'm doing. Here's that mouth just, all this to say is that you can make all these changes all these doodles. That's the leg. Here's the back, here's the arms.
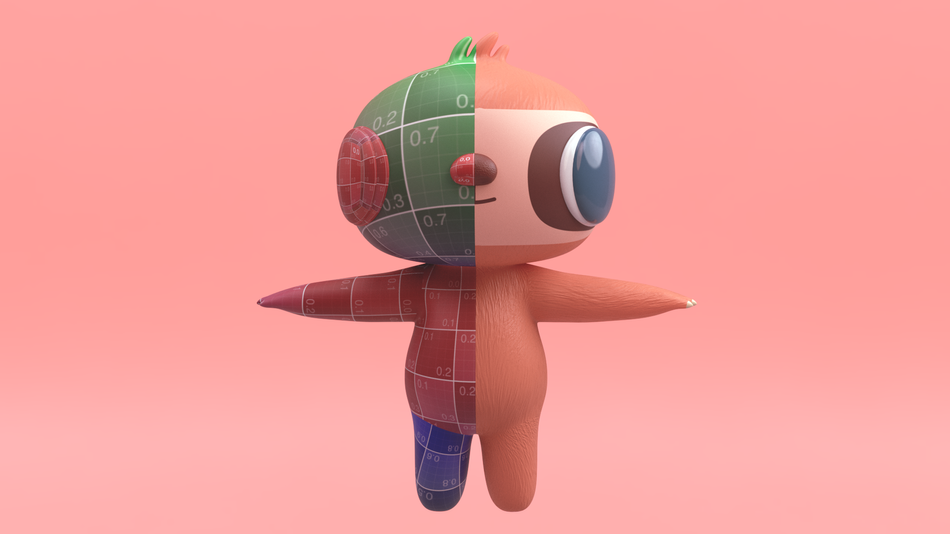
EJ Hassenfratz (49:23): I'm just scribbling at this point, just to show you a point and we can turn off the grid. Okay. We can even turn off the base layer and just have this as an overlay. But what I'm going to do is then save this out and then go back into cinema, go back to my objects here, let's go back to a standard and we can load actually replace this PSD just by reloading it and just say yes, and there's the amazing creepy, uh, slot, but you can see all those textures are applied. All those brush strokes that we made in Photoshop. And if you're a better artist than I am, you can really make a fantastic texture with no distortion. Because again, we are all reliant on mats, really good UV map that we made, uh, by unwrapping our model in a way that we could easily texture and add details onto this guy, or, you know, we make this into the checkerboard Slav and just apply this texture on him.
EJ Hassenfratz (50:31): And you can see even that texture, uh, the checkerboard is not the story that very much at all. Again, you know, if we wanted to straighten out the legs, I can see, okay, there's the legs. There's that selection. Let's rotate this and kind of adjust that to try to straighten it out. Okay. So, uh, this is like very basic level how to unwrap things. Uh, but you can see that the workflow is very applicable depending on what model you're, you're working on. And I think the, the main thing is that the procedural nature in which you can unwrap things like the neck first and then add the seam in the back and then see what that looks like. And then on wrap the back and the, the arms and really audition cuts is a very flexible and easy way to get into a UV unwrapping.
EJ Hassenfratz (51:19): So you can make your own fantastic Slav with amazing textures. So one last thing is this texture. I mean, it's a horrible texture to begin with, but you can see that the resolution is pretty poor to fix that double-click on your material, go into viewport and change the texture preview side from default to something like that to K because we made that a two K texture. So once you do that, you can see, we have very high quality scribbles and no, this wasn't a two-year-old texturing. This, it was a 37 year old. I see you may not be able to shoot lasers from your eyes or fly, but you know how to UV unwrap now. And that's basically the Superman equivalent of lasers shooting from your eyes in the world of 3d. Now, if you want to keep up to date with all of the latest happenings in the world of cinema 4d in MoGraph in general, be sure to hit the subscribe button and I will see you in the next one
ENROLL NOW!
Acidbite ➔
50% off everything

ActionVFX ➔
30% off all plans and credit packs - starts 11/26

Adobe ➔
50% off all apps and plans through 11/29

aescripts ➔
25% off everything through 12/6
Affinity ➔
50% off all products

Battleaxe ➔
30% off from 11/29-12/7
Boom Library ➔
30% off Boom One, their 48,000+ file audio library
BorisFX ➔
25% off everything, 11/25-12/1

Cavalry ➔
33% off pro subscriptions (11/29 - 12/4)

FXFactory ➔
25% off with code BLACKFRIDAY until 12/3

Goodboyninja ➔
20% off everything

Happy Editing ➔
50% off with code BLACKFRIDAY

Huion ➔
Up to 50% off affordable, high-quality pen display tablets

Insydium ➔
50% off through 12/4
JangaFX ➔
30% off an indie annual license
Kitbash 3D ➔
$200 off Cargo Pro, their entire library
Knights of the Editing Table ➔
Up to 20% off Premiere Pro Extensions
Maxon ➔
25% off Maxon One, ZBrush, & Redshift - Annual Subscriptions (11/29 - 12/8)
Mode Designs ➔
Deals on premium keyboards and accessories
Motion Array ➔
10% off the Everything plan
Motion Hatch ➔
Perfect Your Pricing Toolkit - 50% off (11/29 - 12/2)

MotionVFX ➔
30% off Design/CineStudio, and PPro Resolve packs with code: BW30

Rocket Lasso ➔
50% off all plug-ins (11/29 - 12/2)

Rokoko ➔
45% off the indie creator bundle with code: RKK_SchoolOfMotion (revenue must be under $100K a year)

Shapefest ➔
80% off a Shapefest Pro annual subscription for life (11/29 - 12/2)

The Pixel Lab ➔
30% off everything
Toolfarm ➔
Various plugins and tools on sale

True Grit Texture ➔
50-70% off (starts Wednesday, runs for about a week)

Vincent Schwenk ➔
50% discount with code RENDERSALE

Wacom ➔
Up to $120 off new tablets + deals on refurbished items


All-Access Pass
Unlimited access to 50+ courses, unlimited critique, live events, and 24/7 community. Join School of Motion All-Access today.