Start Your 3D Journey in Cinema 4D
Master the essentials of 3D modeling, lighting, and animation in C4D. Enroll in All-Access to unlock C4D Basecamp and 50+ other courses.

Becoming a Camera Master in Cinema 4D
If you’re new to working with cameras in Cinema 4D, the info below will help you step up your game. Since cameras in Cinema 4D are modeled on what real world cameras can do (and then some), it’s helpful to cover some basic photography principles. Download the example .c4d files and follow along.
{{lead-magnet}}
Focal Length
Without getting overly technical, focal length of a camera lens defines how wide or narrow you can see. Create a Cinema 4D camera object (Create menu > Camera >Camera) and you’ll find the focal length under the object properties in the Attribute Manager. A small focal length like 10mm-15m is considered super wide while a long focal length like 100-200mm is considered telephoto.
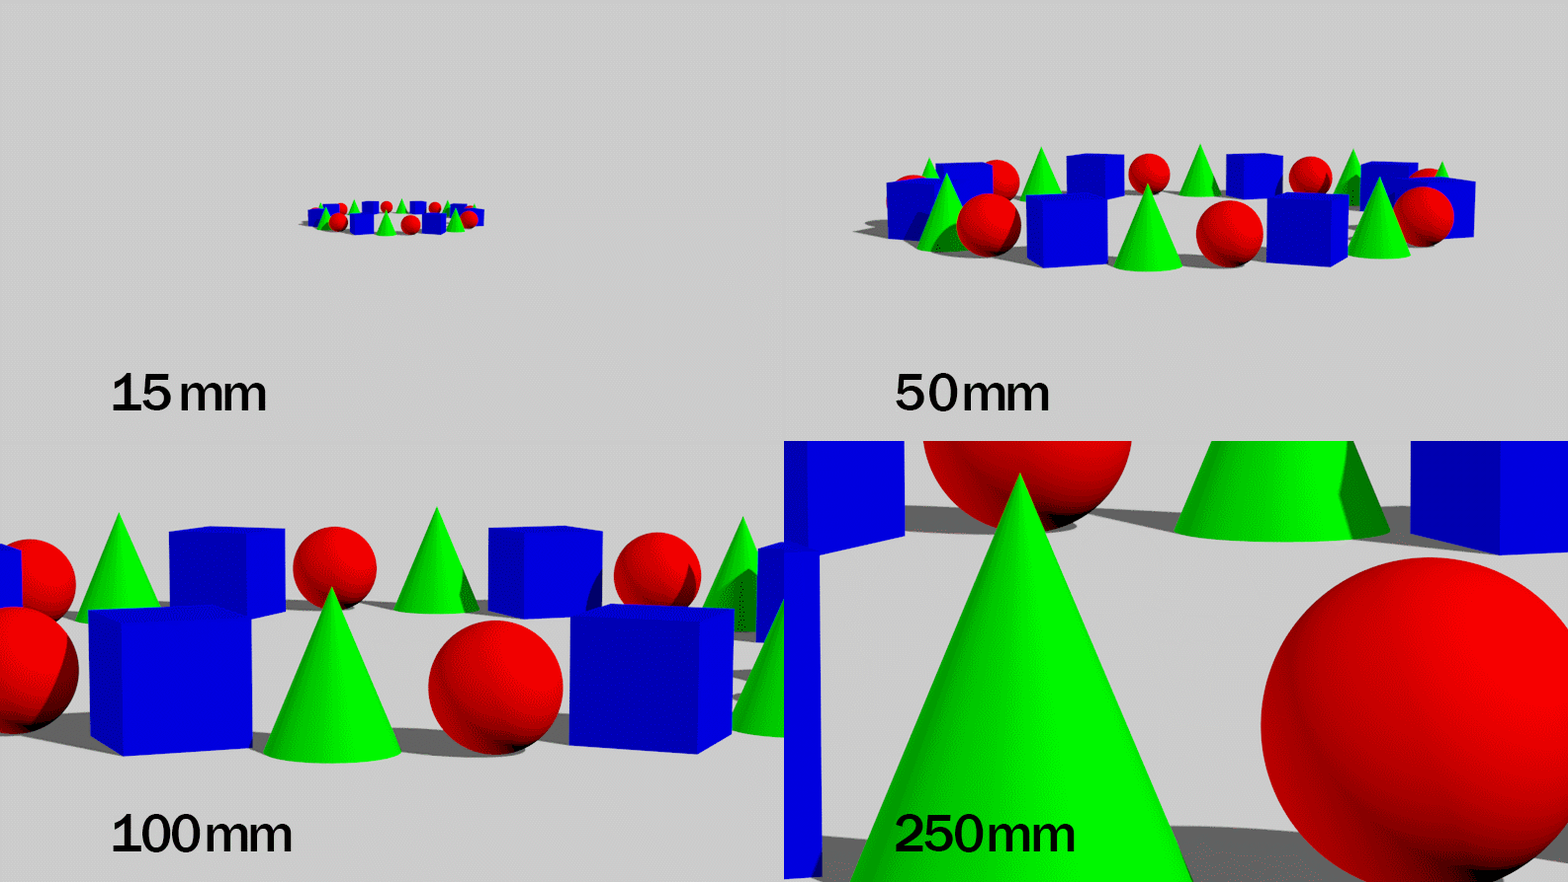
Generally, with longer lenses, you’ll have to back up the camera farther away to fit the subject in the frame. With shorter lenses, the opposite is true. Just try not to get toooo close, right Will?
There’s tons more to be covered regarding focal length so if you want to learn more here's a great place to read more (if you're into that sort of thing.
If we animate along to short focal length while simultaneously animating the camera getting closer to the subject we can get some dope results. This is called the dolly zoom effect (thanks Irmin Roberts) which you’ve no doubt seen before thanks to some dudes named Hitchcock & Spielberg. Ya might have heard of em.

F-Stop & Depth of Field (DOF)
On a real camera, F-stop controls how large the opening of a lens is (and how much light gets in) but also how much depth of field (the range of what’s focused & blurry) the image has. This article goes into the nuts & bolts of it, but to simplify things, we generally need to know that: Lower F-Stops = shallower depth of field (more blurry BG & FG)
Higher F-stops = deeper depth of field (less blurry BG & FG)If you’re going for photorealism when working with cameras in Cinema 4D, any version of C4D except Lite and Prime can recreate these DOF effects by using the Physical Renderer. To enable it, go to the Render menu > Edit Render Settings and make sure ‘Physical’ is selected from the drop down menu. Also under the Physical options > Basic tab enable Depth of Field.
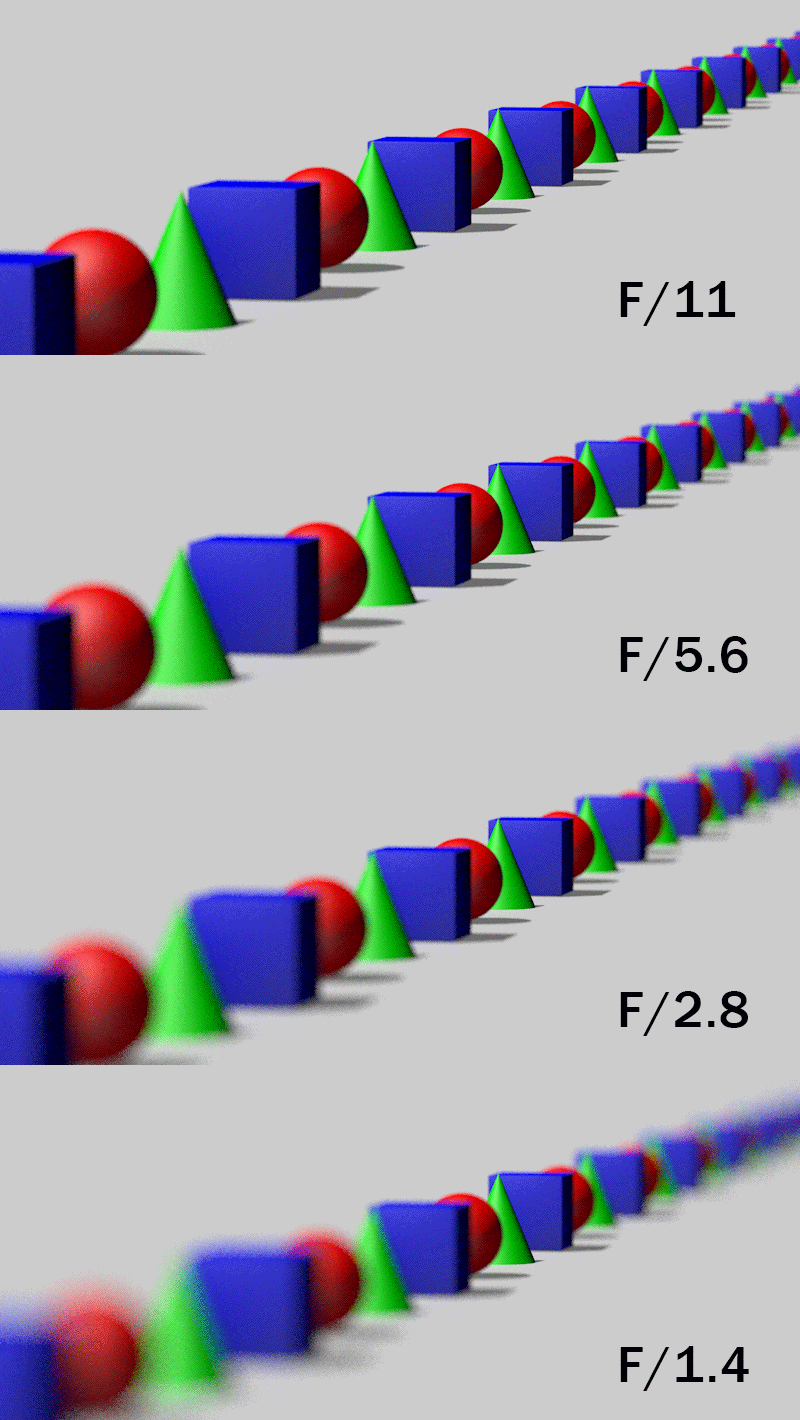
Depth of Field Tip: Creating your scenes using real world scale will get you predictable results. If your scene is larger or smaller than real world, you’ll have to exaggerate the F-stop values to compensate (ie F/0.025 instead of F/1.4 for shallow DOF)
Focus
Now that you’ve introduced DOF, how do you decide what’s in focus? Under the Object tag of the camera object you define the focus distance numerically or hit the pick arrow icon to select the object in the viewport you want in focus. Once you start animating the camera however, both of these approaches pretty much break since you’ll then need to animate the focus distance to maintain focus. Boo. That’s where the Focus Object comes in...
You can ‘lock in’ your focus by simply dragging an object into this field and no matter where you camera moves, the focus sticks. To get even more flexibility, use a Null object as your focus object. This way you can animate it (or not) and get easy visual feedback directly in the viewport as to where your focus is.

Exposure
At this point, since this is 3D, we’re kinda cheating in that we’re getting a perfect exposure every time regardless of our F-Stop. You can read about how F-Stop relates to exposure here.
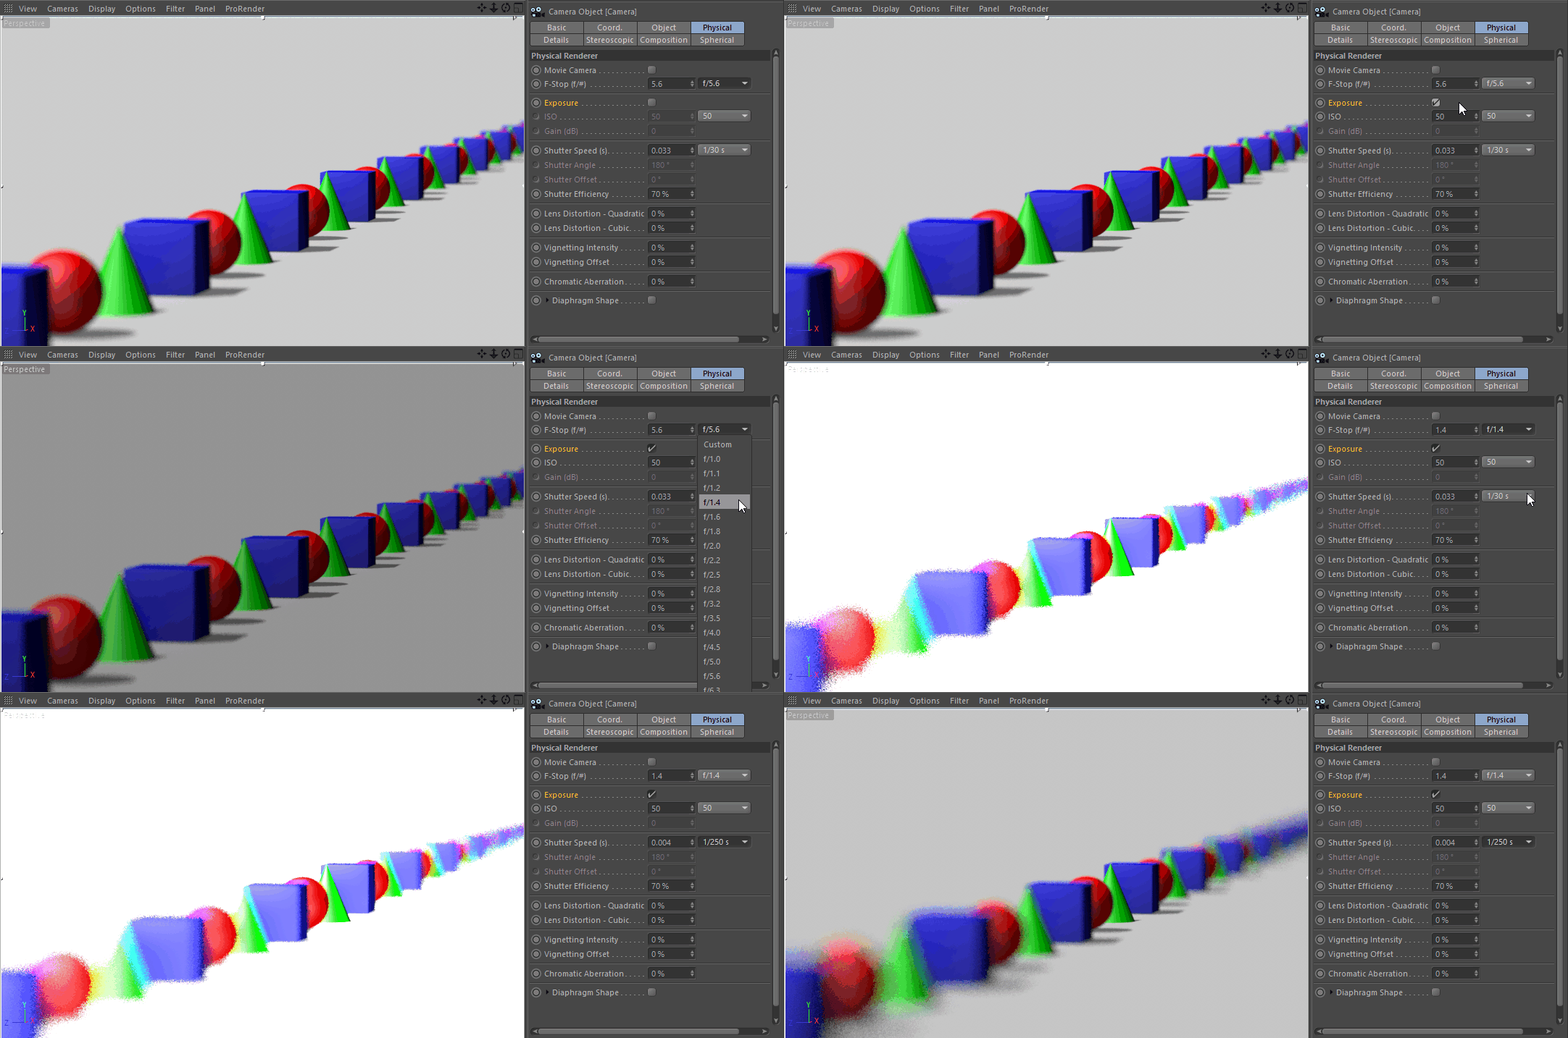
To recreate photorealistic over and underexposures using F-stops, we have to enable the ‘exposure’ option in the camera’s Physical tab. By changing our F-stop to a higher value, we start to under expose and decrease or depth of field, while smaller F-Stops overexpose and increase our DOF. Just like in the real world, we can adjust the shutter speed to compensate for the exposure.
Shutter Speed
Speaking of shutter speed, we can use it to control how much motion blur appears in our renders. Get the low down on shutter speed here. When working with cameras in Cinema 4D we can control how much or how little motion blur appears by dialing up or down the shutter speed.
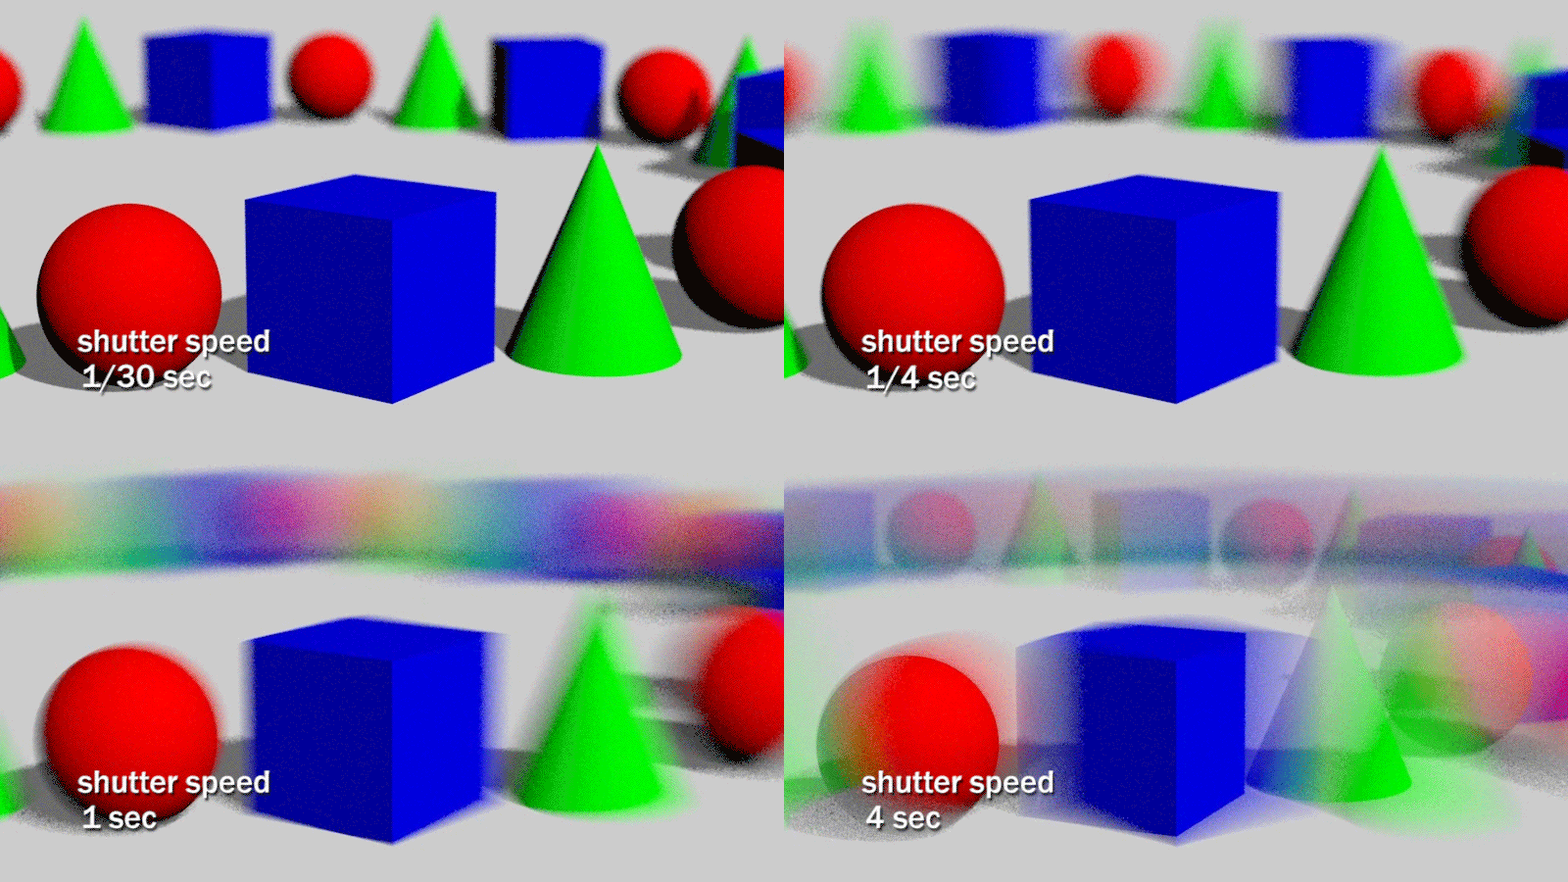
Making the Camera Move
To move the camera as you view thru it make sure that you’ve got the camera selected by either enabling the active camera button in the object manager, or selecting the camera via the viewport menu > Cameras> Use Camera. Once you’re viewing thru the camera, you can use the same navigation tools used to move/rotate/zoom in the viewport. Of course you’re also free to move & rotate the camera from other views as well, grabbing the axis handles of the selected camera.
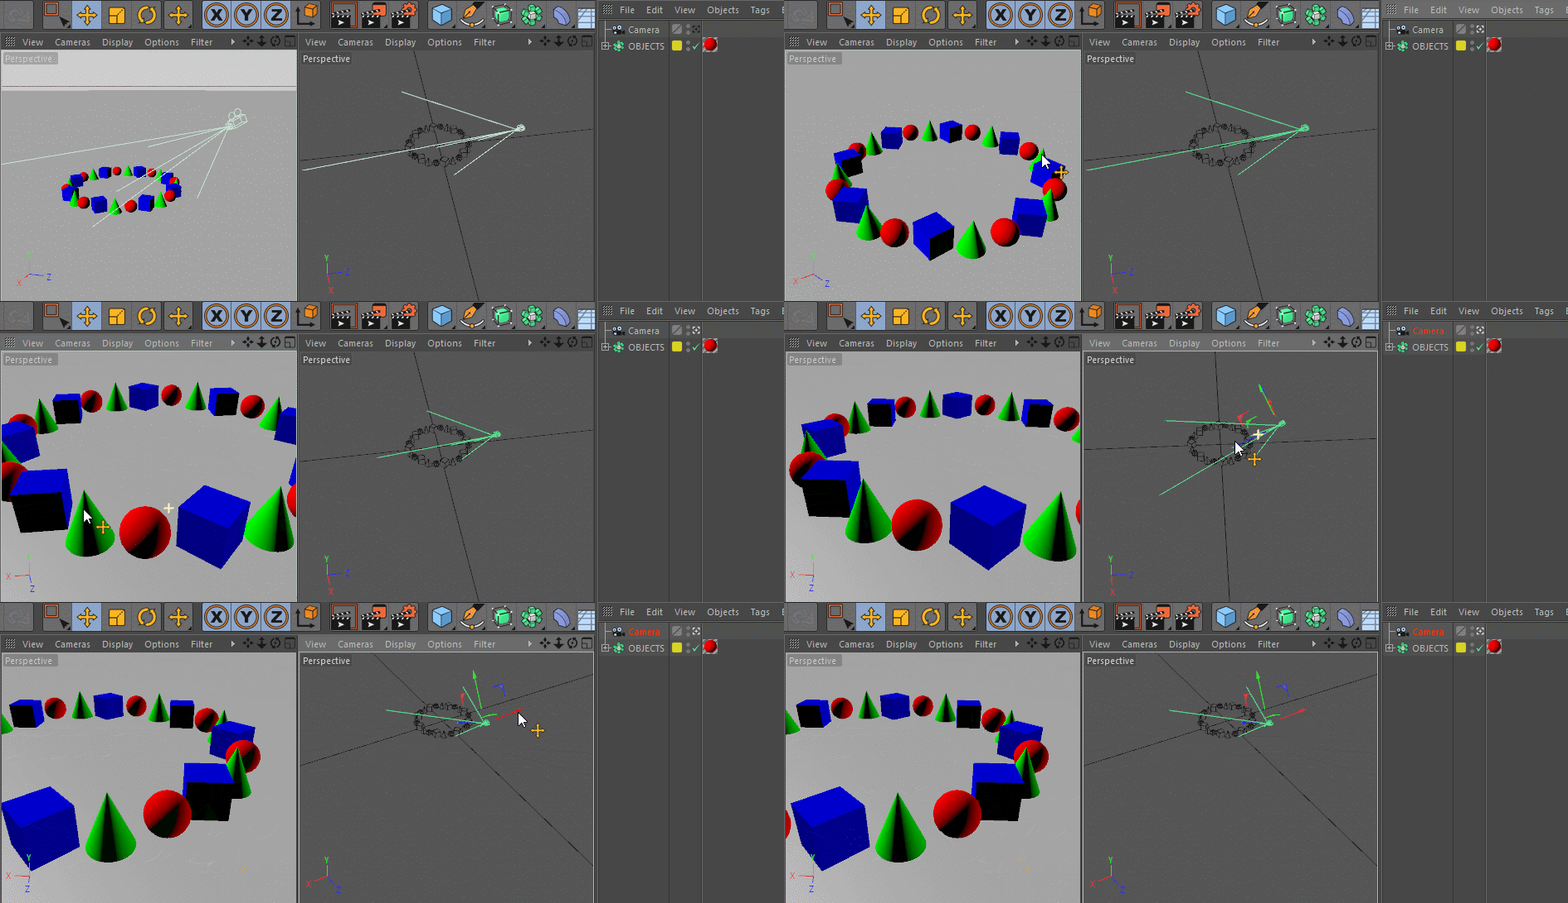
Here’s a little bonus tip to combat something that’s probably already happened to you when working with cameras in Cinema 4D: As you’re orbiting the camera in the perspective view, you might accidentally orbit the camera in a 2D view, which can drive you to wanna dropkick kitty cats. Before you give old Garfield the boot, simply hold down Shift + alt/option as you drag the 2d view back into place. Meow-zaa!

Camera Rigs in Cinema 4D
Animating the camera can be as simple as dragging it around the scene and setting keyframes but if you want to level up your moves and have an easier time doing it, you’ll want to use some kind of camera rig. Rigs can get as complex as you need so start with these simple ones to see what options open up for you.
1. SIMPLE CAMERA RIG (2 NODE)
This one involves using a couple of null objects that help separate out a few tasks, specifically we’ll separate what the camera is pointed at and what the camera orbits around. If you’re an After Effects user, you might recognize this as a two node camera. Add 2 new nulls & rename one ‘Target’ and the other “Parent”.Select your camera and right click > Cinema 4D Tags > Target. If you can guess by the name, this tag points the camera to whatever is defined in the target object tag, in this case drop the ‘Target’ null in and the camera should now point to it. Make the camera a child of the ‘Parent’ null. Now if you move the parent, the camera follows but stays aimed at our ‘Target’ null. Sweet, right?! Switch to the rotate tool and rotate the ‘Parent’ null for clean arcs that orbit around the ‘Parent’ position. The great thing about this setup is that once you’ve animated the target and parent nulls, you still have the freedom to animate the camera object itself.
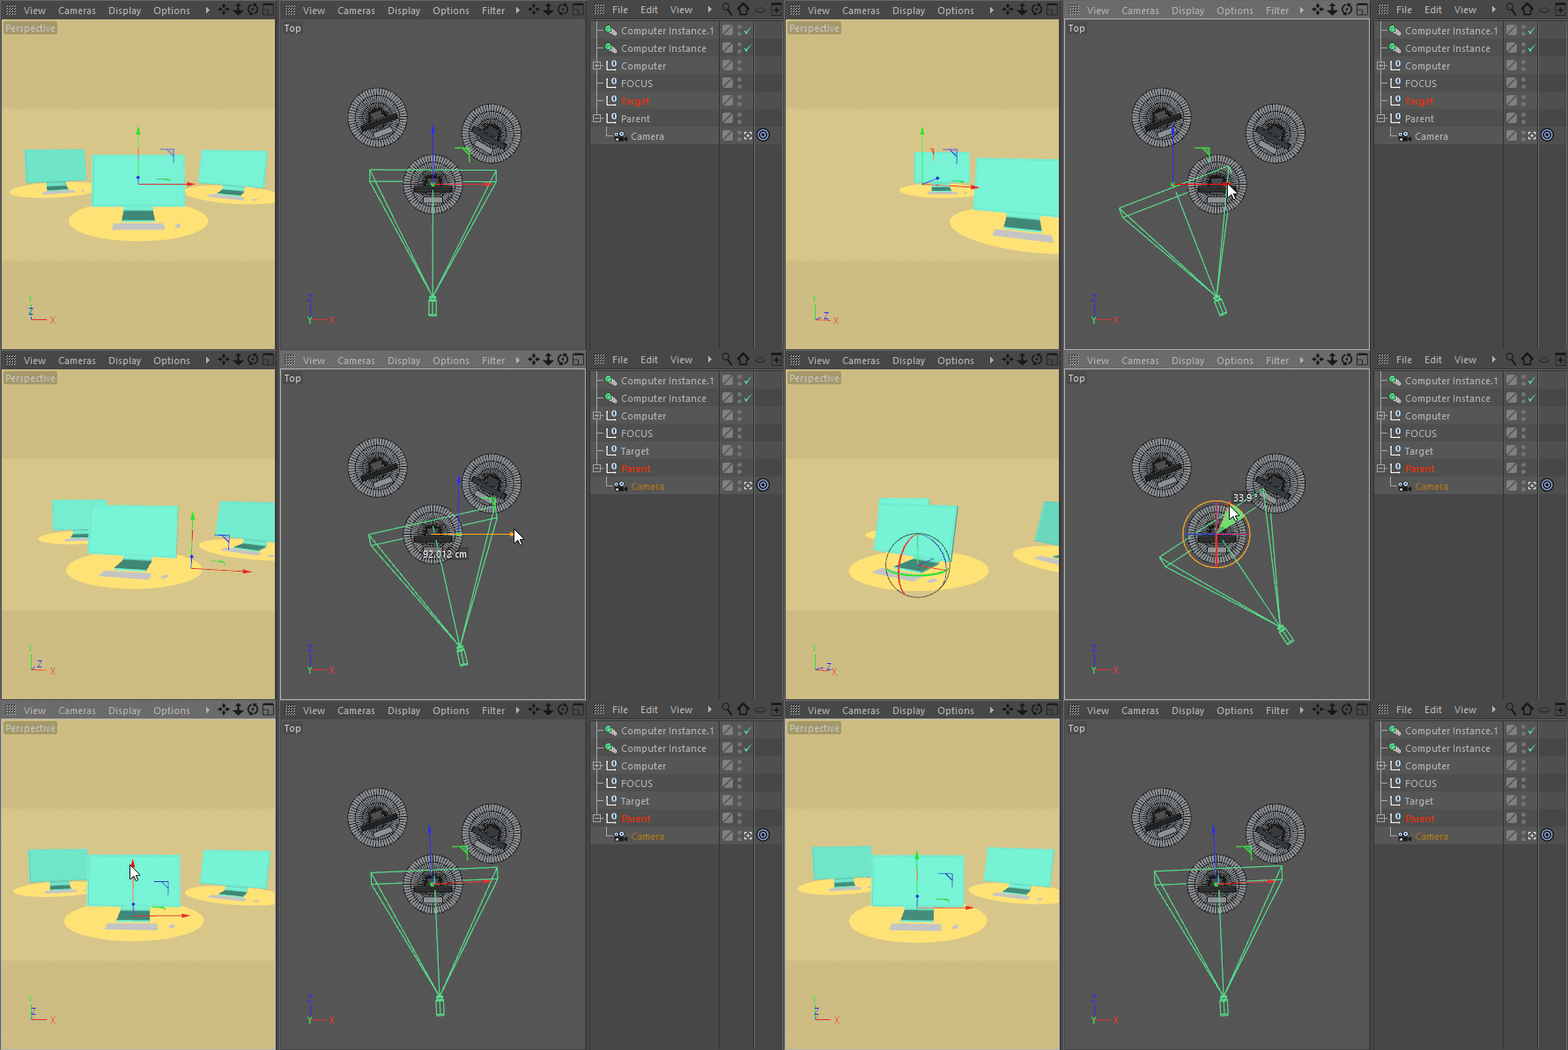
2. SIMPLE CAMERA RIG (SPLINES)
This second rig uses splines to draw out the path the camera will follow. Draw out a path using the pen tool (Create menu > Spline > Pen). On your camera, right click > Cinema 4D Tags > Align to Spline. On the tag you just added, drop your spline object into the spline path. Boom! All you need to do now is animate the ‘Position’ property of the tag to make the camera move along the spline.
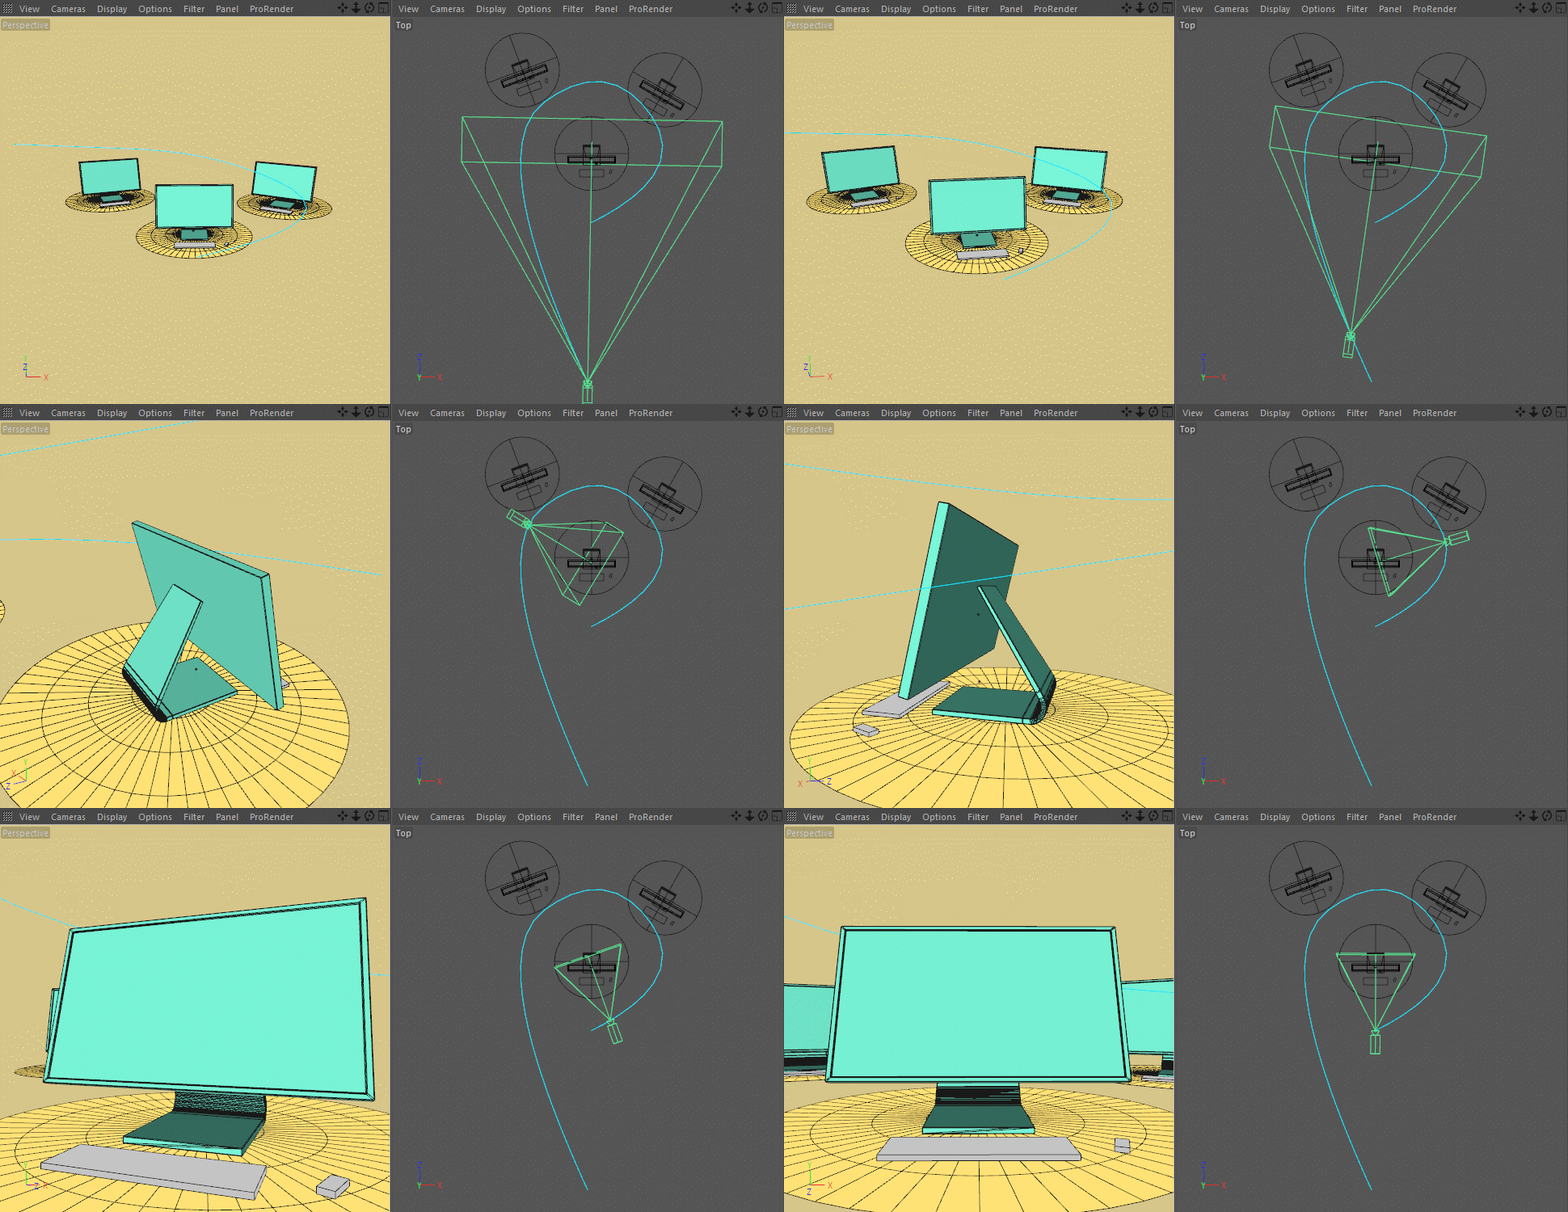
Some spline path tips for ya: If you’re going for all smooth arcs, draw out your path using B-Splines (Pen Tool > Type > B-Spline). It’ll smooth out as much as possible between two points, making your life easier. Secondly, if you don’t have a target tag on your camera, you can make the camera look down the path like when you ride a roller coaster. Just hit the ‘tangential’ button on the Align to Spline Tag.
One nice advantage about this approach is you can more easily adjust your camera path after the fact. Just select the points in your spline object and tweak. Uh oh, the client just called and wants the camera to orbit all the computers? No sweat!

Another advantage is that you separate the timing of the camera move from the shape of the move itself. The path has the move, and the align to spline has the timing. The camera move above uses only 2 keyframes on the align to spline instead of 5 or more keyframing the camera directly.
VIBRATE TAG
Sometimes you want to add a little human element to your camera moves, maybe to give off a handheld vibe. In that case add a Vibrate tag to your camera and enable rotation and/or position with small values.

ENROLL NOW!
Acidbite ➔
50% off everything

ActionVFX ➔
30% off all plans and credit packs - starts 11/26

Adobe ➔
50% off all apps and plans through 11/29

aescripts ➔
25% off everything through 12/6
Affinity ➔
50% off all products

Battleaxe ➔
30% off from 11/29-12/7
Boom Library ➔
30% off Boom One, their 48,000+ file audio library
BorisFX ➔
25% off everything, 11/25-12/1

Cavalry ➔
33% off pro subscriptions (11/29 - 12/4)

FXFactory ➔
25% off with code BLACKFRIDAY until 12/3

Goodboyninja ➔
20% off everything

Happy Editing ➔
50% off with code BLACKFRIDAY

Huion ➔
Up to 50% off affordable, high-quality pen display tablets

Insydium ➔
50% off through 12/4
JangaFX ➔
30% off an indie annual license
Kitbash 3D ➔
$200 off Cargo Pro, their entire library
Knights of the Editing Table ➔
Up to 20% off Premiere Pro Extensions
Maxon ➔
25% off Maxon One, ZBrush, & Redshift - Annual Subscriptions (11/29 - 12/8)
Mode Designs ➔
Deals on premium keyboards and accessories
Motion Array ➔
10% off the Everything plan
Motion Hatch ➔
Perfect Your Pricing Toolkit - 50% off (11/29 - 12/2)

MotionVFX ➔
30% off Design/CineStudio, and PPro Resolve packs with code: BW30

Rocket Lasso ➔
50% off all plug-ins (11/29 - 12/2)

Rokoko ➔
45% off the indie creator bundle with code: RKK_SchoolOfMotion (revenue must be under $100K a year)

Shapefest ➔
80% off a Shapefest Pro annual subscription for life (11/29 - 12/2)

The Pixel Lab ➔
30% off everything
Toolfarm ➔
Various plugins and tools on sale

True Grit Texture ➔
50-70% off (starts Wednesday, runs for about a week)

Vincent Schwenk ➔
50% discount with code RENDERSALE

Wacom ➔
Up to $120 off new tablets + deals on refurbished items


Start Your 3D Journey in Cinema 4D

Master the essentials of 3D modeling, lighting, and animation in C4D. Enroll in All-Access to unlock C4D Basecamp and 50+ other courses.


