
All-Access Pass
Unlimited access to 50+ courses, unlimited critique, live events, and 24/7 community. Join School of Motion All-Access today.

Animating a character in After Effects can feel like herding cats: limbs flying everywhere, anchor points betraying you, and that sinking feeling when your carefully rigged arm decides to detach mid-scene. Whether you're a motion designer tackling your first walk cycle or a seasoned animator looking to speed up your workflow, these five hacks will help you animate characters faster, cleaner, and with way less stress.
Quick Takeaway: Master these five workflow hacks to streamline 2D character animation in After Effects: use null objects as joint controllers, leverage the Anchor Point tool for instant pivot fixes, create custom expression rigs for repeated movements, build a layer naming system that actually makes sense, and use shape layer limbs for faster iteration.
1. Use Null Objects as Joint Controllers (The Puppet Master Trick)
Here's the problem: when you're animating a character with multiple limbs, you end up with a timeline that looks like a Jackson Pollock painting. Keyframes everywhere, no clear hierarchy, and zero fun when the client asks for "just a small tweak."
The hack: Instead of keyframing your character parts directly, parent each limb to a null object positioned at the joint. These nulls become your puppet controls: rotate the null at the elbow, and the forearm follows naturally.
Set this up by creating a null object (Layer > New > Null Object), positioning it exactly where the joint should be, then parenting the limb layer to the null. Now you're animating joints, not layers. It's cleaner, more intuitive, and when you need to adjust the entire arm, you're working with a logical hierarchy instead of hunting through dozens of nested layers.
This approach mirrors how professional riggers work (learn more about this in Character Animation Bootcamp), where understanding parenting hierarchies is fundamental to any complex animation.
Pro tip: Name your nulls clearly: ("L_Shoulder_CTRL", "R_Elbow_CTRL") so you always know what you're grabbing.
2. Master the Anchor Point Tool (Stop Wrestling with Pivots)
If you've ever rotated a character's limb and watched it spin around some random point in space, you know the pain. After Effects defaults to placing anchor points in the geometric center of your layer, which is almost never where you actually need them for character animation.
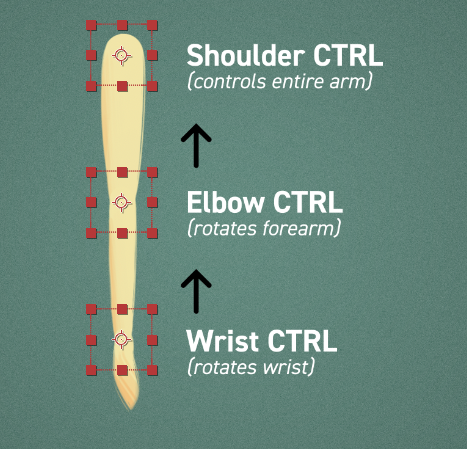
The hack: Use the Anchor Point Tool (Y) or an Anchor Point Mover Script to instantly snap anchor points to exactly where you need them: at joints, rotation points, or wherever makes mechanical sense for your character.
For a character's upper arm, you want the anchor point at the shoulder. For the forearm, it goes at the elbow. Getting these positioned correctly from the start saves you from that awful moment where you realize you've animated 50 keyframes with the wrong pivot point.
If you're working with imported Illustrator or Photoshop files (which you will often be for 2D character animation), After Effects places each layer's anchor point at its center by default. Run through your character layers immediately after import and reposition every anchor point before you animate a single keyframe.
3. Build Expression Rigs for Repetitive Movements
Walk cycles. Blinks. Breathing. Character animation is full of movements that repeat with subtle variation. Keyframing each instance manually is not just tedious, it's a workflow killer!
The hack: Use expressions to create reusable animation behaviors. For a simple breathing cycle, you can create a smooth, looping scale animation with a single line of code:
freq = 0.5; // breaths per second
amp = 5; // scale percentage
[100 + amp * Math.sin(freq * time * Math.PI * 2), 100];
Drop that on your character's chest layer's scale property, and it breathes forever. Need to adjust the breathing speed? Change one number. Want the shoulders to move? Duplicate the expression and adjust the amplitude.
The beauty of expression-based animation is that it's non-destructive and endlessly tweakable. You can layer keyframed "hero" movements on top of expression-driven loops, giving you both consistency and control.
For more advanced expression techniques, Expression Session dives deep into building sophisticated expression rigs entirely within After Effects.
Going deeper: Learn to use the loopOut("cycle") expression for true loop-based animation, or explore wiggle expressions for organic, randomized motion in secondary animation like hair or clothing.
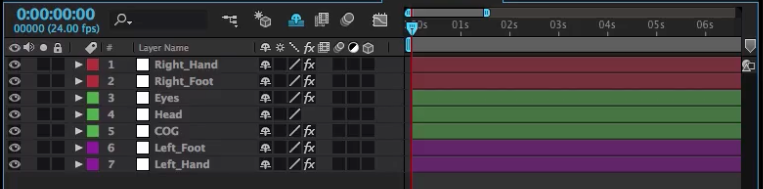
4. Create a Smart Layer Naming System
Open any character animation project you made six months ago. Can you immediately understand what "Layer 47" does? Probably not, unless you named it something useful.
The hack: Establish a naming convention before you start animating. Use prefixes to indicate layer type and position:
- L/R for left/right
- _BASE for the main body layer
- _CTRL for null controllers
- FG/BG for foreground and background elements
Example hierarchy:
Character_BASE
├─ L_Arm_Upper
│ └─ L_Arm_Upper_CTRL
├─ L_Arm_Lower
│ └─ L_Arm_Lower_CTRL
├─ R_Arm_Upper
└─ R_Arm_Upper_CTRL
Color-code your layers too. Assign one color to all control nulls, another to limbs, another to facial features. When you're deep in the timeline at 2AM trying to find the left eyebrow layer, that color-coding becomes your lifeline.
This isn't just about organization, it's about workflow speed. When everything is named and color-coded consistently, you can find any layer instantly using After Effects' search function (Cmd/Ctrl + F in the timeline).
5. Use Shape Layers for Limbs
Most character animators import artwork from Illustrator or Photoshop, which works great…until you need to make changes. Client wants the arms longer? Back to Illustrator, re-export, re-import, re-position. It's workflow death!
The hack: Build your character's limbs using shape layers directly in After Effects. Yes, it feels wrong at first if you're used to designing in Illustrator, but the payoff is massive.
Shape layers are vector-based, infinitely editable, and live entirely in After Effects. Need to adjust a limb's length mid-animation? Just grab the shape path and extend it. Want to add thickness to an arm? Adjust the stroke width. Everything updates in real-time without ever leaving your animation workspace.
Start with simple shapes: rectangles for limbs, ellipses for joints. You can get surprisingly sophisticated with shape layer characters, and tools like the Joysticks 'n Sliders let you build full facial rigs using shape layer paths.
The real advantage comes during revisions. When your character lives as shape layers, every piece is parametric and adjustable. Compare this to raster or vector file imports, where even small changes require round-tripping through other applications.
For character design fundamentals that translate perfectly to shape layer workflows, check out Character Design Fundamentals. Understanding good character construction makes building them in After Effects way easier!
Bonus tip: Use trim paths on shape layers to create smooth "drawing on" effects for limbs during transitions or reveals.
Quick Takeaways
Before you dive into your next character animation project, remember:
- Null objects at joints = cleaner animation and easier adjustments
- Anchor points positioned correctly = rotations that actually make sense
- Expression rigs = eliminate repetitive keyframing forever
- Smart naming systems = find any layer instantly, even months later
- Shape layer limbs = iterate faster without leaving After Effects
The Workflow That Actually Works
Look, 2D character animation in After Effects doesn't have to be painful. The difference between a frustrating project and a smooth one usually comes down to how you set things up before you animate your first keyframe.
These five hacks aren't fancy plugins or expensive scripts, they're fundamental workflow improvements that compound over time. Implement them on your next character project, and you'll wonder how you ever animated without them.
Ready to level up your character animation skills even further? All-Access gives you unlimited access to every School of Motion course, including our comprehensive character animation training. Whether you're just starting out or looking to refine advanced techniques, we've got you covered.
FAQs
Q: Can I use these techniques with third-party rigging tools like Duik or Limber?
A: Absolutely! These workflow hacks complement rigging scripts perfectly. The null object hierarchy and naming systems actually make working with Duik cleaner since you'll have a better organizational structure. Shape layers work great with Limber's rigging approach too.
Q: Should I build my entire character as shape layers?
A: Not necessarily. Shape layers excel for limbs and simple geometric forms, but complex facial features or textured elements often work better as imported artwork. Mix and match based on what needs frequent adjustment versus what stays static.
Q: How do I handle character depth and layering with this system?
A: Use your naming convention to include Z-depth indicators (like _F1, _F2 for foreground layers at different depths) and leverage After Effects' 3D layers for true depth when needed. Pre-comping different depth groups can also help manage complexity.
Q: Will expression rigs slow down my preview performance?
A: Simple expressions like the breathing example have minimal performance impact. If you're stacking dozens of complex expressions, you might see slowdown, but proper pre-comping and selective layer soloing usually handle this fine.
Q: Can I convert existing character rigs to use these techniques?
A: Yes, though it requires some refactoring. Start by adding null objects at joints and re-parenting existing layers. You can introduce expressions gradually and don't need to rebuild everything at once. Each improvement makes the rig more manageable.
ENROLL NOW!
Acidbite ➔
50% off everything

ActionVFX ➔
30% off all plans and credit packs - starts 11/26

Adobe ➔
50% off all apps and plans through 11/29

aescripts ➔
25% off everything through 12/6
Affinity ➔
50% off all products

Battleaxe ➔
30% off from 11/29-12/7
Boom Library ➔
30% off Boom One, their 48,000+ file audio library
BorisFX ➔
25% off everything, 11/25-12/1

Cavalry ➔
33% off pro subscriptions (11/29 - 12/4)

FXFactory ➔
25% off with code BLACKFRIDAY until 12/3

Goodboyninja ➔
20% off everything

Happy Editing ➔
50% off with code BLACKFRIDAY

Huion ➔
Up to 50% off affordable, high-quality pen display tablets

Insydium ➔
50% off through 12/4
JangaFX ➔
30% off an indie annual license
Kitbash 3D ➔
$200 off Cargo Pro, their entire library
Knights of the Editing Table ➔
Up to 20% off Premiere Pro Extensions
Maxon ➔
25% off Maxon One, ZBrush, & Redshift - Annual Subscriptions (11/29 - 12/8)
Mode Designs ➔
Deals on premium keyboards and accessories
Motion Array ➔
10% off the Everything plan
Motion Hatch ➔
Perfect Your Pricing Toolkit - 50% off (11/29 - 12/2)

MotionVFX ➔
30% off Design/CineStudio, and PPro Resolve packs with code: BW30

Rocket Lasso ➔
50% off all plug-ins (11/29 - 12/2)

Rokoko ➔
45% off the indie creator bundle with code: RKK_SchoolOfMotion (revenue must be under $100K a year)

Shapefest ➔
80% off a Shapefest Pro annual subscription for life (11/29 - 12/2)

The Pixel Lab ➔
30% off everything
Toolfarm ➔
Various plugins and tools on sale

True Grit Texture ➔
50-70% off (starts Wednesday, runs for about a week)

Vincent Schwenk ➔
50% discount with code RENDERSALE

Wacom ➔
Up to $120 off new tablets + deals on refurbished items


All-Access Pass
Unlimited access to 50+ courses, unlimited critique, live events, and 24/7 community. Join School of Motion All-Access today.


