Learn how to create and manage artboards in Photoshop and Illustrator with this video tutorial from Jake Bartlett.
How do the professionals plan out those sweet animations? How can you keep your designs consistent across your entire project? The answer my friend is art boards. However, many artists are scared or confused by artboards, so we thought it'd be fun to put together a tutorial all about artboards in Photoshop and Illustrator.
Jake Bartlett, the instructor of Photoshop and Illustrator Unleashed & Explainer Camp, is here to answer all of your artboard questions! If you're looking to up your game and finally start that personal project, then you need to learn how to utilize artboards in Photoshop or Illustrator, this tutorial will help you get there.
Pre-production is a vital part of making your animations stand out from the rest of the crowd. A well thought through animation can go a long way, and that all starts in the design phase! So suit-up, grab your thinking socks, it's time to chase down some knowledge...
VIDEO TUTORIAL: WORKING WITH ARTBOARDS IN PHOTOSHOP & ILLUSTRATOR
Now it's time for Jake to work his magic and make learning fun. Enjoy learning how to work with Artboards in Photoshop and Illustrator!
{{lead-magnet}}
WHAT ARE ARTBOARDS?
An artboard is a virtual canvas. What's great about Photoshop and Illustrator is that you can have multiple canvas in a single document. Hooray!
This is extremely useful if you need to create multiple frames for your animation project. Being able to see all of the artboards next to one another helps keep the continuity of your design consistent throughout your entire project. And, you're able to make small tweaks without having to open multiple projects.
HOW TO CREATE ARTBOARDS
It's one thing to know that artboards exist, but how do you get started with these handy tools? Here's how you can create artboards in Photoshop and Illustrator.
HOW TO CREATE ARTBOARDS IN ILLUSTRATOR
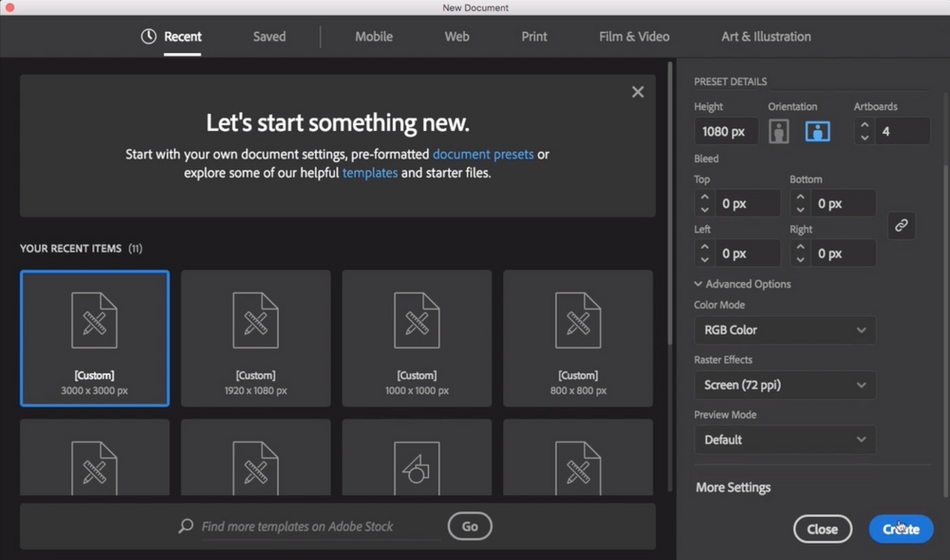
When you launch Illustrator you're met with a pop up screen full of options. Even though this can be overwhelming there are just a few things you need to set in order to get started.
Here's how to create multiple artboards in Illustrator:
- Click Create New... at the top left
- Find the Preset Details panel to the right
- Enter your desired frame width and height
- Enter in how many artboards you would like to start with
- Click Advanced Settings
- Set Color Mode to RGB Color
- Set Raster Effects to Screen (72 ppi)
- Finish by clicking the Create button at the bottom right.
HOW TO CREATE ARTBOARDS IN PHOTOSHOP
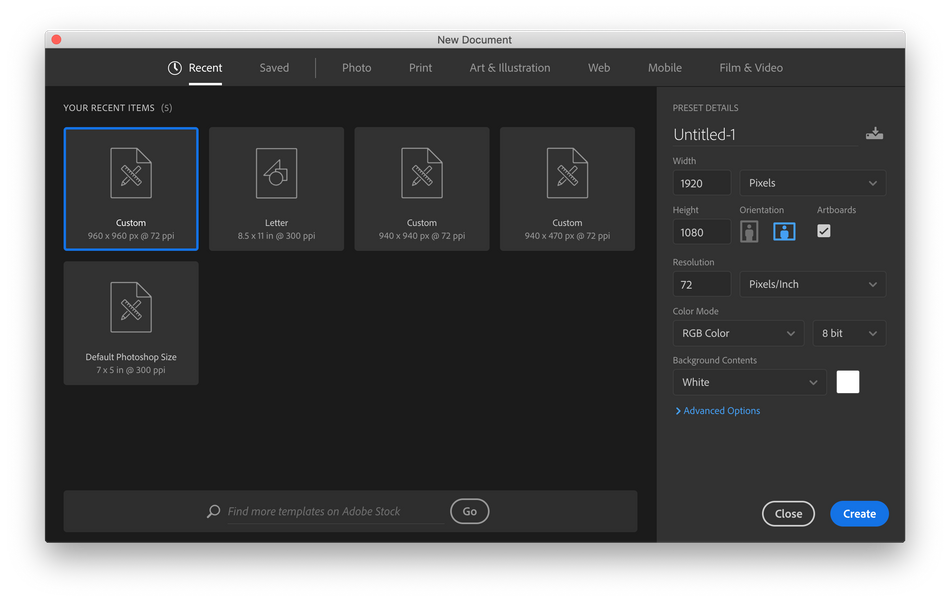
This process is very similar to creating artboards in Illustrator but with one key difference.
Here's how to create an artboard project in Photoshop:
- Click Create New... at the top left
- Find the Preset Details panel to the right
- Enter your desired frame width and height
- Click the artboards checkbox
- Set Resolution to 72
- Set Color Mode to RGB Color
Moving and Creating Artboards
The workflow for creating new artboards in Photoshop and Illustrator are different, but the process very easy. Here's a quick guide for creating and managing artboards once you're in Photoshop and Illustrator.
MANAGING ARTBOARDS IN ILLUSTRATOR
While you're in the project you can re-arrange your artboards and even create new artboards. You're not limited to the number of artboards created at the beginning of the project.
When you're ready to start editing your artboard layout equip the artboard tool from the tools palette. You can find the tool palette on the left side of Illustrator when using the default layout. See the image below for what this tool currently looks like. Also, the keyboard shortcut for Illustrators artboard tool is Shift+O, which is a very quick way to keep your workflow lightening fast!
After you've selected the artboard tool, the properties panel on the right will display your artboard editing options.
Here you can make changes to the artboard names, select a new preset, and quickly create new artboards.
There are a lot of other neat ways you can manipulate and create artboards that Jake covers in this tutorial, like duplicating and moving artboards manually.
There you go! Not so scary after all, and with just that basic info you're all set to start creating artboards in Illustrator! Take this information and use it on your next personal project, pre-production just go that much easier!
MANAGING ARTBOARDS IN PHOTOSHOP
If you're ready to equip your artboard tool in Photoshop, it can be found in the same location as the move tool by default, or press Shift+V.
Once you have the artboard tool selected you can click the plus icon to either side of your currently selected artboard. Or, in the layers panel you can select an artboard and duplicate it by pressing CMD+J.
Once you've created your artboards you can see them show up in the layers panel as folder groups. Here you can add new layers and even rename them. The name you give your artboards here will be what name they are given on export.
Now, if we select an artboard in the layers menu you will see the properties panel populate with new options specifically for that artboard. This allows you to edit the height and width, the Artboard Background Color, and more!
Unlike Illustrator, Photoshop does not have an option to automatically arrange your artboards for you.
You'll need to drag them around yourself, so be mindful of this when you're creating artboards. Note that you can't click in the middle of the artboard canvas, you actually have to click the name just above the artboard. If you want to make it a little easier to move around your artboards make sure that snapping is enabled under the view menu!
And just like that you're up to speed with the basics of creating and managing artboards in Photoshop!
WANT TO REALLY LEARN PHOTOSHOP AND ILLUSTRATOR?
This is just one step in mastering your design workflow. Photoshop and Illustrator can be intimidating, so we've created a course that lays a solid foundation in both of these applications.
In Photoshop and Illustrator Unleashed you'll follow Jake Bartlett through the ultimate design software deep-dive. In just 8 weeks we'll help you go from being extremely uncomfortable, to ready to snuggle your new beastly best friends, Photoshop and Illustrator. Check out our courses page for more information on all of the courses we offer!
-----------------------------------------------------------------------------------------------------------------------------------
Tutorial Full Transcript Below π:
Jake Bartlett (00:00): Hey, it's Jake Bartlett for school of motion. And in this tutorial, we're going to learn about art boards in illustrator and Photoshop. I'm going to talk to you about what art boards are and why you should be using them, how we can work with them in both illustrator and Photoshop, as well as exporting multiple art boards from both pieces of software. Now I'm going to be working with some project files a little bit later in this video. And if you want to work right along with me, then you can download those project files for free right here at school of motion. Or you can follow the link in the description of this video. So go ahead and do that. And then you can work with me.
Music (00:35): [intro music]
Jake Bartlett (00:43): Now what are art boards? You can think of an art board in either of these programs as the canvas that you're creating your artwork on. What's really nice about them is that they allow you to have multiple canvases within a single document illustrator and Photoshop, both used to only allow you to have one canvas within a single document. So if you needed multiple frames to come out of the same document, you would basically have to layer things, turn them on and off and export them. It was a mess. Neither program was ever designed to handle multiple documents within the same document. InDesign is the program that was really from multi-page documents and that's what it has always been. And it still is a really great tool for that purpose, but that's much more for the print world, whereas in the MoGraph world, the reason you would want multiple frames within a single document is so that you could create artwork for multiple frames without having to create more project files.
Jake Bartlett (01:39): Just think about designing boards for a sequence of animation. This way you can keep all of your assets that will eventually be in the final animation, all in the same document and just use these art boards as multiple frames for that sequence of animation. And that's exactly what I'm going to show you how to do in this video. So let's start with illustrator and take a look. How art boards work in that program. All right, here I am an illustrator and we can actually customize art boards right when we're making a new project. So I'm just going to click on the, create new button and take a look at the new document window. This, uh, panel right over here is where we can determine the size of our frames or art boards, as well as how many art boards there will be when we start the document.
Jake Bartlett (02:23): So I'm just going to change this to the standard 1920 by 10 80 HD frame. And I'm going to say four art boards and all four of those art boards are going to have the same size. Uh, under our color mode. We have RGB PPI is 72 that's pixels per inch. That's how I want it all set. So now that that's already, I'm going to click on create, and we're going to get this blank document that has those four art boards. Now I'm going to go ahead and close up some of these extra panels, just so it's a little easier to work with, and you can see what's going on here as zoomed out a little bit. So we can see all four of these art boards at once. And you'll notice that illustrator them in this nice little grid for me. Now, like I said, each one of these art boards is basically a canvas for multiple frames of whatever you'd like them to be.
Jake Bartlett (03:08): So in the case of MoGraph again, that would be a sequence of animation, or at least that's how I'm going to treat it. But this way I can have four individual frames in the same document, and I can add more art boards at any time. So let's talk about how we can add or remove art boards if we want to. Well, first of all, I have the properties panel open. So if you don't have that come up to window properties, and that will give you this panel, that updates with basically whatever tool you have, uh, active or whatever you have selected giving you the most used controls, most useful controls for that selection, because I haven't selected anything yet. It's given me options for my document. And it's telling me that I'm currently on art board one, that's also what this number one down here is telling me.
Jake Bartlett (03:53): These are my individual art boards. As I click on each one of these. It's very hard to see, but if you zoom in nice and close here, you can see that there's just a thin black outline. As I click on each one of these art boards. If you pay attention to this number here or this number here as they click through them, it's advancing through 1, 2, 3, 4. So that's how you can know which art board you're actively working on underneath. That is a little edit art boards button. If I click on that, it's going to go into the art board edit mode and give me some more options. So again, my first art board is the one that is selected or active. And I now have this bounding box around it that allows me to just freely resize this art board. Just like if it were a shape, I can change this to whatever size I want and I can come up here and type in the width 1920 by 10 80 again.
Jake Bartlett (04:44): And it's back to the right size, but it's kind of off. It's no longer in this nice grid. Now I could just click and drag in the middle here and kind of just place this as close as I can, but I'm never going to be able to get that perfectly aligned in that grid. If I were to go up to view and then down to smart guides, the keyboard shortcut is command you for that. That's going to allow me to snap to other things in my document, so that will help with the perfect alignment or if that wasn't so perfect. I could also go to rearrange all in my properties panel. It's also up here in my art board options. So if I click on rearrange, all this allows me to change the layout of the grid. So the first option is the layout, which is a grade by row.
Jake Bartlett (05:25): So you can see what the little icon it's telling us. It's basically going to do 1, 2, 3, 4, depending on how many rows there are. You can change that so that it starts here with one goes down to 2, 3, 4, or you could just go in a straight line from left to right, or from top to bottom, you can also reverse the layout order. So there's lots of options up here for you to modify the arrangement of your art boards, but I'm going to leave it on the default and I'm going to leave the columns at two that's the vertical alignment with only four. It makes sense to do two columns and two rows. But if you were working on say 20 art boards, you might want to have more columns so that it doesn't take up so much real estate vertically in your document. Next up we have spacing, which is going to be the spacing between art boards.
Jake Bartlett (06:12): So you can change this to whatever you want by default. It was not 200 pixels, but if we change it to 200, that's going to give us more space. And then finally we have move artwork with art board, which is checked. And that will make more sense in just a little bit, but for now, I'm just going to rearrange these art boards by clicking. Okay. And there we go. Now you can see that we have 200 pixels between each art board and they're all perfectly aligned again. Okay. Since I'm still on my art board tool, which is this icon right here, by the way, I'm still seeing properties for my art boards up here and in the properties panel. You'll notice that there's a name section. So I could name this art board, something else by default, it's just art board one. And we can see that reflected right here, but I could call this frame one click on the second art board, call that frame two.
Jake Bartlett (07:02): And they're updating in this view as well. This is really helpful because once we go to export these frames, they're actually going to by default, take these art board names and put them into the file name. So keep that in mind, as you're creating art boards, if you want to keep things nice and organized to just name and label all these art boards properly, you can also see an entire list of your art boards if you open the art boards panel. So come up to window and go to art boards. And here you'll see all of your art boards in a list, and we have a lot of the same options. So we have the rearrange, all art boards. We can change the order of the art boards just by clicking and dragging. And you notice that as I click on the art board, it zooms in to full frame on that art board, but I can easily rename these last two frame three and frame four just by double clicking on them.
Jake Bartlett (07:54): Okay, now that those are renamed, I'm going to zoom out one more time and let's talk about how we can add or remove more art boards. So I'm going to go back to that art board tool. And first of all, you can duplicate an art board, just like any other object with the art board tool selected. I'm going to hold down. Option are all done, a PC. See that we have our duplicate arrows show up on my mouse pointer and I can click and drag and just have that duplicated. And then I can do it again. I can do this as many times as I want, and I can even select multiple art boards by holding down shift and then doing this. And then I want to rearrange all of these again. So I'm going to put 100 pixels between each and I'm going to say three columns this time and then click on.
Jake Bartlett (08:34): Okay, so now I have this nice three by three grid with nine frames, and I can now rename each one of these. However I want, I could also freehand draw an art board using the art board tool, just like you would with a rectangle, but I've never really found that to be useful because you can't be very precise with it. And it's not very often that you don't need to be with the size of your canvas since that will be what your final exports resolution will be. So I'm just going to undo that and go back to my grid. If I want to delete some art boards, I can select one of them and press the delete key. That'll remove it. I can also go into the art boards panel and click on the delete or trashcan icon. And that will get rid of an art board with the art board tool selected.
Jake Bartlett (09:16): I can click on the new art board button, and that will add a new one with the default spacing between art boards. So I might need to just correct that, but now you can see how quickly and easily you can rearrange these art boards, add or delete more and get them working exactly the way that you want them to. Now, I really quickly just want to talk about the placement of art boards and how they work in the space of your document, as well as how elements react to the art boards, depending on which one is active. If I go back to my selection tool, remember if I just click on any one of these, you can see right here in the art boards panel, it's going to make that one active well with the art board tool selected. We have the width and height right here, but we also have an X and a Y position value.
Jake Bartlett (10:01): And that might not make sense because generally the position value is based on the bounds of your canvas or the art board, right? If I were to make just a square real quick, and I zoom in here and click on that, we're going to get position values in my property. Transformed controls right here are the X and Y. So if I wanted it in the center of my document, I would say nine 60, which has half of 1920 by five 40, which is half of 10 80 to give me the very center of that frame. But the art board itself has an X and Y position and that's relative to the entire document. So if I zoom out really far here, you can see that there's actually another bounds to your document. This is the document bounds, and you literally cannot have anything outside of this.
Jake Bartlett (10:47): So if you're ever working with a lot of art boards and you're really pushing to the edges of your document bounds, you're going to run the risk of crashing or even corrupting your file. And it won't actually even let you push stuff outside that boundary. So at that point, you're probably going to want to make a separate file. I've never gotten to that point, but it's not something that's totally impossible. Sometimes sequences of animation have hundreds of frames. So you're not going to want to contain all of that into one single document, but that is exactly why our art boards have positioned values as well because it's positioned relative to the entire document. Now, another note about positioning, the actual alignment controls. If you're not familiar with them, show up here on the controls panel, uh, right here control under window. If you don't see that panel, these alignment controls allow you to align multiple objects to each other as well as to the art board.
Jake Bartlett (11:42): So if I wanted this again centered without typing in those numbers, I could just select my object, click on this button right here and make sure aligned to art board is checked and then horizontally align the center and then vertically align the center. And there we go. It's centered in my art board, but what if I want it centered on this art board over here? Well, illustrator is paying attention to whichever art board is active. So if I were to click on this art board, it makes it active. You can see again that tiny little black outline, but if I click on this object, because it's within this art board, it reactivates the first art board. So first things first I have to move this object over to the second art board. Then click on that art board, click on the object again, and then horizontally and vertically align that object to the center.
Jake Bartlett (12:31): And if you're familiar with rulers and guides, those also belong to specific art boards. So again, if I go to say this one right here and I press command or control are on a PC to bring up my rulers, you see that zero zero is in the top left corner of that art board. And if I move over to this one right here, zero zero is now in the top left corner of this art board. It's whichever one I click on to make active. So be aware of that when you're working with multiple art boards, all right, now, I'm going to open up those project files. I told you about earlier. If you want to follow along with me, go ahead and open those up. And here we have a sequence of four frames. So we've got the first frame with a hand coming in to see a cup of coffee.
Jake Bartlett (13:16): It picks it up ever so delicately, smears it off screen, pulls it off real fast. And then we're left with an empty desk. While these four frames might not be a finished sequence by any means, they are a good example of how you might work with multiple art boards within one document in illustrator. And it allows you to convey motion across these multiple frames. And you'll notice that because there's so much artwork from these assets hanging off of the edges of these art boards. I gave a lot of space between each one of these art boards. Again, just set that spacing up. When you go to rearrange all your art boards, change the spacing to something really big so that you have plenty of room outside each art board, and you don't have artwork overlapping multiple art boards. Now I want to go back to that art board tool and find this button right here, which is move slash copy artwork with art board.
Jake Bartlett (14:06): I have it enabled right now. And what that's going to do is take whatever artwork is associated with that art board and move it whenever you move the art board. So if I were to click and drag this, you see that everything within that art board is moving with it. And the reason that this entire clock is moving with it is because it is a group of objects. So if I were to ungroup this command to shift G now all of these objects are loose. And I switched back to my art bar tool and click and drag. Again, anything that was entirely outside of the art board did not move with it. See these numbers right here are partially within it. So they moved, but these ones did not because they were never in the artwork. So that's why I grouped those objects just in case I needed to move the art board around and this the same for when you're rearranging art board.
Jake Bartlett (14:53): So if I click on this again, click on rearrange. All that move artwork with art board is checked so that I can say put in 800 pixels of spacing, leave it at two columns and click, okay. And everything that's contained within each one of these art boards is now spaced out properly. Now I could probably turn that down to maybe 600 pixels and still get away with it just fine. But if I were to have that unchecked, and then I move this art board, you can see that it is not moving the artwork at all, which you very well may want sometimes. So just be aware of that option. I'm going to undo to get that back where it was. And now let's talk about how to export your art boards. Now, remember I told you that naming these art boards is important because that goes along with the file name when we export them.
Jake Bartlett (15:39):
So I just named these frame 1, 2, 3, and four to export them. I'm just going to come up to file export export for screens. And I know that sounds a little bit funny because export for screens, what does that mean? Well, it's because you can actually export art boards in multiple resolutions and even multiple formats. But again, in the case of MoGraph, we just want one format, one resolution. So the four screens part doesn't really apply to us, but regardless, this is how we're going to export our art board. So we have all four of our frames showing up as thumbnails here. You can see that it's cropped to the art board. So nothing outside of them is showing up as well as the art board names, right underneath those thumbnails, which by the way, if you double click on any one of them, you can rename them here.
Jake Bartlett (16:23): So if you didn't do it before, you can actually do it here. And those names will update in your art boards panel after you've exported. And you'll also notice that each one of these has a check mark on it. That means these are all going to be exported. If you only needed to export frame three, then you could uncheck one, two and four. And it's only going to export frame four. If I want to re select all of them quickly, I can just come over to the select area and click on all. Or if you wanted to put all of them in the same document, you could click on full document, but be aware that is not going to crop to your art board. So anything outside of those frames you were going to see. I don't want that. I want individual frames for each art board.
Jake Bartlett (17:01): So I'm going to leave all selected and then move on down here under export two. This is where you're going to choose where these frames will export. I'm going to put them on the desktop. You can have it open the location after you export. If you'd like, I don't need create sub folders check because as you can see in the tool tip, that is four scales. Basically, like I said, you can export multiple resolutions that would divide up each frame into a folder based on its resolution or its scale. We want one time scale, 100, which is 100% resolution. And we don't need to add any more. So we don't need those sub folders. Now you could add a suffix, which as I highlight over this, you can see this text down here, pop up to give you a preview of what that would look like.
Jake Bartlett (17:44): And that'll just add the suffix into the file name right after the art boards name. It can also have a prefix, which in this case I actually do want to add. So I'm going to type in coffee break and then a hyphen. And that way it's going to put coffee break dash frame one dash frame two, all the way down the line under the format, you can choose whatever you'd like for this artwork. I think P and G is probably going to be a good choice because it's all vector. It's all flat. There's not texture. And that'll give me low file size with high quality. But if you need to export as a JPEG, I would recommend doing JPEG 100. These numbers represent the compression level. So if we leave it at 100, it's going to basically have no compression or the least amount of compression.
Jake Bartlett (18:28): All JPEGs are compressed, but it'll give you 100% quality. I wouldn't do anything less than that. Uh, but in this case, I'm going to leave it as a PNG. And then all we have to do is say export art board. So I'm going to click on that. It'll export all four because they had that checkbox checked. It opened up the finder for me. And here we go, coffee break frame 1, 2, 3, and four, just like that. I was able to export all four full resolution frames all from the same document all at once. And that's it. It's really pretty easy to work with art boards inside of illustrator once you know where the tools are and how they behave and exporting them is a breeze compared to opening multiple documents and exporting each one, one at a time. So now that we learned how to do this in illustrator, let's take a look at Photoshop and how it handles art boards just slightly differently, but it's still really useful.
Jake Bartlett (19:18): Okay. So here in Photoshop, I'm going to click on create new, just like we did in illustrator. And this whole setup is very similar. I have my width and height to 1920 by 10 80, and then my resolution 72 PPI RGB color. That's all great. But right here, this art boards checkbox, this is the first difference between Photoshop and illustrator. Instead of being able to choose how many art boards my document has. I only have the option to use art boards. And this is actually something you can change once you're in the document. There's no requirement for you to check this box now, but since we're going to be using art boards, I'm going to go ahead and check it. I just can't add any more. It's going to be one single art board. So I'll go ahead and click on create. And there's my art board.
Jake Bartlett (19:57): And even says right up here in the top left corner, art board one, and you can see that the art board icon, the art board tool icon is the same as it is an illustrator. You can find it underneath the move tool. And this gives me similar options up here in the control panel, like the width and the height, for whatever reason. I don't know why, but Photoshop seems a little bit buggy with getting this width and height backwards when you create a document. But if I select the art board and we take a look at the properties panel, you can see that the width and height are correct. So for whatever reason, it shows up correctly in the properties panel. Again, if you don't have this open come up to window properties, just like we did an illustrator, okay. Now I want to take a look at the layers panel and point out that Photoshop is handling this a little bit differently than illustrator.
Jake Bartlett (20:44): We see the art board show up almost a group, and you see that I can collapse and expand that. And within the art board are the layers. Whereas in illustrator, they didn't show up in the layers panel at all. They're not a layer level item inside of Photoshop. You can basically think of them like groups, but within that art board, you can have groups. So I could press command G and group this layer within that group. It's just another level of grouping basically. And it creates this art board or canvas within my document. Again, if I zoom out really far, we can see that there is a document and then my art board within it. Now we don't see a document bounds like we did an illustrator, but it is there again. You don't want to work with a hundred frames, probably in one single Photoshop document that would just make a massive file and give you much more potential for crashing your machine.
Jake Bartlett (21:39): Now, another difference with art boards in Photoshop is to be able to change the name. All I have to do is go to the layers panel. Double-click on it and type in a different name, just like any other layer. And that will update this right here. I can't, double-click on this. I can't use the art board tool to find that name in any of the properties anywhere else. That is how you rename an art board. And that is very important to know, because for whatever reason, inside of Photoshop, you cannot change the name of your art boards. When you go to export them, you have to do that at this layer panel level. So that's a big difference between these two programs and the way they handle art boards. Another difference is the way that you add new art boards. So with the art board tool selected, I can click on this, add new art board button, and that will allow me to click and it will add a new art board wherever I clicked.
Jake Bartlett (22:28): Now, this actually made that vertical 1920 by 10 80 frames. So that actually explains why this was displaying 10 80 by 1920. It wasn't actually giving me the properties of the selected art board. It was giving me whatever the next art board I creates dimensions would be. Now I want to swap these two, but I want to do it in a quicker way than just deleting this one and making a new one. So to do that, I'm going to select that art board go to the art board tool. And then right here, we have make landscape. If I click on that, you see that it swaps the two dimensions and I can go to portrait landscape just like that. Okay. I can also move this art board around, but not by clicking and dragging in the middle. If I click on this and then grab the art board's name, then I can move this around.
Jake Bartlett (23:14): And I have snapping enabled under view here, which is why I'm getting all this snapping around, but to move it around, you just use the art board tool, or even just the move tool to click and drag on the art boards name. Now, another thing you probably noticed are these plus icons around each one of these art boards, these allow you to very quickly add another art board just by clicking on that plus, and it's going to add the same amount of spacing between each new board. Now, this one didn't have the default spacing away from this one, which is why these four aren't aligned because I manually made that art board with the art board tool just by clicking. Unfortunately there is no arrange art boards tool inside of Photoshop, the way that it is an illustrator. So I'm kind of just going to have to do this by hand, but that is a very quick way of being able to add another art board just by clicking a, those little plus icons.
Jake Bartlett (24:06): And as I'm doing that, you see in the layers panel, I have all of these art boards showing up one way that Photoshop handles the art board similarly to illustrator is its position relative to the documents. So again, if I were to click on the first art board in look at the properties panel, we have the 1920 by 10 80 width and height, but we also have the X and Y position within the document. So if I say zero by zero, that's going to give a very good starting point for that first board. And then we can move onto the second one and see that it's 2028 pixels to the right of the origin of my document and then so on and so forth. So that is one way that it behaves very similarly to illustrator another feature in Photoshop that we didn't have an illustrator is the ability to change how the art board's background is displaying.
Jake Bartlett (24:51): So right now they all have white backgrounds, but I could change the background color with one of them selected. I could change the background color from white to black transparent. So I see the transparency grid or to a custom color, so I could make it a pale red color if I want it to. And as you can see, that is an option for each one of these art boards. Just be aware that that is not actually part of your artwork. It's just a display preference within Photoshop. So if I were to export this frame, I'm not going to have a red background. It's actually going to be transparent. Any color you see in here as the background color is transparency. So typically I like to work with all of my art boards set to being transparent. So I'm just going to do that quick, selecting all of them by shift clicking, and then changing them to transparent.
Jake Bartlett (25:36): All right, I'm going to go ahead and open up the PSD version of our coffee break artwork. So go ahead and open that if you want to follow along and you'll notice these are all in a horizontal row. And now, like I said, Photoshop doesn't have that rearrange art boards tool that illustrator does. So there's no easy way to just change all of these into a two column layout. So it's really important that you pay attention to how you're laying out your art boards in Photoshop, since it's so hard and difficult to actually rearrange them with that said, I want to rearrange this into the two by two grid. So I'm just going to click and drag on this art board and move it down here. And Photoshop is kind of going to guide me to getting these spaced out properly, grab frame four and move it here.
Jake Bartlett (26:14): And there we go. Now we've got our two by two grid and you'll notice all the contents of each one of those art boards that moved with it. That is the default behavior in Photoshop. But if I were to go to my art board tool and take a look at this little settings icon, I want to point out something that's actually really convenient inside of Photoshop. And that's this keep a relative position during layer reordering checkbox. I have it checked. So let's take an object from the first frame. That's not in the fourth. So this coffee cup right here, at least this part of it, and actually I'll grab the group that has the entire coffee cup in it. So I'm just going to rename this really quick coffee mug. And I'm going to click and drag that from frame one, that art board to frame four, and just let go.
Jake Bartlett (27:01): And you'll see that not only has it transferred the group into the art board in the layers, it kept the relative position. When I reordered that layers. That's what that checkbox is for under that little settings icon, keep relative position during layer reordering. If I were to have that unchecked and I do the same thing, I grabbed that coffee mug and I move it to frame one, nothing happens. It's actually not letting me do that because you can't really have artwork outside the bounds of an art board in Photoshop. At least not the same way that you can in illustrator. Like right here, you'll notice that the bounding box of his hand, which the hand ends rate here is going beyond the art board and actually spilling into frame two. But Photoshop is not allowing that object to display on frame two because of the structuring of art boards and Photoshop and how they're different from illustrator.
Jake Bartlett (27:50): Everything is going to be contained within that art board. That's just how Photoshop behaves. So if I want to get this coffee mug back, I have to make sure that that setting is checked. Keep relative position during the layer reordering. And then I can click and drag that coffee mug back into frame one. And it's going to keep the relative position to that art board. Now, I know I just told you that you can't really have artwork outside the bounds of the art board, but that's not entirely true. If I were to grab this coffee mug and make sure that I have auto select group checked, then I can move this coffee mug out here and it's going to display. It's actually pulled it outside of all of my art boards and it's there, but it's never going to export it. And it looks really weird because it's not within an art board anymore.
Jake Bartlett (28:34): If I drag it back into that frame, it's going to look right and it's going to put it back into that frame. One's art board. Let me undo that. So it's backwards supposed to be, but let's say that I just want to take this coffee mug and move it into this frame. Well, if I do that, it's actually going to just transfer it over to the second frames art boards. So there we go. We have a coffee mug group within there, but that only happened because I had another option selected under my art board tool settings. And that is auto nest layers. If I uncheck that, go back to my move tool and try and move this back to this art board. It disappears. It's actually there, it's over there, but it's still contained within that second art board, which is why it's not displaying on frame one.
Jake Bartlett (29:14): So you need to make sure that you have that setting of auto nest layers enabled before you move objects around between frames like that. And this goes the same for duplicating groups. So if I were to hold down option or all to click and drag, it's going to transfer that duplicate into whatever art board I end up letting go of the mouse on. Now, the alignment controls, which are showing up right up here do respond to the art boards, just like they do in illustrator. So if I aligned to the vertical center, the horizontal center or the top bottom edges, all of that responds to whatever art board it's part of. Okay, I'm going to go ahead and get rid of that coffee mug. And one last thing I want to point out is a little bug that I noticed when working with things like gradients.
Jake Bartlett (29:56): So if I were to make a new art board, so I'll just get to my art board tool and add another one here and another one up here, then I want to add a gradient fill on one of these. I'm going to come to my new button down here and say gradient, and I'll choose some crazy colors. Uh, so I'll change this to maybe this color right here and then change this to here. And we've got this colored gradient I'll click. Okay. And you'll notice that I don't see the entire gradient, this color that I chose, this pinkish color is not at the bottom of the, the art board. Even though I have a line with a layer checked, it's not displaying the entire gradient. If I change this angle from 90 to zero, same thing happens. The pink side of this gradient is not being displayed for whatever reason.
Jake Bartlett (30:43): Let me click, okay. And talk about what's going on here. When you're working with things like gradients, it's actually looking at the entire range of art boards within your document to align that gradient to. So since this is a horizontal gradient, it's taking that first color stop of the pink and pushing it all the way over here. Even though I can't see that within this art board, it's a very strange bug, but really the only way to get around this is to right click on the layer and convert it to a smart object. And once I do that, you can see what the actual bounding box of that gradient is. If I double click into that smart object, it's going to open that smart object and show me the entire canvas. Now I don't actually want it this large. So I'm going to change the canvas size by going up to image, canvas size and typing in 1920 by 10 80 pressing.
Jake Bartlett (31:34): Okay, it's going to tell me that it's going to clip the canvas, but that's okay. I'll click on proceed. And now that gradient is respecting the document balance because this smart objects document bounds are 1920 by 10 80. There are no other art boards. So it can't be any bigger than that. I'll save this smart object, close it out. And now that is displaying properly, but it's not where I wanted it. So I just got to click and drag to get that position where it should be, make sure that it's aligned perfectly horizontally and vertically to the center of that art board. And now I have that gradient background. So just one little bug that I noticed, very strange, but that's how you get around it. Okay. Now let's talk about how to export the art boards from Photoshop. I'm just going to get rid of those last two that I just made really quickly.
Jake Bartlett (32:19): And this is a very similar process to illustrator. Again, the naming of the actual art boards in your layers panel is what will be the file name for each frame when you export it. So be aware of that, then come up to file export and then export ads. This brings up a panel that's very similar to the export for screens inside of illustrator. It allows you to customize the file format, the actual image size. You can base it on a scale factor and you can even change the canvas size. I want to leave that as the same size as the frame, so we don't have any margin around it. And over here, we do have that same ability to export multiple versions of the same artwork. Again, we don't need to do that. So I'm just going to leave it at one times the scale, we don't need the suffix, but unfortunately we cannot add a prefix in this panel.
Jake Bartlett (33:08): So if you needed to add in coffee, break hyphen, and then frame 1, 2, 3, 4, you're either going to have to do it after you export or within the art board itself. Also be aware if you want to change any of these properties for all frames, you need to select all of them by clicking, holding shift, and then clicking on another one so that you're editing all of them at once. But to export them all, you don't have to have them all selected. You just come down here and click on the export all button. It's going to ask you where you want to put it. I'm going to leave it on my desktop and click on open Photoshop. We'll export those frames, and then we can find them a rate on the desktop. So here's my frame. 1, 2, 3, and four exported. Just the same as illustrator. All right.
Jake Bartlett (33:50): So that's how you work with art boards in both illustrator and Photoshop. And hopefully you can see why they're such a useful tool for your workflow when it comes to motion design frames. Now, if you'd like to learn even more about Photoshop and illustrator, I have a course on school of motion called Photoshop and illustrator unleashed, where I dive deep into both programs for the complete beginner or for the experienced MoGraph artist, who just, maybe isn't using the full potential of those two programs. You can learn all about it on the courses page at school of motion. I hope you got something out of this tutorial. And I also hope to see you sometime in Photoshop and illustrator unleashed. Thanks for watching.
β
ENROLL NOW!
Acidbite β
50% off everything
ActionVFX β
30% off all plans and credit packs - starts 11/26
Adobe β
50% off all apps and plans through 11/29
aescripts β
25% off everything through 12/6
Affinity β
50% off all products
Battleaxe β
30% off from 11/29-12/7
Boom Library β
30% off Boom One, their 48,000+ file audio library
BorisFX β
25% off everything, 11/25-12/1
Cavalry β
33% off pro subscriptions (11/29 - 12/4)
FXFactory β
25% off with code BLACKFRIDAY until 12/3
Goodboyninja β
20% off everything
Happy Editing β
50% off with code BLACKFRIDAY
Huion β
Up to 50% off affordable, high-quality pen display tablets
Insydium β
50% off through 12/4
JangaFX β
30% off an indie annual license
Kitbash 3D β
$200 off Cargo Pro, their entire library
Knights of the Editing Table β
Up to 20% off Premiere Pro Extensions
Maxon β
25% off Maxon One, ZBrush, & Redshift - Annual Subscriptions (11/29 - 12/8)
Mode Designs β
Deals on premium keyboards and accessories
Motion Array β
10% off the Everything plan
Motion Hatch β
Perfect Your Pricing Toolkit - 50% off (11/29 - 12/2)
MotionVFX β
30% off Design/CineStudio, and PPro Resolve packs with code: BW30
Rocket Lasso β
50% off all plug-ins (11/29 - 12/2)
Rokoko β
45% off the indie creator bundle with code: RKK_SchoolOfMotion (revenue must be under $100K a year)
Shapefest β
80% off a Shapefest Pro annual subscription for life (11/29 - 12/2)
The Pixel Lab β
30% off everything
Toolfarm β
Various plugins and tools on sale
True Grit Texture β
50-70% off (starts Wednesday, runs for about a week)
Vincent Schwenk β
50% discount with code RENDERSALE
Wacom β
Up to $120 off new tablets + deals on refurbished items