
All-Access Pass
Unlimited access to 50+ courses, unlimited critique, live events, and 24/7 community. Join School of Motion All-Access today.

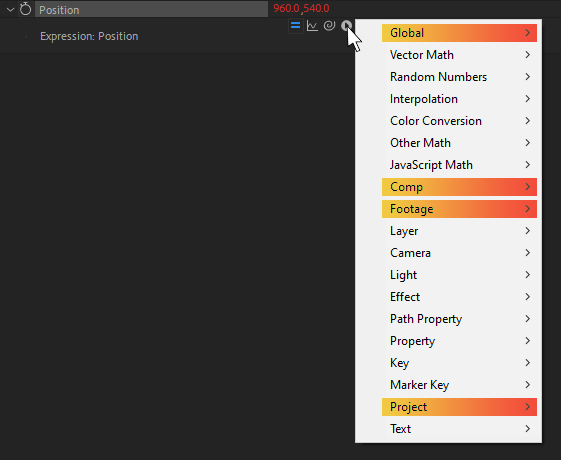
Enhance your expression knowledge with a close look at the Global, Comp, Footage, and Project Expression Language menus.
The Expression Language Menu holds a lot of little pieces for you to assemble. Where do you even start?! This series will walk you through each category and highlight a few unexpected items in each, leaving you better equipped to start expressing yourself via expressions.

Today, we're going to be looking at a few expressions that tie neatly together. As with everything else we've discussed, you'll want to have some familiarity with After Effects so this doesn't just seem like magic. I know it might, but trust me—this is just a little bit of coding and maybe one-too-many cups of coffee.
In this article, we'll discuss these Expression Language Menus:
- Global
- Comp
- Footage
- Project
Check Out the Full Series!
Can't express yourself enough? Check out the rest of the series:
Part 1 - Property and Effects, Layer, Key, Marker Key
Part 3 - Javascript Math, Random Numbers, Path Properties
Part 5 - Interpolation, Vector Math, Color Conversion, Other Math
Global

These global properties and methods all deal with big-picture things — they don't belong to any one category, so they live in this section here as they're useful for all your expressions everywhere.
We'll cover:
- Accessing elements in other compositions
- Getting elements in your current composition
- Automatic animation via expressions
- Changing the frame rate of your expressions without needing to tweak comp settings
- Working between seconds & frames via code
- For more information, see the Docs for Adobe expression reference or Adobe’s Expression language reference
Get ready to span the globe with expressions in the Global menu.
LINKING PROPERTIES ACROSS COMPS

One of the most common functions, your expressions can look at other comps using a global function called comp()!
You need to give the name of the comp you're looking for, and it'll return the corresponding full comp object. You can then pair items in the Comp or Property menus.
If we wanted this layer's fill color to be driven by a color control in another comp, we can achieve it by adding an expression like this to our fill color:
const controlComp = comp("SOM Colors");
const colorController = controlComp.layer("Colors");
colorController.effect("Color 1")("Color");
From here we can easily change what comp we're looking at! We'll toggle between a comp named "SOM Colors" and "Zack Colors" on each layer:

And if we ever renamed our Controls comp, it'd automagically update in the expression as well.
LINKING PROPERTIES ACROSS LAYERS

If comp() is made to look at other comps, thisComp is made to look at... this comp! Both of these give us the same type of comp object, the only difference is that instead of needing to type the name of the comp we're in, thisComp just immediately gets that for us.
I want the square's rotation to drive the triangle's rotation. They're both in the same comp, I just need one rotation to look at the other. To accomplish this:
const squareLayer = thisComp.layer("Square");
squareLayer.rotation;

And now as the square moves, the triangle will too!
ANIMATING WITHOUT KEYFRAMES

Just as the world runs on money and America runs on Dunkins, After Effects runs on time. It's no surprise we use it in our expressions, too!
Typing time anywhere in an expression will give you back the current time in your comp, expressed in terms of seconds.
In a 24fps comp, at frame 12, time will be 0.5; at frame 24, time will be 1; at frame 48, time will be 2, etc.
This number always goes up, matching the current time in your comp, which makes it fantastic for automatic animation.
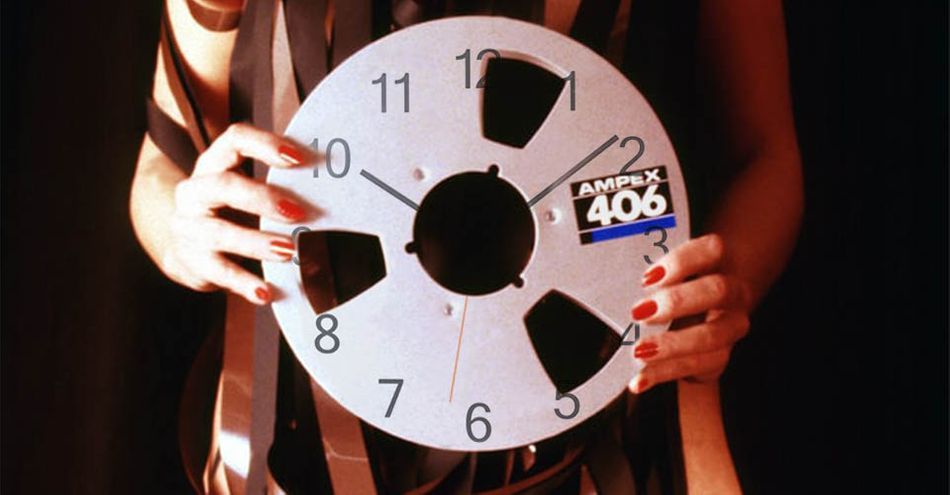
Here we've got a pinwheel. Because it's perpetually windy, this pinwheel is going to spin forrreeverrr, by adding this expression to our rotation:
const spinSpeed = 120;
time * spinSpeed;

Translated into plain English, we can describe this as "for every second that passes, animate another 120 degrees". Want it faster? Increase the speed!
SETTING ANIMATION FRAME RATES

Now, our pinwheel is spinning pretty smoothly. But we're true artistes, and apparently 12fps is all the rage these days.
So let's add an expression to our animation that can take our nice smooth animation, and play it out at 12fps instead of 24.
posterizeTime(12);
const spinSpeed = 120;
time * spinSpeed;

posterizeTime() is a special type of function that kind of acts like an adjustment layer for your entire expression underneath it!
You place it at the top, specify the target frame rate, and it'll do a sort of mathematically accurate 'pausing' so it only evaluates the code at that specified frequency.
CONVERTING BETWEEN SECONDS AND FRAMES
Most animators I know are much more familiar with the idea of frames than seconds—it's easy to understand adding a 12-frame delay to your animation, but it's mind-melting to think of it as adding a 0.166666 second delay!
The challenge here is that most expressions work in terms of seconds, not frames, so we need to convert from one to the other. The math here is straightforward, but it'll change depending on the frame rate of your comp.
To get around this, AE gives us a really helpful function called framesToTime(), which will take a number in frames, and do the conversion to a number of seconds for us!
Here we'll have our triangle follow the square's rotation, but delay it by 12 frames:
const squareLayer = thisComp.layer("Square");
const delayInFrames = 12;
const delayInSeconds = framesToTime(delayInFrames);
squareLayer.rotation.valueAtTime(time - delayInSeconds);

If we just gave it time - 12, it'd be delayed by 12 seconds, not 12 frames!
If we ever needed to go the other way around— turning a number in seconds into frames— AE also has timeToFrames() for us to use as well.
Around the World!
At this point we've looked at a few common, important Global items in the land of AE expressions.
This is just a starting place! From here, we can jump off and begin our expression journey in earnest :)
Comp

Compositions are the lifeblood of working in AE. The holders of all layers, styling, and animation, they come up a lot in the land of expressions!
While this category comes up often simply when pickwhipping layers in your current and other comps, there are some cooler ways we can put it to use.
We'll cover:
- How to look at every layer in a comp
- Finding which layer is active in your comp
- Building a helpful labelling expression for slating
- Dynamically scaling layers to fit comps
- Updating project text via comp names
- For more information, see the Docs for Adobe expression reference or Adobe’s Expression language reference
Grab your composition books and let's take a look at... the Comp menu!
DISPLAYING ACTIVE LAYER NAME FOR ANIMATICS

This tip is going to rely on numLayers, a helpful property that gives us... the number of layers in a comp!
I know, I know. You're wondering what's so special about the number of layers in a comp! Well I'll tell ya: nothing much, really. But wait, there's more!
We can use the number of layers in our comp to help us loop through all of the layers in a comp and find something.
To show this off, let's say we're building an animatic and want our slate to always display the name of the shot we're looking on. While we could go and hand-key the text layer to change its text on each shot, there's a much simpler way!
By using this expression on a text layer's Source Text, we can loop through all of the layers in the comp (after the first layer, which is our text layer), see whether the layer is enabled ("active" in expression parlance), and if so get its name.
let layerName = "";
for (let i = 2; i <= thisComp.numLayers; i++) {
const compLayer = thisComp.layer(i);
if (compLayer.active) {
layerName = compLayer.name;
break;
}
}
layerName;

Now we can rename, reorder, or retime our layers to our heart’s content, and the text will always reflect that layer's name.
The best part is that because this dynamically looks at all of the layers in the comp, we can add or remove shots and don't need to change the expression at all!
DYNAMICALLY SCALING IMAGES TO FIT COMP SIZE

This expression is a twofer. Often when working with toolkits and templates, you need to dynamically insert images into a comp. The only problem is that you can't guarantee beforehand whether that pesky artist is going to use the right size image for the comp!
We can solve this by writing an expression on the image's scale that will check whether the image needs to be scaled based on the width or based on the height in order to fill the comp, and then use that to set the scale.
This is going to use the width and height Comp menu properties, along with a helpful function from the Javascript Math category.
const scaleFactor = Math.max(
thisComp.width / thisLayer.width,
thisComp.height / thisLayer.height
);
[scaleFactor, scaleFactor] * 100;
Now we can easily swap the image source and it'll always always stretch to fit the comp.
CONTROLLING TEXT LAYERS VIA COMP NAME

This is an oldie and a goodie. The name property, unsurprisingly, gives you... the comp's name. But as we can do SO much with it, it kind of feels like an expression cheat code.
My go-to example for this involves lower thirds or any other form of on-screen titling, as it's such a clear demonstration.
We're going to drive text on a text layer using the name of the comp. This means we just need to rename the comp, and the text layer will update!
Not only that, but with a little bit of Javascript magic we can store different bits of info in the comp name, and have them drive different things in the project.
Toss this onto the text property of a text layer and see the magic work— it really is this simple:
thisComp.name;
Eaaasy! Now we can change our comp name, and our AE text will update—bing bang boom.
Later, Skaters!
So the next time Ms. Lavigne asks why you went and made things so complicated, tell her... you didn't. We made things simpler. With expressions. C'mon, Avril, keep up.
Project

The project category is really handy for folks in production, because it's all about getting you info about the whole project you're in.
Creating slates is an important part of version control and client dialog, and so it's important to ensure that as much info on your slates is as accurate as possible!
We'll look at:
- Finding our AEP folder path
- Identifying the filename
- Displaying the current date on a slate
- For more information, see the Docs for Adobe expression reference or Adobe’s Expression language reference
Let's stop projecting our expression fears and start expressing our.. Project. Menu. Expression. Thing.
GETTING FILENAME AND DATE FOR PROJECT SLATES

The idea here is that we want to get the full filename we're working from, so we can see the version number, artist name, and version name all at once.
Using fullPath will give us this info— then, we can do some Javascript string and array operations to just get the filename and display it on screen.
We'll throw the date in there as well, just 'cause we can:
const pathToProject = thisProject.fullPath.split("\\");
const filename = pathToProject.pop();
[
`project: ${filename}`,
`date: ${new Date().toLocaleString()}`
].join('\n');
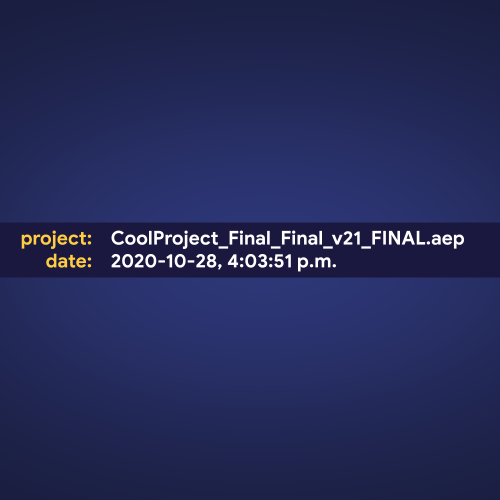
We're using a few little Javascript tricks here to create multi-line pieces of text, and to display today's date in a nice, readable format, but think of those as bonuses! Note that if you're on MacOS, you'll need to replace "\\" with "/" in the first line.
Apart from those, there we have it! The current date and project info, right on screen, and it'll always be up-to-date.
A Growing Slate
The Project category is a fairly new one, and though it's limited at the time we're hoping it's expanded to add all manner of new features!
The main benefit I've found thus far is for slating purposes, as above, though I'd love to hear of some other clever uses!
Footage

This category deals with all things to do with... footage! In this context, 'footage' refers to any files you've imported into the project panel.
A lot of what this menu provides is pretty straightforward— name will get the footage name, width the number of pixels wide, and so on.
The real highlight here is the ability to import special types of data files into AE, and work with that data in fun ways.
We'll cover:
- Accessing the data within a data footage item
- Storing your favorite expressions in a library file on disk
- Having your expression library automatically import into new projects
- Calling functions right from your very own expression library
- For more information, see the Docs for Adobe expression reference or Adobe’s Expression language reference
Alright, that's it for the expression exposition. Let's dive in and futz with Footage.
CREATING AND USING PERSONALIZED EXPRESSION LIBRARIES

Generally used to get spreadsheet or json data into AE, so you can have different layers or comps pull info from each row (more info on the Adobe site), a cool secondary feature is the ability to create your own expression libraries!
By that I mean: you can take all of your favorite or commonly-used expressions, toss them into a single file you store on Dropbox, have it part of your New Project Template so that it's automagically included in every new AE project you start.
Going into how you create an expression library will be the topic of another article, but here's a sample of what that looks like:

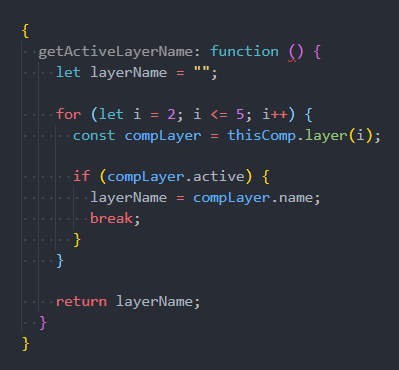
Now to use it in AE, we'll import that .jsx file into our project, and any time we want to use it we'll use an expression like this. In this case, we'll use our function getActiveLayerName(), which... gets the name of the active layer in the comp.
Because this function gives us some text back, we'll apply it to the Source Text property of a text layer.
(If you want to see more info on this expression, check out the Comp article!)
const expressionLibrary = footage("expressionLibrary.jsx").sourceData;
expressionLibrary.getActiveLayerName();
Now, as our timeline moves and different layers become active, our text layer will update to show that layer's name.
And yeah, we could have written the full expression out here, but this is something that we keep using in different projects; by storing it in our library, we can easily reuse it all over the place. All of this is made possible solely with our sourceData property.
Checking Out
And with that we'll check out our expressions from the library and put one Footage in front of the other on our way home.
A lot of the expressions from this series would make great additions to your own expression library, in case you needed a starting point!
Expression Session
If you're ready to dive into some radioactive goop and gain a new superpower, don't do that! It sounds dangerous. Instead, check out Expression Session!
Expression Session will teach you how to approach, write and implement expressions in After Effects. Over the course of 12 weeks, you'll go from rookie to seasoned coder.
ENROLL NOW!
Acidbite ➔
50% off everything

ActionVFX ➔
30% off all plans and credit packs - starts 11/26

Adobe ➔
50% off all apps and plans through 11/29

aescripts ➔
25% off everything through 12/6
Affinity ➔
50% off all products

Battleaxe ➔
30% off from 11/29-12/7
Boom Library ➔
30% off Boom One, their 48,000+ file audio library
BorisFX ➔
25% off everything, 11/25-12/1

Cavalry ➔
33% off pro subscriptions (11/29 - 12/4)

FXFactory ➔
25% off with code BLACKFRIDAY until 12/3

Goodboyninja ➔
20% off everything

Happy Editing ➔
50% off with code BLACKFRIDAY

Huion ➔
Up to 50% off affordable, high-quality pen display tablets

Insydium ➔
50% off through 12/4
JangaFX ➔
30% off an indie annual license
Kitbash 3D ➔
$200 off Cargo Pro, their entire library
Knights of the Editing Table ➔
Up to 20% off Premiere Pro Extensions
Maxon ➔
25% off Maxon One, ZBrush, & Redshift - Annual Subscriptions (11/29 - 12/8)
Mode Designs ➔
Deals on premium keyboards and accessories
Motion Array ➔
10% off the Everything plan
Motion Hatch ➔
Perfect Your Pricing Toolkit - 50% off (11/29 - 12/2)

MotionVFX ➔
30% off Design/CineStudio, and PPro Resolve packs with code: BW30

Rocket Lasso ➔
50% off all plug-ins (11/29 - 12/2)

Rokoko ➔
45% off the indie creator bundle with code: RKK_SchoolOfMotion (revenue must be under $100K a year)

Shapefest ➔
80% off a Shapefest Pro annual subscription for life (11/29 - 12/2)

The Pixel Lab ➔
30% off everything
Toolfarm ➔
Various plugins and tools on sale

True Grit Texture ➔
50-70% off (starts Wednesday, runs for about a week)

Vincent Schwenk ➔
50% discount with code RENDERSALE

Wacom ➔
Up to $120 off new tablets + deals on refurbished items


All-Access Pass
Unlimited access to 50+ courses, unlimited critique, live events, and 24/7 community. Join School of Motion All-Access today.