
Create Stunning Visual Effects in AE
Learn compositing, tracking, keying, and rotoscoping in After Effects. Enroll in All-Access to unlock VFX for Motion and 50+ other courses.
The After Effects 17.0 Update is All About Performance
With new GPU-based motion design apps appearing left and right, many motion designers have been looking to their long-preferred program to "get to up to speed" (pun intended).
It's nearly 2020, and Adobe's latest update is out. Does After Effects 17.0 meet the increasing demand for a faster engine (and other performance enhancements)?

We asked Kansas City-based designer, video editor, SOM Teaching Assistant and alum, and Adobe Community Professional Kyle Hamrick to investigate.
In his After Effects 17.0 breakdown, Kyle covers speed improvements impacting:
- RAM Previews
- Shape Layers
- Expressions
- Content Aware Fill
- EXRs
He also reports on:
- The new Cinema 4D Lite, updated for Maxon's Release 21
- Essential Graphics Panel Dropdown Menus
- Access to Text using Expressions

After Effects 17.0: New Features: Tutorial Video
{{lead-magnet}}
After Effects 17.0: New Features: Explained
PERFORMANCE IN AFTER EFFECTS 17.0
Before measuring performance in a complex design app like Adobe After Effects, you need to understand what performance means.
The After Effects team divides the app's performance into three categories:
- Rendering, or how fast After Effects displays pixels on your screen
- Interactive, or how fast the UI responds to your actions
- Workflow, or how fast you can complete a task
With that in mind, we look at what has (or hasn't) been upgraded in 2019-2020.

PREVIEW PLAYBACK IN AFTER EFFECTS 17.0
In the new version of After Effects, playback has been beefed up.
- When you've cached RAM preview files, you'll get real-time playback of your composition
- When playing back your cached frames, you can interact with the UI without affecting playback
CONTENT AWARE FILL IN AFTER EFFECTS 17.0
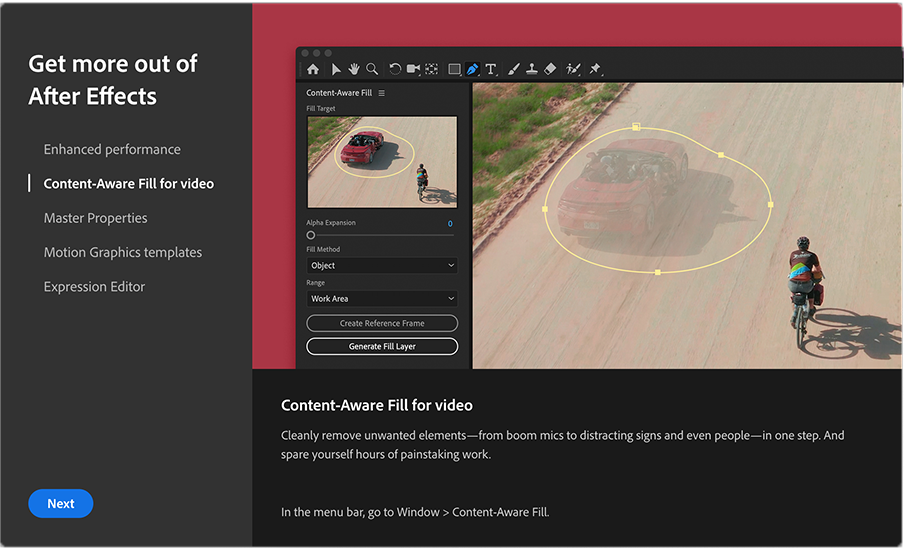
In 2019, Adobe introduced Content Aware Fill in After Effects, enabling you to more easily remove objects from your scenes.
In After Effects 17.0, this already popular feature is 10% to 25% quicker and relies approximately two-thirds less on memory — a particularly significant and immediately obvious spruce-up for motion designers with less RAM in their machines.
EXPRESSIONS IN AFTER EFFECTS 17.0
Expressions are a motion designer's secret weapons. They can automate repetitive tasks, build flexible rigs, and extend your capabilities far past what is possible with keyframes alone. However, you're limited by how well After Effects can keep up with your coding.
Adobe knows this and, to expedite Expressions processing in After Effects, has focused efforts in two primary areas:
Using Expressions with Master Properties
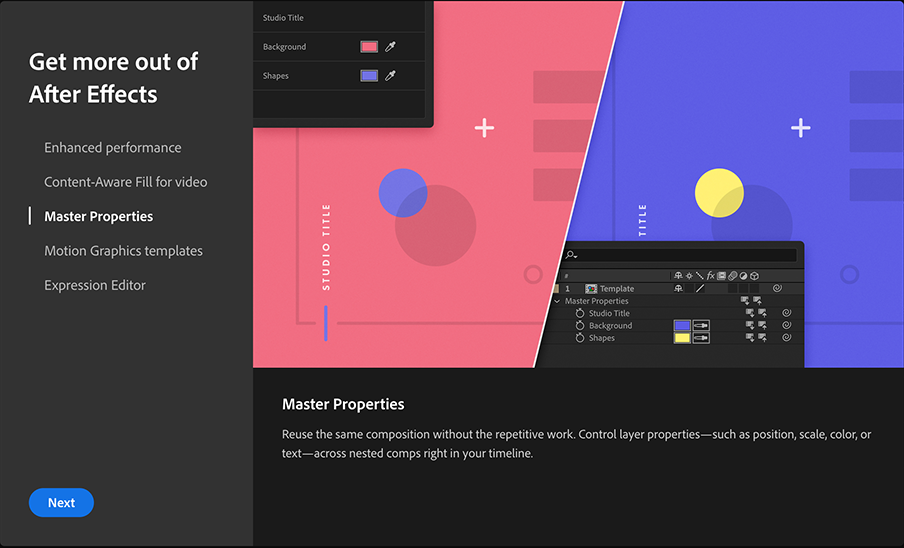
Thanks to some new tweaks and optimizations, you'll notice in the After Effects 17.0 a smoother experience using Expressions in combination with Master Properties.
Want to learn more about Master Properties features that can expedite your workflow? Watch How to Use Master Properties in After Effects:
Fewer Calculations Per Frame
Expressions experts understand there are some calculations that aren't warranted, and some Expressions that simply don't need to be recalculated every single frame.
In previous versions of After Effects, certain codes — like posterizeTime(0);, for example — unnecessarily generated a new calculation each frame; in After Effects 17.0, gratuitous calculations have been removed.
MULTILAYERED EXR FILES IN AFTER EFFECTS 17.0
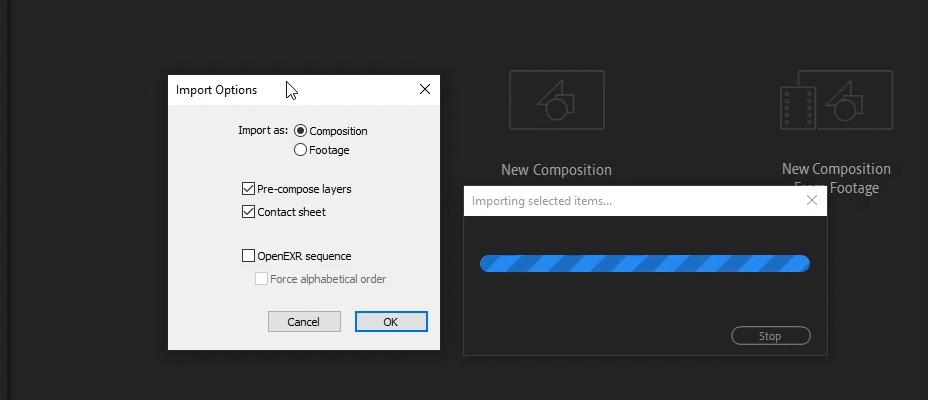
Perhaps the most important performance improvement in After Effects 17.0, the speed at which After Effects reads multilayered EXR files is now 10 to 20 times faster in After Effects 17.0 — drastically expediting 3D and compositing workflows,
Plus, now:
- Multilayered EXR files can be imported as layered compositions
- Cryptomatte is natively supported
SHAPE LAYERS IN AFTER EFFECTS 17.0
Shape layers have also been upgraded in After Effects 17.0; with our work heavily relying on vector-based illustrations, expect a significant speed boost to your workflow.
GROUPING AND UNGROUPING SHAPES IN AFTER EFFECTS 17.0
In earlier iterations of After Effects, to group or ungroup shapes you had to create a new group using the Add drop-down menu and then drag and drop; now, you can group or ungroup shapes with a single right click.
As in Adobe Illustrator, simply hit CMD + G to group or ungroup your shapes in After Effects 17.0.

CINEMA 4D LITE IN AFTER EFFECTS 17.0
With the recent release of Cinema 4D R21, we had to assume updates to Cinema 4D Lite and Cineware in After Effects were forthcoming — and, fortuitously, we were right.

The two biggest takeaways are:
- New flexibility and efficiency with Caps and Bevels, including Step and Curve Bevel options, and saving and loading Bevel presets
- A new denoise filter for cleaner renders, accessible by clicking the Effect button on the left in the Render Settings window
DROPDOWN MENU EXPRESSION CONTROLLERS IN AFTER EFFECTS 17.0
Design a lot of .MOGRT templates? There's a brand-new feature in After Effects 17.0 that's ideal for animating and rigging: dropdown menus can now be used in Master Properties and are available as Expression Controllers.
To set your options for your dropdown menu Controller, use the Effect Controls panel, and click Edit at the top right of the window.
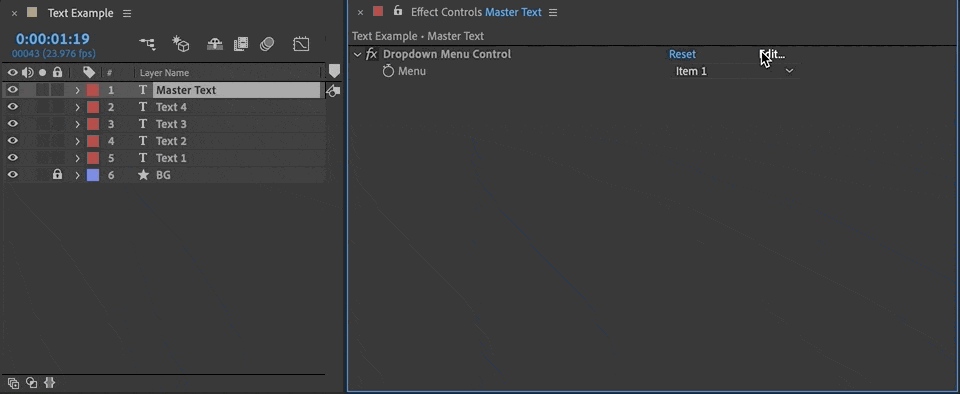
To change the number of options, simply click the + or - icon at the top right of the dialog box.

TEXT STYLE EXPRESSIONS IN AFTER EFFECTS 17.0
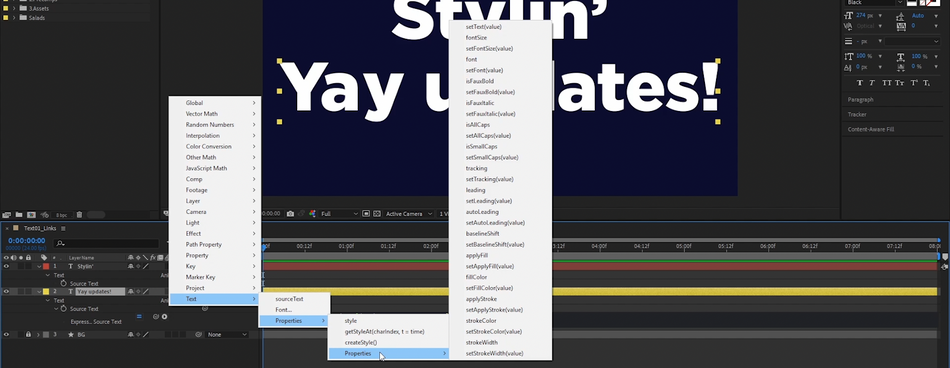
If you're working with motion templates or projects adhering to branding guidelines, you'll benefit from now being able to directly access text property options — like font type, size, color, and stroke width — using Expressions.
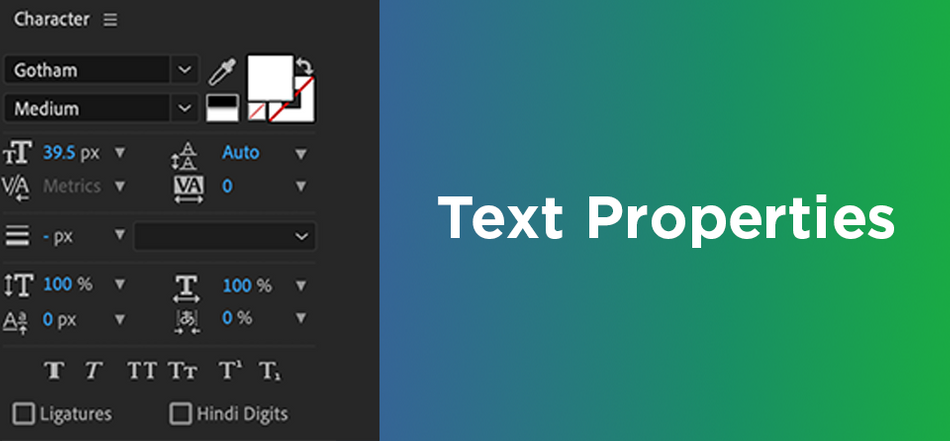
In After Effects 17.0, you can "Get" text properties from other layers, or "Set" text style properties using Expressions.
Of course, there are benefits beyond templates, as well.
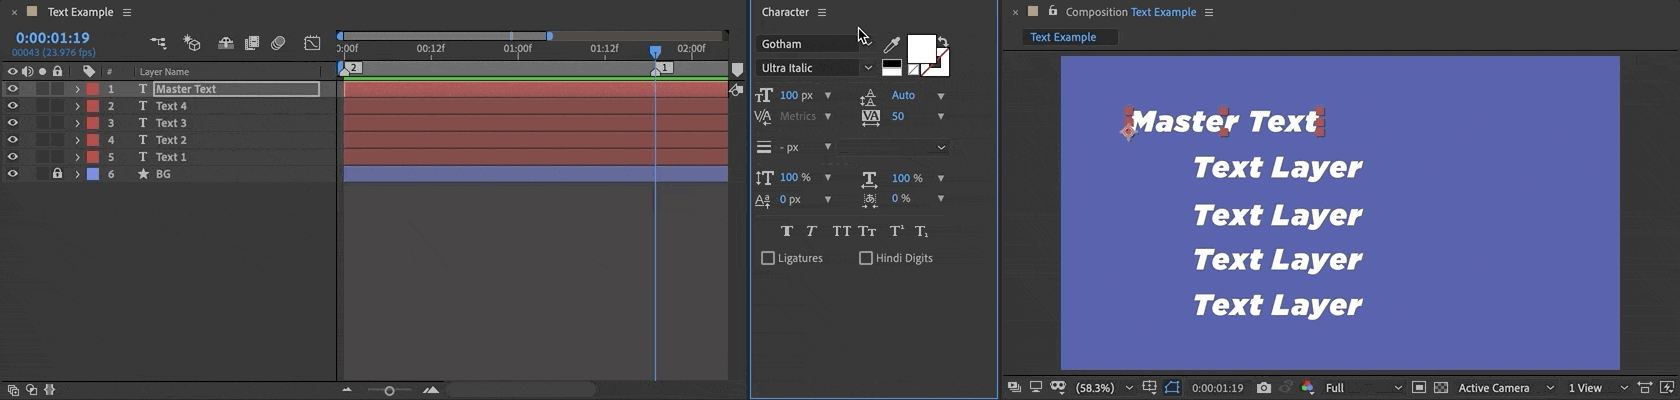
Imagine setting up Expressions on all your text layers that watch for changes in one main text layer, your Master Layer. Your code is instructing After Effects: if the font changes in the Master Layer, copy those changes and reflect them in all other layers.
After Effects 17.0, and the Adobe User Voice Platform
To review all the new features and fixes in After Effects 17.0, see What's New.
If you have a bug to report or a change to request, don't forget you can now use the Adobe User Voice platform. The more community votes an idea receives, the more likely Adobe will take action, so be sure to upvote suggestions you'd like to see in future versions of the app.
Mastering After Effects 17.0
Ready to make the most of the world's leading motion design software? There's no better way to master After Effects — and position yourself for further success — than investing in your education, like our 5,000-plus alumni.
Our classes aren't easy, and they're not free. They're interactive and intensive, and that's why they're effective.
By enrolling, you'll gain access to our private student community/networking groups; receive personalized, comprehensive critiques from professional artists; and grow faster than you ever thought possible.
Plus, we're entirely online, so wherever you are we're there too!
AFTER EFFECTS KICKSTART
In our After Effects Kickstart course, Nol Honig of The Drawing Room will educate and empower you to excel in a career in motion design, visual effects, character animation, or even UX prototyping.
EXPRESSION SESSION
Want to focus on writing code for motion design? We've got you covered.
Expression Session, taught by the titanic tag team of Zack Lovatt and Nol Honig, will teach you how to use Expressions, and why.
-----------------------------------------------------------------------------------------------------------------------------------
Tutorial Full Transcript Below 👇:
Kyle Hamrick (00:00): Hey everyone, Kyle Hamrick here for school of motion. It's Adobe max time. And that means we just got a brand new version of after effects. I'm pretty excited to show you a couple of the new features they just added. So let's dive in and check it out
Kyle Hamrick (00:23): Today. We're going to be covering the big new features and after effects 2020, which is more officially known as after effects version 17. With every update. Adobe puts out a full description of all the new features and fixes in full detail, which we've provided a link to. I highly recommend you look through that to make sure you're up to date on anything. I might not cover in this video. Now let's dive in and check out what's new. And after effects, the after effects team has put lots of work into speed and stability. So in this release, you're going to see several performance boosts as well as bug fixes. Cinema 4d has upgraded to our 21. So we'll be getting a new version of cinema 4d light and the CINAware plugin. And then we have two new features that will be really helpful for templates or McGirts or just rig work in general, which are the dropdown menu and text styling expressions.
Kyle Hamrick (01:09): So let's take a minute and talk about speed in after effects. The after effects team gets a lot of feedback about this. And one thing that's important to note is that in a complex app, like after effects, speed means a couple different things. So I'm taking this language directly from a public statement by the after effects team that they view it in terms of three different things, there's rendering performance, which is how fast can aftereffects get pixels onto your screen. This is the speed of previews and of exports. There's interactive performance, which is how fast does UI respond to your actions? How responsive is after effects while you're actually working in it. And then there's workflow performance, which is how fast can you complete a task and after effects, this is the actual tools and features that may speed up things that you used to have to do manually.
Kyle Hamrick (01:54): So specifically in this version, the after effects team has made big enhancements on preview playback optimization. So what this means is that once cashed, once your Ram preview is fully built, you should get real-time playback on your previews without any slowdown. Even if you're interacting with the UI, there's probably always going to be a few edge cases and exceptions. So again, you should check out the release notes for that, but generally speaking, you should have a really good preview experience. Obviously this isn't something I can really demo here. So dive into some of your older projects and see if you can feel the difference. The after effects team is continuing to work on other aspects of performance and has publicly stated that they are actively working on multithreaded CPU rendering as well. So you can kind of draw your own conclusions from that, but hopefully that means we'll continue to see speed enhancements over the next couple of versions.
Kyle Hamrick (02:42): We'll also see an overall performance boost on shape layers. They should be quite a bit faster than they used to be. And there's also this handy little group ungroup option that you can get by, right, clicking on a shape layer here, which is just a nice little convenience feature. You'll also see a performance boost on certain expressions that don't need to recalculate every frame, something like poster eyes, time, zero for example, was previously still actually recalculating, but now it will just hold that value and only calculate once which should make everything faster. You'll also see a performance boost for expressions used in combination with master properties. If you're not familiar with master properties, we posted a video explaining them when they first came out last year. And if you're interested in learning more about expressions, make sure to stick around for the rest of this video.
Kyle Hamrick (03:26): We've also got a major performance boost to content aware fill, which was introduced earlier this year. Lastly, we have a big boost for performance and workflow for multichannel EXR files. These are primarily used if you're creating multi-layer passes from 3d software that you're then compositing within after effects. As I said, you'll see a big time performance boost. And as of this version, you now have the ability to import them as layer to compositions, similar to a layered Photoshop or illustrator document, which should make this workflow much faster and better. They now have native support for crypto mat and there's even a contact sheet view. So you can view all your passes at once. So in general, you should be able to spend a lot less time setting this up and a lot more time making your 3d passes look awesome. Speaking of 3d cinema 4d was recently updated to our 21, which means that we get a brand new version of cinema 4d light with this version of after effects.
Kyle Hamrick (04:20): EGA released a video in September going over all the new features of the full version. Obviously we don't get all of those with the light version, but we do get quite a few specifically. I wanted to point out these new cap and bevel options, which should be a really nice enhancement for light users. There's a new layout and some new functionality here that makes it a little easier to work with. We have a new step bevel, which you can see enable some cool stuff. And there's also this new curve bevel editor, where you can create custom. Bevels exactly the way you want them. And you can even save and load presets, which should be super handy. There's also a new de noising filter that should help your passes look better. And the CINAware plugin that allows you to bring cinema 4d objects directly into after effects.
Kyle Hamrick (05:01): Like this has been updated as well to work with our 21. I should also point out that the aftereffects Ray tracing 3d engine has been removed as of this version. It was already deprecated previously, but it's actually gone now. So if you have any old projects that are still relying on the Ray tracer, you'll either need to sunset those or go ahead and update them to the cinema 4d render. These last couple of features. Won't be for everybody, but as someone who makes a lot of templates and expression rigs, there's something that I'm pretty excited about. New to this version. We have dropdown menu expression controllers, which I'll show you in a minute, but it also means that dropdown menus and existing effects can be added to the essential graphics panel for use in McGirts or in master properties. So in this composition, I just have a solid with the fractal noise effect on it.
Kyle Hamrick (05:49): Fractal noise actually has multiple dropdowns in it, but we'll just look at the first one here, which determines what kind of fractal is being used to generate pattern. I'll just set that back to basic previously, drop down menus for something that could not be added to the essential graphics panel, but now in this version, they can. So you see here I've added it, which would make it easy to access. If I were just building a template for myself, but more importantly, these can be accessed as master properties. So if I add this to another composition, you see that fractal type is now available as a master property, that would be able to access this and change it. However, I see fit right here. So generally this is going to make a lot more stuff available for master properties, which is really nice. So additionally, we're getting a dropdown menu control as one of the expression controls that you can add to layers, to control various things, to explain how to use this.
Kyle Hamrick (06:43): I'm going to have to explain expressions a little bit. So warning expressions, content, so to use the dropdown menu expression control, and we're going to have to write some expressions, specifically a conditional statement, which is commonly known as an if else. The way this works is you specify a condition. For example, a dropdown menu is set to a certain option. And when that happens, a certain result occurs. Otherwise a different result occurs and you write it in a format like this, where you say if condition in parentheses and then you use these curly braces to define your results. So result a happens if the condition occurs else, otherwise result B. The other thing you'll commonly see it written in this sort of more cascading vertical format, because as conditional statements get more complicated, you end up needing lots of space like that, and it helps just make things clear.
Kyle Hamrick (07:39): We're doing pretty simple ones today. So I'm going to keep it in a more single line sentence format, because I think that'll be a little easier for newer folks to understand. I'm going to explain this concept, using a checkbox controller, just because it's a bit simpler. And then I'll show you how to use it with a dropdown controller in a minute in this composition, I've added a checkbox controller to this layer, which just to point out, you can find it in effects, expression controls, checkbox control. What I'm going to do here is use this checkbox to determine whether or not this layer is visible. So I will click the stopwatch for opacity, and I'm going to start by creating a variable for the checkbox, just to make things a little easier to look at V a R variable. And then I'll define my variable as checkbox equals.
Kyle Hamrick (08:29): And then I'll just pick whip to that checkbox and my line with a semi-colon and hit enter. Now I will say if checkbox, and then you need a double equal sign here. That's just the way it works equals zero. That means it's off in the case of a checkbox close parentheses. So if the checkbox is off, then I want this layer's opacity to be zero else. If the checkbox equals anything but zero, anything but off, then I want this layers capacity to be 100. So right now the checkbox control is on. So this layer is visible. If I turn it off, click gone. Hopefully that makes sense. It's a pretty quick basic lesson in how to use an if else expression. So I have another composition here with a couple of shapes with specific colors, you can see red circle, blue square, yellow triangle, and then I have a no layer that I'm going to use to hold my expression control, right? Click affect expression controls down menu control. Now I'm going to start by establishing the options that I can choose from by clicking this edit button right here, instead of item one, let's say red circle, instead of item two blue square, instead of item three, let's say yellow triangle.
Kyle Hamrick (09:56): You could add more options if you want, or take them away to have fewer whatever you want. I'll hit. Okay? And now you can see, these are my options on this menu. You can define these as whatever you like as far as after effects is concerned. This is 1, 2, 3. So now we're going to write an expression, just like the one I showed you to determine the opacity of these layers so that we can use this menu to select which shape is visible. So we'll expose this menu control here. Now on red circle, I'll click the opacity and let's write VAR menu. I'm just choosing that to be the name of my variable. You can name it, whatever you like, and I'll pick whip to that dropdown menu right there. Semi-colon if parentheses menu equals one close the parentheses curly brace 100, this time I'm deciding if it equals that thing, then be on since red circle is the first choice on the menu.
Kyle Hamrick (11:01): That's what I want to pick close my curly brace ELLs. If it equals anything except one, then this opacity should be zero. So let's choose something else. And the circle turns off. Perfect. I'm going to copy this alt click paste it to blue and just change this to two because blue square just wants to look at the second option on that menu. Right? I'll click paste it down here to the yellow triangle. Change that to three. So now each layer is looking at one specific option on the menu. So if blue square has chosen from the menu, that's, what's visible yellow triangle red circle. Great. If I want to add this to the essential graphics panel, I can just drop this menu control right here and see, I can still make changes here or more importantly, I can drop this into another composition and use this as a master property to determine what's visible. Let's go ahead and close the essential graphics here. I can pull this over. Let's set this one to be red circle. The great thing about master properties is that by using only one composition, I can actually have instances of that composition.
Kyle Hamrick (12:26): And you can see here that I can choose multiple options from that list that I set up, but it's still only one composition. I set up another dropdown control here on this text layer using a very similar expression. So do you like these updates? Maybe? No. Yes. I certainly do. I know this isn't something that all of you are necessarily going to use, but generally speaking, it should make templates and motion graphics templates, a lot more intuitive to use because you'll be able to have controls that actually say what they do previously. We had to use things like slider controls that were a little bit arbitrary, where you might choose between different color schemes or something by choosing 1, 2, 3, but now you could actually choose, you know, light mode, dark mode, whatever the case may be, right? So this should be a nice step towards making templates and expression regs a lot more intuitive.
Kyle Hamrick (13:16): This last new feature is also pretty expression, but don't be intimidated. Even if this isn't something that you are interested in, coding yourself, it should make text presets a lot more useful. It should make motion graphics templates in particular, a lot more useful and versatile. And this will be really nice for people that are building those templates. Specifically. What we're getting here is expression access to text styling properties. So while there are a couple of exceptions, generally speaking, if it's something that's in the character panel here, you can use expressions to get or set specific style properties based on hard coded values based on other layers, based on expression controls you create. It really just gives you a lot of cool new options for quite a while. We've been able to link a source text using the expressions source text is the actual characters that you typed into your text layer.
Kyle Hamrick (14:05): You can use the property pick whip, where you could click, and then you use the expression pick whip right here, just tie this layer directly to that other layer. And now it will take the same text string, but notice that it's still using its original styling with this new feature, it's possible to pull the style from that layer either separate from, or in addition to the actual source text. If you just want the style, but want to retain the original text string that you typed in here, you can just add.style to the end of this line. And now it will pull all of those text properties. You'll see this layer was set to Gotham black at 2 74 size, pretty much everything else on the defaults. And now this layer is also doing, despite the fact that it is written in a different font, different size had a different text string. Now, in this case, I'm pulling the style from the first character of this other line. And there are actually ways to be more specific about this. If you're familiar with the expressions, fly out menu, there's a new category here called text, and you can reference all kinds of stuff. Notice you can reference specific fonts. This will call up a list of all the fonts that you have installed on your machine.
Kyle Hamrick (15:25): You can also reference all the available text properties here. You see, you can set size photo, bold, letting fill color, et cetera. Like I said, pretty much everything in the character panel is available here. If I want to be making an exact duplicate of this other layer right now, I'm just pulling the style, but using my original text string, I could to the end of this, add dot and then go in here to the fly-out menu, properties properties set text inside here. I could set a specific text string to be my value in this case, I could type expressions and it will now display expressions in the style of the layer that it's looking at, or I can point that back to the source text. And so it's taking from that layer from that source text, take the style and then set the text to that source text.
Kyle Hamrick (16:23): As you can see, there are a lot of other options in here. So you can manually set things like the font or various other styling properties. And that also means that if you create expression controls for these things, you can potentially manipulate these easily and expose them as master properties or for motion graphics, templates. Another really useful thing. This enables is being able to save and apply animation presets that will hold all the texts settings for a specific look. This is going to be really useful. If you have specific branding guidelines that you need to follow all the time, so you could set it up once and then just apply it as needed. Here. I have a text layer that has no expressions on it, but I've already created an animation preset that I can just apply here, animation it's in my reasons, cause I just made it tech styling.
Kyle Hamrick (17:07): And now if I open this up, you can see the style is setting the font to ISO Sans black it's setting the fill color to this blue it's setting apply stroke. True. Yes, apply a stroke stroke with the 16 stroke color to white font size to 200 tracking to 40. Really anything that you want to store in here, you can. And just to point out anything that's not being overridden in here is still editable. So I could still do italics and all caps and things like that. But if it's referenced here in the expression, it will override whatever's happening in the character panel. Just in case you don't know how to create an animation preset, you just select whatever key frameable properties you want. They can have key or not. It'll just hold the value. If there's no key frames and you go to animation, save animation, preset, give it a location and a name, and then you can just call it up whenever you need it.
Kyle Hamrick (17:59): In the future. Being able to dynamically set text size is also going to be really useful, especially for paragraph text. If you use the text tool and drag a box, you can create what's called paragraph text or a text box. I'll just fill it up with some Laura MIPS from here. It will reflow depending on the text size here, but previously this has been pretty hard to access. It was only accessible. If you added your source text to the essential graphics panel and then threw a control in there, but it still wasn't really possible to edit it dynamically. Like you can. Now I'm going to create effect expression control, slider control, and I will use this to control the text size. Let's go ahead and just set it to 50 for now. We'll open up our source text. And in here let's add.style dot and then let's find font size set, font size value.
Kyle Hamrick (18:59): So in place of value, I could set a specific value, like 200 and that's the size that will make the text. But instead let's pick with that to the slider that we created. And now we have an easily accessible text size right here, which of course can also be fed to the essential graphics panel, could name this text size, and then you could easily feed this out as a master property or for a motion graphics template. I've got one last example that combines these new text expressions with the dropdown menu. Now in the last version, much like the size, you can allow the font to be editable if you fed this into the essential graphics panel, but then that exposed the entire font list. So being able to do it this way, you could create just a very small list of options, of acceptable thoughts. You can see here. I set up a few options of different fonts right here using my dropdown and control. And then the source text, I set up an expression variable a is a specific font, a zero Sans, regular variable B is HT neon. So on, you can just choose within these parentheses. You can just set text font, and then whatever font you choose from this list is what it will put in there.
Kyle Hamrick (20:20): And then with this, if else, expression here, this one's written a little differently because it has multiple choices. You can use this font selector to choose what font this is. There should be really handy for templates and it will help keep things within specific brand guidelines, but still give people options. So this should be really useful for text templates in general, making those just really streamlined and easy to use. Hopefully you saw cool new stuff in here that you're excited to try out again. The Adobe team releases a full description of any new features along with this update. So it's always good to check those out and make sure you're aware of anything new or different. I hope this video got you excited to dive into aftereffects and test out the new features. Maybe bust out a project you made with a ton of shape layers and see how the performance compares to the previous version.
Kyle Hamrick (21:07): Maybe one of these features was the thing you were waiting for that kept you from really diving into making templates with every new version comes new possibilities. So get in there, explore and figure out what you can do with them. If the expressions related features I showed today were way over your head. School of motion has just announced a new expression scores expression session that may be perfect for you. It's taught by the dynamic duo of Zach Lovatt and Nol Honig. You can come in with zero expressions experience and you'll learn to love all this crazy coding stuff, which can open up a whole new side of aftereffects for you. So head over to school of motion.com/courses and check it out again. If you want to stay up to date on after-effects and on the entire motion design industry, please subscribe and head over to school of motion.com to sign up for a free student account. You'll be able to download a project file with some of the demos I just showed you and get access to tons of other cool stuff as well.
ENROLL NOW!
Acidbite ➔
50% off everything

ActionVFX ➔
30% off all plans and credit packs - starts 11/26

Adobe ➔
50% off all apps and plans through 11/29

aescripts ➔
25% off everything through 12/6
Affinity ➔
50% off all products

Battleaxe ➔
30% off from 11/29-12/7
Boom Library ➔
30% off Boom One, their 48,000+ file audio library
BorisFX ➔
25% off everything, 11/25-12/1

Cavalry ➔
33% off pro subscriptions (11/29 - 12/4)

FXFactory ➔
25% off with code BLACKFRIDAY until 12/3

Goodboyninja ➔
20% off everything

Happy Editing ➔
50% off with code BLACKFRIDAY

Huion ➔
Up to 50% off affordable, high-quality pen display tablets

Insydium ➔
50% off through 12/4
JangaFX ➔
30% off an indie annual license
Kitbash 3D ➔
$200 off Cargo Pro, their entire library
Knights of the Editing Table ➔
Up to 20% off Premiere Pro Extensions
Maxon ➔
25% off Maxon One, ZBrush, & Redshift - Annual Subscriptions (11/29 - 12/8)
Mode Designs ➔
Deals on premium keyboards and accessories
Motion Array ➔
10% off the Everything plan
Motion Hatch ➔
Perfect Your Pricing Toolkit - 50% off (11/29 - 12/2)

MotionVFX ➔
30% off Design/CineStudio, and PPro Resolve packs with code: BW30

Rocket Lasso ➔
50% off all plug-ins (11/29 - 12/2)

Rokoko ➔
45% off the indie creator bundle with code: RKK_SchoolOfMotion (revenue must be under $100K a year)

Shapefest ➔
80% off a Shapefest Pro annual subscription for life (11/29 - 12/2)

The Pixel Lab ➔
30% off everything
Toolfarm ➔
Various plugins and tools on sale

True Grit Texture ➔
50-70% off (starts Wednesday, runs for about a week)

Vincent Schwenk ➔
50% discount with code RENDERSALE

Wacom ➔
Up to $120 off new tablets + deals on refurbished items


Create Stunning Visual Effects in AE
Learn compositing, tracking, keying, and rotoscoping in After Effects. Enroll in All-Access to unlock VFX for Motion and 50+ other courses.