
Add Video Editing to Your Toolkit
Learn Premiere Pro from a motion designer's perspective. Enroll in All-Access to unlock Premiere for Motion Designers and 50+ other courses.
In this article we'll take a close up look at creating motion graphics for video and ribbon boards in sports venues.
When you think of motion graphics in sports, a few things probably come to mind. Sports show graphics packages, weird looping 3D animations on the local news, and Gatorade commercials. An often overlooked segment of the motion graphics industry is in stadiums and venues across the world.
It’s hard to imagine without dipping your toes into it, but there’s a very large world out there itching for MoGraph on screens that aren’t 16:9. Today we’ll look at some of the types of boards that are commonly used across sporting venues, their content, and how that content is created. We'll also take a closer look at a division 1 football stadium in Fort Worth, TX.
Types of Video Boards
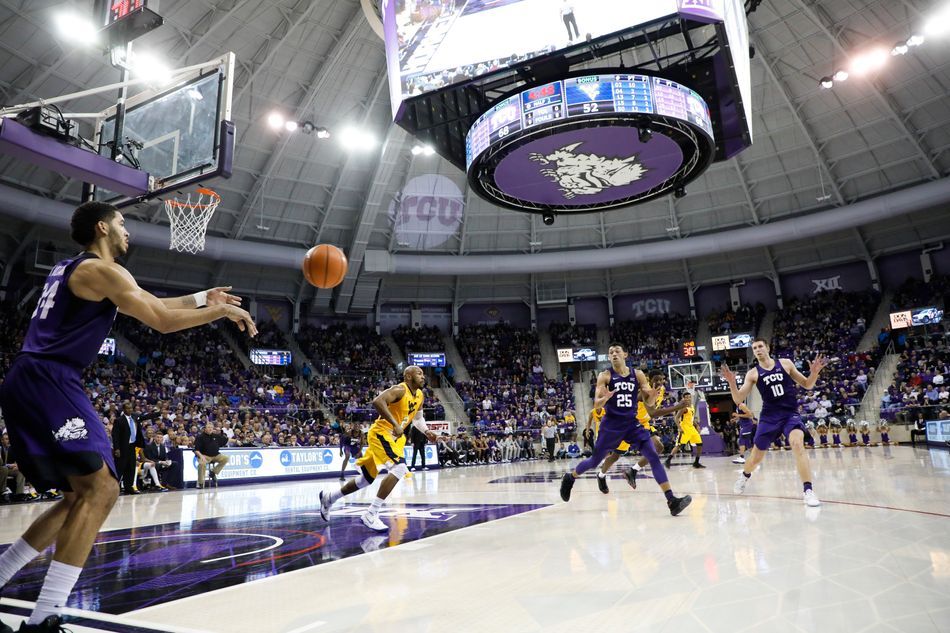
Rectangles are rectangles, right? Not so much. The beauty of video boards is they can be created in almost any shape and size imaginable. Granted, the most common are very large rectangles.
You’re probably used to seeing large video boards, long skinny ribbon boards, and even circular center hung rings. If they’re used well, these boards blend seamlessly into a stadium’s façade and don’t call attention to themselves by being ghastly eyesores. They add to the game’s atmosphere with flashy graphics, some sync’d to videos while others are prompted, and most also provide troves of information for the stat-hungry fan.
When we look at video boards, there are a few categories of things that most content can squeeze into.
Videos
Videos can range from features like team intro videos, to headshots, replay wipes, sponsor slides, pre-packaged content, and obviously to a live feed. These are typically standardized to a 16:9 resolution or very close.
Kyle Hicks Video Headshot (by Clayton Regian)
Prompts
Prompts are graphics used to give energy to a crowd. Think about when the home team scores, the stadium erupts in bright lights, music, and intense graphics blowing up in your face. Alternatively they can be used to get some momentum going. Imagine the home team is down, so in between plays the DJ ramps up his music and the video boards start flashing graphics like, “LET’S GO!”, “MAKE SOME NOISE!”, and “LOUDER!”
De-fense Prompt (by Will Draper)
Sponsors
This content is where the money is at, literally... Sponsor content can be quite the rabbit hole because most sponsors are always looking for new and unique ways to engage with fans. Sticking to just video boards, their content can be segments during the game with prompts on the main video board, part of a ribbon board rotation that’s seen throughout the game, or attached to a game’s specific elements, like social media feeds, stats, or fan cams. As you can imagine, sponsor content can range from the simple bug (small logo) in the bottom corner of a video to the incredibly complex; combining live on-field elements with choreographed video board and ribbon board elements.
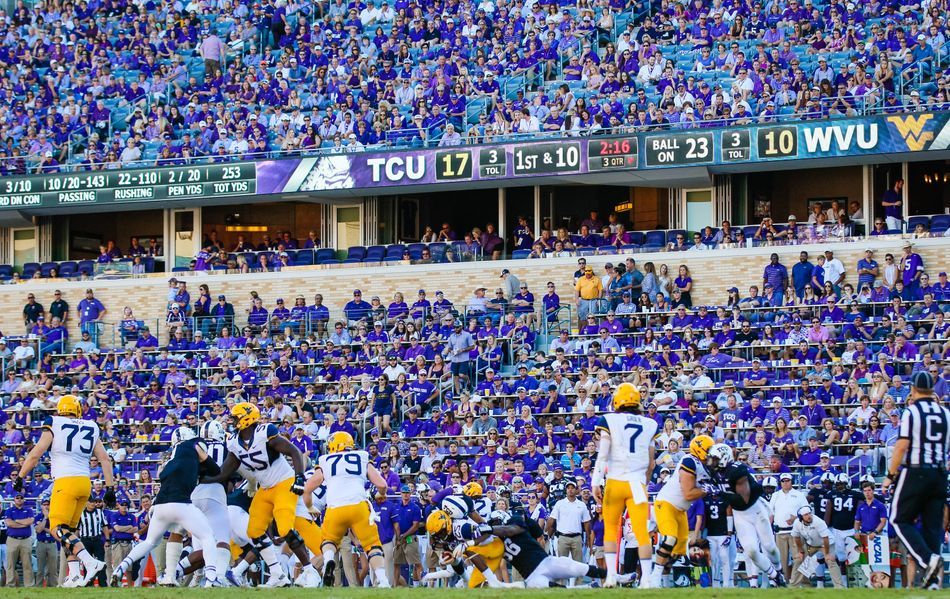
Game Information
This is also a wide ranging topic. Depending on the venue, game info can be anything as simple as a clock and score to showing advanced real-time statistics on teams and individual players. The information itself is typically driven by a special computer system or systems, but there is subtle animation that happens in the background. Think looping animation
An odd thing regarding game info is that form definitely follows function. While you and I want things to look pretty, that can sometimes cause information to be hard to read. There’s a fine line to walk on making stats look good, but also legible. Unfortunately a lot of that comes down to best guesses and then testing in venue.
The categories typically work in conjunction with one another in a game setting. Meaning, game information will be displayed while sponsor graphics are also on the boards and other variations like that. I’ll provide a few more specific examples once we deep dive into TCU Athletics later.
Many elements in a game will also be sync’d together, like when a team intro video plays on the main screen, all of the other ‘supporting boards’ (ribbons, rings, etc.) will have choreographed content that go along with the video. You’ve probably seen this taken to the max at events like the Olympics and some NBA arenas where projection mapping is also used to add a whole new dimension to the fan’s visual experience.
Now that you’re more aware of some of these elements in live venues, how are they made? That answer is pretty simple on the surface: most any video editing/graphics program can make content for these screens. After Effects, Cinema 4D, and Photoshop are by far the most common tools of the trade when creating content for these odd shaped boards. In a pinch, you could even coax Premiere into making these graphics, but outside of standard video, that’s not advised. There also seems to be a never ending line of people who think we run everything from Microsoft PowerPoint...
The key to creating this content and having it work with the computer systems that run the video boards is paying close attention to the final video’s required specs. For a quick lesson, Joey did a great tutorial on jumbotrons you can check out.
Ultimately though, Dimensions, frame rates, and codecs are the most important things to consider when delivering your finished product. Those three things are determined by the size of the boards on which the content is being displayed, the computer system(s) running the content, and specifically how that content is being used. By that I mean is the content always on? Is it in the background? In the foreground? Does it pop up on command or programmatically? Etc.
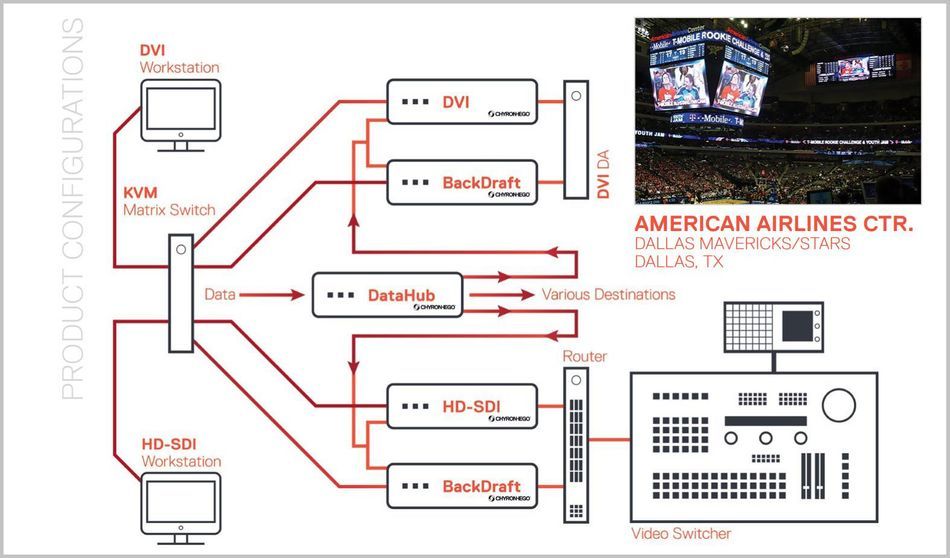
So what kind of systems run these video behemoths? I’m glad you asked. Here are the big players in the field of video boards:
Each of these systems has their various intricacies. What is common amongst all of them is they take video and audio files (created in specific codecs) and pull them into a user friendly interface for quick deployment during sporting events. These machines are the front end to a much larger infrastructure that take a video signal and maps it to the appropriate spot on a large video display.
A Case Study: TCU Athletics
Now let’s dive into a specific example. I’ve had the pleasure of developing the layout and content for some brand-spanking-new video boards for the Horned Frogs over the past couple of years. Most recently were the additions of East and West ribbon boards in Amon G. Carter stadium.
The stadium's ribbons would be run from a single Click Effects Blaze v2 system and would need to accomplish multiple things. Display flashy prompts, run graphics sync’d to videos, make money with sponsor promotion, keep track of out of town scores and – oh yeah –readily show player, team, and general game information (like who’s winning) in real time. That’s a lot to cram into two very long, very skinny video boards. To show you what I mean, here are the dimensions for each of the sides:
- East – 8960 x 50
- West – 8240 x 50
To add to the challenge, the west side’s board isn’t one continuous piece. Fun! When building the graphic for the west side, we still treat it as a single board, but have to pay close attention to pixel counts to know where to ‘break’ our graphics. Alternatively we can create looping graphics that also move left to right (or vice versa) so the breaks aren't noticed, like in the image below.
I won’t bore you with the math used to determine the exact layout, but this is what we ended up creating to make the ribbons appear to mirror each other during game play:
The center of each board houses game info, team stats, and rotating player stats. We based the dimensions of this graphic off of the size of the center section on the west ribbon. This graphic and the out of town scores found on the ends of each ribbon is identical in size on both sides. So I can build one graphic for each of those two sections and Blaze is smart enough to recognize them. It then mirrors and maps them appropriately to specific sections of each board.
That leaves us with 4 large gaps of different sizes that are filled in with a rotation of sponsor graphics. These range from static jpg images to fully animated QuickTime movies and are built as two files (east and west) that include the sponsor content and a large gap to accommodate the game info and stats.
The game info and stats are process hungry, pulling information in real-time from XML files located on a FTP site. Because of this, it’s easier on the computer to leave the stats on once they are initially fired up, rather than turning them on and off throughout a game. Because of this, all other content is layered on top of the stats in order to constantly leave them on, but hidden at times.
Stats and game info make up the bottom layer. The in-game sponsor rotation sits on the layer just above the stats and game info. Finally, features, prompts, and some exclusive sponsors ($$$) sit on top of all layers so that they cover everything in the stadium when run.
FEATURE & PROMPT DISPLAY
The game in progress mode was the most challenging part to initially configure, but the exciting part is creating sync’d graphics for features and prompts. Prompts are straightforward enough, coming on quickly and prompting the crowd to do something.
Louder Ribbon Prompt (by Will Draper)
They can be fired off automatically, like when a team scores, or on demand by clicking a command. In TCU’s example, the prompt takes over the board for a few seconds, then clears to reveal the game info and sponsors again like nothing ever happened.
Features are more intensive and the most fun in my opinion. These graphics are where creativity gets to shine. Let’s look at TCU Football’s 2017 Intro video. This feature is played immediately prior to the team running onto the field, so its job is to get the crowd jacked.
The video is thrown in overdrive with the addition of other supporting board content that is sync’d to the feature. In TCU's example, this includes ribbon boards, field level LEDs located in the end zones and square pillar boards located in the north end zone.
A typical workflow for creating this media is to start with the main video. Once its edit is locked – or close to – then ribbons and other boards can be designed around the concept of the video. Sync’d timing is achieved in After Effects by paying close attention to frame rates, timecodes, and durations.
We can QC the sync by dropping all final graphics and feature video into one comp and then playing back to visually make sure everything is hitting its mark before exporting for the actual boards. Lots of ram and a good video card makes this a little less painful to endure. It's quite the grind on your system.
Once the graphics and videos are exported for the Click Effects computers, they’re loaded onto the computer’s raid 5 media drives, networked together via the systems user interface, and manually adjusted to compensate for any possible frame delays created by the network topology. Then crank the volume, put some butts in some seats, and click GO!
If you’re interest is at all peaked about creating content for video boards or working in sports in general, you might be saying to yourself, “Self, how do I get into that?”
In the collegiate world, spots for motion designers and/or general video creators are opening all of the time as there becomes a higher demand for social content in addition to video board content. Pro teams/venues will have in house positions too, but farm out most of their content to advertising agencies and production companies. Check out the NCAA Jobs or Work In Sports to start looking for openings. If you really want to set yourself apart from the rest of the field, add a good background in 3D to your skillset.
I hope you enjoyed this deep dive into motion graphics in sports. We barely scratched the surface here, but you can see that implementing motion graphics on these large boards takes a lot more than just spitting out a final render from After Effects. This field is constantly evolving and solving the unique challenges stadiums throw at you can be both riveting and daunting. So if you have a knack for shoving square pegs in round holes, maybe this niche is for you.
ENROLL NOW!
Acidbite ➔
50% off everything

ActionVFX ➔
30% off all plans and credit packs - starts 11/26

Adobe ➔
50% off all apps and plans through 11/29

aescripts ➔
25% off everything through 12/6
Affinity ➔
50% off all products

Battleaxe ➔
30% off from 11/29-12/7
Boom Library ➔
30% off Boom One, their 48,000+ file audio library
BorisFX ➔
25% off everything, 11/25-12/1

Cavalry ➔
33% off pro subscriptions (11/29 - 12/4)

FXFactory ➔
25% off with code BLACKFRIDAY until 12/3

Goodboyninja ➔
20% off everything

Happy Editing ➔
50% off with code BLACKFRIDAY

Huion ➔
Up to 50% off affordable, high-quality pen display tablets

Insydium ➔
50% off through 12/4
JangaFX ➔
30% off an indie annual license
Kitbash 3D ➔
$200 off Cargo Pro, their entire library
Knights of the Editing Table ➔
Up to 20% off Premiere Pro Extensions
Maxon ➔
25% off Maxon One, ZBrush, & Redshift - Annual Subscriptions (11/29 - 12/8)
Mode Designs ➔
Deals on premium keyboards and accessories
Motion Array ➔
10% off the Everything plan
Motion Hatch ➔
Perfect Your Pricing Toolkit - 50% off (11/29 - 12/2)

MotionVFX ➔
30% off Design/CineStudio, and PPro Resolve packs with code: BW30

Rocket Lasso ➔
50% off all plug-ins (11/29 - 12/2)

Rokoko ➔
45% off the indie creator bundle with code: RKK_SchoolOfMotion (revenue must be under $100K a year)

Shapefest ➔
80% off a Shapefest Pro annual subscription for life (11/29 - 12/2)

The Pixel Lab ➔
30% off everything
Toolfarm ➔
Various plugins and tools on sale

True Grit Texture ➔
50-70% off (starts Wednesday, runs for about a week)

Vincent Schwenk ➔
50% discount with code RENDERSALE

Wacom ➔
Up to $120 off new tablets + deals on refurbished items


Add Video Editing to Your Toolkit
Learn Premiere Pro from a motion designer's perspective. Enroll in All-Access to unlock Premiere for Motion Designers and 50+ other courses.