Start Your 3D Journey in Cinema 4D
Master the essentials of 3D modeling, lighting, and animation in C4D. Enroll in All-Access to unlock C4D Basecamp and 50+ other courses.

How You Can Use Real World References to Craft Your Masterpieces.
In this tutorial, we're going to explore how to use references to create more realistic worlds.
In this article, you'll learn:
- How to accurately create shaders to mimic car paint
- Improve the look of wet roads
- Create believable plant shaders
- Improve rust shaders
- Create realistic ice, water, and snow
In addition to the video, we've created a custom PDF with these tips so you never have to search for answers. Download the free file below so you can follow along, and for your future reference.
{{lead-magnet}}
We think that because we live in reality, we know what different materials should look like. That’s often far from the truth when we’re pressed to recreate them in 3D. From reflections to subsurface scattering, its the finer details that really bring your creations to life.
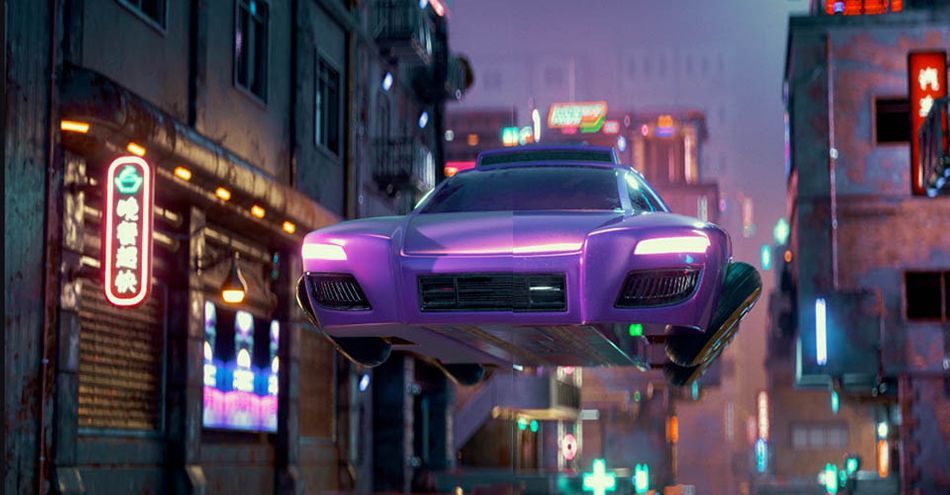
For example, let’s take a look at this flying car in my cyberpunk scene.
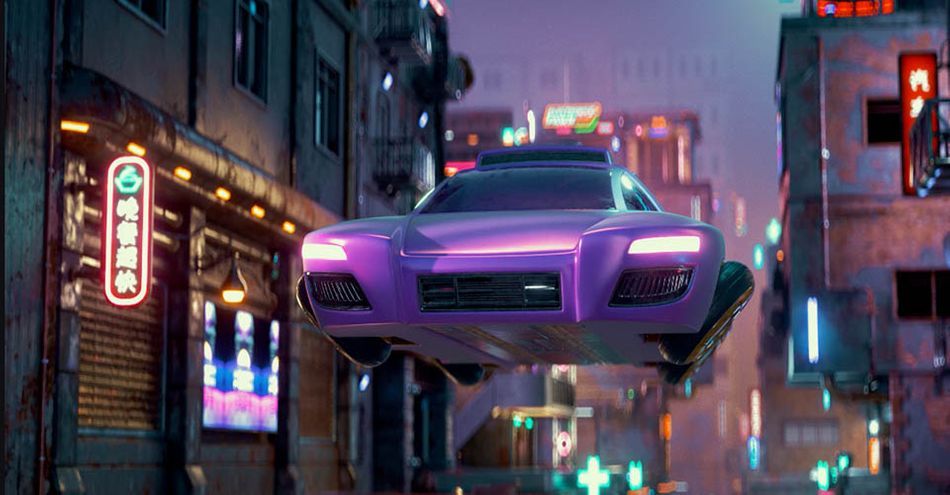
It looks pretty good, and if we didn’t look at references, we might just stop here. But upon further inspection, it’s pretty clear that cars are much more reflective than this, and that’s due to the clear coat on top of the paint.
We can create a blend material and just have a mirror surface that we mix into the paint layer with a falloff node. So far so good, but if we look closely at the underlying layer of real car paint, there’s another property going on here, which is that the paint often sparkles and reflects light at all different angles.
To recreate this effect, there are normal maps known as flake maps which just allow the light to reflect at a ton of different angles. Once we add that in, this is what we get, and this resembles a car paint much more closely.
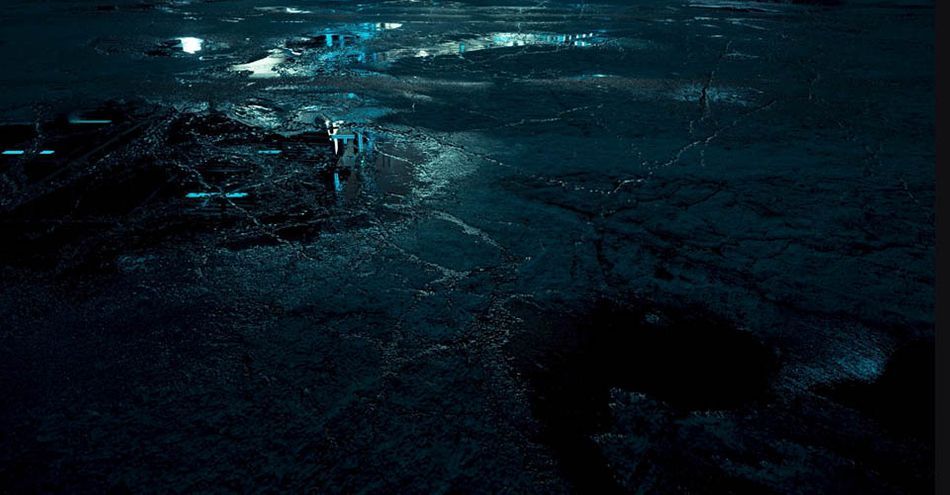
Few things look as cool and cinematic as a road after the rain. Let's say you're tasked creating some wet asphalt. You've successfully mixed between a perfectly shiny version of the pavement and a rough version, but something seems off. If we look at photos of wet pavement, often there’s more of a sheen and a transition between the wet and dry areas. So just by taking our mask that’s mixing between the two materials, and using it in the bump channel, we get a much more realistic result.
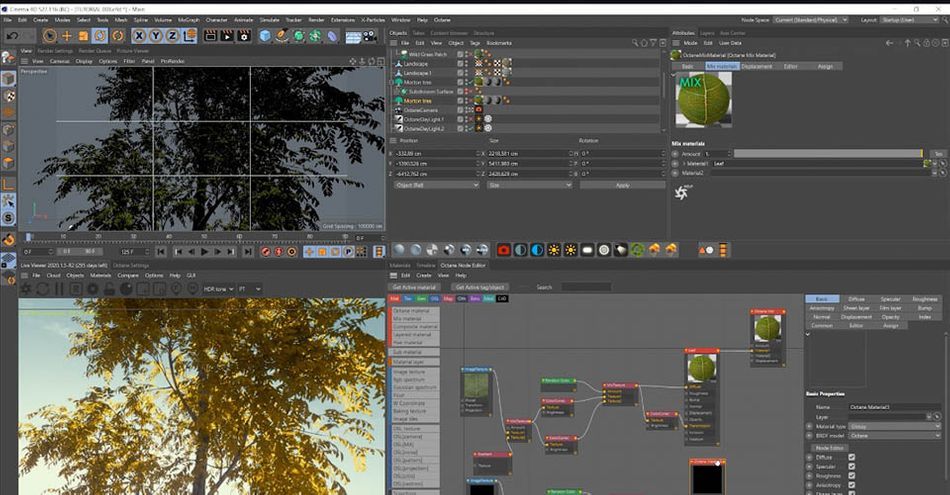
Plants can be tricky too. There are many tools and assets we can use, but the scenes often feel plastic and unrealistic. Take a look at references of leave in the sun. Because they’re so thin, light comes through to create different shades and textures. Let’s add in a diffuse texture into the transmission channel, and if we’re in Pathtracing mode—which allows for true Global Illumination—this will look even better.
.gif)
Leaves are often very waxy and have a glossy component, and if we look at a few images we’ll see that they can be super shiny. Let’s try to match that. If we create a composite material, we can do a 50% blend between a glossy version of the leaf and a transmissive version. Or even easier, with the Octane universal material, we can get all of that in one go without having to create a mix between two materials.
.gif)
As we've talked about before, adding in natural wear and tear to your assets and materials adds realism. When looking at images of real rust, the rusty sections are very rough or diffuse, and block the shininess of the metal. If we make sure the rusty material has almost no reflection, we’re in a much better spot.
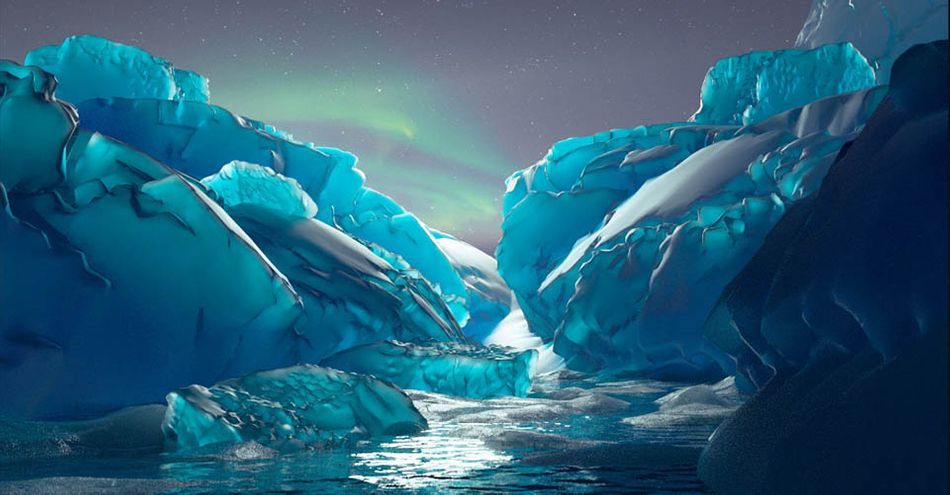
Finally, let’s look at this scene with ice, water, and snow. The water looks pretty good as I’ve added in a bump to create some ripples, but if we look at a shot of the real ocean, it’s clear that water of different depths has different colors, and that’s due to the absorption. We need two things: actually add in the absorption component, and to create a surface underneath the water.
Next, let’s dial in the ice, and for this I’ve added in a bunch of Megascans rocks. Now if we just use the same material as the water, we’ll be a bit closer, but it’s overly see-through. We need the ice to look more cloudy like our references. So instead of an absorption medium, let’s try a scattering medium, with a blue color in the absorption.
Now we’re looking icy. Let’s also add in a cracked black and white map to the roughness, so that gets a bunch more detail, as well as a normal map for rocks, to create even more surface detail.
For the snow, we can use a similar design path as we did for the car's paint above. By using the flake map, we achieve a realistic shimmer effect as the sun hits millions of individual snowflakes. Now we've got a fairly realistic iceberg.

Every artist you've ever admired studied references. It is a fundamental skill that will make you a better designer. Learn how materials react to different light sources, and how subsurface scattering changes the shade and texture of everyday objects. You're well on your way to making some incredible renders.
Want more?
If you're ready to step into the next level of 3D design, we've got a course that's just right for you. Introducing Lights, Camera, Render, an in-depth advanced Cinema 4D course from David Ariew.
This course will teach you all of the invaluable skills that make up the core of cinematography, helping to propel your career to the next level. You’ll not only learn how to create a high-end professional render every time by mastering cinematic concepts, but you’ll be introduced to valuable assets, tools, and best practices that are critical to creating stunning work that will wow your clients!
-----------------------------------------------------------------------------------------------------------------------------------
Tutorial Full Transcript Below 👇:
David Ariew (00:00): The best artists in history used real world references and crafting their masterpieces. And so should you,
David Ariew (00:13): Hey, what's up, I'm David Ariew and I'm a 3d motion designer and educator, and I'm going to help you make your renders better. In this video, you'll learn how to accurately create shaders, that mimic properties of car paint, improve the look of wet road materials, create believable plant shaders with both transmissive and glossy components, improve rush shaders, and create realistic ice water and snow shaders. If you want more ideas to improve your renders, make sure to grab our PDF of 10 tips in the description. Now let's get started. Often. We think that because we live in reality, we know what different materials should look like, but that's often, far from the truth when we're pressed to recreate them in 3d. For example, let's take a look at this flying car and my cyber punk scene. It looks pretty good. And if we didn't look at references, we might just stop here.
David Ariew (00:58): But upon further inspection, it's pretty clear that cars are more reflective than this. And that's due to the clear coat on top of the paint. Okay. So in octane, that's not too difficult to do. We can create a composite material here and just have a mirror surface that we mix into the paint layer with a falloff node, so that the whole car isn't overly reflective, but on the edges, it's super shiny so far so good. But if we look closely at the underlying layer of car paint, we'll realize that there's another property going on here that we're missing, which is that the paint often sparkles and reflects light at all different angles, giving a kind of glittery effect. So to do that, there are these normal maps out there that look like this also known as flake maps, which just allow the light to reflect at a ton of different angles.
David Ariew (01:40): Once we add that in, this is what we get and this resembles a car paint much more closely. Here's what it looks like before the flakes and after. And here's a closeup before and after here's another good one. I've got this wet asphalt and I'm successfully mixing between a perfectly shiny version of the pavement and a rough version. But something seems off. If we look at photos of wet pavement, often there's more of a sheen and a transition between the wet and dry areas. So just by taking our mask, that's mixing between the two materials and using it in the bump channel, we get a much more realistic result. Plants can be tricky too. Here's a pretty okay looking scene with some trees and leaves being strongly backlit by the sun. But when we Google photos of backlit leaves, we realize because they're so thin, the light comes through them a ton. So let's add these diffuse textures for the leaves and grass into the transmission channel for each material. Again, this will just allow the sunlight to pass through the leaves and create that nice backlit look here's the before and after. And if we're in path tracing mode, which allows for true global elimination, this will look even better.
David Ariew (02:45): Okay? So we're getting there, but leaves are often very waxy and have a glossy component too. And if we look at these images, we'll see that they can be super shiny. Here's a great reference that shows both transmissive and glossy leaves in the same shot. So let's try to match that.
David Ariew (02:59): If we create a composite or mixed material, we can do a 50% blend between a glossy version of the leaf and a transmissive version. Here's a closeup before and after. So now this is looking great and here's another trick. This might be even easier with the octane universal material. We can get all of that in one, go without having to create a mix between the two materials. All we have to do is make sure that the metallics slider is all the way down. So the leaves aren't metallic, and then just plug in that diffuse texture into the transmission channel, as well as playing with the amount of roughness in this scene here, we've got a similar issue where the lanterns look really nice, but the lights inside them aren't coming through. Many artists would be tempted to just set the exterior walls of the lantern to an emissive material, but that would just blow everything out to white.
David Ariew (03:46): And we wouldn't see the nice glowy paper texture. So let's keep the light inside the lantern and just do the same trick where we set the diffuse map to the transmission channel as well. And suddenly we're getting lanterns that look realistic. Next let's look at arresting material here. The rust shader is pretty good. It's got a ton of variation and areas that are clearly rusty with others that are more metallic and color, but when looking at images of real rust, it should be clear that the rusty sections are very rough or diffuse in nature and block the shininess of the metal. So let's see if we can recreate that here. If we really clamp this down and make sure that the rest of the material has almost no reflection, we're in a much better spot. Here's the before and after finally, let's take a look this scene with ice water and snow, the water looks pretty good as I've added in a bump to create some ripples.
David Ariew (04:33): But if we look at a shot of the ocean, for instance, the shot of the Caribbean, it's clear that water of different depths has different colors and that's due to different depths absorbing more and more light. So for that, we need two things we need to add in the absorption component. And we need to create a surface underneath the water here with a displaced icy surface underneath, we're getting a bit closer and we could try our familiar transmission trick to colorize the water. And here I've just added a daylight so we can see this next difference more clearly, but the transmission isn't getting as much color variation by clicking here on the medium tab and then hitting the absorption button as well as reducing the density and adding in an RGB spectrum with a blue color, we get that look of varying types and color next let's dial in the ice.
David Ariew (05:13): And for this, I've just added in a bunch of rocks for mega scans. Now, if we just use the same material as the water, without the bump ripples, we'll get a bit closer, but it's overly see-through. We need the ice to look more cloudy. Like these references here, I've removed the transmission color because we'll do that with the scattering medium instead. And instead of an absorption medium, which only changes the color based on depth. Let's add a scattering medium here for real subsurface scattering and get that cloudy look. And we'll add in RGB spectrum into both the absorption and the scattering with a scattering, the brighter, the color is the more subsurface scattering it creates. So I just use a pure white and control the look of the scattering overall here with the density and in the absorption, we'll make sure that we've got that nice blue color.
David Ariew (05:53): Again, one more time. The absorption parameter acts to create various colors on depth and the white color we piped into the scattering allows the light to bounce around inside the material and from material to get cloudy. And finally, the density controls how deep the light can penetrate. Now we're looking much icier. Let's also add in a cracked black and white map to the roughness. So that gets a bunch more detail as well as adding back in the normal maps that come from the mega scans rocks to create even more surface detail. Okay. Now for the snow, if we look at photos of snow on ice, we can see that the snow blocks the reflection and feels much more diffuse or rough in nature. So let's try for that. If we right click, we can convert this material to a sub material and begin creating a composite shader.
David Ariew (06:34): The sun material just allows us to add this material into a composite material because the regular material won't pipe into a composite material, let's use a falloff map set to normal versus vector 90 degrees to create a slope effect where the flat facing surfaces get the color black and the vertical surfaces, get the color white. And then we'll use this as a mask that blends between the snow shader and the ice shader for the snow shader. We don't want this cracked roughness map or the normal map, but we could use our flakes map from before. Because as you see here in this reference, snow often gets sparkly, just like our car paint due to reflecting the light. It's so many different angles. So here's before the snow and after, and then with the flakes and here's a closeup now, we've got a pretty awesome looking scene. I have to say, and all, thanks to checking ourselves with reference images, by keeping these tips in mind, you'll be well on your way to consistently creating awesome renders. If you want to learn more ways to improve your renders, make sure to subscribe to this channel, hit the bell icon. So you'll be notified when we drop the next tip.
ENROLL NOW!
Acidbite ➔
50% off everything

ActionVFX ➔
30% off all plans and credit packs - starts 11/26

Adobe ➔
50% off all apps and plans through 11/29

aescripts ➔
25% off everything through 12/6
Affinity ➔
50% off all products

Battleaxe ➔
30% off from 11/29-12/7
Boom Library ➔
30% off Boom One, their 48,000+ file audio library
BorisFX ➔
25% off everything, 11/25-12/1

Cavalry ➔
33% off pro subscriptions (11/29 - 12/4)

FXFactory ➔
25% off with code BLACKFRIDAY until 12/3

Goodboyninja ➔
20% off everything

Happy Editing ➔
50% off with code BLACKFRIDAY

Huion ➔
Up to 50% off affordable, high-quality pen display tablets

Insydium ➔
50% off through 12/4
JangaFX ➔
30% off an indie annual license
Kitbash 3D ➔
$200 off Cargo Pro, their entire library
Knights of the Editing Table ➔
Up to 20% off Premiere Pro Extensions
Maxon ➔
25% off Maxon One, ZBrush, & Redshift - Annual Subscriptions (11/29 - 12/8)
Mode Designs ➔
Deals on premium keyboards and accessories
Motion Array ➔
10% off the Everything plan
Motion Hatch ➔
Perfect Your Pricing Toolkit - 50% off (11/29 - 12/2)

MotionVFX ➔
30% off Design/CineStudio, and PPro Resolve packs with code: BW30

Rocket Lasso ➔
50% off all plug-ins (11/29 - 12/2)

Rokoko ➔
45% off the indie creator bundle with code: RKK_SchoolOfMotion (revenue must be under $100K a year)

Shapefest ➔
80% off a Shapefest Pro annual subscription for life (11/29 - 12/2)

The Pixel Lab ➔
30% off everything
Toolfarm ➔
Various plugins and tools on sale

True Grit Texture ➔
50-70% off (starts Wednesday, runs for about a week)

Vincent Schwenk ➔
50% discount with code RENDERSALE

Wacom ➔
Up to $120 off new tablets + deals on refurbished items


Start Your 3D Journey in Cinema 4D
Master the essentials of 3D modeling, lighting, and animation in C4D. Enroll in All-Access to unlock C4D Basecamp and 50+ other courses.