
Expedite Your Premiere Pro Workflow with These Five Video Editing Tools
Adobe Premiere Pro is the world's leading video editing software for film, TV and the web — but if you're like a lot of motion designers, you've never used it.
Leave it to the video editor, you've thought.
Well, what if you could do it all? Sure, Premiere Pro doesn't look like After Effects. But that doesn't mean — with the right guidance — you can't become adept enough to edit your own videos. Plus, it is compatible.
Here's where School of Motion and our instructor Jake Bartlett come in.
Jake teaches Explainer Camp and Photoshop + Illustrator Unleashed; he's also worked for Coca-Cola, Twitter and Skype, has a hefty online following, and knows a thing or two about all aspects of animation.
In today's tutorial, Jake demonstrates five of the most practical, useful video editing tools in Premiere Pro, showcasing much of the interface in the process.
The Top 5 Editing Tools in Premiere Pro: Tutorial Video
{{lead-magnet}}
HOW TO USE THE RIPPLE EDIT TOOL IN PREMIERE PRO
Instead of cutting up a clip into a bunch of small sections and unwanted gaps, use the Ripple Edit tool keep your timeline clean.
To use Ripple Edit, click the Tools window; or hit the B key on your keyboard.
So, what does Ripple Edit actually do?
Think of the Ripple Edit tool as creating a "ripple effect" — when a clip is trimmed, it causes a ripple effect throughout the rest of your timeline, shifting all other clips into a new timeline position.
Specifically, Ripple Edit trims the in and out points of a layer, and then slides all the following clips over to meet the new out point.
For example, if you remove 10 frames from the back end of your clip, your remaining clips will move forward 10 frames.

Note: any video editing tracks that are locked will not be affected by the Ripple Edit; if you have several tracks of videos, be sure to double-check what's locked and unlocked.
HOW TO RIPPLE DELETE IN PREMIERE PRO
The Ripple Edit tool can create gaps in your timeline. This is where Ripple Deleting comes in.
To Ripple Delete, simply click the empty space between two separate clips; this should turn that space white, indicating the section you will be removing.
Then, press the backspace or delete key on your keyboard; this will automatically shift your clips to line up with the outpoint of the closet clip in the timeline.
Again, be sure to lock any tracks that you don't want to affected by the Ripple Delete.
HOW TO USE THE SLIP TOOL IN PREMIERE PRO
Need to move the in and out points of a clip by a few frames? Like the Pan Behind tool in After Effects, the Slip tool in Premiere Pro is designed to maintain your edit without changing your in and out points.
Of course, for this tool to work, you'll need footage before/after your in and out points.
To access it, click Slip Tool in the Tools window; or, hit the Y key on your keyboard. Your mouse cursor will change to bi-directional arrows, pointing to vertical bars.

To start "slipping," click in between the in and out points of your clip, and drag left or right.

The program window will display four different panes, with time codes at the bottom of the two large panes.
The top left and right images are the clips before and after the current clip you're slipping, representing the out point of the previous clip and the in point of the following clip.
The two larger images below represent the in and out points of the current clip you're slipping, illustrating where and how your clip is starting and ending.

All four of these panes come in handy when tweaking an edit by only a few frames, helping you nail cuts on action.
HOW TO USE THE SLIDE TOOL IN PREMIERE PRO
If you're satisfied with the beginning and end of your clip, but need the entire clip to move left or right, it's best to use the Slide tool — and not the standard Selection tool.
Why? If you move a clip using the Selection tool, you'll leave a gap before or after the clip, depending on the direction you move it; with the Slide tool, you avoid the extra step of deleting this empty space.
The Slide tool works by preserving the in and out points of your selected clip, and dynamically changing the in and out points of the surrounding clips.

To access it, use the Tools menu (it's right below Slip Tool); or, hit the U button on your keyboard.

HOW TO USE THE ROLLING EDIT TOOL IN PREMIERE PRO
Similar to the Slide tool, Rolling Edit is used for manipulating the in and out points of clips.
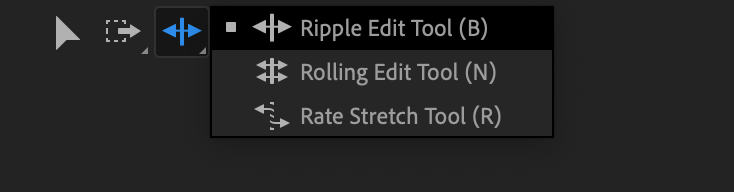
To use the Rolling Edit tool, hit the N button on your keyboard; or, find it in the Tools panel, grouped with the Ripple Edit tool.

To use Rolling Edit, click and drag the cut point: where the out and in points meet between two clips. This will update the in and out points, without moving the clips, shortening one clip while lengthening the other.

HOW TO USE THE RATE STRETCH TOOL IN PREMIERE PRO
The Rate Stretch tool allows you to change the speed of a clip — without right-clicking, digging through the menus, and guessing by what percent you need to speed up or slow down the footage in each clip.
Equip the Rate Stretch tool with keyboard shortcut R; or, locate it in the Tools window, grouped with the Ripple Edit tool.

By simply dragging the in or out point of a clip with the Rate Stretch tool, you can change how fast your footage plays back, as if you were changing the length of the clip itself.

Learn More

WORKFLOW EFFICIENCY
To learn more about mastering the motion design project workflow, read our Guide to Completing Your Motion Design Project.
Whether you're wondering where to start, stuck in pre-production, or uncertain when a motion design is ready to share, this handy guide will help you turn your passion into a finished project.
MAKING MOVES IN MOGRAPH
Got your personal passion project workflow optimized, but not sure how to land a paying gig? There's nothing more inspiring than hearing from your heroes.

Our 250-page Experiment. Fail. Repeat. ebook features insights from 86 of the world's most prominent motion designers, answering key questions like:
- What advice do you wish you had known when you first started in motion design?
- What is a common mistake that new motion designers make?
- What’s the difference between a good motion design project and a great one?
- What’s the most useful tool, product or service you use that’s not obvious to motion designers?
- Are there any books or films that have influenced your career or mindset?
- In five years, what’s one thing that will be different about the industry?
Get the insider's scoop from Nick Campbell (Greyscalegorilla), Ariel Costa, Lilian Darmono, Bee Grandinetti, Jenny Ko (Buck), Andrew Kramer (Video Copilot), Raoul Marks (Antibody), Sarah Beth Morgan, Erin Sarofsky (Sarofsky), Ash Thorp (ALT Creative, Inc.), Mike Winkelmann (AKA Beeple), and others:

-----------------------------------------------------------------------------------------------------------------------------------
Tutorial Full Transcript Below 👇:
Jake Bartlett (00:00): Hey, it's Jake Bartlett. And in this tutorial, I'm going to be taking you into premiere pro and showing you some of my favorite tools and techniques that you're probably not using, but are really going to save you a lot of time. If you don't already have one, create a student account for free at school of motion so that you can download the assets that I'll be using and follow along with me, if that's what you want to do, let's get started
Jake Bartlett (00:31): Now, if you're like a lot of motion designers, you probably dread opening up premiere being in this weird environment that doesn't really match after effects has different tools, and you don't know what a lot of them do, but it's just like any other piece of software. Once you understand what the tools do and how you can use them to your advantage. It really is a big time-saver and it's a much better piece of software for editing than after effects. So here I am in premiere, and this is the default layout that premiere is probably going to start with for you. The workspace is called editing, and honestly, this is not the way that I like to have it set up. So I'm going to clean this up. And in fact, I even just have my own workspace right here. I'm going to click on, but just want to point out that down here, there's a lot of stuff that I don't even need, like the libraries or info, um, the effects I do need, but markers, you know, a lot of these panels are unnecessary for what I'm doing.
Jake Bartlett (01:21): So I'm just going to switch over to my workspace by clicking on my name. And I kind of set this up a lot more like after effects, uh, you know, I've got my project manager over here, I've got my effect controls over here, the effects menu. I just kept over here just because that's where I'm used to having it. But my timeline takes up almost the entire lower portion of my workspace. I've got my tools over here, audio levels, but then my program viewer and my source monitor over here. So that's my basic layout. It's very stripped down only what I need. And if I need anything else, just go up to a window and open up the panel I need. But anyway, let's dive into what we're actually going to be working with. I've already set up a sequence. Um, and what we have down here already is a music track.
Jake Bartlett (02:02): That's about 17 seconds long. I've added markers on the beats of that track. So I can have those editing cues to snap my clips to very easily. And I also have a title graphic and an end card for this kind of promo that I'm putting together. So I also have a couple of adjustment layers here, the color grade, which is another thing that I've already set up to work with the clips that we're going to be using. Don't worry about that. But I also have these two adjustment layers right up here that are a flash, and you'll see what that is. Once we get to actually editing things in, but first let's just listen to the track and you can see the title and end cards just so you know what we're working with. So let's play this back
Jake Bartlett (02:58): So there you have it now, uh, right there at the end card, you see that, uh, we're kind of making an advertisement for epic Joan shots and by Michael James, who has been so gracious to give us his own drone footage from Iceland, uh, that we can work with in this project. And you can download this premiere project file along with the video clips that I'll be using. Just make sure that you're signing your free school of motion account and follow the link in the description of this video. But I just want to give a big shout out to Michael James for allowing us to use these clips. You can also find his website in the description of the video, so go check them out and thank you, Michael. All right. Now, let me zoom out a little bit here on my timeline and let's take a look at the actual drone shots that we have to work with.
Jake Bartlett (03:37): I've already got them all in order here. I'm basically just for simplicity sake. I'm going to go ahead and use the order that they're already in and just lay them into sequence again, editing them to the beat using these markers, but we've got this epic flyover of some water, some rivers, we've got some ice formations, you know, all of this, just amazing looking drone footage, horses, waves, crashing, uh, this awesome kind of crashed airplane in the middle of nowhere. Um, just some really epic shots. And like I said, I've already prepared these clips. I've done a little bit of color correction just to kind of bring them all together a little bit better, but that way we don't have to worry about all that. We're just going to focus on these time-saving tools that you're probably not using in premiere. So let's just start by laying these clips in one at a time.
Jake Bartlett (04:23): Uh, obviously each one of these clips is significantly longer than we can fit in, in a sequence. So we're going to need to do a lot of trimming. And if you're not that familiar with premiere, uh, if you just use it to get by then you're probably doing most of your editing like this. Let me zoom in on press plus on the keyboard and then come over to my tools and grab the razor tool. So you're probably used to grabbing this, uh, finding a spot that you want to start at. Maybe we'll say this frame right here, cutting. And then going forward a little bit, um, maybe about there and cut again, then switch to your selection tool, grab that clip and back it up. And I'll zoom out a little bit, zoom out a little bit and just move this into place from there.
Jake Bartlett (05:05): You'll probably just delete the rest of this clip and then move on to the next one and repeat that process over and over again, but let me undo. Um, and just get back to before I made those edits. Now there's nothing inherently wrong with editing that way, but there's actually a lot more steps in that technique than need to happen in order to get this clip where it needs to be. So the first tool we're going to talk about is the ripple edit tool, which you can find over here in the tool bar right here with the arrows going in either direction of the edit line. So this is the ripple edit tool B on the keyboard is the shortcut and the way this works is the same way as with the selection tool. I can grab the end, click and drag to change my edit point.
Jake Bartlett (05:44): So let's say I'm looking right about here, where that little arm of the river is coming out. Um, at the, at the base of the frame, this is where I want it to start. So if I click and drag this point and then let it go, it looks like the clip didn't move, but everything after it did. So what actually happened was it trimmed the layer to that point, but then shifted everything in the timeline backwards in time. So that, that edit point was preserved. Let me undo and just show you that one more time. If I click and drag this, I'm moving the edit point to say about here. And as soon as I let go, everything after that just shifted over to the left to keep that clips in point right where it was already. It just changed the point of time that the edit happened in.
Jake Bartlett (06:28): I can do the same thing on the opposite end of the clip. And let me zoom out a little bit, so you can see more of what's in my timeline. If I grab that edit point and the arrow is pointing to the left. So I know that I'm going to be editing this clip here. If I click and drag and find the point that I want this clip to end at somewhere around here, it doesn't really matter. Uh, but it's going to remove this entire portion of the clip to the right of where my mouse is. And when I let go all of the clips after it shift over to the left as well, and this works across all tracks. So if I had more clips or more information up here at, uh, at the top of the timeline, it would move with it. So if I move this clip up two tracks and this one up one track, press B to switch to my ripple, edit tool again, and extend this clip out this time.
Jake Bartlett (07:11): It shifts everything beyond it, the same distance that I'm extending that clip. So that's why it's called a ripple edit because it's rippling across everything else past that point in the timeline. So let me undo go back to where all those clips are on the same track. And now that that's there, I can switch back to my selection tool, which is V on the keyboard, the same as pretty much every Adobe application, and then click and drag that clip back. And I have my snapping enabled, which you can find right here, snap in timeline as is the keyboard shortcut to turn that on and off. Uh, but that's why I'm able to snap to these markers and other points in my timeline. So I'm just going to back that up right to the front of this edit right at that marker. And let me zoom in here a little bit with my little, uh, scroll bar down here.
Jake Bartlett (07:54): So I can see this clip better. And I want to make sure to trim this just by using my selection tool this time, uh, to match up with that marker. So it highlights it when it snaps to it. And that way I know that clip is going to be right in time to that portion of the music now because ripple editing and some of these other editing tools affects everything after what you're working on, everything further in the timeline, uh, that can cause some issues with things like a color grade adjustment layer or these title clips that I want to leave exactly where they are. So to save myself the trouble of worrying about where they are, I'm just going to grab both the title clips, uh, both title and end cards, drag them up one track layer, and then lock that track right here by clicking on the lock icon.
Jake Bartlett (08:37): Now those will not be affected by ripple edits or anything else. They're completely locked. I'm going to do the same thing for this track here. And I told you, I'd show you what this is all about. Um, that's an adjustment layer that just does this little white flash. That's literally it. Um, just to give a little bit of a transition rather than having, you know, the clip hard edit there. It's going to have a flash for two, maybe three frames, um, make sure that's enabled before I lock it. And that's just going to make the transition a little bit better. So let's watch that first clip.
Jake Bartlett (09:12): Cool. So let's move on to the next clip. Now I could zoom out here and kind of move my play, head down the timeline and work over here a little bit, but, uh, I really, I just want to close up this gap down here. So I'm still going to click on this empty space right here. And this is my next quick little tip is called a ripple delete. And literally all you have to do is select that gap and press delete and everything on that track moves backward, just for good measure. I'm going to lock my music track. So nothing is going to be manipulated except the drone footage. And we can work on this next shot right here. Now I told you that I set these markers up to the beat of the music. And if you don't know anything about music, it's basically what you can clap your hands to the beat of the song.
Jake Bartlett (09:52): And there are four beats per measure. And again, it doesn't matter if you don't know what that means, but I'm just going to count this out for you really quick. So we've got 1, 2, 3, 4 1 2 3 4 1 2 3 4 1. So on every one, that's where I put the marker. That's how this song is constructed. It's a very common format for music, especially stock music, uh, but there are four beats per measure. So the edits typically look good on those beats, but in this particular song, if we listen to this first clip again, right here, watch when the scrubber goes right there, there's a hit on the music there, right? And I think the edit is going to look nice if I shift this back one beat. So on the third beat instead of the fourth beat. So let's use that ripple edit tool, be on the keyboard, grab this clip. And I'm going to find where that beat is plus on the keyboard we'll zoom in and I'm kinda just gonna scrub through this and try and find where that is right there. You can hear it. Okay. So that's where I want the edit to be. I'm going to grab this clip right here, ripple edit back to that point and then play this again.
Jake Bartlett (11:07): Cool. So for the next shot, I actually want to cut even a little bit quicker. So, um, I think I'm going to do two beats on this clip and then bring in the next clip. So let's listen to that one more time here with that second hit is so there's a, an identical hit on this beat as there is right here where that little thump is. That's what I want the next edit to be, use my ripple edit and bring this back. Okay, Cool. And then the next little thump is right there on that beat. So that's, that's kind of what I'm editing too. I'm going to ripple edit the rest of that back.
Jake Bartlett (11:53): And
Jake Bartlett (11:53): Then we've got this epic shot of these horses running, which is just awesome. So I'm going to give this one a little bit more time and use all four beats on this measure right here. I'm just going to ripple, edit back to that marker.
Jake Bartlett (12:13): Same thing right there. So I'm going to ripple edit this clip back to that whole beat. And then from this point, the song is kind of mirrored or repeats from that point, at least the structure of it. So let's just listen to the rest
Jake Bartlett (12:32): Okay. So it's very similar in the structure as the first half of this edit. So I'm going to make very similar choices in the editing. So for the first clip of the second half, I'm going to do the same three beats of that measure. So I'm going to go three beats and right there at that thump, that's where I'm going to ripple, edit this back to the next clip, make sure I get straight to the play head there. And the next set I want to happen right here. Right? Where that, that kind of clamp is right there when it bled it back. And then this shot, I want to be shorter. So I'm going to edit on that whole beat right there. Not the playhead, but the marker. There we go.
Jake Bartlett (13:26): That will be the last shot. I don't think I have any more clips after that. Um, so I'm just going to trim this down to this point in the edit, just to keep everything contained. And this is what I'm left with. Now, I'm going to fit my timeline to my view by pressing the forward slash button. And now I have all of my clips in place. So let me switch back to my selection tool V on the keyboard, and we'll watch this whole thing as is, and I'm going to maximize this panel by hovering over it and pressing the Tilda key, the little squiggly line next to the one key under your escape, key on the keyboard and press play.
Jake Bartlett (14:12):
All right. That's pretty epic. So the timing there, I think is great. It's edited the music. I'm very in-sync and I think it's a nice snappy little edit, but I think we can do a little bit better on the selection of what's in some of these clips. Um, why don't we start with this, this shot of the horses right now, because every single one of these clips just starts right at the start of the, the source footage. And there might be more interesting stuff later on in the clips they're all very long. So the next two tools I want to talk about are the slip and slide tools. And you can find those right down here underneath the razor. We have the slip and slide tools. So what the slip tool does is leaves the in and out points of the clip that you're going to be manipulating, right, where they are, but it slides the footage around in those in and out points.
Jake Bartlett (14:56):
This is exactly the same as if you were to use the pan behind or anchor point tool and after effects to slide a layers contents around in the timeline. So if I click and drag on this clip, um, you see that nothing is moving, but I'm getting this time code indicator, letting me know how far I'm shifting this clip from where it was. And if you look in the program monitor in the top, right, you can see the in and out points. Uh, the, the frames of what those in and out points are. So let's say I want to frame up these horses to be more the central focus at the start of the clip. They're not that close to the camera, but I could say choose a more interesting starting point maybe right about here. The rate as that mountain peak in the background is in frame.
Jake Bartlett (15:37):
And then the right side is the outpoint. So I can kind of see where the camera will be when I let go of my mouse. So I'm clicking and dragging, let's say right about there. Now that clip has not changed its position. The contents of just slipped around inside the edit points. So if I play this back, I get a better view of those horses without modifying the rest of my edit. So that's the slip tool. So why don't we pick a couple other clips that maybe we want to change the in and out points of as well? So this one right here, for instance, um, why don't we start just before that glare on the left side, uh, at the end point, you can see the sun peaks out behind that mountain. I like that. So let's start just before that.
Jake Bartlett (16:21):And we've got that nice little Glint right up here of the sun peaking out. And I think I'm going to shift that over just a little bit more. So it starts right away. Very cool. Okay. Let's see if there's anything more interesting in this clip. Um, honestly the whole clip is awesome. Just flying through this little Creek bed. Um, but maybe right here where that rock is passing pretty close to the camera on the right side. Um, that's where I'll have the outpoint and there we go. Got our horses. This shot's pretty cool. It's in slow-mo I believe. Um, maybe we'll push forward a little bit, uh, somewhere around here, right? Where that wave is crashing on the rocks. So I'll start it just before it starts to crack there, it splashes go to the next shot. And that's probably enough for now. We can worry about the other clips in just a little bit.
Jake Bartlett (17:13): Uh, let's move on to the next tool that I want to point out to you, which is the slide tool. If you click and hold on the slip tool right under it is the slide tool. And this behaves a little bit differently instead of shifting the contents of that footage or that clip that you're editing and leading the edit points, it's going to preserve what's in between those edits and slide, those edits around in your timeline. So if I click and drag this clip, you can see that the in and out points are moving and that clips contents are being maintained. So if I wanted to back this clip up so that the end point is at this marker, um, I could do that. I'll let go. And the in and out points for the surrounding clips have been shifted to make that edit possible just with the one tool.
Jake Bartlett (17:56): If I undo and say, use my selection to, I would have had to, you know, back this one, up to overwrite the previous clip, and then come over here and drag this one out. It's just more work than you need to do. So if I undo one more time, go to my slide tool, grab that clip and back it up, everything else is taken care of and I can play it back. And here we go. Now I didn't actually want to do that. So let me undo. But those are the slip and slide tools. Similar to the slide tool is the rolling edit tool. And this is underneath the ripple edit tool. So if I select that tool, what this is going to do is, uh, it only works on edit points. What it allows you to do is just shift the edit point of the two clips on either side of that edit.
Jake Bartlett (18:38): So if I just move this over, it's not changing the contents of the clips at all. It's literally just shifting the edit point for those two clips. And that's again, just another really time-saving tool, because if I was to use my selection tool, I'd have to move one clips in point and then the next clips outpoint. So it just saves you some time. Let me undo that. Okay. So let's move on to this clip right here. I said that I had something different in mind for this, and if I double-click this clip, so we can see it in our source monitor, uh, you'll see that we're just using the first couple seconds. It's actually over a minute long clip and we have this nice, cool pan all the way around the airplane. Now, what I want to do is use that entire shot, but within this timeframe down here, so I want the entire clips duration to take place between these two edit points.
Jake Bartlett (19:25): And we can do that with time remapping. Now, if you're not familiar with the next two, I'm going to talk about the way you might do this is maybe bring the clip up, um, extend this all the way out. So we have the full length of the clip. Let me just do that, bring this all the way out and then right, click on it, go to speed slash duration, and then change the speed to something really high, like 500%. And that'll give you a duration of two seconds, four frames, but that's really just guesswork. And what you really need is to know the duration between these two points. So you could cancel out of that and, you know, maybe set an point right here at the start of that, that gap right here, press, I can go here, press oh, for the out point. And then we get the duration one second, four frames, and then you could go back into speed and then change this to one second and four frames.
Jake Bartlett (20:15): And there you go, the clip is the right length, but there's, he much, much simpler way to do this without having to check for any of, uh, you know, this timing at all, clear the in and out. And that's using the rate stretch tool. That's underneath the ripple edit tool as well, right here, rate stretch tool. What this allows you to do is literally change the speed of the clip as if you were just editing the length of the clip. So if I just click and drag on the, outpoint bring this all the way back to that point right there, where I want it to end. The entire clip is now playing back within that timeframe. And I can move this clip back down, and now if you play this back,
Jake Bartlett (20:55): Here we go. Oh, and it looks like I pulled it back just a little bit too far. There's one dead frame there. So I'm going to click on my rate, stretch tool again, and just bring that out. There we go. The speed has automatically updated for that clip. And there we go. Now we can see that entire duration of that clip, uh, within that timeframe, no math involved, no needing to set in and out points. Very easy. Okay. For the next clip, I want to do something very similar. Uh, because again, if we go into the source monitor, you can see there's a lot more to this clip than what we have in the in and out point. So what I'd like to do is play this much of the clip fast and then go into normal speed. So what I need to do is, again, bring this clip up to a point where I can extend this out a little bit.
Jake Bartlett (21:39): Um, so let me just zoom out, give myself a little bit more room here and just extend this clip out pretty far, probably not going to need the whole thing. Uh, but let's find that point where I want it to go from fast motion to regular motion. So probably right about here, where you can see the horizon and I'm going to make an edit right there. And I'm just going to use my razor tool. There's no reason not to. There we go. Uh, then I'm going to grab the rate stretch tool and find the point that I want the fast motion to stop. So I'm going to zoom in here one more time and listened to the song.
Jake Bartlett (22:15): Actually, I think I'm just going to use my marker for the beat rate there. That's where I want the fast motion to stop. So with my rate stretch tool, I'll just grab this point, bring it back. And because I made that razor cut right there, I know that the end of this clip is going to go straight into the start of this clip. So now we can grab my selection tool, bring this one back and then just trim the out point of this to fill in the rest of that gap and bring those two clips back down. And now this should play back seamlessly. Very cool. So faster to start and then into regular motion. All right, this next clip, same thing. It's pretty slow, but it's a very dynamic camera move. So I'm going to just speed it all up by bringing this out, uh, up up a track rate, stretching it down to fit the entire, uh, gap right there, that edit point. But now the entire clip is within that timeframe
Jake Bartlett (23:12): And it's a much more dynamic camera move that way. Okay. And for this last clip, let's just do the exact same thing as the airplane shot, where it starts off fast and then goes a little bit slower. So maybe right about there is where I want it to go to regular motion. Um, so I'll just cut it with my razor tool. One more time. I'll find the point that I want this fast motion to stop. Probably right there in that hit right there, grab my rate, stretch tool, bring this back, select the second clip and bring it back and then trim the outpoint to match my edit. I'll bring this down now, zoom in to fit with the Ford slash QI and then play that back. Perfect. Let's play this whole thing back and see where we ended up
Jake Bartlett (24:19): So there you have it a really quick rundown on some of my favorite tools in premiere that I feel like a lot of people aren't using to their full potential. Hopefully you got something out of that and you can start applying that to your own editing projects, whether it's as simple as cutting your own demo reel or you're working on client work that actually requires editing. The reality is you're saving clicks by using these other tools, rather than just using the razor tool and the selection tool to shift stuff around. It really comes down to the number of clicks that you're putting in to an entire day's worth of work inside of premiere. It can save you a lot of time if you use these tools to your advantage, thanks so much for watching. And if you enjoy this tutorial, be sure to share it on social media. That really helps us get the word out. And don't forget to sign up for a free student account so that you can get access to not only the assets in this tutorial, but also a wealth of other information and invaluable resources. Thanks again for watching. And I'll see you in the next one.
ENROLL NOW!
Acidbite ➔
50% off everything

ActionVFX ➔
30% off all plans and credit packs - starts 11/26

Adobe ➔
50% off all apps and plans through 11/29

aescripts ➔
25% off everything through 12/6
Affinity ➔
50% off all products

Battleaxe ➔
30% off from 11/29-12/7
Boom Library ➔
30% off Boom One, their 48,000+ file audio library
BorisFX ➔
25% off everything, 11/25-12/1

Cavalry ➔
33% off pro subscriptions (11/29 - 12/4)

FXFactory ➔
25% off with code BLACKFRIDAY until 12/3

Goodboyninja ➔
20% off everything

Happy Editing ➔
50% off with code BLACKFRIDAY

Huion ➔
Up to 50% off affordable, high-quality pen display tablets

Insydium ➔
50% off through 12/4
JangaFX ➔
30% off an indie annual license
Kitbash 3D ➔
$200 off Cargo Pro, their entire library
Knights of the Editing Table ➔
Up to 20% off Premiere Pro Extensions
Maxon ➔
25% off Maxon One, ZBrush, & Redshift - Annual Subscriptions (11/29 - 12/8)
Mode Designs ➔
Deals on premium keyboards and accessories
Motion Array ➔
10% off the Everything plan
Motion Hatch ➔
Perfect Your Pricing Toolkit - 50% off (11/29 - 12/2)

MotionVFX ➔
30% off Design/CineStudio, and PPro Resolve packs with code: BW30

Rocket Lasso ➔
50% off all plug-ins (11/29 - 12/2)

Rokoko ➔
45% off the indie creator bundle with code: RKK_SchoolOfMotion (revenue must be under $100K a year)

Shapefest ➔
80% off a Shapefest Pro annual subscription for life (11/29 - 12/2)

The Pixel Lab ➔
30% off everything
Toolfarm ➔
Various plugins and tools on sale

True Grit Texture ➔
50-70% off (starts Wednesday, runs for about a week)

Vincent Schwenk ➔
50% discount with code RENDERSALE

Wacom ➔
Up to $120 off new tablets + deals on refurbished items


